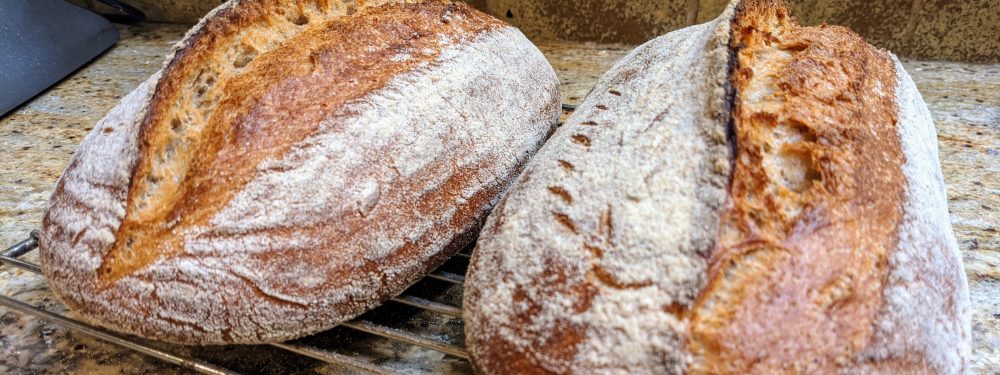
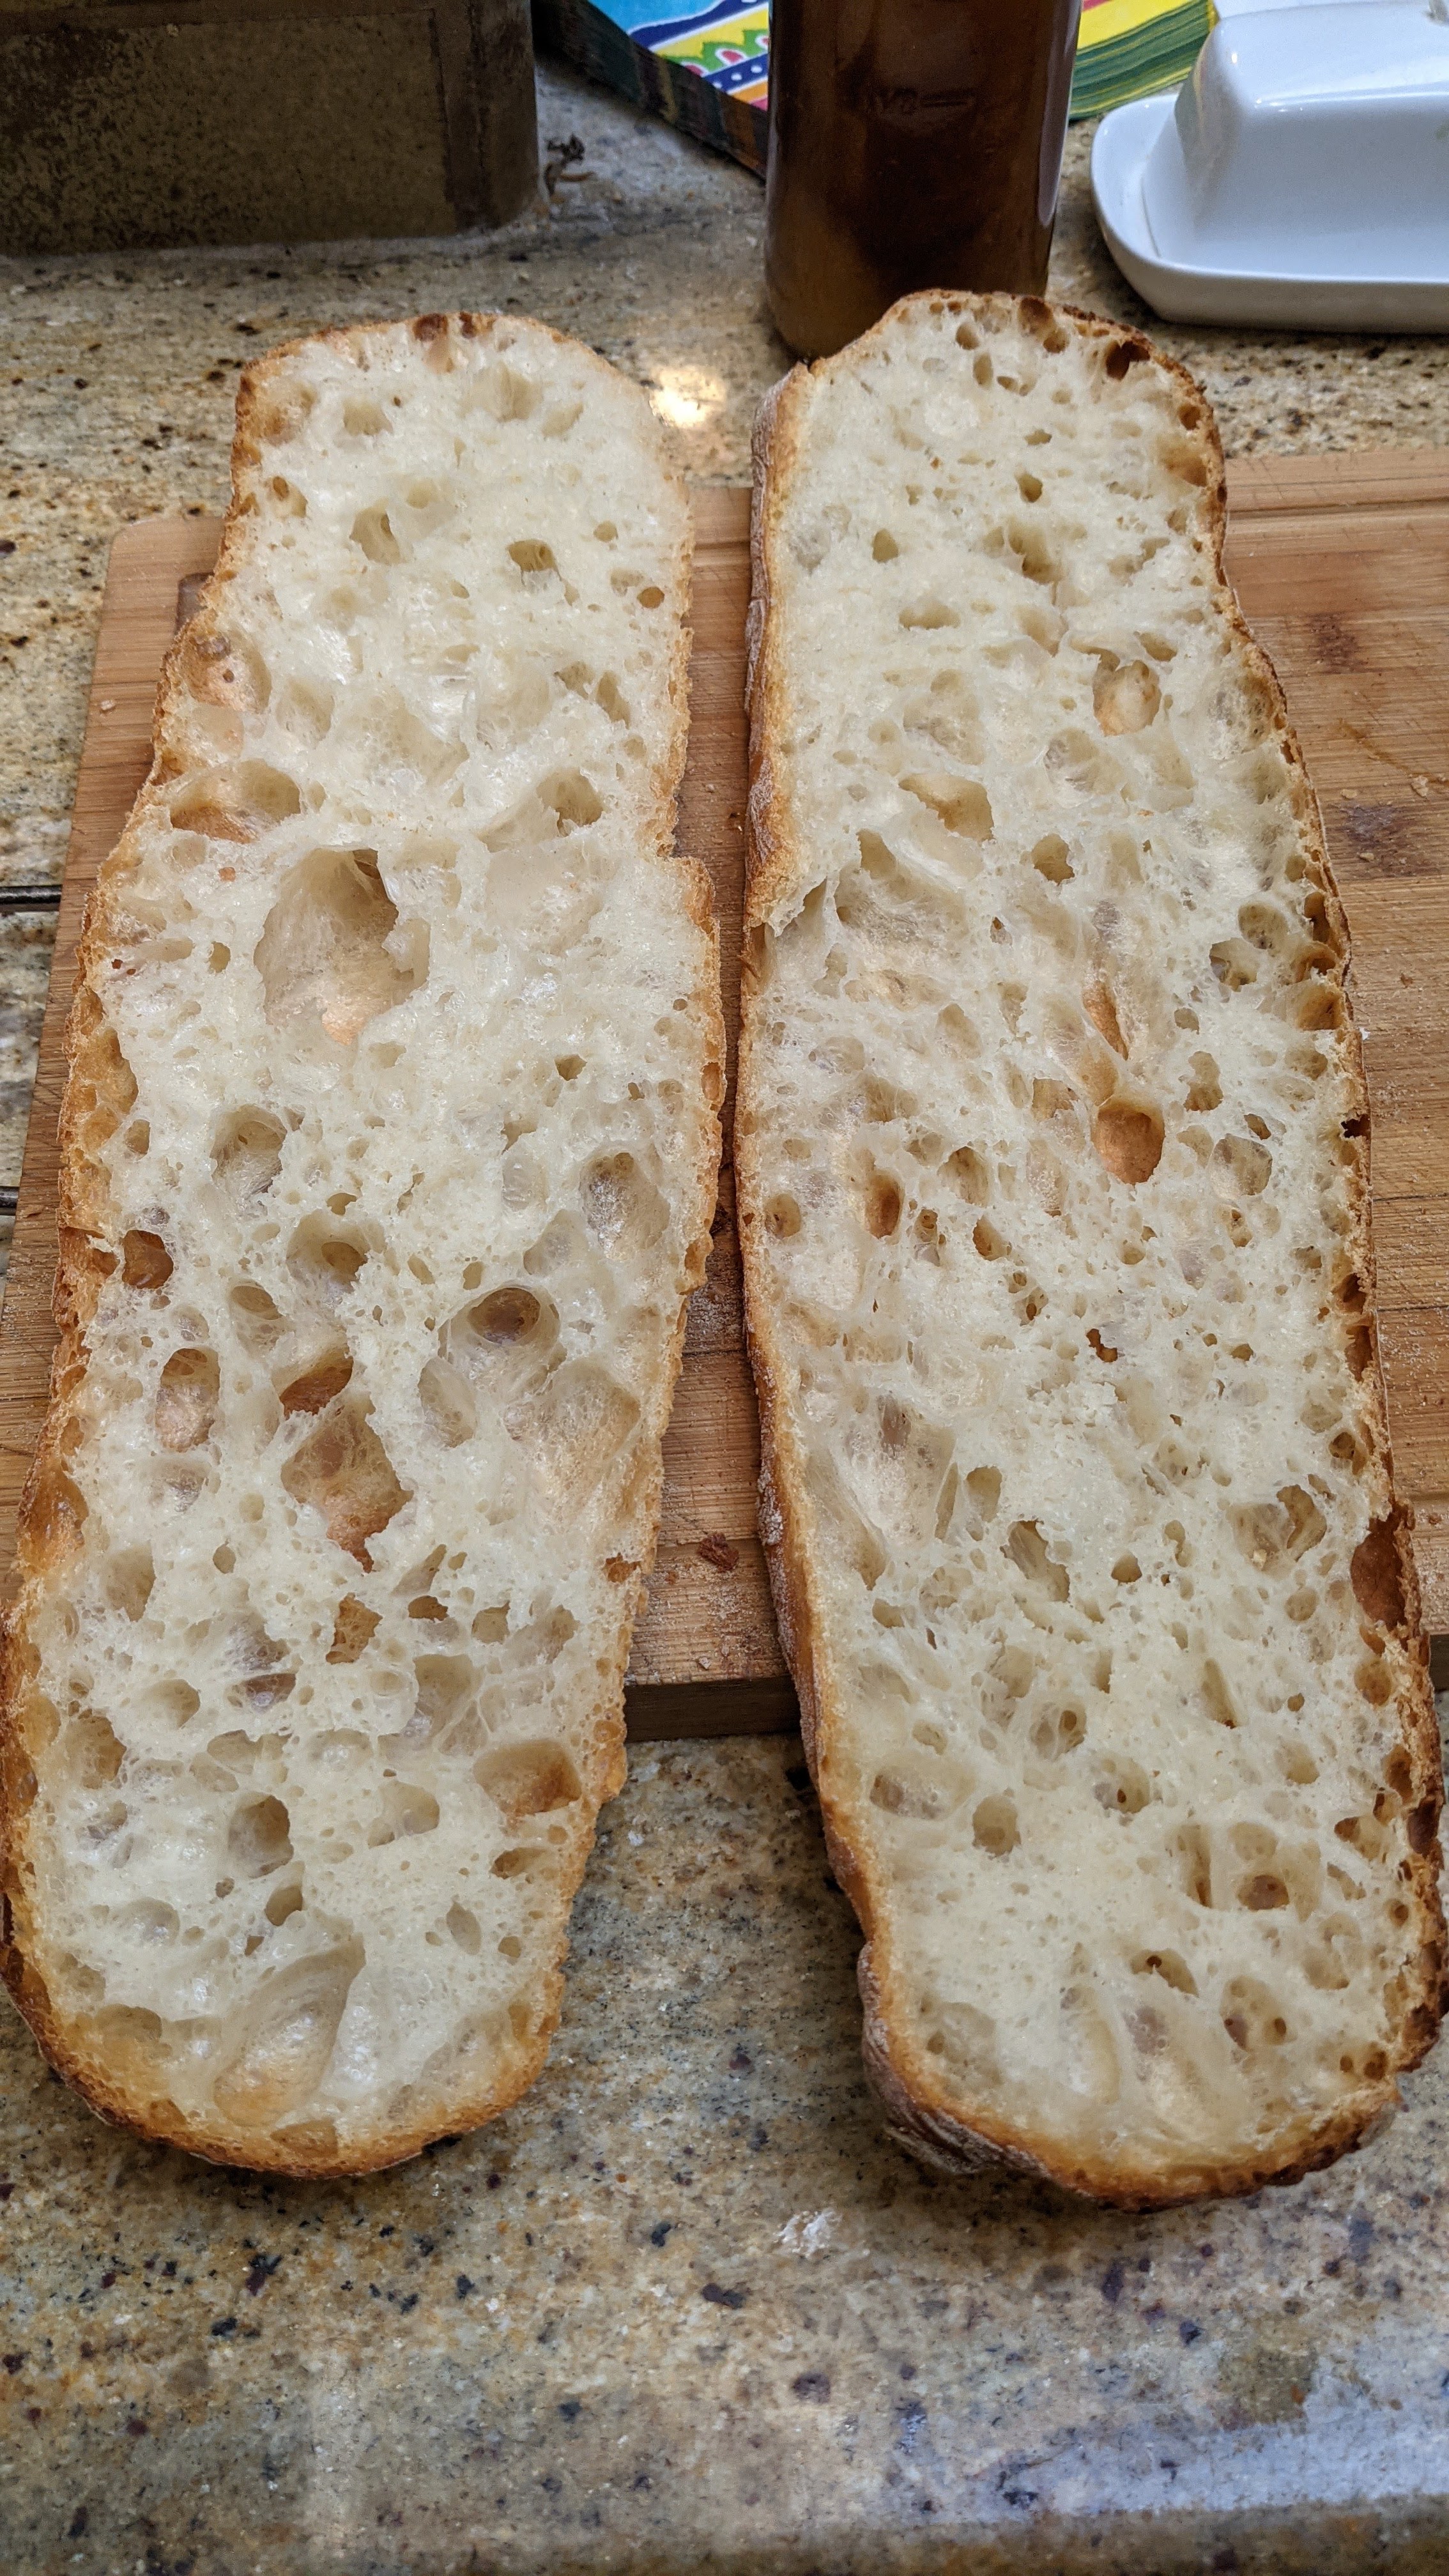
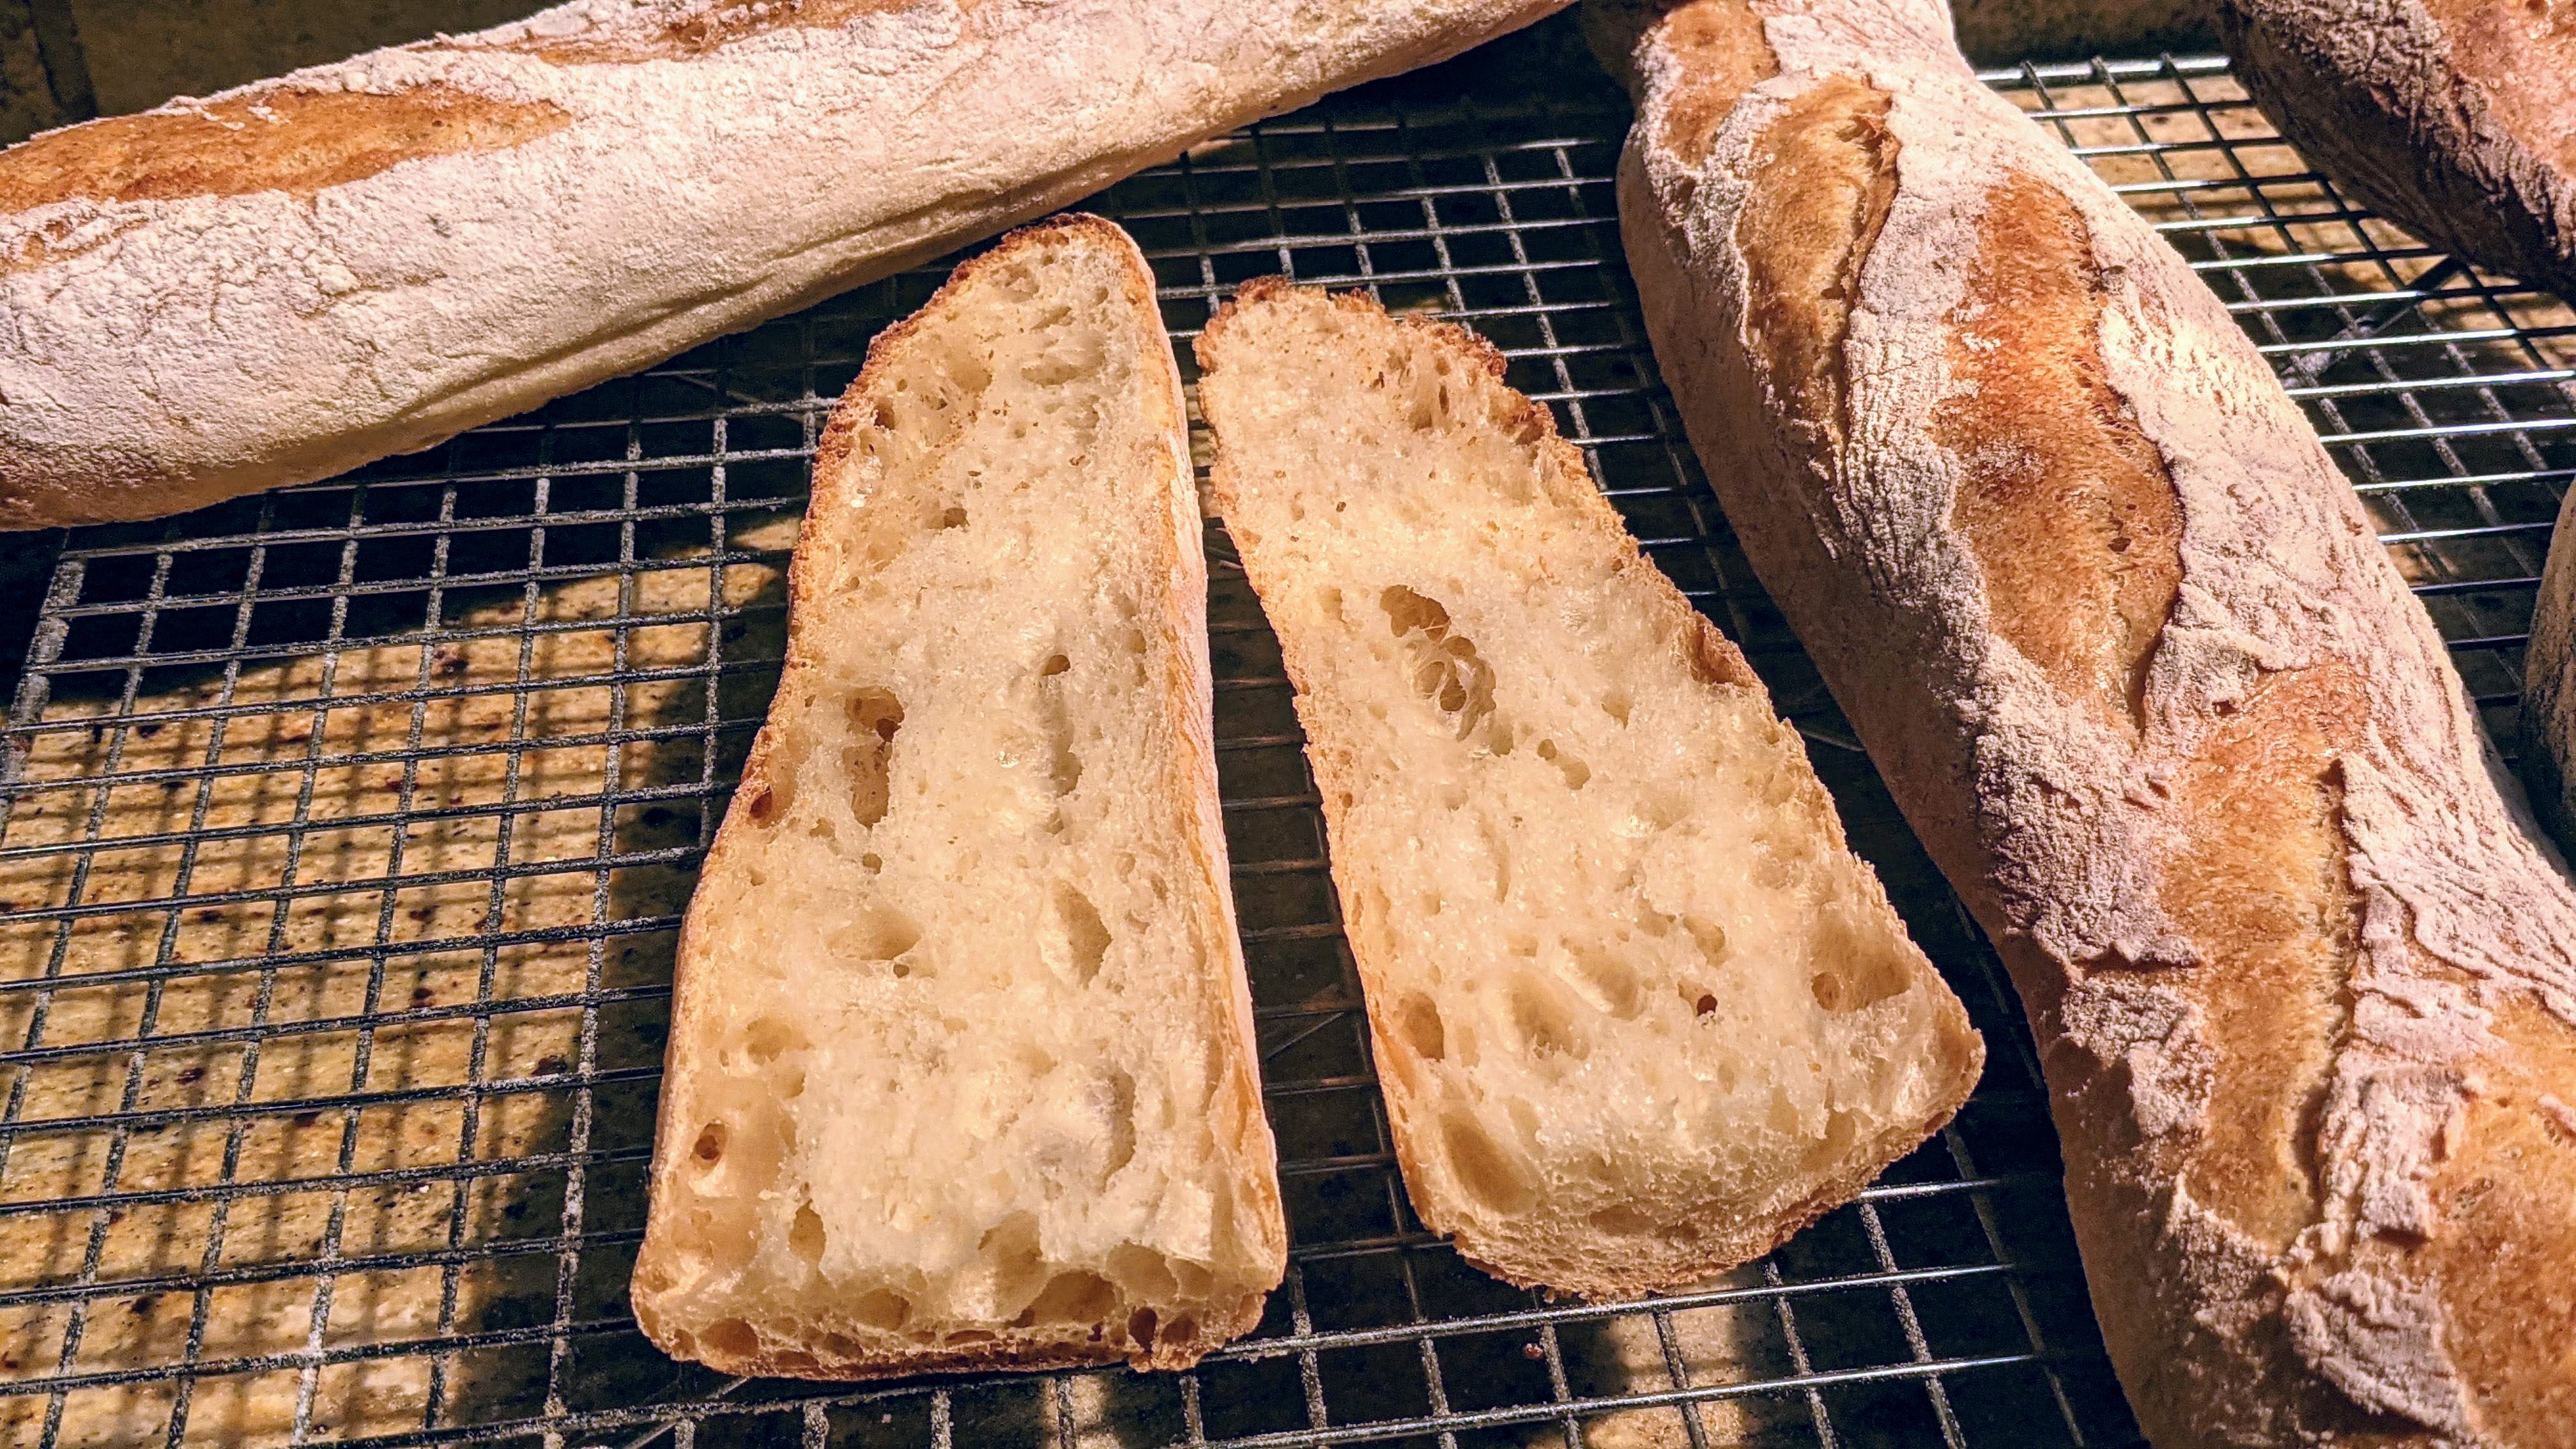
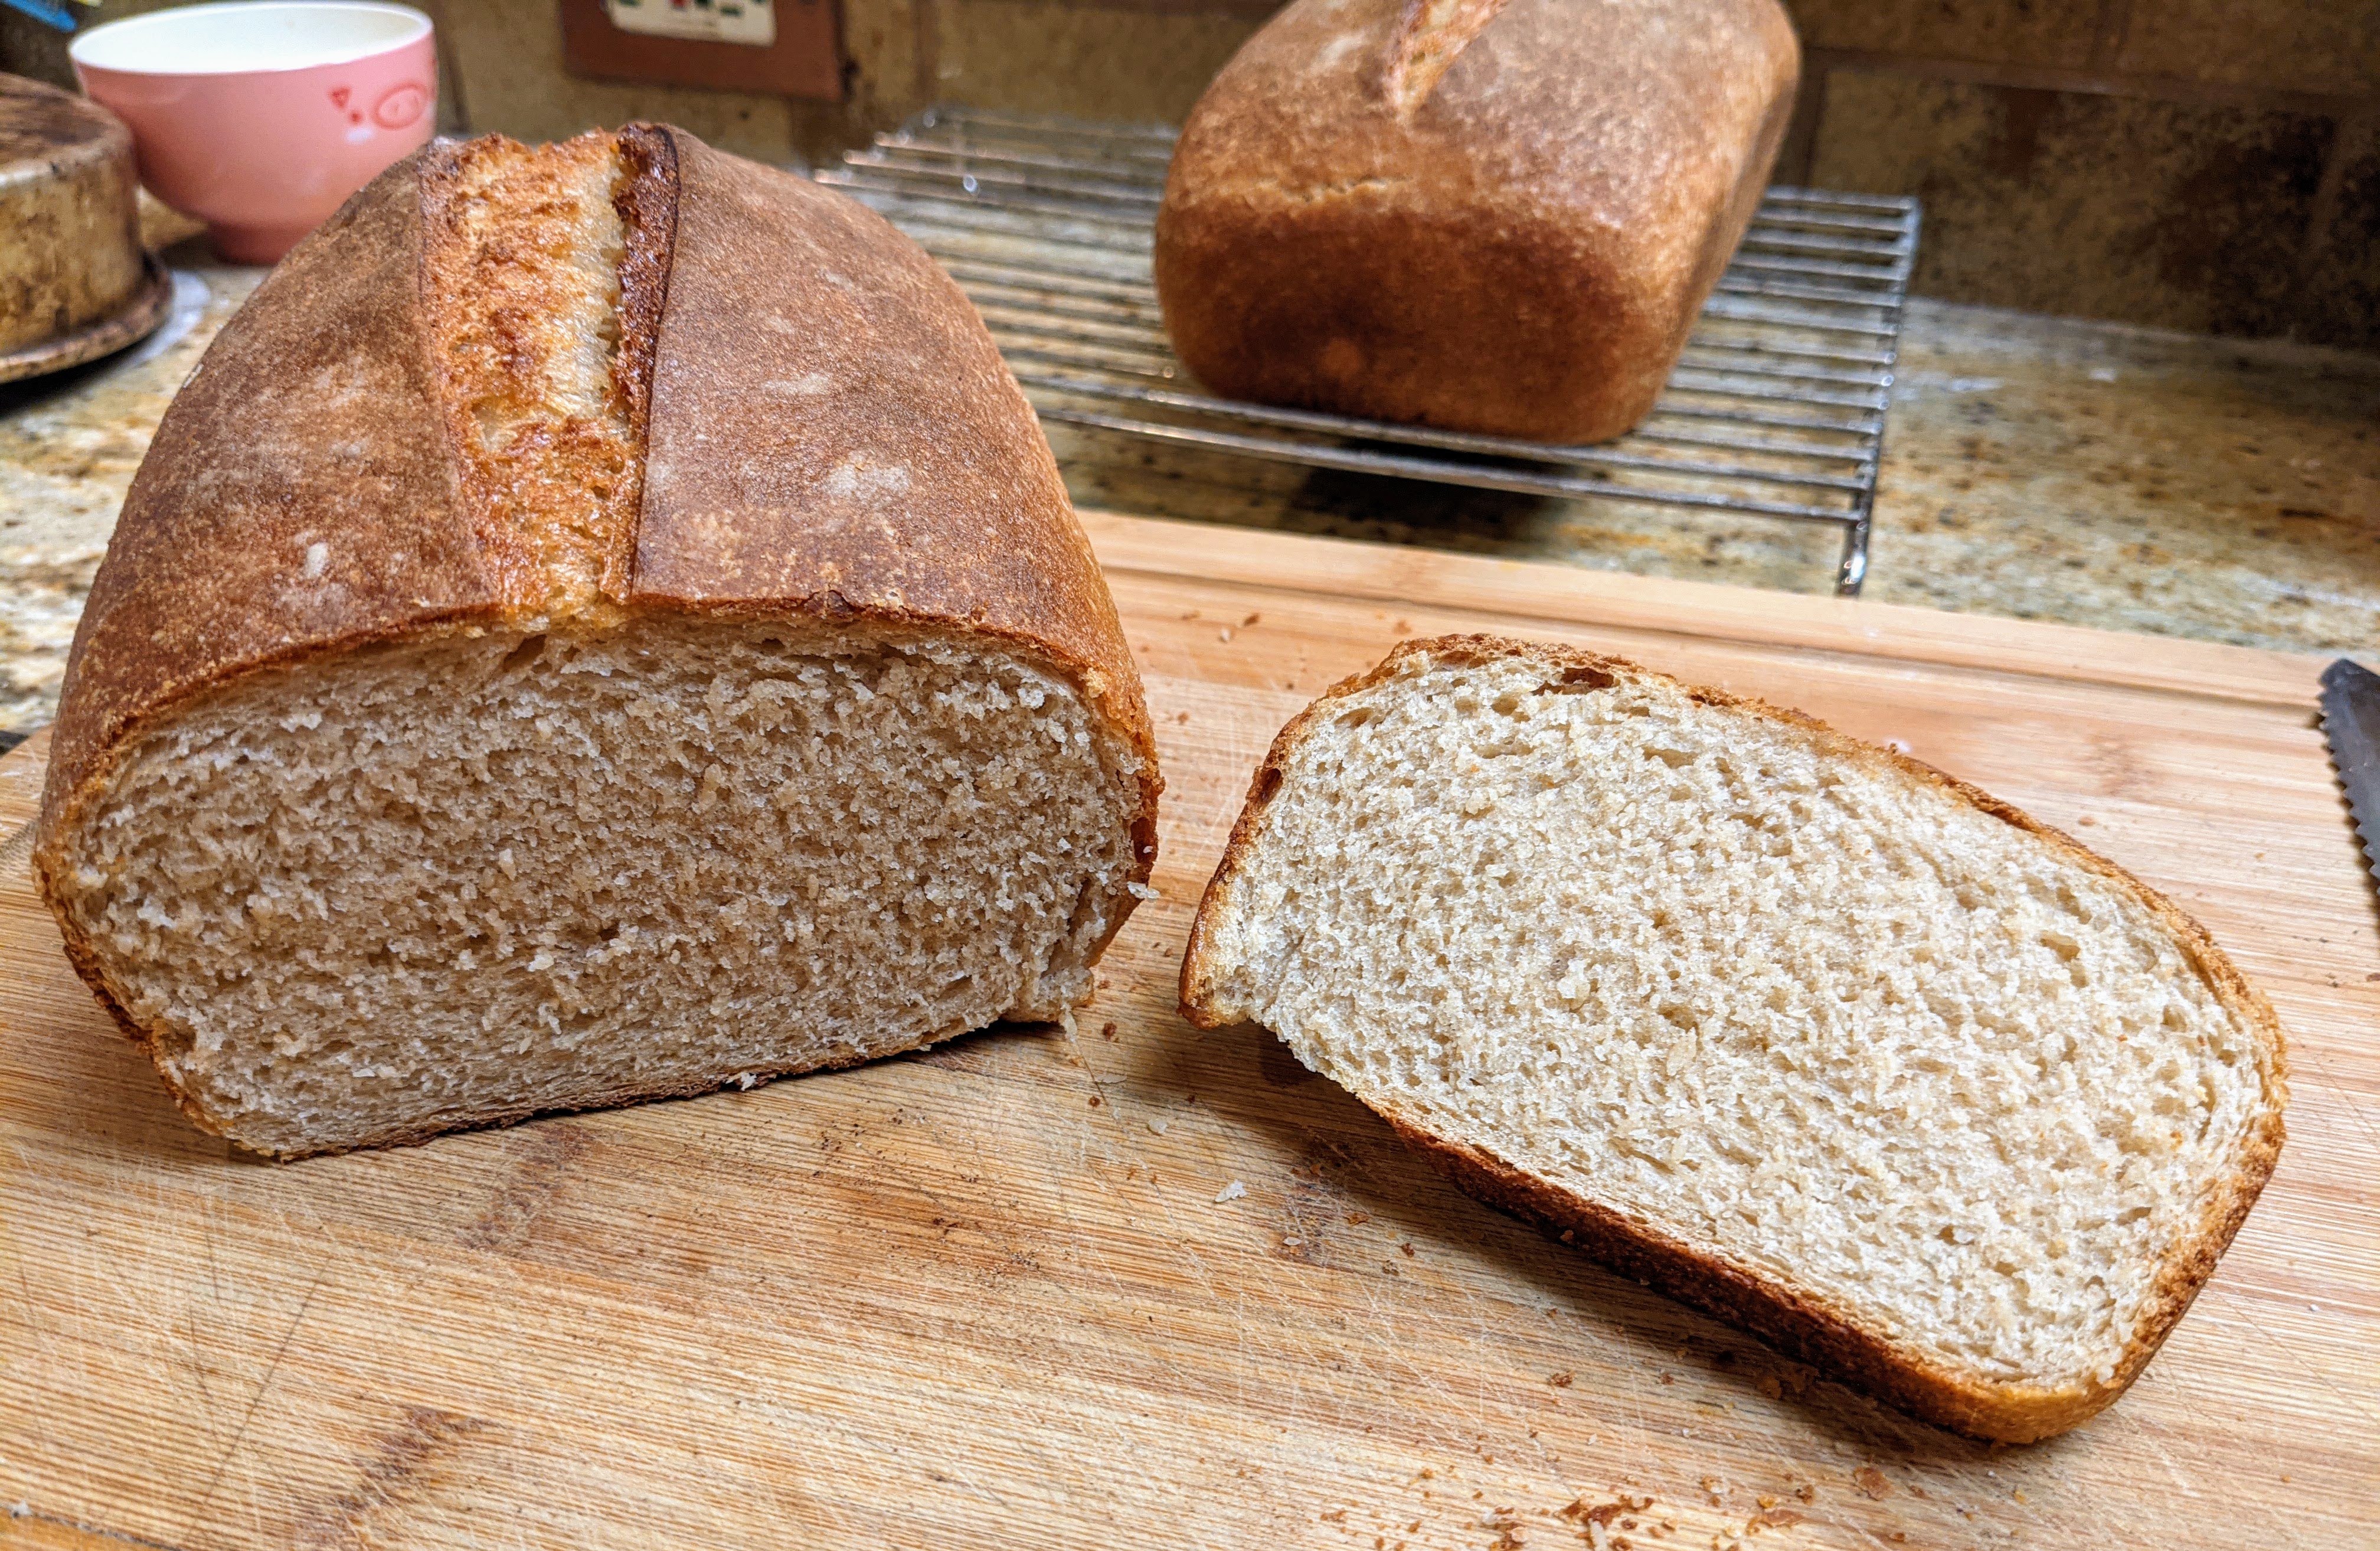
A little disappointed with the bottom of the loaf. Not sure if my stone was hot enough, so that could be my bad there for not letting the stone fully come to temp.
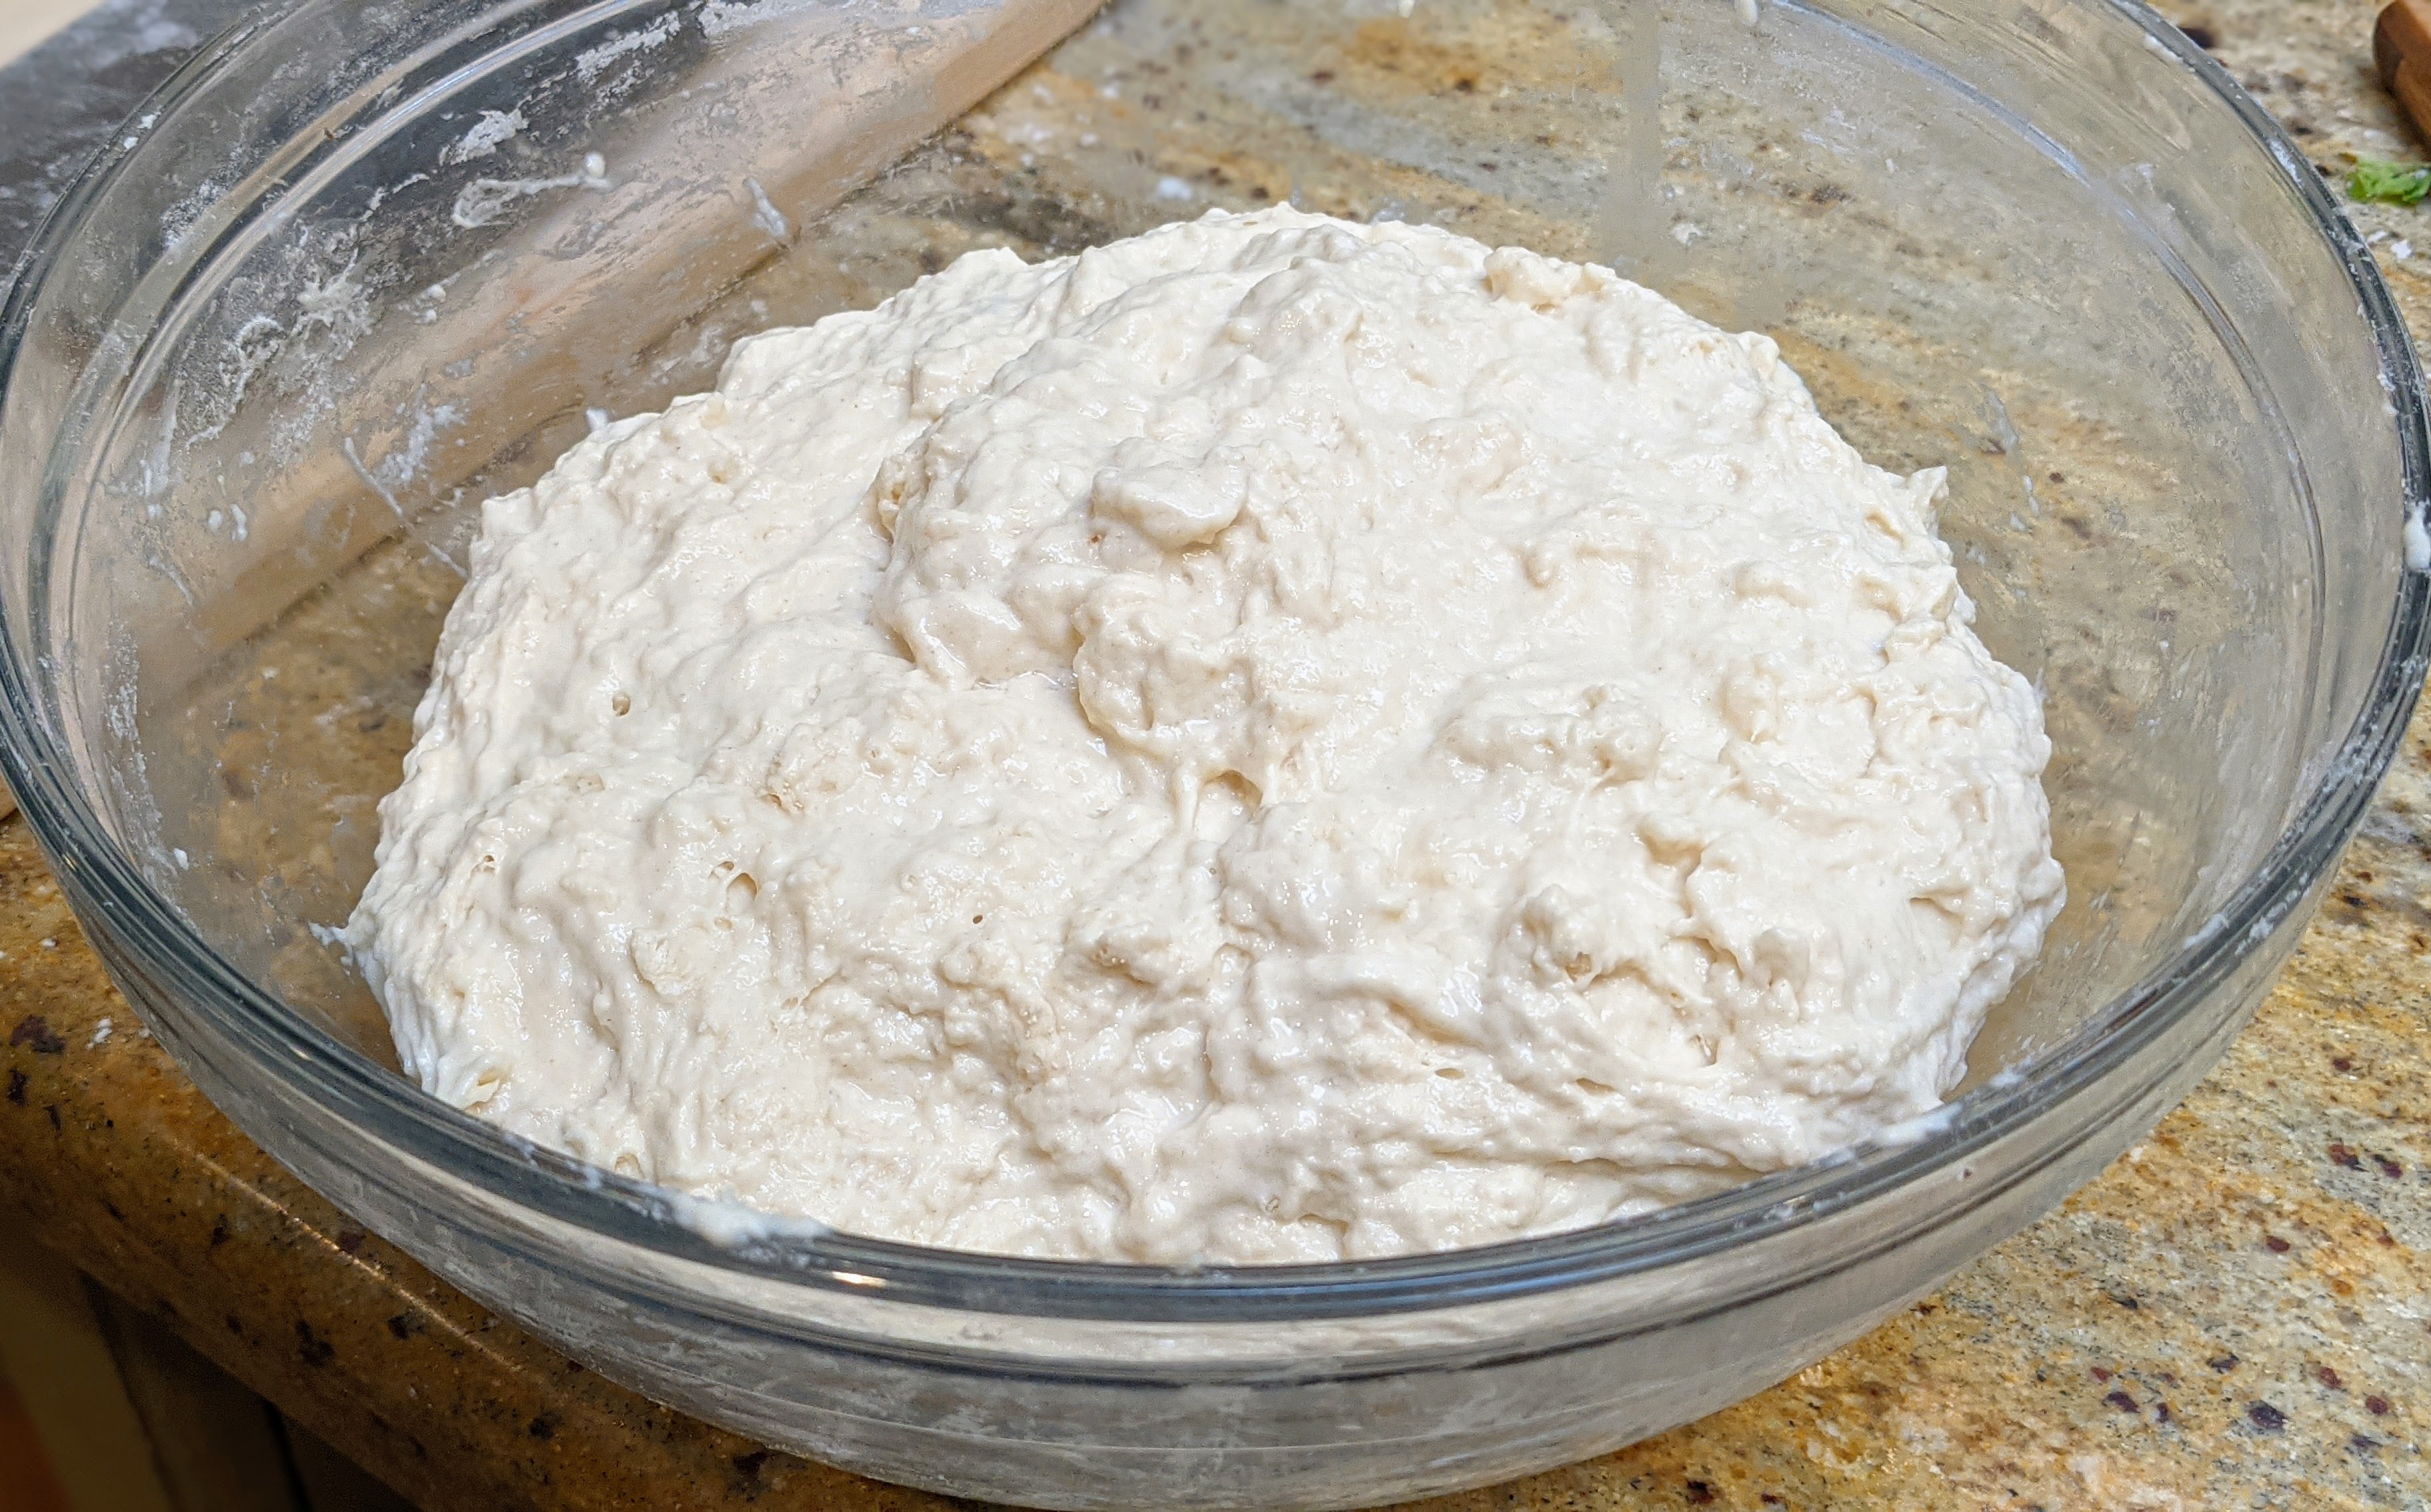
After re-reading Tartine No. 3 recently, I got inspired to start experimenting again with super-high hydration sourdough production. My typical hydration for sourdough is 75%, but Tartine goes even past 90% hydration! My earlier forays into 90%+ hydration were a little discouraging. I produced pretty flat loaves that, though possessed of a really open crumb, didn’t have much vertical rise. Then I saw some pictures of full loaves of Tartine and realized they had similar results!
But for me, I wanted to find a balance between extreme hydration and maintaining some oven rise. So I decided to do some tests, of which this is the first. The loaves in the pictures above were made with 85% hydration dough. I have a feeling that that is probably the limit of the type of flour I’m using, but the next bake, I’m going to push it to 90%.
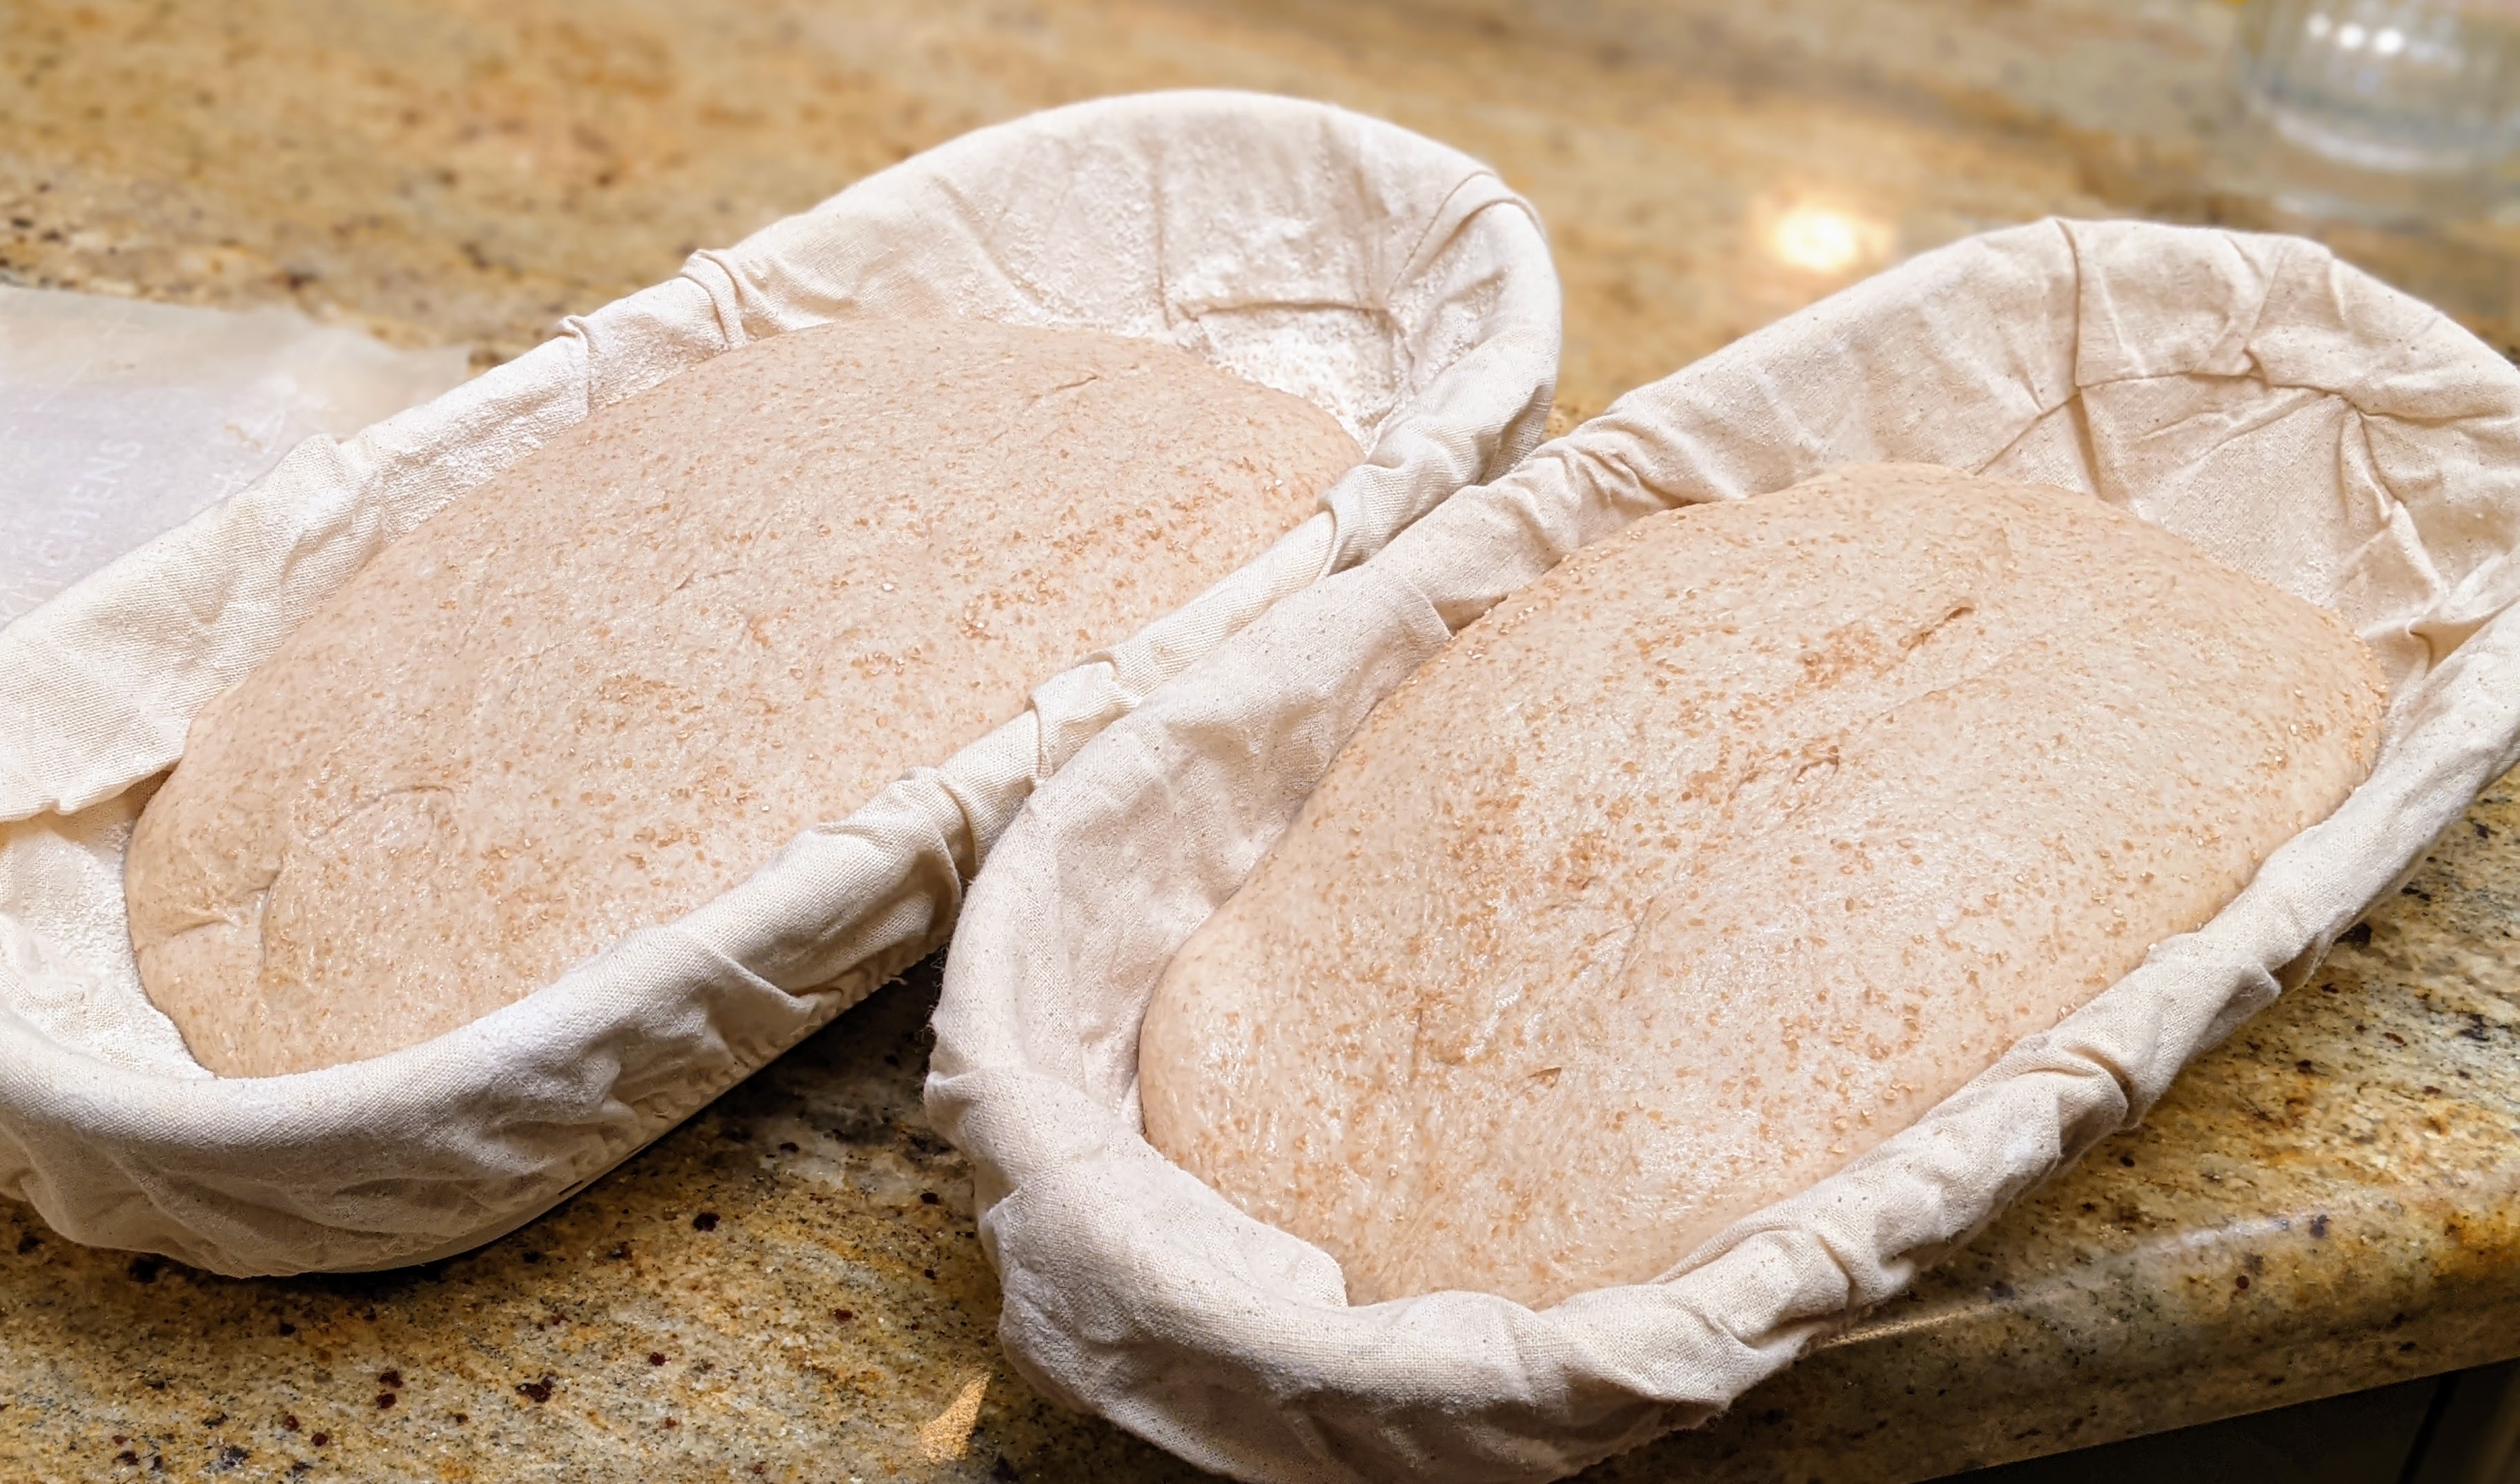
These turned out a lot better than my previous forays. And part of that – I think – is due to the baskets I used. I watched some videos of both Tartine and several other bakers that were making high-hydration oval loaves and they all used what appeared to be 14″ baskets. So I got a couple. I think it makes a difference as it allows the dough to expand. But I won’t be absolutely sure until I make loaves using a standard oval basket and a long basket at the same time.
Baker’s Formula
Flour
100.00%
Water
85.00%
Salt
2.00%
Diastatic Malt Powder (optional)**
2.00%
Total Percentage
189%
*Levain percentage factors the flour from the levain into the total flour **Depending on the flour bread flour I use, I’ll add malt if there’s none added by the miller.
*Levain is calculated as 25% of the total flour which can be arrived at by taking the target dough weight and dividing it by the total percentage, so 2020 / 189%.
The Process
Make the Levain. Like Tartine, I prefer to use a young levain because I like the nutty flavor characteristics of a young levain and prefer to develop sourness during final fermenation. Even if I end up fermenting the dough enough to make it sour, it won’t be overpowering. For this particular recipe, I take about 50g of mature starter (I maintain a separate mother) and combine it with 150g flour and 150g water (warm enough to get my dough to about 80°F). Levain is ready when it passes the float test (anywhere from 2 – 5 hours depending on weather).
Initial Mix/Autolyse. Reserve about 50g of water, then mix the rest with all of the flour (if you’re using diastatic malt powder, add it now so the enzymes have a chance to break down the starches in the flour). When I use whole grain flour, I will typically autolyse for 2-4 hours, in parallel with my levain maturing.
Final Mix. Add all the levain, salt, and reserved water to the dough. Mix thoroughly until all ingredients are fully incorporated.
Bulk Fermentation. 4-6 hours depending on ambient temp or rate of fermentation or until the dough has expanded about 30-35% of its original size. There are a lot of variances in the timing. With the loaves shown above, they took a long time to bulk ferment, even at 80°F.
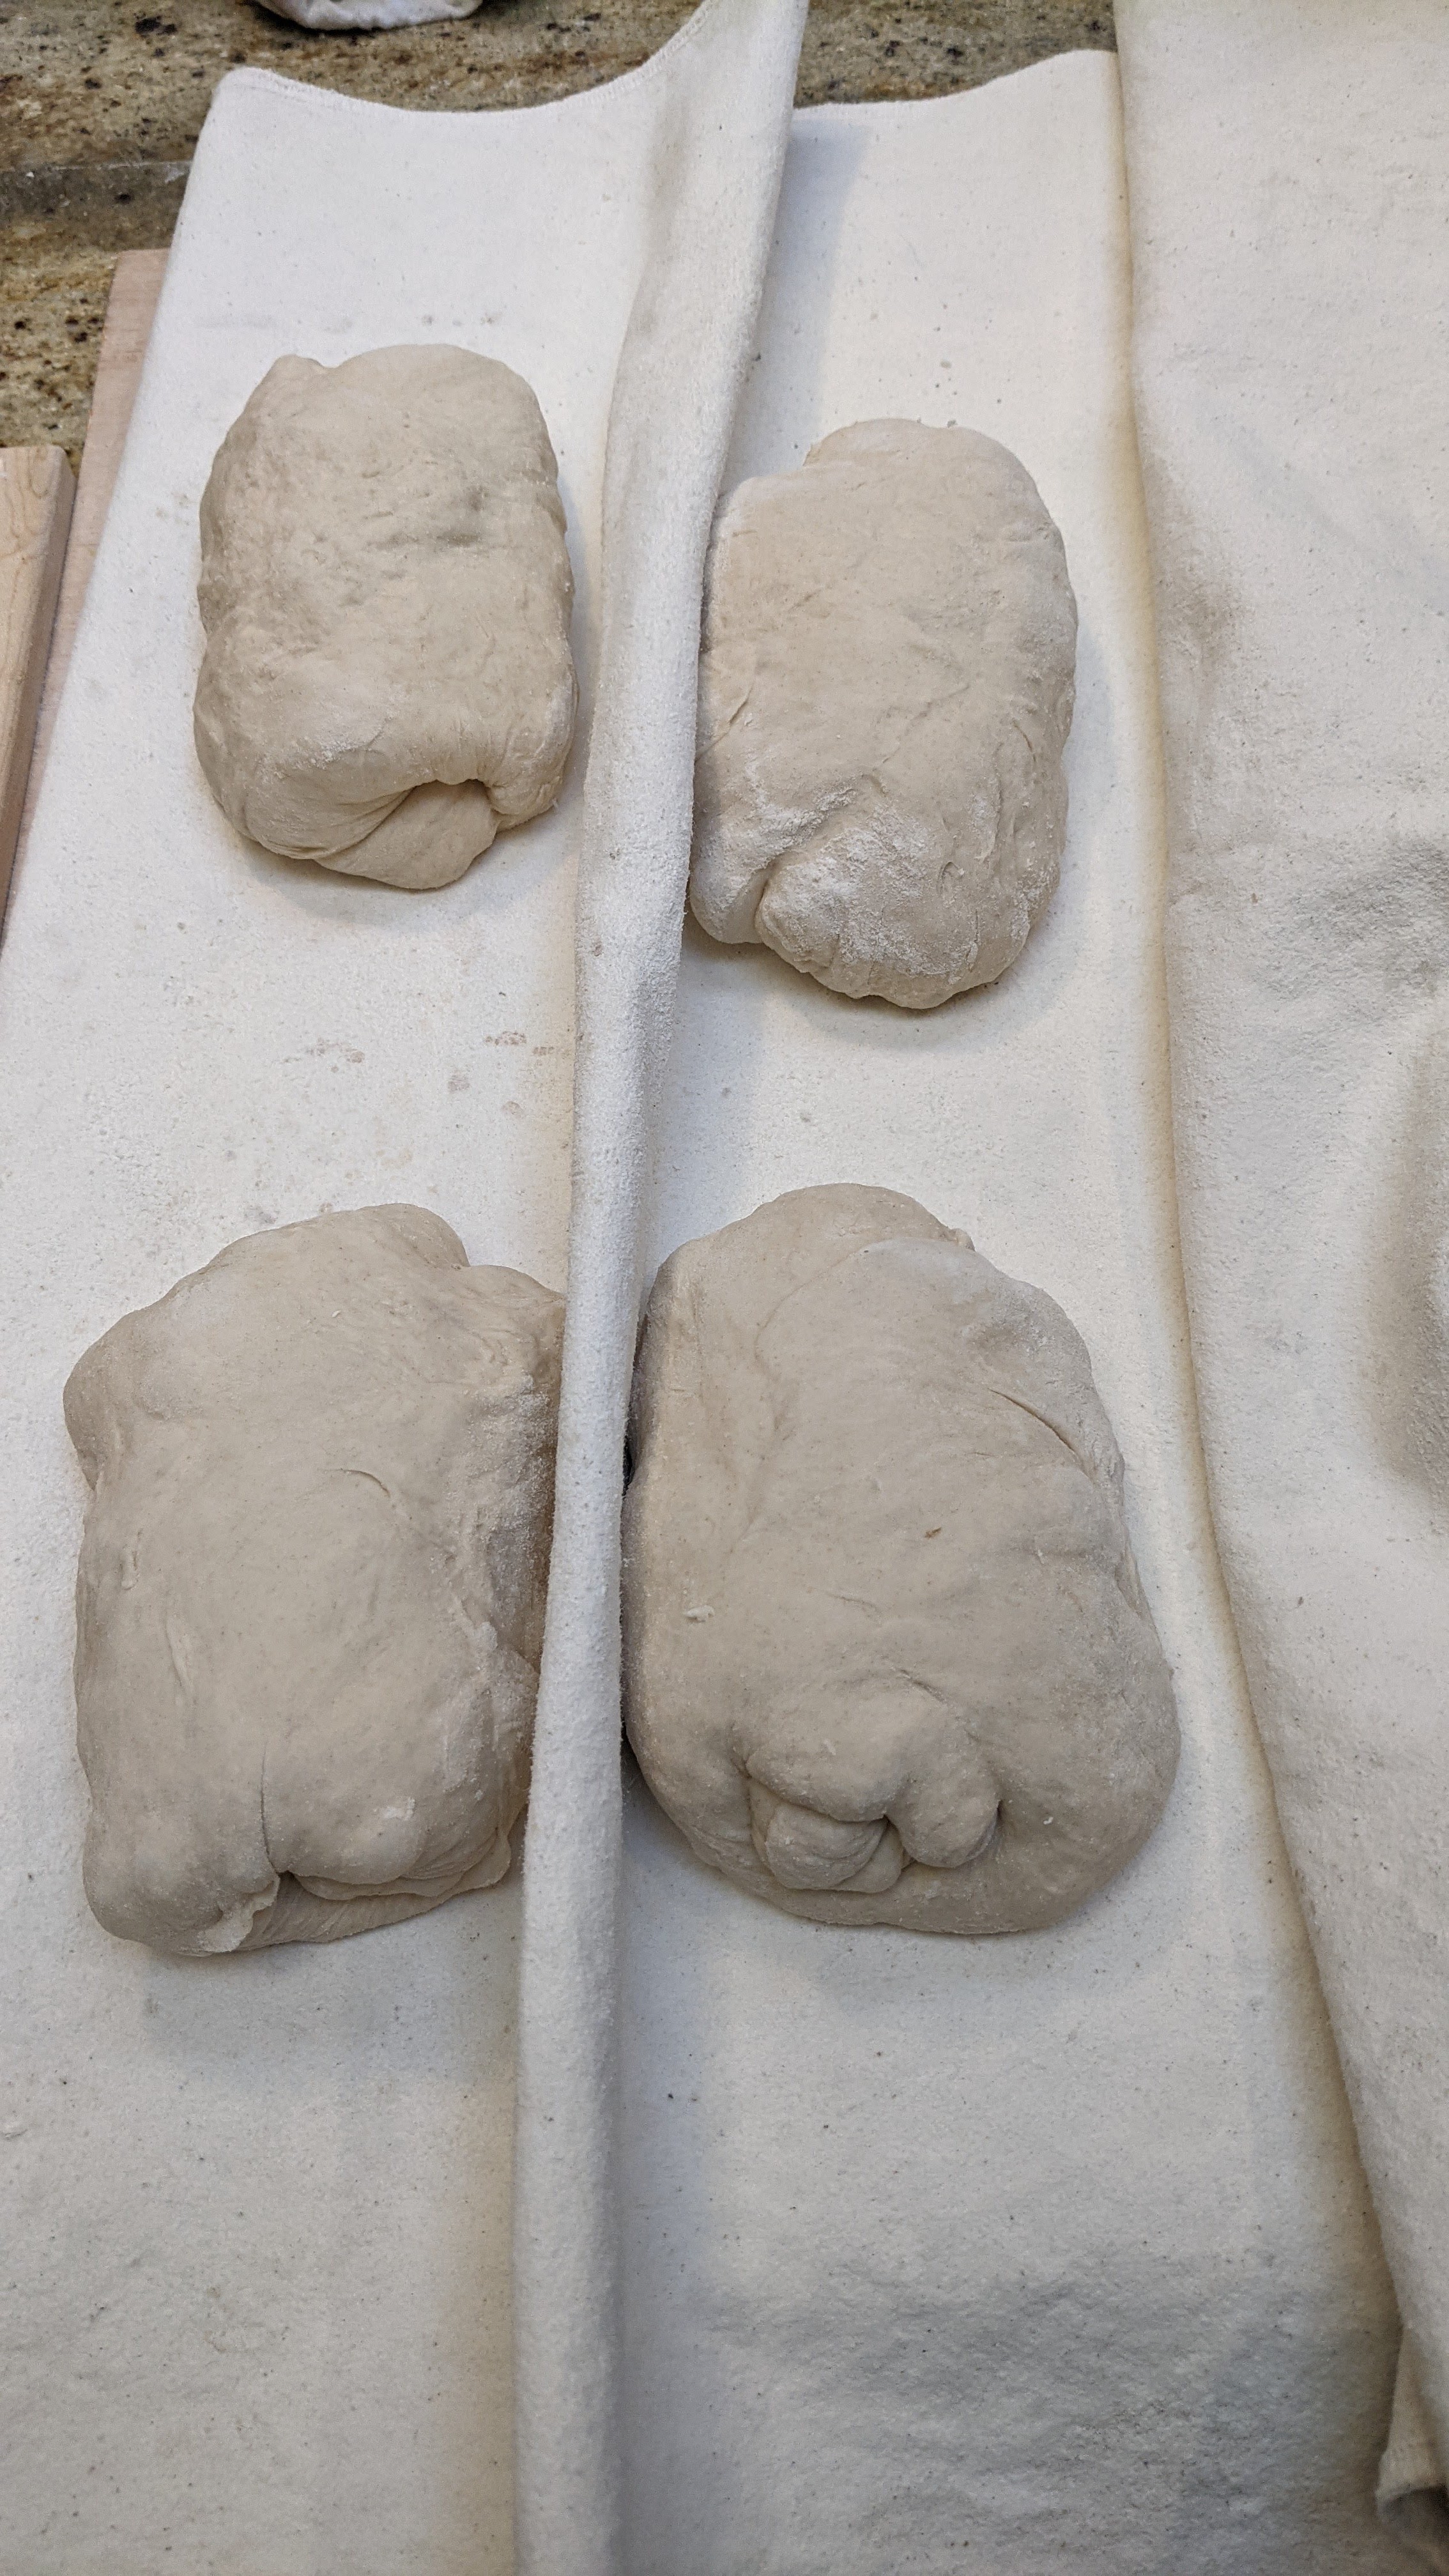
Divide and Pre-Shape. Divide the loaves into 1-kilo pieces, then work into rounds, developing a little surface tension. Bench rest uncovered for 20-30 minutes until the balls have relaxed.
Shape. Shape into rounds or ovals, then place into baskets.
Final Fermentation. 12-24 hours at 39°-42°F. The longer you go, the sourer the bread. I’ve taken loaves out to 36 hours but by that time, the acids started breaking down the gluten and I didn’t get much oven spring.
Bake. Bake at 475°F for 20 minutes with steam (if using a Dutch oven, then 20 minutes with the lid on). Remove the steaming container, then bake for 25-35 minutes dry at 425°F or until the crust has baked to a deep, golden brown.
No way am I going to take credit for developing this recipe, though I have made my own tweaks to the flour. The recipe comes from master chef Markus Farbinger. I had no idea who he was until I happened to stumble on his baguette shaping video on YouTube. His technique was so incredible that I ended up buying his baguette and ciabatta video series on Vimeo. This ciabatta recipe is from that series.
To be honest, even though I’m documenting the recipe, I’m really only scratching the surface. I highly recommend renting or purchasing the series. Chef Markus the former Dean of Curriculum and Instruction for Baking and Pastry Arts at the Culinary Institute of America, and is co-owner of the Ile de Pain bakery in South Africa where he uses a wood-fired oven to bake his artisan bread. In other words, this dude is totally legit!
Overview
Like traditional baguettes, this ciabatta uses a poolish that you make the night before you bake, then in the morning, you mix the final dough. With this particular recipe, the process is quick! I mean, real quick. Things happen much faster than with your typical artisan loaf. Once you mix the final dough, your loaves are in the oven within an hour-and-a-half!
On top of that, you only manipulate the dough three times before baking and two of those times are devoted to creating structure. So you really only have two opportunities to create structure and strength in your dough before you bake. That third time is just pushing the dough into a loaf shape and transferring it to a couche. There’s no formal shaping and scoring with a ciabatta. So you have to get the structure-building steps down!
Now don’t go thinking that this is a beginner’s bread simply because of the short prep time or the use of commercial yeast. It isn’t. What makes it difficult is the hydration rate is a whopping 85%! At that level, it’s almost like working with a batter, and even for seasoned bread makers, that kind of hydration rate can be a little daunting. So like making baguettes, making a great ciabatta is less about the ingredients and so much more about the technique.
The Recipe
If you read the recipe table, you won’t see any olive oil. The only time it is used is to coat the mixing bowl after the second fold, just prior to the final fermentation. I’m not sure why this is, but the results are pretty marvelous just the same.
Like baguettes, the process occurs over two days. You create a poolish the night before, then mix the final dough and bake in the morning.
Overall Formula
I’m providing the overall formula because it is possible to do this as a straight dough.
Flour
Water
Salt
Yeast
100% (10% Whole Wheat) (90% Bread Flour)
85%
2%
0.64%
Poolish – Day 1
I love that the flour of the poolish represents 50% of the total flour. The influence of flavor from this amount of poolish is immense!
Flour
Water
Yeast
100 g Whole Wheat Flour 400 g Bread Flour
500 ml
0.4 g
Mix all the dry ingredients together, then add water in batches until you form a smooth, thick batter. Set aside at room temperature for 12-16 hours. I shoot for 14 hours. As an early-riser, I make the poolish at about 4pm then mix the final dough at 6am the next day.
If you’re using yeast packets, simply take a healthy pinch from a packet to use for the poolish, then use the rest for the final dough.
Final Dough – Day 2
Flour
Water
Salt
Yeast
Poolish
500 g Bread Flour
350 ml
20 g
6 g
1000 g
– If you’re wondering if the amount of yeast listed seems to be a bit much, bear in mind that Chef Markus uses 15 grams fresh yeast. The instant/active yeast equivalents are 30-40% of fresh yeast.
Dough Temp: 475F/24C
Before you start, I recommend using a round-bottom mixing bowl for the fermentation steps. The dough is so wet that it will be difficult to do stretch & folds if you use a vertical-sided container. Also, a couche is very helpful to have, especially for the final proof.
Note that the times listed are approximate! I just baked a batch yesterday and because it was early in the morning and very cool, I had to extend the times to 30 minutes, and I let the final proof go for 20 minutes.
Mixing. Sift the flour into a mixing bowl, then add the salt and yeast. Use a whisk to combine and thoroughly incorporate all the dry ingredients together. In a separate bowl, combine the poolish and water and completely dissolve the poolish. Once it’s liquified, pour the liquid into the mixing bowl and mix until no dry ingredients are left. Mix into a shaggy mass, then let the mixture rest for 20 minutes.
You can use a stand mixer for this step, but with this small amount of dough, I just mix by hand and use a Danish dough whisk. It’s pretty fast with this kind of hydration.
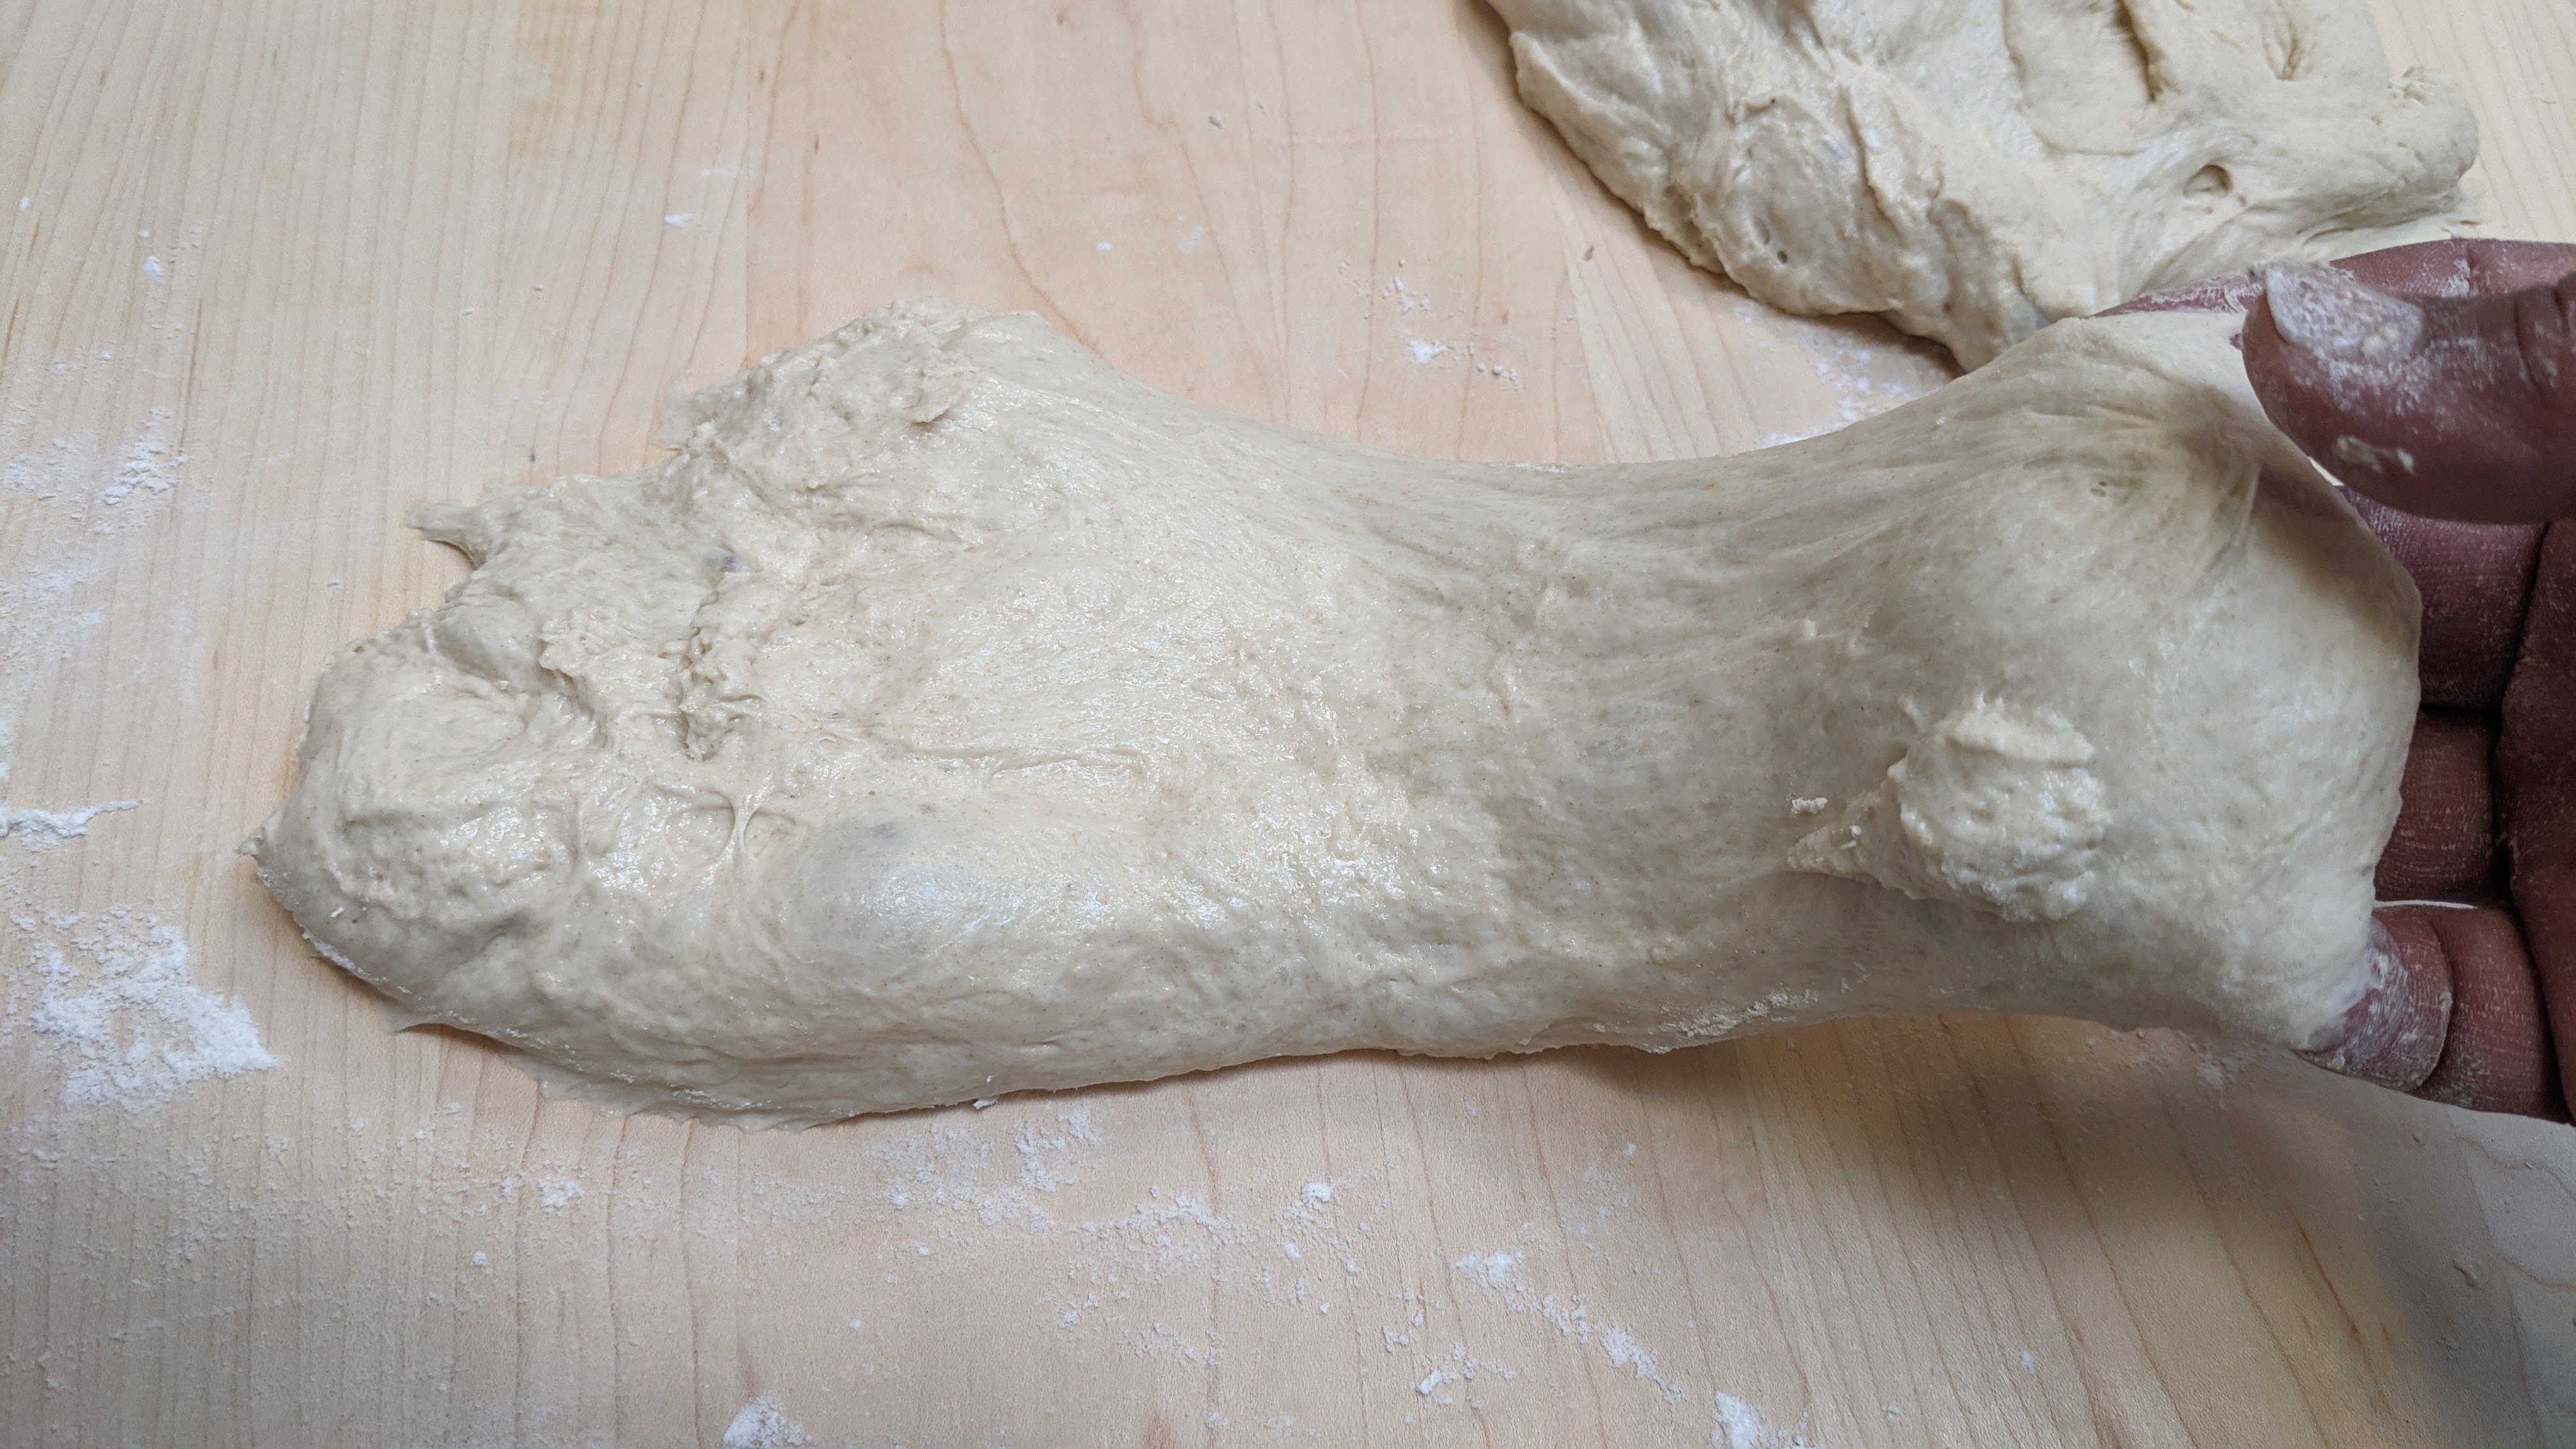
Bulk Fermentation First Fold. After the dough has rested, do a series of stretches and folds in the bowl. The trick to folding a super-wet dough like this is to make your hand like a wooden spoon, with your fingers pressed together. Scoop from the side and slip your fingers under the mass, then lift. At first, most of the dough will kind of pour out of your hand, but as you stretch the dough more and more, you’ll feel the tension building and the dough won’t pour out nearly as much. Wet your hand regularly! Once you feel as if you can pick up about a third of the dough mass when you scoop, you’ve built up enough strength for that session. Cover the dough and rest for another 20 minutes.
At this point, it’s a good idea to start preheating your oven (to 475°F/250°C), especially if you use a baking stone like I do.
Bulk Fermentation: Lamination. Generously flour your work surface, and I mean generously, then pour out your dough onto your work surface. Check to see if you can lift up the edges of the dough, and use your bench scraper to push flour under areas that are sticking. Gently tug the dough into a square, then starting at the bottom edge, quickly work your fingers under the dough (your fingers should be pressed together, give that side a stretch toward you, then fold the edge about 2/3 over the dough. Do the same with the top edge. Once you’ve folded the top edge over, gently pat the dough down to even out its thickness, then fold the left and right sides. Gently pat down the folded dough, then repeat the process.
Chef Farbinger laminates his dough 3 times. But with the King Arthur AP flour I use, by the time I’m finished with the 2nd lamination, the dough is nice and strong. Not matter what, once you’ve finished lamination, Roll the dough onto its seams then form it into a round. Place the dough into a well-oiled bowl (I just rinse out my mixing bowl then spray oil in it). Let the dough rest for 20 minutes.
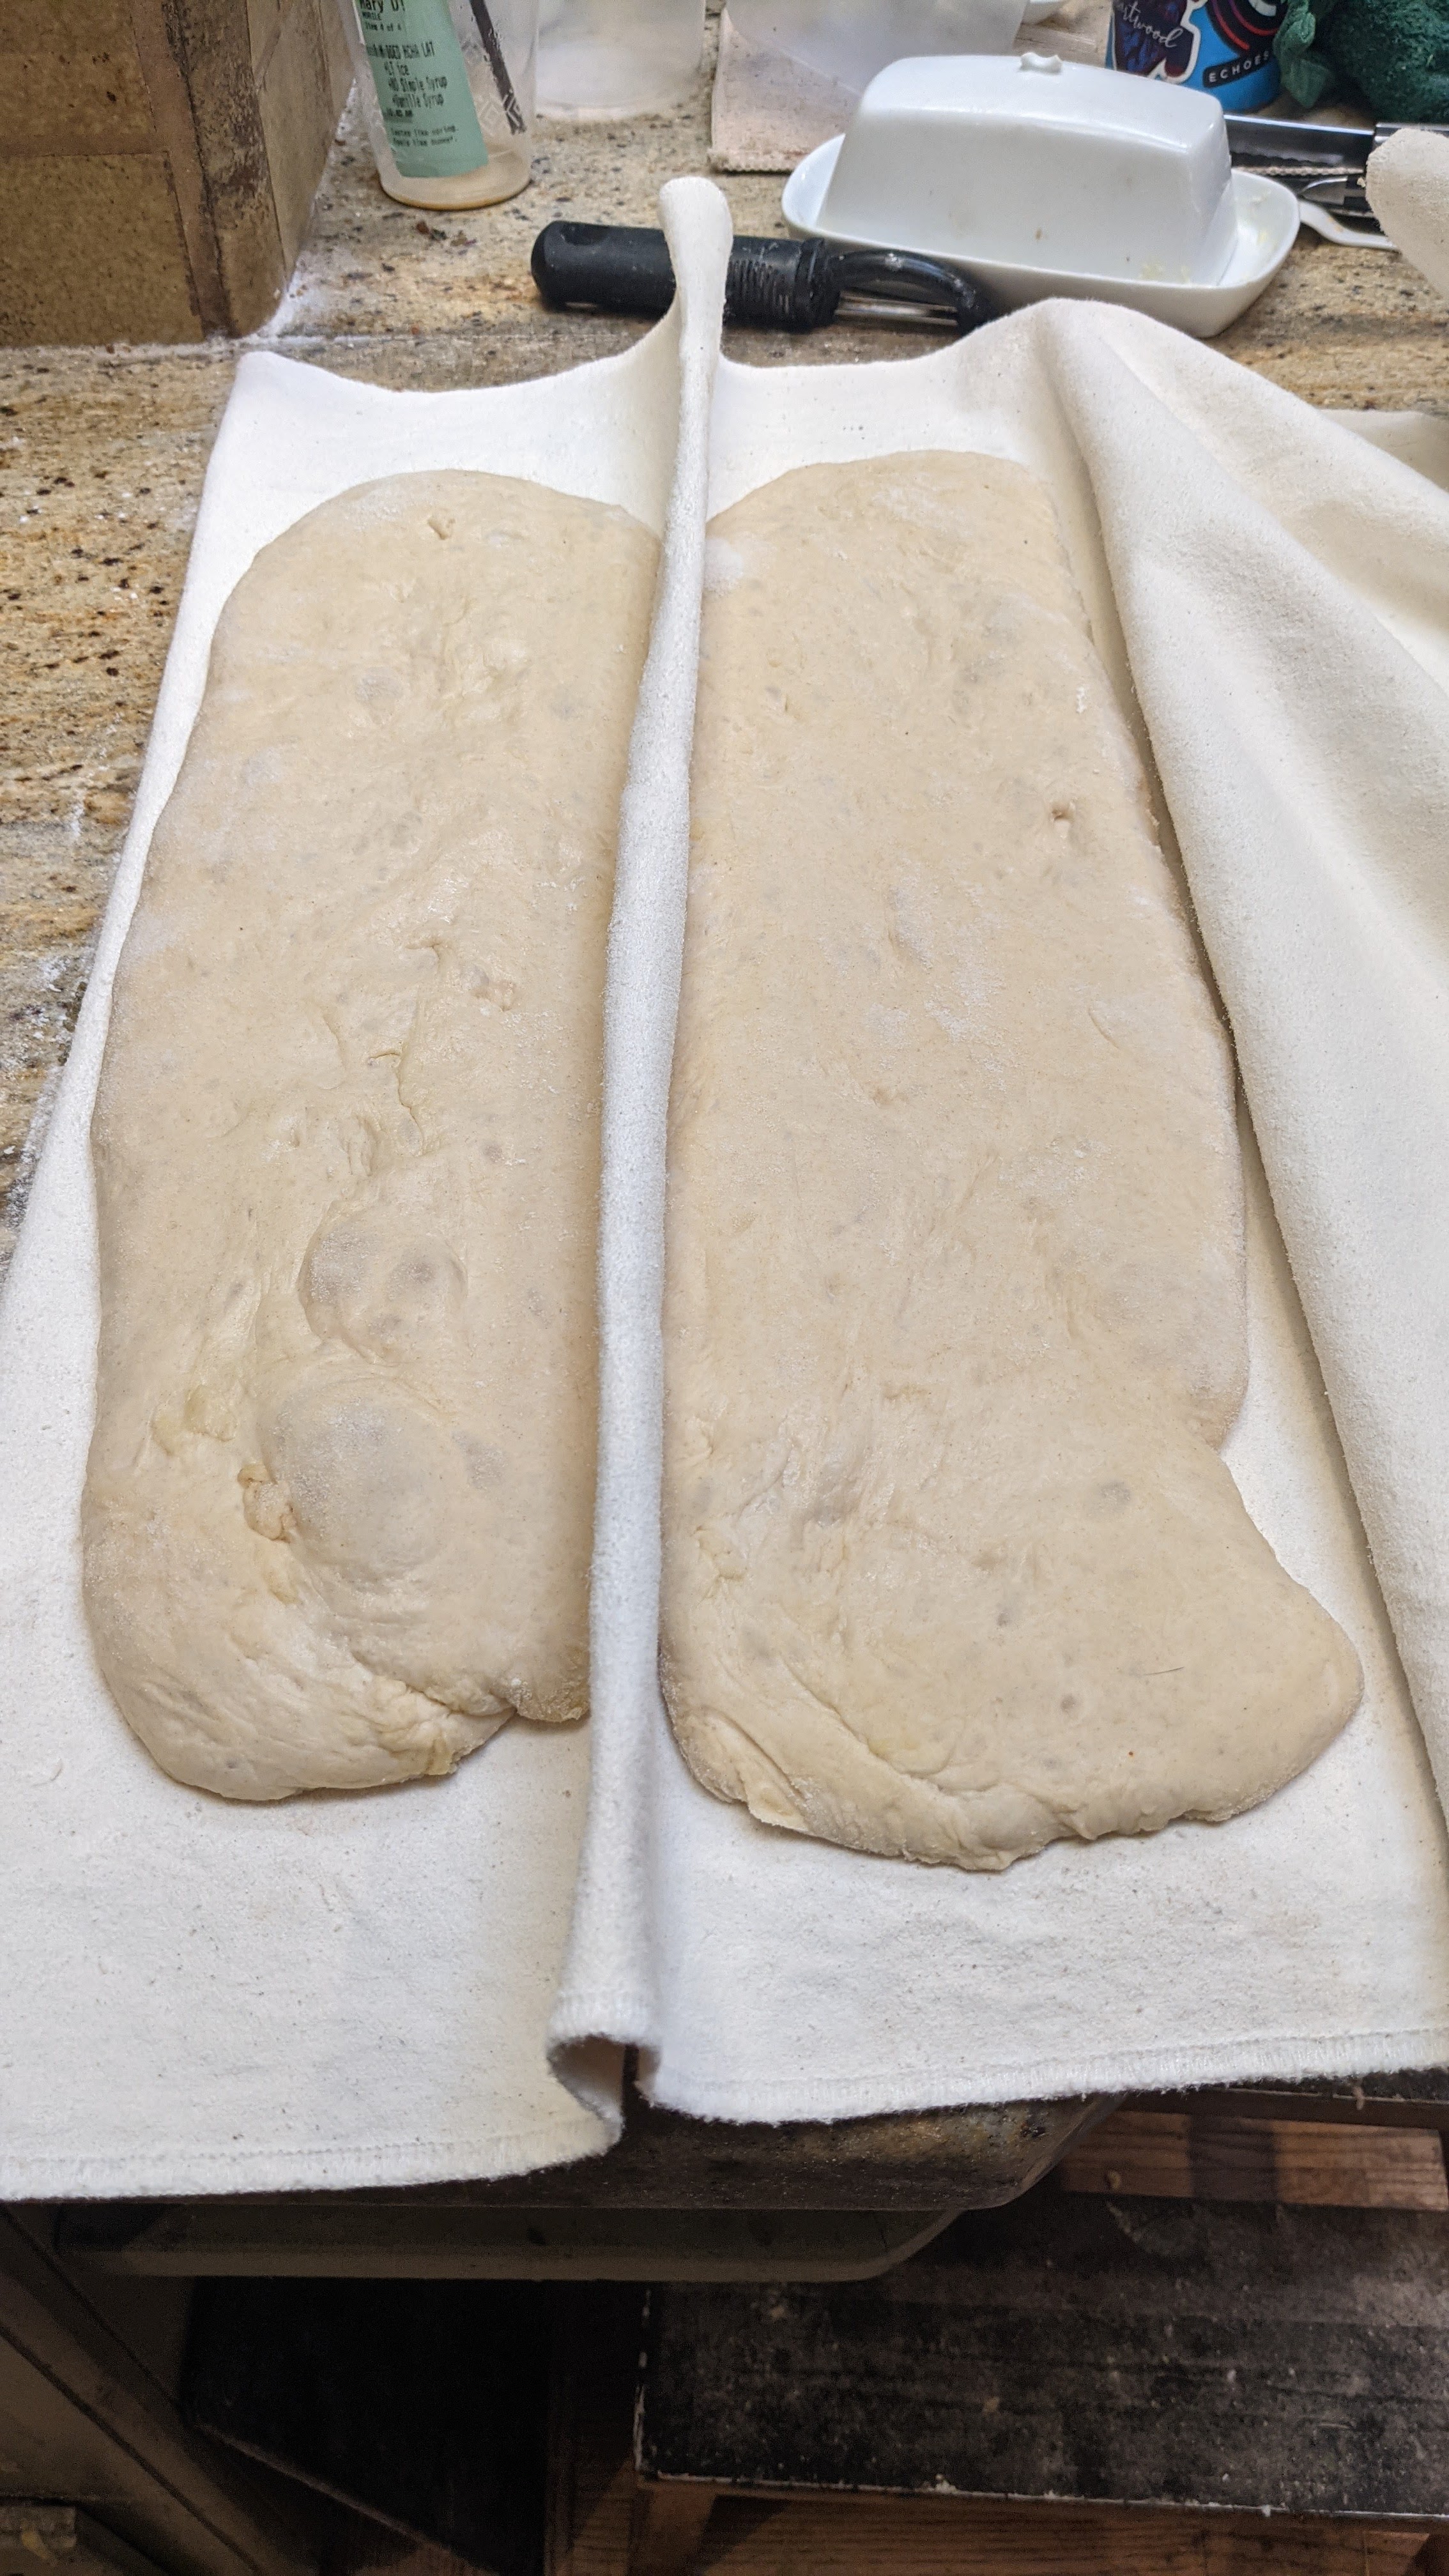
Divide and “Shape“: Flour your work surface again, but not nearly with as much flour as with lamination. Slide the dough ball into the surface. Then using your bench scraper, gently tug the dough into a rectangle with fairly even thickness. Cut the dough down the center along the long edge to form two “slippers.” Then work each piece into long rectangles. Picking the loaves up from the ends and scooping towards the middle, transfer the loaves to a well-floured couche or tea towel. Lightly flour then dimple the tops to even out the thickness.
Final Fermentation: 10 minutes
Bake. If you’re baking on a stone, transfer the loaves to a loading board generously sprinkled with cornmeal. If you don’t have a board, cover a baking sheet with parchment paper, then sprinkle cornmeal on the parchment paper. Bake the loaves at 475°-480°F (~250°C) with steam for 15 minutes. Remove steaming container(s), then turn down the oven to 400°F (200°C) for another 15-20 minutesor until the crust turns a deep golden brown. If you want to follow tradition, don’t bake your loaves past this as the standard crust thickness should be 3mm on average according to Italian law. But that said, bake the loaves to whatever doneness you want!
I put “tradition” in italics above because technically ciabatta didn’t exist until the early 1980s. However, the technique is steeped in thousands of years of tradition.
One would think that with the bread craze that has swept the world during the pandemic lockdown, that sourdough is the only bread being made and that the only bread that qualifies as artisan can only be made with a starter. That’s bullshit of course because doing something in an artisan way has less to do with the ingredients or materials and much more to do with craftsmanship.
When I make ciabatta, I typically use a biga or a poolish. But sometimes, I just want some bread. So as I do with Baguettes de Tradition, I’ll just whip up a batch of dough in early in the morning, and have fresh, hot bread for breakfast. No, it doesn’t keep, but at the small quantities I make, it’s gone in less than a day.
One might think that a straight dough can be bland and boring. But done right, a bread made from straight dough can be absolutely wondrous. And I will submit that while a same-day straight dough bread may not have the depth of flavor of one made with a preferment or employing a slow-rise, cold bulk ferment, employing great technique will go a long way toward making up for that.
That said, one way to add a little flavor complexity is to use a flour blend. Though I list using unbleached AP flour in the formula, my flour is actually a blend of 30% high-extraction flour and 70% AP flour. The high-extraction flour lends a nuttiness to the overall flavor of the bread, plus an ever-so-slight grainy texture to it making it seem much more substantial than it actually is.
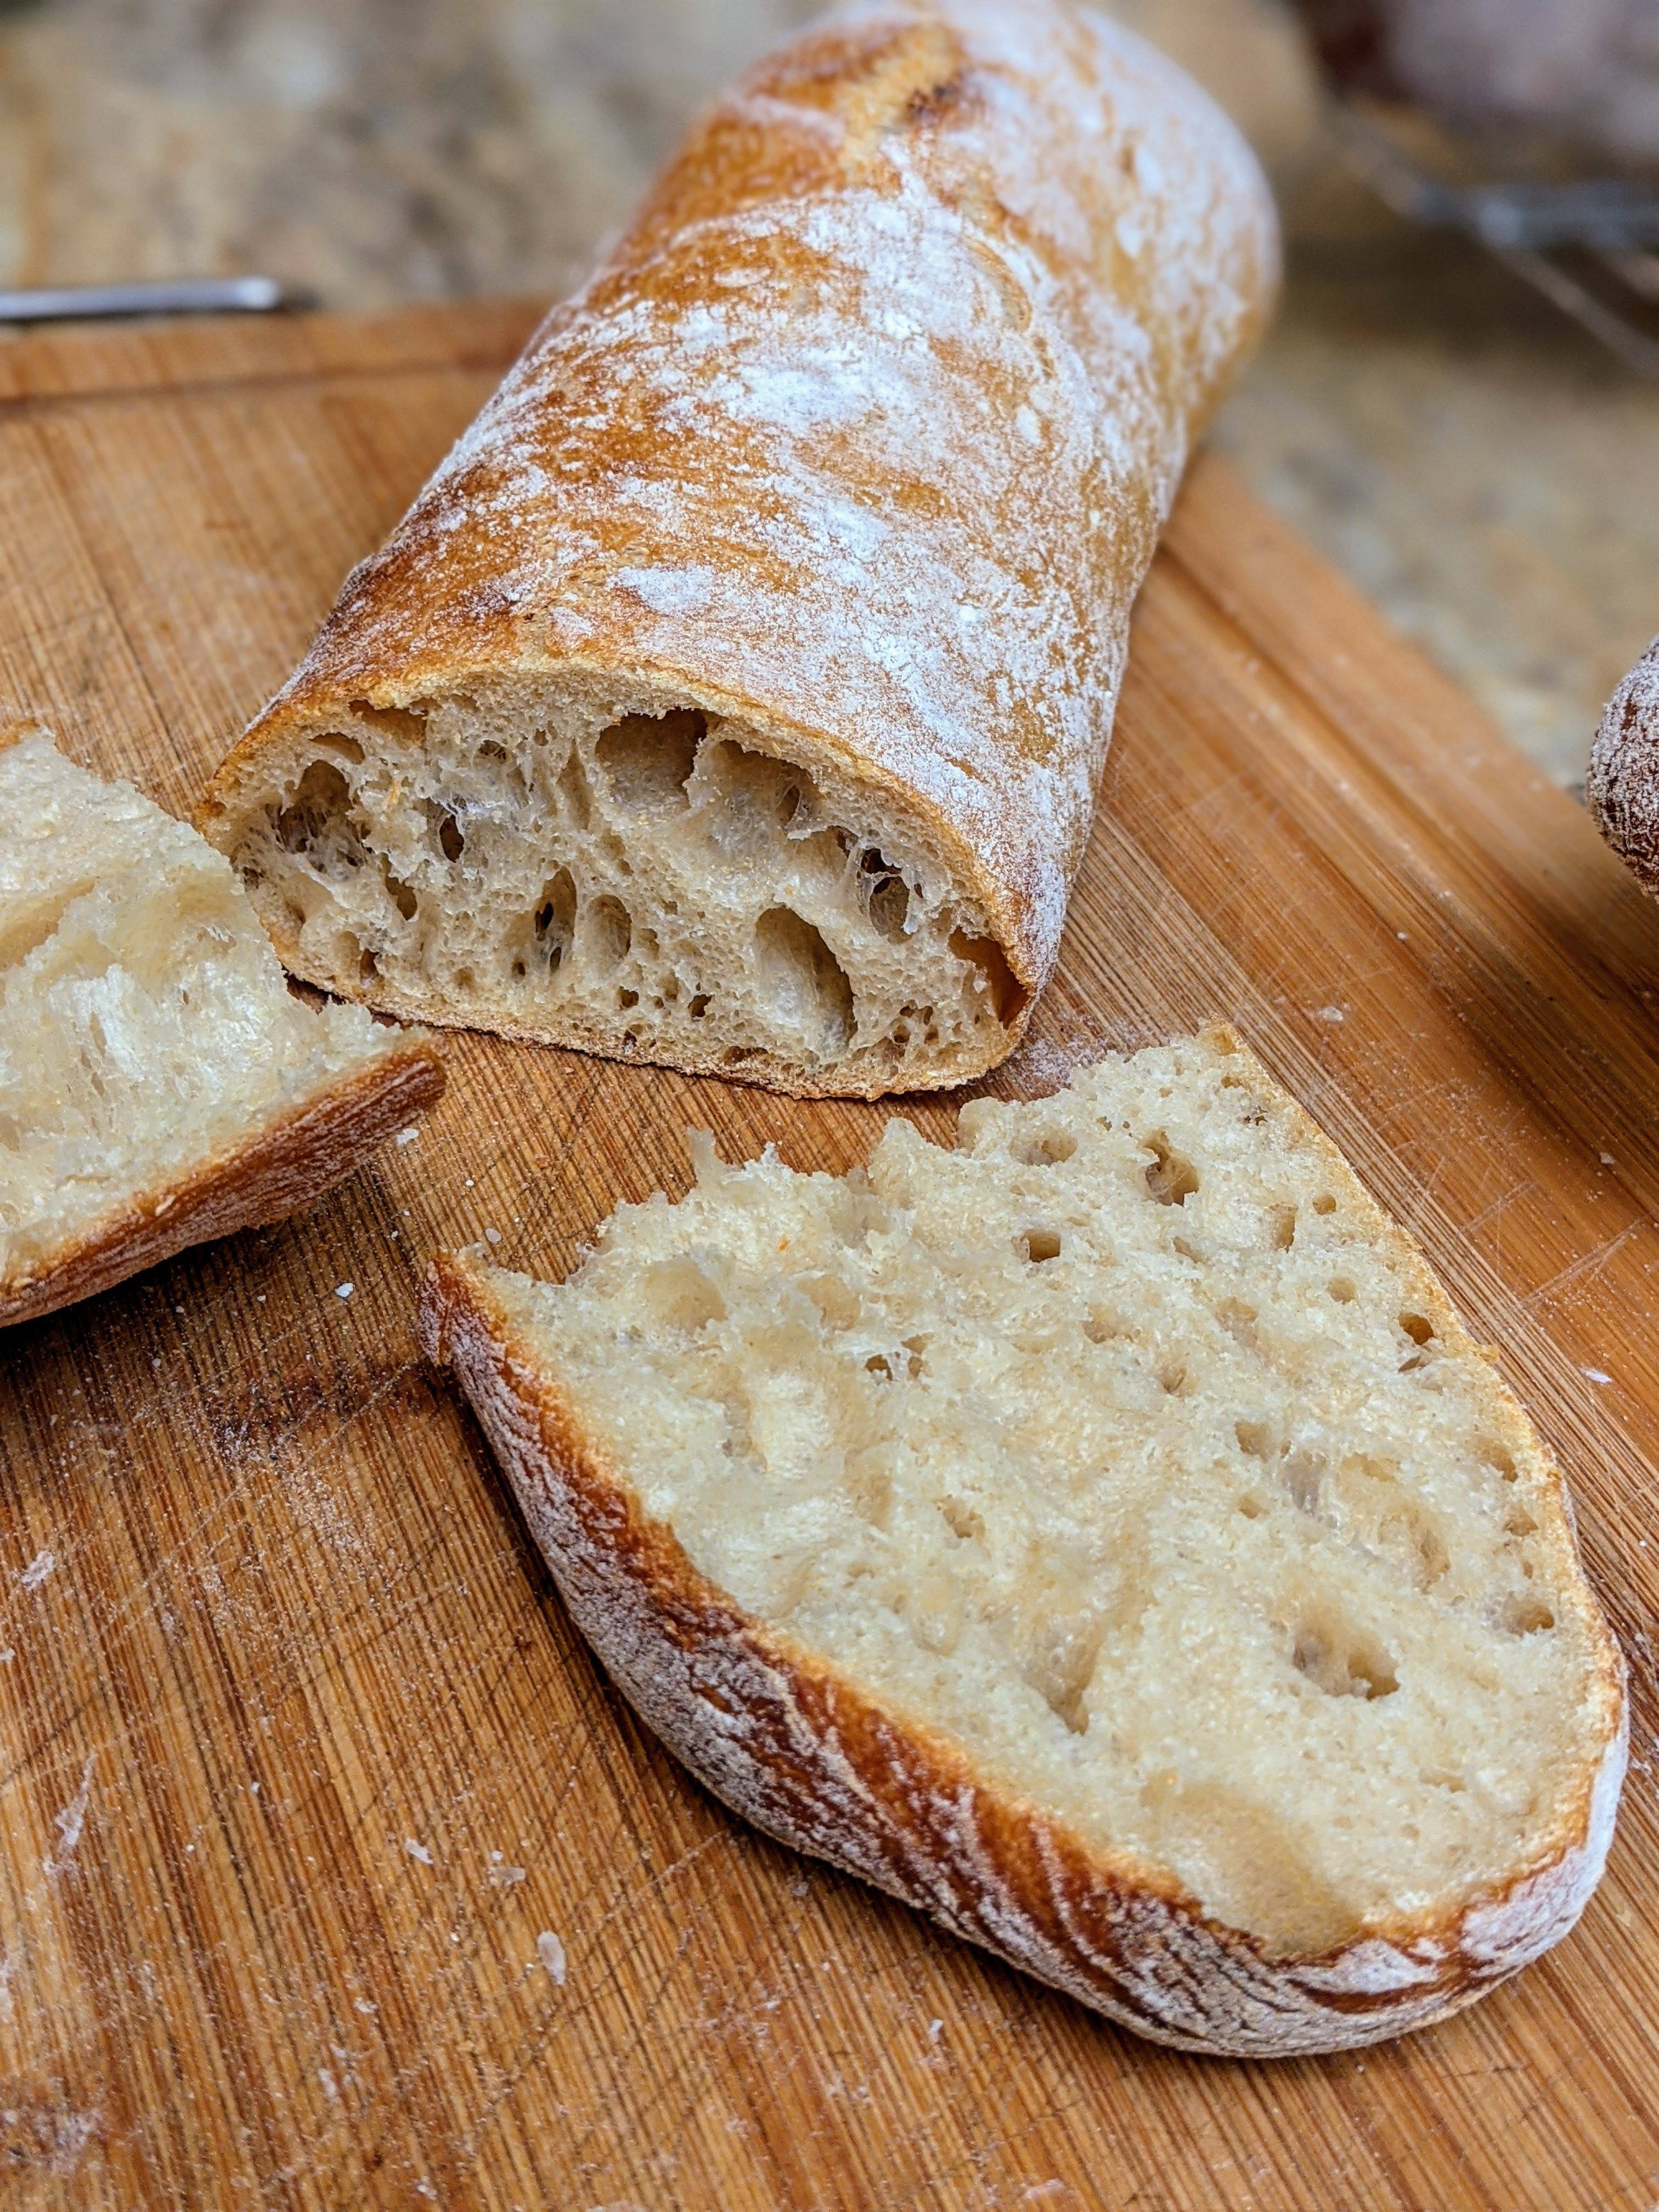
Especially with ciabatta, the crisp, crackly, and crunchy crust combined with the light and airy crumb, redolent with large holes can create a magical bread. A full bake that activates the Meillard reaction (but not taking it to super-dark) can add flavors that would otherwise not be present on lightly baked loaves.
Overall Formula
Unbleached All-Purpose Flour
100.00%
Water
75.00%
Salt
2.00%
Yeast
1.50%
Milk (optional – see below)
10%
Olive Oil
4.00%
MILK?!!! No, I’m not kidding. It actually makes the dough fluffy and soft. This is perfect for sandwiches. You can dispense with the milk though and replace it with water. Definitely do the bassinage stage described below, so mix to an initial 75% hydration, then take it up to 85% with the reserved water.
Final Dough
Unbleached All-Purpose Flour*
525
Water
394
Salt
10
Yeast
8
Milk**
52
Olive Oil
21
Yield
2 X 500g loaves 4 X 250g loaves
Optimal Dough Temp
76°F
*Preferably organic and definitely > 11% protein. You can use Bob’s Red Mill or King Arthur. I use Azure Market AP Flour. **If you don’t want to use milk, that’s okay, just use all water, but milk will help with the fluffiness of the bread.
If you use a baking stone, preheat your oven to 485°F / 250°C to ensure your stone’s hot by the time you’re ready to bake. Things happen pretty quick with this bread, and you don’t want to get to final fermentation and have to wait for your oven to warm up.
Mixing. I recommend using a stand mixer if you have one, but this can be done by hand as well – it just takes longer. Sift the dry ingredients together then add the water. If using a mixer, mix on slow speed to incorporate all the ingredients then go to the second speed until mixture is smooth and the dough climbs to the top of the dough hook as the gluten is starting to form at this point. Rest for 20 minutes.
Bassinage. Once the dough has rested (you may also notice bubbles forming), fold the milk (or water if you decide not to use milk) into the dough until it is fully incorporated. This will get it to 85% hydration. But since the gluten started developing with the thorough mixing, there’s already strength in the dough and it will not feel like a soupy mess. You can actually feel the gluten strands! Once the liquid has been fully incorporated, drizzle the olive oil over the dough, and mix it in well.
Again, I use a stand mixer for this because it’s much more effective at getting the milk and olive oil incorporated.
You want to be gentle with folding and lamination steps. What we’re trying to do is build the gas retention properties of the dough in these steps.
Folding. Once the milk and olive oil have been incorporated, rest the dough for 20 minutes then do a set of stretch and folds. Don’t just do the standard four-fold North-South-East-West. Stretch and fold until you feel the tenacity of the dough building. Rest for 20 minutes.
Laminate. Liberally flour your work surface then gently pour the dough onto it. Gently tug it into a rectangular shape that is about 1/2″ to 3/4″ thick. Letter fold the dough in an NSEW pattern 3 times, gently pressing and flattening the dough between folds. After the last letter fold, roll the dough onto the seam (no need to seal) and shape it into a round. The dough ball should hold together and not collapse too much (don’t worry, it will collapse a bit because of the hydration). Place the dough into a well-oiled bowl seam-side-down (I just wipe down my bowl then spray it with olive oil). Rest for 20-30 minutes (or more) until the dough ball has almost doubled in size.
After laminating, you can go directly to dividing or shaping after the 20-30 rest, or retard the dough in your fridge for a few hours. With this much commercial yeast though, I recommend that your fridge temp is between 36°-40°F. You really want to slow the yeast and promote the lacto- and acetobacillus activity. That said, alternatively, you could use a bit less yeast, say 4 grams and retard the dough for an even longer period of time.
Divide and “Shape.” Again, liberally flour your work surface then pour your dough onto it. Gently tug it into a rectangle, then divide it into two equal pieces (or four if you want to make sub-sized buns). I’m kind of anal about things being even, so I actually scale out my pieces to 500 grams apiece. Gently tug each piece into long rectangles, then transfer to a well-floured couche (as shown to the right). Once you transfer them to the couche, flour your fingertips and gently dimple the loaves to promote even rising – and prevent over-rising, believe it or not – for the final ferment.
Final Fermentation. Cover the loaves and allow them to ferment for 30 minutes or until the dough is nice and relaxed and puffy.
Bake. Liberally sprinkle semolina or rice flour over the loaves while they’re on the couche, then flip them onto your transfer board. Bake the loaves with steam at 485°F for 12 minutes. Remove your steaming container, turn your oven down to 435°F, then bake for 20-25 minutes or until the crusts are a deep golden brown. You don’t want to go out to dark brown/black with these as the dough doesn’t have enough complexity in flavor to compensate for a super-dark crust. That’ll be the predominant flavor and the bread will taste like burnt toast. Not good. However, a deep golden-brown crust will also be relatively thicker lending a nice, textural quality. I realize that this veers from the traditional thin crust of ciabatta, but I love the textural contrast between the crunchy crust and the soft, pillowy crumb.
These are best eaten warm, so let cool for 30 minutes, then enjoy!
I don’t really think about it because I’ve made it so much, but ciabatta’s a challenging dough with which to work because of its hydration level. You have to make quick, precise movements with a dough like this. But the handling of the dough is mitigated by the bassinage. I just can’t stress enough how important that step is!
When first mixing the dough, it’s at a workable 75%. This allows us to work it and develop the gluten and thus dough strength early on in the process. Once the milk and olive oil are added, even though dough may appear to be a smooth batter, if you pull on it, you’ll see that it actually transforms into a highly extensible dough with all the wonderful gas-retention properties we expect! (Read: big holes)
And let me re-emphasize that the craftsmanship put into making bread like this is tantamount to its quality. But be that as it may, as a straight dough, it doesn’t really have a lot of complexity in flavor. That said, done right, it becomes a canvas on which you can build wonderful dishes.
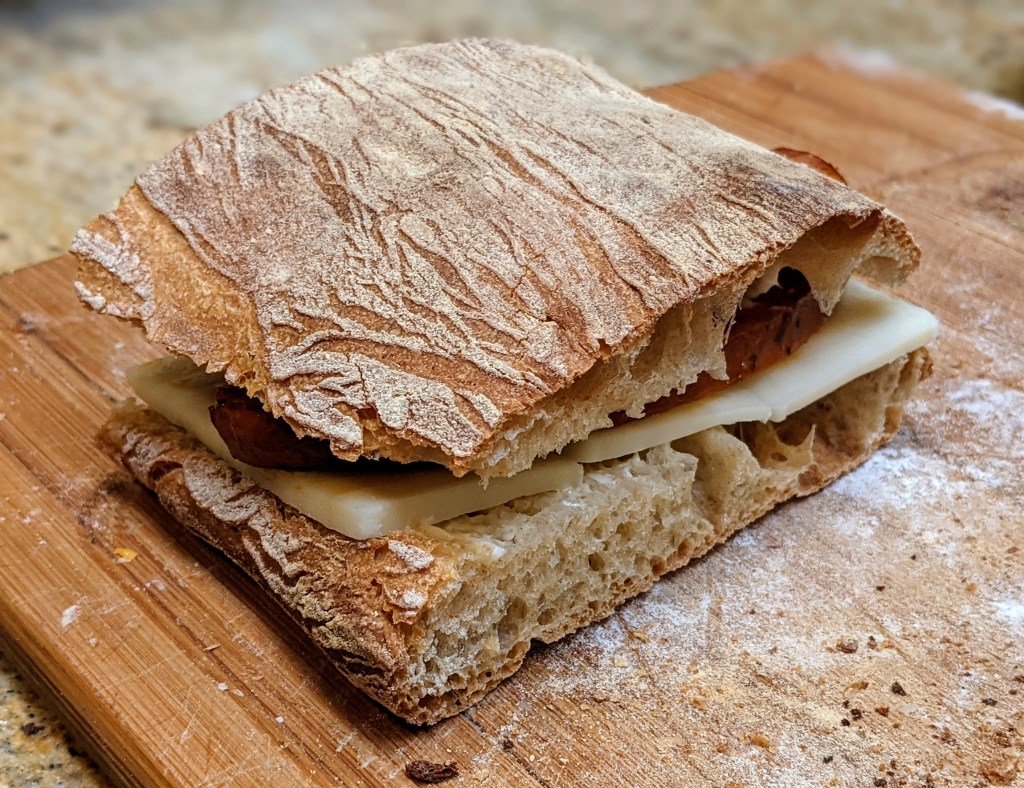
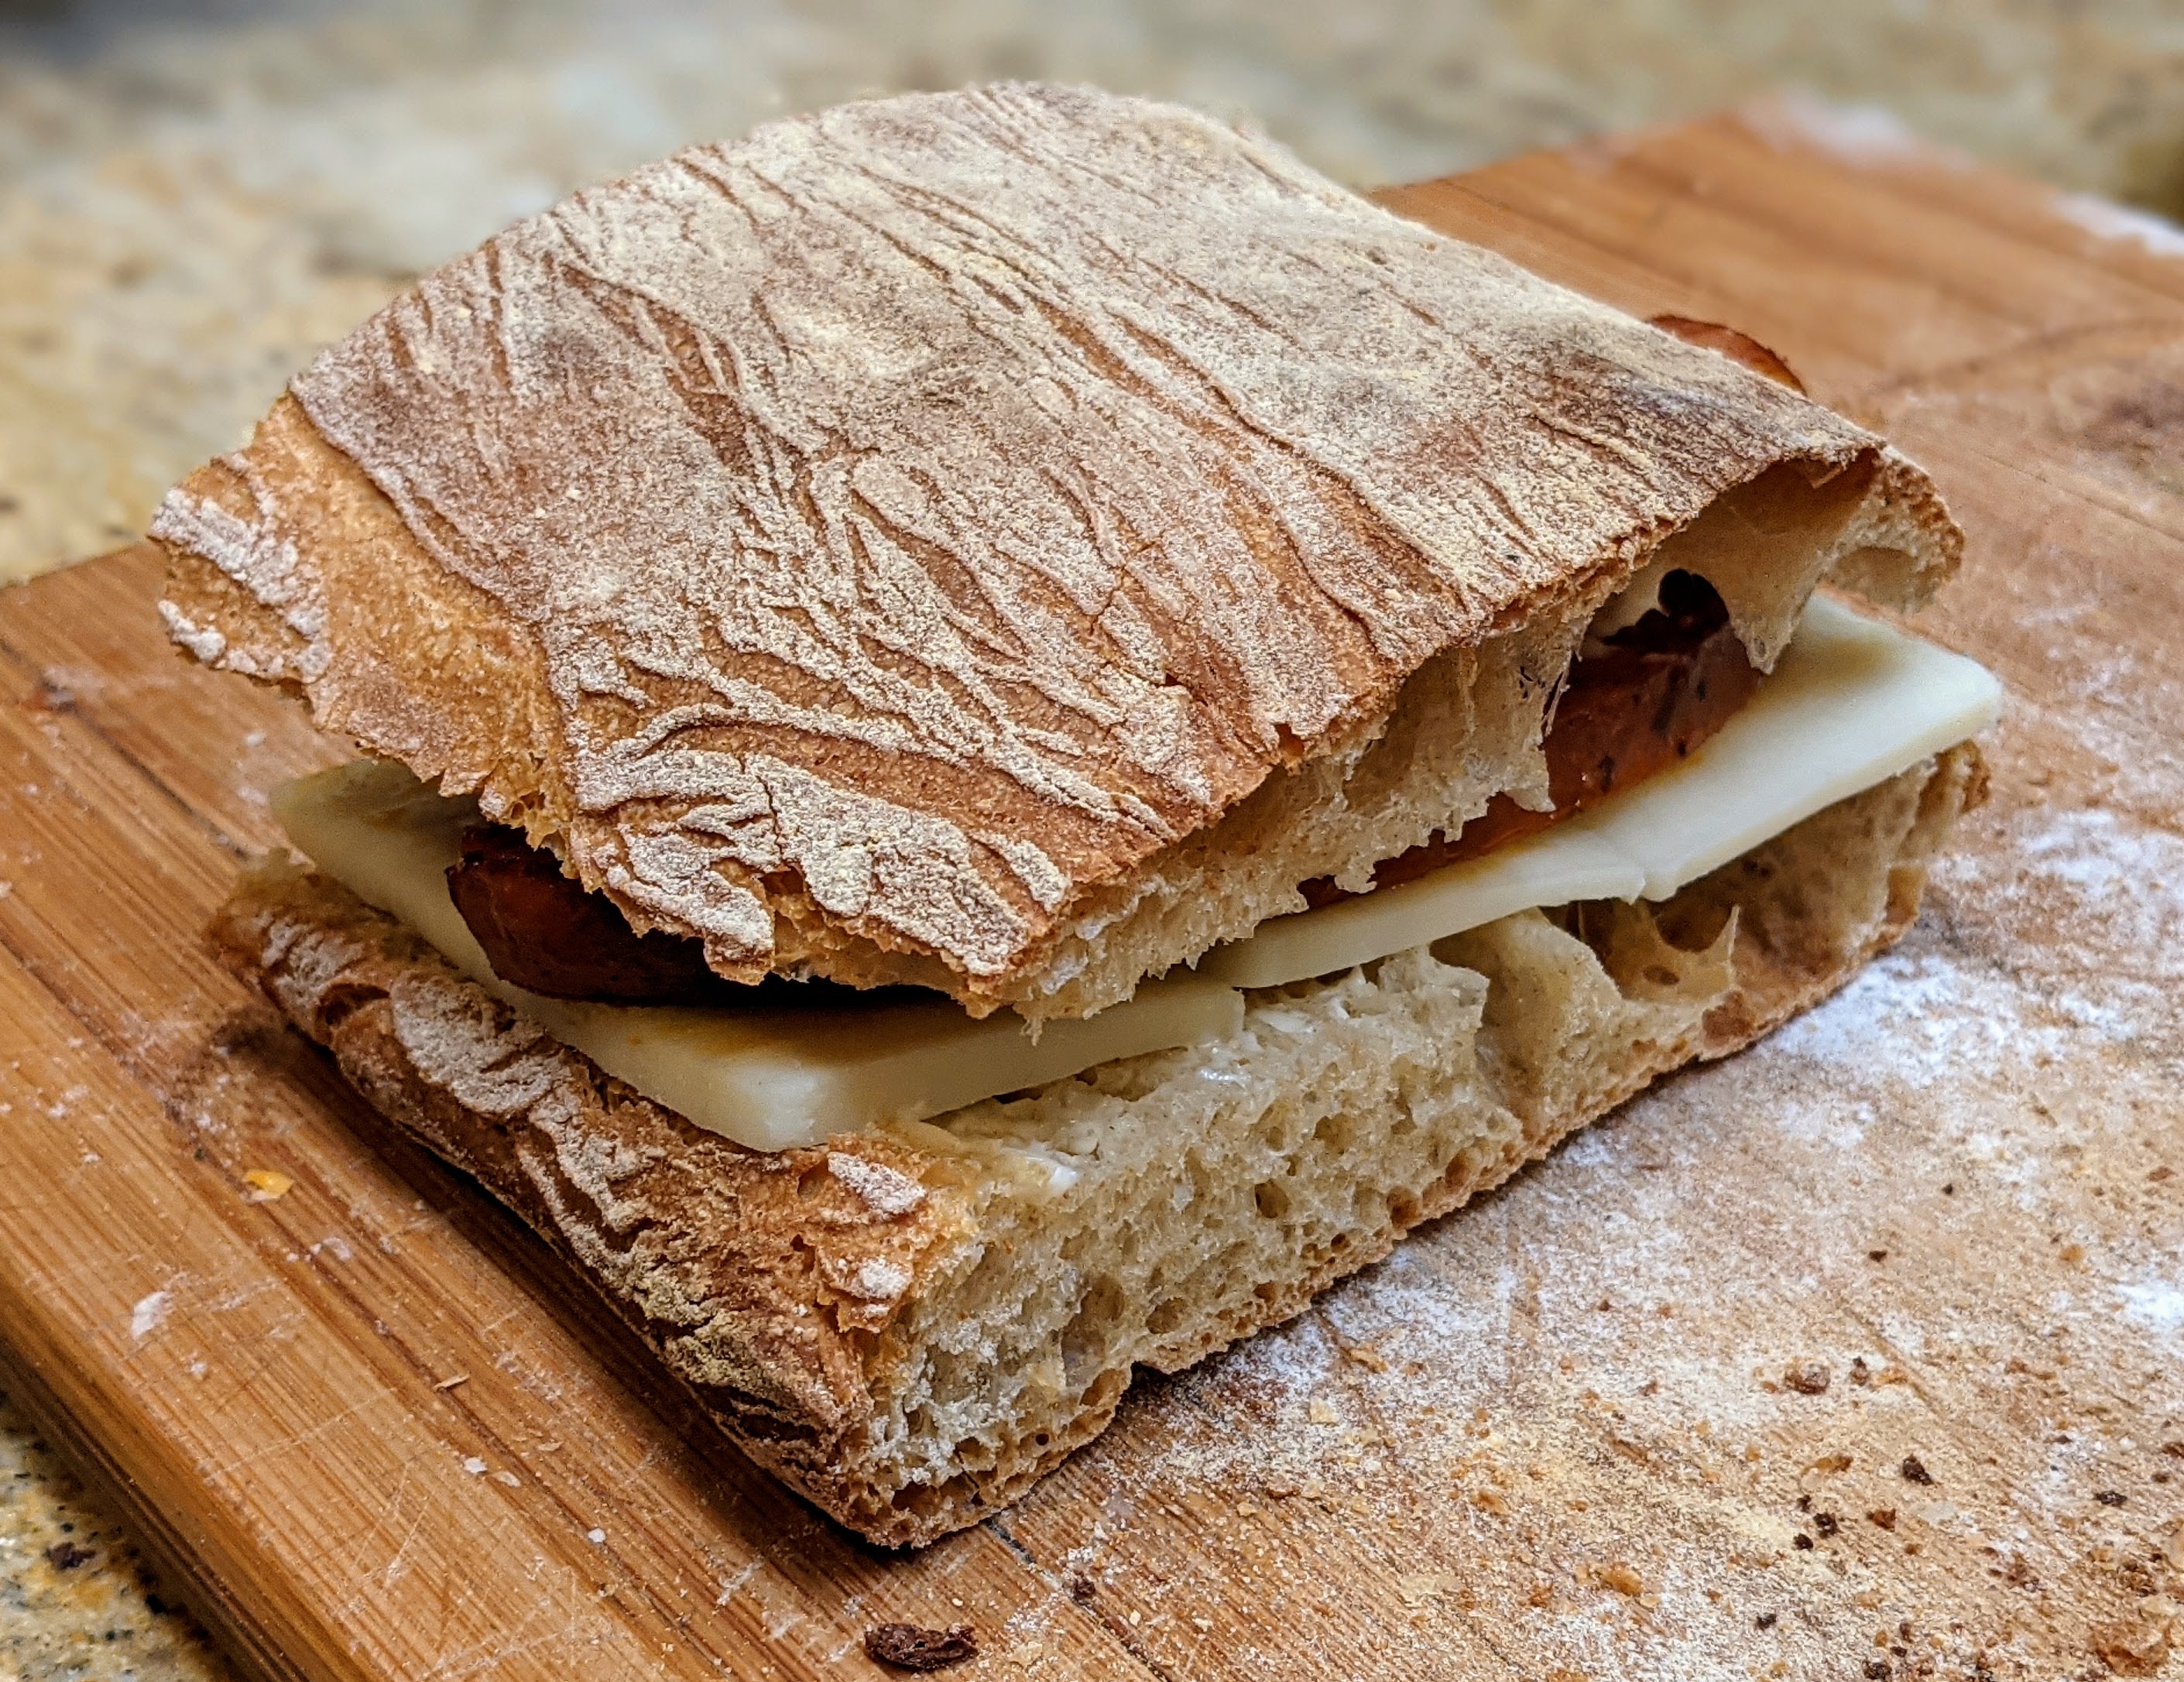
I love using this bread for dipping into a fine olive oil (my preferred brand is Segreto from Italy that I have my daughter bring from New York City) mixed with a well-aged balsamic vinegar. I’ve used this bread for bruschetta as well. And let’s not forget that its very shape lends itself for wonderful sandwiches! Gawd! I’m getting hungry just thinking about these things! 🙂
As I mentioned previously, my favorite bread to make is a baguette. And I think the primary reason is that I love to make sandwiches out of baguettes! To me, happiness is a great sandwich made with great bread. But I was SO excited because I think I finally found the perfect flour blend for my baguettes!
Yeah, yeah… I’m always tweaking. Well, not for my boules and batards any longer. I have the flour blend down for that. But with my baguettes, I’ve been trying to strike a good balance between texture, taste, and especially, nutritiousness. I didn’t want to do a pure white flour baguette, but I also didn’t want the bread to be as heavy as my 75-25 high-extraction/whole wheat blend. So I decided to lighten it up. But instead of using bread flour, I decided to use regular old AP flour, and the results were magnificent!
Before I get into the recipe, especially if you’re new to making baguettes, the formula and process may seem a bit daunting. But I wanted to include as much detailed information as possible because there’s a lot to know and frankly, baguettes are one of the hardest breads to make well. I’ve learned how to make baguettes through a lot of trial and error plus a variety of sources, both online and from books. What I’m presenting here is kind of a conglomeration of all the stuff I’ve learned.
Flour That I Use
In general, I use high-quality and if possible organic flour. For common AP flour, it’s almost always King Arthur or Bob’s Red Mill. Both offer consistent quality for baking (though I’ve recently taken to using Central Milling organic AP flour – it’s very nice).
For my baguettes, I use a blend of flour that is predominantly unbleached AP flour. By using a substantial amount of AP flour, I lower the protein content slightly. The one thing I found about baguettes is that you don’t want a real tight internal gluten structure. You want a nice, taut skin when shaping, but internally, you don’t want nearly as much dough strength as you would a boule or batard – just enough dough strength to hold the bubbles together.
Azure Market Organics Unbleached Bread Flour, Ultra Unifine, Organic – In its place you can use a Type 85 flour or another high-extraction flour. And make sure that the flour is ground fine- to extra-fine. If you can’t find any high-extraction flour, no problem. Just use regular bread flour. However, one of the main reasons I suggest using high-extraction flour is that it retains most of the natural yeasts, oil, and microbes that are essentially removed from white flours; not as much as whole grain flour, but certainly much more than white flour. They will add more complexity to the overall flavor of the bread!
As for 100% whole-wheat flour, you should sift it before mixing. Retain the bran, then sprinkle it over the shaped loaves right before baking. It’ll give the tops of the baguettes a rustic look.
AP Flour – I struggle with this because technically you could use standard grocery store brands like Gold Medal or store label AP flour. King Arthur, Bob’s Red Mill, and Azure Standard are 11.5% to 11.7% protein. It’s really not that much difference in protein amount, but it makes a world of difference in oven spring and dough strength!
Bleached or Unbleached Flour?
My preference is to use unbleached flour which is aged naturally as opposed to bleached flour which uses chemical agents to speed up the aging process. From a taste perspective, you shouldn’t notice any differences. Texturally, it is said that unbleached flour has a denser grain and tougher texture, but I’ve only used unbleached flour, so I couldn’t tell you the difference.
Without further ado, here’s the formula.
Overall Formula
Flour
100%
Water
75%
Salt
2%
Yeast
0.43%
Total Percentage
177.43%
Poolish*
Flour
100%
200
Water
100%
200
Yeast
0.16%
0.3
Flour of the poolish represents 25% of the total flour (see below Final Dough)
*It’s a good idea to make more poolish than you actually need. There will always be some loss due to evaporation and dough sticking to your mixing utensil. So even though the dough technically calls for 190g of flour/water (380g poolish), I’d use at least 200g flour and water each.
Final Dough
Flour
572g AP flour (75%): 428g, High-extraction (25%): 143g
Water
381g
Salt
15g
Yeast
5g Use half if bulk fermenting cold
Poolish
380g
Yield
1340g (+ 13g wiggle room) 4 X 335g (60cm) loaves 6 X 225g (40cm) loaves
Optimal Dough Temp
76°- 80°F
Total Flour (incl. poolish)
762g
Total Water (incl. poolish)
572g
Instructions
Day 1
Prepare the poolish 6-12 hours before you intend to mix the final dough. I usually make it the evening before my bake, but also, since I’m an early-riser, I’ll make the poolish at 5-6am, then mix the final dough in the afternoon.
Day 2
Mixing. Break up and completely dissolve the poolish into the water. In a separate bowl, thoroughly combine all the dry ingredients. Then mix the wet and dry ingredients together. Mix until all the ingredients are combined with no large lumps. If mixing by hand, a Danish dough whisk works great! If using a mixer, mix on the slowest speed and regularly scrape down the sides. Mix until you form a well-combined, but shaggy mass as shown to the left.
Bulk Fermentation. 2 – 2½ hours. Take the dough to no more than 50% of its original size. Though you can take it to double, you want some food for the final ferment, and doubling cuts it real close. Rolling out the baguettes will degas the dough, so you want to have enough yeast activity for the shaped dough to rise.
Folding. Fold three times (stretch and fold in the bowl), every 20 minutes in the first hour. I want to stress that you need to be very gentle with the folding. Definitely stretch the dough but be very careful to not tear it or degas it too much! Stretch and fold until the dough no longer wants to be stretched then stop. By the end of the third folding session, your dough will be smooth and luxurious, as in the picture to the right. You will see bubbles formed just beneath the surface of the dough.
(optional) Cold Bulk Fermentation. After the first hour, you can pop the dough into your fridge for some further flavor development. With this amount of commercial yeast though, I wouldn’t recommend doing this for more than 6-8 hours. You want to make sure the dough is still well-domed when you remove it from the fridge. The reason for this is commercial yeast – even at 36°F- 39°F – are pretty hardy little buggers. They’ll certainly slow down, but unlike indigenous yeast, they’re like little Energizer Bunnies! 🙂 That said, if you want to do an even longer cold bulk fermentation, cut the yeast in half or even down to a quarter of what I listed and you can cold bulk for a couple of days!
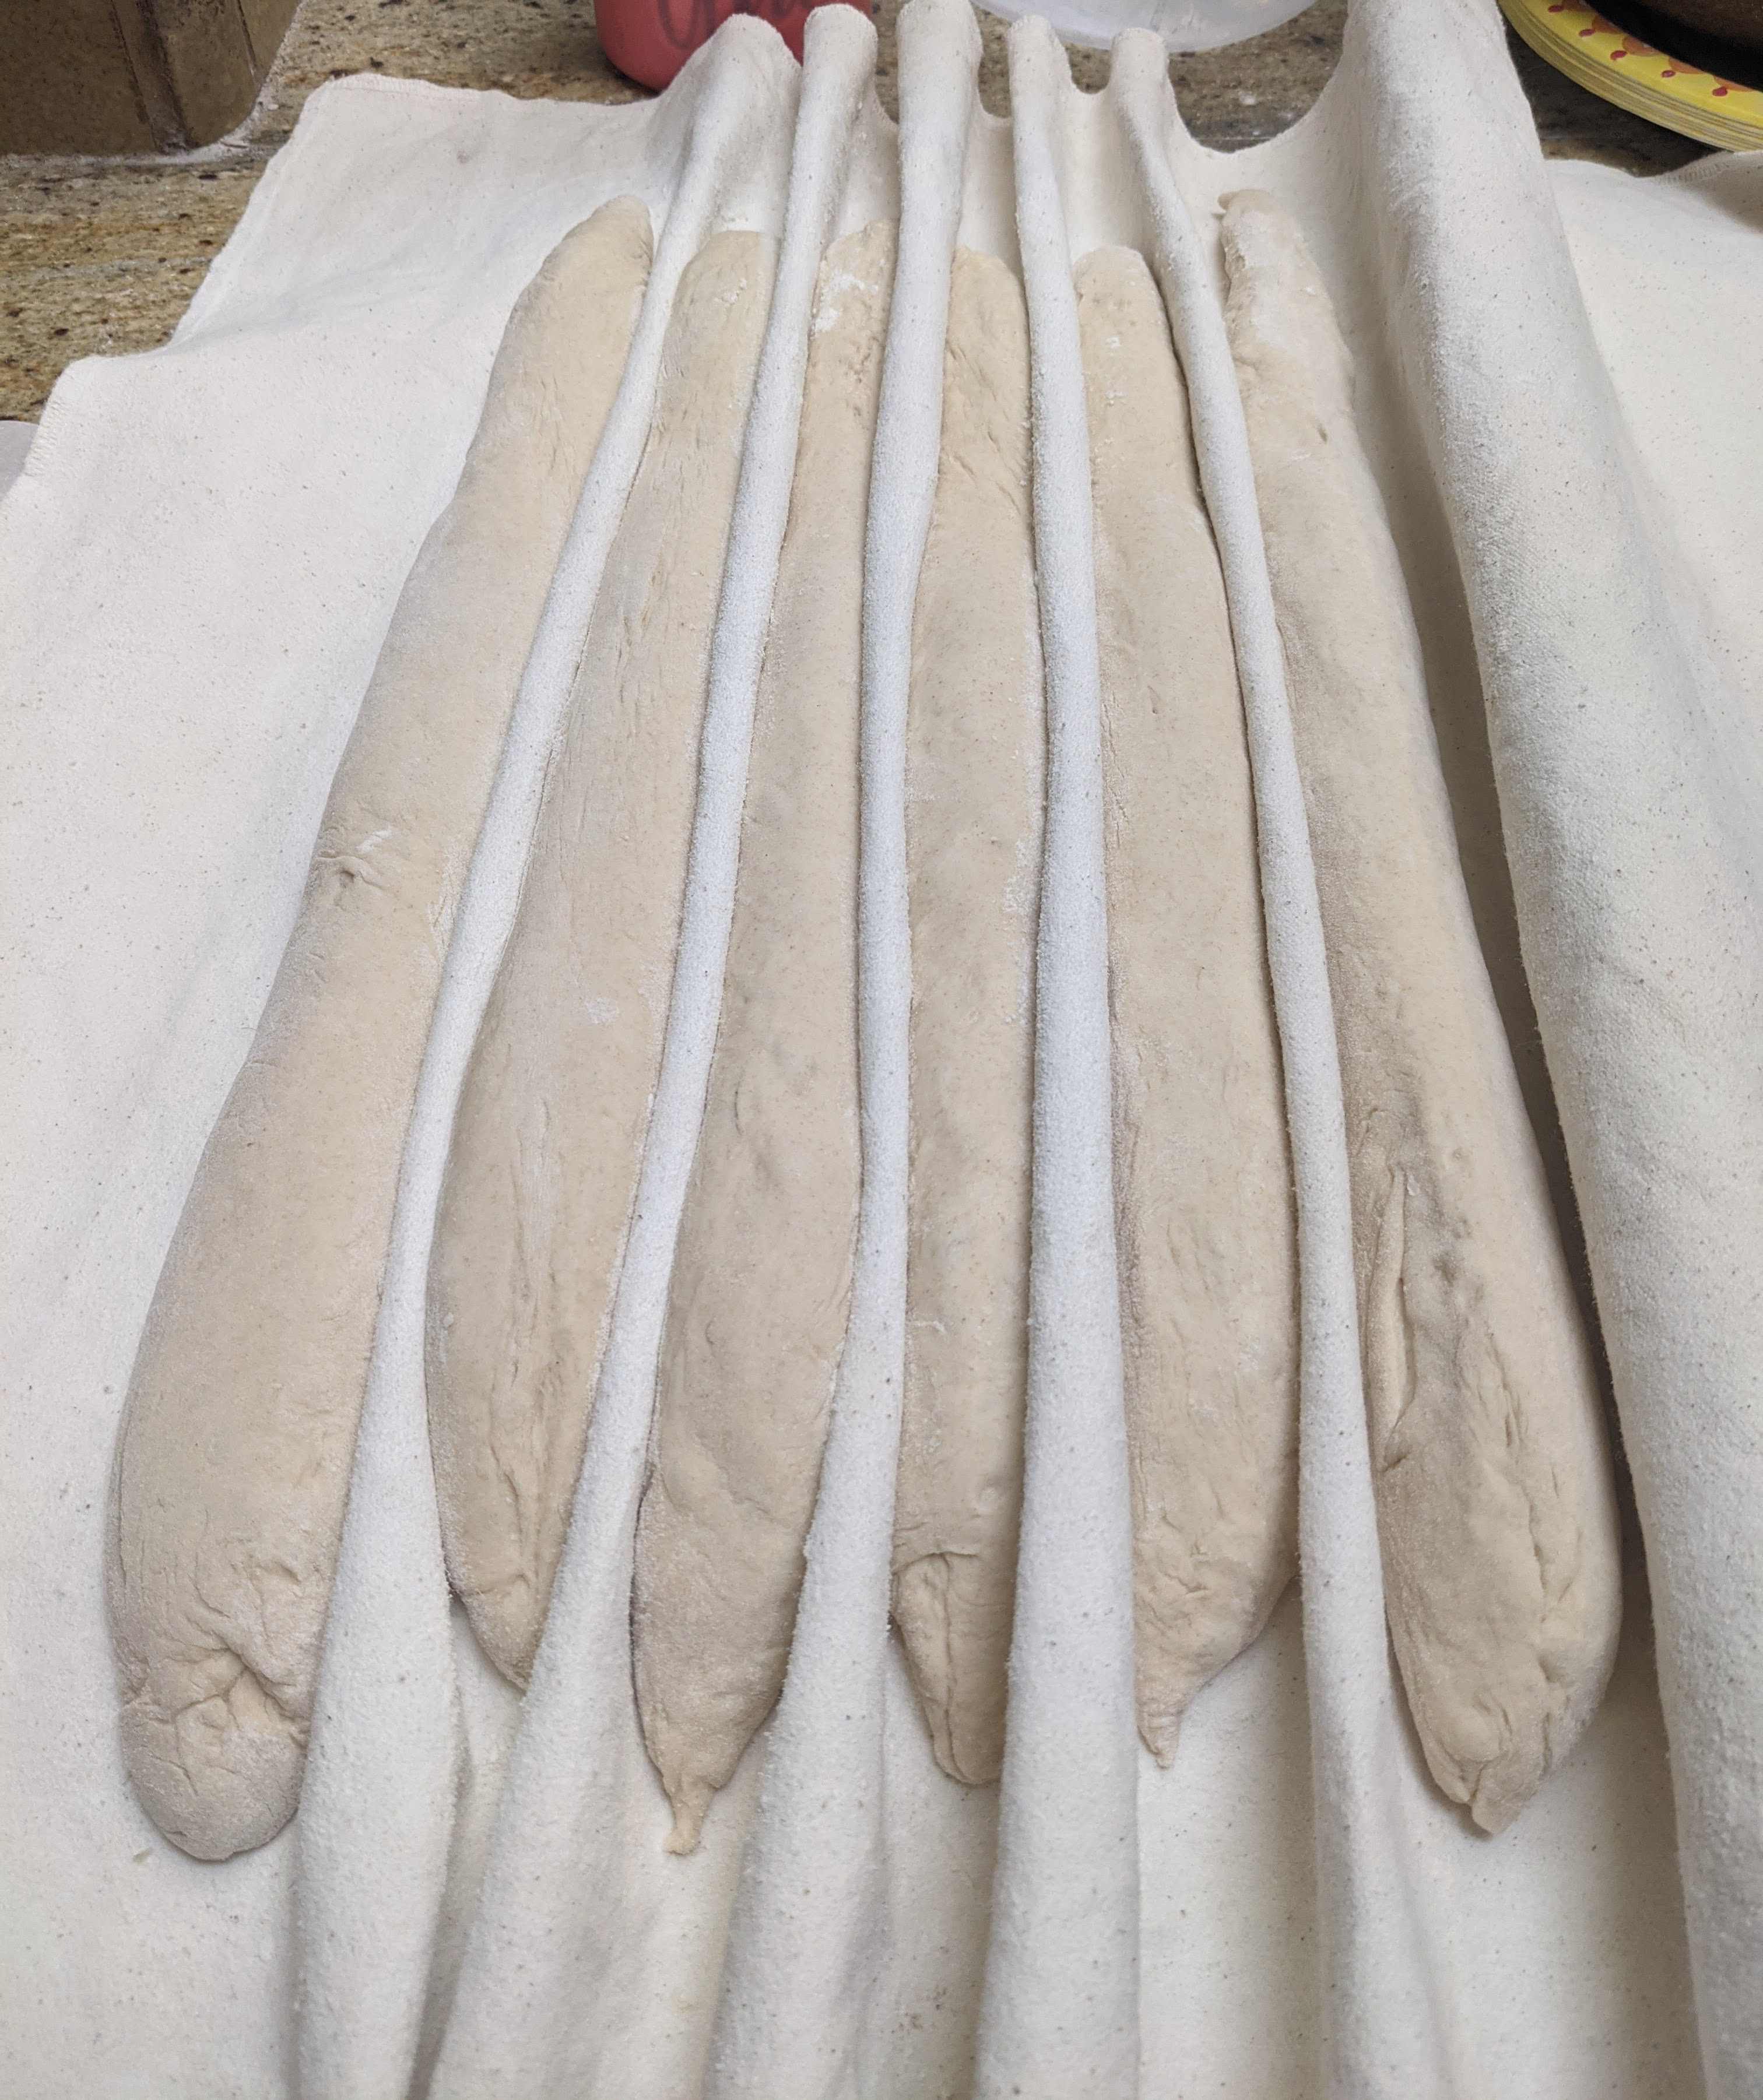
Divide and Pre-shape. Gently pour the dough out onto a lightly floured surface. Tug it into a rectangle, then divide it into 4 X 335g pieces for standard 60cm baguettes or 6 X 220g pieces for 40cm baguettes. Letter fold each piece by gently pulling out the sides and folding to the middle, then jelly-roll it perpendicular to the letter fold seam to form a rough, short log. Seal the seam, then place on a well-floured couche, seam-side-up (on the left). Allow the dough to relax for 10-30 minutes depending on how tightly you rolled the initial log. The dough should be very relaxed before you shape, otherwise, it will fight you!
Shaping. After the bench rest, shape the logs into baguettes about 15-20″ depending on the size of your oven (I have a baking stone, so I roll mine out to 24″). and return to the couche for final fermentation. Make sure to leave lots of room in between the pieces to prevent tearing during the final ferment. You’ll know the dough’s relaxed enough when you can stretch it and it doesn’t fight you. If you find the dough fighting you, let it sit for a few minutes then resume shaping.
Final Fermentation. 1 – 1½ hour. This could be shorter or longer depending on the weather! Use 1 hour as the baseline, but during warm weather, check the progress of the loaves at 30 minutes.
Bake. Transfer the loaves to a transfer board, score, then bake at 475°F for 12 minutes with steam. Release steam (remove your steaming container), turn down oven to 425°F and bake another 15-20 minutes until you achieve a rich, russet color. Personally, I’m not a fan of taking baguettes out to super-dark. The crust at that point becomes too hard to be enjoyable. But that’s just me.
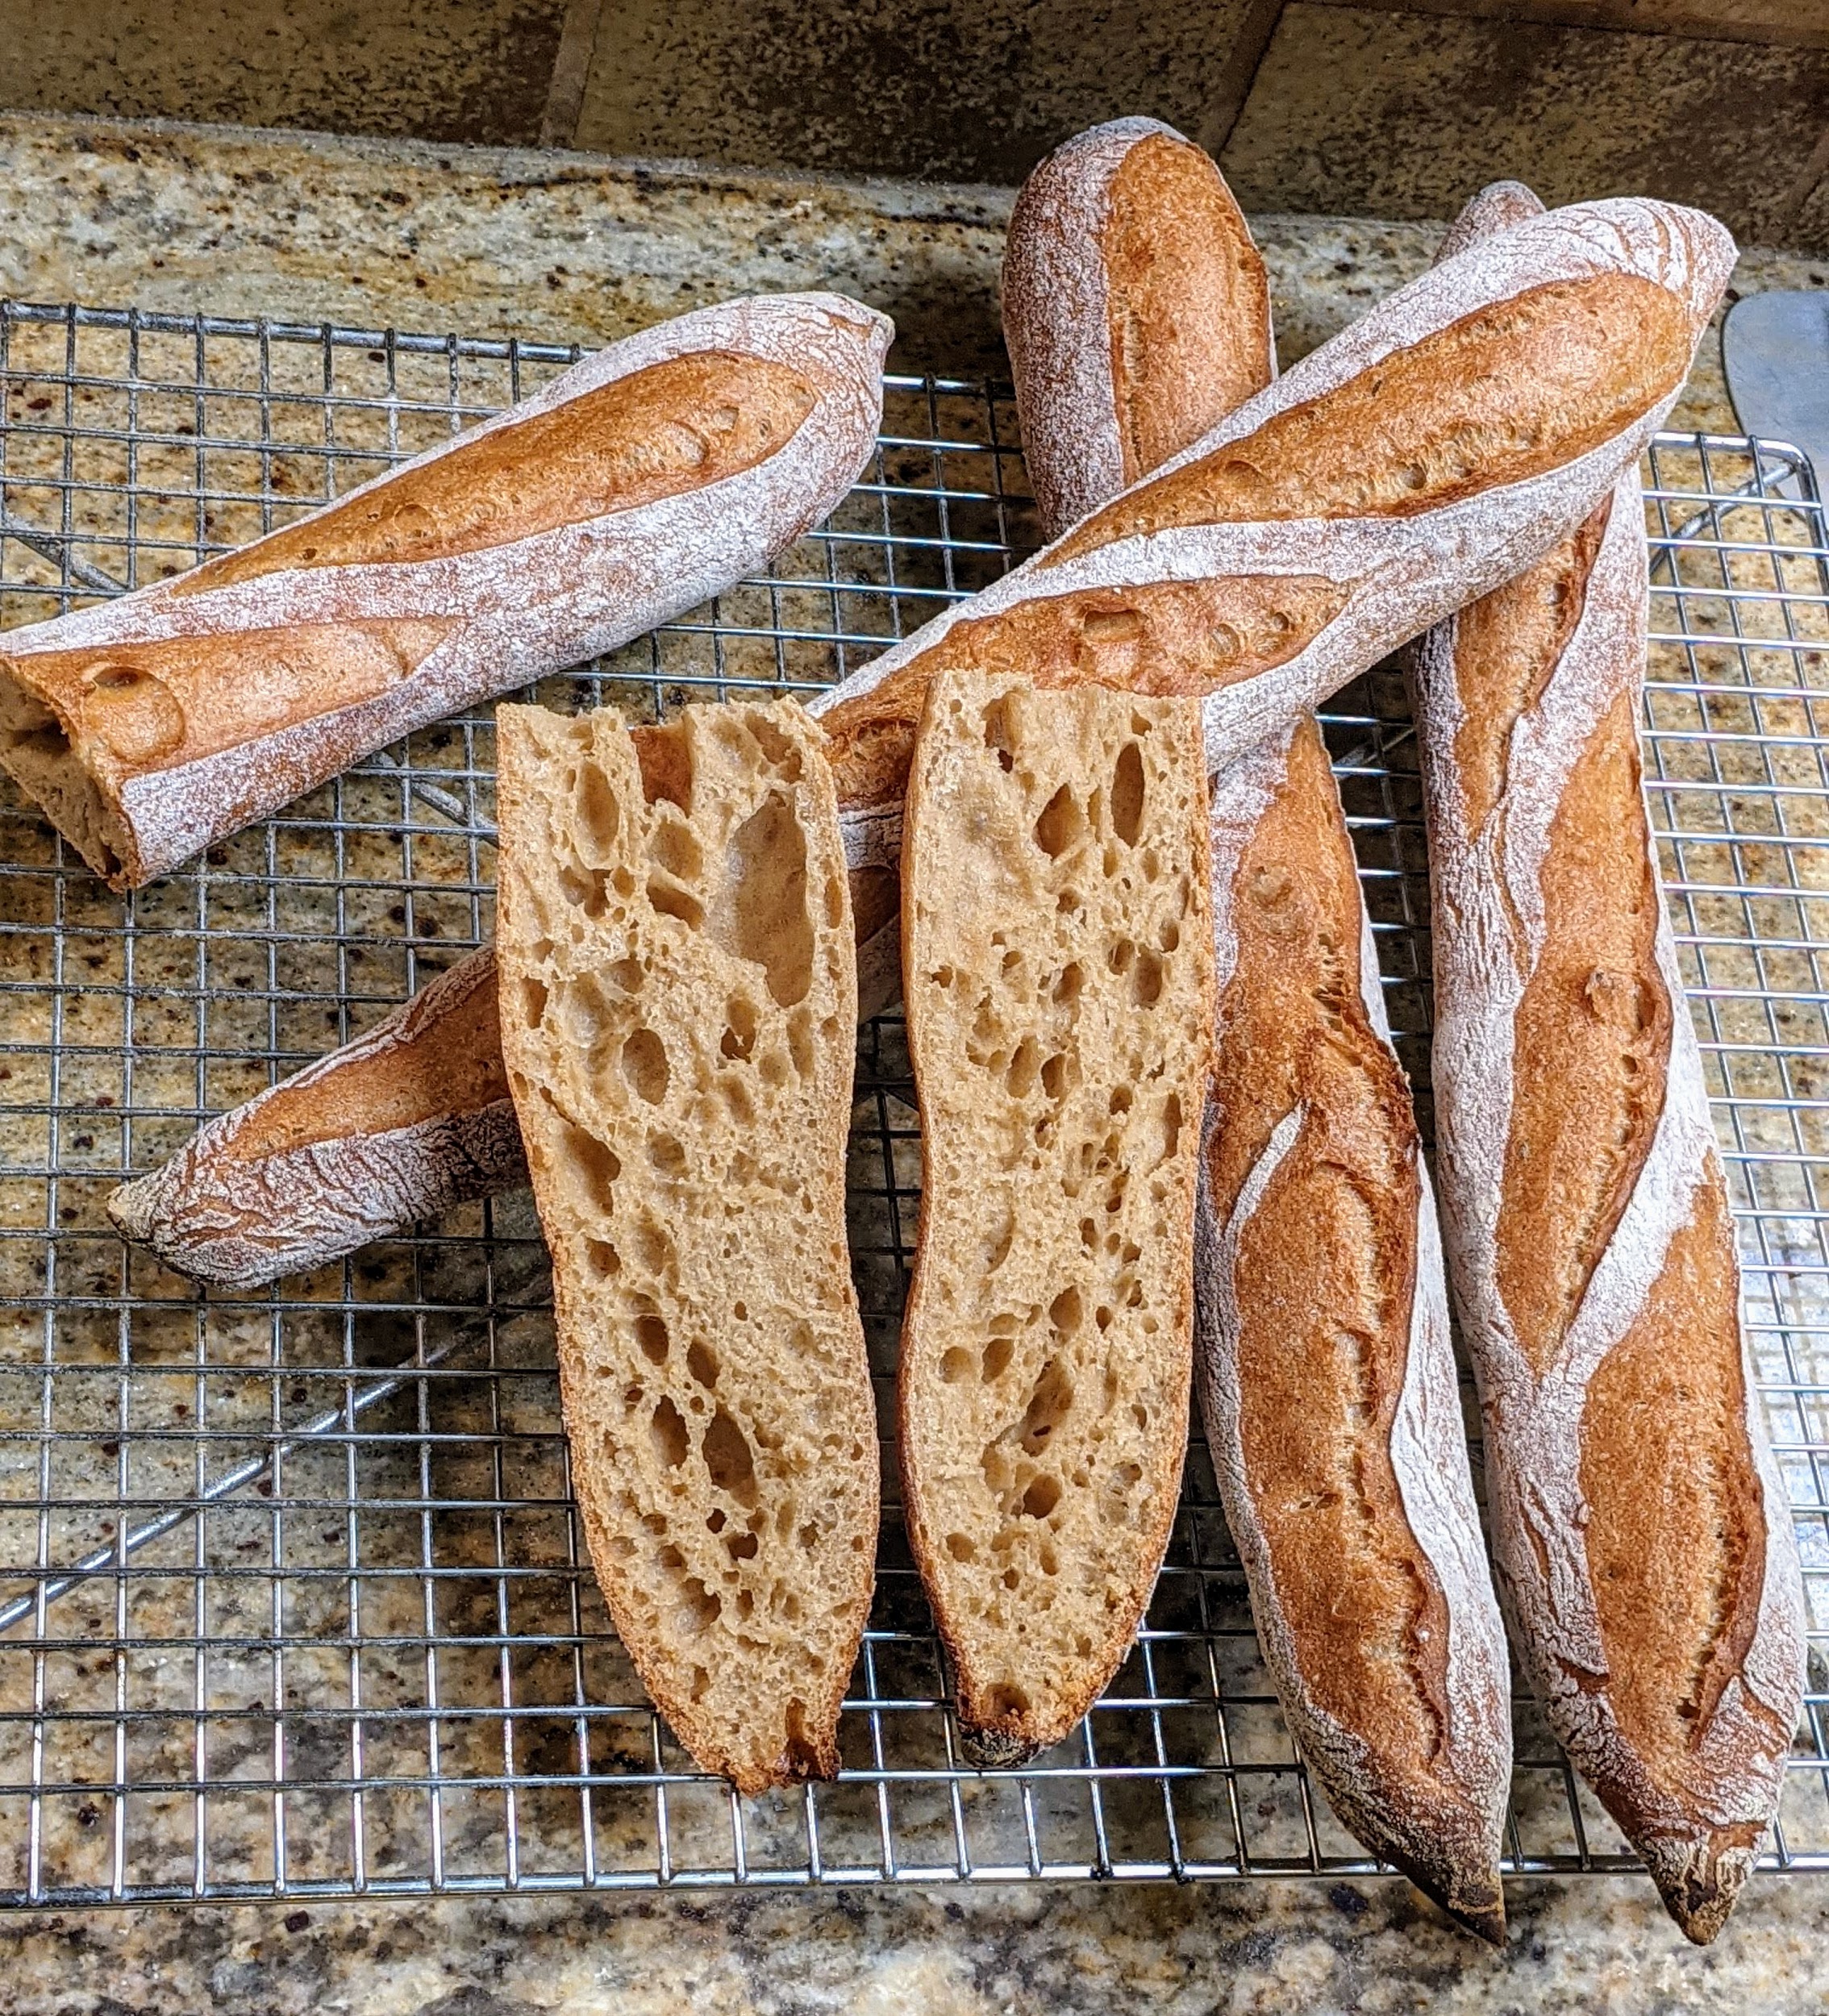
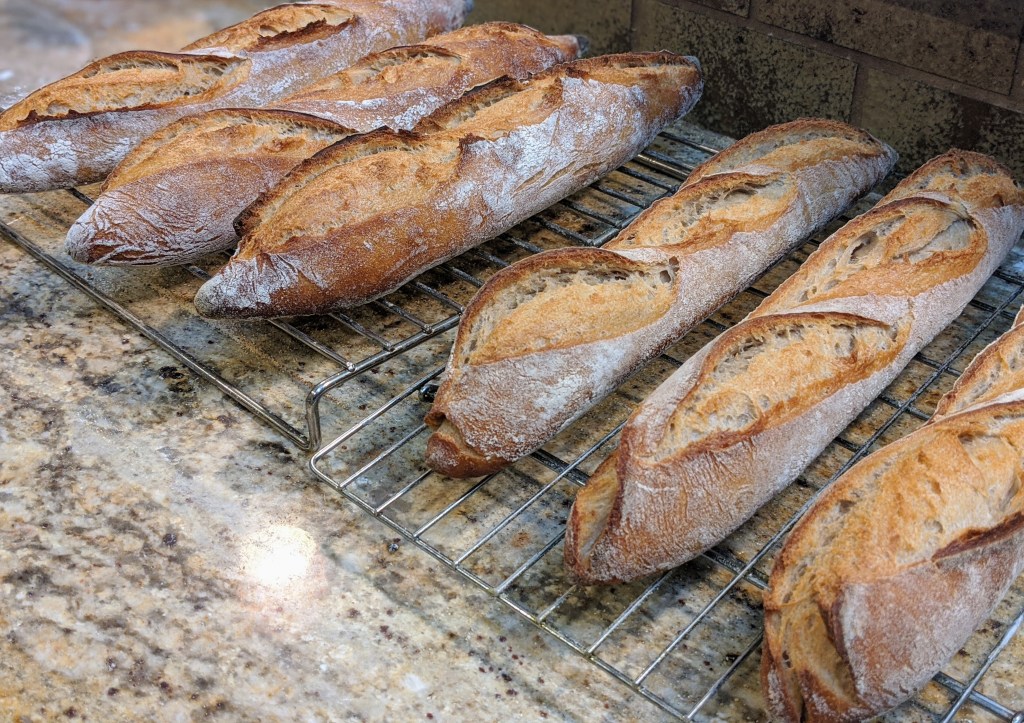
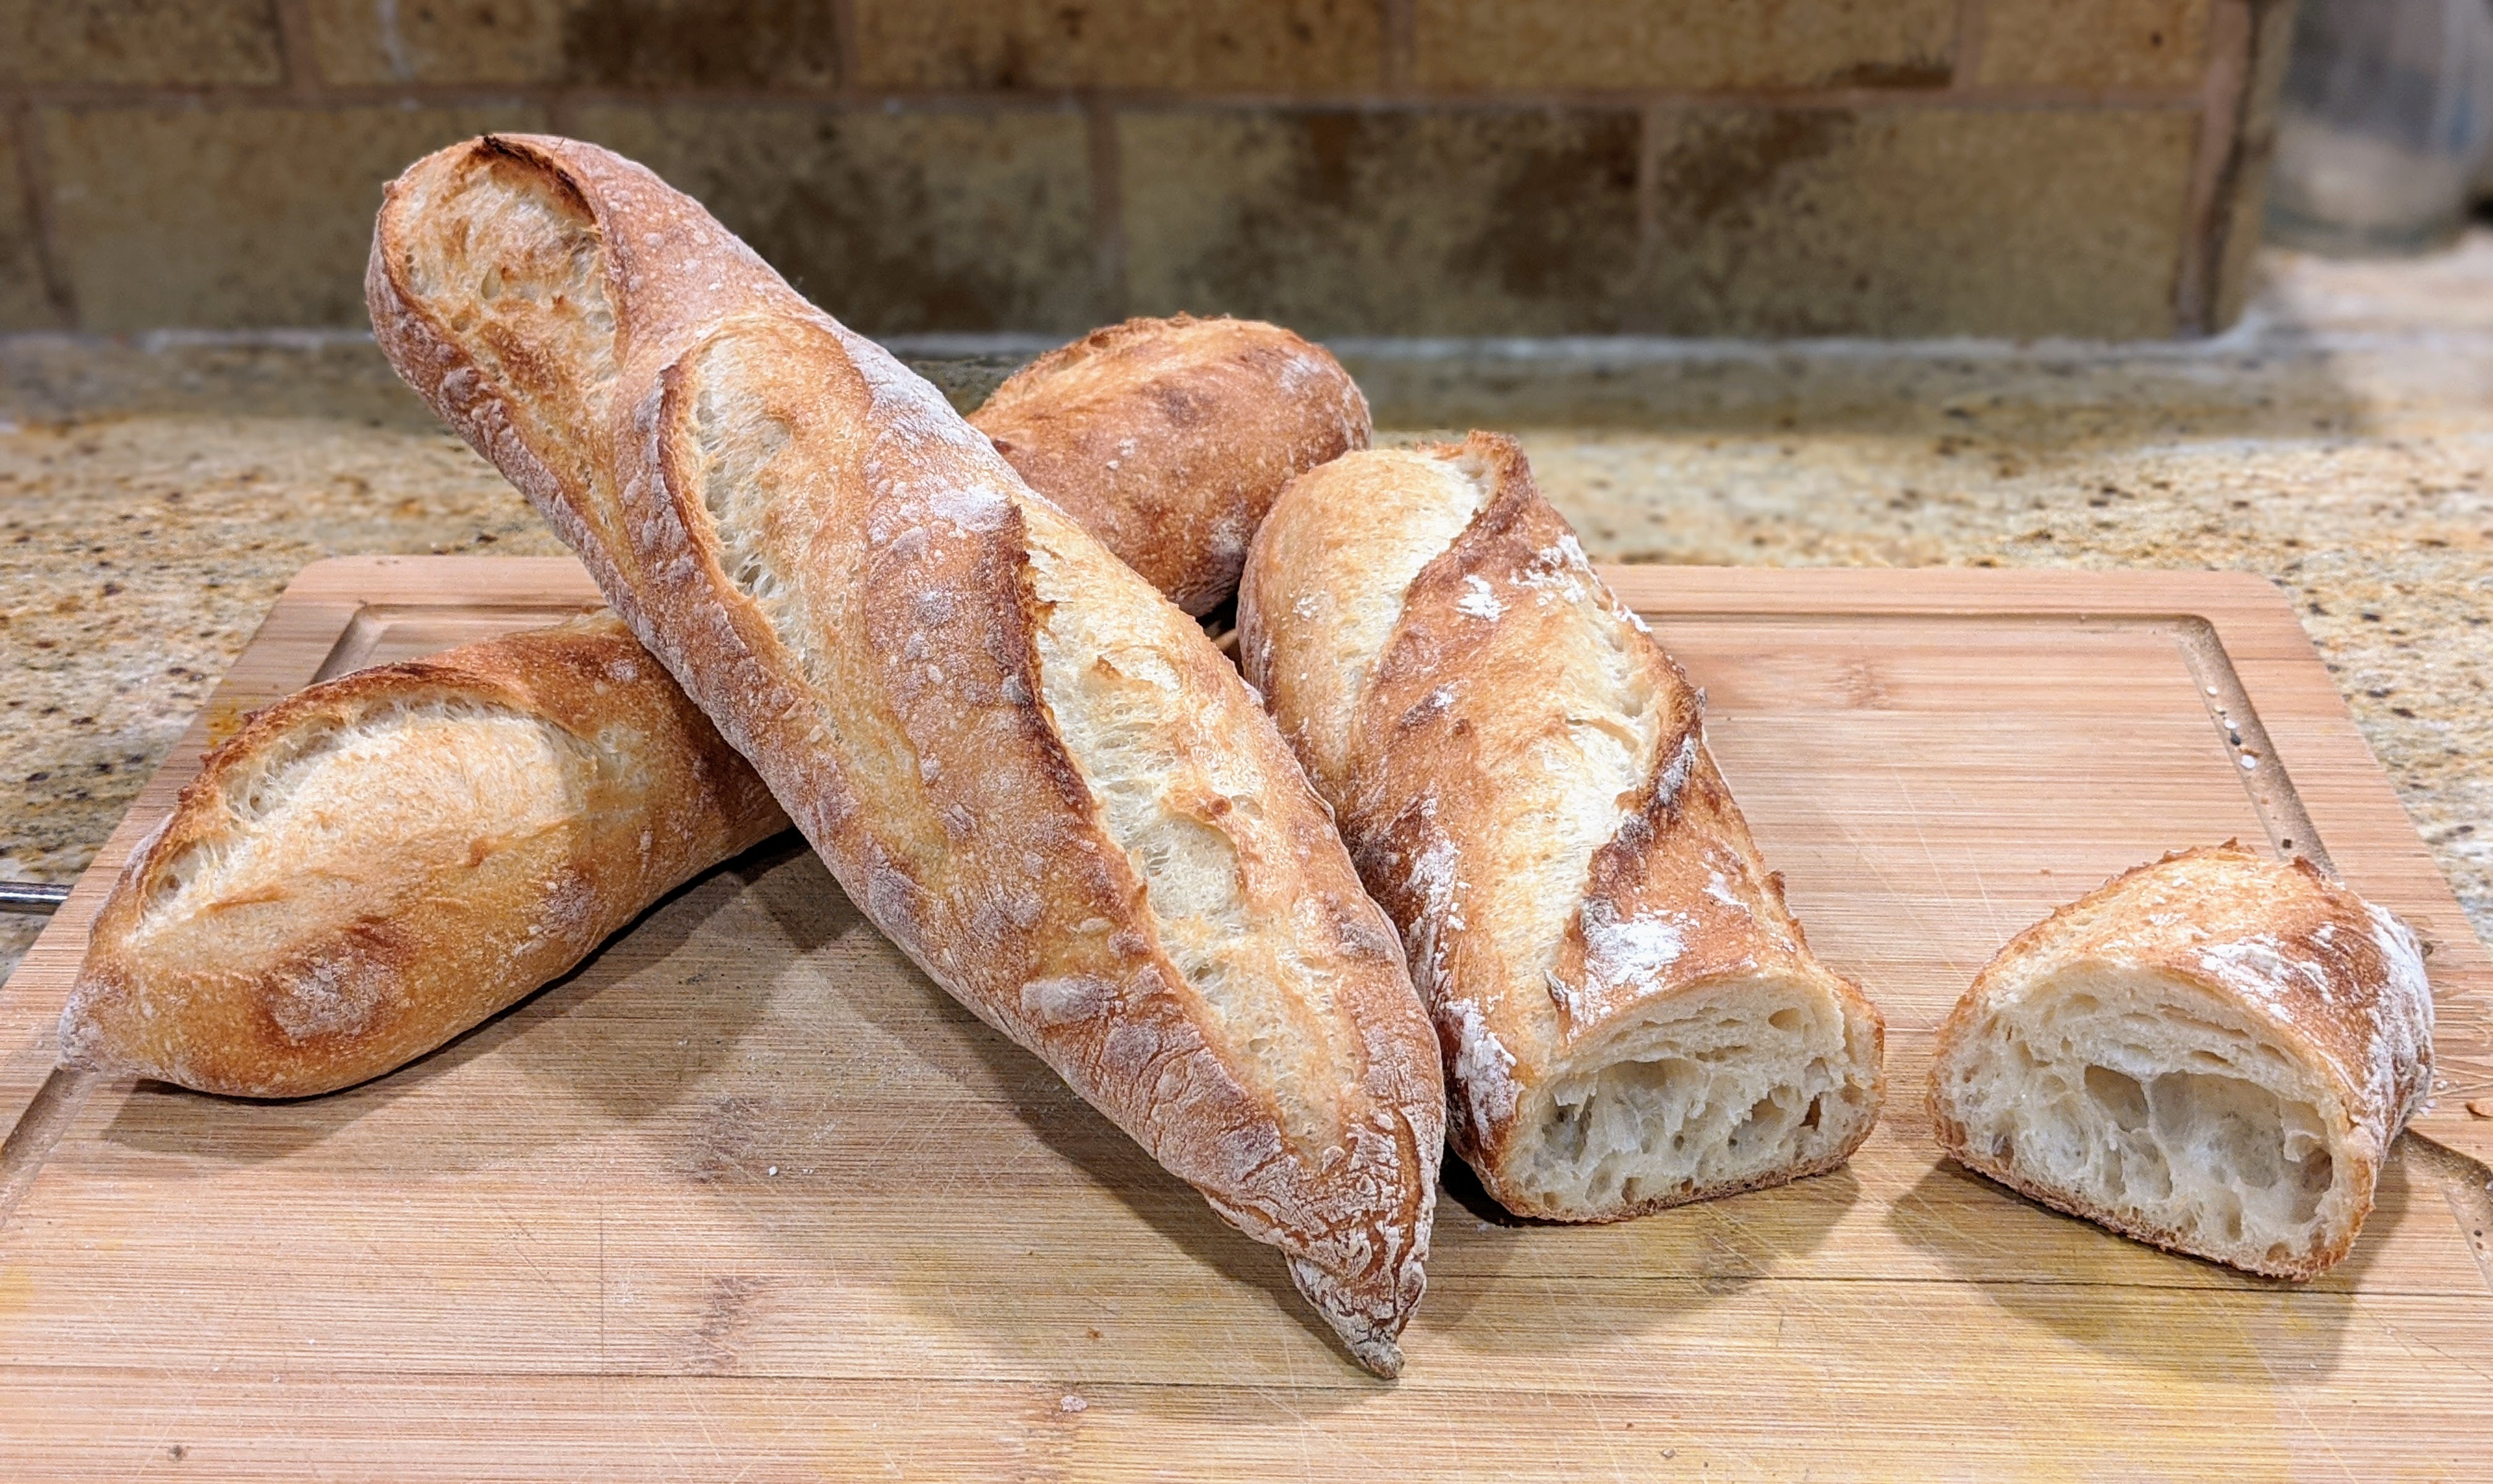
The ideal baguette will have various sized holes that dot the crumb.
I allowed these demis to get a bit of a skin, thus they formed ears.
Notes
You might be wondering where I got the 380g of poolish. That represents 50% of the total flour, including the poolish flour. To calculate total flour for any formula, take the the Total Dough Weight divided by the Total Formula %, so 1353 / 177.43% = 762. Technically, 50% of that is 381, but I like nice, round numbers.
You can replace the poolish with sourdough starter. But make sure it’s at peak activity (passes the float test) and is nice and bubbly. The process will slow a bit because the yeast density of starter is not nearly as high as with commercial yeast.
The pre-shape step is absolutely critical, not just in starting to orient the gluten strands but it also acts as an intermediate fermentation stage, however short.
When shaping baguettes, make sure your hands are lightly floured lest the dough sticks to your palms and tears the skin. You need to avoid that! And remove any rings!
Having made hundreds of baguettes, I’ve learned not to put too much importance on forming ears on the loaves as you can see with the loaves above. I actually cold-fermented the shaped loaves before I baked them because I had other loaves in the oven. They kind of formed a skin even though I had them covered. And though they were delicious, they were pretty crunchy. The aesthetic that I go for now is to get a moderately crunchy crust, but not to go overboard.
It is ULTRA-important that you don’t take the final fermentation all the way to the finish. You actually want to get to about 85-90% fermentation, then bake. This’ll ensure that you get great oven spring. Otherwise, the loaves will be flat.
As mentioned above, if you want to do a longer cold bulk fermentation, use less yeast. I’d start out by using half the yeast. But you could treat the bulk like pizza dough and use even less and take a couple of days for bulk fermentation. If you do that, use less than a gram of yeast.
What If I Can Only Bake Half the Shaped Loaves at a Time?
If you don’t have room to bake all the loaves at once, then pop the other loaves into your refrigerator while the other loaves bake. Once your oven comes back up to temp after the first batch, remove the extra loaves from the fridge and place them on your board.
You could also pop them in the freezer, but I don’t recommend doing that for more than 30 minutes.
This bread’s name translates to “bread of Como of the past.” This is now known as pane francese in Italy or French bread, though this “French bread” is quite different in taste and texture from the actual French loaf which has a thinner crust and lighter crumb. But irrespective of all that, this is an ancient bread that is magnificent in both texture and taste and very easy to make.
I adapted this recipe from what I consider to be the definitive book on Italian Bread called “The Italian Baker” by the late Carol Fields. This is a GREAT book. Ms. Fields traveled throughout Italy to learn these recipes directly from local bakers in the regions she visited, so these are authentic.
As with most Italian loaves, this bread is started with a biga the day before, which is much like a poolish, using flour, water and a tiny amount of yeast, only stiffer. A poolish is 100% hydration where a biga can be anywhere from 60%-80% hydration. This recipe’s biga is 80% hydration. Let’s get started!
Overall Formula
Flour
100.00%
Water
75.00%
Salt
1.60%
Yeast
0.30%
Day 1 – Make the Biga
Unbleached AP Flour*
100g
Water (75° – 80° F)
80g
Yeast
0.4g
*I highly recommend using either Bob’s Red Mill or King Arthur, or any unbleached AP flour that has a protein content greater than 11%. Most generic brands are 10%. Gluten development is very difficult with those flours. Also, organic is better.
I’m going to come clean and admit that I actually used my sourdough starter to make an 80% hydration levain. The Italians call this type of biga “Biga Naturale.” My levain was 100% whole wheat, so I didn’t use the whole wheat flour that’s listed in the final dough below.
Mix all the ingredients and let ferment for 12-16 hours at room temperature. As with any preferment, you want to make sure it’s nice and bubbly.
Day 2 – Final Dough
Biga
180g
Unbleached AP Flour
435g
Whole Wheat Flour
65g
Water (80°-85° F)
360g
Salt
10g*
Yeast
2g**
*You may see a recipe online that lists the salt as 16 grams. For this small amount of dough, 16 grams is WAY too much.
**If the weather is cold, adding a little yeast will help the process along.
The Process
According to Carol Fields, Italians predominantly use a mixer to mix up their dough. But you can mix by hand if you choose or if you don’t have a mixer. The process is pretty much the same.
Set aside about 50 grams of the water and dissolve the salt in it.
In a large mixing bowl, break up and dissolve the biga with the rest of the water, then add the flour in batches. If you use the yeast, add it to the water before the flour.
Once you form a shaggy mass (and there are no dry ingredients), let it rest for 20 minutes to help hydrate the flour. This is kind of a hybrid autolyse.
Add the saltwater to the mass, then thoroughly mix until you start forming a smooth dough that feels elastic. This is where a mixer really comes in handy.
Dump the dough onto a board and knead for 8 minutes or until you feel the dough has built some strength.
You don’t have to knead if you don’t want to. I instead mix until everything’s incorporated, transfer the dough to a container, then do two sets of folds in the first hour or so. This will create plenty of dough strength. This is more like baguettes.
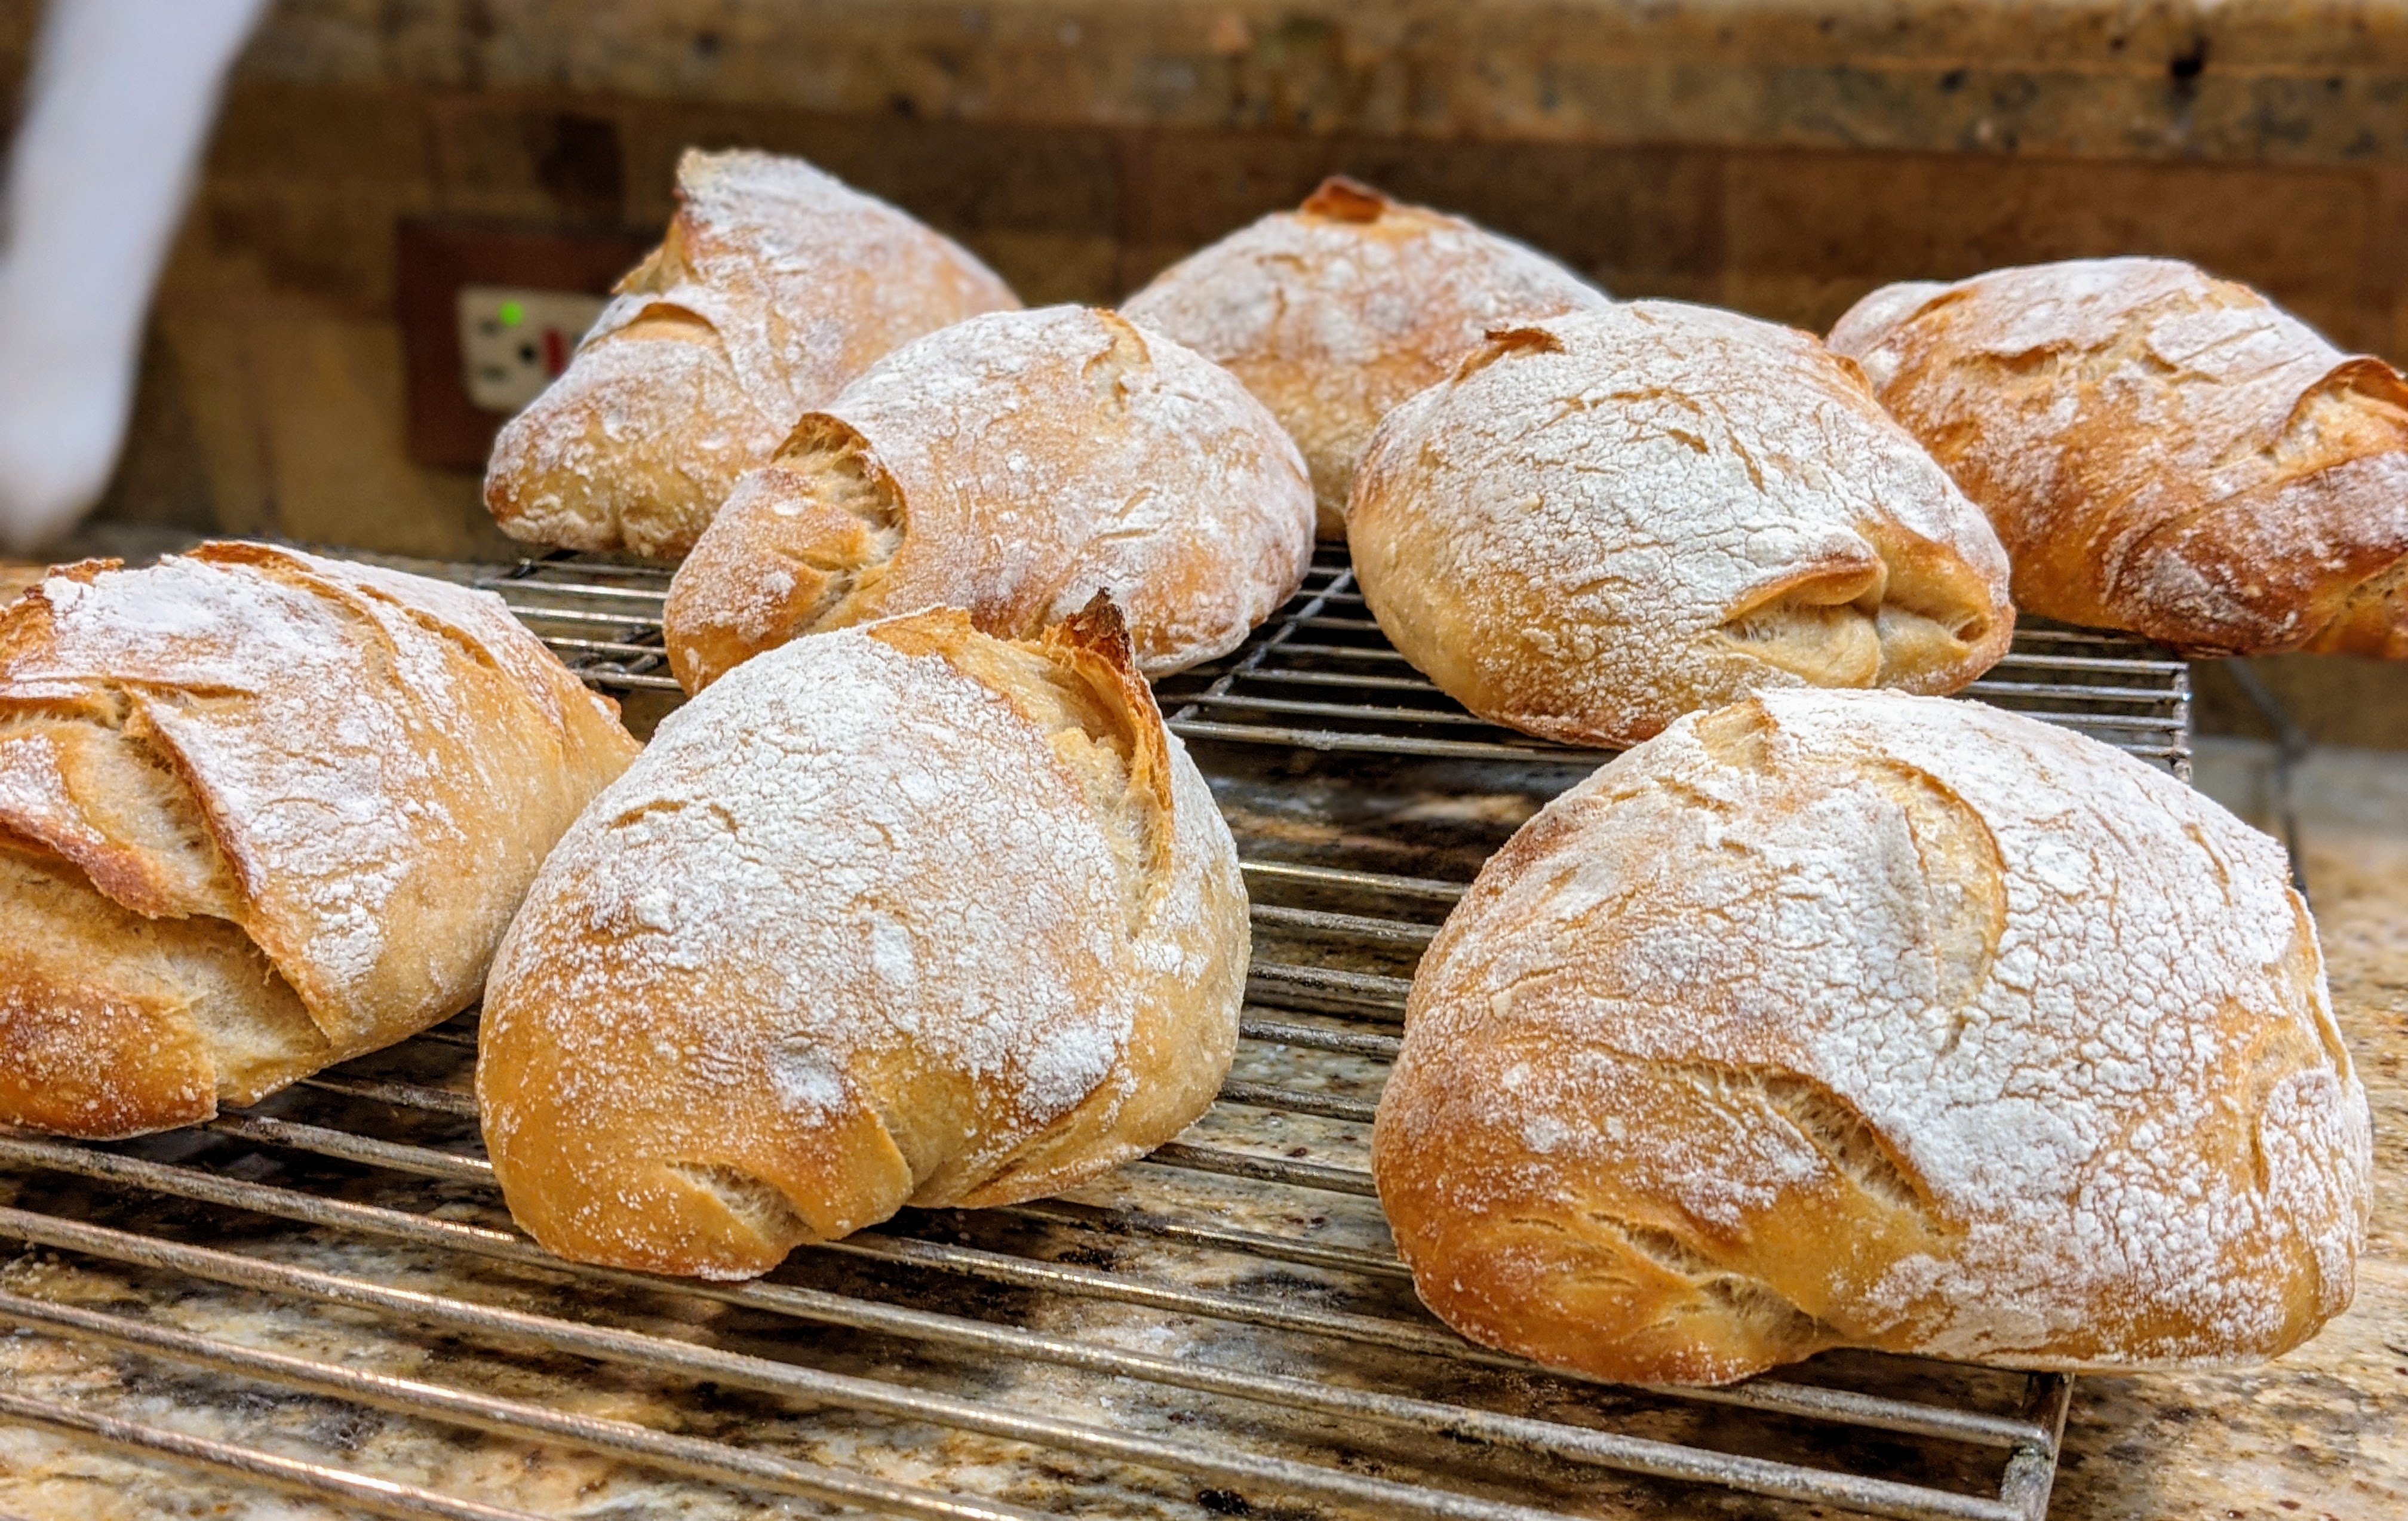
Transfer the dough to a lightly oiled container, then cover with plastic wrap and let it rise until almost doubled. The dough should have plenty of bubbles and should be blistering on top with a nice dome. 1 1/2 to 2 hours or until dough has expanded 50%-75% of its original size.
Pour the dough onto a lightly floured board and divide it in half.
Shape each half into a nice, taut ball (like you would a boule), sealing the seams, then set it aside seam side down.
Sprinkle a little flour over each ball, then cover with a cloth for 20-30 minutes to bench rest. The dough should be relaxed.
Preheat your oven to 485° F.
After the balls have rested, shape into cylinders about a forearm’s length. I use a baguette shaping method to create some internal structure and to ensure the cylinder is even, though I don’t make pointy ends. The cylinders will be much thicker than baguettes, but they’ll have a structure you can feel.
Lay each cylinder seam side down (or up if you prefer) onto a transfer board lined with parchment paper, or if you don’t have a baking stone, a parchment-lined baking sheet. The cylinders will spread and flatten a bit and that’s okay!
With floured hands, dimple the cylinders all over to prevent over-springing. Don’t worry, they’ll puff up.
Cover with a well-floured cloth or couche and let rise for 1 to 2 hours. You should see bubbling and blistering. Carol Fields says to wait until they’re doubled in size. But based on my experience with baguettes, what you want to look for is a puffiness to the loaves and a little resilience when you poke them. You don’t want to take final fermentation out too far, lest you lose oven spring.
Bake with steam for 15 minutes (I use a broiler pan on the bottom rack and pour a cup of scalding water in it).
After 15 minutes, remove your steaming tray/container and the parchment paper, turn the oven down to 425° F, then bake for another 12-15 minutes until the loaves are golden brown.
Cool on racks for 30 minutes. They taste GREAT while they’re still a little warm!
I originally got “The Italian Baker” because I wanted to get a recipe for Pane Pugliese from a credible source. I made the Pane Pugliese from the book, and it turned out okay, but as I pored over the book, I saw this simple, straightforward recipe and knew I had to make it.
I think the romance of this recipe being ancient really got to me. In fact, my whole bread-making obsession has stemmed from the romanticism of making bread from recipes that are hundreds, maybe even thousands of years old. Granted, the flour of today is so much more refined than the flour of yesteryear, but to replicate bread from ages-old recipes and traditions… That’s just so FREAKIN’ cool to me!
This is what keeps me exploring. I don’t know if this will turn into anything other than a hobby, but I do know one thing: I love continuing tradition!
Besides baguettes, ciabattas are my other favorite loaves to make. Once I learned Master Chef Markus Farbinger’s recipe, I was hooked! Ciabattas are SO easy to make. Whether you use the standard recipe that I linked to above, or use a sourdough starter, it can be a same-day bake! Though if you go the sourdough route, I suggest doing an overnight bulk ferment, which I’ll explain below.
With this particular recipe, I’m going for a much lighter crumb and am using bread and AP flour. I know that I have eschewed using white flours, but the enzymes in the sourdough starter help break down the flour to make it more digestible, so while the flour may not be as nutritious as whole wheat and high-extraction flour, we’ll still get plenty of nutrition from the bread. That said, let’s get started!
Ingredients
Levain
Starter
200 grams
Unbleached Flour
150 grams
Water (90°-95° F)
150 grams
For flour, I use a high-extraction flour from Azure Standard called Ultra Unifine Bread Flour.
Final Dough
Levain
500 grams
Unbleached Bread Flour
250 grams
Unbleached AP Flour
500 grams
Water*
550-600 grams
Salt
20 grams
Instant Yeast** (optional)
2 grams
*With water, you have to gauge it. 550 grams will get you to 80% hydration. But depending on your flour, if the dough is a little stiff, you’ll want to add more water. The initially mixed dough sh9uld be the consistency of a stiff batter.
**Using a bit of instant yeast is purely optional, but I’ve found that it is very helpful on cold days. I wouldn’t use it on hot days where I can rely on the ambient temperature of my kitchen to keep the microbes super-active.
Instead of using separate containers for the levain and the final dough, I just use a 6-quart Cambro tub. When my levain’s ready, I just add all the ingredients to the tub. It’s much more convenient. I’m going to provide some times as guides during the process. By no means are they hard and fast, especially with varying kitchen temps where the bulk and final fermentations can be shorter or longer depending on the ambient temperature of your kitchen.
Make the Levain
Feed your starter so you can produce 200 grams of starter. When the starter’s ready, transfer 200 grams to a large mixing bowl or a large plastic tub. Note that the starter doesn’t have to be active and at its peak. My daily grape starter is maintained at 400 grams total, so I just use 200 grams from my mother culture, then feed her. Works like a charm!
(4:00 pm) To the 200 grams of starter, add 150 grams of unbleached flour (here’s where I use my high-extraction flour, but you can use any unbleached flour that you want) and 150 grams of water. Mix thoroughly until smooth.
(4:15 pm) Place the levain container in a warm place to ferment. It has been cold as of late, so I put my levain container in my oven with the door cracked to get a little heat from the oven light.
(8:30 pm) If you have a fairly active starter, your levain should be actively bubbling by now. If it’s not, I suggest waiting until it’s really active.
Mix the Final Dough
(8:40 pm) There’s no autolyse with a ciabatta, so just add all the final dough ingredients to the levain and mix thoroughly until you’ve incorporated all the dry ingredients and create a shaggy mass (about 5 minutes). Note: If you’re going to do a same-day bake, I suggest turning on your oven to 250° C or ~485°F now.
It’s a bit messy, but I prefer to mix the dough by hand, alternating squeezing the dough through my open fingers, then using a stretch and fold motion to turn the dough. I’ll do this until I feel comfortable that the salt and yeast have been totally incorporated.
Clean off your mixing hand and let the shaggy mass rest for 20 minutes.
(9:05 pm) Using a wet hand, do a series of stretch and folds until you feel the tension in the dough building. When it kind of fights you, then let the dough rest for another 20 minutes.
(9:25 pm) Dump the dough onto your well-floured work surface – it should be really well-floured – making sure you clean and scrape all the excess dough left in the container, then wipe the container with a paper towel.. Using quick motions, pull the dough into a rough rectangle, then do letter folds, front to back, and side to side at least three rounds. Make sure that when you fold, you also pull flap, then fold over. Once you feel that the dough strength has been built up (it will fight you a bit), roll the dough onto its seams, then using your bench scraper, form the dough into a ball.
(9:30 pm) Spray the container with a light coat of olive oil (I use one of those PAM olive oil spritzers) then gently pick up the dough ball (you can form it up a bit more to make it easier), then drop it into the container.
So here we have two alternatives:
Let the dough rest for 5-10 minutes, then put the container in your fridge for an overnight bulk ferment.
Let the dough rest for 20 minutes, and you’ll be ready for shaping.
Dividing and “Shaping”
Again, depending on how you do the bulk ferment there are two routes to take. The steps are similar, but different enough to warrant discussing them in separate sections.
Same-Day Bake
After 20 minutes, again liberally sprinkle flour on your work surface, then slide the dough ball out of the mixing bowl.
Using quick motions, gently tug the ball into a rough rectangle, then divide the dough into equal pieces. If I’m making loaves, I cut the rectangle in half.
Technically, you’re not supposed shape the ciabatta dough. You pull it into a basic form. But I like to make my loaves into little rectangular pillows, so I gently letter fold the divided dough pieces, being extremely careful not to degas them.
Once you’ve formed the loaves, gathering them from the long ends and cupping under the dough, transfer them to a well-floured couche, seam side up.
Sprinkle the loaves with a bit of flour, then cover them and let proof for 10 minutes.
After 10 minutes, check the loaves for springiness using the finger dent test. You want to have some spring. If there’s a bit too much; that is, the dough immediately springs back, let it rest another 10 minutes.
Overnight Ferment
If you did the overnight ferment, check your dough in your fridge. It should have at least doubled in size. If it hasn’t, you’ll have to wait. My retarder is set to 39° F and it takes 10-12 hours for my dough to double. So if you’re dough’s ready, turn on your oven now and set it to 250° C or about 485° F. Do not proceed until your oven is up to temp, then divide. If you’re using a baking stone, wait at least an hour before proceeding.
Gently slide the fully fermented dough out of the bowl or container on a very well-floured surface. It should easily slide out since you oiled it down.
As above, gently tug the ball into a rough rectangle then divide the dough into equal-sized pieces. Personally, the anal-retentive part of me, can’t resist scaling the pieces so they’re all roughly the same weight.
(optional) As I mentioned above, you don’t have to shape the loaves, but I always do a simple letter fold, then place the loaves on seam side up on a well-floured couche.
Sprinkle the loaves with flour, cover them, then let them rest for 20 minutes.
At this point, I transfer the loaves, seam side down to my transfer board, covered with parchment paper. If you’re not going to use a baking stone, you can use a parchment-covered metal baking sheet.
Sprinkle the tops with flour, cover them, then let the loaves rest for 20 minutes.
Bake
Bake the loaves for 20 minutes (250° C/485 F) with steam (I now use a broiler pan on the bottom rack of my oven and pour a cup of scalding water into it).
Remove your steaming tray after 20 min. Turn down the oven to 200° C/400° F) and continue baking for another 15 minutes, though check for doneness at 10 minutes.
If you want a real crunchy crust, turn the oven off, then leave the loaves in the oven with a slightly cracked door for 10-15 minutes to cure the crusts.
As with my other recipes, I realize that I’ve been a bit long-winded. But I want to make sure I cover as much nuance as possible.
Okay, it’s not 100% whole wheat which is why I didn’t put 100% whole wheat in the title. But it’s damn close. This uses my favorite flour combination of 25% White Whole Wheat / 75% High-Extraction Flour, both milled using the Unifine process. The high-extraction flour is like a Type 85 flour that retains at least 85% of the bran and germ of the wheat berry when milled, though this particular flour is more like Type 90. What this means is that it is very close to whole wheat but it’s SO much smoother.
This recipe uses an overnight poolish. But unlike other recipes I’ve developed, where the poolish only accounts for about 20-25% of the total flour, this recipe uses a poolish that accounts for 50% of the total flour. The reason for this is because all the whole wheat flour goes into the poolish and soaking it overnight ensures that the bran and germ are fully hydrated. Here we go!
The Night Before ~ Make the Poolish
Flour
Water
Yeast
250 g High-Extraction Flour 250 g Whole Wheat
500 g
0.5 g
1. If you don’t have any high-extraction flour, I advise using whole wheat bread flour. It’s milled finer than regular whole wheat flour. 2. Mix everything together until you form a thick, but smooth batter with no dry flour left over, and no lumps (this is important).
Baking Day – Make the Final Dough
Flour
Whole Milk or Half N Half
Salt
Yeast
Butter
500 g High-Extraction Flour
200 g
20 g
12 g
1 tbl (softened, not melted)
In a separate bowl, mix the dry ingredients together with a whisk.
Use the milk to loosen up the poolish by slowly pouring it around the edges of the poolish, then use a scraper or spatula to tease it away from the sides. Then moving about the container, pull the spatula towards the center (like you would making an omelet), scraping the bottom of the container. The poolish should now just pour out and into your mixing bowl.
Once your poolish is transferred, make sure to get as much of the residual material out of the poolish container, then incorporate the milk into the poolish until it’s fully dissolved.
Working in batches, add the dry ingredient mix to the poolish. Once you’ve added a cup or so, drop the softened butter into the mix, then continue mixing until all the ingredients are incorporated and you’ve created a shaggy dough.
You can also do this in a stand mixer, which is my preferred method of mixing ingredients.
Dump out the dough onto an unfloured work surface, and knead it until smooth (about 8 minutes). Again, you can do this in a stand mixer as well (about 3-4 minutes).
Transfer the dough back to your mixing bowl and cover with a towel or plastic wrap and let the dough rest for 30 minutes.
After 30 minutes, do a stretch and fold of the dough, then turn it over onto the folds.
Rest the dough another 30 minutes and do a final stretch and fold.
Rest the dough from 1-2 hours until it has risen about 50%
This is the tricky part. I just made my loaves early this morning, around 6 am, and my kitchen was a bit cold, so even though I proofed in my oven with the door slightly ajar so that the oven light provides a little heat, it took a little over 2 hours to rise.
After the bulk ferment, dump out the dough and divide and scale it into 2 equal pieces.
Pre-shape the dough into balls, either using the stretch and fold technique, or the scraper technique. Set the balls aside, sprinkle a little flour on top of them, and let rest for 20 minutes.
Preheat your oven to 485° F (about 250° C)
Take a ball, flip it over onto the floured side onto a lightly floured surface.
Using your fingers, gently form press out the ball into an 8″ X 12″ rectangle (it doesn’t have to be perfect).
Roll the sheet up by folding from the top and gently pressing out, much like you’d shape a batard. What we’re trying to do here is really get the skin taut.
Seal the seam, then place it into a well-oiled loaf pan.
Repeat steps 12 through 15 for the second loaf.
Cover the loaves with a floured cloth and let them go through their final proof for at least an hour.
Mine took about an hour and a half this morning until they passed the finger dent test.
Once proofed, score the top of each loaf with one long slash, then place the pans gently in the oven and apply steam.
For steam, I use an old metal cake round that I put about a cup of scalding water, and I throw a few ice cubes on the bottom of my oven.
Set the timer for 15 minutes and once it goes off, turn the loaf pans around to ensure even baking and remove your steaming container.
Bake 10 more minutes, then remove from the oven.
Melt about a 1/2 stick of butter, then slowly pour it into the cracks of the loaves.
Some butter may run off the sides, so I suggest placing a plate under the loaves to catch the spilled butter, then use a paper towel to soak up the excess and wipe it on the top surface of each loaf.
Let the loaves cool at least 45 minutes before cutting (if you can last that long).
Notice I don’t have any added sugar in this recipe. It doesn’t need it. The use of butter and milk provide fat which helps soften the bread.
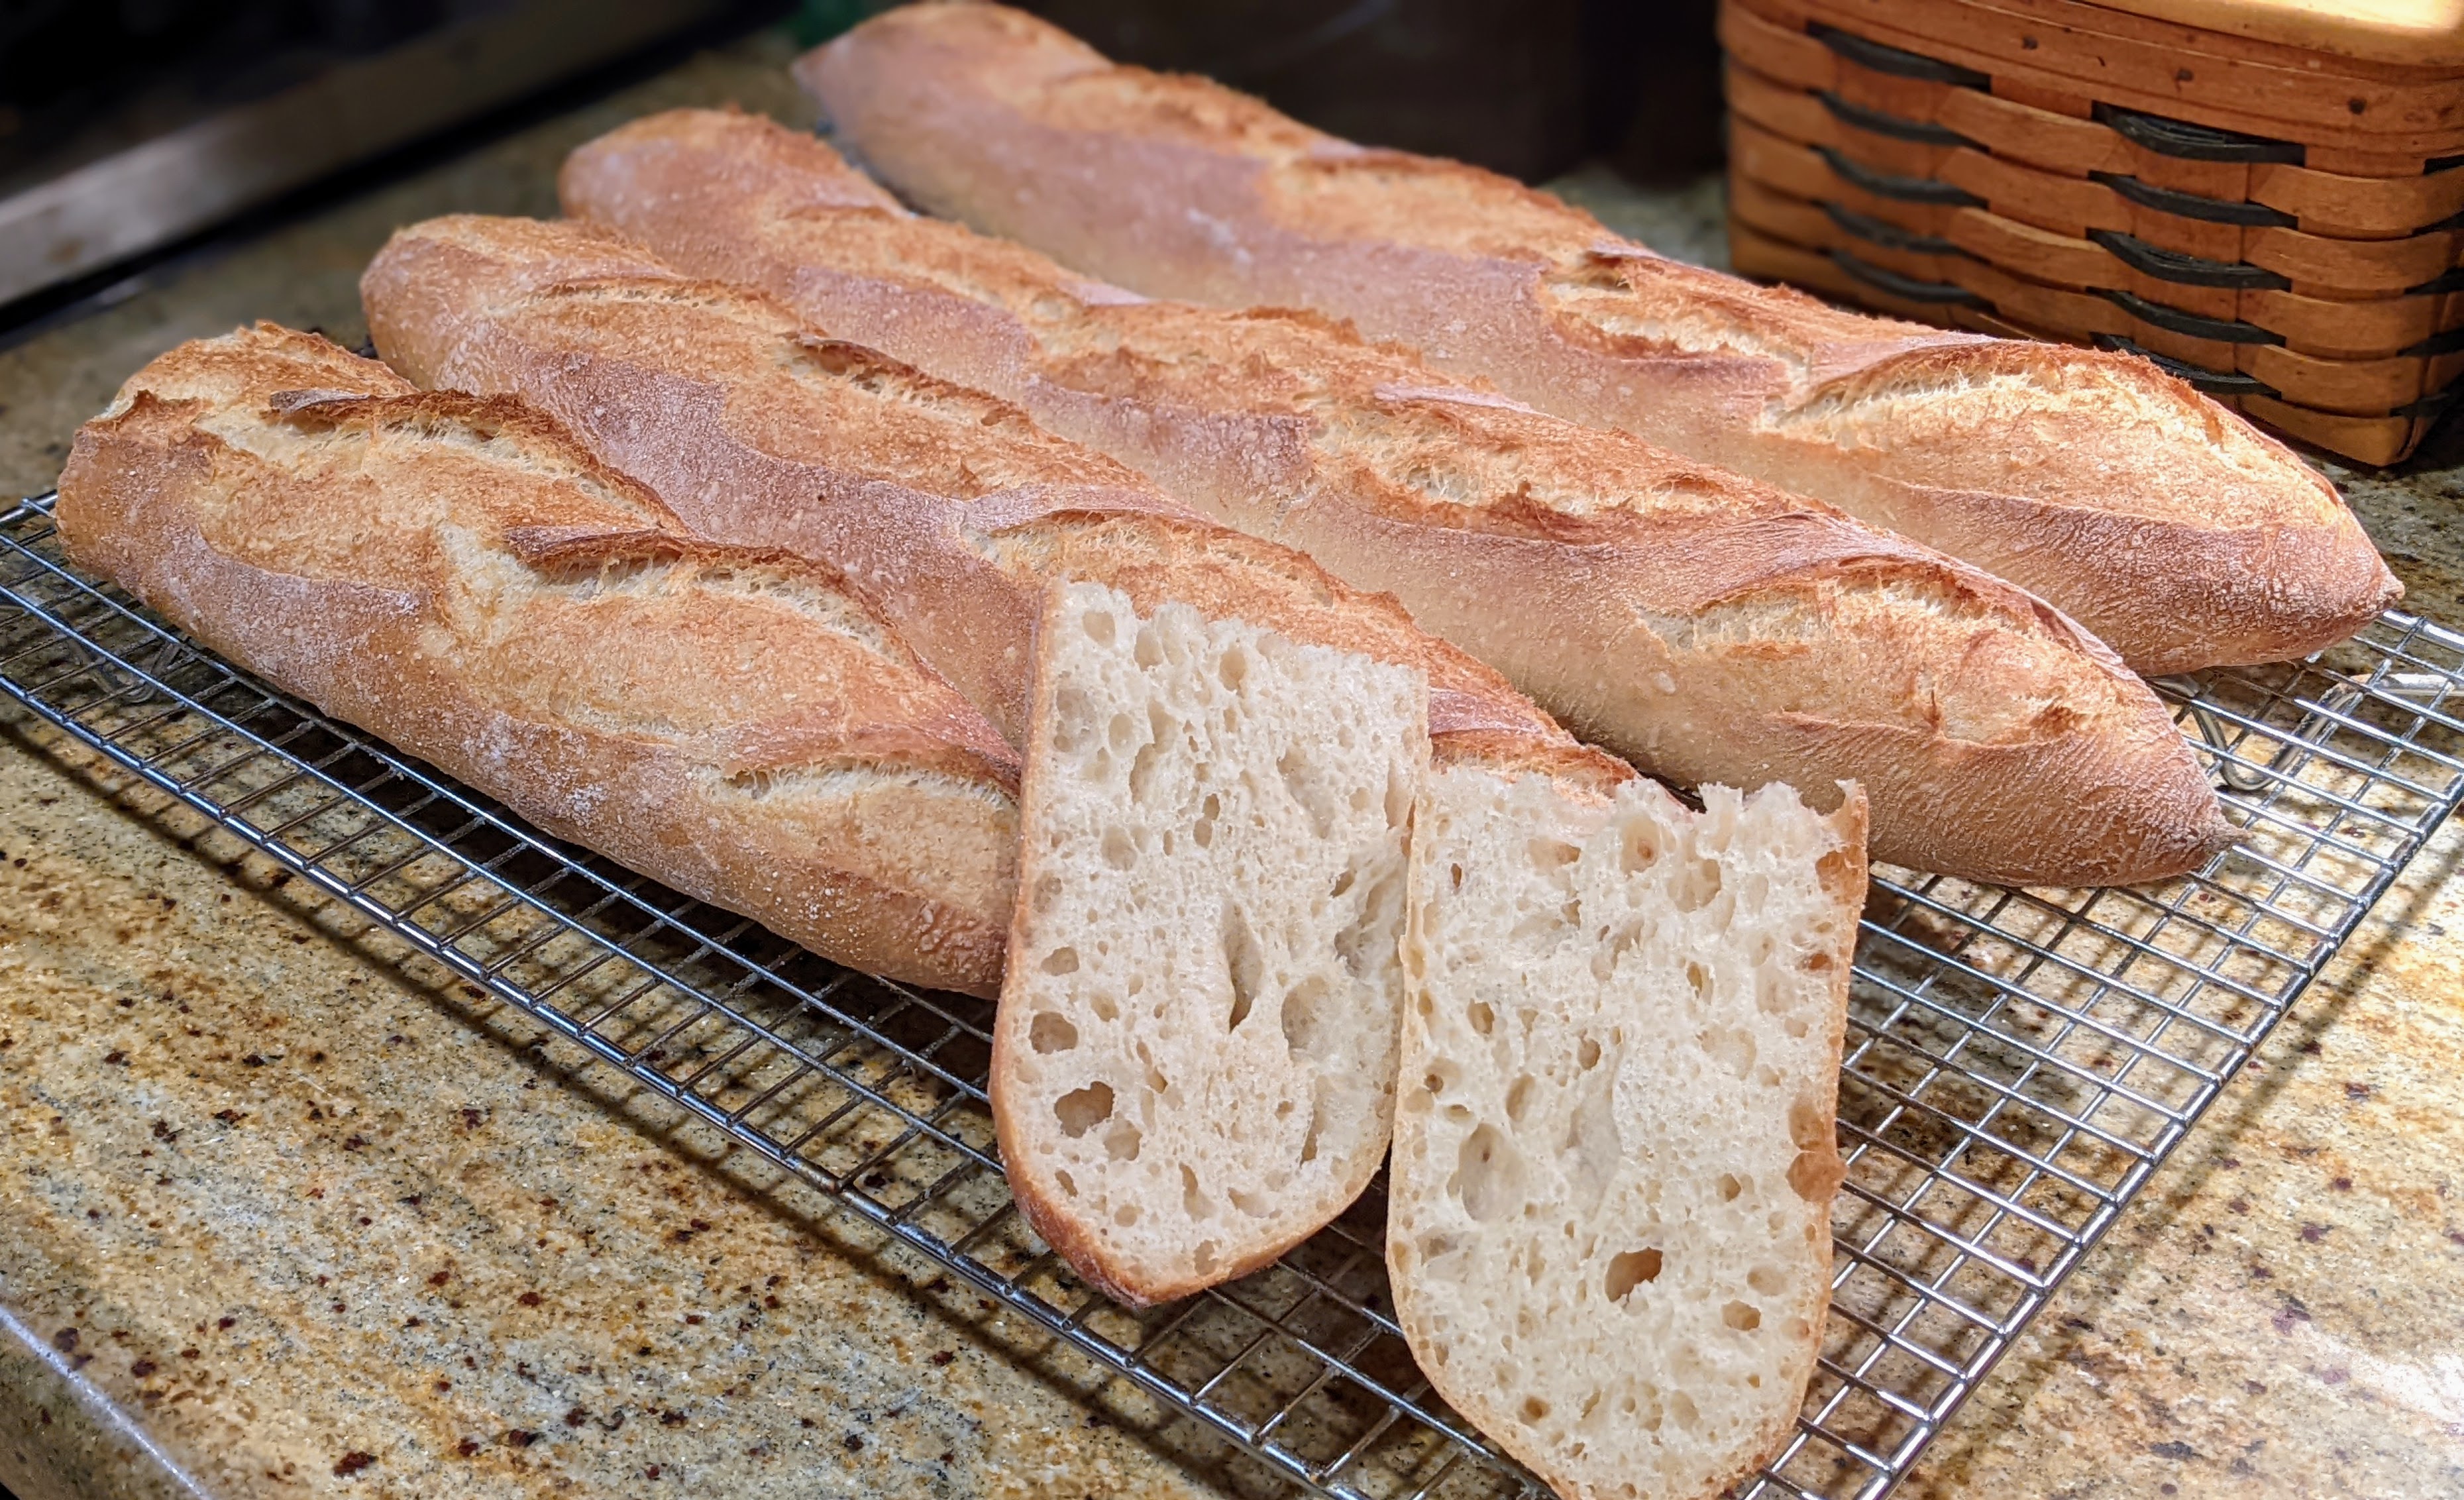
I’m actually pretty amazed at how mobile I am just three days after full hip replacement surgery. And I have to admit that my relative comfort level has quite a bit to do with the pain meds I’m on. But irrespective, since I’m capable of moving around and to avoid getting bored, I decided to bake baguettes!
I just pulled those baguettes out of the oven a few minutes ago! You’ll notice the ears on one loaf and just nice openings on the others. I was experimenting with my scoring and wanted to see what a shallow score would produce. I’ll stick with the deeper score. 🙂
Now normally when I bake baguettes, I make a poolish the night before I bake. But I was pretty exhausted last night, so I decided to make a straight dough this morning. Here’s my recipe:
Flour
Water
Salt
Yeast
500 grams
365 grams (85º-90º F)
12 grams
7 grams
This will produce a 73% hydration dough
Measure out your flour into a large mixing bowl.
Add the water and mix until no dry ingredients are present and you form a shaggy dough.
Let the dough rest for 30 minutes (autolyse)
Sprinkle the salt and yeast evenly over the surface of the dough.
Thoroughly mix the salt and yeast into the dough.
Dump the dough onto an unfloured surface
Knead the dough until it just starts getting smooth (about 5-8 minutes). Do NOT overwork it! The moment you start feeling tension in the dough (it feels like you’re fighting it), stop kneading.
Transfer the dough back to your mixing bowl and let it rest for 30 minutes.
Now do a stretch a fold and form the dough into a ball, then turn it over onto the folds.
Allow the dough to rise from 1-2 hours. Check after an hour – you want the dough to have expanded at least 50%. You should see some bubbles formed on top and the surface should be nicely domed. At about 50% rise, you have room for proofing/final rise which I found is critical with baguettes.
If you don’t see much activity, which typically happens on cooler days, do one more gentle stretch and fold and let the dough rise for an hour. But check it at a half hour because sometimes all the little beasties needed was a nudge. 🙂 Again, you want to see some bubbles, but not a preponderance of them.
Gently remove the risen dough from the bowl onto an unfloured surface.
Portion out the dough into four equal pieces. By weight, the pieces should weigh about 213-215 grams apiece. Alternatively, you can portion out into three for a little beefier baguettes (I do this when I’m making baguettes for sandwiches).
Lightly sprinkle the tops of the portioned dough with flour, then pre-shape each into a nice, tight ball.
Flip the balls over on their folds, sprinkle a little more flour on top, then cover with a cloth and bench rest for 15 minutes.
Shape the balls into baguettes. Here’s a simple, yet effective shaping technique from Markus Farbinger. But just take note: When you fold the dough, you want to make sure you’re creating good tension on the skin without tearing it! You don’t want to be lackadaisical with the folding because you won’t get any spring.
If you have a couche, transfer the shaped loaves to the couch (or you can use a well-floured towel) and let them proof for an hour. This is why you don’t want to over-ferment in the bulk fermentation stage.
Preheat your oven to 480 degrees.
Once proofed, transfer the loaves to your peel, score with nice longitudinal cuts, then bake for 15 minutes. Provide steam for the first 15 minutes, then remove the steaming container. Then turn your oven down to 450 for 10 minutes.
You might be wondering why I’m using 7 grams of yeast. You can definitely use less, but it lengthens the timeline. I came up with this recipe specifically because I wanted to produce the bread relatively quickly with limited manipulation because I was literally three days out of total hip replacement surgery. But you know what? I like this process because it produces great results!
What About Using a Poolish?
You can absolutely use a poolish, and that’s my normal method of making baguettes. Typically I use 25% of my total flour for the flour I use for a poolish, and I make the poolish at 100% hydration. I do this the night before I bake and give it about 12-16 hours to ferment. At 12 hours, it will not be sour, but at 14-16 hours, it will get nicely sour, so if you vary the times of the poolish, you can make different flavored baguettes.
If you do use a poolish, you have the option of bumping up the fermentation activity with some yeast, or just let the poolish be the only leavening agent. If you do decide to use a bit of yeast, use no more than 2 grams of yeast because you have a lot of active microbes already in your dough, and you just want to give it a little kick.
Yet Another Word on Flour
If you read this blog with any regularity, I’m pretty obsessed with flour. Now even though I occasionally make my baguettes with white flour, you all know that my flour of choice is a 75-25 blend of high-extraction flour and white whole wheat flour (the second picture); and specifically, flours produced with the Unifine milling process. I prefer the darker crust it produces (the picture at the top) but more importantly, the nutrition those flours provide.
If you venture into high-extraction flour (Type 85 and above), do not expect to get the kind of open crumb you get with white flour. It just ain’t gonna happen. The particulates in high-extraction and whole wheat flour cut the gluten strands. And if you think working the dough to build more structure will help, it won’t. The strands you do create will be so tight, you won’t get any holes!
This is why I advocate for doing a shorter bulk and a bit longer final proof. This allows the dough to really relax so when you place the loaves in the oven, the final activity before the microbes die will allow for better gas pocket formation.
I purposely put quotes around “Sourdough” because even though the bread has a slightly sour taste, it is not made from a levain, but from a pre-ferment; specifically a poolish. What? Sourdough bread from a poolish? Well, give it a bit of time and it’ll turn sour, then when added to the final dough, that will give the microbes plenty more to feed on, and it’ll produce a very pleasing, sour taste throughout the loaf.
One might argue that a bread like this will not be as complex in taste as a traditional sourdough bread. But I disagree. Just as with cooking, complexity can come from several sources. I’ve joined the school of thought that doesn’t depend solely on the microbes to provide the flavor complexity. The combination of the flours I use plays an immense role in influencing the flavor and texture of the bread.
If you read this blog, you know I’ve written another batard with poolish recipe. That one works great, and even though the proportions are exact, the fundamental difference with that recipe and this are the number of stretch and folds that are done with this recipe. The original had just four folds, this has six. The extra two folds make a HUGE difference in the structure of the dough!
Here’s the recipe:
Flour
Water
Salt
Yeast
Poolish
250*
250
0.40
Final Dough
750**
500†
19
2.6***
Totals
1000
750
19
3.00
Bakers %
100.00%
75.00%
1.90%
0.3%
* Whole Wheat Flour (fine or extra-fine ground) ** You can use regular, high-protein bread flour here, but I recommend using a high-extraction flour such as Type 85. *** Add a bit more yeast (up to a gram) if your kitchen is around 70-degrees. The amount listed here is for 75+-degree kitchen, like mine is in the summer.
†You really want to have your dough be in the 75-80 degree range. So take the temperature of your flour with a food-grade thermometer, then use the table in this article to determine what your water temp should be.
In a separate container, make the poolish mixing everything together until smooth. This is wet, and you don’t want any lumps.
Allow the poolish to rest for at least 12 hours, but probably not more than 16 hours. With this long of a resting time, make the poolish at about 8-9 PM at night, and it’ll be ready in the morning.
When you’re ready to make the final dough, transfer the poolish to a large mixing bowl or a stand mixer bowl. Add most of the water and whisk until the poolish is dissolved. Then use the rest of the water to rinse out your poolish container so you get everything.
Add the flour to the poolish mixture, and combine until there are no dry spots. It’ll be shaggy. Cover the bowl with a damp cloth or plastic wrap and let it autolyse for 30 – 45 minutes. It’s important not to mix to a smooth state because all we’re trying to do here is help the flour with water absorption and not start to develop the gluten structure. Note that with the poolish in there, fermentation will start, but that’s okay.
Once autolyse is complete, sprinkle the salt and yeast evenly over the top of the dough and start mixing until smooth. Admittedly, I do this with a stand mixer because it does it better than I can with my hands. I used to do this step with my hands but using a stand mixer saves me a little time; especially when the bulk fermentation takes over three hours.
One the mixture is smooth, transfer the dough to the container you’ll be using for fermentation. Once transferred, immediately do a stretch and fold of the dough to form it into a ball. Then turn the ball over onto its folds. I use Ken Forkish’s stretch and fold technique and stretch and fold in my fermentation container. There are lots of others but I started out with Ken’s technique and it’s what I’m used to. In any case, once you’ve done the stretch and fold, cover your container and put it a place where you can reasonably maintain the temperature of your dough.
Repeat step 6 every half hour for the next 3 hours. Yup… you read that right. This one takes time, but it is SO worth it! Also, note that you want to treat the dough gently and not degas it. When you stretch and fold in the bulk fermentation stage, you want to be gentle and not tear or press down on the dough.
After the last fold, let the dough rest for 45-60 minutes. You should see nice bubbles in the dough, but it shouldn’t be going crazy. Your dough should be a bit jiggly from the air pockets that have formed.
Now, carefully pour the dough onto an unfloured work area. You don’t want to degas it and ruin all the work the microbes have done. Divide the dough into two reasonably equal portions, then lightly flour the tops of the pieces. These will be the tops of your dough.
Take a portioned piece and flip it over onto the floured side (with a little flour on your board). Try to gently move the dough. If it sticks, just lift it up and sprinkle some flour underneath the sticky area. Pre-shape the piece into a nice, tight ball then flip it over onto the seams. Repeat this with the other piece.
Lightly flour the tops then cover with a floured cloth and let them rest for 15 minutes.
Once the balls have rested, shape them into the type of loaf you want and place them into an appropriate proofing container, seam side up.
Place the containers in separate plastic bags, then put them in a cool, dark place place to proof for up to 2 hours. Check after an hour though and if your dough passes the finger dent test, then it’s ready to bake.
While the dough is proofing, preheat your oven to 475-degrees. If you’re using a Dutch oven, place it in the oven now. I use a baking stone and it needs a minimum of an hour to come to temp. If using a baking stone, also place a metal baking pan (I use a 9″ cake round) on the bottom rack of the oven.
Baking
Dutch Oven
Remove your preheated Dutch oven from your oven, then place a loaf directly into it. Carefully score the top of the bread, cover the pot, then put it back into the oven. Bake covered at 475-degrees for 20 minutes, then uncovered for 10 minutes to harden the crust.
If you only have one Dutch oven, then pop the other container in the fridge while the first loaf is baking. Once it’s done, you can transfer the chilled dough directly to the Dutch oven.
Baking Stone
Before you transfer your loaves to your peel, put about a cup of hot water into the metal baking pan to start generating steam. If your oven doesn’t have heating coils at the bottom, you can help with the steam by pouring a little on the bottom of the oven. Immediately close the door, so your loaves will enter a humid environment.
Now, transfer your loaves to your peel, then score the loaves. Now, as quickly – and safely – as you can, place your loaves onto your baking stone and get the door shut as quickly as you can. You can do the water at the bottom of the oven to get the steaming process going again.
Bake at 475-degrees for 35 minutes.
After 20 minutes, remove the water pan from the oven to allow the crust to set and harden for the last 15 minutes.
Final Thoughts
The cool thing about this is that with the stretch and folds, I recently started doing this because my previous loaves kept on collapsing on my peel. You have to expect a little collapse, but these were laying out too much. It was perplexing because I knew I nailed the proofing times and I’d get a big ear and an open crumb – just not much vertical rise. So I thought I needed to work the dough a bit more to get some more structure.
It turns out that this is exactly what the famous Tartine bakery in San Francisco does! I just read several Tartine recipes by various people (yes, even the famed NY Times recipe) and each had six stretch and folds over the course of three hours! Pretty awesome!
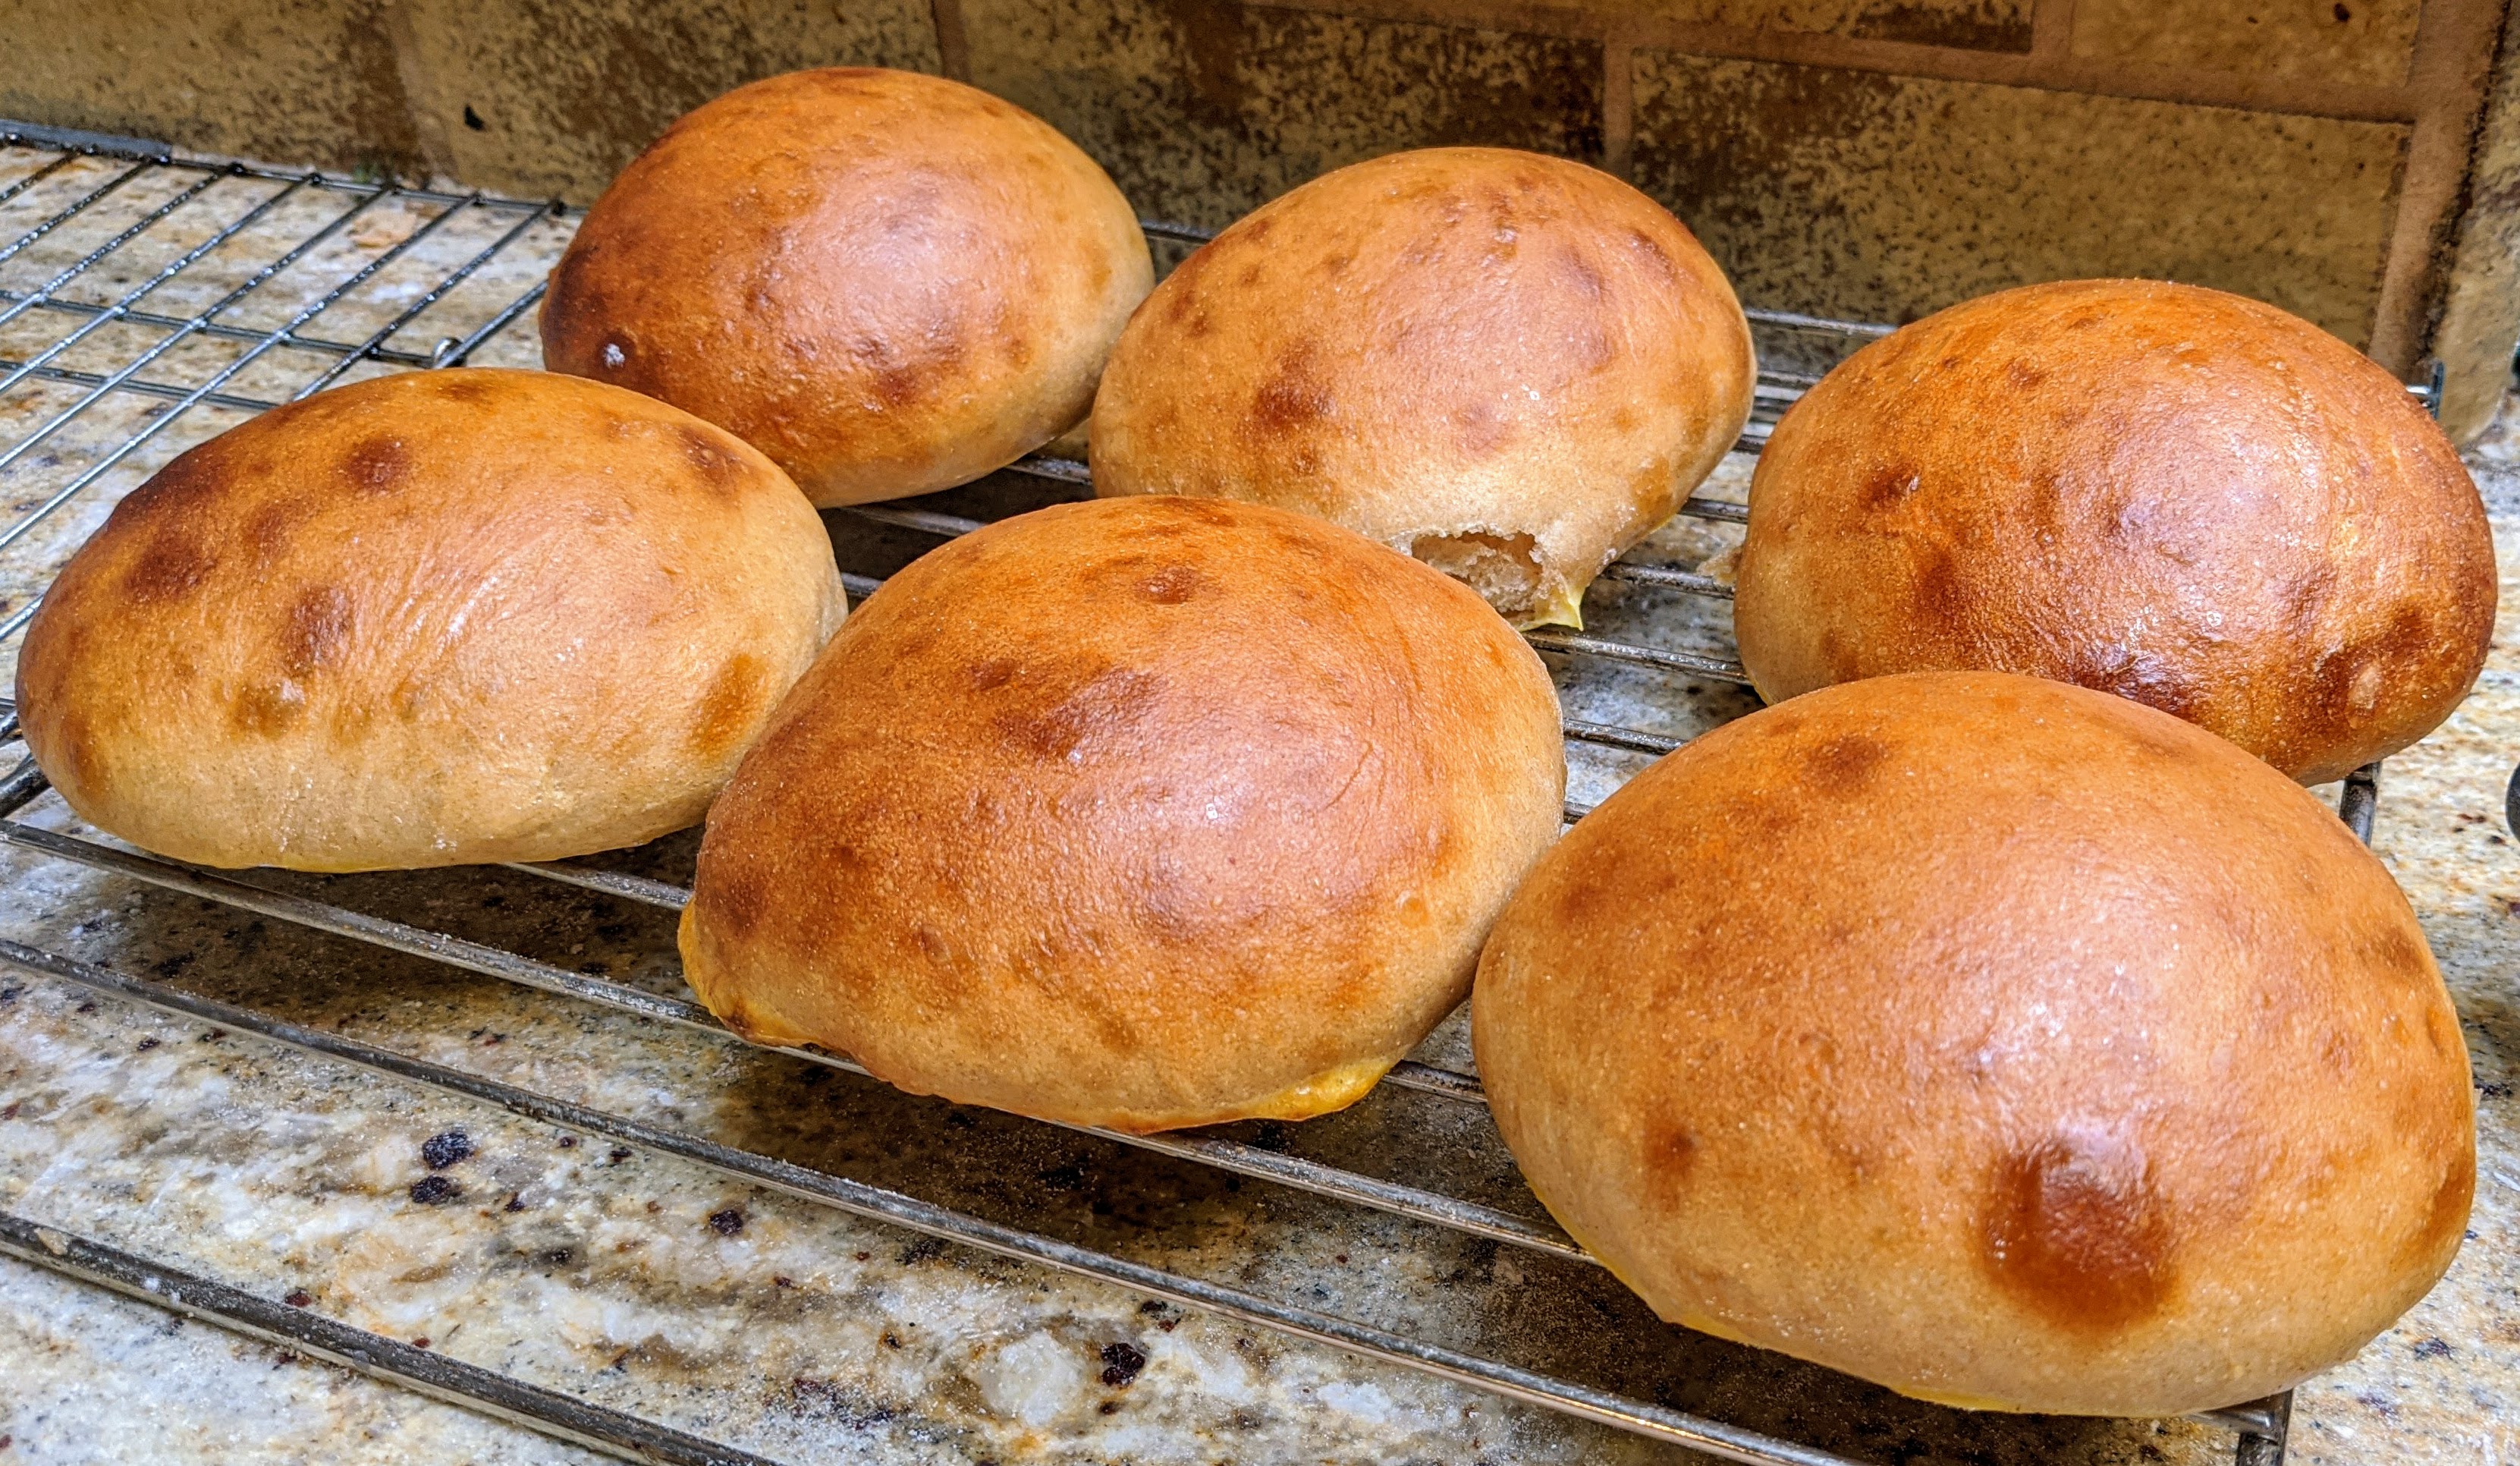
These burger buns are light, airy and fluffy, and guess what? They’re nutritious because of the whole wheat or high-extraction flour retaining the wheat’s nutrients! The dough is no-knead, but you’re still going to have to do stretch and folds for the first hour or so to help develop the gluten network and because we’re using flour with more of the bran and germ than regular flour, this dough is wet. Kneading really isn’t an option.
Tip: Though you can do the initial mix completely by hand, I’d recommend using a stand mixer if you have one.
A Note About the Flour You Use
It is critical that you use fine or extra-fine flour if you’re going to use 100% Whole Wheat. Course-ground flour has too many sharp particles in it that will literally cut the gluten strands. Myself, I use high-extraction bread flour that has about 90% of the bran and germ. It works like regular bread flour, but bakes like whole wheat flour which means it needs a really high hydration rate.
Mix the flour, butter, salt, yeast, and diastatic malt powder until fully incorporated.
Measure out the 105º water into a container, then add the honey to it and stir until the honey is completely dissolved.
Slowly add the water/honey mixture to the dry ingredients, then mix until smooth with no lumps (this is why I suggest using a stand mixer as it makes it a lot easier).
Check the dough. It will be too wet, so with your mixer running at Speed 2, add a couple of extra tablespoons of flour until the dough pulls away from the sides of the bowl, but is still pooled at the bottom. You don’t want to make a dense ball with this dough!
Transfer the dough to a large mixing bowl and cover it with a towel to rest for 10 minutes.
Stretch and fold the dough, turn the dough over onto the folds, then let it rest for another 10 minutes.
Repeat the stretch and folds every 10 minutes for the next hour for a total of 6 stretch and folds. By the last stretch and fold, you should see plenty of large bubbles forming.
Cover the bowl again and let the dough rest for an hour or until the ball doubles in size (don’t worry, with this amount of yeast and with the diastatic malt powder, the yeast will go crazy).
Once doubled, gently pour the dough out onto an unfloured bench being careful no to tear the dough and ruin all the hard work the yeast has just done.
Divide the dough into 125-gram pieces. This recipe will make about 14 buns. Only 6 will fit on a standard cookie sheet, so you can do as I did and make a baguette or mini-batard with the excess dough.
Sprinkle flour over the tops of the divided pieces. These will be the tops of your buns.
Now, lightly flour your work area.
Take a piece of dough, flip it over, gently, press it out into a circle, then shape it just like you would shape a boule, pulling an edge and bringing it to the center. If the dough sticks, add a bit of flour underneath the piece. We’re building tension on the top, so this is important!
Now, flip the ball over onto its seams, then round the ball out using a claw-like shape with your hand and rotating.
Once you’ve got a reasonably nice spherical shape, gently flatten the ball until it’s about 3-3 1/2″ in diameter, being careful not to degas it.
Place the shaped disc on a parchment-covered cookie sheet.
Repeat steps 12 – 16. But only re-flour your bench if it needs it.
Once you’ve created your discs, sprinkle flour on the top of them, then cover the cookie sheets (you’ll need 2) with a paper towel and let them proof for an hour.
At this point, pre-heat your oven to 425º. If you have double oven, then heat both so you can bake the sheets at the same tie.
After an hour, the buns will be ready to bake. If you only have a single oven, pop the other sheet into the fridge to retard the proof (don’t worry, you can bake them right out of the fridge).
Bake for 25 minutes. Hint: To help them pop up, I put some hot water (1/2 cup) in a metal pan on the bottom rack of my oven. This develops steam and helps with the oven spring in the first 15 minutes of the bake.
Once finished, immediately transfer for cooling racks! Do not let them cool on the cookie sheet as the bottoms will get all gooey!