Yeah, yeah, before any Texas chili purists chime in, I like my chili with beans, but with this recipe, beans are optional.
This is a recipe that took me years to develop. I don’t know – or care – if it’s competition-worthy, but it’s hearty and delicious. The batch above was made with venison hamburger and venison sausage. But pork or beef or any meat will do – even ground turkey and chicken!
This is a low-and-slow chili that takes about 3 hours to finish, but it’s simple to make, even though it may take some time to cook.
Ingredients
4 large, dried Guajillo chilis 1 yellow onion 6 cloves of garlic 1 1/2 lb lean ground meat (85-15 to 90-10) 1/2 lb sausage (preferably something with low sage like Texas breakfast sausage) 1 1/2 tbsp cumin 1 tbsp chili powder 1 tbsp cocoa powder 1 tsp black pepper 1 tsp MSG (optional) 1 tbsp paprika 1/2 tsp ground coriander 1/2 tsp black pepper 2 bay leaves 2 cans diced tomatoes (I like fire-roasted) 2 cans of beans, drained (optional – I like kidney and black beans) 2 tbsp corn starch slurry Salt to taste – about 1 tbsp for me, usually 8 oz. beer (I prefer Pilsner or a Lager. IPA are too bold)
Rehydrate the dried chilis in 2 cups of warm water
Cut the onion into quarters and place in a blender with the garlic
Once the chilis are rehydrated (about 1/2 hour to an hour), remove the stems and place in the blender with the onion and garlic.
Pour about a cup of the chili water into the blender and blend. You want the consistency to be thick, but not a paste. If it’s too thick, add a bit more chili water.
Add all the dry spices to the blender and mix thoroughly.
In a medium pot, add some olive oil, then fry up the onion blend over medium heat until aromatic.
Add the tomatoes and slurry and mix thoroughly.
Add the meat and break it up till there are no large chunks. Stir often.
Add the bay leaves.
At this point, you can add the beans.
Pour in the beer and fold it in thoroughly.
Allow the chili to come to a boil, cover, then reduce heat to simmer.
Let simmer for an hour and a half, stirring every 15-20 minutes.
Uncover, then let simmer without a cover to help thicken. Stir once halfway through.
Turn the heat off, cover, and let the chili rest for an hour.
Before serving, remove the bay leaves.
Serves 6.
Notes
This is just a basic recipe, but you can tweak it any way you want. I sometimes add a small can of chopped green chilis to give it an extra kick.
It’s even better the next day! I often make it the day before I serve it, let cool down, then pop it in the fridge overnight. All the flavors marry.
You can top with chopped onions, sour cream, and cheddar cheese.
This sounds crazy, but this is great on spaghetti!
If you don’t add beans, you might let this simmer partially covered so more water evaporates from the chili.
Ever since I was a little boy, I have loved lamb. When my mom made lamb chops or roasted a leg of lamb, those were some of my favorite meals growing up. Nowadays I don’t eat it much and normally it’s at a restaurant. My wife doesn’t like lamb and since there aren’t many people in the house, I don’t get to cook it. But I know I can make it at least once a year and that’s on my birthday.
For all the years I’ve made it, I’ve roasted it in the oven, then served it as slices. But this time, I wanted to do something different and barbecue it to make pulled lamb. I got some further inspiration from Matt Pittman of Meat Church who makes pulled lamb for gyros! So that’s what we’ll be having for dinner tonight. My daughter is making her awesome homemade tzatziki sauce and dicing up Persian cucumbers and tomatoes. We’ll be serving all that on fresh-made pita bread from our local falafel shop. But enough of that, let’s get to making the lamb.
Preparation
There’s really not much to do to prepare a leg of lamb. But a little effort will go a long way to creating a great product in the end. First off, I remove the hard fat from the leg. All hard fat does is block heat from penetrating the meat, so I remove it. But I keep the soft fat on because it’ll melt away and make the meat much more succulent. I also don’t remove the silver skin. You can, but it’s just a lot of work and it’s usually so thin that it just cooks away.
Some legs of lamb have a big flap of meat at the end of the bone. Whether I’m smoking or roasting the leg, I always fold it over the joint and truss it with some butcher twine. That’ll ensure a nice, even cook.
As far as seasoning is concerned, you can go from basic to sophisticated. Some folks like to make an oil and fresh herb and garlic rub with fresh dill, rosemary, garlic, and olive oil. I prefer using dry rubs. For this cook, I used my new favorite rub from Meat Church called the Hail Mary Rub. This is Matt Pittman’s tailgating rub that he uses for Dallas Cowboys tailgating before games (he’s the Cowboys’ official tailgate pitmaster, BTW). This is a great blend of several different spices and it goes great with lamb. I also use a light sprinkling of Meat Church Honey Hog Hot to give it just a tiny bit of a bite. Finally, I finely chop fresh rosemary from my garden and sprinkle that all over the leg.
What about garlic? That’ll come later.
When I do a leg of lamb, I always crosshatch the fat cap through the fat to expose some meat. I then season it liberally with whatever rub I’m using. I’ve gotten the best results prepping the lamb the day before and putting it into the fridge to dry brine. Once I’m ready to cook it, I apply a bit more seasoning to the top of the leg (fat side for me), then into the smoker or oven it goes.
Smoking the Lamb
For this cook, I cooked the lamb at 225°F. It was cold and windy to I set my Traeger to 250°F. It fluctuated between 220° and 230° the entire cook. When the lamb reached 160°F (about 6 hours), I placed it in a half sheet foil pan and dropped in about dozen cloves of whole garlic and a sprig of fresh rosemary. I covered the pan with a sheet of heavy duty foil, then finished the cook in a 250°F oven until the internal temp reached 201°F (about an hour and a half) and the meat was probe tender. If it took a little effort to probe the meat, I would’ve let it go to 203°F to 205°F.
Pulling the Lamb
Meats like pork and lamb don’t need a rest like beef, so I pulled it by hand using insulated gloves. That meat practically dropped off the bone in a few places! I also have large pulling forks that normally use for pulled pork, but for the lamb, I chose to do it by hand to get a chunkier end product.
As for the garlic, the beautiful thing about adding the whole garlic cloves to the pan was that they roasted in the au jus. The rosemary sprig added tons of aroma and flavor.
At that point, the lamb was ready to serve, but dinner was still a couple of hours away, so I re-covered the pan and put it back in the oven at the “keep warm” setting after I let most of the heat out. This’ll allow the au jus and juices really penetrate the pulled meat.
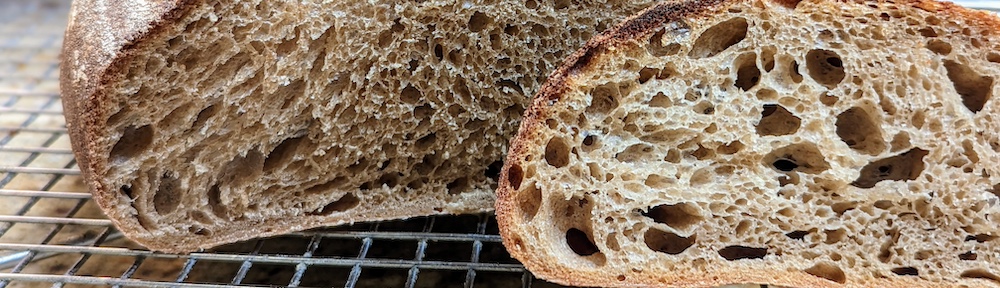
Pain de Campagne or literally “country bread,” originated in France going back to medieval times. Baked in communal ovens and meant to last for several days or even weeks, it was made from a blend of different flour, usually white, wheat, and rye, and always fermented with a natural starter. It was literally the daily bread of common folk.
But with the introduction of commercial yeast, the making of the traditional country bread declined in favor of the convenience commercial yeast brought with it. Baguettes and other types of bread took precedence over the lowly country bread. But in the 1970s, naturally fermented bread saw a renaissance among home bakers, not just in France, but all over the world.
The Tartine Basic Country Loaf formula from “Tartine Bread” by Chad Robertson
Then Chad Robertson published “Tartine Bread” in 2010, and it transformed bread baking across the US, providing the inspiration for both professional and home bakers to return to their roots and rediscover the beauty of artisan bread baking. His in-depth discussion of his Basic Country Loaf (which is simpy Pain de Campagne) captured the care and passion that went into creating a finely crafted loaf of bread.
But at least for me, Tartine Bread wasn’t just a recipe book. It articulated and affirmed a belief I had formulated since I made my first loaf of bread over 40 years ago: that making bread by hand was so much more than mixing ingredients to produce a loaf. It was a lifestyle choice. Like Jeff Spicoli said in “Fast Times at Ridgemont High,” “Surfing’s not a sport, it’s a way of life, it’s no hobby.” So it goes with baking artisan bread.
Think about the time and devotion to the task that making even a single loaf requires. Think of the investment of time and resources spent on developing the skills to consistently produce bread. There’s nothing casual about it, even for someone who wants to casually make a loaf or two. I think this is where most people new to baking artisan bread get discouraged. They peruse online forums and read books like “Tartine Bread” and think, “Holy s$%t! That takes dedication. Maybe it’s more than I’m willing – or able – to commit!”
Of course, one can take a casual approach to baking and still make delicious bread. For thirty years, my only aim with baking bread was to create something delicious with little attention paid to aesthetics. My family and friends loved the taste of my bread and that was all that mattered to me. But when I started baking in earnest, I had an archetype in mind that I wanted to aspire to.
And to get to that point meant going down a lot of rabbit holes, experimenting with different techniques and ingredients, taking courses, researching the science behind yeast and bacterial metabolism, and most importantly, baking a lot of bread to hone my skills as a baker. And I realize that I’ve gone off on a tangent. But as the title of this entry says, at least for me, making Pain de Campagne is so much more than just making country bread.
Speaking of experimenting, the beauty of Pain de Campagne lies in its roots where it was produced out of necessity. As I mentioned above, different blends of flour were used, white flour for structure, wheat for taste, and rye to boost fermentation. I have no idea what the ratios were, but I imagine they varied based on what was on hand. Plus, considering that recipes and starters were handed down from generation to generation, I’d imagine that the makeup of the loaves varied considerably from bake to bake. And that variability is why country bread is such a great bread to learn to bake sourdough with. It’s easy to experiment with different things.
One thing I’m experimenting with right now is a technique I learned from a blog post called, “Don’t Be a Bread Hostage” by Martin Philip of King Arthur describing how he used unfed starter – or discard – right out of the fridge as opposed to building a levain. He learned the technique from a friend of his and in this video, says that is how he makes his sourdough at home.
I was a little incredulous about this when I first read it, but it makes a lot of sense. Even if a starter is way past its peak, it doesn’t mean that the yeast has died. It’s just dormant until it’s introduced to a new source of food. Normally we wake up the yeast in a culture by creating a levain, then using the levain at the peak of the yeast’s activity. All we’re doing with a levain is introducing a food source.
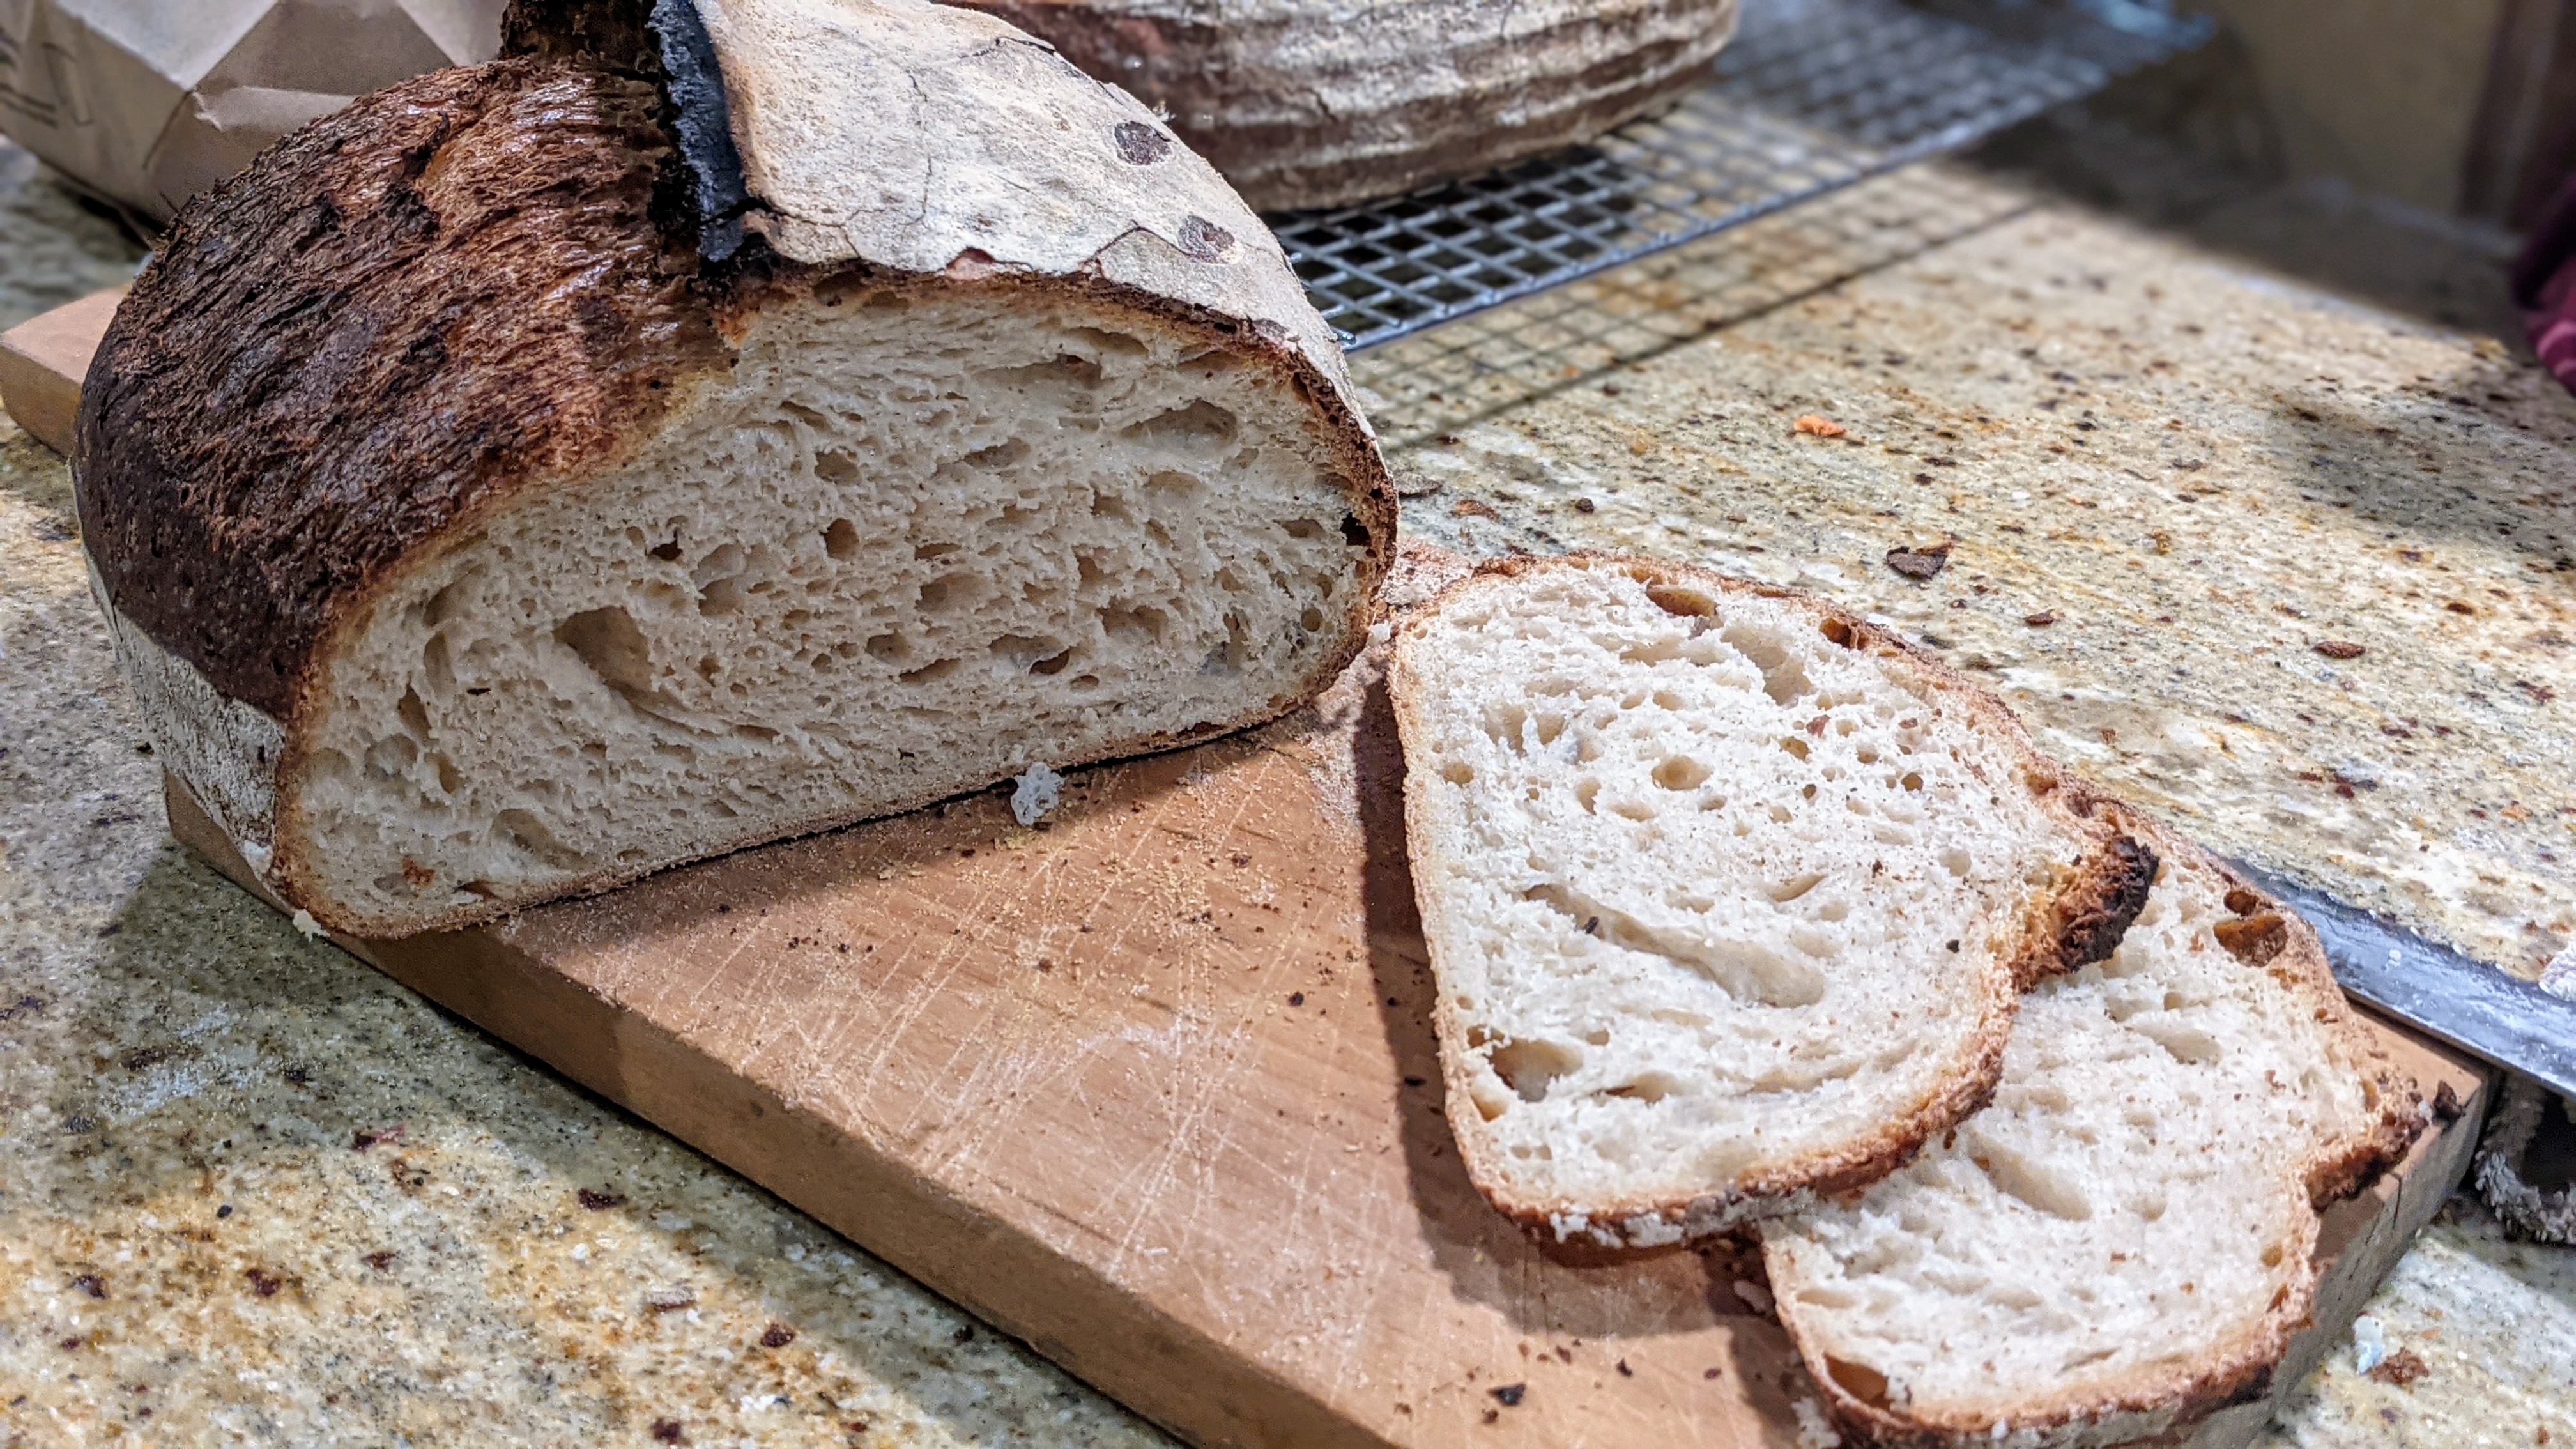
When we use a starter right out of the fridge, and mix it into a dough, all we’re doing is introducing the yeast to a new food source. So, instead of waiting for the yeast to wake up and get to peak activity, we just let it wake up within the final dough. What I found with this technique is that bulk fermentation is much slower than if I use a peaked levain – lasting from twelve to sixteen hours. But the advantage of this is that I just mix everything together, do three folds every fifteen minutes in the first forty-five minutes, then let the dough rise until it has doubled.1
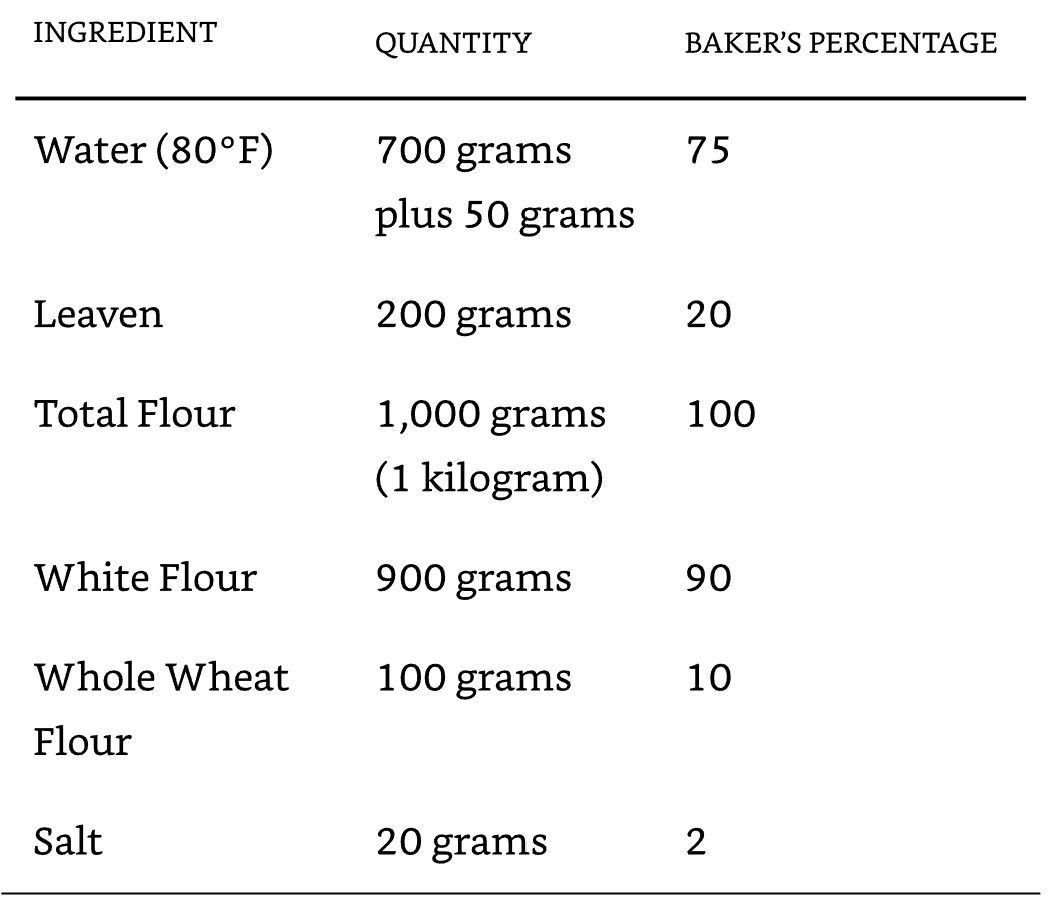
Here are the formula and final dough:
Yield: 2 X 1 kilo loaves
Formula
Flour
100.00%
Water
80%
Salt
2.00%
Starter will be 10% of total flour
Final Dough
Bread Flour (I recommend at least 12% protein content)
Mix. Mix all the dry ingredients in a separate bowl, including the salt. In a separate bowl, dissolve the starter into all the water, then add to the dry ingredients and mix until you form a shaggy mass with no large lumps. If you used a stand mixer mix your dough, transfer the dough to a suitable container.
Bulk Fermentation. Overnight. In the first 45 minutes, do three sets of stretch and folds every fifteen minutes. Don’t freak out when you’re folding the dough, especially with the first set. This is a high-hydration dough. By the third fold, the dough will have developed a lot of strength – you will feel it.2
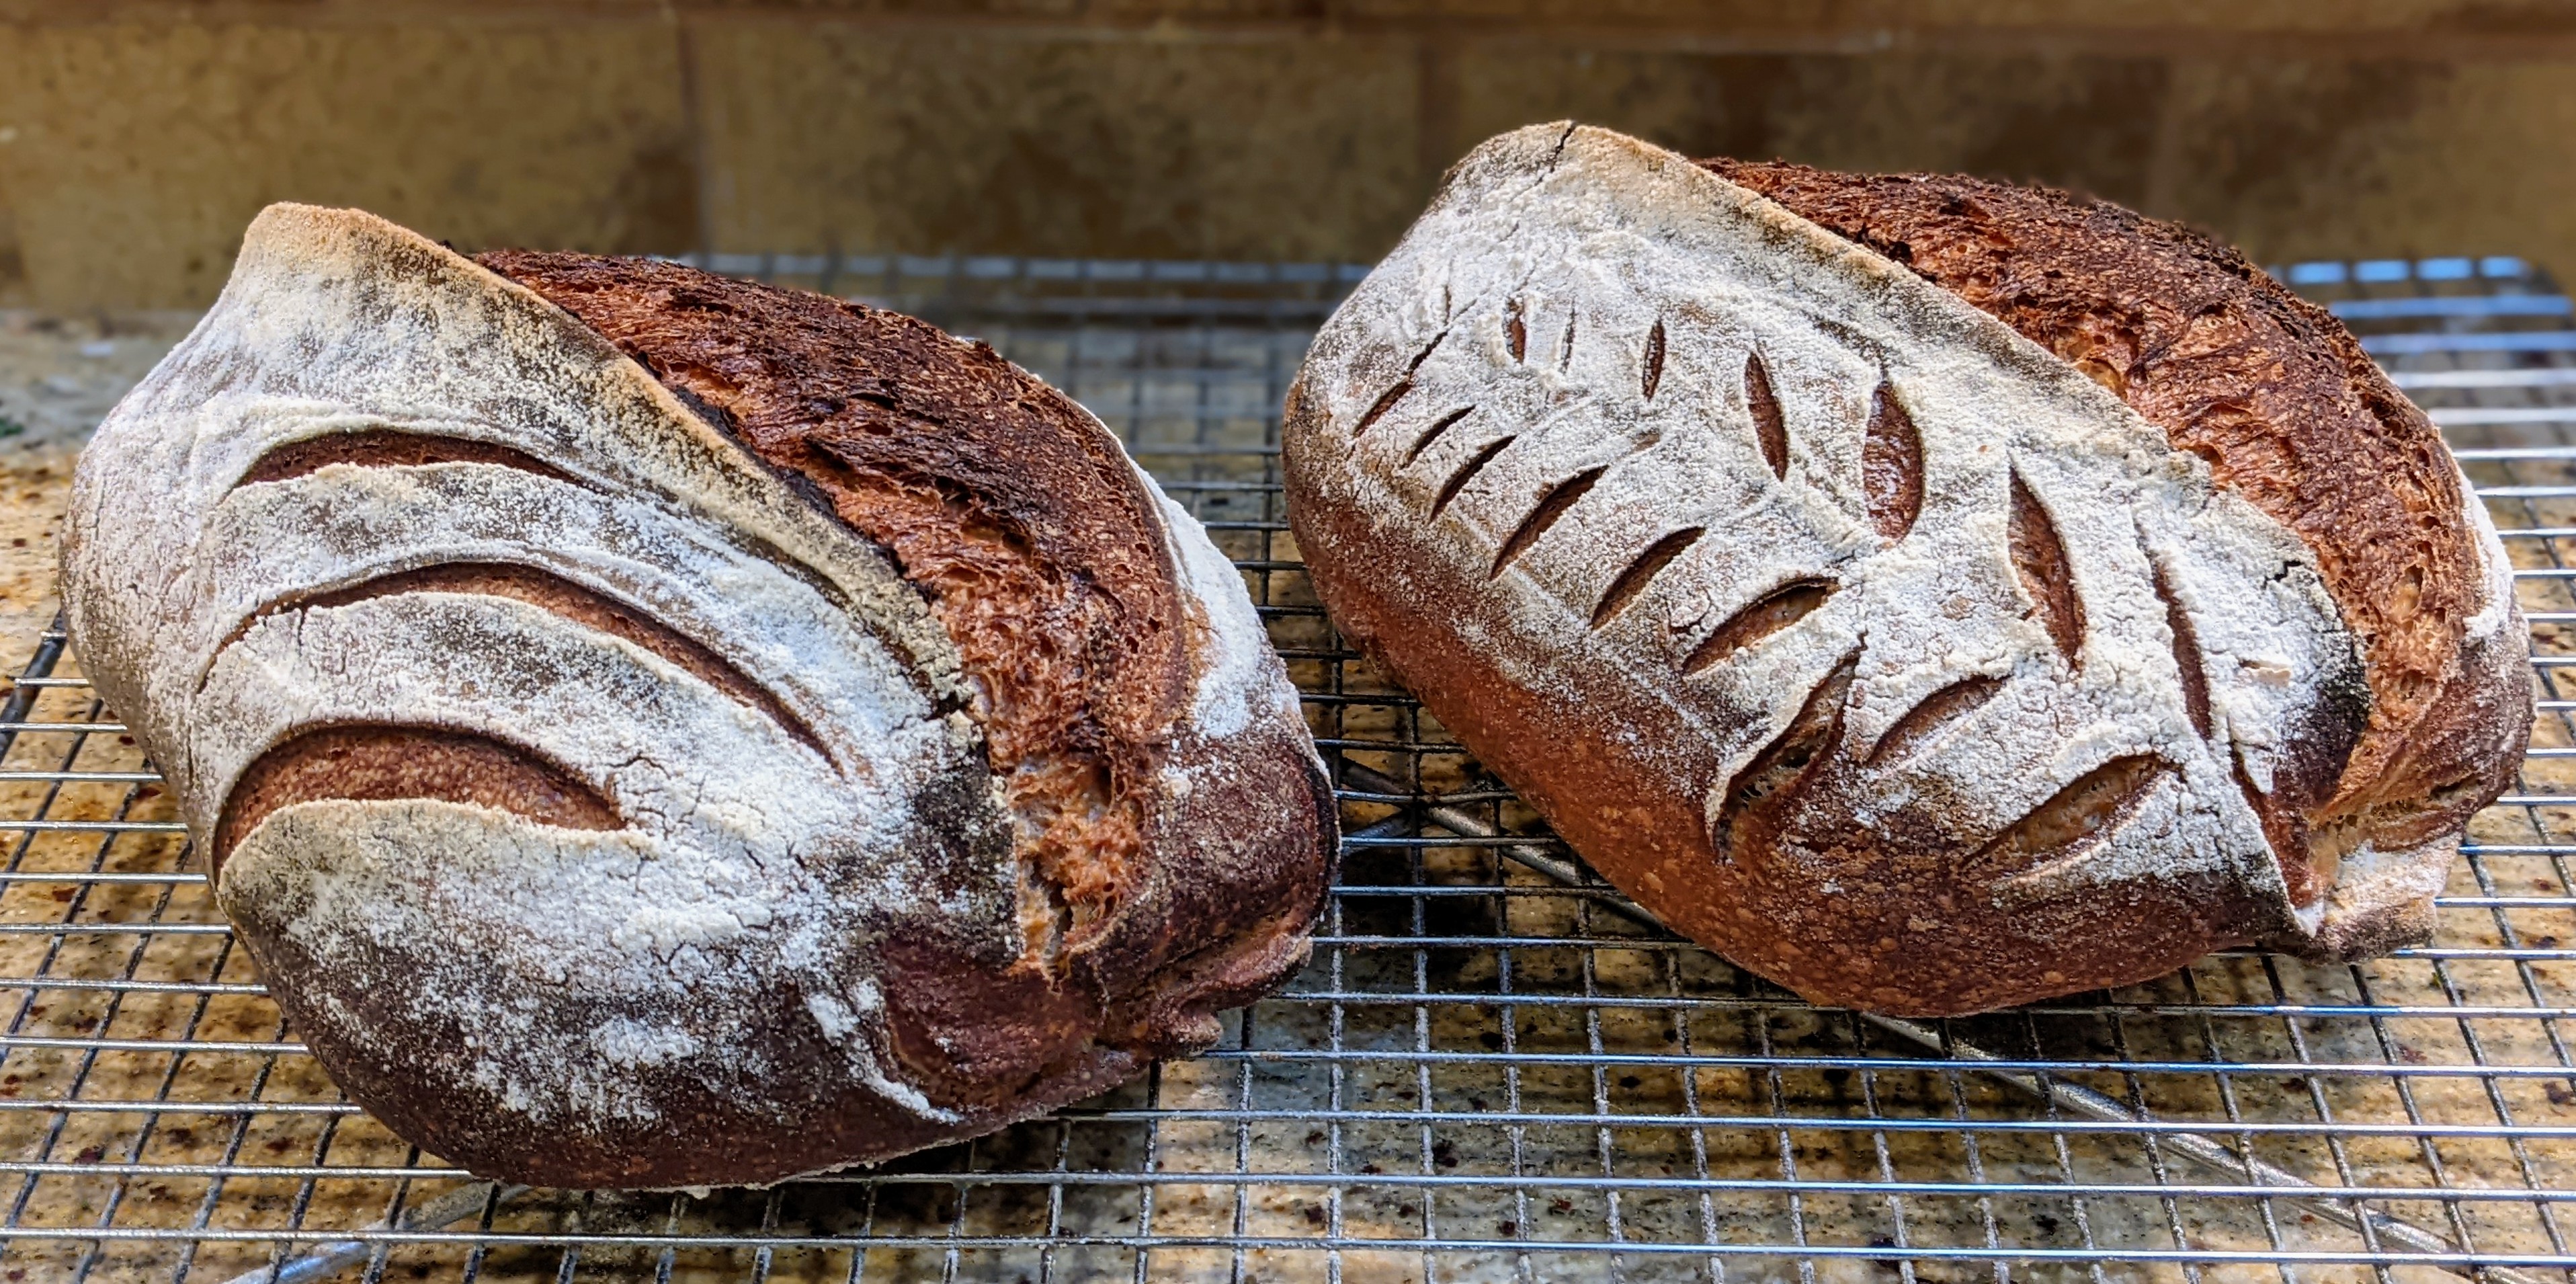
Divide and Pre-shape. Once the dough has almost doubled (see footnote below), pour it out onto a well-floured work surface. This is a high-hydration dough, so you don’t want it to be sticking. Divide into two equal pieces about a kilogram each and pre-shape into boules. Place the boules seam side down, sprinkle a little flour on top of each, then cover them with a tea towel and let them bench rest for 15-20 minutes.
Shape and Final Fermentation. Shape the boules into whatever shape you want then place them in bannetons. Cover them and put them into the fridge for 8-12 hours. My advice is to check them at six hours to see how they’re progressing. When you do the poke test, the dough shouldn’t spring back too quickly, and the indentation shouldn’t fade all the way.
Bake. Bake at 450°F for 20 minutes with steam (if using a Dutch oven, cook covered for 20 minutes), remove steaming container or uncover if using a Dutch oven, then bake for another 20-25 minutes uncovered or until the crust is a deep golden brown. Personally, I take it to brown as I like a well-caramelized crust. Cool for at least 30 minutes before cutting (though it’s better to let the bread cool for a couple of hours.
In Martin Philip’s video, he mentioned letting the dough double. But if you use a very mature starter, be VERY careful to monitor the progress of your dough because a mature starter is highly acidic, and acid will break down gluten. The first time I used this technique, I let the dough get to double and it was overproofed! Also, he mentioned that he let his dough go for 12 hours. Bear in mind that that’s just a guideline. Expansion is more important. I’ve learned to check at about 8 hours, and I will divide and shape when the dough reaches about 70%-75% expansion just to be safe. ↩︎
If the dough hasn’t done much by the time you wake up, don’t worry. Give it another stretch and fold to move the yeast to a new food source. You will soon see progress. ↩︎
I’ve gone to my house in Hawaii and so far, I’ve already baked a couple of times and will bake bread yet again for a Labor Day party in couple of days. I got a special request for Labor Day by the host of the party, and my wife’s friend invited us to dinner tonight and asked if I could bake some bread to bring to the dinner. Then my daughter asked me to bake some bread for her because she hadn’t had any of my bread for a year.
It is never a problem for me to bake. I love it and enjoy baking when I have the time; yes, even on vacation. But one thing I haven’t done is bring my starter with me. I suppose could bring a little starter and grow a levain if someone specifically wanted sourdough, but my thinking is that I can make so many diverse types of bread that it seems almost pointless to bring a starter.
Plus, I refuse to let my starter rule my life. Holy crap! I’ve seen people proudly post pictures of themselves in their hotel rooms proudly holding up their jars of sourdough starter that they took on vacation with them so they can feed it. To each their own, but if I’m on vacation, I don’t want my activities limited by my freakin’ starter feeding schedule! I feed my starters (yes, I have anywhere from two to four) before I leave then put them in the fridge. They’ll keep for weeks.
So what did I bake? I made two batches of ciabatta, one for us and one for the dinner party with our friends. For the Labor Day party, I baked two dozen Hawaiian rolls that went perfect with the BBQ short ribs we had. Both of those types of bread just required regular old yeast. For the ciabatta, I made an overnight biga preferment. Wow! Were they delicious.
And the Hawaiian rolls were the hit of the party! They didn’t last at all! They were rich with butter and soft and pillowy. I’m going to have to make more!
Anyway, the point to this is that if you want to bake on vacation and have the means to, go for it. But just remember this: It doesn’t have to be sourdough.
While the word “focaccia” dates to the 14th century, the Romans baked panis focacius which was a flat bread baked in a hearth. In other words, this type of bread has been around quite a long time. It’s one of the simplest, most straightforward breads to make, and this version of it is super simple, only requiring mixing. No kneading, no folding.
Yesterday, I realized that I hadn’t baked any kind of bread for weeks because of my increasingly busy schedule of work. So, I resolved to remedy that and decided that I’d make some focaccia. I also realized that even though I’ve made it many times, I never posted a recipe here.
Don’t let the title of this bread make you think it’s something special or complicated to make. Focaccia al Rosmarino is simply focaccia topped with rosemary. Here’s the recipe:
Overall Formula
Flour
100.00%
Warm Water
88.00%
Salt
2.00%
Yeast
1.00%
Total %
191.00%
Final Dough
1/2 Bread / 1/2 AP Flour
529g
Water
465g
Salt
11g
Yeast
5.29g
Total Yield
1010g
Other Ingredients
Rosemary (fresh or dried, whole or chopped)
1 tbs
Butter
1 tbs
Olive Oil
~1/4 cup
Mix Dough. Mix all the dry ingredients together until fully combined. Gradually add water and mix dough until smooth. This is wet dough. If mixing by hand, I highly recommend using a Danish dough whisk if you have one. Otherwise, a stand mixer works great!
Bulk Fermentation. If you used a mixer to mix the dough, transfer the dough to a large glass bowl. At this point, you have two options: 1) Let the dough rise at room temperature until the dough ball doubles in volume or 2) Cover the bowl with plastic wrap and pop it into the fridge for 8-12 hours. Option 2) is better as that allows some organic acids to form to give the bread a slight twang.
Final Fermentation. Liberally grease a 9″ X 13″ glass baking pan with butter, then spray or spread olive oil on the bottom of the pan. Transfer the dough to the pan, placed roughly in the center. Transferring will degas the dough, but don’t worry, it will re-gas. Spray olive oil on the top of the dough. Cover with plastic or a tea towel and allow the dough to expand out to the edges of the pan, again doubling in volume. Once doubled, using your fingertips, dimple the dough to spread it out to the extents of the pan and to create little pockets on the top of the dough. Sprinkle rosemary all over the top, then liberally spray olive oil on the top as well. Allow the dough to relax for another hour.
Bake. Bake at 425℉ for 25 minutes (the top should be golden brown). Once baked, transfer the loaf to a cooling rack. Brush butter or olive oil on top then lightly sprinkle salt on the dough.
For years, I’ve occasionally experimented with creating a dough that I could use for both pizza crust and bread, and I finally produced a formula that works wonderfully for both! As you’ll see in the formula below, there’s not much to it. But the kicker for me was using a much lower hydration than I’ve been experimenting with in the past.
My earlier experiments employed hydration 75% and above. I was also using a combination of high-gluten bread flour and AP flour, and sometimes mixed with some Kamut™️ flour. But yesterday afternoon, I thought about an episode of Diners, Drive-ins, and Dives where Guy Fieri visited this pizza place and the chef used AP flour only. That got me thinking that if I used just AP flour and lowered the hydration, I could still achieve decent gluten formation, and the small amount of olive oil would help to create a soft crumb if I used it for bread.
As far as bread is concerned, this dough produces a closed but airy crumb that is perfect for rolls, but placed in loaf pans, is perfect for sandwich loaves! For pizza, the lower hydration creates a nice, strong dough that can easily be spread out into a pizza crust. And here’s the kicker: The long, cold fermentation takes place during bulk fermentation. This means you can create the dough the day before, and let it sit in the fridge for 12-24 hours. If you’re making pizza, you can divide the dough immediately after kneading, then let it rise in the fridge. More details below. For now, here’s formula and the final dough to make 6 buns.
Formula
AP Flour
100.00%
Water
65.00%
Salt
2.00%
Yeast
0.60%
Olive Oil
1.30%
Final Dough
AP Flour
825g
Water (lukewarm)
536g
Salt
17g
Yeast
5g*
Olive Oil
11g
Total Yield
1394g 6 X 230g buns 12 X 115g rolls
*Use half the yeast for a 24-hour bulk ferment
I must come clean. I experimented with making longer buns as you can see in the pictures above. They turned out great, but they’re a little too heavy to be used for sandwich rolls. Based on those results, I’d lengthen them to make bread sticks for dipping. And if I’m going to use it for sandwiches, I’d definitely make loaves for loaf pans.
Process
Mix. Combine all the dry ingredients together. Then add the oil and water and mix thoroughly. Knead the dough until smooth (you can use a mixer or do it by hand).
Bulk Fermentation. If you’re making bread or rolls, place the dough into a container (I use a 6-liter Cambro container). If you’re making pizza dough, divide the dough into two or three equal pieces, depending on the crust size you want, form into balls, then place on a sheet and cover with plastic wrap. In either case, place the dough in your fridge with a temperature in the range of 39℉-42℉. Ferment for 12-16 hours. The dough may triple or quadruple in volume during this time. But it’ll be okay if it’s domed in the middle.
If you want to go for a long bulk fermentation, use half the yeast. With that amount, the dough should expand to its fullest in about 24 hours.
Divide and Shape. If you made pizza crusts, there’s no need to divide. Simply gently press out the balls to about 1cm-thick discs, then cover and set aside. For rolls, divide into twelve pieces, then form balls and place on a baking sheet covered with parchment paper. For sandwich bread, divide into two equal portions, then form each into logs and place them into loaf pans. For breadsticks, form into long logs then set on a well-floured couche.
Final Fermentation. Let the dough proof for an hour at room temperature or until it doubles in volume.
Bake. For bread, lightly brush the tops of the loaves or rolls with a little water, then score if you want. Bake at 425℉ for 30 minutes. Use steam for the first 10-15 minutes of the bake to help rise. For pizza, shape, top, and bake as you normally would.
Having been to Mexico several times over the years and being born and bred in California, I have a deep appreciation for Mexican food. But I have a special place in my heart for the Torta, the Mexican version of a sandwich. In the US, when we think of a “sandwich,” what typically comes to mind is a flat piece of meat with some condiments like mayo or mustard, and maybe some lettuce, onion, and tomato.
But the Torta… Ah, the torta. Like a sandwich, it’s meat between some bread, but that’s where the commonalities end, especially with the meat. The meat can be carne or pollo asada (grilled steak or chicken), or puerco (pork), camaron (shrimp), polpo (octopus), and my favorite: arrachera (marinated, grilled skirt steak). Heck! You can use any type of meat – yes, cold cuts as well. But instead of mayo, there will invariably be avocado. As for vegetables, you might get some grilled onion or diced tomato. In the states, shredded lettuce or lighly pickled cabbage are often added as well.
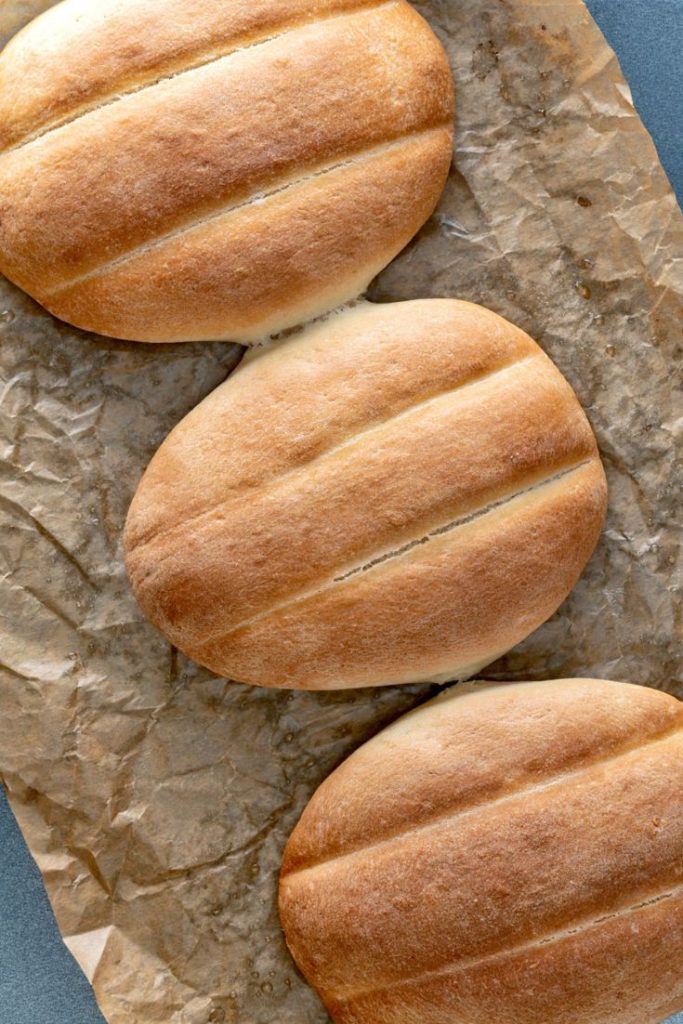
What I love so much about the Torta – and I suppose sandwiches in general – is that there are no rules. It’s a wide-open playing field! But that said, there is a type of bread that is commonly used for Tortas, and that is the Telera roll.
The Telera is an oval or rounded rectangle roll that is neither too wide nor long. The crumb is soft and fluffy with a firm but slightly chewy crust, making it perfect to soak up the juices of the various meats that are used. Visually, it is marked by two indentation lines across the top (we’ll get into that later). As for taste, technically, the Telera is a savory roll, but there is a slight sweetness as the dough contains a small amount of sugar.
As you can see in the picture to the left, it’s much like a hamburger bun that is ever-so-slightly longer on one side. This makes it a perfect platform for the grilled meats or seafood that are usually put on it.
Being a baker, after having a few Tortas on my last trip to Mexico just recently, I wanted to learn how to make them. And after a bit of research, and a bit of trial and error, I finally got a formula and recipe that’s both easy and delicious!
Overall Formula
Flour
100.00%
Water
60.00%
Butter (Softened)
5.00%
Yeast
1.40%
Salt
2.00%
Sugar
4.00%
Total Percentage
172.40%
Final Dough
Flour
516g
Water
309g
Butter (Softened)
26g
Yeast
7g
Salt
10g
Sugar
21g
Total Weight
889g* 8 X 110g rolls
78ºF/26ºC
*The extra 9g is factored in to allow for process loss.
Mix. Combine all the dry ingredients together in a large mixing bowl and mix to evenly distribute. If you use a mixer, use the paddle at lowest speed. Cut butter into the dry ingredients much like you’d do with biscuits (butter should be soft). Add the water in 3-4 batches, making sure it’s well-incorporated. If using a mixer, switch to the dough hook and slowly add the water until everything has been incorporated together.
Knead. Even though I use a mixer to mix, I enjoy kneading simply because I don’t do it that often as most of my bread is “no-knead” bread. Turn out the dough onto a clean work surface and knead it for 5 minutes or until the dough is smooth. Richard Bertinet’s slap and fold works great too! Work the dough into a ball, then place it in a greased bowl (I use olive oil), seam side up. Flip the dough over onto the seams so the whole ball is covered. Cover the bowl with a cloth.
Bulk Fermentation. Place the bowl in a warm place and let the dough rise and expand to almost double in volume. 45 minutes – 1.5 hours. Remember, watch the dough and not the clock!
Divide and Shape. Punch down the dough to release the gas (no, you don’t want an open crumb), then divide the dough into 110g pieces. Roll each piece into a tight ball, then set aside to relax for about 15 minutes.
On a lightly floured surface, press each ball out into an oval of about 1 -1.5 cm thick. Sprinkle a little flour on top of the oval, then about a 1/3 of the way from the long side of the oval, press a straw or chopstick down to the board, being careful not to tear the dough, but really work it down into the dough. Repeat on the other side, then place on a baking sheet covered with parchment paper. BTW, you’ll want to move the sections together when you place them on your baking sheet. This is a method of scoring without a blade. And if you find that your dough sticks to your work surface, just use a bench scraper to lift it up.
Final Fermentation. Once all the rolls have been shaped, cover the baking sheet with a damp cloth (you don’t want to form a skin), and allow the rolls to double in volume. This could take 30 minutes to an hour depending on your ambient temperature. Preheat oven to 400ºF/200ºC.
Bake. Before baking, lightly brush the tops of the rolls with water, then bake for 15 minutes at 400ºF/200ºC or until golden-brown on top. Don’t let these overcook as the sugar – even though there’s just a little – will caramelize easily so be watchful!
Making a Torta
There are no hard and fast rules when making a torta. Even in Mexico, tortas vary from region to region. And while it’s generally accepted that the Telera roll is the common roll to use, even in Mexico, depending on the region, different bread may be used. For instance, in Guadalajara, there is the Torta Ahogada or “drowned” torta that uses a sourdough bread called “Bilote Saldado.” But for our purposes, we’ll just stick with the basic torta.
If you want something really basic, just put some grilled meat between the halved bread, top it with avocado, then close the bun. This is the way it is normally served in Cozumel. But if you want to get fancier (and I like to get fancier), coat the halves with smashed avocado, spread some shredded lettuce or cabbage (I prefer cabbage), add some sliced tomato, then top that with the grilled meat. Add lime juice for a little zest.
As for meats, you can use pretty much any meat or even seafood. Cold cuts are fine as well. My favorites are:
Carne or Pollo Asada
Arrachera (skirt steak)
Grilled Octopus
Shrimp (Grilled, Sauteed)
Grilled Fish
My two big favorites are Arrachera and Octopus. But truth be told, I’ve only had octopus in Mexico. Not sure how it’s prepared, but it ROCKS!
My daughter asked me if I could make her a garlic-parmesan-rosemary loaf for her birthday, as that is her favorite bread of mine. I normally make this as a sourdough, but because of time constraints, building a levain wasn’t an option. But I didn’t want to make just a straight dough. Not that it would be bland, but for me at least, it would just be a bit boring. Plus, a straight dough just doesn’t keep fresh for long.
But then it occurred to me that I could still use a preferment and make a poolish. While it wouldn’t have the sourness of a levain, it would contain at least some organic acids that would not only add to the flavor profile, but also add some natural preservative. Then it further occurred to me that if I made the poolish from rye flour, I’d add yet another dimension to both the flavor and textural profiles! The result was magnificent, as you can see in the picture above. Here are numbers…
Overall Formula
Flour
100.00%
Water
76.00%
Salt
1.50%
Yeast
1.00%
Roasted Garlic
6.00%
Poolish
Preferment % of total flour
50%
Preferment Hydration
100%
Flour
301g
Water
301g
Yeast @ 0.33%
1g
Final Dough
Bread Flour
821g
Water (90-100°F)
558g
Salt
16g
Yeast
11g
Roasted Garlic
66g
Preferment
547g
Total Yield
2020g 2 X 1000 loaves
Extra Ingredients
Normally, I’d include the whole garlic cloves, cheese, and rosemary in the overall formula and the final dough. But I’ve found that developing the dough first, then including the cheese and garlic when I’m shaping gives me much better results.
Raw, Whole Garlic Cloves
200-250g
Parmesan Grana Padano Cheese
400g
Fresh Rosemary (finely chopped)
10-15g
Make the poolish. The night before you bake, make the poolish. Since it’s going to ferment overnight, there’s no need to use warm water. Just use regular tap water or room temp water. Because you’re using rye flour, you won’t get many surface bubbles, if any at all. But you will get lots of expansion by morning. And don’t worry if the poolish has peaked and subsided a bit.
Roast the garlic. Place the garlic in either an oven-safe container or some foil. Drizzle with a little olive oil to coat the cloves, then wrap them so all cloves are covered. Roast for 30-45 minutes at 375℉/250℃ until the cloves are mashable with a fork. Mash the cloves well, then set aside and allow to cool.
Mix.
In a separate bowl, combine all the wet ingredients together, along with the yeast and poolish. Mix well to break up and dissolve the poolish and set aside.
Thoroughly combine the flour and salt in your main mixing bowl.
Pour the liquid mixture into the dry mix, then start to slowly combine. As the dough starts forming, add the mashed garlic.
Mix the dough until smooth and no dry ingredients remain.
While you can certainly hand-mix the ingredients, I like to use a mixer for this dough. It’s more efficient.
Bulk Fermentation. You want this dough to double in volume. This could take anywhere from 1 1/2 – 2 hours.
Folding. Fold the dough once within the first 45 minutes. But make sure you fold it to the point where the dough no longer wants to be folded. Once you’ve finished folding, turn the dough over onto the seams.
Divide and preshape. Once the dough has fully fermented, turn it out onto a clean work surface. Divide into two 1000g pieces (yes, I scale out the portions), then form the pieces into nice rounds. Bench rest the rounds for at least 15 minutes to allow the dough to relax.
Shape.
Work a round into a rough rectangle as shown below.
Next, spread half the garlic cloves, parmesan cheese, and rosemary evenly over the surface of the dough.
Next, fold over the ends of the rectangle.
Starting at the “top” of the rectangle, start rolling the dough into a cylinder. Try to make the rolls as tight as possible without tearing the dough.
Once you’ve finished rolling up the cylinder, pinch the cylinder closed, then roll cylinder onto the seam.
Now, with a sharp knife, cut the cylinder in half length-wise, and form a “V” with the two halves.
Carefully, twist the two halves together.
Pick up the twisted mass from the ends, then place it into a well-oiled 9″ X 5″ X 3″ pan.
Bake. Drizzle olive oil over the top of each loaf, and bake at 375℉/250℃ for 45-50 minutes. It may seem that this is a low temp to bake at, but you want to roast the garlic slowly, plus you don’t want to completely liquify the cheese, which will happen at a higher temp. Bake the loaves until the internal temperature reaches 205-210℉.
Remove from the oven, turn the oven off, then separate the loaves from the pans. Put the loaves onto a baking sheet, then return them to the oven and let them cure for 15-20 minutes to help solidify the crust.
As much as I love baking with KamutTM, my normal supplier has been out of it for some months now. But what they have had in stock is dark rye flour. So for the past few months I’ve been experimenting with it and trying to find a good ratio. Like KamutTM, rye flour doesn’t form gluten. They’re both high in protein, but their proteins are more gelatinous in the presence of water as opposed to forming chains. Needless to say, they don’t add to the structure of the dough.
While you certainly could do a 100% rye or KamutTM loaf, you’d have to keep the hydration pretty low or bake your bread in a pan. As for myself, while I’ve made bread using 100% rye or KamutTM, I have to admit I’m not a fan. But I love what they contribute to the bread when used in a flour blend.
For this recipe, the final blend is a 75% bread flour / 25% rye flour blend. 15% of the flour comes from the rye-based starter. The other 10% blended with the bread flour for the final dough.
Here’s the recipe:
Overall Formula
Flour
100.00%
Water
76.00%
Salt
1.50%
Total %
177.50%
Flour Blend
Rye Flour from Preferment
15.00%
Bread Flour
75.00%
Rye Flour
10.00%
Total %
100.00%
Final Dough
Bread Flour
854g
Rye Flour
114g
Warm Water
694g
Salt
17g
Levain
341g
Total Yield
2020g 2 X 1000g loaves
Total Flour
1138g
Total Water
865g
Optimal Dough Temp
78°-82°F / 25° -27°C
Prepare the Levain. Make a levain that will yield about 350g or a bit more from a mature starter and equal parts of rye flour and water. The mother culture I use for this is 100% rye flour, but if yours isn’t, don’t sweat it. Once the levain passes the float test, it’s ready.
Initial Mix. In a separate bowl, mix the levain with all the water and make sure to break up the levain. The water should be very warm to increase the yeast activity. Blend the bread and rye flour together well, then add the liquid to it. You can mix by hand, but I use a mixer on the lowest setting. Mix until you achieve a shaggy mass and there are no dry ingredients. You don’t want much gluten development at this point. Cover and let the dough rest in a warm place for 30 minutes to ensure the flour is well-hydrated.
Final Mix. Sprinkle the salt over the top of the dough, then fold it into the dough. I do this with a wet hand, scrunching the dough together, then folding it. I do this until I can’t feel salt granules. This also serves as a bit of a stretch and fold session.
Bulk Fermentation. I’m not going to give a time for this as it varies wildly. But the telltale you’ll look for is 75-100% volume expansion – almost double. With the amount and type of starter I use (it’s from an ancient Italian culture that I got from Sourdoughs International), my bulk fermentation is about 2 1/4 hours! It’s fast. Make sure your dough temp is within the optimal range I listed above!
Folding. Fold once after the first hour of bulk fermentation. I realize this seems counterintuitive, especially if you’ve followed the dogma of 6 folds over a 3-hour period. But we’re baking with rye flour and even though it represents only 25% of the total flour, it’s still delicate. So don’t want to keep punching it down. When you fold, make sure you’re getting a really good stretch from the dough and fold it until the mass no longer wants to be folded and the whole mass comes up when you stretch. When you’re done, turn the mass onto the folds and LET IT SIT!
Divide and Shape. Gently transfer the dough to an unfloured work surface. Divide it into two equal piece weighing a kilo each. Shape into rounds and bench rest for 15-20 minutes, or until the dough has relaxed. Finally, shape them into rounds or ovals, then place them in bannetons.
Final Fermentation. Pop your bannetons into your fridge and let the dough ferment for 12 – 18 hours. I went up to 24 hours with my previous batch as an experiment, and though flavorful, there wasn’t much energy left in the yeast for oven spring.
Bake. Bake at 460°F/240°C for 15 minutes with steam. After this, remove your steaming container, then turn your oven down to 425°F/220°C and bake for 25 minutes. You can go longer if you want a darker crust.
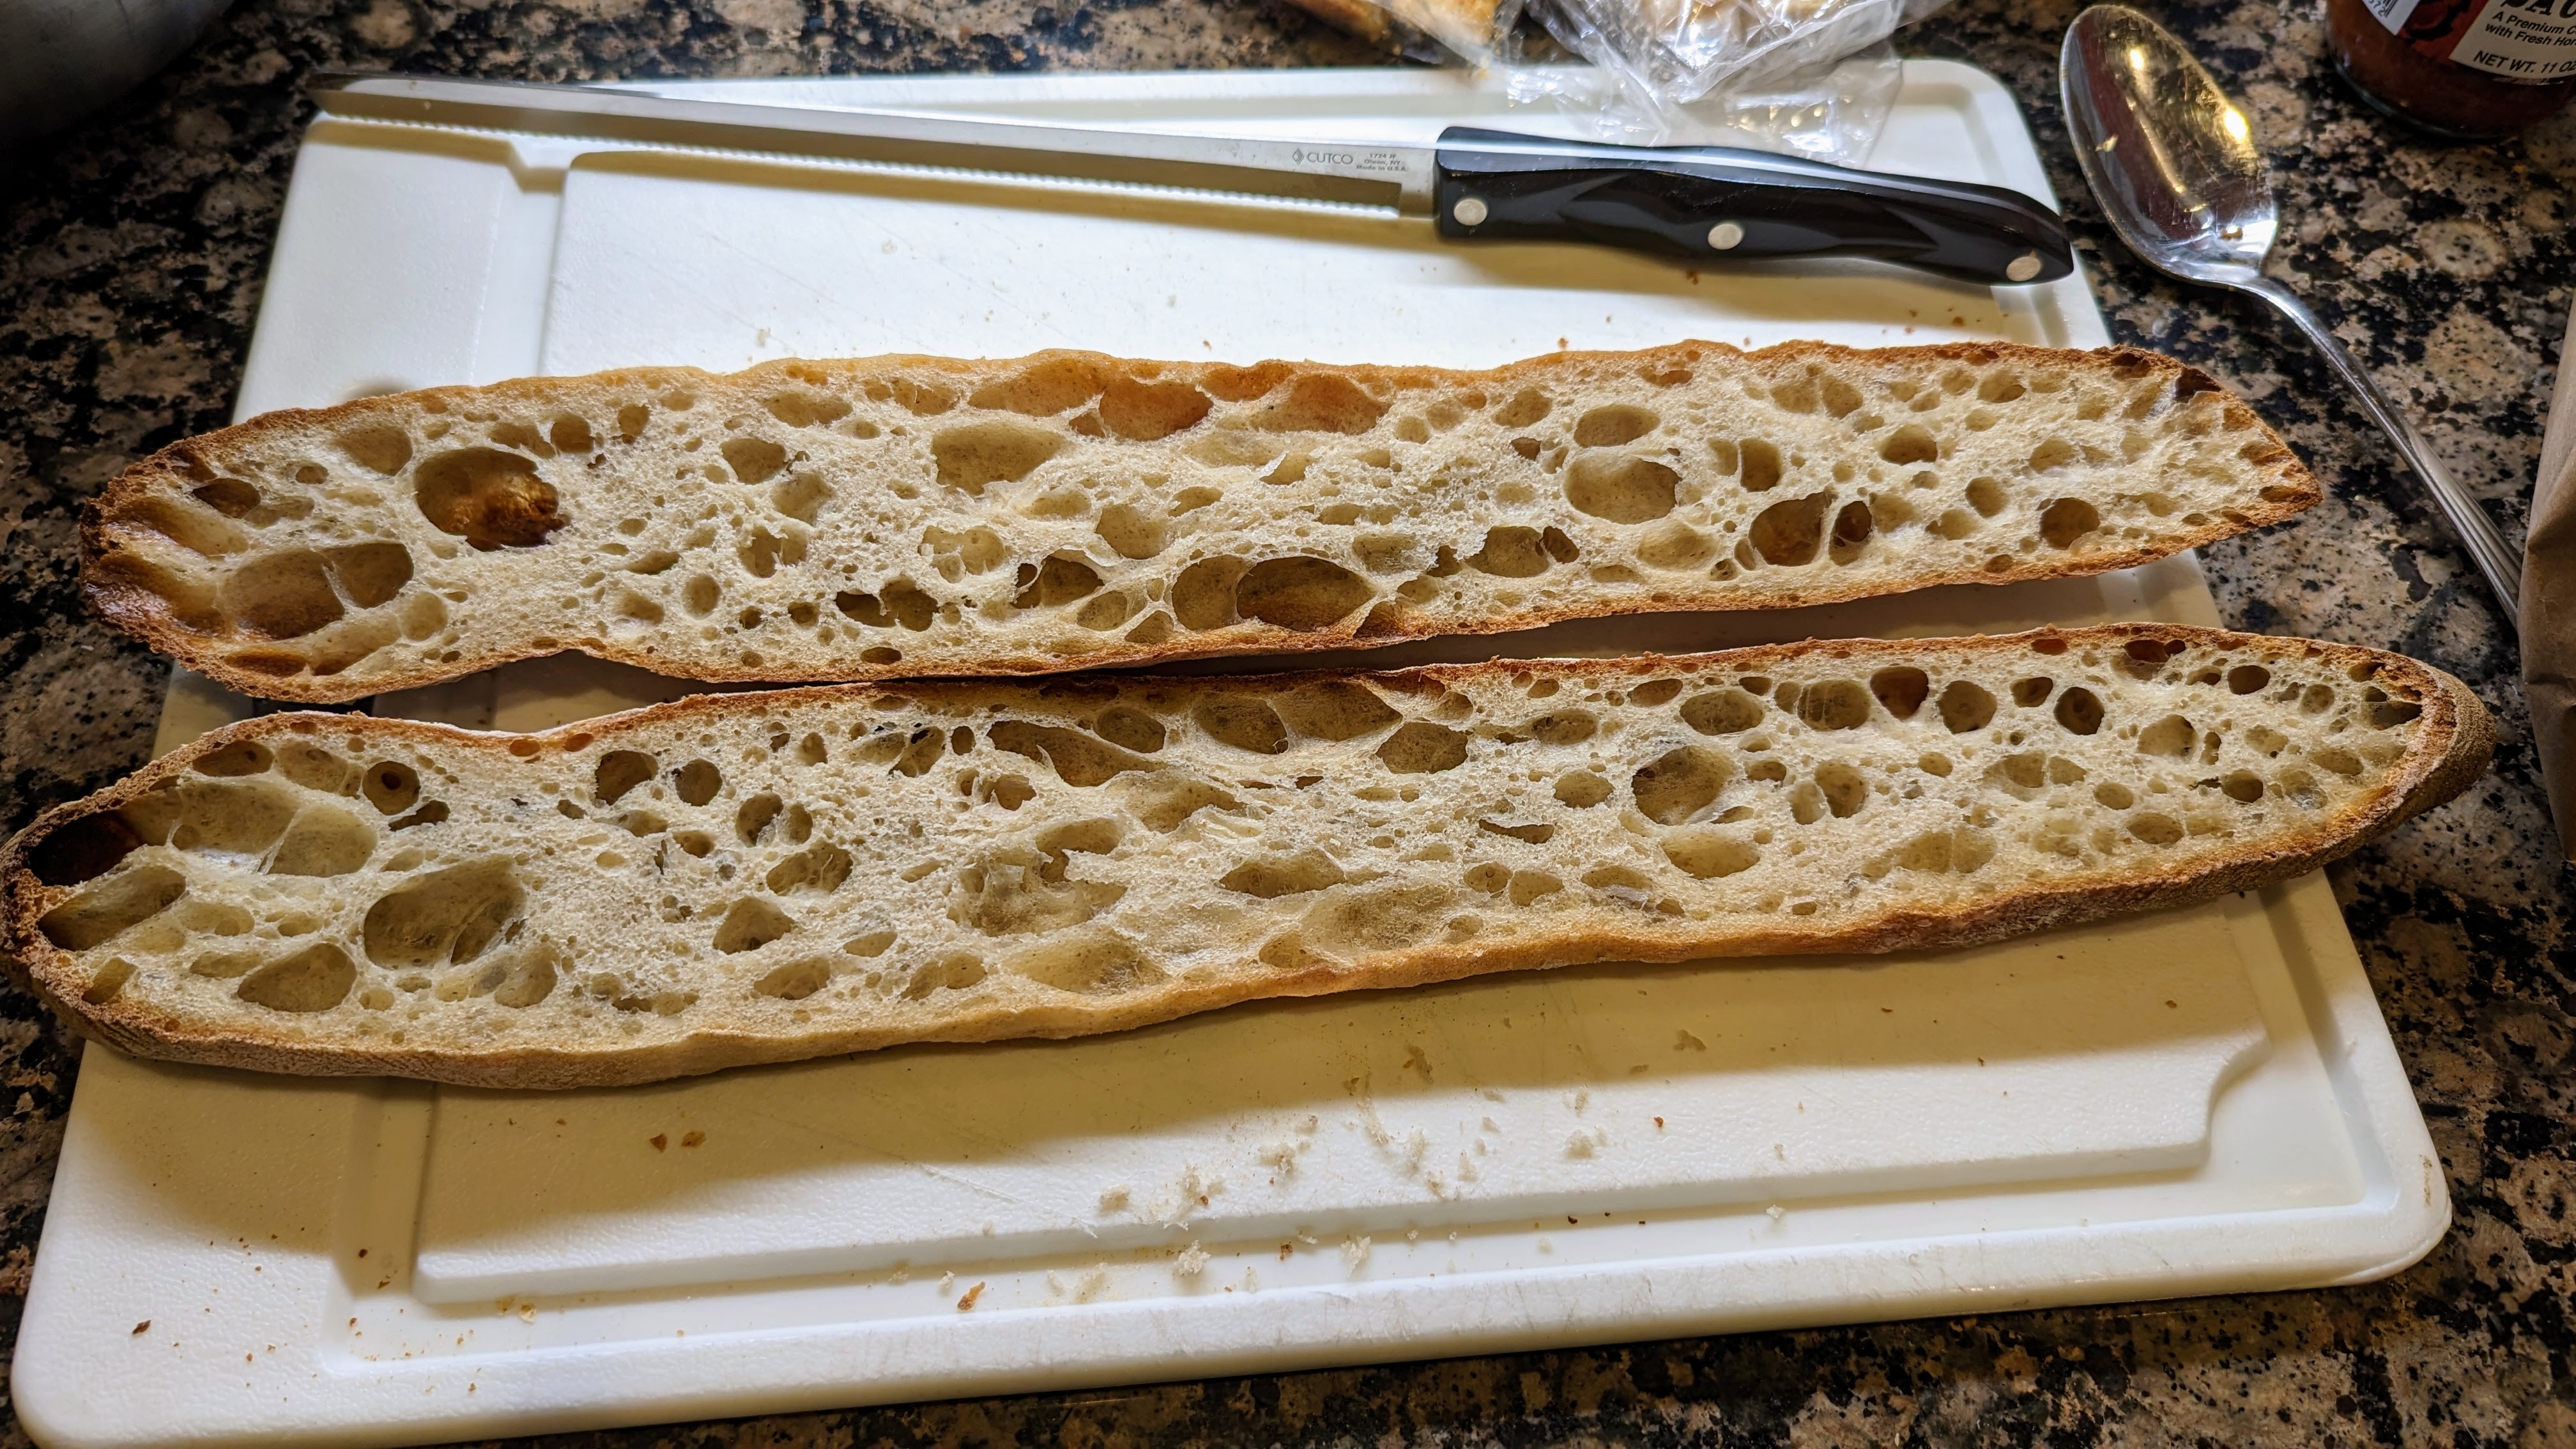
As I’ve mentioned many times in previous posts, the bread I love to bake the most is the baguette. The reason is that what makes a great baguette boils down to technique. Whether you use yeast or a starter to raise the dough, the dough itself is simple and straightforward. But the dough development and shaping techniques – for lack of a better word – are unforgiving. And on top of that, I’ve found that making baguettes requires using quite a bit of intuition and feel, much more than other types of bread I bake.
With more standard loaves like rounds and ovals, I tend to focus on building dough strength during fermentation. As long as I do that, shaping is pretty easy. Baguettes, on the other hand, are a different animal altogether. Dough strength is important, but timing and observing certain telltales with the dough are critical to getting a good result. And when using a sourdough starter, the process is a little slower than with commercial yeast, so the telltales are important. I’ll discuss those below.
As for these particular baguettes, the rye flour adds incredible flavors that really enhance the taste of the bread. You get the rye grain flavor as about 12-15% of the total flour comes from the rye. But I’ve also found that a rye starter creates a nice sour tang. It’s not really strong, but it’s noticeable.
And at least in the case of my mother starter, the yeast absolutely loves rye flour. In fact, if I add my mother starter cold from fridge into the rye flour and water mix, it will peak in less than 3 hours! I don’t know what that may be due to, but there must be something in the rye that makes my yeast go wild!
Overall Formula
Flour
100.00%
Water
76.00%
Salt
2.00%
Levain
30%
Levain
Rye Flour
125g
Water @ about 100℉
125g
Mature Starter
50g
Final Dough
Bread Flour
418g
AP Flour
228g
Water @ about 95-100℉ to get a 78-82℉ dough temp
464g
Salt
15g
Levain (30% of total flour)
228g
Total Yield
4 X 40cm-335g loaves
Initial Mix. Reserve 50g of the water. We’re going to do a Tartine-style autolyse by combining the flour, levain and water. Mix well and make sure all dry ingredients are incorporated with no large lumps. Personally, I do the initial mix with a mixer with the dough hook. Let rest in a warm place for 20 to 30 minutes. We don’t want fermentation to really get going.
Incorporate the salt. Dissolve the salt into the reserved water, then mix it into the dough. You can use a mixer for this, but salt will tighten up the dough and it will quickly climb up the hook. So I just mix the salt in by hand. If you do it this way, wet your hand often. Transfer dough to another container to do your bulk fermentation (I use a 6L Cambro).
Bulk Fermentation. No time on this. You’re looking for a 30%-50% rise from the original dough mass. Using my active starter, this usually takes about 2 – 2 1/2 hours total with a dough temp of 80℉.
Folding. This only needs two folds within the first hour and a half. In each session, stretch and fold until you can pick up the entire mass. After the second fold, just let the dough ferment until you achieve 30-50% rise from the dough.
Telltale: Before you start folding, check the dough. You want to get good extensibility out of the dough. It should stretch very well but not tear. By the time bulk fermentation is complete. your dough should feel velvety smooth and luxurious.
Divide and Pre-Shape. Divide the dough into 335g pieces. You can refer to my baguette dough development process. Let rest for 20 minutes or until the dough as relaxed.
Shape. Roll pieces into logs, then transfer each to a well-floured couche.
Final Fermentation. Especially with sourdough baguettes, it is critical to leave them alone once you start final fermentation. You want the shaped dough to expand to almost double in volume or until the indentation of the poke test comes back very slowly. You’re taking the dough out to almost full fermentation.
Bake. Bake a 475℉ for 12 minutes with steam, then 425℉ for 12-15 minute or until the crust is the desired color. I prefer a slightly darker crust without getting too crunchy.