Recipe: Roasted Garlic Ciabatta

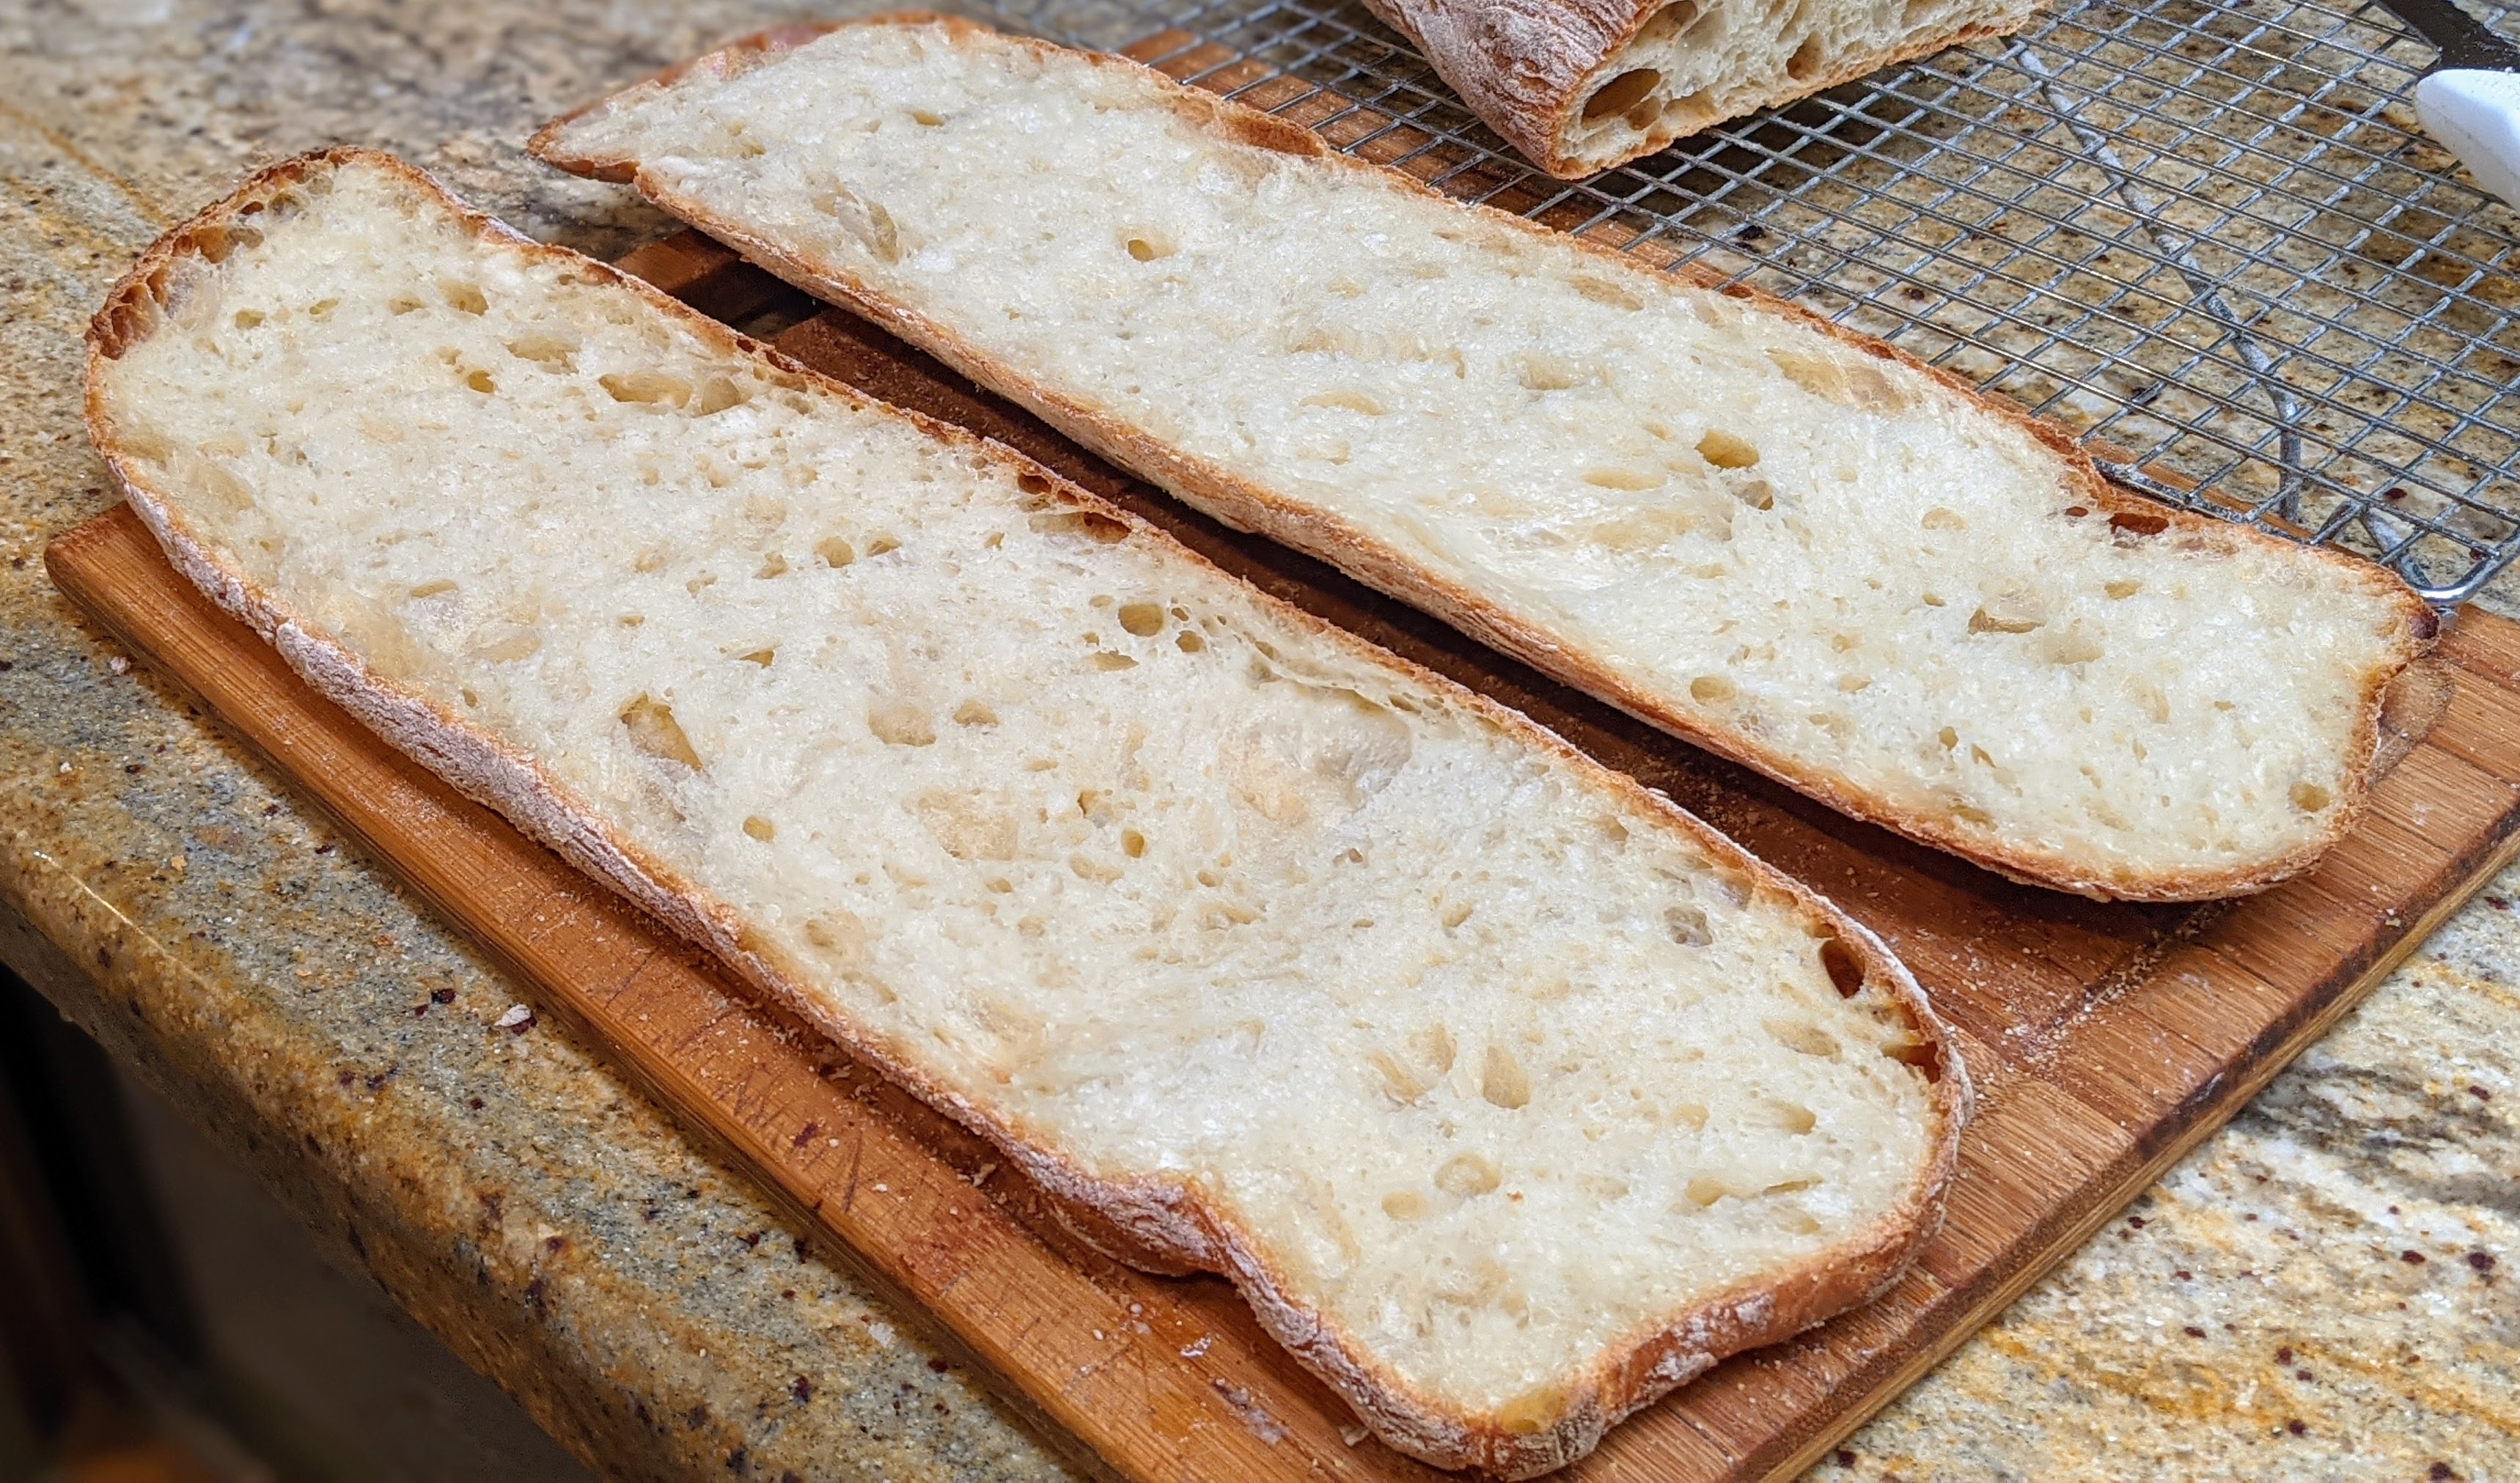
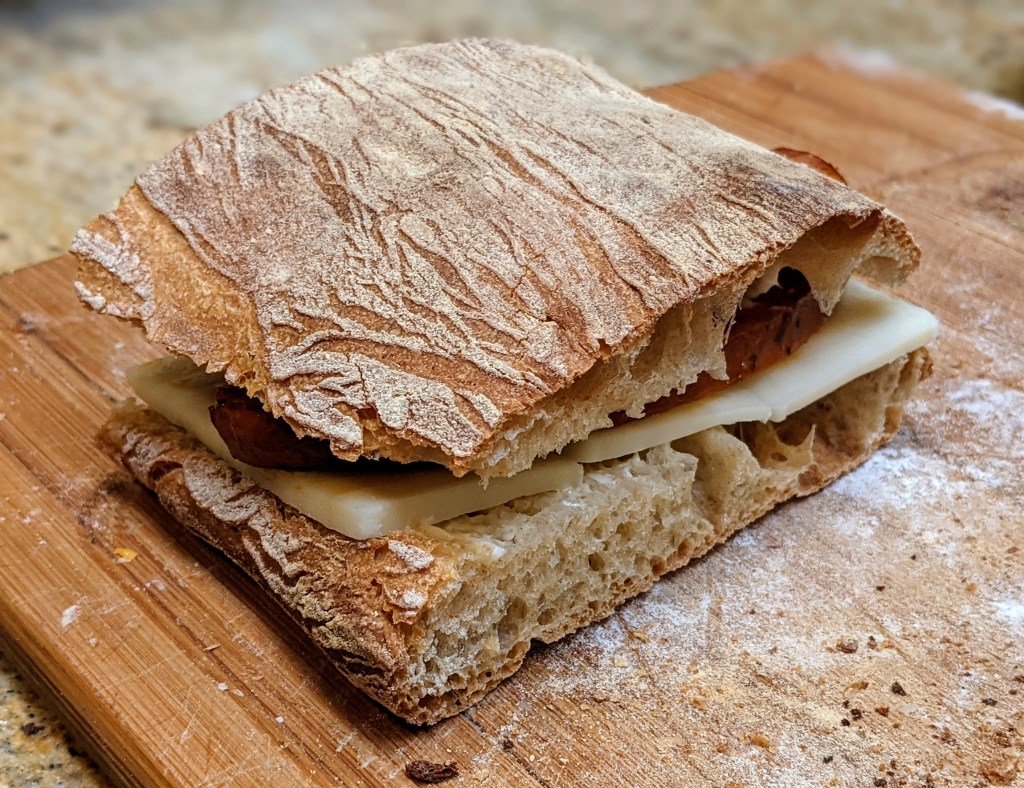
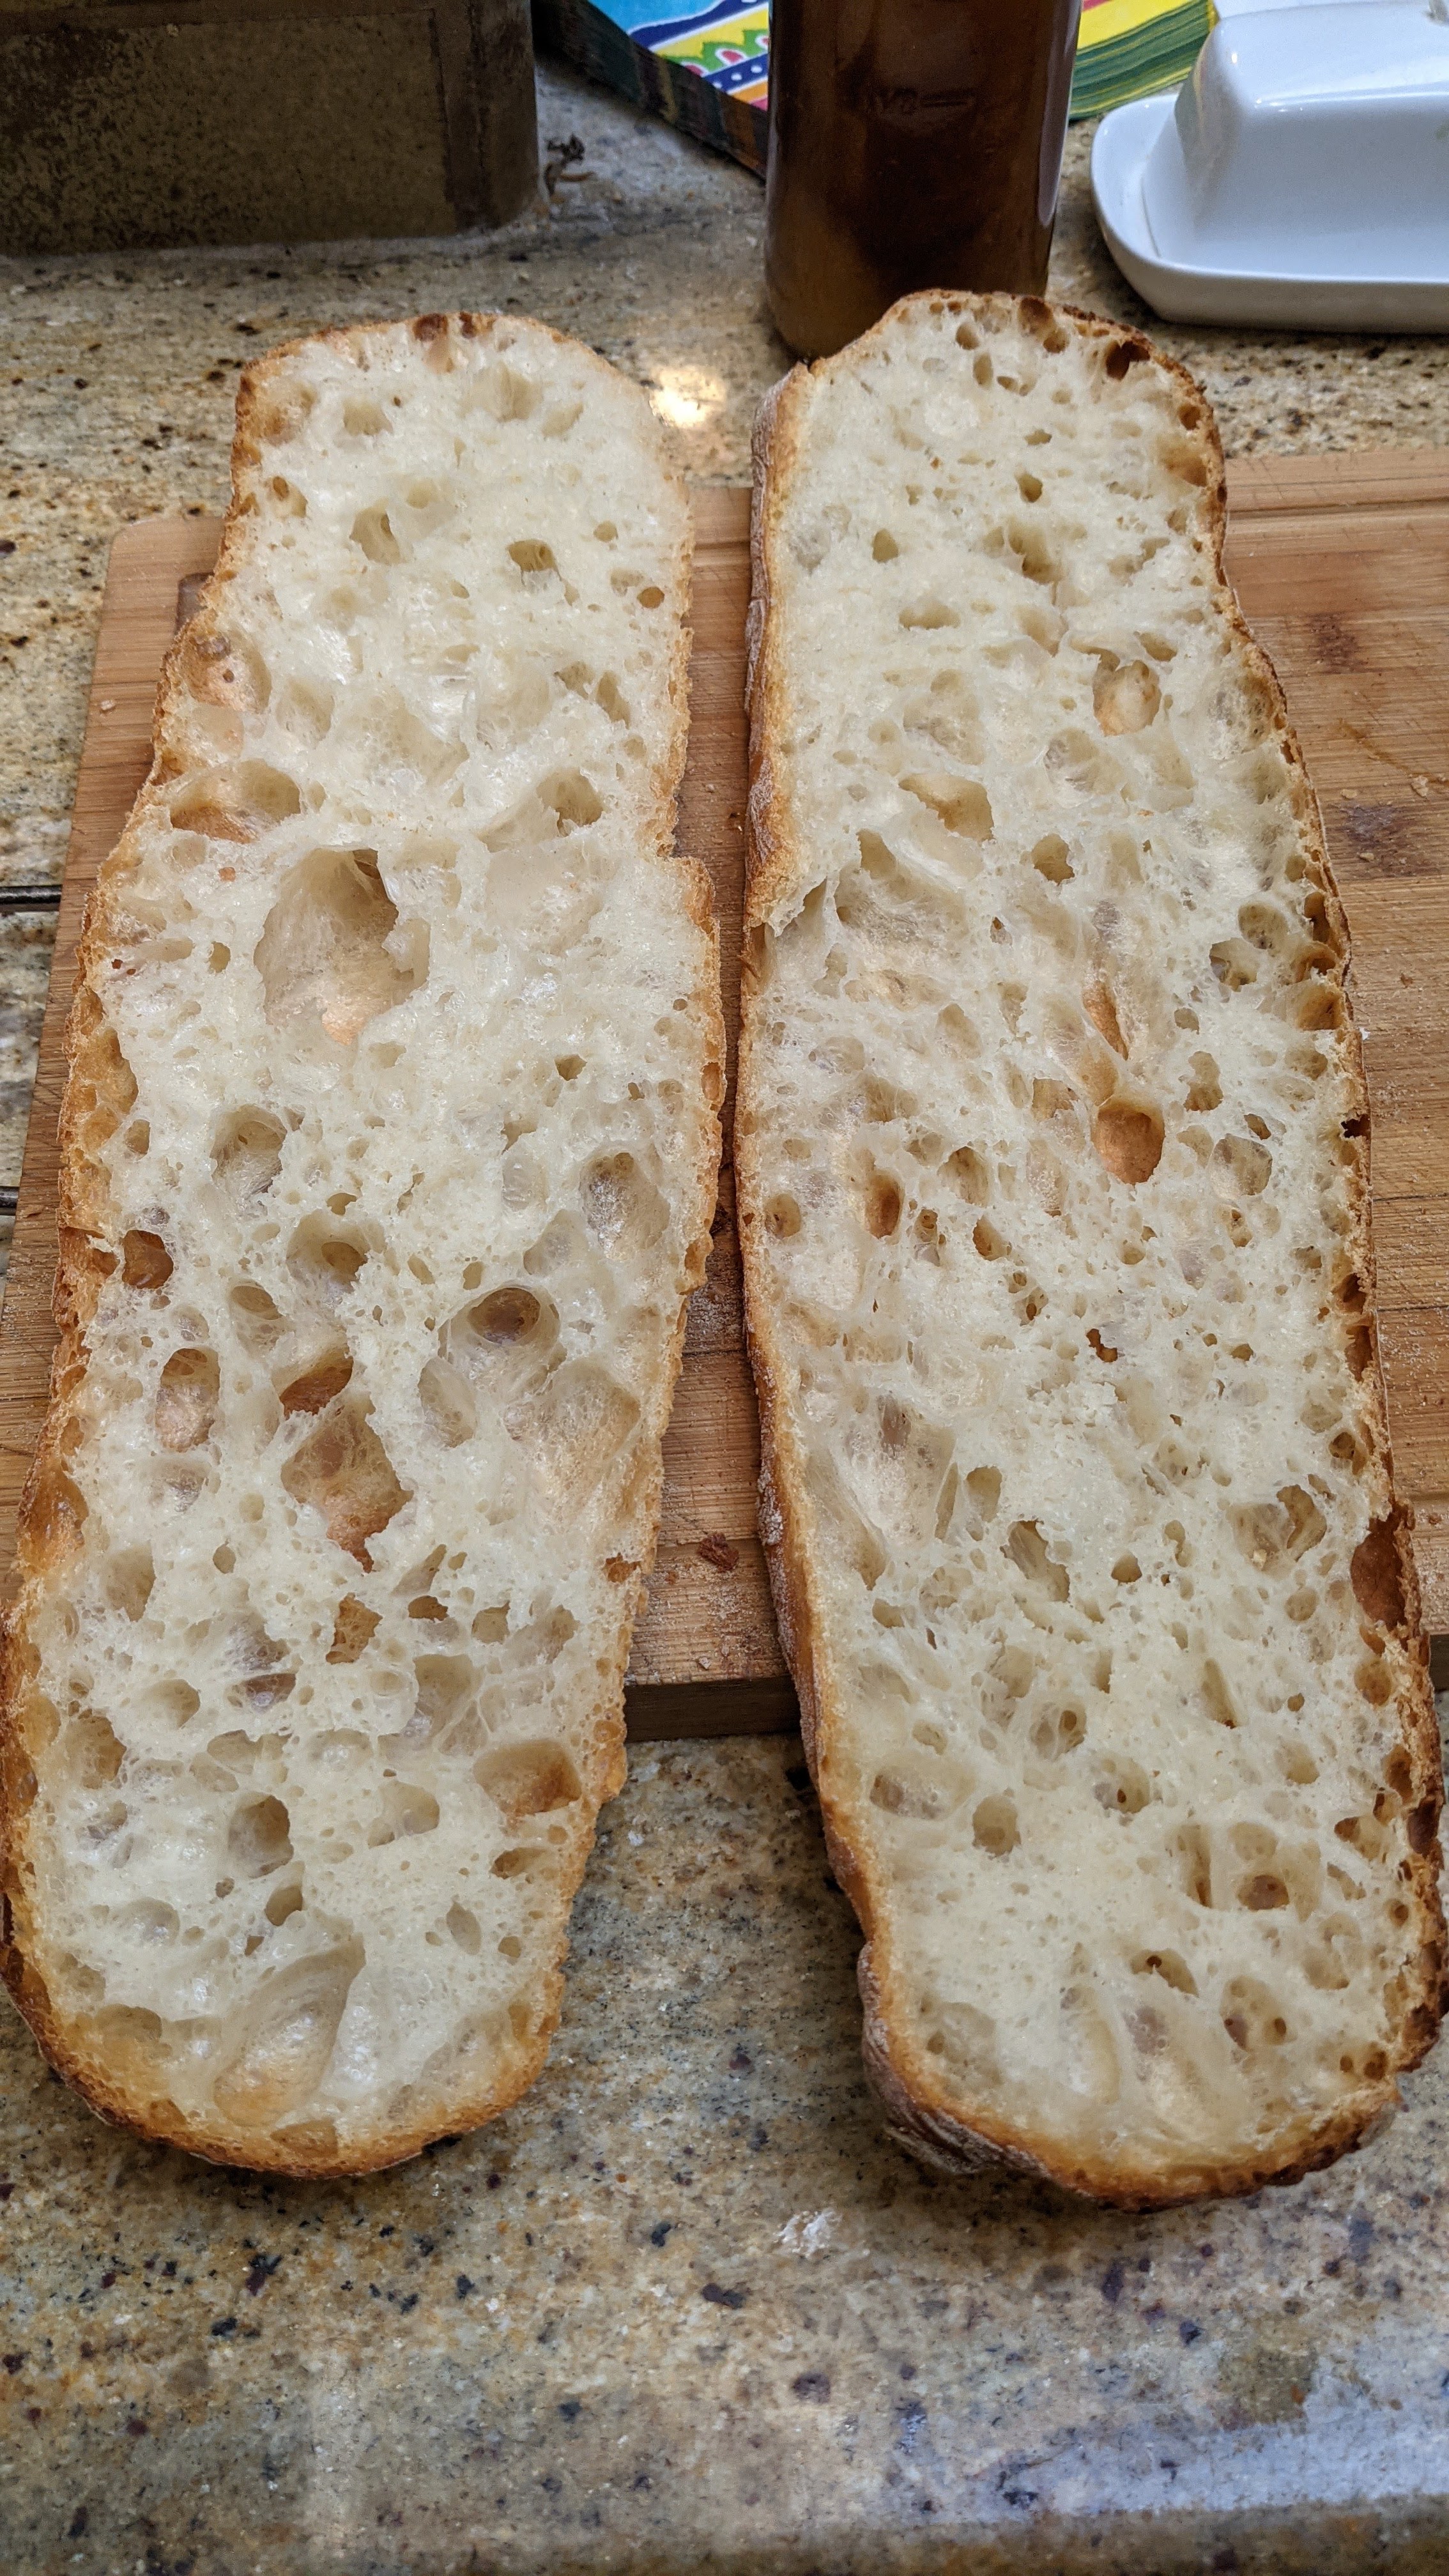
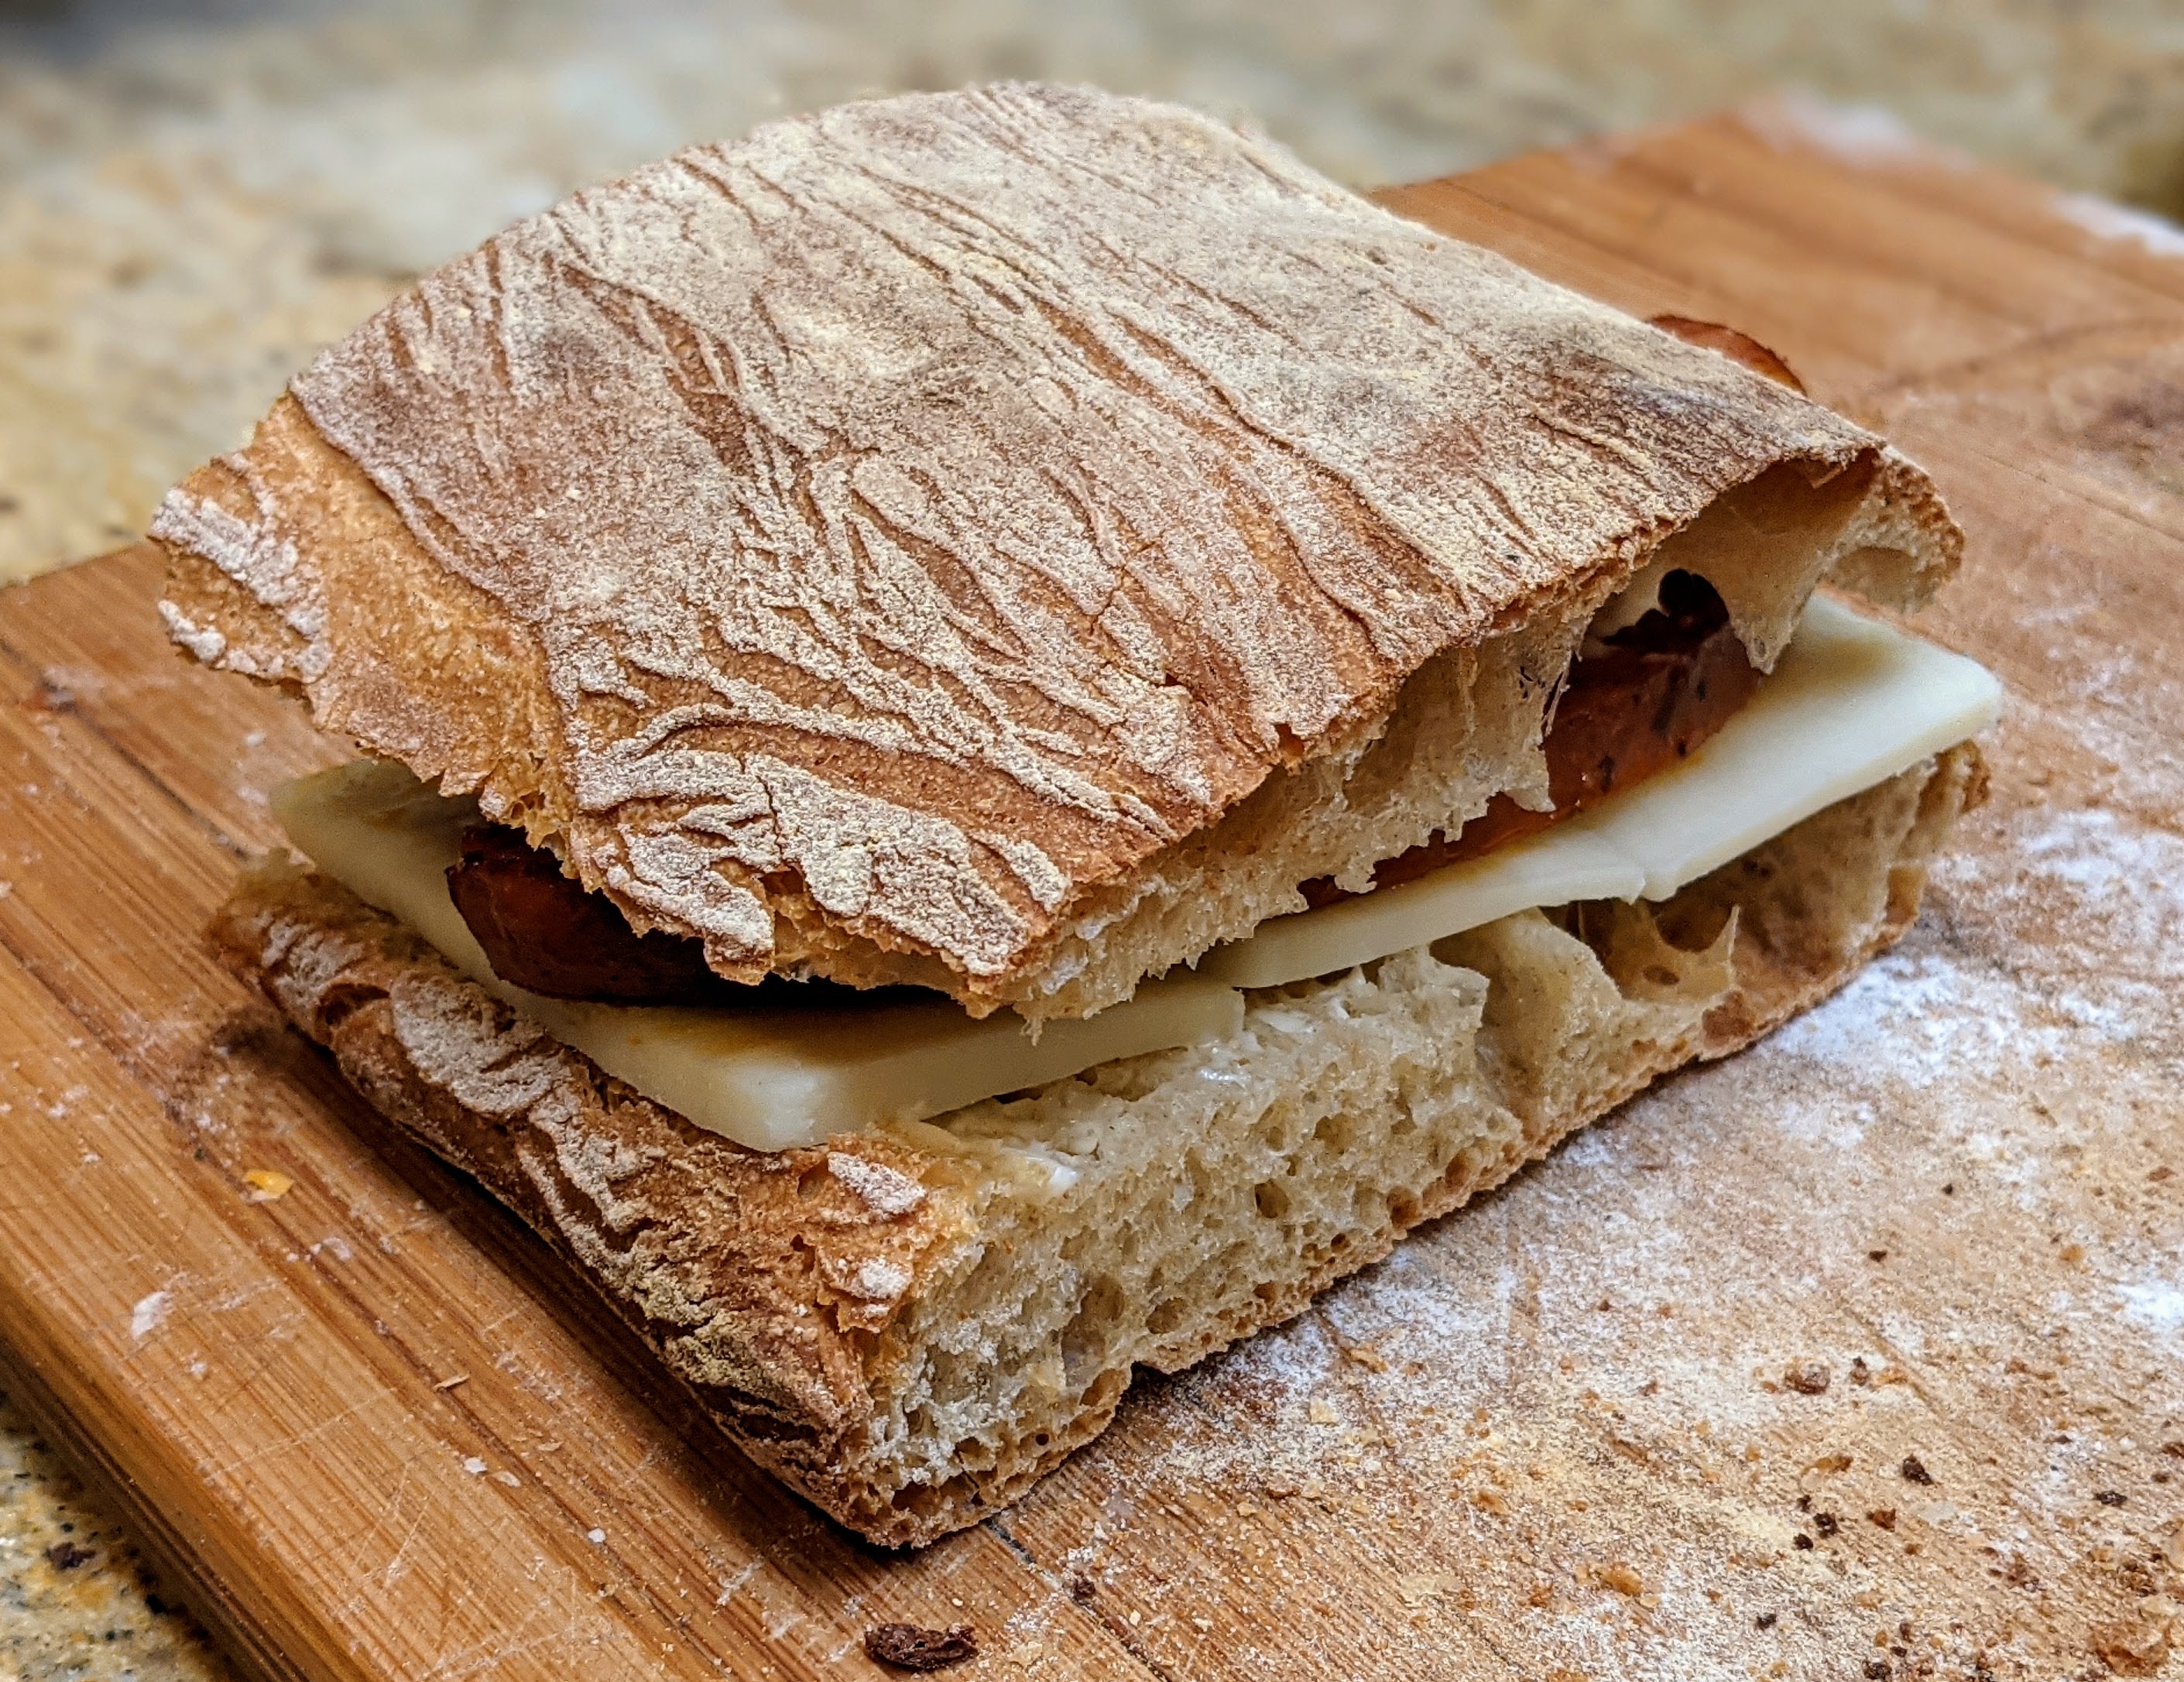
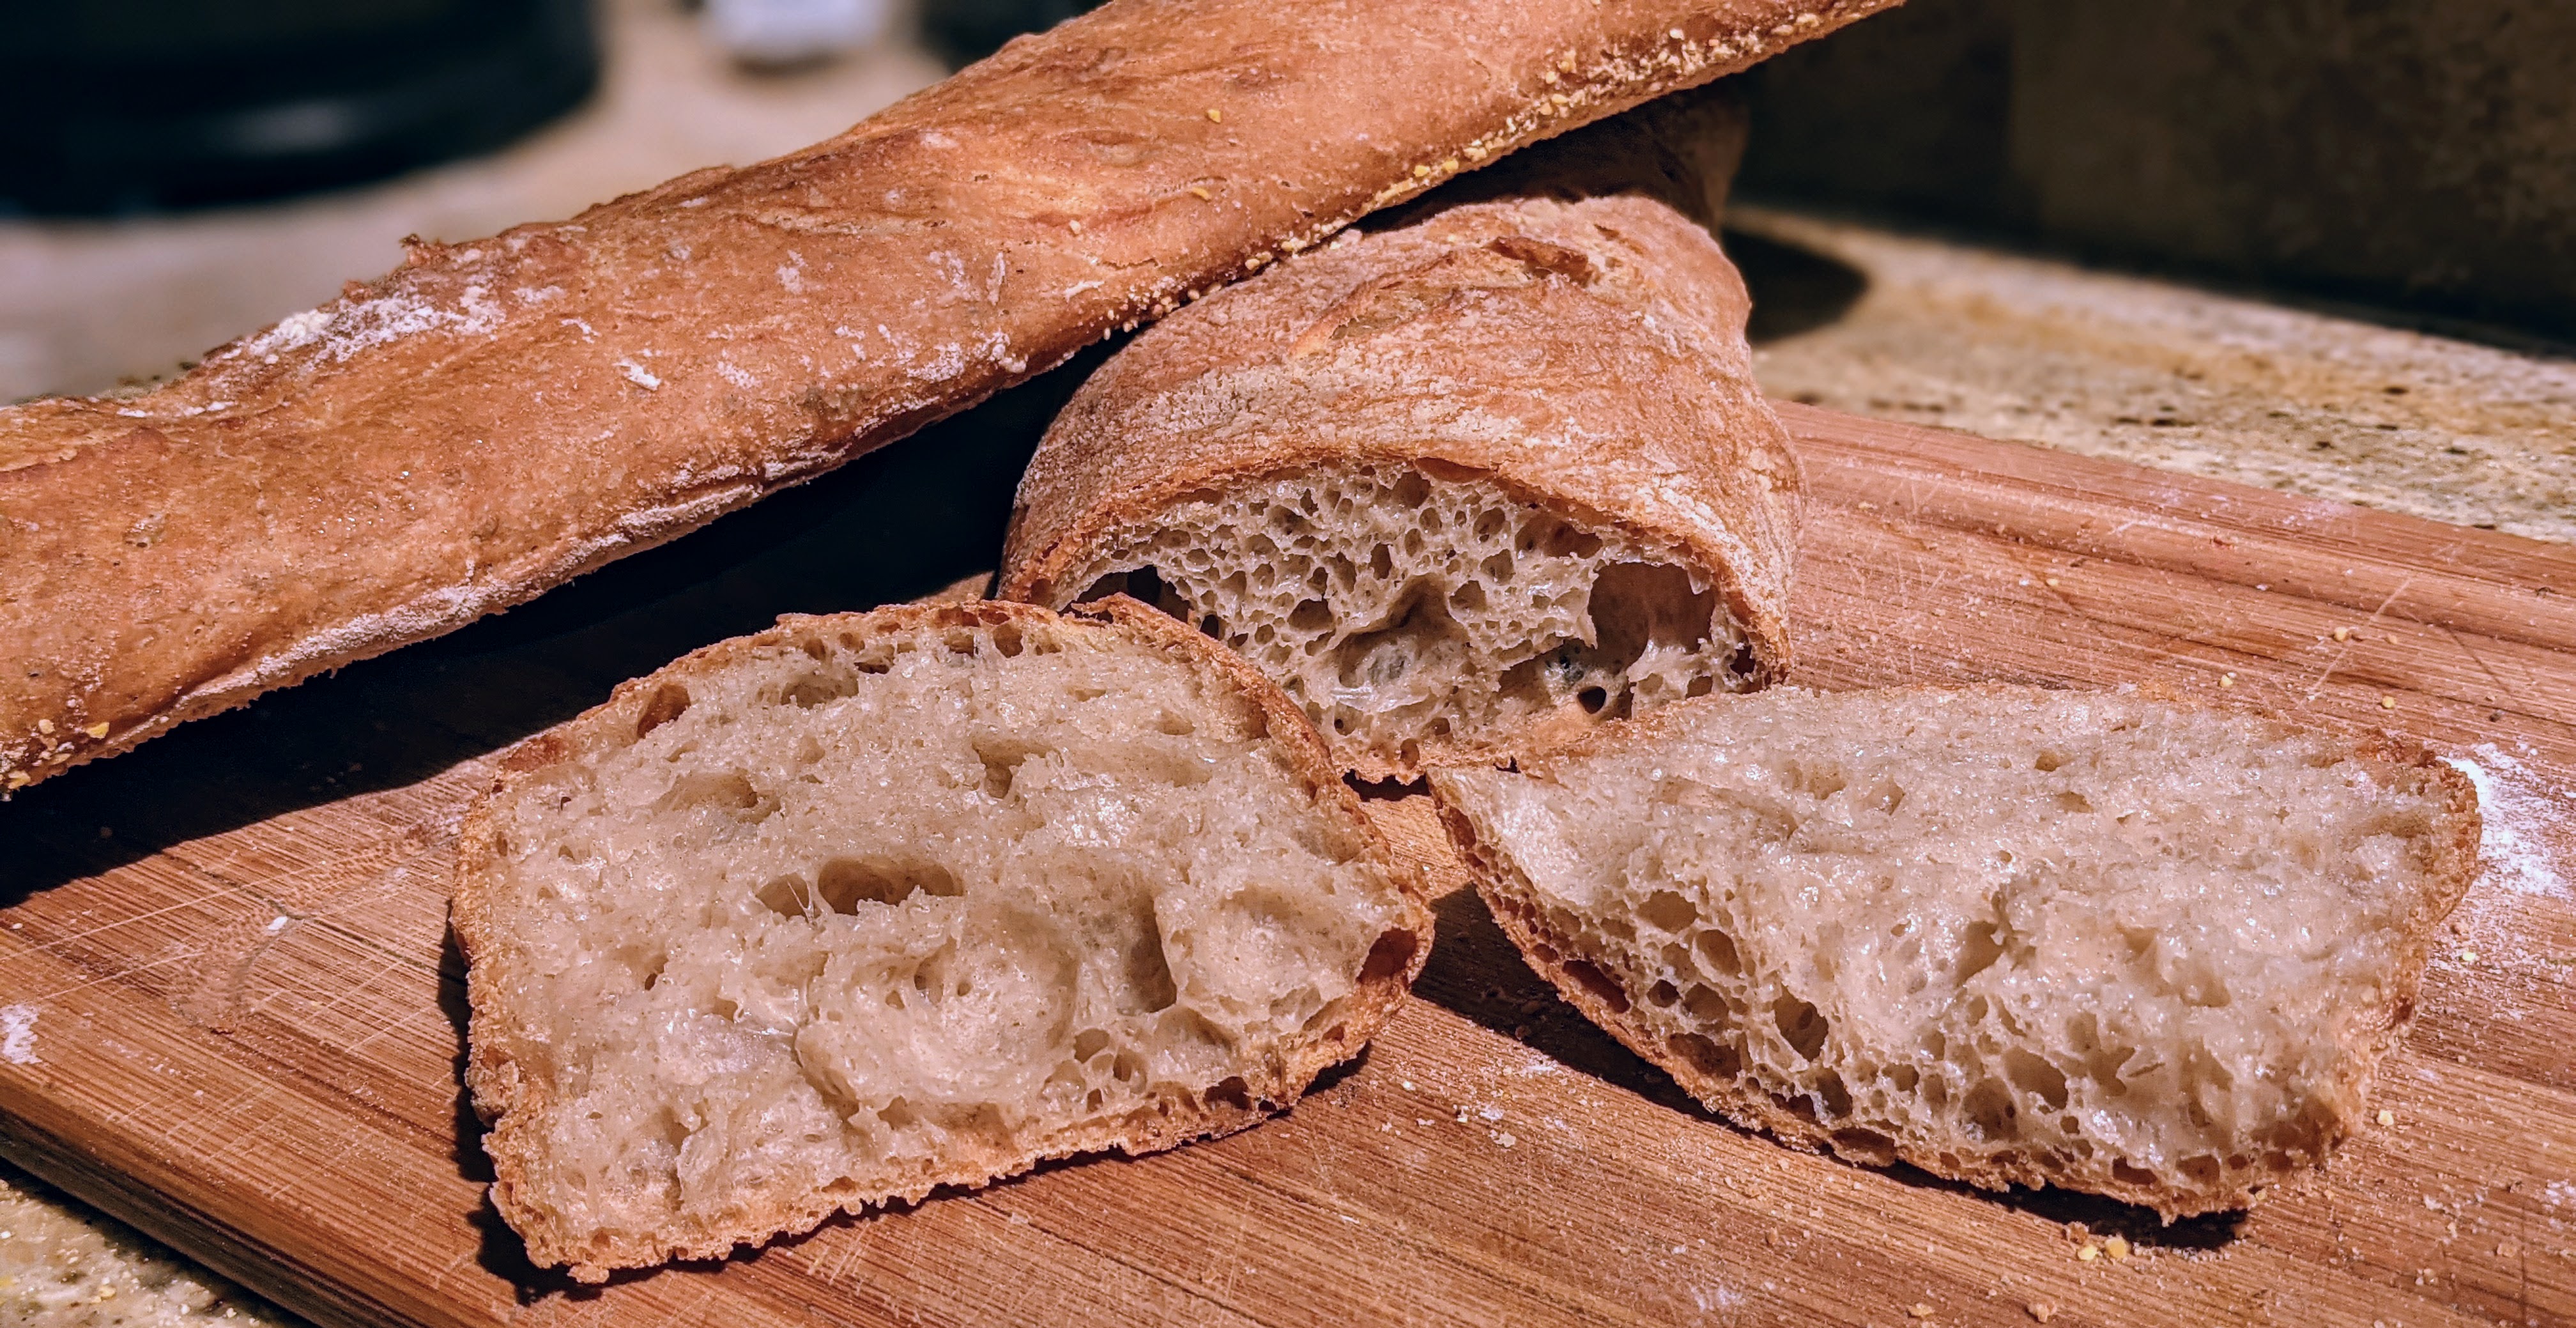
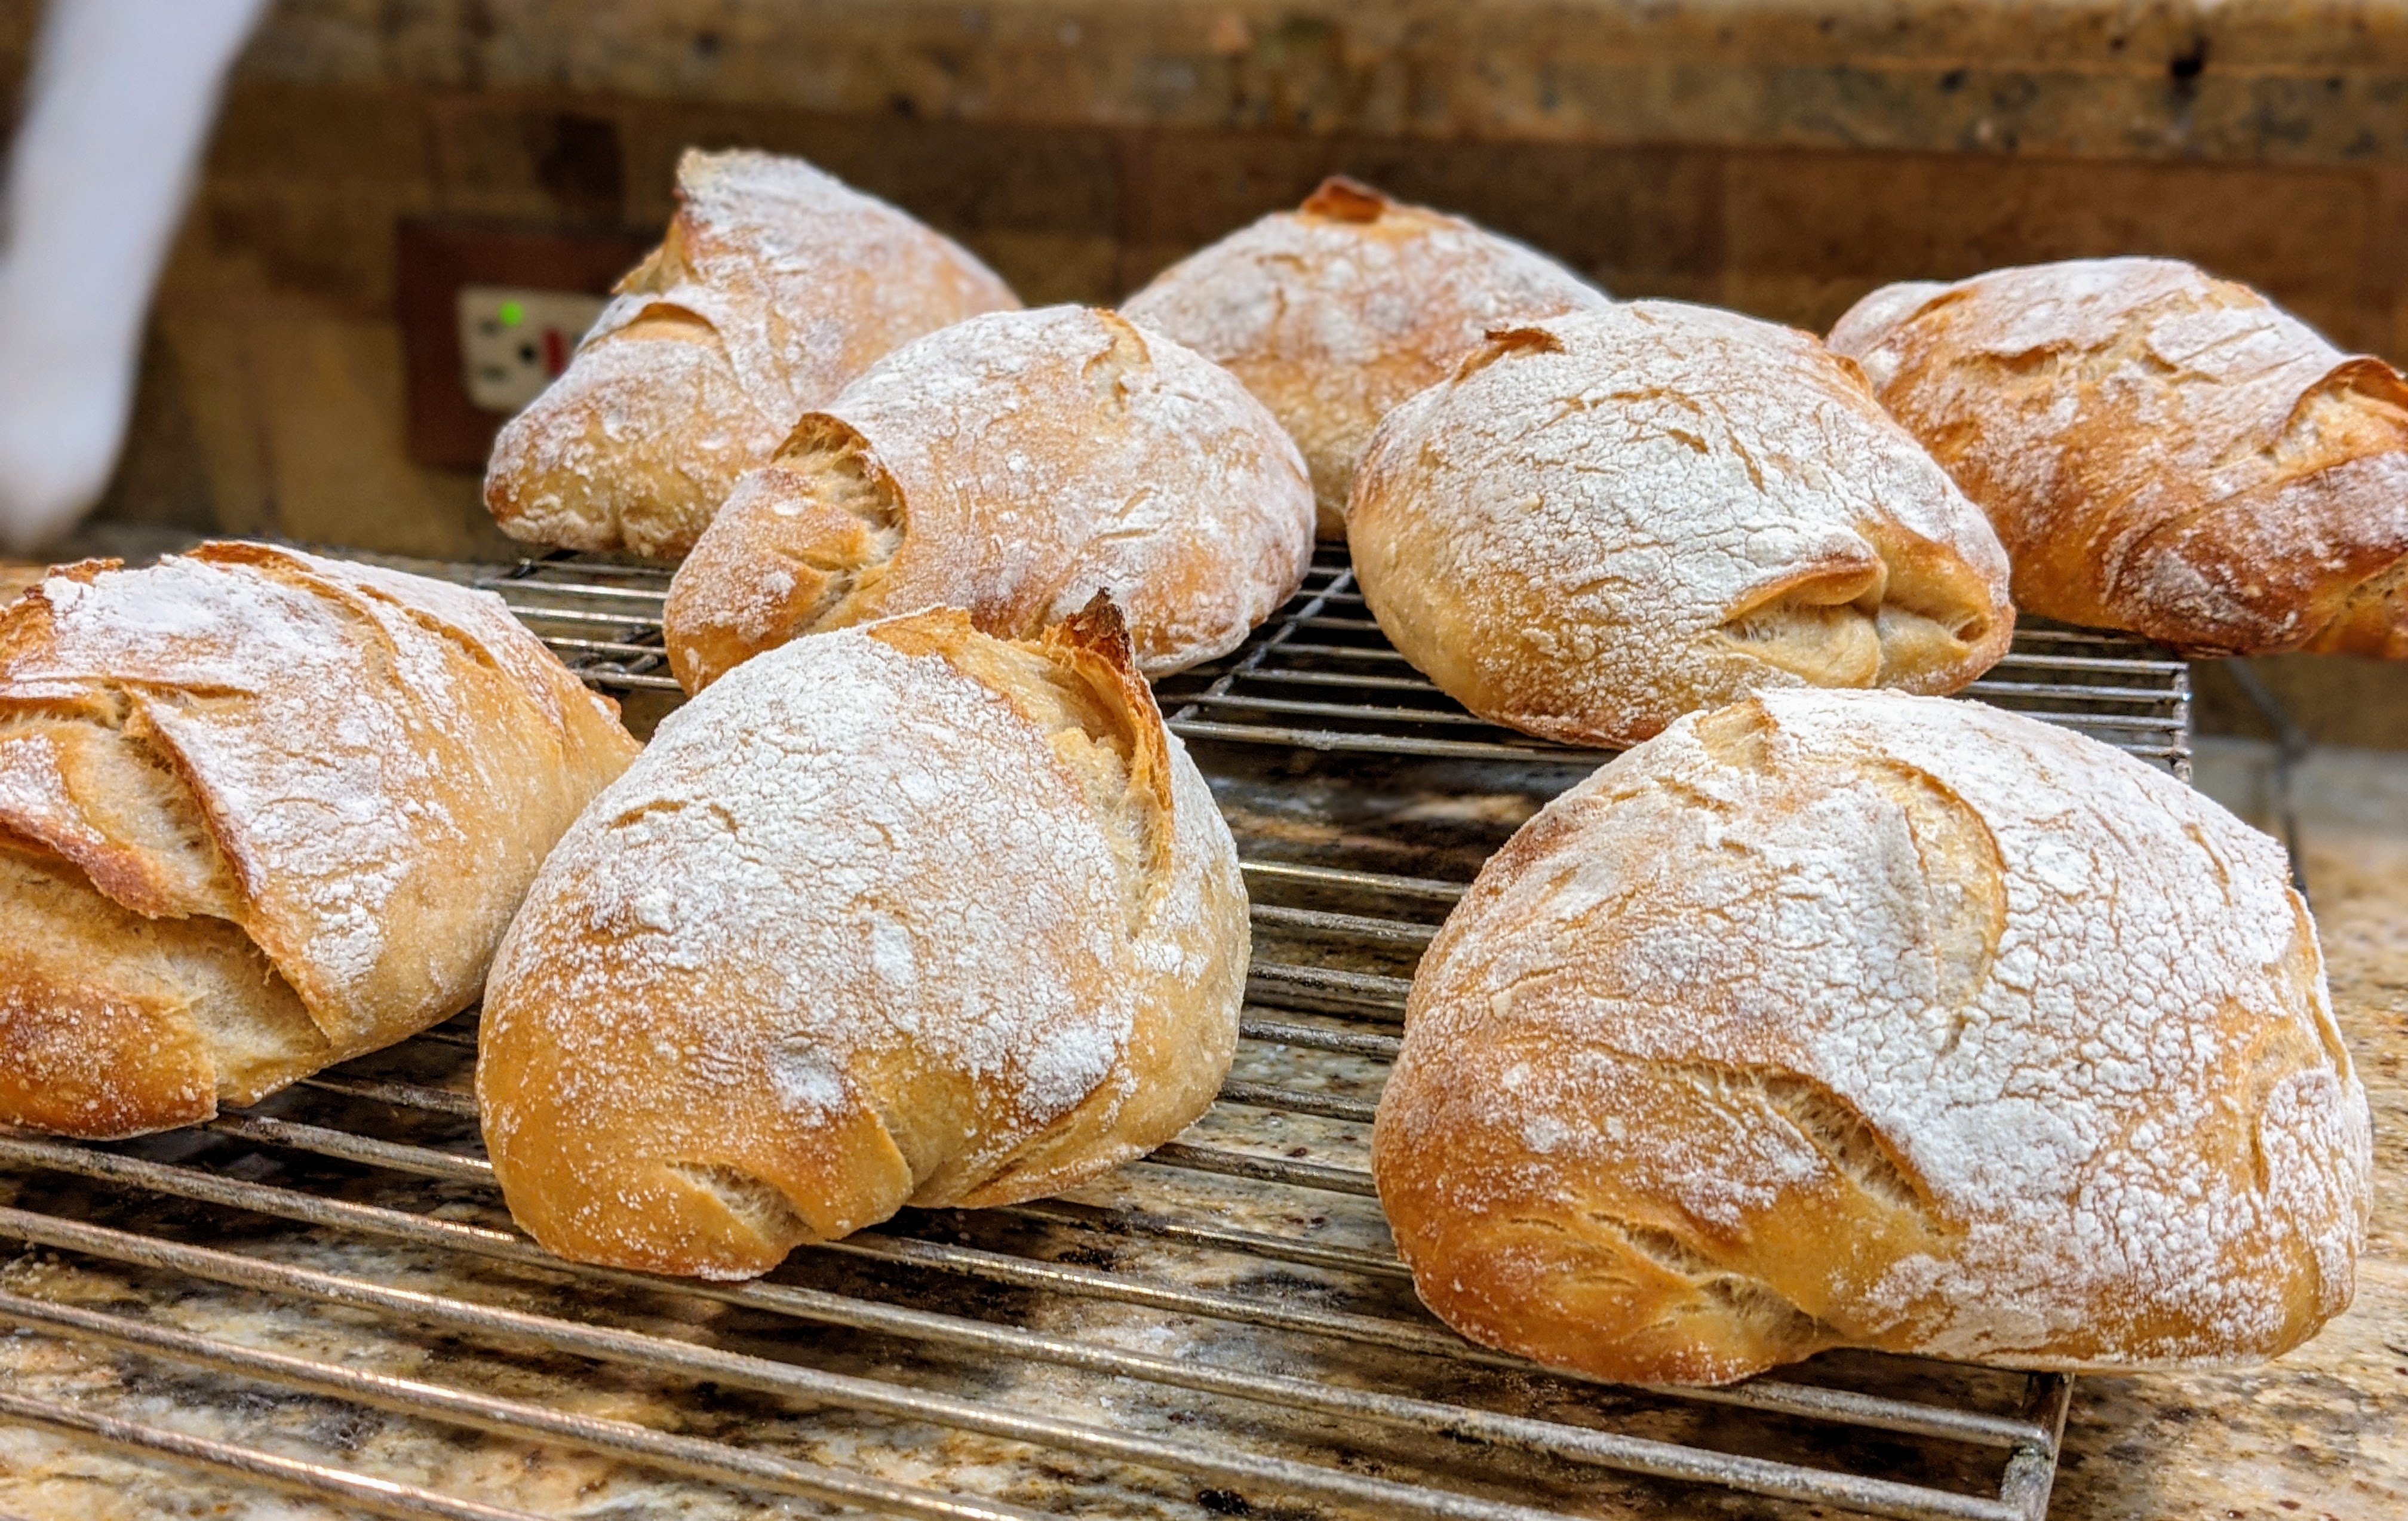
The other bread that I love to bake on a regular basis besides baguettes is ciabatta. This is yet another super-simple dough and like baguettes, requires a bit of finesse to get a good result. That good result is a loaf that feels light as a feather when you pick it up and whose crumb is open and airy.

With this version, I thought I’d change it up a bit and use a white flour blend but I also added a roasted garlic paste to the mix to give it a bit of a garlic kick.

Formula

Flour100.00%
Water82.00%
Salt2.00%
Yeast0.50%
Garlic5.00%

Poolish

AP Flour200g
Water200g
Yeast0.40g

Final Dough

AP Flour369g
Bread Flour185g
Warm Water (~95°F)421g
Salt15g
Yeast4g
Garlic37g
Poolish369g
Total Yield1400g
2 X 700g loaves

Make the Poolish. The night before, make a 400g 100% hydration poolish. Cover tightly with plastic and let it sit overnight on the counter. By morning, it should be filled with bubbles and slightly domed on top. Don’t worry if it has collapsed or you see a bit of hooch around the edges.

I highly recommend using a mixer. This is a very wet dough and while you could mix it by hand, you’ll get a more uniform consistency with a mixer.

Roast the Garlic. You can do this at any time. Just have it ready for when you mix. I use peeled garlic drizzled with olive oil then loosely wrap it in foil. I roast the garlic at 375℉ for 30-35 minutes to where it’s fork-tender. After roasting, transfer to the garlic to a bowl and mash it well.

Mix. Add all the dry ingredients to the mixing bowl. Mix on low speed with the paddle attachment. While that’s mixing, loosen the poolish from its container by pouring the water around the edges of the dough mass. Stop the mixer, then add the poolish-water mixture to the bowl. Switch to the dough hook and mix at low speed until the dough (it’s more like batter) starts coming together. Stop the mixer again and add the roasted garlic mash. At this point, mix at medium-low until smooth and the dough starts climbing up the hook a bit.

At this point, you can transfer the dough to another bowl (I like to use a glass mixing bowl going forward) or just let it rest in the bowl for 45 minutes.

Bulk Fermentation. About 2 hours at 70℉ ambient temp.

First Fold. After 45 minutes, fold the dough in the bowl. Make sure you stretch the dough adequately enough to feel the tension building in the dough. After several folds, rest for 45 minutes.

Second Fold. Generously flour your work surface (and I mean generously), then pour the dough out. With closed fingers, work your hands under the dough and shape it into a rough rectangle less than an inch thick throughout the mass. To make it easier to understand, the long side should be the East-West side. Take one of the long sides, stretch it out away from the sheet, then fold it back over almost to the end. Gently pat the dough down, then repeat with the opposite end. Do the same for the North and South sides. When you do the North-South side, you may notice that the dough fights you a little. This is a good thing! It means the gluten strands are aligning and you’ve built strength in the dough. Gently roll the dough mass onto the seams and let it rest for several seconds to seal.

Transfer the dough seam-side-down to a well-oiled bowl. You can use the same mixing bowl, but this time, you need to oil it down. Cover the bowl and let the dough double in volume. At around 70℉, this will take about 30-45 minutes.

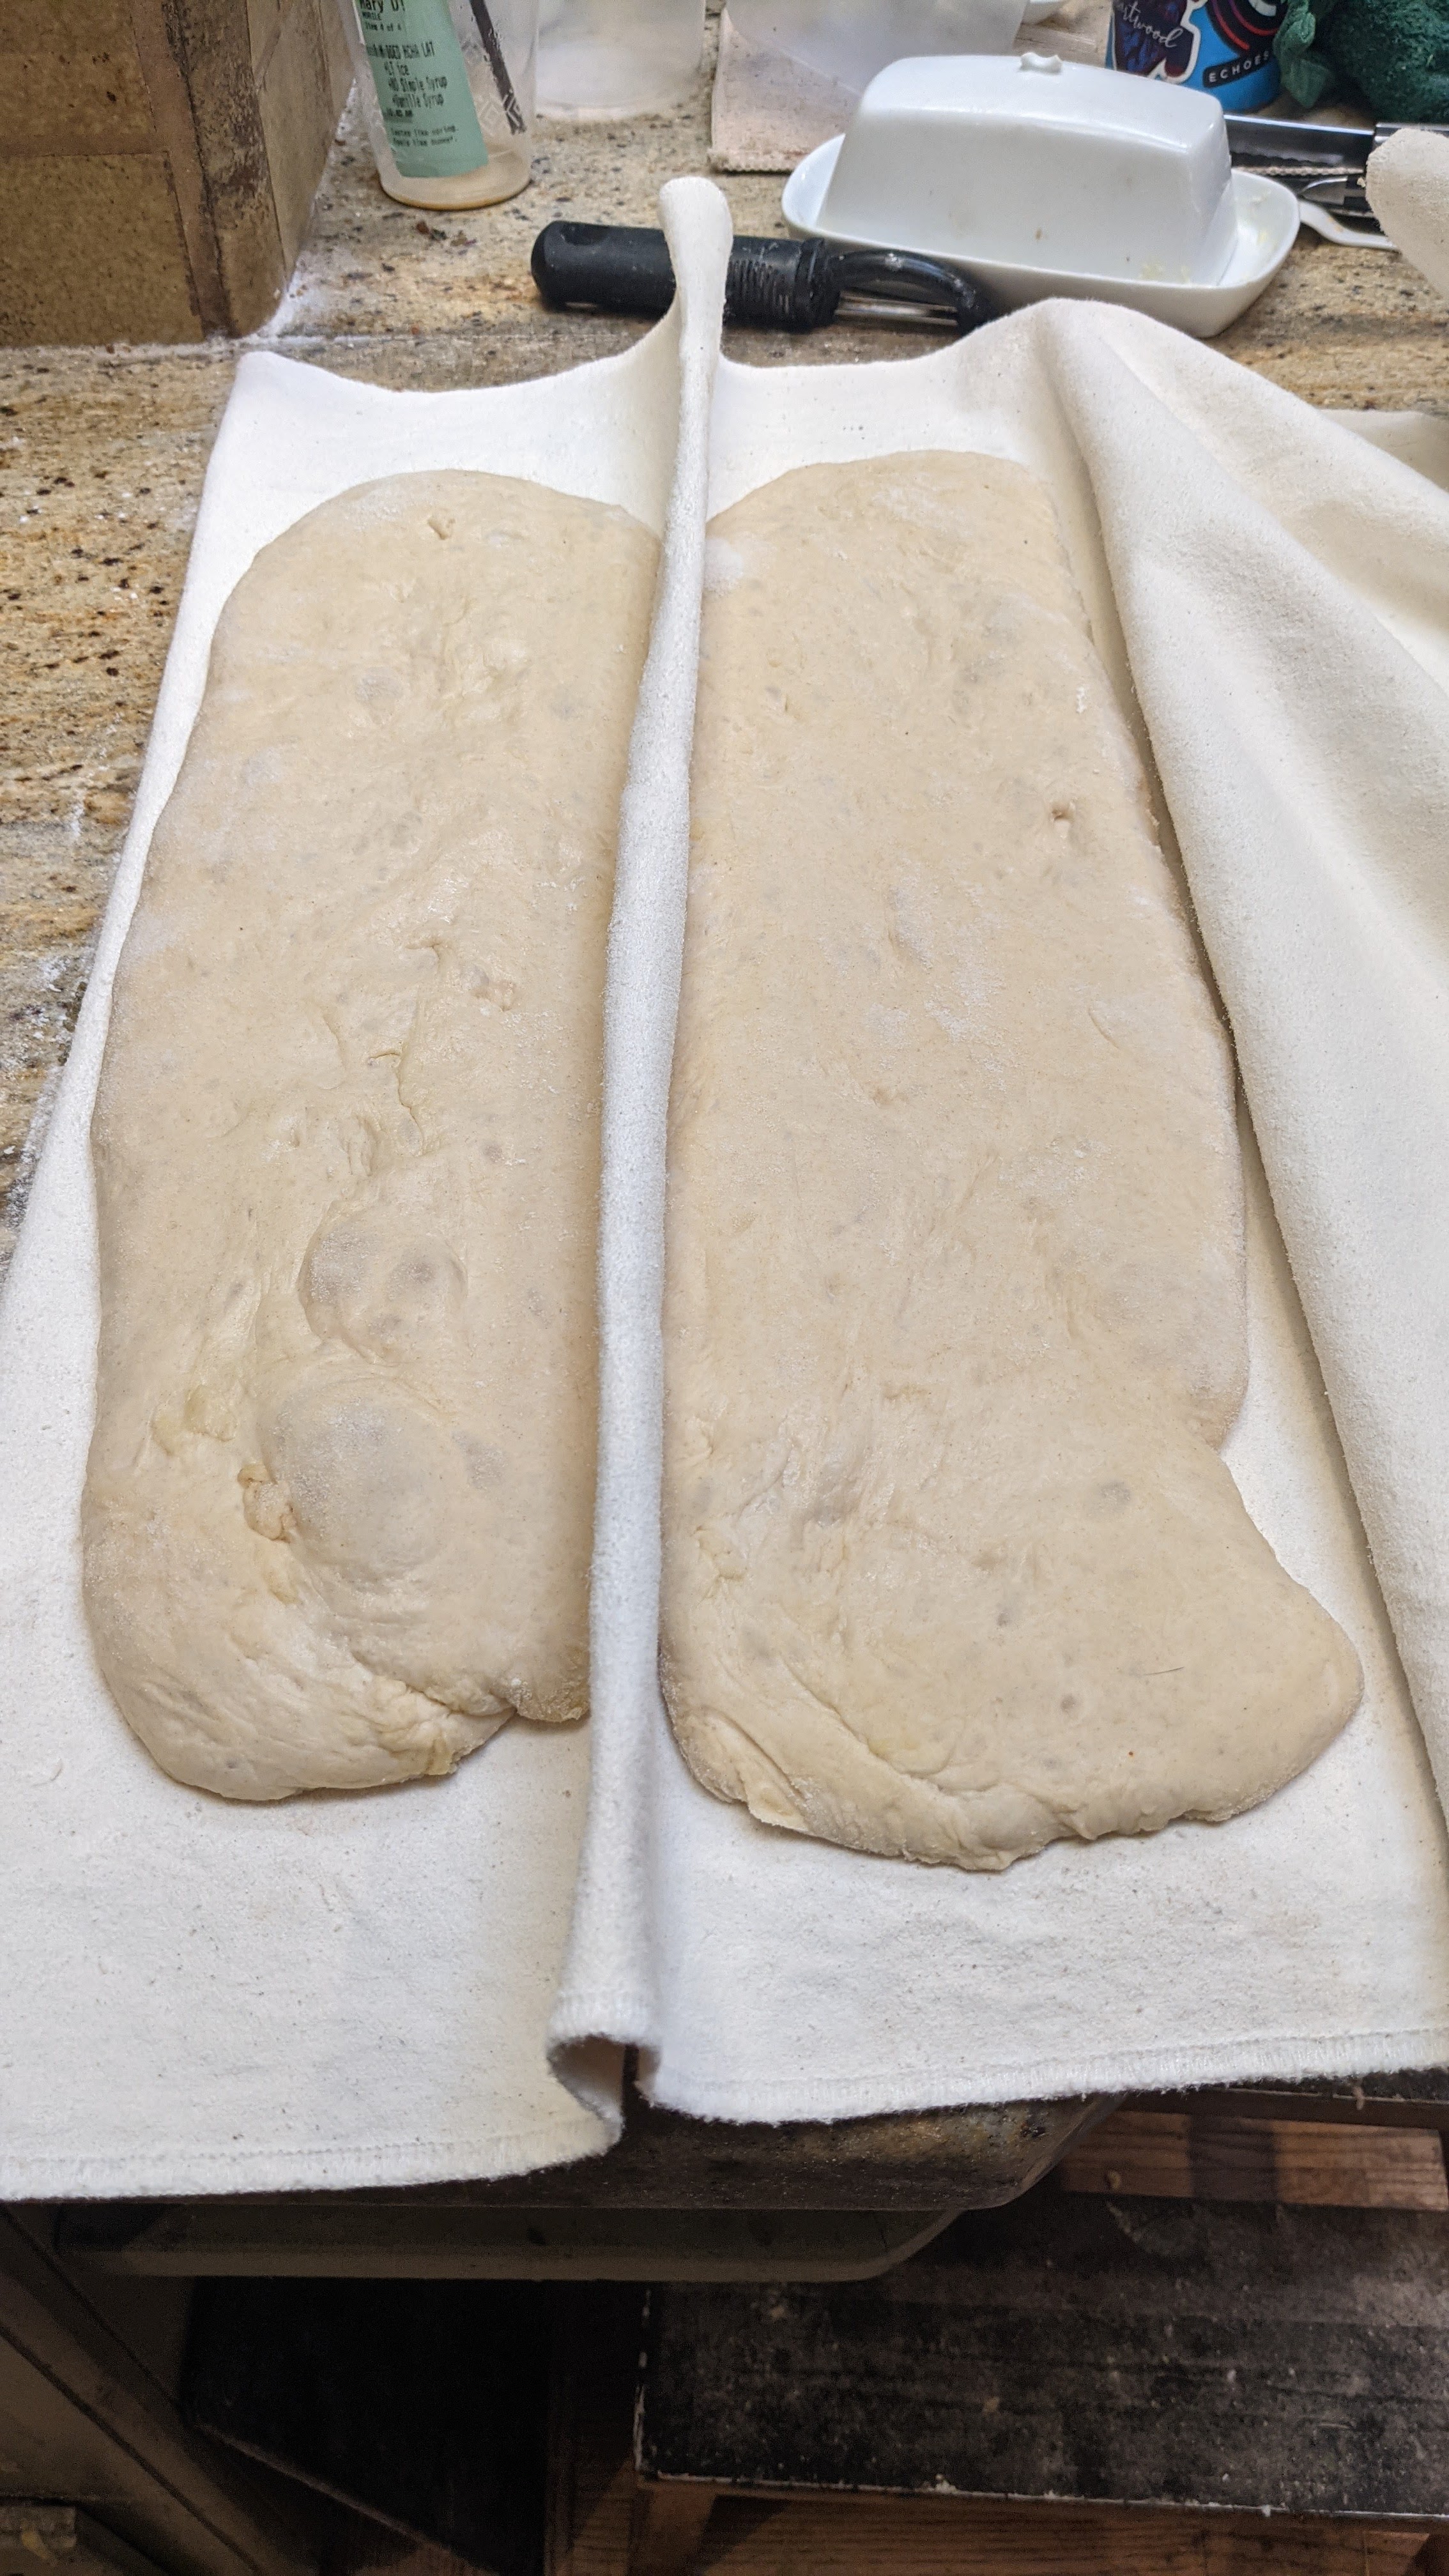
Divide and “Shape.” At this point, I personally like to scale my dough, but you can eyeball it as well. As with the second fold above, transfer the dough seam-side-up onto a generously floured surface. Work the mass into a rectangle with even thickness, then cut the dough in half. With ciabatta, there’s really no shaping. What I like to do is take a piece, gently work it into a slightly long rectangle, then transfer it to a generously-floured couche. Once on the couche, I’ll tug it into the final rectangle shape I want.

Final Fermentation. This can take as little as 15 minutes or up to 30 minutes depending on your ambient temperature and yeast activity. The purpose of this step isn’t for more expansion, but to let the dough relax before baking to ensure that the bubbles will expand in the oven.

Bake. Bake at 475℉ with steam for 12 minutes. Remove steam/steaming container, then bake for 12-15 minutes at 425℉.

Advertisement

Recipe: Roasted Garlic Kamut Ciabatta

Ever since I learned Jeffrey Hamelman’s Roasted Garlic Levain bread, I’ve used roasted garlic in a number of recipes. But up until now, I didn’t think about using it in ciabatta. There is nothing like the smell of garlic roasting in the oven, and when incorporated into the dough and baked, the result is a luxurious and delectable bread that you’ll want to make all the time!

Since I go on long airplane trips several times a year, I’ve learned to bring my own food as opposed to buying the crappy food they now serve – and you have to purchase – on the plane. Tomorrow, my family is traveling to New York City to attend our daughter’s graduation from Fordham University this weekend, so true to form, I made sure to have sandwiches for the trip.

Normally, I make fat baguettes, but this time I wanted to make ciabatta. But to put a twist on it, I thought I’d add roasted garlic and give the bread a little kick. The formula and recipe are below:

Formula

Flour100.00%
Water81.00%
Cream0.80%
Salt2.00%
Yeast1.00%
Olive Oil4.00%
Garlic6.00%
Total Percentage194.80%

Final Dough

Flour
My blend: 30% Kamut Flour, 30% Bread Flour, 40% AP Flour
622g
Warm Water (about 100°F)504g
Cream or Half & Half5g
Salt12g
Yeast6g
Olive Oil25g
Garlic (peeled)37g
Total Yield1,212.00
2 X 600g loaves
(+1% due to process loss)

Process

Because this is such a super-wet dough, I highly recommend using a stand mixer.

Roast the garlic. Weigh out the garlic you need then place the cloves in a square of foil with a little olive oil (don’t worry if you have too much garlic – personally, I usually exceed the required amount by a few grams). Cinch up the foil, the roast at 400°F for 30 minutes. The garlic should be slightly brown and mashable. Transfer to a small bowl, and mash up the garlic with the oil. Don’t worry if there are harder bits. Just break them up.

Mix. If you’re using a flour blend, thoroughly mix the different flour types together first (the mixer paddle is perfect for this). Add the salt and yeast, then continue mixing for several seconds until all the ingredients are evenly incorporated.

By the way, it’s a myth that salt kills yeast. It doesn’t, at least not at this low concentration, and especially if both are dry. Besides, if salt did kill yeast, once you add salt to a yeasted dough, it shouldn’t rise!

In a separate container, combine all the liquids. Attach the dough hook, then turn on your mixer to slow, then slowly add about 75% of the liquid. Allow the dough to form. Once the dough starts climbing up the hook, slowly add the rest of the liquid until all the ingredients are combined (make sure to use a spatula to get all the oil out of the container). Once the liquid is incorporated, add the roasted garlic. Turn the mixer up to medium-low and mix until the dough is smooth (it’s more like a batter at this stage).

At this stage, you can transfer the dough to a standard mixing bowl or just keep it in the mixer’s bowl.

First Fermentation. Let the dough rest for 30 minutes. Then using a wet hand, do a series of stretches and folds. The dough at this point will still be quite wet. But using hand like a spoon, scoop under the dough and pull up. Eventually you will feel the dough strengthening a bit.

Second Fermentation. Again, let the dough rest for 30 minutes. Then pour it out onto a well-floured surface. You have to be pretty generous with the flour. Letter fold the dough. Once you’ve finished the pattern, pat the dough down, then letter fold it again. Once you’re done, roll it over onto its seams, then transfer it into a well-oiled bowl.

I’d start preheating my oven at this point – my oven is slow to come to temp, so I start preheating after the first fermentation.

Third Fermentation. Finally, let the dough rest 20 minutes. You should see some expansion of the dough mass with bubbles starting to form on the surface. Pour the dough out oil-side-up onto a well-floured surface. Divide the dough into two pieces. Personally, I eyeball it, but still scale out one of the pieces to 600 grams. At this point, handle the dough gently. You don’t want to degas it too much!

Final Fermentation. Gently tug the two pieces into rectangles, then transfer them to a couche or well-floured dish cloth. Let the loaves rest for 20 minutes.

Bake. Transfer the loaves to a loading board generously covered with cornmeal. Load your oven, then bake the loaves at 460°F with steam for 15 minutes. After that, expel the steam, then finish baking at 400°F for 20 minutes.

If you don’t use a baking stone, you can bake the ciabatta on a regular baking pan.

Recipe: Easy Ciabatta by Scott Megee of the Artisan Crust

Like many baking enthusiasts, during the pandemic lockdown, I watched A LOT of baking videos to learn different bread baking techniques. I started out watching regular YouTubers. Some are great like Sune, the Foodgeek, but as with any social media platform, the real good stuff takes some searching. So eventually, I found pros like Markus Farbinger, Jeffrey Hamelman, and Chad Robertson (I read the latter two’ book as well). But then I discovered and also followed Scott Megee, Master Baker of Australia and owner/proprietor of The Artisan Crust in Victoria, Australia. And I tried out his easy version of ciabatta.

In short, this bread rocks! Not only is it easy to make, but despite not using a preferment at all, it’s delicious! The trick is using really good olive oil – first cold-pressed is the best. Don’t make the mistake of using “first pressed” or “cold-pressed” olive oil. It has to be “first cold-pressed” as that is the real deal extra virgin olive oil. Of course, there’s lots of chicanery in the olive oil business, so it’s never entirely clear.

For me, I use California extra virgin olive oil produced by the Sciabica family. I originally became familiar with them through the Dominican Sisters. Each year, they have the olives harvested from the grounds of their convent in Mission San Jose, and the Sciabica family presses and processes their olive oil.

As for the Sciabica family olive oil, though I usually purchase 1.5-liter boxes directly from them, in California, you can also find their oil in grocery stores under the “Mission Trail” brand. This is a very nice oil made from olive trees in Northern California. It’s wonderfully fruity with a peppery finish.

Okay, let’s get to the important stuff!

Overall Formula

Flour
AP Flour: 50%
Bread Flour: 25%
Kamut Flour: 25%
100.00%
Water76.00%
Salt2.00%
Yeast0.50%
Olive Oil3.00%
Total %181.50%

Final Dough

Flour*
AP Flour: 501g
Kamut Flour: 167g
668g
Water508g
Salt13g
Yeast3g
Olive Oil20g
Total Yield1212g
2 X 600g loaves
Optimal Dough Temp82°F (28°C)
*You can use your own blend or just use AP flour. I wouldn’t recommend 100% high-protein bread flour as it would make the crumb chewy.

Mix: Mix all the dry ingredients together thoroughly. Reserve 20% of the water and combine it with the oil. Then mix the dry ingredients together with 80% of the water. Mix until smooth and you achieve a bit of gluten development. Once the initial mix has come together, slowly add the oil and water mixture and work it into the dough (this is known as bassinage). Mix until smooth, then transfer to a lightly oiled bowl. Cover the container, then let the dough rest for 45 minutes.

Note: I recommend using a mixer for ciabatta (Hey! The Italians do!), but you can certainly mix the dough by hand.

Process. At this point, it’s a lot easier to learn Scott Megee’s technique by watching his video:

Note that where I started the video, Scott is measuring the temperature of the dough and it reads 23°C. But his recipe actually lists the optimal dough temp to be 28°C.

Bake. Bake with steam for 20 minutes at 450°F. Then finish baking for another 20 minutes without steam. If the crust color seems a little dark after the first 20 minutes, reduce oven temp to 400°F. Internal dough temp should be 200°F to ensure the dough is fully cooked.

Recipe: 60% Durum Wheat Flour (Semolina) Ciabatta Sandwich Rolls

Ciabatt-ahhhhhhhh! Those pillows of airy goodness. I make basic ciabatta (just AP flour) almost as much as I make baguettes. They’re so light with a crispy crust. You can eat them plain, or with some butter, or dip them in good olive oil… Just puts a smile on my face. But despite loving to make them so much, I wanted to see what they’d be like with a flour blend.

Then it hit me that the other Italian bread I love to make is Pane di Altamura. That recipe uses an 80/20 Durum/AP Flour blend that’s absolutely delicious. So I decided to do a version of ciabatta that uses Durum wheat flour.

About Semolina…

Durum wheat ground up into flour is commonly called Semolina. But you can’t just use any semolina flour off the shelf as that is typically too coarse for making dough. You have to be sure that it’s ground fine to extra-fine. I get my Durum from Azure Standard. This is actually a high-extraction version of their Semolina that has a lot of the sharp bits of bran sifted out after milling. I use it for making bread and pasta!

Overall Formula

Flour
Semolina
AP Flour
100.00%
60%
40%
Water90.00%
Salt2.00%
Yeast1.10%
193.10%

Final Dough

AP Flour377g
Semolina251g
Water565g
Salt13g
Yeast7g
Total Yield1212g
6 X ~200g loaves
Optimal Dough Temp80ºF

Initial Mix/Autolyse. Mix all the flour and all but 50g of the water together in a large bowl. Autolyse for an hour. Semolina is a very hard wheat and benefits from an autolyse.

Final Mix. Sprinkle the yeast and salt over the dough, then add the reserved water. Work the water, salt, and yeast into the dough until fully incorporated.

Bulk Fermentation. 1 1/2 to 2 hours.

NOTE: You’ll do two folds in the first hour, separated by 30 minutes.

First Folding. After 30 minutes, stretch and fold the dough using a wet hand. With a dough this wet, you need to be very gentle with the folding to ensure you don’t tear it while stretching. Stretch and fold until the dough no longer wants to be stretched.

Second Fold. Generously flour your work surface to prevent any sticking, then pour the dough out of your bowl and use your scraper if any dough sticks – you want to minimize tearing. Using quick movements, tug the dough from underneath into a rough rectangle. Then working in an N-S-E-W pattern, letter fold the dough by stretching a side, then pulling it over the dough mass. Once the pattern is complete, gently pat the dough down to flatten it, then repeat the letter folding pattern. If any side sticks, use your scraper to push flour underneath the dough. Once the second letter fold is complete, roll the dough onto the seams, then work it into a nice taut round. Transfer the round to a well-oiled bowl, seam-side-down. Allow the dough to expand about 50% of its original size after folding.

From this point on, the keyword for handling the dough is: gentle. Semolina flour-based dough is extremely delicate and will easily degas.

Divide and Shape. Slide the dough out onto a well-floured surface and gently tug it into a rough rectangle. Divide the dough into 200g pieces. You can then just tug the individual pieces into sandwich roll rectangles. Myself, I like to letter fold the pieces then using my fingertips, dimple the pieces and work them into sandwich roll rectangles. Once done with shaping a piece, transfer it to a well-floured couche or appropriate cloth for final fermentation.

Final Fermentation. 30-45 minutes. Rolls will be ready when they’re puffy and slightly billowy.

Bake. Transfer rolls to a baking sheet or transfer board, then dust lightly with flour. Bake at 460ºF for 15 minutes with steam. After 15 minutes, remove the steaming container, then bake until deep golden brown (about 10-15 minutes).

Master Chef Markus Farbinger’s Ciabatta Recipe (Updated)

No way am I going to take credit for developing this recipe, though I have made my own tweaks to the flour. The recipe comes from master chef Markus Farbinger. I had no idea who he was until I happened to stumble on his baguette shaping video on YouTube. His technique was so incredible that I ended up buying his baguette and ciabatta video series on Vimeo. This ciabatta recipe is from that series.

To be honest, even though I’m documenting the recipe, I’m really only scratching the surface. I highly recommend renting or purchasing the series. Chef Markus the former Dean of Curriculum and Instruction for Baking and Pastry Arts at the Culinary Institute of America, and is co-owner of the Ile de Pain bakery in South Africa where he uses a wood-fired oven to bake his artisan bread. In other words, this dude is totally legit!

Overview

Like traditional baguettes, this ciabatta uses a poolish that you make the night before you bake, then in the morning, you mix the final dough. With this particular recipe, the process is quick! I mean, real quick. Things happen much faster than with your typical artisan loaf. Once you mix the final dough, your loaves are in the oven within an hour-and-a-half!

On top of that, you only manipulate the dough three times before baking and two of those times are devoted to creating structure. So you really only have two opportunities to create structure and strength in your dough before you bake. That third time is just pushing the dough into a loaf shape and transferring it to a couche. There’s no formal shaping and scoring with a ciabatta. So you have to get the structure-building steps down!

Now don’t go thinking that this is a beginner’s bread simply because of the short prep time or the use of commercial yeast. It isn’t. What makes it difficult is the hydration rate is a whopping 85%! At that level, it’s almost like working with a batter, and even for seasoned bread makers, that kind of hydration rate can be a little daunting. So like making baguettes, making a great ciabatta is less about the ingredients and so much more about the technique.

The Recipe

If you read the recipe table, you won’t see any olive oil. The only time it is used is to coat the mixing bowl after the second fold, just prior to the final fermentation. I’m not sure why this is, but the results are pretty marvelous just the same.

Like baguettes, the process occurs over two days. You create a poolish the night before, then mix the final dough and bake in the morning.

Overall Formula

I’m providing the overall formula because it is possible to do this as a straight dough.

FlourWaterSaltYeast
100%
(10% Whole Wheat)
(90% Bread Flour)
85%2%0.64%

Poolish – Day 1

I love that the flour of the poolish represents 50% of the total flour. The influence of flavor from this amount of poolish is immense!

FlourWaterYeast
100 g Whole Wheat Flour
400 g Bread Flour
500 ml0.4 g
Mix all the dry ingredients together, then add water in batches until you form a smooth, thick batter. Set aside at room temperature for 12-16 hours. I shoot for 14 hours. As an early-riser, I make the poolish at about 4pm then mix the final dough at 6am the next day.

If you’re using yeast packets, simply take a healthy pinch from a packet to use for the poolish, then use the rest for the final dough.

Final Dough – Day 2

FlourWaterSaltYeastPoolish
500 g Bread Flour350 ml20 g6 g1000 g
– If you’re wondering if the amount of yeast listed seems to be a bit much, bear in mind that Chef Markus uses 15 grams fresh yeast. The instant/active yeast equivalents are 30-40% of fresh yeast.

Dough Temp: 475F/24C

Before you start, I recommend using a round-bottom mixing bowl for the fermentation steps. The dough is so wet that it will be difficult to do stretch & folds if you use a vertical-sided container. Also, a couche is very helpful to have, especially for the final proof.

Note that the times listed are approximate! I just baked a batch yesterday and because it was early in the morning and very cool, I had to extend the times to 30 minutes, and I let the final proof go for 20 minutes.

Mixing. Sift the flour into a mixing bowl, then add the salt and yeast. Use a whisk to combine and thoroughly incorporate all the dry ingredients together. In a separate bowl, combine the poolish and water and completely dissolve the poolish. Once it’s liquified, pour the liquid into the mixing bowl and mix until no dry ingredients are left. Mix into a shaggy mass, then let the mixture rest for 20 minutes.

You can use a stand mixer for this step, but with this small amount of dough, I just mix by hand and use a Danish dough whisk. It’s pretty fast with this kind of hydration.

Bulk Fermentation First Fold. After the dough has rested, do a series of stretches and folds in the bowl. The trick to folding a super-wet dough like this is to make your hand like a wooden spoon, with your fingers pressed together. Scoop from the side and slip your fingers under the mass, then lift. At first, most of the dough will kind of pour out of your hand, but as you stretch the dough more and more, you’ll feel the tension building and the dough won’t pour out nearly as much. Wet your hand regularly! Once you feel as if you can pick up about a third of the dough mass when you scoop, you’ve built up enough strength for that session. Cover the dough and rest for another 20 minutes.

At this point, it’s a good idea to start preheating your oven (to 475°F/250°C), especially if you use a baking stone like I do.

Bulk Fermentation: Lamination. Generously flour your work surface, and I mean generously, then pour out your dough onto your work surface. Check to see if you can lift up the edges of the dough, and use your bench scraper to push flour under areas that are sticking. Gently tug the dough into a square, then starting at the bottom edge, quickly work your fingers under the dough (your fingers should be pressed together, give that side a stretch toward you, then fold the edge about 2/3 over the dough. Do the same with the top edge. Once you’ve folded the top edge over, gently pat the dough down to even out its thickness, then fold the left and right sides. Gently pat down the folded dough, then repeat the process.

Chef Farbinger laminates his dough 3 times. But with the King Arthur AP flour I use, by the time I’m finished with the 2nd lamination, the dough is nice and strong. Not matter what, once you’ve finished lamination, Roll the dough onto its seams then form it into a round. Place the dough into a well-oiled bowl (I just rinse out my mixing bowl then spray oil in it). Let the dough rest for 20 minutes.

Divide and “Shape“: Flour your work surface again, but not nearly with as much flour as with lamination. Slide the dough ball into the surface. Then using your bench scraper, gently tug the dough into a rectangle with fairly even thickness. Cut the dough down the center along the long edge to form two “slippers.” Then work each piece into long rectangles. Picking the loaves up from the ends and scooping towards the middle, transfer the loaves to a well-floured couche or tea towel. Lightly flour then dimple the tops to even out the thickness.

Final Fermentation: 10 minutes

Bake. If you’re baking on a stone, transfer the loaves to a loading board generously sprinkled with cornmeal. If you don’t have a board, cover a baking sheet with parchment paper, then sprinkle cornmeal on the parchment paper. Bake the loaves at 475°-480°F (~250°C) with steam for 15 minutes. Remove steaming container(s), then turn down the oven to 400°F (200°C) for another 15-20 minutes or until the crust turns a deep golden brown. If you want to follow tradition, don’t bake your loaves past this as the standard crust thickness should be 3mm on average according to Italian law. But that said, bake the loaves to whatever doneness you want!

I put “tradition” in italics above because technically ciabatta didn’t exist until the early 1980s. However, the technique is steeped in thousands of years of tradition.

Sourdough Ciabatta

After the success I had with the baguettes based on the Tartine Bread recipe, I thought I’d apply a similar principle to making ciabatta. But this time around, roughly 30% of the flour would come solely from a young sourdough starter as opposed to the half levain/half poolish of the baguettes.

Notice that I mentioned employing a young sourdough starter. This is important in that I wanted lots of yeast activity and also to mitigate the sourness from the bacteria. This is along the lines of Chad Robertson’s approach in Tartine Bread.

Like all ciabatta, this is an extremely wet dough. When you fold this dough the first time, it’ll feel a little icky. But don’t worry. The results are fabulous! Let’s get into the formula.

Overall Formula

Flour100.00%
Water (warm – 85°F)80.00%
Salt2.00%
Olive Oil5.00%
Total Percentages187%

Levain

Preferment Flour %*30%
Hydration %100%
AP Flour194.44
Water194.44
Mature Starter~30
Preferment Required389
Note that the weights listed here are what is needed for the recipe. I’ll get into building the levain below.

Final Dough

Flour454
Water324
Salt13
Olive Oil32
Levain389
Total Yield1212
2 X ~600g loaves
Optimal Dough Temp80°F-82°F
Weights are in grams

Please TRUST YOUR EYES AND YOUR HANDS with this. I list out times like 30-60 minutes, but things can happen faster or slower. As with any baking process, times are only guidelines!

Make the Levain. I do a double feeding to really crank up the yeast activity before I mix the dough. So I first take a good spoonful of mature starter and add that to 100g of AP flour and 100ml of water and mix it up well. I place my container in a fairly warm place (80°F+) and let it more than double. When it’s ready, the top is bubbly – very bubbly – and you can see the activity of the yeast. Once it gets to that point which, at least for my starter, takes about 2-3 hours, I feed it with 100g flour and water, then let that double. The activity is pretty strong at this point, so the levain is ready in under 2 hours (yesterday, my levain was ready in an hour!). The levain will be fairly bubbly and as with the initial feeding, you should see activity at the top of the mass.

Initial Mix. In a large bowl, mix the levain and all of the water and completely liquify the levain. Place the flour in another large bowl, then gradually add the water and mix until there are no dry ingredients. Rest for 30 minutes.

Final Mix. Sprinkle the salt over the dough mass, then once lightly incorporated into the dough, add the olive oil. It’s best to just squeeze it into the dough to work it in. Once all the olive oil is incorporated, do a series of light stretches and folds to fully incorporate the salt and oil. Note that this isn’t meant to build strength in the dough. Rest for 30 minutes.

Bulk Fermentation. Up to 2 hours depending on ambient temp. Ideally, your dough should ferment in an environment that’s no lower than 78°F.

Folding. After 30 minutes, stretch and fold the dough. It will be wet and will feel like a batter. Continue stretching and folding until you start feeling some tension build in the dough. You may have to do 10-12 stretches and folds. Four will not do the job. This is a critical step in building up some dough strength and gas retention properties in the dough. I love this part because I can literally feel it transform from a very liquid mass into a dough. After folding, rest for 30 minutes.

You may not see much apparent fermentation activity at this point, but that’s okay. The yeasts are working!

Lamination. This is the last step in building structure in the dough, so it’s pretty important. Liberally flour your work area. Don’t be stingy with the flour here because you do not want it to stick and tear the dough. Using your bowl scraper pour your dough out onto your work surface. Then to ensure that there’s flour underneath your dough, use your bench scraper to push flour underneath any areas that could potentially stick. To make sure your dough’s not sticking, move the whole mass around. It should move easily. Then once you know it’s not going to stick, with quick, definitive motions, slide your fingers under the sides of the dough and lightly stretch it into a square till the dough is about 3/4″ thick.

Take the top of the dough and stretch it away from you a bit and bring it to the center. Take the bottom half, pull it toward you, then completely overlap the top fold. Gently pat the rectangle down to even out the thickness, then do the same stretch on the left and right sides. Pat the dough down, then repeat the process two more times if you can. If the dough fights you, that’s a good thing. It means you’ve built some strength into the dough. Once you can no longer laminate the dough, gently roll it onto the seams and with cupped hands, work it into a round. Transfer the round seam-side-down into a lightly oiled bowl. Let the dough rest in the bowl for another 30 minutes or until you see about a 25% increase in volume. Note that this could take a little longer.

At this point, preheat your oven to 500°F and make sure you have steaming container handy – a cast iron pan or a loaf pan with water-soaked towels.

Divide and Shape. Slide the dough out of the bowl onto a well-floured surface. As with the lamination step, gently pull the dough into a square with roughly even thickness, then cut it into two equal halves. Gently tug each half into long rectangles (forming the slippers). Then holding a rectangle at each end, bring your hands together to scoop the rectangle and place it onto a well-floured couche or towel. Once it’s on the couche, gently tug it back into shape. Once both loaves are on the couche or towel, gently dimple the tops of each piece to promote even rising.

Final Fermentation. This can take anywhere from 30 minutes to 2 hours. What you want to watch for is that the loaves are nice and puffy with obvious bubble formation on the skin. Exercise some patience here because with natural yeast, things happen A LOT slower than with commercial yeast, and if you bake the dough too early, you will not get very good bubble formation!

Bake. Get some hot water into your steaming container to get the steam going in your oven about 10-15 minutes before baking.

You’ll really need a flip board for this so as not to degas the loaves. If you don’t have one, you’ll have to basically do the same motion as putting the loaves onto the couche to transfer the loaves to either a baking sheet covered lightly with cornmeal (if you don’t have a baking stone) or flipped onto a transfer board sprinkled with cornmeal or semolina.

Quickly place the loaves into your oven and immediately turn the heat down to 475°F. About five minutes into the bake, check to make sure there’s still water in your steaming container. If not, replenish it (see notes). Bake with steam for 12 minutes then remove your steaming container(s) (I use multiple to ensure steam is produced faster than it can be vented) and reduce your oven temp to 425°F. At this point, the loaves will have started to take on color. Bake for another 12-15 minutes or until the crust is a deep golden brown. You can let these cool if you want, but there’s nothing like slathering a hot slice of ciabatta with butter and honey!

Notes

  1. Some bakers I’ve encountered talk about not being able to keep steam in their ovens. I can’t either. Like almost all domestic ovens, my oven is designed to vent moisture. But if you produce more steam than the rate that the oven can vent it (I use multiple containers), you’ll be able to maintain a steamy environment. Furthermore, when you bake with steam, you need to check to see if your water has burned off during the time you need to be steaming! I always check my steaming containers 5 minutes into each bake to make sure they’ve got plenty of water to do the job.
  2. Once you add the olive oil, the dough will really feel liquidy. Don’t worry and please don’t add flour. Olive oil is like a gluten lube. It increases a dough’s extensibility immensely and in addition to adding great flavor, contributes to the production of large bubbles.
  3. Speaking of olive oil, do yourself a favor and use nothing but real extra virgin olive oil, not the cheap grocery store stuff.

Basic Ciabatta

One would think that with the bread craze that has swept the world during the pandemic lockdown, that sourdough is the only bread being made and that the only bread that qualifies as artisan can only be made with a starter. That’s bullshit of course because doing something in an artisan way has less to do with the ingredients or materials and much more to do with craftsmanship.

When I make ciabatta, I typically use a biga or a poolish. But sometimes, I just want some bread. So as I do with Baguettes de Tradition, I’ll just whip up a batch of dough in early in the morning, and have fresh, hot bread for breakfast. No, it doesn’t keep, but at the small quantities I make, it’s gone in less than a day.

One might think that a straight dough can be bland and boring. But done right, a bread made from straight dough can be absolutely wondrous. And I will submit that while a same-day straight dough bread may not have the depth of flavor of one made with a preferment or employing a slow-rise, cold bulk ferment, employing great technique will go a long way toward making up for that.

That said, one way to add a little flavor complexity is to use a flour blend. Though I list using unbleached AP flour in the formula, my flour is actually a blend of 30% high-extraction flour and 70% AP flour. The high-extraction flour lends a nuttiness to the overall flavor of the bread, plus an ever-so-slight grainy texture to it making it seem much more substantial than it actually is.

Especially with ciabatta, the crisp, crackly, and crunchy crust combined with the light and airy crumb, redolent with large holes can create a magical bread. A full bake that activates the Meillard reaction (but not taking it to super-dark) can add flavors that would otherwise not be present on lightly baked loaves.

Overall Formula

Unbleached All-Purpose Flour100.00%
Water75.00%
Salt2.00%
Yeast1.50%
Milk (optional – see below)10%
Olive Oil4.00%

MILK?!!! No, I’m not kidding. It actually makes the dough fluffy and soft. This is perfect for sandwiches. You can dispense with the milk though and replace it with water. Definitely do the bassinage stage described below, so mix to an initial 75% hydration, then take it up to 85% with the reserved water.

Final Dough

Unbleached All-Purpose Flour*525
Water394
Salt10
Yeast8
Milk**52
Olive Oil21
Yield2 X 500g loaves
4 X 250g loaves
Optimal Dough Temp76°F
*Preferably organic and definitely > 11% protein. You can use Bob’s Red Mill or King Arthur. I use Azure Market AP Flour.
**If you don’t want to use milk, that’s okay, just use all water, but milk will help with the fluffiness of the bread.

If you use a baking stone, preheat your oven to 485°F / 250°C to ensure your stone’s hot by the time you’re ready to bake. Things happen pretty quick with this bread, and you don’t want to get to final fermentation and have to wait for your oven to warm up.

Mixing. I recommend using a stand mixer if you have one, but this can be done by hand as well – it just takes longer. Sift the dry ingredients together then add the water. If using a mixer, mix on slow speed to incorporate all the ingredients then go to the second speed until mixture is smooth and the dough climbs to the top of the dough hook as the gluten is starting to form at this point. Rest for 20 minutes.

Bassinage. Once the dough has rested (you may also notice bubbles forming), fold the milk (or water if you decide not to use milk) into the dough until it is fully incorporated. This will get it to 85% hydration. But since the gluten started developing with the thorough mixing, there’s already strength in the dough and it will not feel like a soupy mess. You can actually feel the gluten strands! Once the liquid has been fully incorporated, drizzle the olive oil over the dough, and mix it in well.

Again, I use a stand mixer for this because it’s much more effective at getting the milk and olive oil incorporated.

You want to be gentle with folding and lamination steps. What we’re trying to do is build the gas retention properties of the dough in these steps.

Folding. Once the milk and olive oil have been incorporated, rest the dough for 20 minutes then do a set of stretch and folds. Don’t just do the standard four-fold North-South-East-West. Stretch and fold until you feel the tenacity of the dough building. Rest for 20 minutes.

Laminate. Liberally flour your work surface then gently pour the dough onto it. Gently tug it into a rectangular shape that is about 1/2″ to 3/4″ thick. Letter fold the dough in an NSEW pattern 3 times, gently pressing and flattening the dough between folds. After the last letter fold, roll the dough onto the seam (no need to seal) and shape it into a round. The dough ball should hold together and not collapse too much (don’t worry, it will collapse a bit because of the hydration). Place the dough into a well-oiled bowl seam-side-down (I just wipe down my bowl then spray it with olive oil). Rest for 20-30 minutes (or more) until the dough ball has almost doubled in size.

After laminating, you can go directly to dividing or shaping after the 20-30 rest, or retard the dough in your fridge for a few hours. With this much commercial yeast though, I recommend that your fridge temp is between 36°-40°F. You really want to slow the yeast and promote the lacto- and acetobacillus activity. That said, alternatively, you could use a bit less yeast, say 4 grams and retard the dough for an even longer period of time.

Divide and “Shape.” Again, liberally flour your work surface then pour your dough onto it. Gently tug it into a rectangle, then divide it into two equal pieces (or four if you want to make sub-sized buns). I’m kind of anal about things being even, so I actually scale out my pieces to 500 grams apiece. Gently tug each piece into long rectangles, then transfer to a well-floured couche (as shown to the right). Once you transfer them to the couche, flour your fingertips and gently dimple the loaves to promote even rising – and prevent over-rising, believe it or not – for the final ferment.

Final Fermentation. Cover the loaves and allow them to ferment for 30 minutes or until the dough is nice and relaxed and puffy.

Bake. Liberally sprinkle semolina or rice flour over the loaves while they’re on the couche, then flip them onto your transfer board. Bake the loaves with steam at 485°F for 12 minutes. Remove your steaming container, turn your oven down to 435°F, then bake for 20-25 minutes or until the crusts are a deep golden brown. You don’t want to go out to dark brown/black with these as the dough doesn’t have enough complexity in flavor to compensate for a super-dark crust. That’ll be the predominant flavor and the bread will taste like burnt toast. Not good. However, a deep golden-brown crust will also be relatively thicker lending a nice, textural quality. I realize that this veers from the traditional thin crust of ciabatta, but I love the textural contrast between the crunchy crust and the soft, pillowy crumb.

These are best eaten warm, so let cool for 30 minutes, then enjoy!

I don’t really think about it because I’ve made it so much, but ciabatta’s a challenging dough with which to work because of its hydration level. You have to make quick, precise movements with a dough like this. But the handling of the dough is mitigated by the bassinage. I just can’t stress enough how important that step is!

When first mixing the dough, it’s at a workable 75%. This allows us to work it and develop the gluten and thus dough strength early on in the process. Once the milk and olive oil are added, even though dough may appear to be a smooth batter, if you pull on it, you’ll see that it actually transforms into a highly extensible dough with all the wonderful gas-retention properties we expect! (Read: big holes)

And let me re-emphasize that the craftsmanship put into making bread like this is tantamount to its quality. But be that as it may, as a straight dough, it doesn’t really have a lot of complexity in flavor. That said, done right, it becomes a canvas on which you can build wonderful dishes.

I love using this bread for dipping into a fine olive oil (my preferred brand is Segreto from Italy that I have my daughter bring from New York City) mixed with a well-aged balsamic vinegar. I’ve used this bread for bruschetta as well. And let’s not forget that its very shape lends itself for wonderful sandwiches! Gawd! I’m getting hungry just thinking about these things! 🙂

Happy Baking!

Ciabatta with Biga

Like the humble baguette, a ciabatta is the model of simplicity when it comes to its ingredients. But also like the baguette, if you don’t bring your A-game to this bake, it’ll bite you in the ass! The dough is so wet that you have to use quick movements when working with it. I can’t tell you how many times I’ve ended up with my hands covered with dough (more like batter). I don’t want to discourage anyone from making this, but just be prepared.

Speaking of preparation, I’ve adapted this recipe from a few sources, but mainly from what I learned from Carol Fields’ book, “The Italian Baker” and her Ciabatta Polesana, which she in turn adapted from former race driver Arnaldo Cavallari who quit racing and started baking the flour from his family’s mill. In her recipe, she recommends using high-gluten flour. I’m not sure just how high of protein content she was talking about, but the high-protein flour I use is 17% protein. At 88% hydration, it’s like working a regular dough. So I upped my hydration to 93% when using this flour to get it to a looser consistency. But I do recommend bread flour or a mix of bread and AP flour at this hydration.

Ms. Fields also recommend using a mixer. I usually use one if I’m making a larger batch of ciabatta. But when I’m just whipping up a couple of loaves, I just mix by hand. But as I often recommend, a Danish dough whisk really comes in handy. That said, let’s get to the formulas!

Overall Formula

Flour100.00%
Water88.00%
Salt1.80%
Yeast0.75%
Total Percentage190.55%

Biga

Make a 75% hydration biga from 35% of the flour you’ll need (we’ll get into that in just a bit). Whatever that weight comes out to, make a bit more than what you calculate. For this particular recipe, our yield will be 2 X 500g loaves and I always add a percent or two for process loss, so about 1010g total dough weight. The biga formula is as follows:

Preferment Flour % of Total35%
Hydration %75%
Preferment Flour Weight185.52
Preferment Water139.14
Preferment Required325

As the table above shows, to make the total dough weight, we need 325g of biga. I made 350g and just measured out what I needed the next day.

To figure out how much total flour you’ll need for ANY recipe, take your target dough weight (this recipe is 1010g) and divide that by the total percentage (in this case 190.55% or 1.9055). That will give you about 530g. So, for the biga, you’ll need about 185g of flour as that is 35% of the total flour.

Final Dough

Flour345
Water327
Salt10
Yeast4
Biga325
Total Yield1,010.00
Total Flour530.04
Total Water466.44

Biga. The night before, mix the flour, yeast, and water you’ll need for the biga. Form into a ball, cover with plastic and let it rest. The next morning, it should be covered with bubbles and slightly domed. For my kitchen, it took about 10 hours to get to this state. It will be shorter in warm weather and longer in cold weather. Carol Fields recommends putting the biga in the fridge after an hour. But be forewarned that it will take 18-24 hours to get to the proper state. This is NOT a bad thing as it will develop the flavors of the organic acids.

Mix. In a large bowl, mix biga, yeast and water. Break up the biga (it will not completely dissolve. Add the flour, then sprinkle the salt over the flour. Mix until well incorporated and get the mixture to be as smooth as possible. Adjust hydration so that the dough is loose, but not quite a batter.

Bulk Fermentation. Approximately 1 to 1 1/2 hour.

Folding. After mixing, let the dough rest for 20 minutes then stretch and fold the dough.

Be sure with your folding that you do not tear the dough! However, do plenty of stretch and folds and feel the gluten strands develop. You will not get a lot of resistance at first, but you will feel it build. Also, don’t be afraid of wetting your folding hand often to prevent the dough from sticking.

Laminate. Pour the dough out onto a well-floured surface (be generous with the flour). Using wet or well-floured hands (and I also use my bench scraper), gently tug the dough into a large rectangle about 3/4″ thick. You don’t want to pull it too thin because you want to retain the bubbles as much as possible. Gently stretch out one of the short sides of the dough then fold it 2/3 over the sheet, then repeat with the other side. Do this again with the short sides of the dough until you’ve completed a north-south-east-west pattern. Gently pat the dough a little flatter, then repeat the NSEW pattern two more times, with a light pat-down in between. The dough will build up after each lamination, so be careful not to flatten it out too much. After the third lamination, gently roll it over onto the seams – no need to seal. Move the dough ball to a lightly oiled bowl for the final stage of bulk fermentation. Let the dough almost triple. This will take anywhere from 30 minutes to an hour and a half. At this point, we’re after bubble production!

Do yourself a favor and use really good olive oil. While you can use the standard stuff you can find in a grocery store, I’ve found that even the small amount that’s used with this bread makes a huge difference in the taste. I use Frantoi Cutrera Segreto Degli Iblei cold-extracted extra-virgin olive oil from Sicily.

Dividing and “Shaping.” At this point, you can be pretty generous with the flour you put on your board. Slide your dough out onto a well-floured work surface and tug into a rectangle about 3/4″ to 1″ thick. You’re going to divide it along the length, so try to make the rectangle as even as possible. Placing your fingers under the ends of a piece, quickly bring your hands together to scoop up the dough and transfer it to a very well-floured couche, or well-floured baking pan. Do some final arrangements to evenly distribute the dough across the flat loaf. The loaves will not be of even weight, though you can get pretty close. (Update: I scale out to 500 grams pieces – I like ’em even)

You will also notice bubbles just under the surface of the skin. Do not pop them!

Note: If you use a baking pan, use a mixture of flour and course-grind cornmeal or semolina. You won’t be transferring the loaves to a stone.

Final Fermentation. This is a little tricky because all you really want to do is let the dough reset from dividing and shaping. Chef Markus Farbinger only waits 10 minutes for this final stage. I go from 15-30 minutes. The poke test will not work here. What I look for is if the dough has puffed up a bit and the sharp edge of my cut is all but gone.

A good ciabatta will be riddled with holes!

Bake. Transfer the loaves to a transfer board. For added texture, I sprinkle a generous amount of cornmeal on my transfer board to give the bottoms of the loaves a nice crunch. Lightly spray olive oil on the tops of the loaves. Bake with steam at 485°F for 12 minutes. Remove the steaming container, turn the oven down to 435°F and bake for another 20-25 minutes until the crust is a deep golden brown. Cool for 30 minutes before cutting.

Fully baked, a ciabatta will feel a lot lighter than what its size may indicate. My ciabatta are 22″ long, but they feel light as a feather. If your loaves feel a little heavy, bake them for a few more minutes. It’s the water that makes them heavy.

Happy Baking!

What About Using Sourdough?

That is entirely possible, though I’d change the formula a little to use a hybrid starter/commercial yeast method of rising as indigenous yeast tends to make finer holes. You’ll use half the yeast prescribed in the original recipe and cut the starter’s flour percentage to 20%.

Furthermore, I recommend building a levain from AP flour to keep the flavor mild. Or if your starter is based on whole-grain flour, I’d recommend a grain that has some gluten in it. If you want to use a rye-based starter, then knock the hydration down a couple of percentage points.

Given all that, here’s what the adjusted formula would look like:

Overall Formula

Flour100.00%
Water88.00%
Salt1.80%
Yeast0.30%
Total Percentage190.10%

Starter

Preferment Flour % of Total20%
Hydration %75%

Final Dough (Yield: 2 X 500g loaves)

Flour425
Water388
Salt10
Yeast2
Preferment186

Notes

  1. Though I mentioned using a hybrid rising technique you could still go with using nothing but a levain to raise the dough. But if you do, I highly recommend doing a long, cold bulk fermentation for at least 12-16 hours to ensure good bubble formation. Also, after you remove the dough from the fridge, you’ll need to give it a couple to a few hours to come up to near room temp before proceeding with the rest of the processing.

Baking Bread on “Staycation”

Making a biga for ciabattas this afternoon!

So… I’m sitting here in Waimanalo, Oahu, Hawaii where my wife rented a house for a couple of weeks so we could all “work from home” away from our real home for awhile. We arrived in the early evening and went out for dinner last night, but we spent WAY too much on dinner, having dined at one of Guy Fieri’s Triple D restaurants, Uahi Grill in Kailua. It was good, but nothing spectacular.

I had the poké which was pretty good, but to be honest, Fresh Catch in Kaneohe is WAY better; so is the poké at Foodland Supermarket – and they have 10 different varieties that they make fresh every day! But I digress…

Anyway, after getting over the initial shock of spending over $200 on dinner last night (it’s not that we can’t afford it, it’s just a lot to pay for okay food), since we rented a house, I promised my wife I’d go grocery shopping the next day and get provisions so I could cook dinner most of the nights we’re here.

So early this morning, I drove to the local Foodland to pick up groceries and, of course, today’s supply of poké. On the menu, at least for the next couple of days, are some traditional Filipino and Hawaiian dishes like Pork Adobo and Pancit and Spam Musubi.

While I was going down the Rice and Pasta aisle, it just happened to be the baking goods aisle as well. I was not intending to bake on this trip. I was going to take a little break. But the kids wanted to make sandwiches for lunch and I’m sorry, even though Foodland bakes their own bread and it’s pretty good as grocery store bread goes, I just can’t get myself to buy grocery store bread any longer.

As I’m writing this, I looked up at my wife who’s sitting across the kitchen table from me and said, “I ust realized that I haven’t bought a loaf of bread for over a year! There’s just been no need.”

My aversion to grocery store bread was strong enough to overcome my wanting to take a bread from baking. Yeah, I’m pretty obsessed with baking, though not so crazy as to bring a starter with me. But truth be told, baking on this particular trip is purely practical. I’d rather bake my own bread where I know exactly what goes into it, than buy bread that has additives and preservatives in it.

Luckily Foodland had some King Arthur flour and Red Start Active Dry Yeast on hand. Niether were cheap, but I’ll be making ciabattas later today (I’ve got a biga started). Technically, I probably could make baguettes as well, but I’ll see how it goes with the ciabattas first.

The challenge here is that I have no scale, so I’m going to have to pretty much eyeball everything. As I wasn’t planning on baking in the first place, I didn’t even bring my trusty, compact precision scale which I could’ve easily packed. But hey! After watching several shows of people making traditional breads by hand, and owing to the fact that I bake so much that I’ve learned to determine a dough’s consistency by look and feel, this won’t be much of a problem for me. In fact, I’m pretty excited!

Every time I bake, I get this excited feeling. At least for the past year since I’ve put a lot of energy into artisan baking, I get this anxious feeling in the pit of my stomach. But it’s a good anxious; that anxiousness of anticipation, and I just can’t help but smile. I have to admit that I’ve been the happiest I’ve ever been since I picked up baking.

Even when I’m doing my charity projects where I’m baking a bunch of loaves at once, it’s like my brain releases a flood of serotonin into my bloodstream, and my feelings of well-being and happiness go straight through the roof! Is it weird? Maybe. But I’m addicted to the feeling.

Well, I just realized that I forgot to get a small bottle of olive oil, so I need to go out to the grocery store again…

Happy Baking!

P.S. Here’s what the finished product looks like!

Recipe: Sourdough Ciabattas

Besides baguettes, ciabattas are my other favorite loaves to make. Once I learned Master Chef Markus Farbinger’s recipe, I was hooked! Ciabattas are SO easy to make. Whether you use the standard recipe that I linked to above, or use a sourdough starter, it can be a same-day bake! Though if you go the sourdough route, I suggest doing an overnight bulk ferment, which I’ll explain below.

With this particular recipe, I’m going for a much lighter crumb and am using bread and AP flour. I know that I have eschewed using white flours, but the enzymes in the sourdough starter help break down the flour to make it more digestible, so while the flour may not be as nutritious as whole wheat and high-extraction flour, we’ll still get plenty of nutrition from the bread. That said, let’s get started!

Ingredients

Levain

Starter200 grams
Unbleached Flour150 grams
Water (90°-95° F)150 grams
For flour, I use a high-extraction flour from Azure Standard called Ultra Unifine Bread Flour.

Final Dough

Levain500 grams
Unbleached Bread Flour250 grams
Unbleached AP Flour500 grams
Water*550-600 grams
Salt20 grams
Instant Yeast** (optional)2 grams
*With water, you have to gauge it. 550 grams will get you to 80% hydration. But depending on your flour, if the dough is a little stiff, you’ll want to add more water. The initially mixed dough sh9uld be the consistency of a stiff batter.

**Using a bit of instant yeast is purely optional, but I’ve found that it is very helpful on cold days. I wouldn’t use it on hot days where I can rely on the ambient temperature of my kitchen to keep the microbes super-active.

Instead of using separate containers for the levain and the final dough, I just use a 6-quart Cambro tub. When my levain’s ready, I just add all the ingredients to the tub. It’s much more convenient. I’m going to provide some times as guides during the process. By no means are they hard and fast, especially with varying kitchen temps where the bulk and final fermentations can be shorter or longer depending on the ambient temperature of your kitchen.

Make the Levain

  1. Feed your starter so you can produce 200 grams of starter. When the starter’s ready, transfer 200 grams to a large mixing bowl or a large plastic tub. Note that the starter doesn’t have to be active and at its peak. My daily grape starter is maintained at 400 grams total, so I just use 200 grams from my mother culture, then feed her. Works like a charm!
  2. (4:00 pm) To the 200 grams of starter, add 150 grams of unbleached flour (here’s where I use my high-extraction flour, but you can use any unbleached flour that you want) and 150 grams of water. Mix thoroughly until smooth.
  3. (4:15 pm) Place the levain container in a warm place to ferment. It has been cold as of late, so I put my levain container in my oven with the door cracked to get a little heat from the oven light.
  4. (8:30 pm) If you have a fairly active starter, your levain should be actively bubbling by now. If it’s not, I suggest waiting until it’s really active.

Mix the Final Dough

  1. (8:40 pm) There’s no autolyse with a ciabatta, so just add all the final dough ingredients to the levain and mix thoroughly until you’ve incorporated all the dry ingredients and create a shaggy mass (about 5 minutes). Note: If you’re going to do a same-day bake, I suggest turning on your oven to 250° C or ~485° F now.
    1. It’s a bit messy, but I prefer to mix the dough by hand, alternating squeezing the dough through my open fingers, then using a stretch and fold motion to turn the dough. I’ll do this until I feel comfortable that the salt and yeast have been totally incorporated.
  2. Clean off your mixing hand and let the shaggy mass rest for 20 minutes.
  3. (9:05 pm) Using a wet hand, do a series of stretch and folds until you feel the tension in the dough building. When it kind of fights you, then let the dough rest for another 20 minutes.
  4. (9:25 pm) Dump the dough onto your well-floured work surface – it should be really well-floured – making sure you clean and scrape all the excess dough left in the container, then wipe the container with a paper towel.. Using quick motions, pull the dough into a rough rectangle, then do letter folds, front to back, and side to side at least three rounds. Make sure that when you fold, you also pull flap, then fold over. Once you feel that the dough strength has been built up (it will fight you a bit), roll the dough onto its seams, then using your bench scraper, form the dough into a ball.
  5. (9:30 pm) Spray the container with a light coat of olive oil (I use one of those PAM olive oil spritzers) then gently pick up the dough ball (you can form it up a bit more to make it easier), then drop it into the container.
  6. So here we have two alternatives:
    1. Let the dough rest for 5-10 minutes, then put the container in your fridge for an overnight bulk ferment.
    2. Let the dough rest for 20 minutes, and you’ll be ready for shaping.

Dividing and “Shaping”

Again, depending on how you do the bulk ferment there are two routes to take. The steps are similar, but different enough to warrant discussing them in separate sections.

Same-Day Bake

  1. After 20 minutes, again liberally sprinkle flour on your work surface, then slide the dough ball out of the mixing bowl.
  2. Using quick motions, gently tug the ball into a rough rectangle, then divide the dough into equal pieces. If I’m making loaves, I cut the rectangle in half.
  3. Technically, you’re not supposed shape the ciabatta dough. You pull it into a basic form. But I like to make my loaves into little rectangular pillows, so I gently letter fold the divided dough pieces, being extremely careful not to degas them.
  4. Once you’ve formed the loaves, gathering them from the long ends and cupping under the dough, transfer them to a well-floured couche, seam side up.
  5. Sprinkle the loaves with a bit of flour, then cover them and let proof for 10 minutes.
  6. After 10 minutes, check the loaves for springiness using the finger dent test. You want to have some spring. If there’s a bit too much; that is, the dough immediately springs back, let it rest another 10 minutes.

Overnight Ferment

If you did the overnight ferment, check your dough in your fridge. It should have at least doubled in size. If it hasn’t, you’ll have to wait. My retarder is set to 39° F and it takes 10-12 hours for my dough to double. So if you’re dough’s ready, turn on your oven now and set it to 250° C or about 485° F. Do not proceed until your oven is up to temp, then divide. If you’re using a baking stone, wait at least an hour before proceeding.

  1. Gently slide the fully fermented dough out of the bowl or container on a very well-floured surface. It should easily slide out since you oiled it down.
  2. As above, gently tug the ball into a rough rectangle then divide the dough into equal-sized pieces. Personally, the anal-retentive part of me, can’t resist scaling the pieces so they’re all roughly the same weight.
  3. (optional) As I mentioned above, you don’t have to shape the loaves, but I always do a simple letter fold, then place the loaves on seam side up on a well-floured couche.
  4. Sprinkle the loaves with flour, cover them, then let them rest for 20 minutes.
  5. At this point, I transfer the loaves, seam side down to my transfer board, covered with parchment paper. If you’re not going to use a baking stone, you can use a parchment-covered metal baking sheet.
  6. Sprinkle the tops with flour, cover them, then let the loaves rest for 20 minutes.

Bake

  1. Bake the loaves for 20 minutes (250° C/485 F) with steam (I now use a broiler pan on the bottom rack of my oven and pour a cup of scalding water into it).
  2. Remove your steaming tray after 20 min. Turn down the oven to 200° C/400° F) and continue baking for another 15 minutes, though check for doneness at 10 minutes.
  3. If you want a real crunchy crust, turn the oven off, then leave the loaves in the oven with a slightly cracked door for 10-15 minutes to cure the crusts.

As with my other recipes, I realize that I’ve been a bit long-winded. But I want to make sure I cover as much nuance as possible.