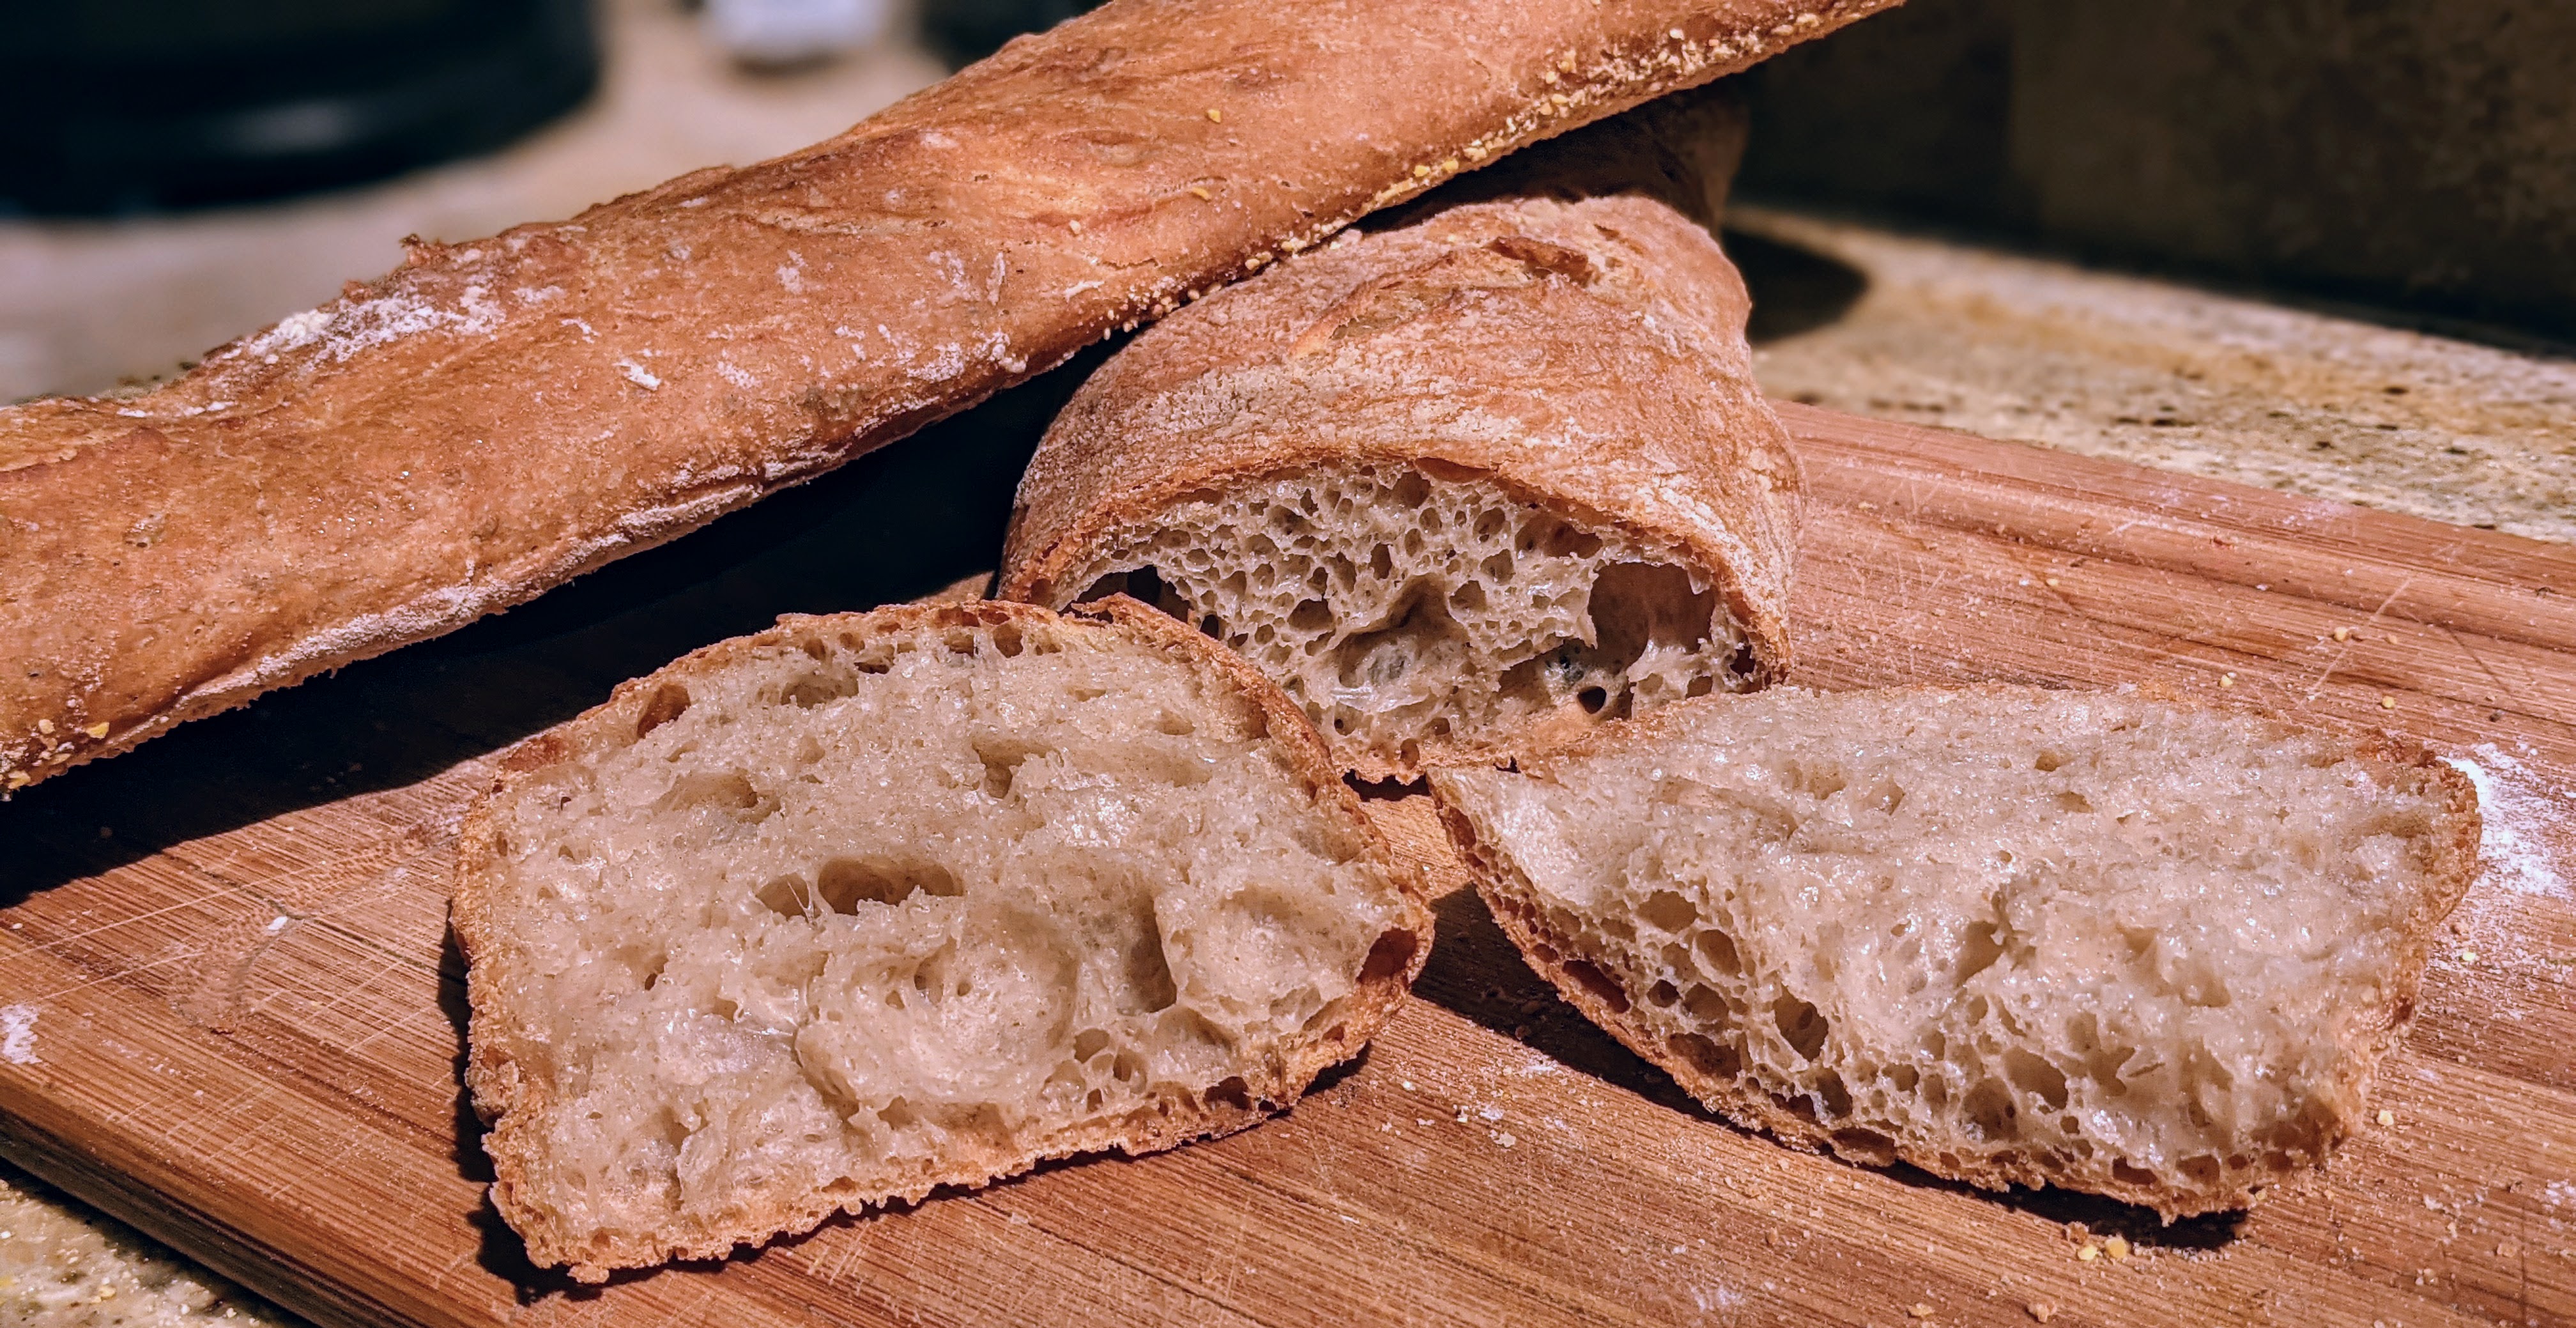
Like the humble baguette, a ciabatta is the model of simplicity when it comes to its ingredients. But also like the baguette, if you don’t bring your A-game to this bake, it’ll bite you in the ass! The dough is so wet that you have to use quick movements when working with it. I can’t tell you how many times I’ve ended up with my hands covered with dough (more like batter). I don’t want to discourage anyone from making this, but just be prepared.
Speaking of preparation, I’ve adapted this recipe from a few sources, but mainly from what I learned from Carol Fields’ book, “The Italian Baker” and her Ciabatta Polesana, which she in turn adapted from former race driver Arnaldo Cavallari who quit racing and started baking the flour from his family’s mill. In her recipe, she recommends using high-gluten flour. I’m not sure just how high of protein content she was talking about, but the high-protein flour I use is 17% protein. At 88% hydration, it’s like working a regular dough. So I upped my hydration to 93% when using this flour to get it to a looser consistency. But I do recommend bread flour or a mix of bread and AP flour at this hydration.
Ms. Fields also recommend using a mixer. I usually use one if I’m making a larger batch of ciabatta. But when I’m just whipping up a couple of loaves, I just mix by hand. But as I often recommend, a Danish dough whisk really comes in handy. That said, let’s get to the formulas!
Overall Formula
| Flour | 100.00% |
| Water | 88.00% |
| Salt | 1.80% |
| Yeast | 0.75% |
| Total Percentage | 190.55% |
Biga
Make a 75% hydration biga from 35% of the flour you’ll need (we’ll get into that in just a bit). Whatever that weight comes out to, make a bit more than what you calculate. For this particular recipe, our yield will be 2 X 500g loaves and I always add a percent or two for process loss, so about 1010g total dough weight. The biga formula is as follows:
| Preferment Flour % of Total | 35% |
| Hydration % | 75% |
| Preferment Flour Weight | 185.52 |
| Preferment Water | 139.14 |
| Preferment Required | 325 |
As the table above shows, to make the total dough weight, we need 325g of biga. I made 350g and just measured out what I needed the next day.
To figure out how much total flour you’ll need for ANY recipe, take your target dough weight (this recipe is 1010g) and divide that by the total percentage (in this case 190.55% or 1.9055). That will give you about 530g. So, for the biga, you’ll need about 185g of flour as that is 35% of the total flour.
Final Dough
| Flour | 345 |
| Water | 327 |
| Salt | 10 |
| Yeast | 4 |
| Biga | 325 |
| Total Yield | 1,010.00 |
| Total Flour | 530.04 |
| Total Water | 466.44 |
Biga. The night before, mix the flour, yeast, and water you’ll need for the biga. Form into a ball, cover with plastic and let it rest. The next morning, it should be covered with bubbles and slightly domed. For my kitchen, it took about 10 hours to get to this state. It will be shorter in warm weather and longer in cold weather. Carol Fields recommends putting the biga in the fridge after an hour. But be forewarned that it will take 18-24 hours to get to the proper state. This is NOT a bad thing as it will develop the flavors of the organic acids.
Mix. In a large bowl, mix biga, yeast and water. Break up the biga (it will not completely dissolve. Add the flour, then sprinkle the salt over the flour. Mix until well incorporated and get the mixture to be as smooth as possible. Adjust hydration so that the dough is loose, but not quite a batter.
Bulk Fermentation. Approximately 1 to 1 1/2 hour.
Folding. After mixing, let the dough rest for 20 minutes then stretch and fold the dough.
Be sure with your folding that you do not tear the dough! However, do plenty of stretch and folds and feel the gluten strands develop. You will not get a lot of resistance at first, but you will feel it build. Also, don’t be afraid of wetting your folding hand often to prevent the dough from sticking.
Laminate. Pour the dough out onto a well-floured surface (be generous with the flour). Using wet or well-floured hands (and I also use my bench scraper), gently tug the dough into a large rectangle about 3/4″ thick. You don’t want to pull it too thin because you want to retain the bubbles as much as possible. Gently stretch out one of the short sides of the dough then fold it 2/3 over the sheet, then repeat with the other side. Do this again with the short sides of the dough until you’ve completed a north-south-east-west pattern. Gently pat the dough a little flatter, then repeat the NSEW pattern two more times, with a light pat-down in between. The dough will build up after each lamination, so be careful not to flatten it out too much. After the third lamination, gently roll it over onto the seams – no need to seal. Move the dough ball to a lightly oiled bowl for the final stage of bulk fermentation. Let the dough almost triple. This will take anywhere from 30 minutes to an hour and a half. At this point, we’re after bubble production!
Do yourself a favor and use really good olive oil. While you can use the standard stuff you can find in a grocery store, I’ve found that even the small amount that’s used with this bread makes a huge difference in the taste. I use Frantoi Cutrera Segreto Degli Iblei cold-extracted extra-virgin olive oil from Sicily.

Dividing and “Shaping.” At this point, you can be pretty generous with the flour you put on your board. Slide your dough out onto a well-floured work surface and tug into a rectangle about 3/4″ to 1″ thick. You’re going to divide it along the length, so try to make the rectangle as even as possible. Placing your fingers under the ends of a piece, quickly bring your hands together to scoop up the dough and transfer it to a very well-floured couche, or well-floured baking pan. Do some final arrangements to evenly distribute the dough across the flat loaf. The loaves will not be of even weight, though you can get pretty close. (Update: I scale out to 500 grams pieces – I like ’em even)
You will also notice bubbles just under the surface of the skin. Do not pop them!
Note: If you use a baking pan, use a mixture of flour and course-grind cornmeal or semolina. You won’t be transferring the loaves to a stone.
Final Fermentation. This is a little tricky because all you really want to do is let the dough reset from dividing and shaping. Chef Markus Farbinger only waits 10 minutes for this final stage. I go from 15-30 minutes. The poke test will not work here. What I look for is if the dough has puffed up a bit and the sharp edge of my cut is all but gone.

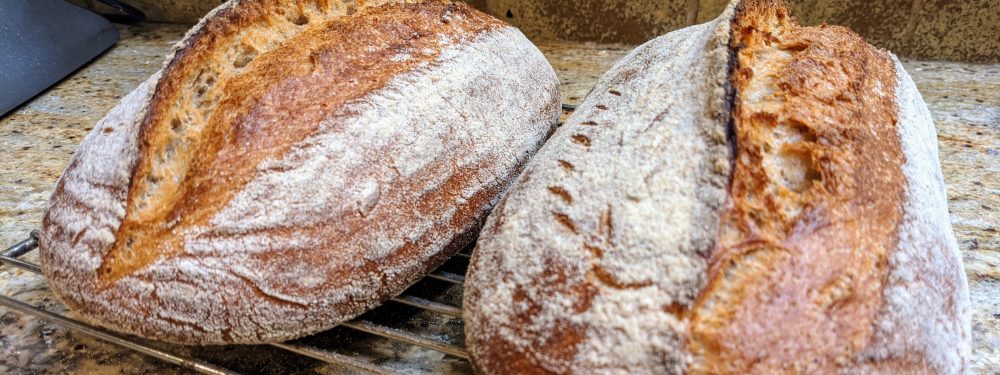
Bake. Transfer the loaves to a transfer board. For added texture, I sprinkle a generous amount of cornmeal on my transfer board to give the bottoms of the loaves a nice crunch. Lightly spray olive oil on the tops of the loaves. Bake with steam at 485°F for 12 minutes. Remove the steaming container, turn the oven down to 435°F and bake for another 20-25 minutes until the crust is a deep golden brown. Cool for 30 minutes before cutting.
Fully baked, a ciabatta will feel a lot lighter than what its size may indicate. My ciabatta are 22″ long, but they feel light as a feather. If your loaves feel a little heavy, bake them for a few more minutes. It’s the water that makes them heavy.
Happy Baking!
What About Using Sourdough?
That is entirely possible, though I’d change the formula a little to use a hybrid starter/commercial yeast method of rising as indigenous yeast tends to make finer holes. You’ll use half the yeast prescribed in the original recipe and cut the starter’s flour percentage to 20%.
Furthermore, I recommend building a levain from AP flour to keep the flavor mild. Or if your starter is based on whole-grain flour, I’d recommend a grain that has some gluten in it. If you want to use a rye-based starter, then knock the hydration down a couple of percentage points.
Given all that, here’s what the adjusted formula would look like:
Overall Formula
| Flour | 100.00% |
| Water | 88.00% |
| Salt | 1.80% |
| Yeast | 0.30% |
| Total Percentage | 190.10% |
Starter
| Preferment Flour % of Total | 20% |
| Hydration % | 75% |
Final Dough (Yield: 2 X 500g loaves)
| Flour | 425 |
| Water | 388 |
| Salt | 10 |
| Yeast | 2 |
| Preferment | 186 |
Notes
- Though I mentioned using a hybrid rising technique you could still go with using nothing but a levain to raise the dough. But if you do, I highly recommend doing a long, cold bulk fermentation for at least 12-16 hours to ensure good bubble formation. Also, after you remove the dough from the fridge, you’ll need to give it a couple to a few hours to come up to near room temp before proceeding with the rest of the processing.

Pingback: Welcome! | The Dawg House!
Photos look like whole wheat flour…which WW are your using that is 17%?
It’s not whole wheat. 🙂 It’s more like T85. I get it from Azure Standard. It is their Ultra-Unifine Bread Flour. It retains more of the bran but is pulverized so fine that it doesn’t affect the rise as much as whole grain flour.