

I wrote a post saying that I had some issues with the Tartine Bread baguette recipe, especially with the yield, which was much more than the two or three baguettes that the recipe said it would produce. It was more like seven or eight baguettes. Not a bad thing, but the inconsistency kind of bugged me. I was also a little dubious about the hydration being only 64% and that the poolish used a seemingly large amount of yeast for such a small poolish amount.
But despite my issues, these baguettes totally intrigued me because Chad Robertson employed both a levain AND a poolish. And unlike most poolish baguette recipes that add a little yeast to the final dough, the rising potential with both types of preferments completely eliminates the need to use any extra commercial yeast other than what goes into the poolish!
Using two preferments was all I needed to know to want to make these baguettes. Chad’s reasoning was that they’d contribute tons of flavor to the bread – they do – but also give the dough lots of extensibility and a longer shelf-life (and I could attest to that because my pure sourdough baguettes will last a week).
But I didn’t want to make as much dough as the recipe in the book yields, so I had to scale it down. To scale it down I had to get the overall formula, then figure out my ingredient weights from that. I shared all this in my previous post, but I’ll put it down here now:
Overall Formula
| Flour | 100.00% |
| Water | 64.00% |
| Salt | 1.70% |
Levain
In Tartine Bread, Chad Robertson says to use a tablespoon of mature starter – it’ll be somewhere around 30-40g of mature starter. The important thing is to make near a 300g levain.
| Mature Starter | 30-40g |
| AP Flour | 150g ~14.25% of total flour |
| Water | 150g |
| Optimal Fermentation Temp. | 78°-82°F |
Poolish
The book says to use 3 grams of yeast for 200 grams of flour and water each. Even if he meant fresh yeast, that’s an awful lot for such a small amount of flour (instant yeast weight would be 1.2g – that’s an insane amount). It’s not necessarily wrong, but the poolish will mature much faster than 3 hours with that amount of yeast and the aim is to get both preferments to peak near the same time.
| AP Flour | 150g ~14.25% of total flour |
| Water | 150g |
| Instant Yeast | 0.4g |
| Optimal Fermentation Temp. | 78°-80°F |
Final Dough
| Bread Flour | 170g |
| AP Flour | 402g |
| Water | 286g |
| Salt | 14g |
| Poolish | 229g |
| Levain | 229g |
| Total yield | 1330g 4 X 330g 60cm loaves 6 X 220g 40 cm loaves |
| Optimal dough temp | 78°-82°F |
Note the relatively high dough temperature of 78°-82°F. This is consistent with Chad Robertson’s method of a warm bulk ferment. You can achieve this by placing your bulk fermentation container in a cold oven with the light on. The light bulb will provide enough heat to maintain that temperature range. But keep an eye on the temp. You don’t want it to get too warm. Propping the door open with a dish towel or oven mitt will help control the temperature.
This is a fairly straightforward formula. BTW, in case you’re interested, both the Poolish and Levain flour contribute 14.25% each to the total flour. So if you want to scale this up, you can use that percentage to determine how much flour you’ll need for both. Without further ado, let’s get into the dough development!
Make the Preferments
One thing to note is that both preferments should be made from predominantly AP flour. The reason for this is that whole grain flours will have much more fermentation activity.
Build the Levain
For the levain, take about 30-40 grams of mature starter and mix it with 150g each of flour and water. Your starter should have enough activity where the levain will be ready in three to four hours. Or if you have a regular schedule, try to coincide the peak of the levain with the peak of the poolish.
Poolish
With the poolish, thoroughly mix all ingredients together. Set aside in a warm place to promote yeast activity. Poolish will be ready when it is heavily bubbled on the top.
Both preferments should pass the float test to ensure optimum activity.
Initial Mix/Fermentolyse. Set aside 50 grams of water. Measure out what you need from both preferments and place in a mixing bowl. Liquify the preferments with the rest of the water, then sift all the flour and add to the liquid. Mix well until there are no dry ingredients and no large lumps in the mix. It’ll be shaggy. Cover and rest for 30-60 minutes.
If you’ve made baguettes previously, you will notice how stiff the dough is. Don’t be alarmed and add more water! The fermentation action of the starters will soften and aerate the dough. Also, note that this is not a true autolyse as the preferments are included. But it does help to hydrate the flour!
Final Mix/Bassinage. Sprinkle the salt all over the dough mass, then add the remaining 50 grams of water. Note that for this small amount of dough, I just mix it by hand, squeezing the salt and water into the dough. Mix until all the water has been incorporated and you don’t feel any salt crystals when you squeeze the dough.
You could use a stand mixer for all the mixing. But if you do, mix only on the lowest setting! I’ve found that with baguettes, you actually don’t want to develop the gluten too much in the mixing stage. You’ll do all that through the folds.
Bassinage Explained
Bassinage is a term you’ll occasionally hear from bakers from time to time. The literal translation of the word is “bathe.” From the perspective of dough development bassinage is the process of folding reserved water into an already mixed dough; basically bathing the mixed dough. You hold back some water (typically 5%-10%), then mix the dough with the remaining water to start the gluten formation. At a later time, you add in the reserved water.
The idea behind it is actually kind of ingenious. The thinking is that the initial mix will get gluten formation started. Then when the reserved water is added, though some water will obviously combine with the remaining flour, other water molecules will get trapped in the gluten matrix, thus forming little pockets of water, which in turn will help in the formation of a more open crumb.
Given that, especially with a moderately stiff dough like the Tartine baguettes, bassinage conceivably will help with creating an open crumb as the trapped water molecules will form steam bubbles during baking.
Bulk Fermentation. 3-4 hours. As with Chad’s basic country loaf, you’re looking for about 25-30% dough expansion. I let the bulk fermentation go for about 4 hours to get to that kind of expansion.
Folding. Fold every 30 minutes within the first three hours up to a total of six folds. Truth be told, I got to the fourth fold and the dough had plenty of strength, forming a nice windowpane. As with any kind of bread, you should never be too parochial about the folding suggested in a recipe. Once you’ve developed enough strength, stop folding. Continuing will just degas the dough.
To be honest, having made these a few times now, I’m not convinced the dough needs this many folds. The hydration is so low that the gluten bonds form quickly. I’ve never gone past four folds. The bulk fermentation does take four to five hours though. With that in mind, I’d suggest doing four folds every 45 minutes instead of six every 30 as is written in the book. But this also depends on your flour. When I use my Azure Standard Bread Flour, two folds is all I need.
Divide and Preshape. Gently turn the dough onto a lightly floured surface and tug it into a rough rectangle, then scale out four 330g pieces for 60cm baguettes, or six 220g pieces for 40cm baguettes. With each piece, letter-fold the dough in an east-west direction, then roll it up like a jelly roll and seal the seam and ends. Take care not to roll too tightly. Add just a little tension! Place seam-side-up on a well-floured couche. Rest for 30-45 minutes depending on how tightly you rolled the pieces. With this low-hydration dough, you need the dough to be well-relaxed.
Shape. I always use Master Chef Markus Farbinger’s baguette shaping technique. But if you have a shaping method already, feel free to use it. One thing that Chef Farbinger doesn’t mention in shaping is that while rolling, your fingertips and the heels of your hands should have contact with your board as you roll the dough out, forming a natural cup. To lengthen the log, you simply flatten your hands a bit – not completely – and the dough will push out to the sides.
Final Fermentation. Up to 3 hours. Yes, you read that correctly. Remember, this is a stiff dough, and after shaping, you want to give it plenty of time to relax. With my last batch, my dough was ready in about an hour and a half. It was a warm afternoon when I baked, and I didn’t want to run the risk of over-fermenting the loaves. In hindsight, I could’ve let it go out for about two hours. To tell if the loaves are ready to bake, if you do the poke test, the surface should give easily. And once you press a little deeper, the interior should have a little more tension, but it should give as well. Once you remove your finger, observe how the dough springs back. It should spring back slowly.
I can’t stress enough how important this last fermentation step is! This step will make or break the bake – even more so than the bulk fermentation because that rest period will allow the bubbles to re-form, which is crucial to achieving an open crumb. Remember, this is a stiff dough at 64% hydration compared to the standard hydration of 75%. And though the acid in the preferments will aid in the extensibility of the dough, it still needs time to develop the bubbles. So, once you’ve shaped, give this dough time to expand.
Bake. During the last hour of final fermentation, warm up your oven to 500°F. I use a stone to bake, but you can bake on a sheet or even a dedicated baguette pan. Use lots of steam! When I bake baguettes, I use both a broiler pan that I put hot water into, plus two loaf pans that have well-soaked terry-cloth towels in them to provide a steamy environment (NOTE: Your oven should be steamy when you place the baguettes in it). These are in the oven for about 10-15 minutes before I pop the loaves in (allowing my oven to come back to temperature). Quickly place your loaves in the oven, then immediately turn it down to 475°F. Bake for 12-15 minutes on steam or until the crust just starts getting color. Remove the steaming containers, turn down the oven to 425°F, then bake for another 12-15 minutes until the loaves turn a deep golden brown.
Cool on rack. You can eat these warm!
Notes
- The trick to this recipe is getting the preferment timing close. You might expect the poolish to ferment more quickly than the levain, but having made these a lot, it’s hard to predict timing. But do not worry if one is ready before the other! It just means the yeast ran out of food. Once you mix everything together, the yeast will have a new food source.
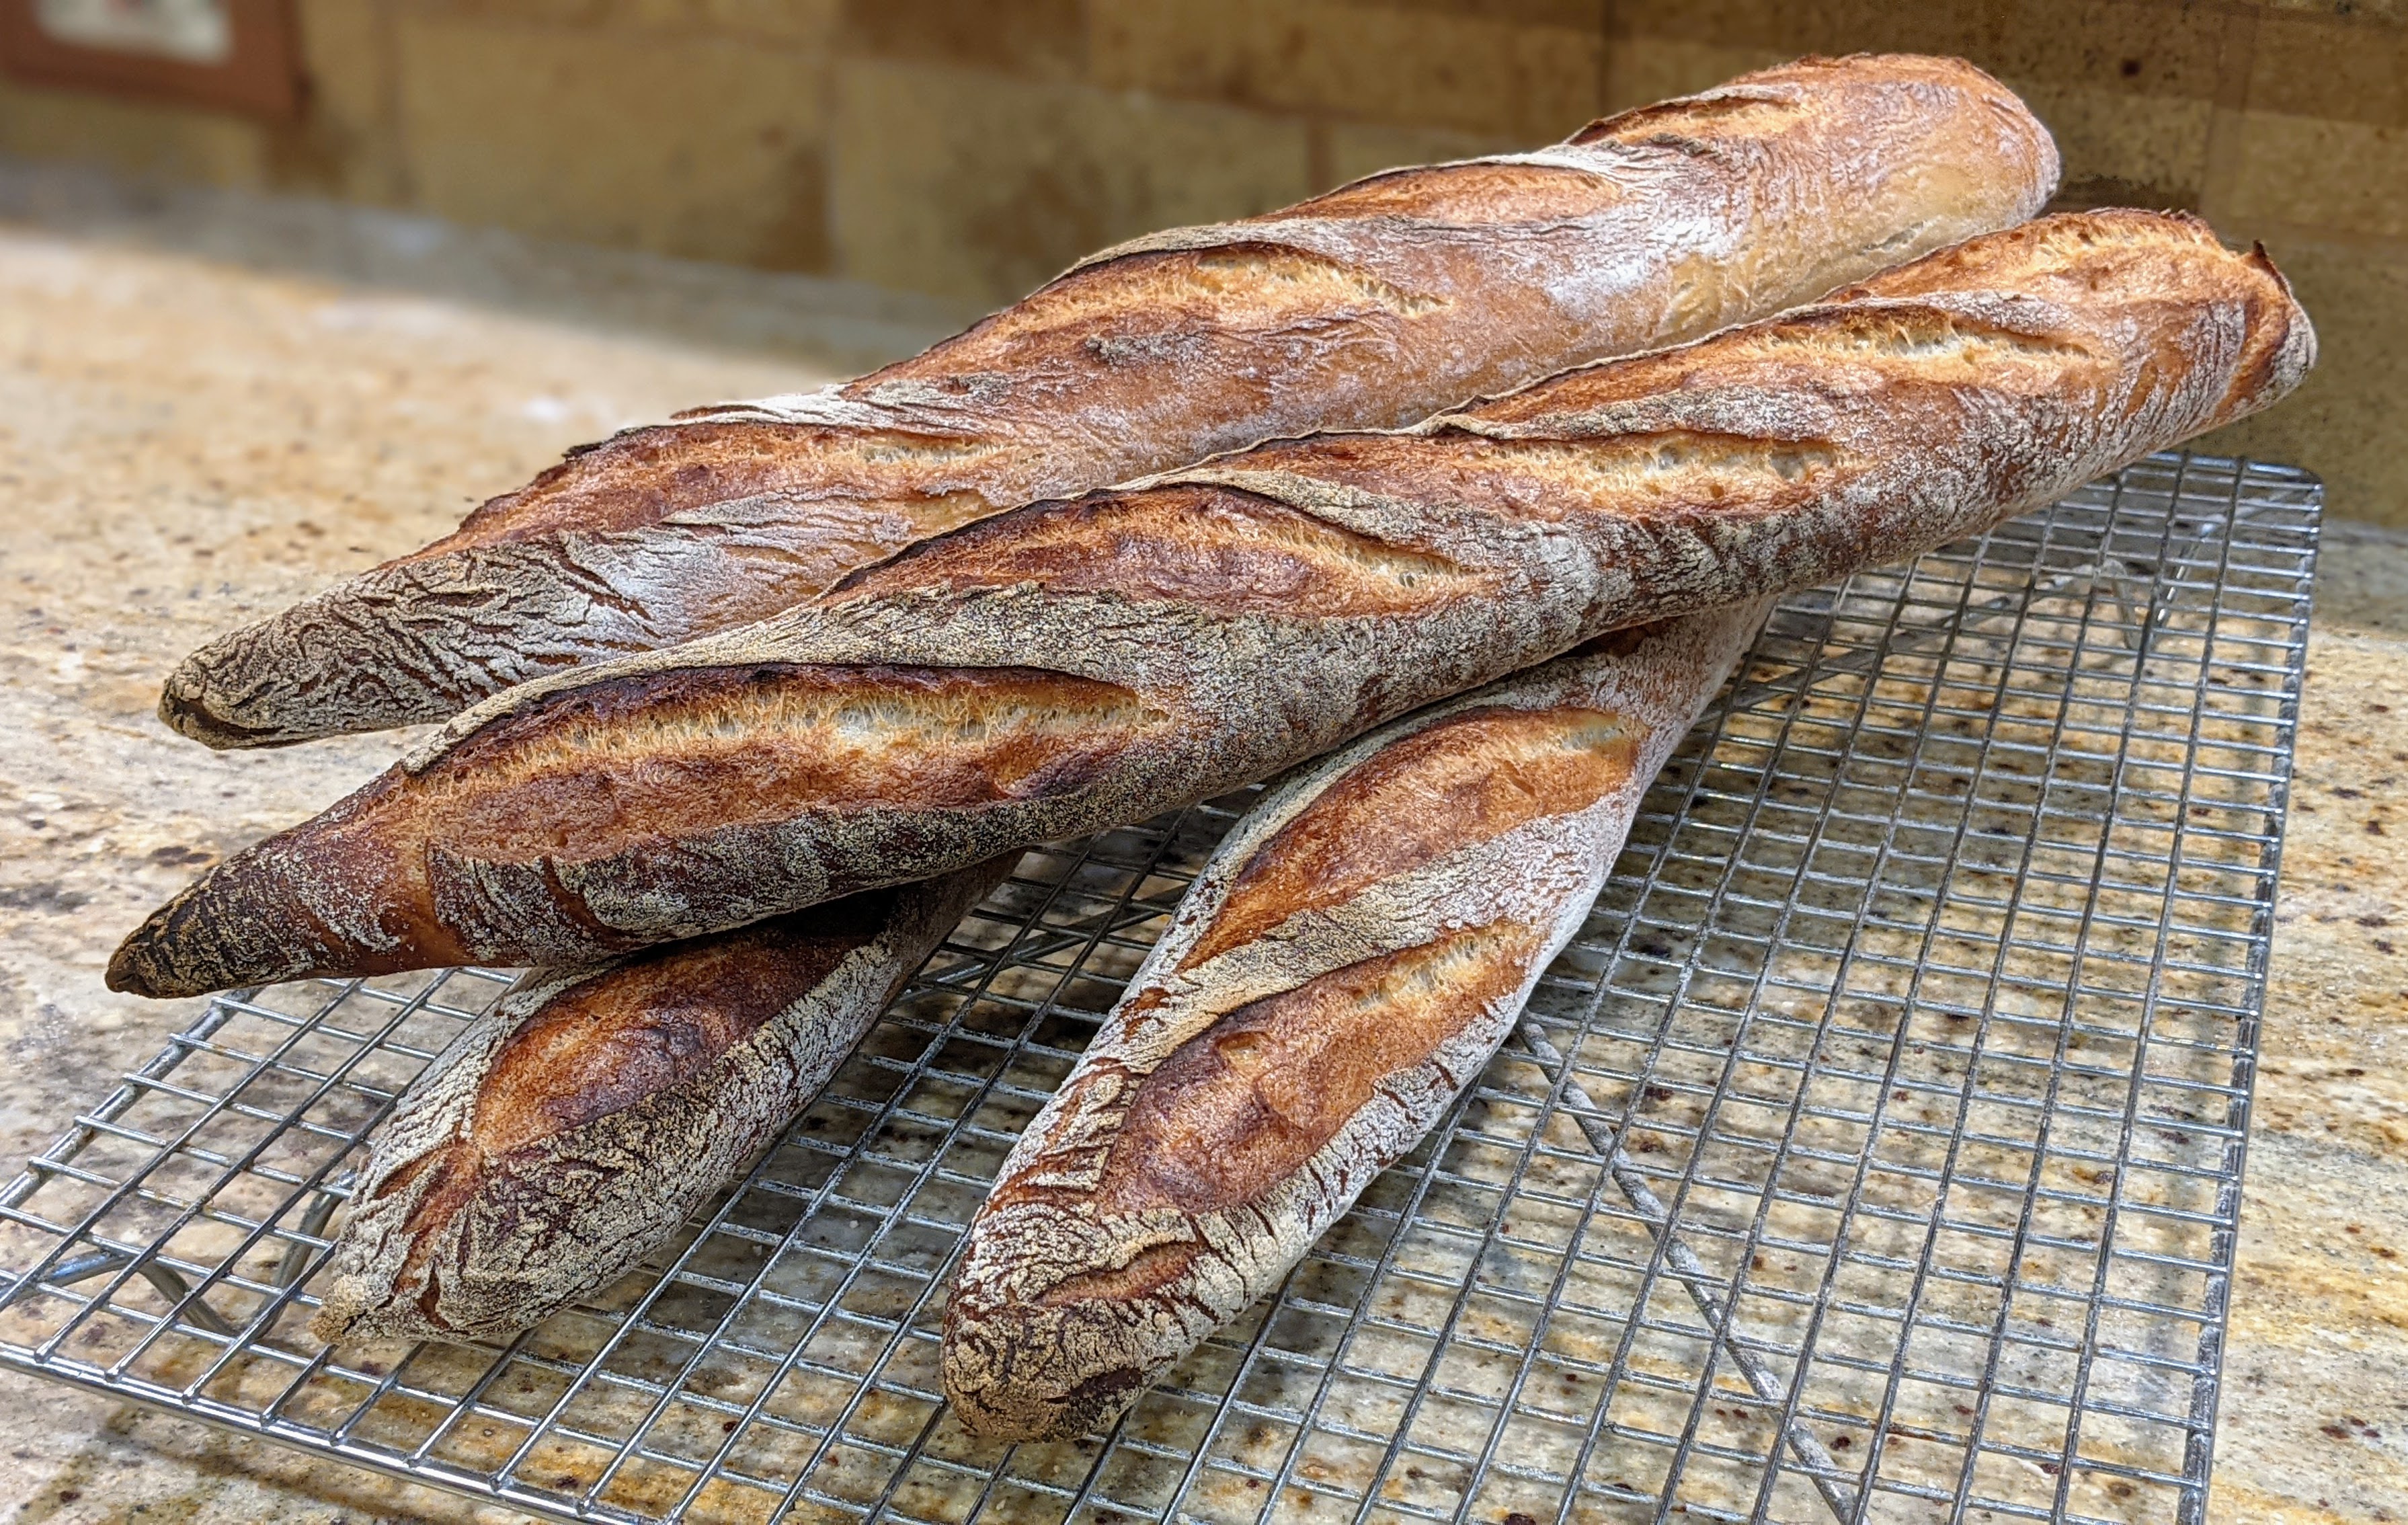
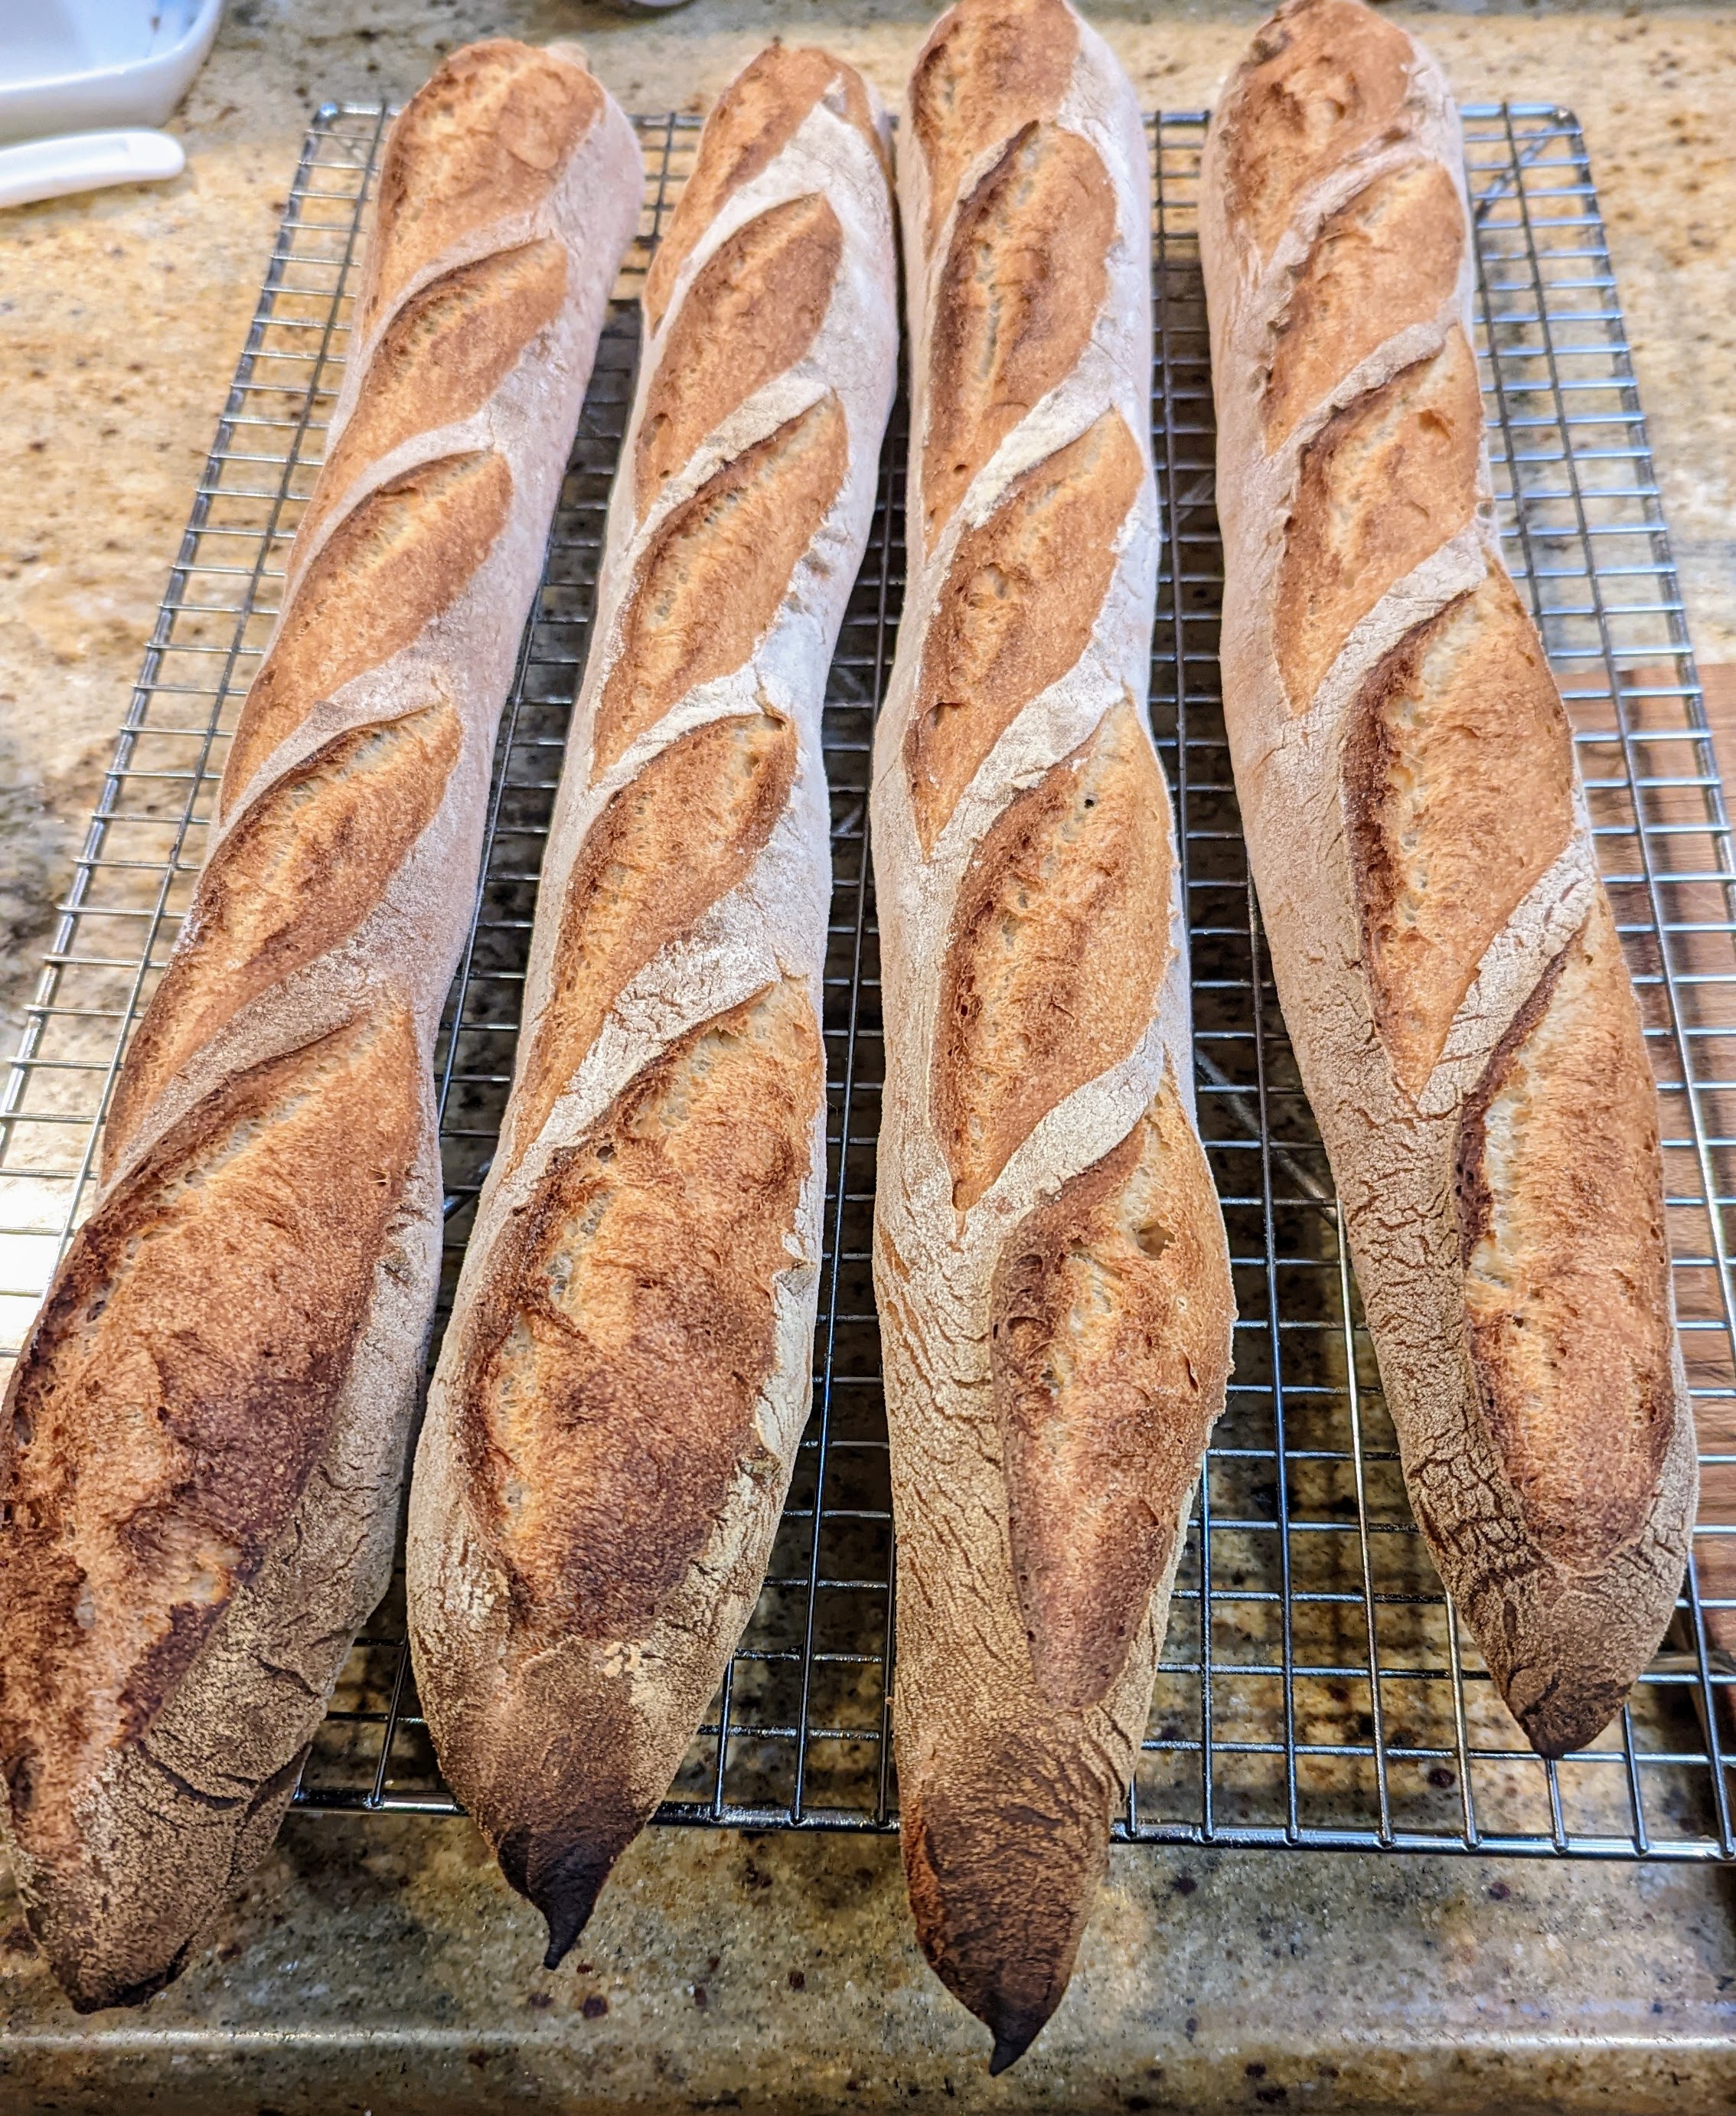
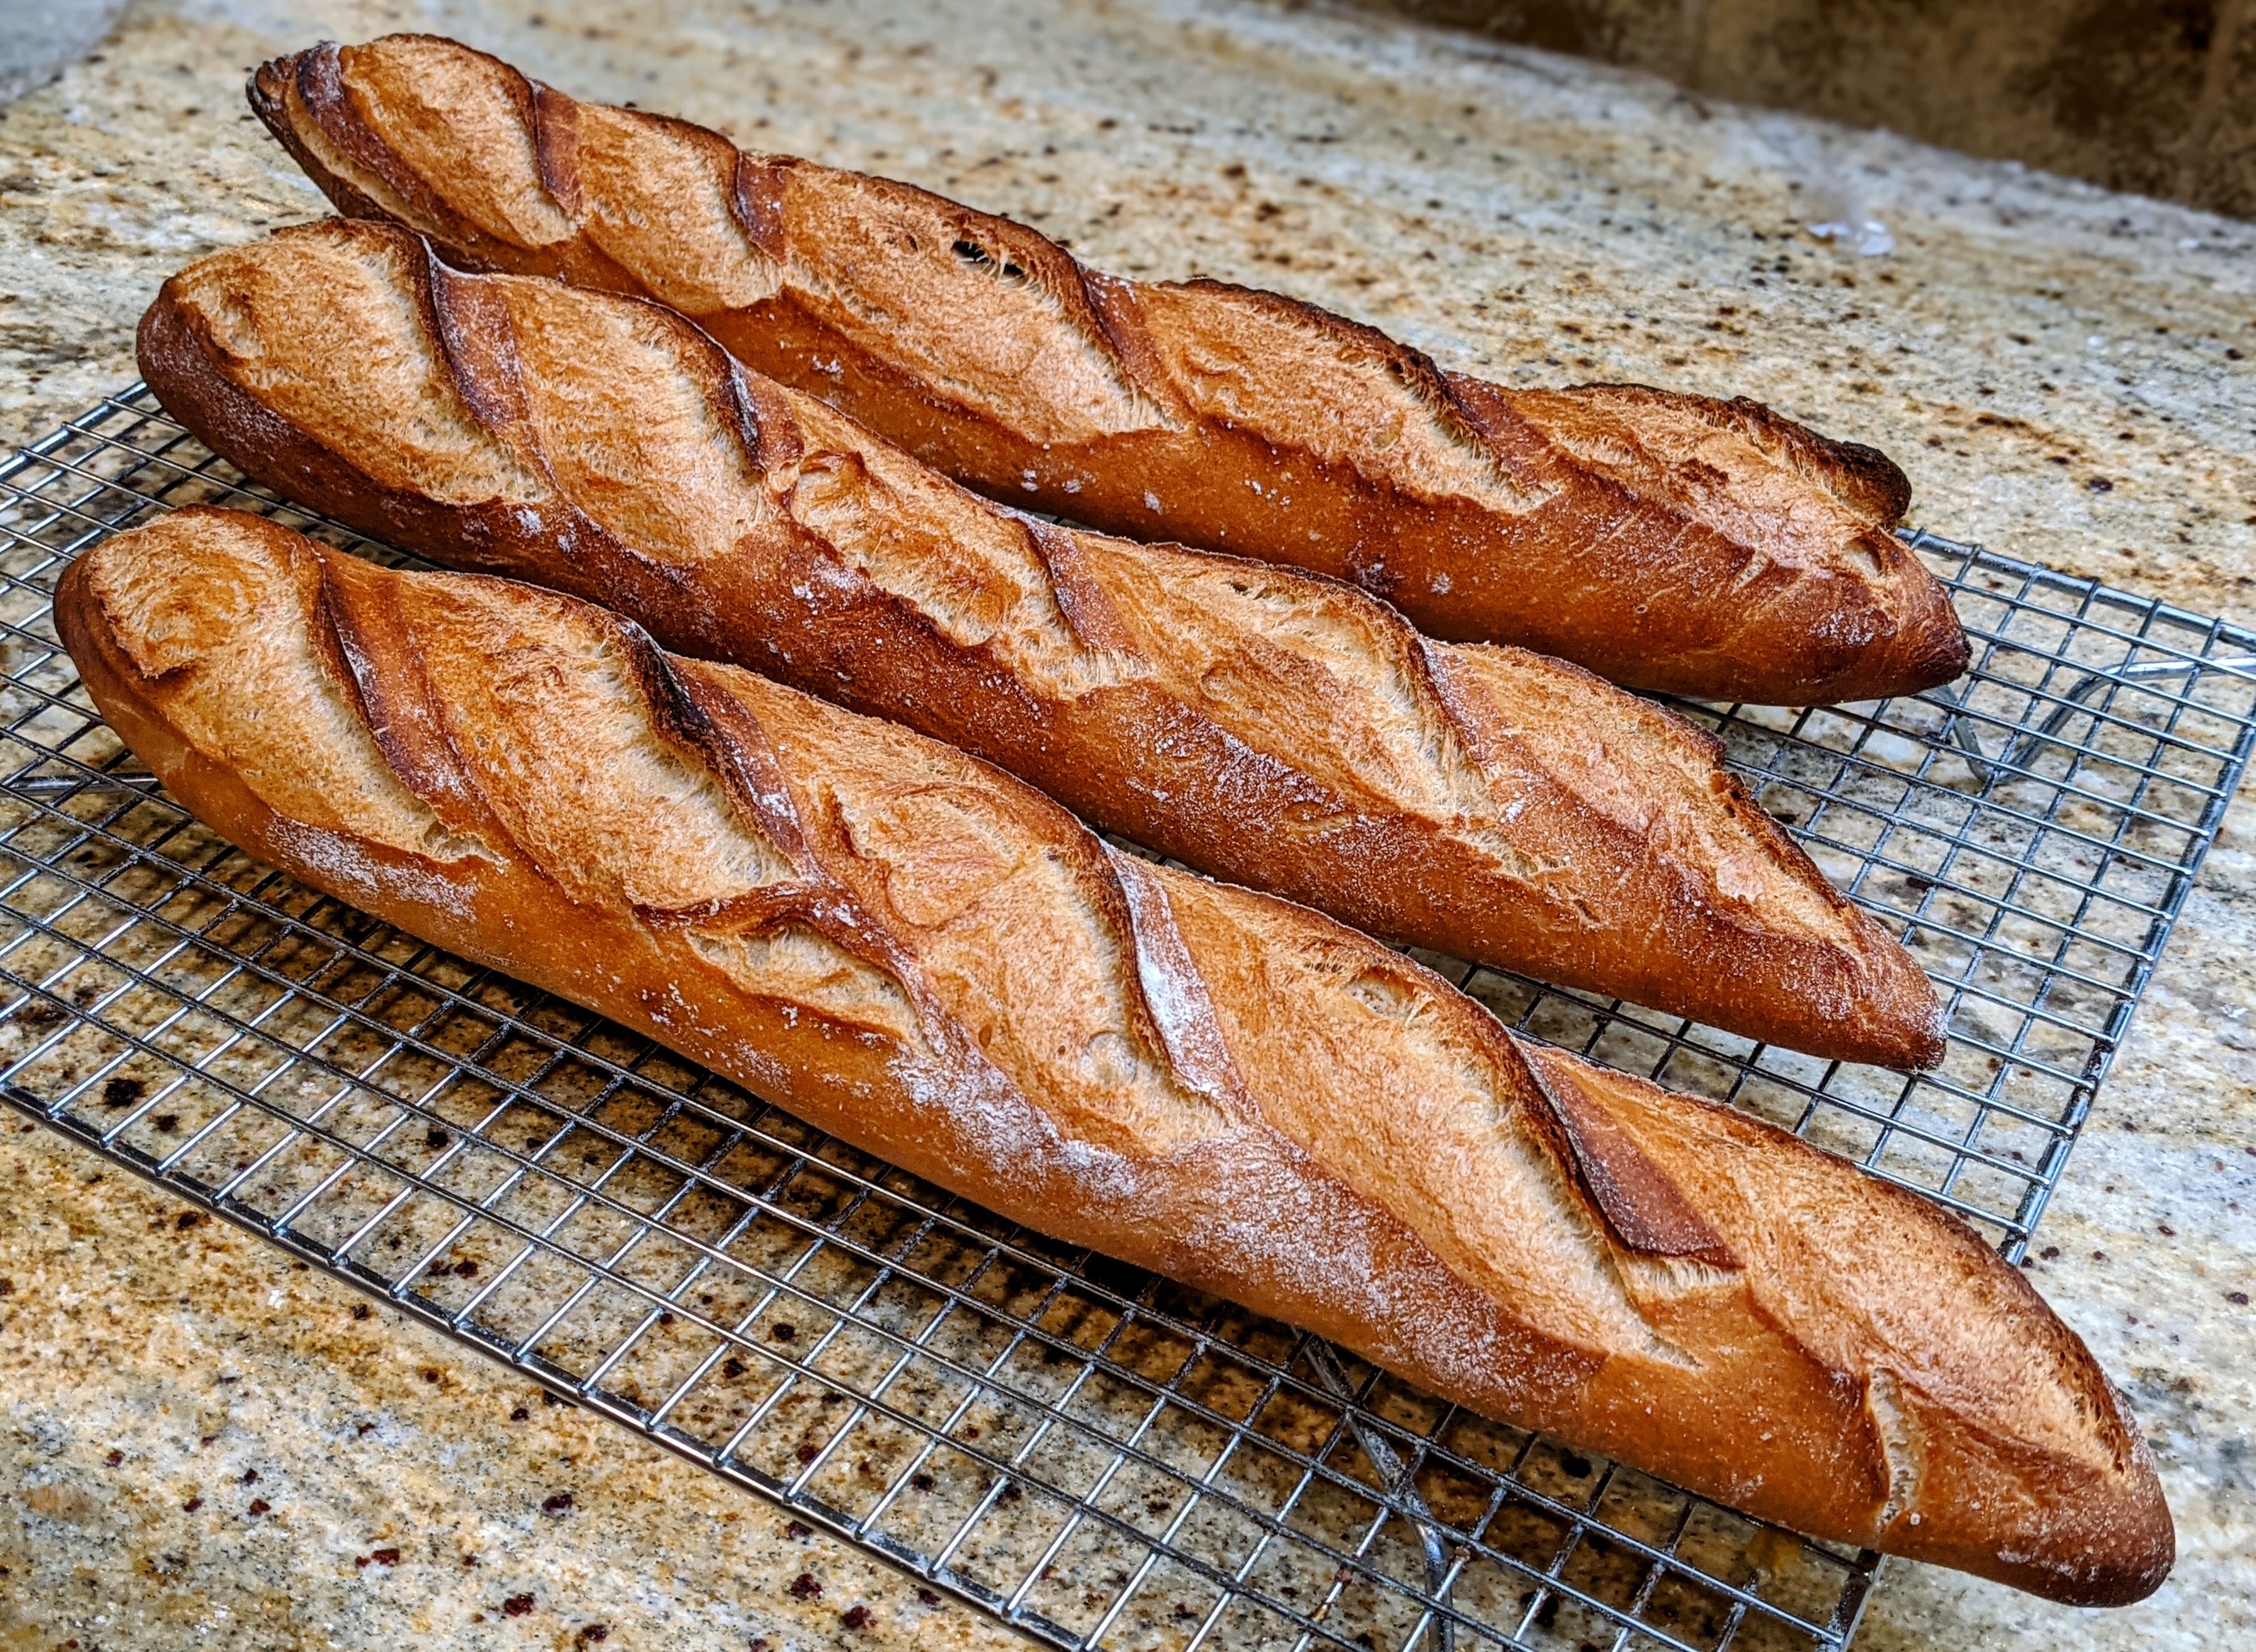
- The crumb, while open, is very much like a sourdough crumb. It’s tender, but a lot chewier than the baguettes I normally make. I realize that that could be a function of the flour I used. The next time I make these, I will use all AP flour – most probably Central Milling flour as it is only 10.7% protein. This should lend itself to a much lighter crumb texture.
- While I appreciate the romanticism of baking on a stone, I always use parchment paper on my transfer board to get my loaves into the oven. Especially with baguettes, since I load them into the oven along their long sides, I’ve had too many mishaps where the loaves roll off my board! So, I use parchment paper. When I remove the steaming containers, I also remove the parchment paper from underneath the loaves.
- The loaves could’ve benefited from a longer final fermentation. As you can see in the pictures, they turned out fine, but I think I could’ve had them even puffier had I let the final fermentation go longer. That said, I will have to monitor their progress carefully if I use low-protein flour.
- Once the final fermentation is complete, I cannot stress enough that you handle the shaped loaves as gently as possible.
- I must admit that I’m still a little bugged by the yield in the original recipe and the recommendation to break up the dough into 2 or 3 pieces. But despite that, I will relegate that to copy-editing oversight.
Update 9/4/2025 – To be honest, I never liked the low hydration of the dough because the texture of the crumb was more like traditional sourdough in that it was chewy. Baguette crumb should be chewy to some extent, but not nearly as toothsome as sourdough. So, I used the same technique but changed the hydration to the standard 75%. They’re much lighter with a nice, open crumb. Plus, I add a bit of diastatic malt powder (0.5%) to help soften both the crumb and crust.


When you see the Real Bread loaf mark, it indicates that this recipe produces bread with no artificial additives and is leavened either by a natural starter or commercial yeast.

Pingback: Sourdough Ciabatta | The Dawg House!
Pingback: Welcome! | The Dawg House!
I’m very thankful for all this information. I was so confused with Tartine recipe once I had to divide the dough in two baguettes that I decided to call my wife, mum and dog to get a second opinion.y mum is an excellent baker and she told me I shouldn’t trust that book anymore (hahaha). My wife is a extremely loyal companion through my baking journey and always (ALWAYS) makes great reviews of all my breads, even though they turn out to be a seed-coated stone. My dog is always next to me while baking and, contrary to my wife, she doesn’t eat the bread if it has something wrong (burned or hard).
Having said that, I’m following your instructions today. Thanks so much for the detailed information.
Pingback: Making Bread More Flavorful | The Dawg House!
Agreed the native Tartine proportions are too much for the published 2-3 loaves. Since then I’ve struggled a bit to work out fitting weights for ~60cm loaves.
Thanks so much for this post. Im responsible for my familie’s xmas bread this year. You’re gonna save my skin. Or. Crust
I’m so happy I started looking up questions I had with the Tartine formula and found this! Thank you. I, too, went with my intuition with “adjustments” to the percentages until I was happy with the results. That said, you’ve inspired me to cut back my hydration, and my levain development time, and see what happens. I’m working in an un-air conditioned kitchen, in midwest summer, scaling up for a local farm market, and an over-proof would ruin everything! Thanks for this! – Laura
So glad that I could help you out! And though I recommend using regular bread flour for the levain, it works great with a rye-based levain. You just have to keep an eye on it.
Just to follow up: two weeks ago, I went halfway between your adjustments and mine. This week I went full-on your percentages in my 90F kitchen. Very happy with the results: easy to score, no over-proofing, fabulous color. Thank you!
Hi,
How many hours is the whole process take? You mentioned that you baked in the afternoon. Did you do the levain and poolish the night before ?
From your directions, I calculated something like start time 8am, bake around 10-11 pm. Is that right? What if someone wants to bake it morning or afternoon ?
The preferments should take about 3-4 hours. You can “shortcut” the process by doing them the night before if you want. But my starter is very active, so I’ll start a 1:1:1 levain early in the morning (around 6am as I get up at 5:30am) and let it ferment in my oven with the light on to speed up the process. I don’t really want sour bread, so I favor yeast production by keeping it warm (around 80 degrees F). I will either do a same-day poolish or do one the night before. I just have to make sure that both preferments peak at roughly the same time. Usually, by 9am I’m ready to mix. I don’t do 6 folds over 3 hours. I will do folds every 45 minutes until I feel there’s enough strength in the dough. Usually that’s just two folds with the flour I use, but bulk fermentation will be 3-4 hours in a warm environment. Final fermentation usually starts at around noon or so, and I’ll be baking by 3-4pm.
can you shape and prove them then refrigerate overnight for an early morning bake
I suppose you could, but I would shape them, then proof them in the fridge overnight as opposed to letting them proof at room temp then refrigerating. You run the risk of overproofing them that way. If you shape then pop into the fridge, the final ferment will be slower (as long as you don’t drop below 39℉) but will proceed. If it hasn’t completed in the morning, just give it a little time on the counter, then bake.
So thankful to know that I’m not the only one who read the original recipe and tried to figure out how it could possibly be just two or three baguettes.
I’m so confused! Probably the most complicated recipe I’ve ever read. Maybe cause I’m new to baking. But please make it easy!!!
Tina, this isn’t a recipe I’d recommend to someone just starting out. It uses two different preferments and the processing is complicated. There’s no easy way to do it, as there are no shortcuts when it comes to baking any bread. Instead, if you want to make fantastic baguettes, here’s a much less complicated recipe that I use a lot more than the Tartine recipe because it’s so straight-forward.
Baguettes de Tradition
Happy Baking!
i would recommend starting with the Tartine basic loaf and follow the instructions in the book. Its rather fool-proof. The baguettes are complicatd. Took me 2 years and 6-10 efforts to produce decent product.
Great recommendation, Mr. Continental! If you master the Tartine basic dough, then it makes the baguettes a lot less challenging.
Is it possible to par-bake these baguettes? If so, how would do it?
Yes, it is possible to par-bake any bread. I don’t have a specific timing, but you will want to pull the baguettes out once the crust has set, that is, once the loaves have fully expanded, just as they start to brown. You don’t want to pull them out too early as there may be unbaked dough in the middle. But it’s usually a safe bet to pull them once they’ve completely expanded.