One of the most important things I’ve learned about baking is striving to achieve consistency; that is, doing things the same way time after time to achieve consistent results. When bake a certain type of loaf, I expect it to fit a particular ideal I’ve established in appearance and taste. And as long as I haven’t strayed from the basic formula and process, it’s reasonable to assume that ideal will be met.
One way I achieve consistency is working with different ratios. After all, bread formulas are all about ratios. And working with ratios eliminates guesswork, and a lot of it you can do in your head. For instance, if I want to create a 75% hydration dough and I use a kilo of total flour, I automatically know that I’ll need 750g of water.
So given that, I worked out a ratio for scaling baguettes that ensures that I’ll get consistent results from bake to bake. Essentially it works like this:
Target Baguette Length (centimeters) X 5.5 = Portion Weight (grams)
Where did I get that “5.5?” I actually got it from Chef Markus Farbinger’s Baguette series on Vimeo. He scales out 220g portions for 40cm (~15 1/2 inches) baguettes. So given that, I took the weight of the portion and divided it by the length to give me grams per centimeter and that works out to 5.5g/cm. Because I have a nice baking stone, I bake 60cm baguettes (I used to do 40 cm), but I was able to easily scale up to 60cm and I know that each portion should be 330g. Easy, right?
I make four different types of baguettes: Baguette Traditional (straight dough), Pointage en Bac (straight dough with a slow bulk ferment – the one I bake the most), Levain, and of course, a Poolish baguette. No matter the type, I scale them the same. I may not bake them the same; for instance, the levain baguette gets a lot more oven time to get color into the crust. But they’re all scaled the same. For me, as I mentioned above, it takes the guesswork out of things.
The less you guess, the more consistent your results!
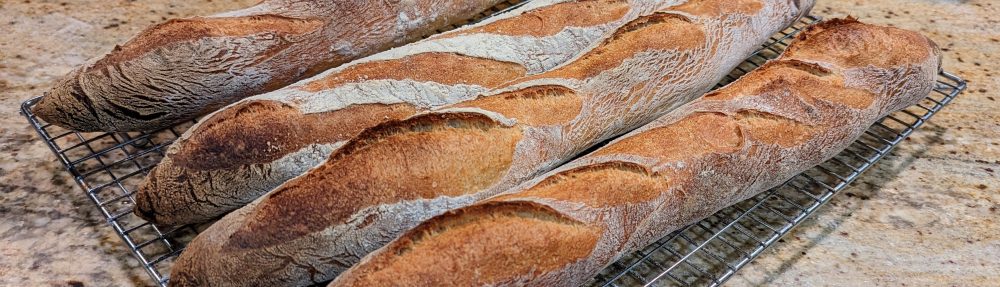
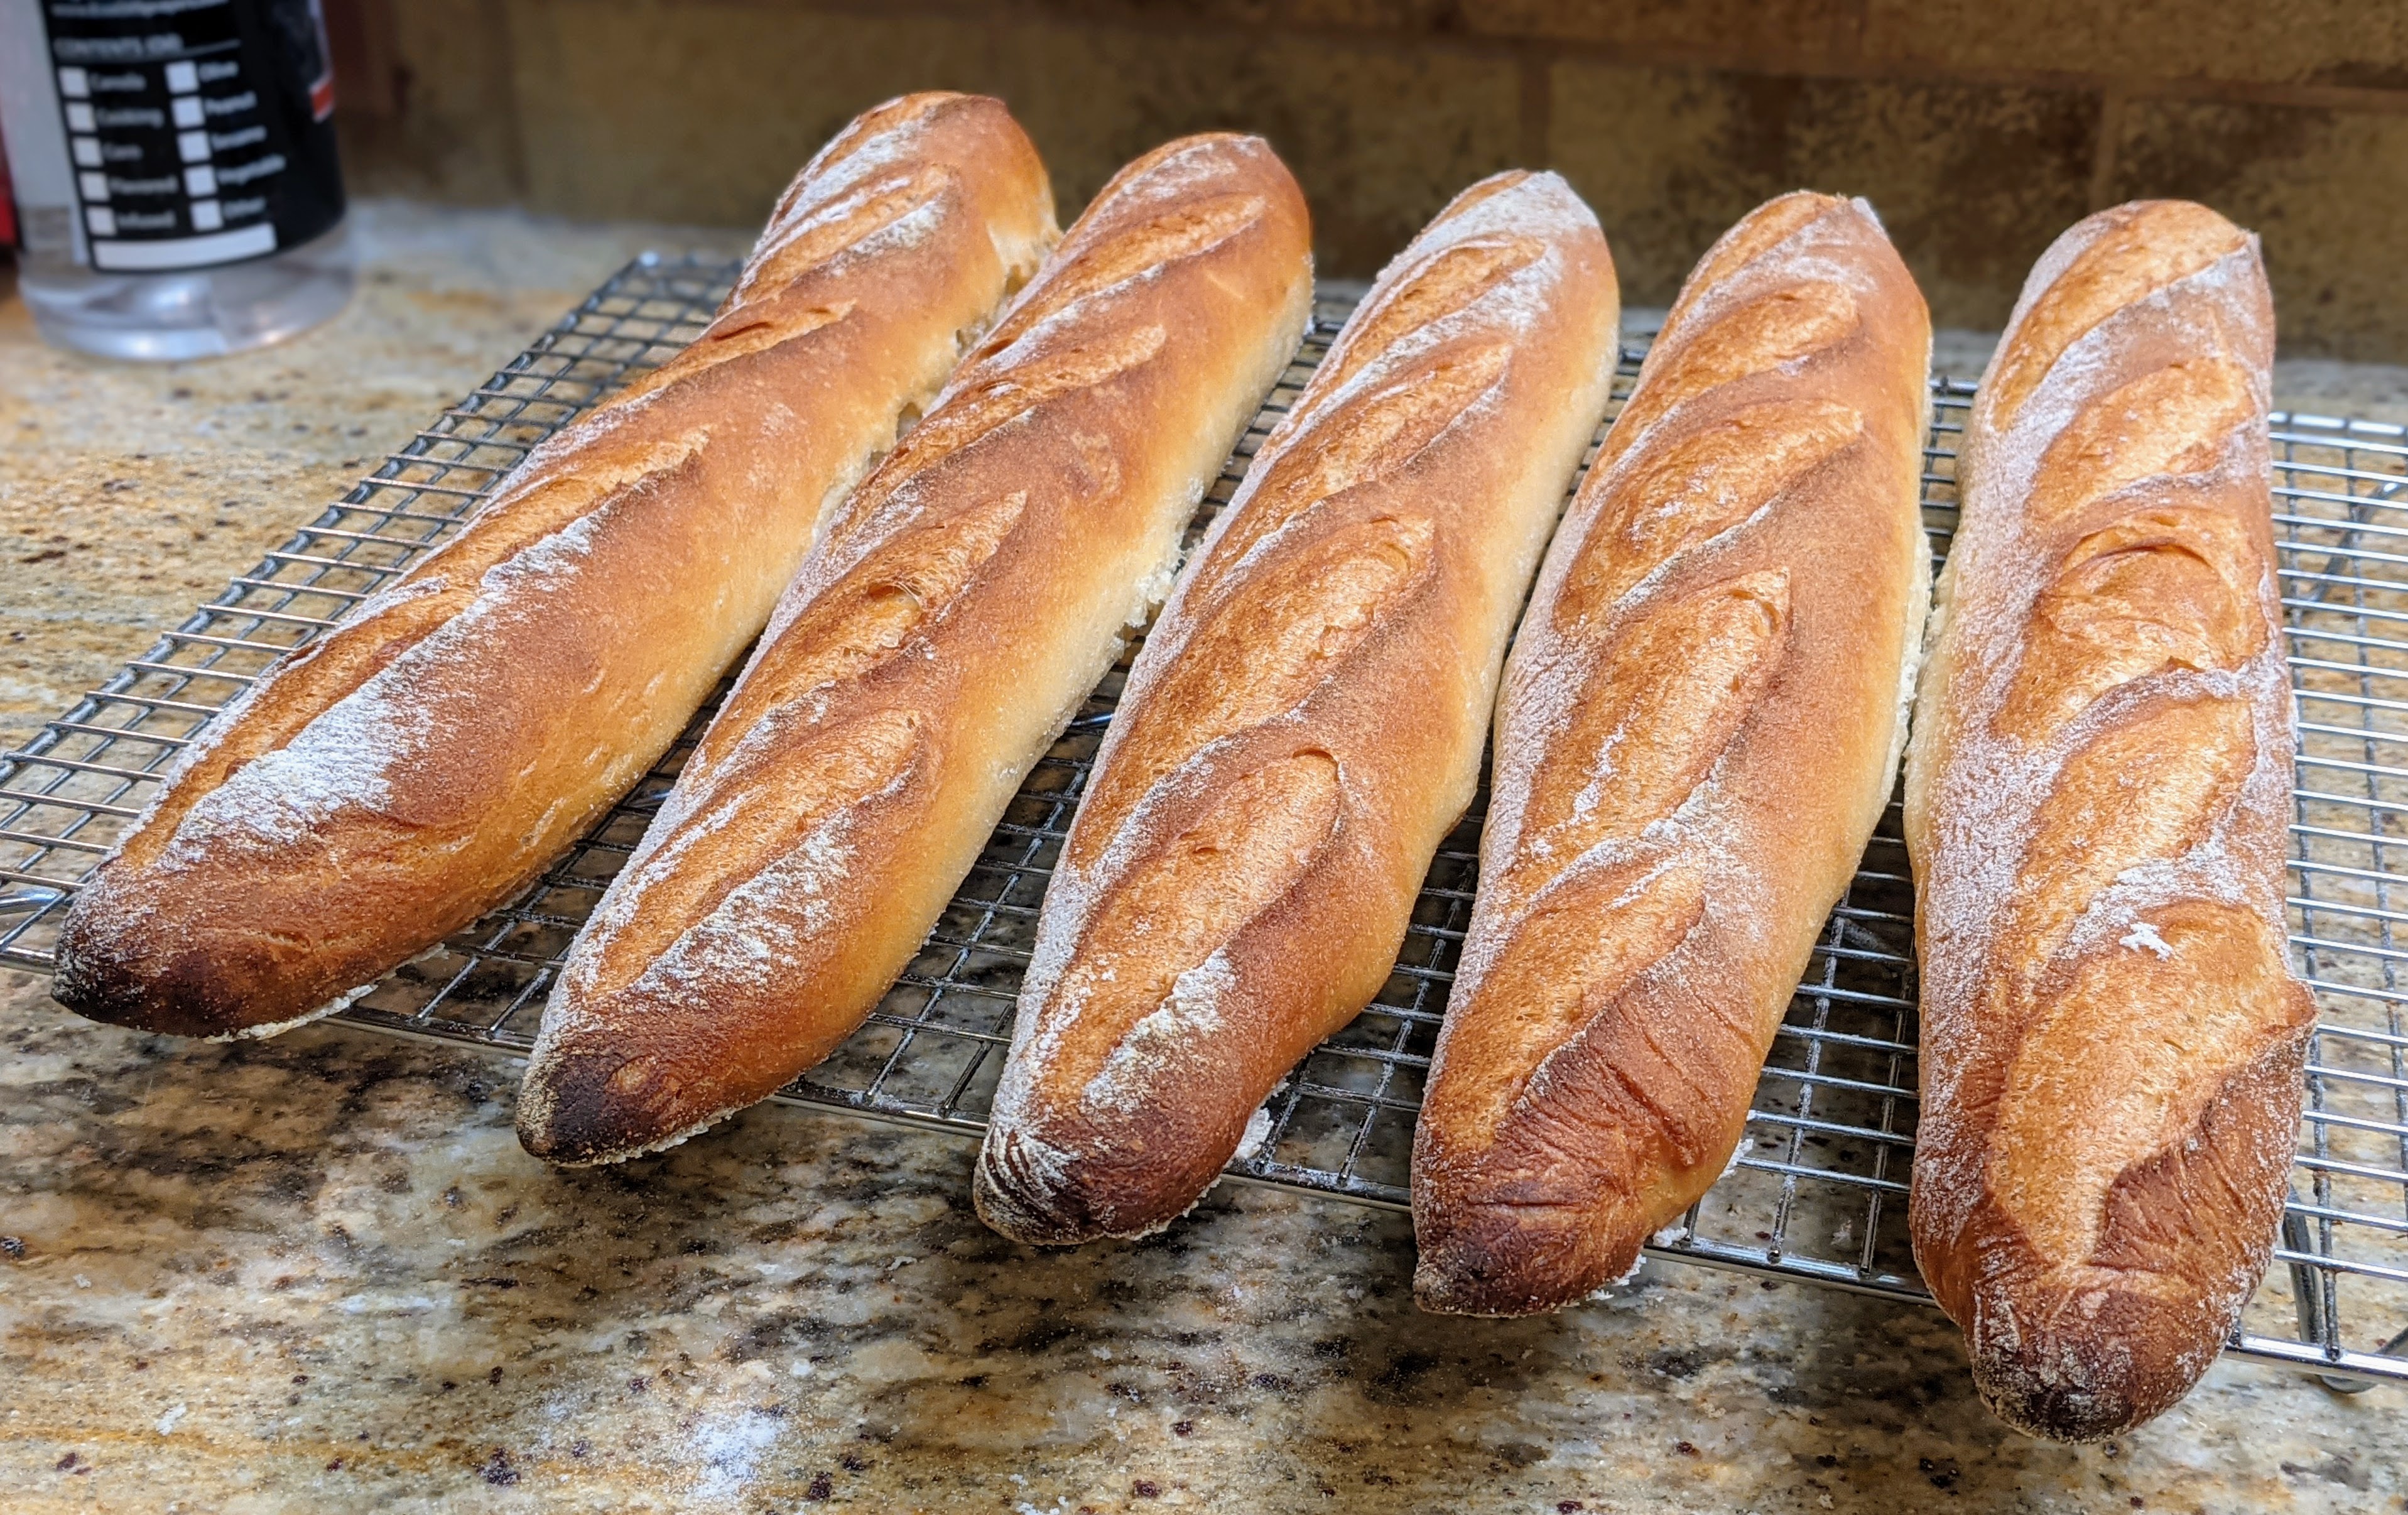
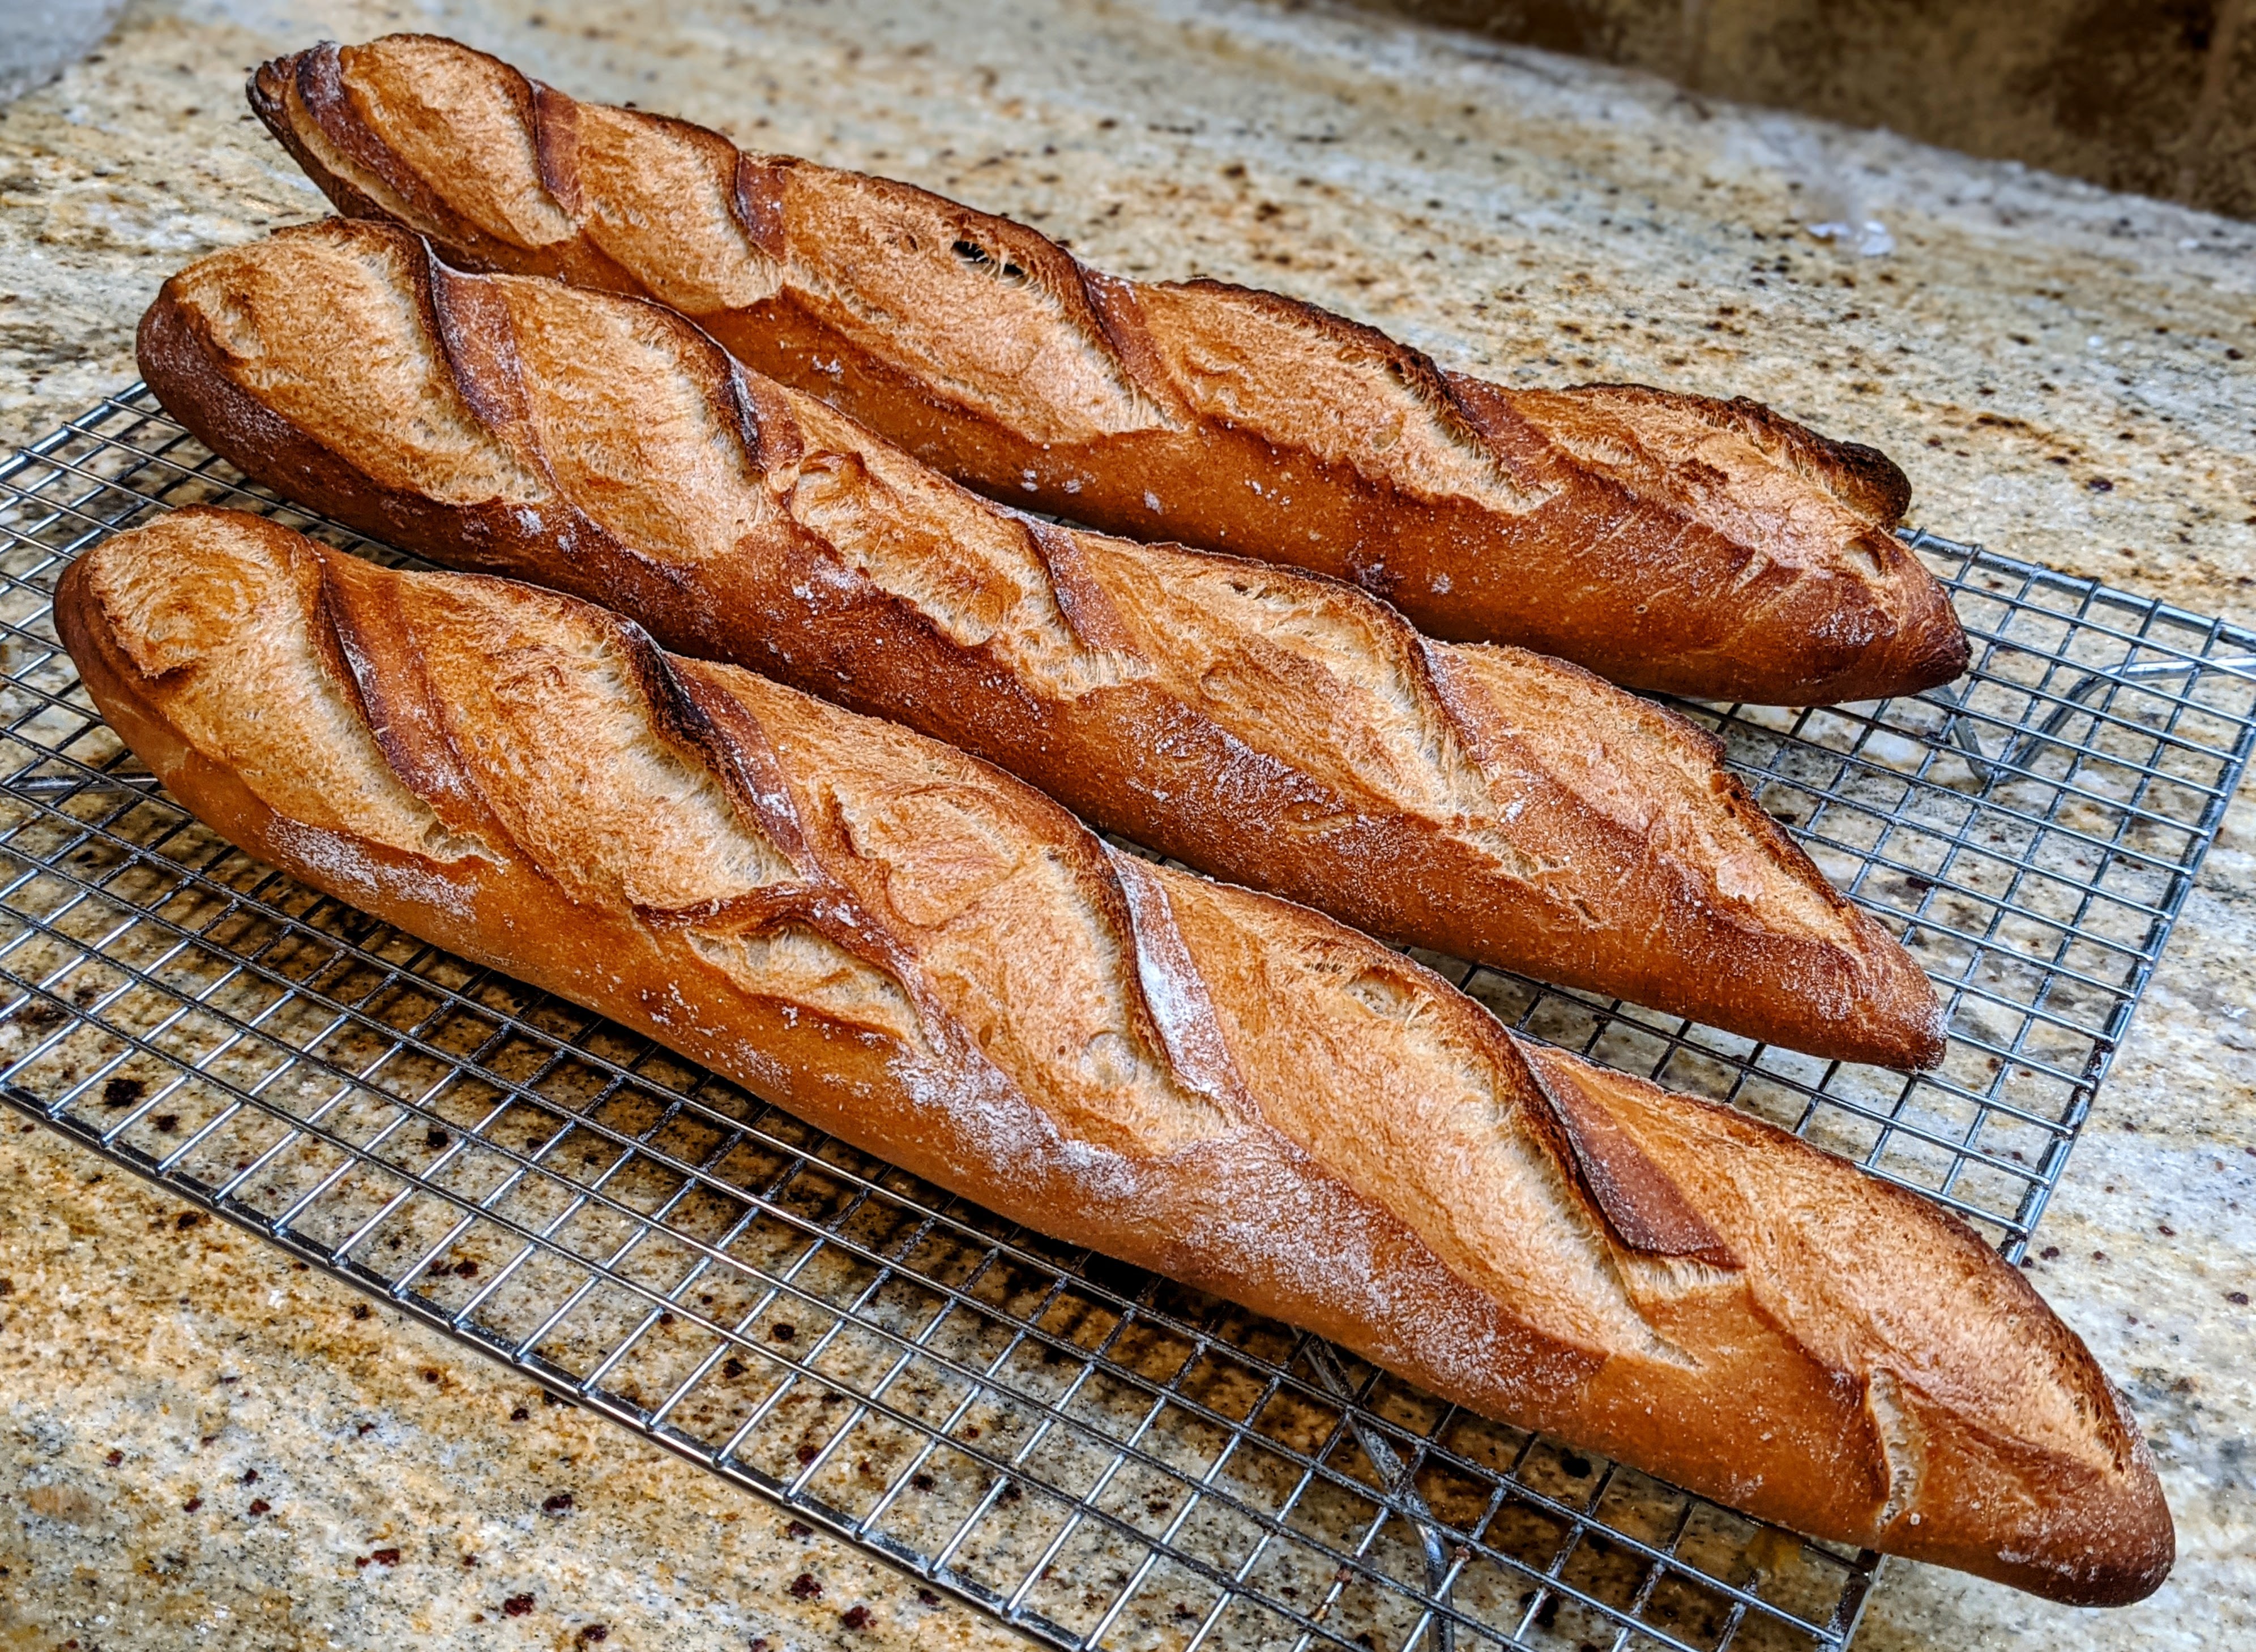
It’s no secret that I love making baguettes. In fact, I made a batch of sourdough baguettes based on Hamelman’s Baguettes de Tradition from his great book “Bread” this morning. Technically, Baguettes de Tradition is a straight dough. But I love the processing technique and it’s difficult to make because the hydration is 76%. And using a levain further exacerbates things because the acid in it makes the dough more extensible – and sticky.
But after I made them, I wondered what the chef’s poolish formula was like, so I looked it up and was a little shocked by his formula. A 66% hydration dough? That couldn’t be right. It’s commonly accepted that baguette dough is around 75% hydration, give or take a percentage point or two. It’s a fairly wet dough. But 66% is getting close to stiff!
But the kicker for this recipe is the long bulk fermentation at 2-2 1/2 hours and the long final fermentation at 1-1/2 hours. This gives the dough plenty of time to form lots of air bubbles, which is what you want with baguettes plus, the long periods of rest in the bulk fermentation give the dough plenty of time to relax. With a moderately stiff dough like this, you want to give it plenty of relaxation time if you can.
As my title indicates, this is an adapted recipe. The reason for this is that in the book, the quantities are all listed in kilos and pounds, which leads me to believe that this recipe really is geared towards a full-fledged bakery. But everything can be scaled if you work out the percentages properly. Also, the chef uses fresh yeast in his final dough, but I adapted the recipe to use regular, instant dry yeast for both the poolish and final dough. There’s no difference in what either does. You just use less granulated yeast. Here’s the formula:
Poolish
Final
Total
Baker’s %
Bread Flour
330
670
1000
100.00%
Water
330
330*
660
66.00%
Salt
0.00
20
20
2.00%
Yeast
0.70
4**
4.70
0.47%
*Target dough temp is 76-78°F so adjust water temp accordingly. **If you have fresh yeast and want to use it in place of the granulated yeast, just divide by 0.4.
Poolish
Mix all the ingredients together until smooth. I like mixing the yeast into the flour first to distribute it, then adding the water. Let ferment at room temperature for 12 to 16 hours or until the top is highly pockmarked and bubbling and ever so slightly domed.
When the poolish is ready, dump everything thing into a mixing bowl and mix thoroughly. If using a mixer, incorporate ingredients at low speed for a couple of minutes, then increase speed to second speed and run for 1-2 minutes to break up any large lumps. Once the dough starts to pull cleanly off the sides, stop. If mixing by hand, thoroughly mix until moderately smooth being careful not to knead the dough too much.1
Bulk ferment the dough for 2 hours, gently folding it after the first hour and being careful not to degas it too much.
Divide2 the dough and lightly shape it into rounds, then bench rest (covered) on a lightly floured surface seam side up for 10 to 30 minutes depending on tightly you preshaped them. I recommend having a fairly light touch as you don’t want a skin to form.
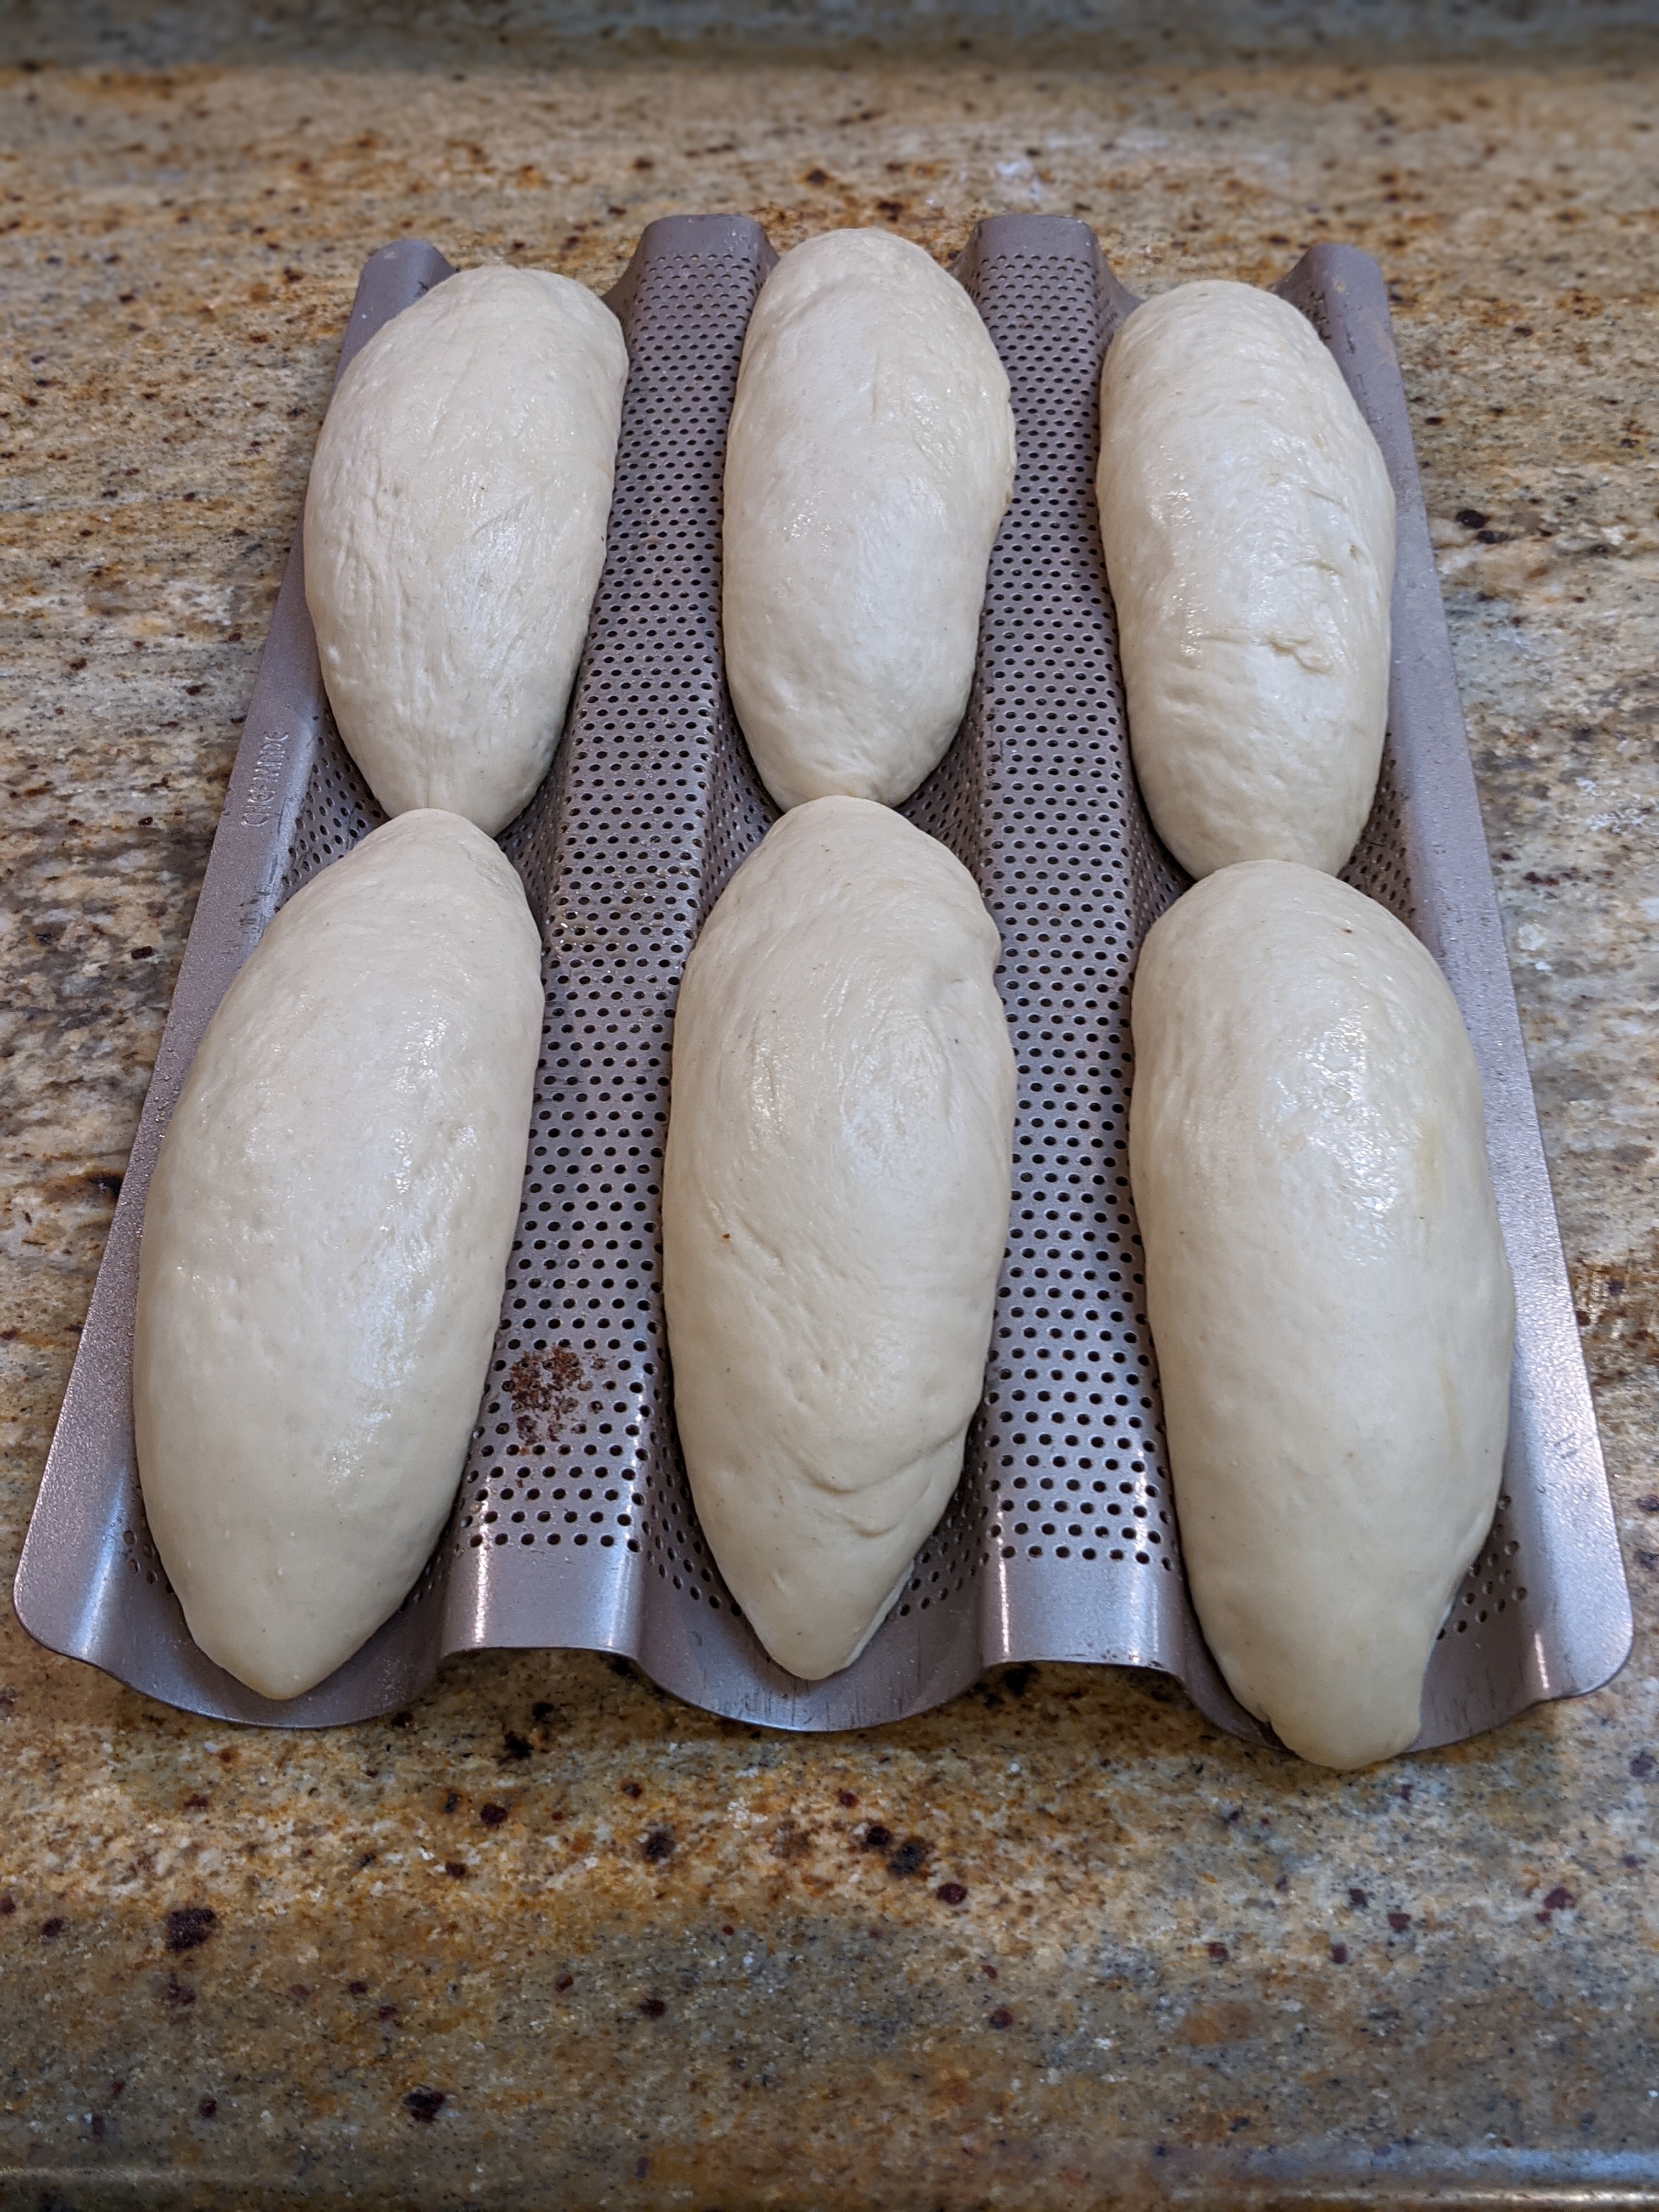
Once the dough has relaxed, shape them into long cylinders then set them on a well-floured couche or tea towel seam side up.
Let the shaped loaves do a final fermentation for 1-1 1/2 hour. This is VERY important because shaping the loaves will have degassed them a bit and this long, final fermentation allows the gluten to relax and reform bubbles.
Preheat oven to 460°F. When the loaves are ready, bake them for 24-26 minutes applying steam for the first 15 minutes.
Notes
Whether using a machine or mixing by hand it’s important to NOT knead a baguette dough too much. You want the fermentation process to naturally form the gluten bonds and not force it by kneading. This will really tighten up the dough which you don’t want.
Since I bake on a stone, I divide the dough into five pieces at about 336g apiece and 20″ long. You can do 8 pieces at about 14-15″ long as well to fit on a baking or baguette tray.
I’ve been writing this post while smack dab in the process of making these baguettes. I have to admit that I was really surprised at how supple the dough was when it ready to shape. It wasn’t nearly as pliable as my normal, high-hydration baguettes, but it was still pliant and luxurious.
And because it was rather cool in my kitchen, I let bulk fermentation go for almost three hours. And even at that point, it was easily less than 80% fully proofed. But that’s okay because it gave me plenty of runway for final fermentation, which I’ll probably take to a full 1 1/2 hour to ensure the loaves are close to fully proofed. This is definitely a recipe where I need to let everything that happens before baking get most of the work done on the dough!
When I first started getting serious about baking artisan bread, I knew that I’d be eventually going through flour pretty quickly. So I researched various places in which I could purchase bulk flour in amounts equal to or greater than 25 lbs..
The obvious first choice to look was at the largest online retailer that we all know and… we all know… It’s tempting to go there because with Prime, there’s free shipping. But here’s the thing: The retailers jack up the price of the flour. How do you think they can ship for free?
For instance, to get a 50 lb bag of King Arthur Sir Galahad flour (the brand that is the bakery/restaurant equivalent to their retail AP flour), the cheapest I saw it was around $59.00 with free shipping. BUT I can get 25 lb. bags of KA AP flour at my local Smart & Final for less than $17.00! So you see, the online price has the shipping built into the price.
I had to learn this lesson the hard way. I purchased a 50-lb bag of KA Special Patent Flour which is similar to their bread flour. I paid $60 for that bag! And after spending that much I literally spent days poring over the ‘Web to find different sources of flour where I could either buy direct and pick up, or as in the case of Azure Standard (no, it’s not an affiliate link), the company has various “drop points” near me where their truck will stop and I can pick up my order.
For instance, a 50-lb bag Azure Standard unbleached organic bread flour is about $42. I pick it up at a drop point that’s 20 minutes from my home. So not only do I get my flour with not shipping, I’m getting certified organic flour. It’s amazing!
Mind you, it’s not that I mind paying shipping. But I do mind being misled by the whole “free shipping” bit. So if I can get my flour locally or all I have to do is drive no more than 30 minutes to pick it up, it’s a fair trade-off.
That said, I will pay for shipping if there’s a flour I just can’t get locally. One of those flours is the Hudson Cream brand by Stafford County Mills in Hudson, Kansas. Their white whole wheat flour is just a dream to work with and is milled to a super-fine consistency. It’s almost like working with bread flour! I’m not sure if they add any sprouted, malted barley to the flour for the amylase (which helps break down flour into sugars), but I get such great oven rise out of this flour. But King Arthur sources flour from this mill, so it’s definitely high-quality.
The reason I’m writing this entry is because we’re living in a world right now where there are lots of dishonest people taking advantage of the lockdown situation for their own personal gain. So take some time to do your research before you pull the trigger on flour with “free shipping.”
Before I start the discussion, let me say this: This isn’t a discussion meant to argue that one is better than the other, nor will I suggest you use one folding technique exclusively. But what I will say that at least in my experience, the folding technique you use depends on the bread you’re making, and it will affect the type of container you use for fermentation, though I realize many bakers prefer to do their folding on their bench.
So I have a rule-of-thumb with respect to the type of folding I do: If I’m using whole grain flour at or above 20%, or if my dough contains inclusions such as cheese or nuts or dried fruit, I will invariably use coil folds. The reason for this is that it is much gentler on the dough and the particles of inclusion material or bran have less of a chance of tearing the dough. Otherwise, I’ll just do regular stretch and folds.
Now that’s the kind of general rule-of-thumb I use. But the reality is that as of late, once my dough becomes pretty gassy, I tend to do coil folds for my final sets, irrespective of inclusions or whole grain. I do my best to retain the gases as much as possible especially with naturally leavened bread. I don’t want to ruin all the work the wild yeast has done.
The exception to this is when I do yeasted breads, such as baguettes. I will always do stretch and folds with a dough that uses commercial yeast. The reason for this is that it’s fast-acting and once activated very active, so I’m less concerned about degassing the dough and can be a little more assertive with it. Those little buggers will just pick up and fill the dough wtih CO2.
I realize that this is nothing groundbreaking, especially for experienced bakers. And this entry, as most of my non-recipe entries – is more of a reminder for me to practice what I just preached.
Click on the book to go to Amazon (and no, it’s not an affiliate link)
This past Friday, I was in downtown Mountain View at Books, Inc. and as usual when I’d go to a bookstore nowadays, I immediately went to the cooking section to see if there were any bread baking books that I haven’t read or heard of yet.
Sure enough, I ran across “Naturallly Fermented Bread” by Paul Barker. I almost dismissed it, thinking that it was just another book on sourdough. But I since I had never heard of the book before, I decided to pull it off the shelf. I was immediately intrigued because on the cover wasn’t a picture of a sourdough culture or loaf of bread, but a watercolor of fermenting fruits and vegetables!
For those that don’t know me, I love fermenting hot peppers and other veggies and fruit, so when I saw the cover, I knew I had to take a closer look. Plus having recently created starters from grapes and – ahem – cannabis, I immediately thought that this was right up my alley! But what further intrigued me was the tag line:
Learn to use yeast water starters to bake wholesome loaves and sweet fermented buns.
When I made my wild yeast starters from grapes and pot, it was a suspension of the ingredient within a flour-water dough. But that tag line suggested that the actual fermentation liquid is used. That was a real face-palm moment for me! And I thought to myself, Of course! I’ve always used fermentation liquid from a previous fermentation to kickstart a new fermentation, so it makes sense to use it for freakin’ bread!
So what about the book? The real meat of the book where Paul Barker talks about how it all works is actually only a few pages. The rest of the book talks about breadmaking techniques that while useful, have been covered in lots of other books. That’s about the first third of the book. The rest of the book contains his recipes and how to use a botantical culture in conjuction with the yeast water to leaven dough.
The book’s not long at all, but it’s great and I highly recommend it. It’s in hardcover, but also available in digital format. Personally, I’m a bit old-school when it comes to cookbooks, so I just bought the hardcover.
The other day, I made a big batch of Biga Naturale which is a biga made from a sourdough starter, at 75% hydration. Once it was mostly risen – nicely domed with bubbles forming on the surface as pictured above – I divided it into 4 X 200 gram portions (for pizza/flatbread starter that I’d store in the fridge for the coming week) and a single 360 gram portion that I’d use to make a double recipe of Pane di Como Antico.
All was well. I used two of the pizza portions to make some pizza dough for dinner last night, and early this morning, I took the 360 gram biga out of the fridge to bake my Pane di Como Antico for a community service event this afternoon.
Normally, I would’ve followed the recipe exactly, but this time, I was doubling the recipe and changing the hyrdration a bit so I needed to figure out the hydration of the starter. Had my starter been a 100% starter, it would’ve been a no-brainer to figure out the formula percentage of the flour and water – they’d both be 50%. But because I was using a 75% starter, I needed to figure out the actual formula percentage that each ingredient contributed to the overall mass of the dough.
For any given hydration rate, to figure out the flour and water percentages, it’s simple math:
So where did I get the 1? When calculating decimal fractions, we always use 1 as the “whole.” In this case, 1 represents the total amount of flour. So when we add 1 and the hydration rate, what we’re looking at is the representation of the flour and the water together.
Then to get the mass of the flour and water, it’s again just simple math:
Flour Mass = Dough Mass * Flour Formula Percentage Water Mass = Dough Mass * Water Formula Percentage
Here’s a simple table where I’ve done the calculations:
Hydration Rate
Flour Formula %
Water Formula %
60%
63%
38%
61%
62%
38%
62%
62%
38%
63%
61%
39%
64%
61%
39%
65%
61%
39%
66%
60%
40%
67%
60%
40%
68%
60%
40%
69%
59%
41%
70%
59%
41%
71%
58%
42%
72%
58%
42%
73%
58%
42%
74%
57%
43%
75%
57%
43%
76%
57%
43%
78%
56%
44%
79%
56%
44%
80%
56%
44%
Mind you, this is not totally accurate. We’re not taking into account the weight of the microbes (which will be minuscule anyway) and we’re also assuming that there’s no water loss due to evaporation. But it’ll get us close enough to get the job done in calculating an overall contribution to the final dough.
Also, you’d think that you could apply this technique to figure out the weight of any ingredient in the final dough. I suppose you could if you built the dough under a tightly controlled and consistent environment. But the problem with that is that during mixing you may add a bit of flour or water, to adjust for temperature and humidity. So it throws off the actual flour and water you may have used. In this case, the best you can do is get an estimate of an ingredient. Personally, I’ve found that the margin for error is about 10%.
And even with the starter calculation, it’s not totally accurate. But we’re only dealing with a two-ingredient dough, so there’s not going to be much else to take into consideration.
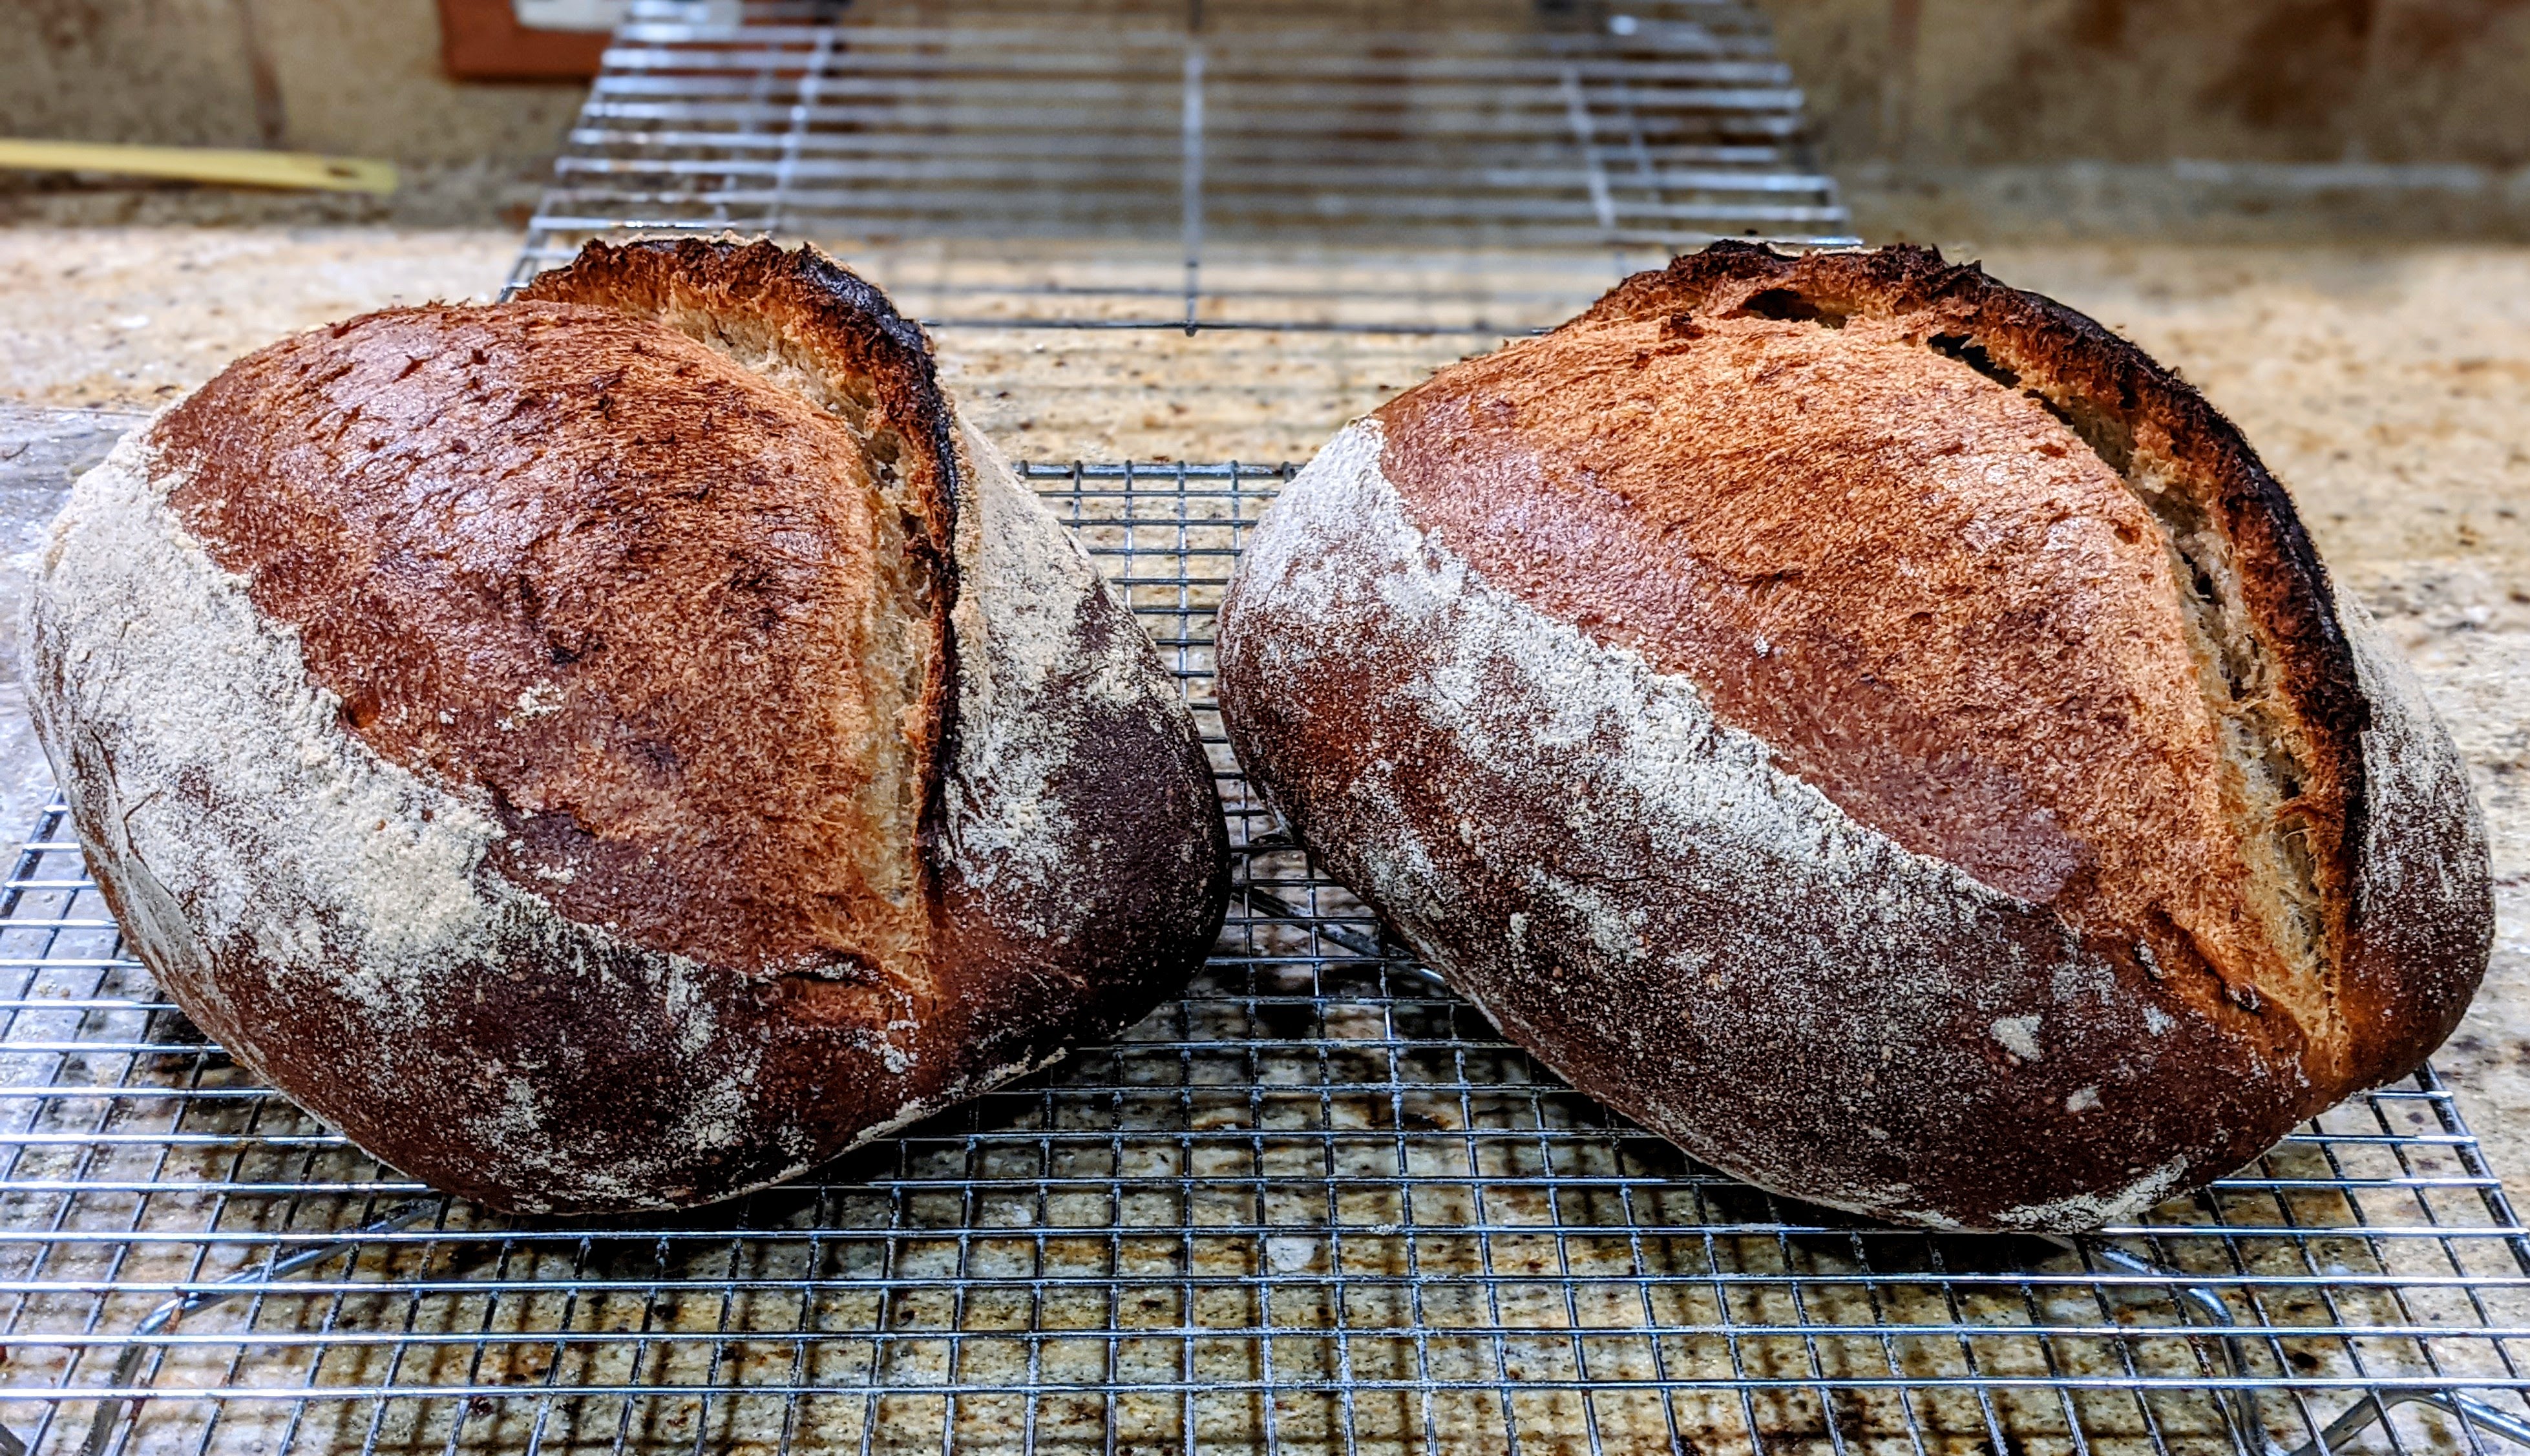
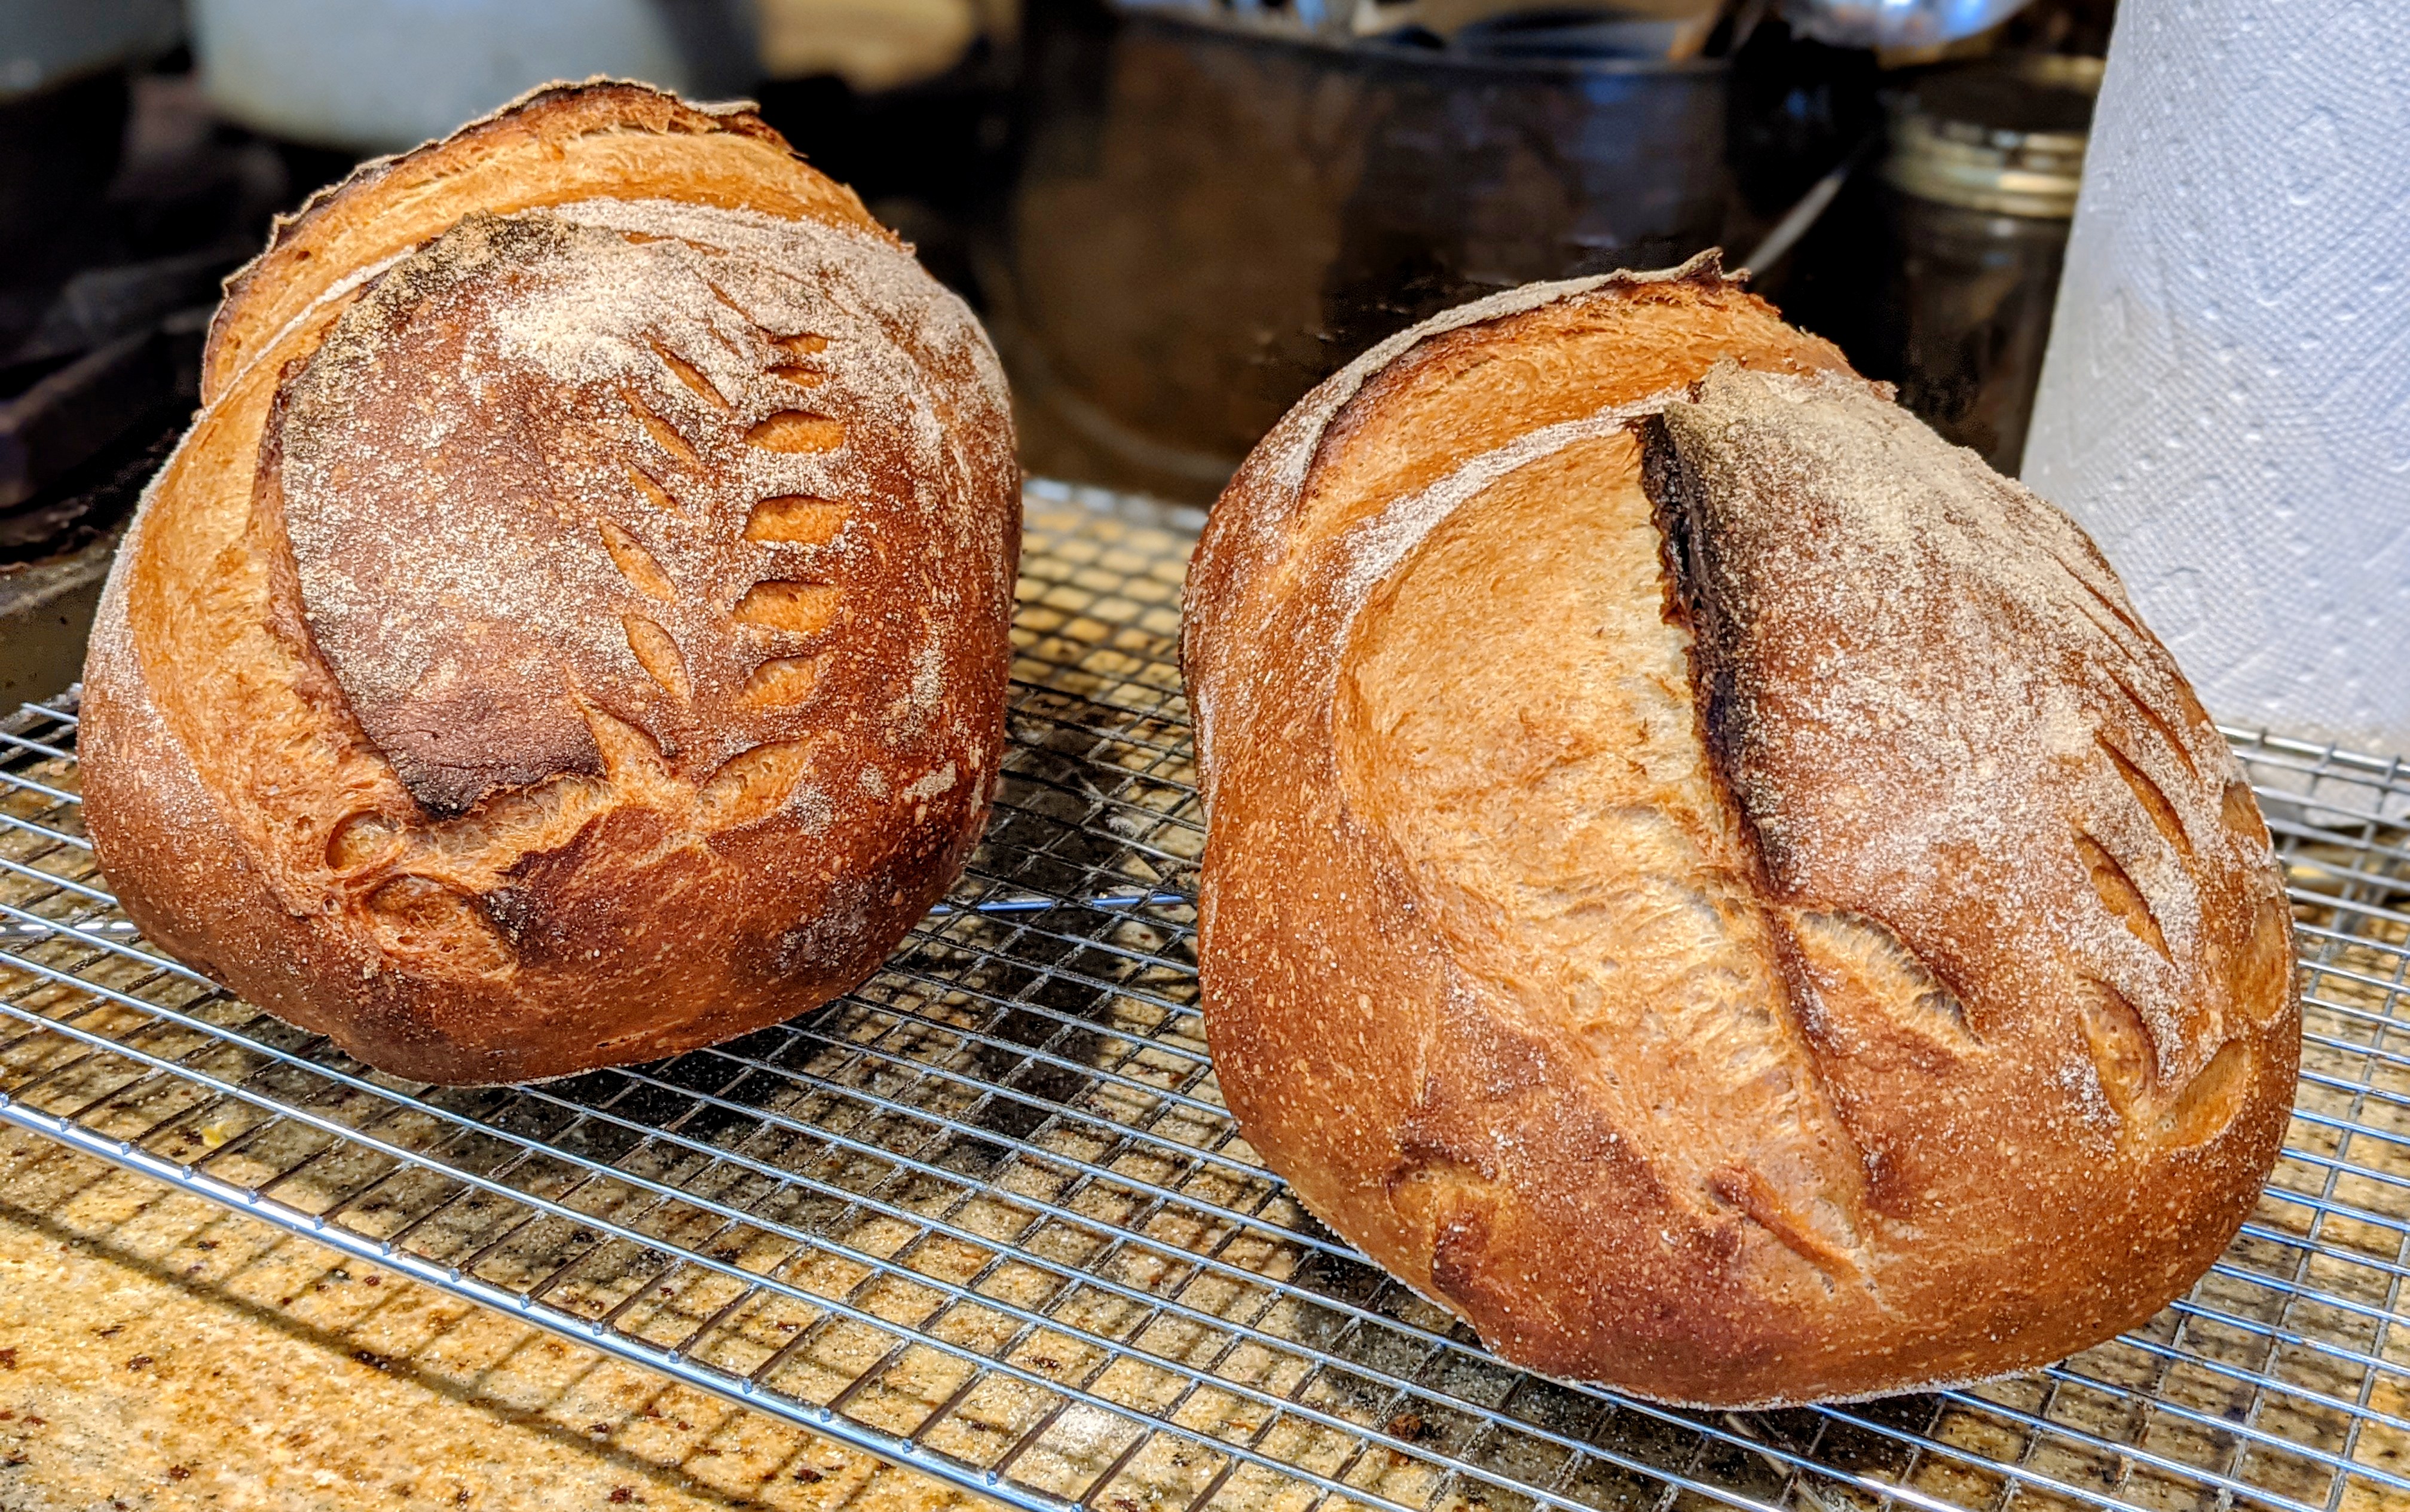
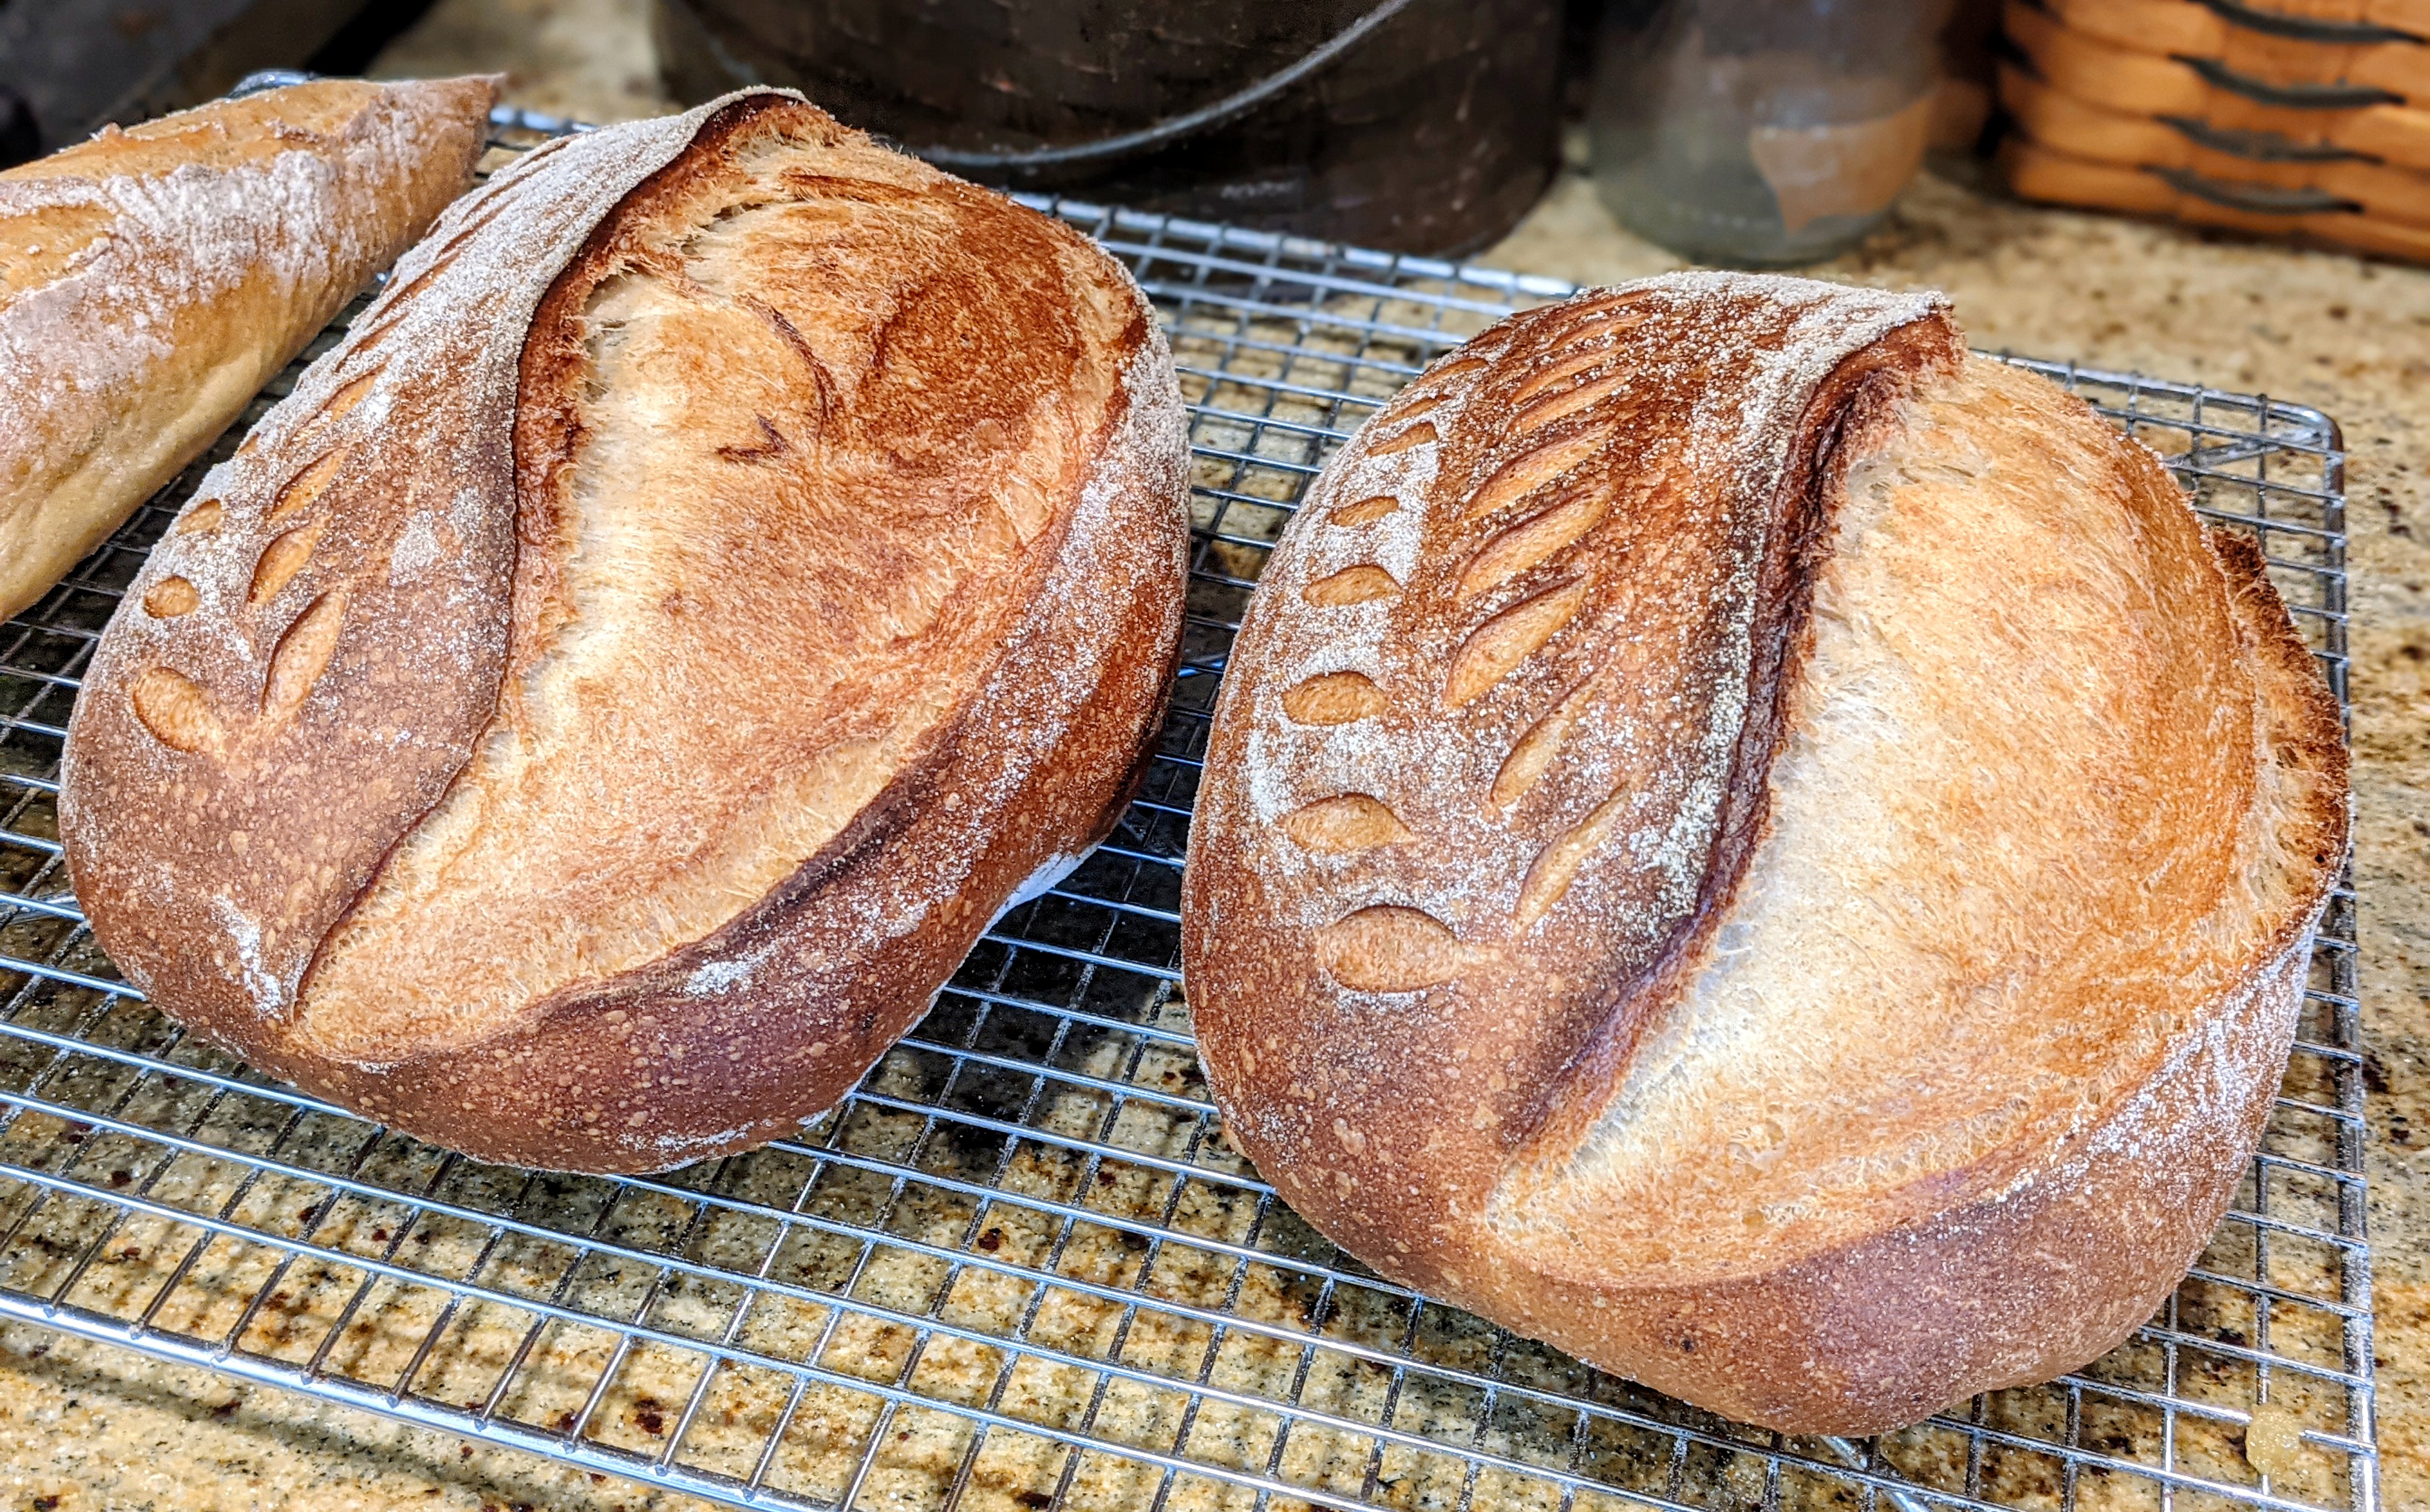
Look at the loaves above. I just pulled the loaves in the left-hand photo out of the oven. I baked the loaves on the right about two weeks ago. I used the exact same process for each set: Long autolyse, 24-hour bulk ferment, 24-hour final proof. The difference? The loaves on the right used 30% King Arthur 100% Whole Wheat flour, while the loaves on the right used 30% Azure Standard 100% Whole Wheat Flour. The Azure Standard flour is Unifine milled, so it’s A LOT finer. The KA flour is pretty smooth, but you can definitely feel the bran particles in it.
When I was shaping the loaves on the left yesterday morning, I knew I wouldn’t get an ear. I knew the oven spring would be good, but I knew I wouldn’t get an ear just the same. The reason, is that I couldn’t develop a really taut skin without tearing the dough. And no, the dough wasn’t at all over-fermented. I wouldn’t have gotten the spring that I did if the dough was over-fermented.
But as I’ve mentioned previously, course, whole-grain flour contains lots of bran particles that cut the gluten strands. You have to be extra, extra gentle handling the dough! For instance, I did six rounds of stretch and folds, but by the third set, I had to switch to coil folds because I knew how delicate the dough would be due to the bran in the flour.
By no means is this a complaint. I was expecting this. But it is definitely a lesson in how different flour types – or brands of the same flour type – affect the resulting loaves. That said, I’m okay with how the loaves turned out. But I have to admit that I would’ve been totally pissed off if they didn’t spring. It would’ve indicated a break in my technique and that’s a totally different story! 🙂
Though I love the bread I make on its own merits, I’ve always had an ulterior motive with it: The bread I make has to make a good sandwich. To me, there’s nothing more sublime than shoving meat and cheese and veggies and condiments between a couple of slices of bread or in a sandwich bun. So whether it’s a boule or batard or a baguette or ciabatta, I want to be able to use it for a sandwich.
One of my favorite sandwiches is a Vietnamese Banh Mi sandwich; but moreover, I love Bahn Mi bread. I’ve tried to make it in the past, but failed horribly. The bread was good, but the crumb was much more baguette-like in texture, and for the life of me, I couldn’t figure out what made the crumb that soft and luxurious.
But I did some research and read LOTS of different recipes and they all include a key ingredient: Dough Improver. This can come in the form of either a dough improver such as the King Arthur Dough Improver or a combination of vital wheat gluten and an organic acid such as ascorbic acid (Vitamin C) or acetic acid (vinegar). KA dough improver is actually that combination of vital wheat gluten and acetic acid.
I followed another recipe that prescribed using vital wheat gluten and 500 mg of ascorbic acid. I crushed up a Vitamin C tablet and was off to the races. The results in the picture speak for themselves. They literally came out exactly as I had intended!
But here’s where I’m getting conflicted…
Though I’m not a member, I’ve made a conscious decision to follow the principles of the Real Bread Campaign and make bread that has no artificial additives. The ascorbic acid I added to my dough is exactly that. I know it sounds kind of janky, but I kind of felt like I crossed over the dark side.
But according to a well-known American chef, Andy Ricker (who specializes in Southeast Asian cuisine) a dough improver is a vital ingredient in making Banh Mi. He should know. He has spent years studying all aspects of Southeast Asian cuisine. Though he’s best know for his Thai food, he possesses a great breadth of knowledge and experience that goes beyond just Thai food. So when he said that a dough improver’s “stabilizers and chemicals are what help give the baguettes their characteristic texture” I almost shit pants!
But I charged forward anyway and I love what I created. They taste great and they’re light and airy. When I made a sandwich with that bread, there were crumbs all over the place. That’s the sign of a great Banh Mi bun! BUT it goes against my ethos of not using artificial ingredients in my bread.
Luckily, that forced me to research alternatives and I found that some people have been using apple cider vinegar for their acid. I think I’m going to have to try that in place of the Vitamin C. Yes, I could go out and buy KA Dough Improver. But that’s just vital wheat gluten and acetic acid. I have plenty of vital wheat gluten and not only that, I have a bottle of Bragg ACV, which is the best commercial ACV out there in my opinion.
So all is not lost. But it still felt a little wrong to me. By the way, I baked my Bahn Mi based on this recipe. Though I made a couple of tweaks and converted everything to grams. Here’s my formula in the table below:
Ingredient
Ounces
Grams
Bakers’s %
My Amounts
AP Flour (11.75 protein)
16
453.6
100.00%
482
Water
10
283.5
62.50%
301
Salt
0.2
5.67
1.25%
6
Yeast
0.2
5.67
1.25%
6
Vital Wheat Gluten
0.6
17.01
3.75%
18
Sugar
0.2
5.67
1.25%
6
Butter
0.6
17.01
3.75%
18
Vitamin C
500 mg
500 mg
500 mg
With my recipe, I used AP flour. Almost all recipes called for bread flour. However, the amount of vital wheat gluten I used brings the total protein content to 14% which I found to be optimum for making great Banh Mi buns. Notice that my flour and vital wheat gluten combined are 500 grams. I typically include VWG as part of my total flour. This is important because you technically only want to use 0.5% ascorbic acid to total flour.
Other than my personal tweaks, I used Andrea Nguyen’s fermentation process; however, for shaping, I used a technique that Andy Ricker shared in a YouTube video:
Handling an shaping of a Bahn Mi dough is so counterintuitive. With most breads, I’ve learned to be gentle with the dough. But with Bahn Mi dough, it’s handled rather aggressively!
I’m soon going to be doing a big bake. It’s for a fundraiser that I’m putting on where for each loaf of bread I sell, I donate a loaf to a local shelter. With that in mind, I’ve been trying out ways to be as efficient as possible. One of those ways was to see if I could make different kinds of loaves from the same batch of dough. Hence, a “mother” dough.
So two nights ago, I started a 1:5:5 levain (1 part 100% hydration starter to 5 parts flour/water each). I let that ferment overnight, then mixed a final dough which was 3 parts flour to 1 part levain, then added water to bring the hydration to 71%. My thought was to create a dough that I could use for boules and batards and baguettes.
I was a little iffy about the baguettes because I normally make them at 75+% hydration. But my starter has been particularly active as of late, so I thought the yeast could more than compensate for the slightly lower hydration, and I would proof them a little longer than normal to create just a touch lower pH in my dough to help with its extensibility.
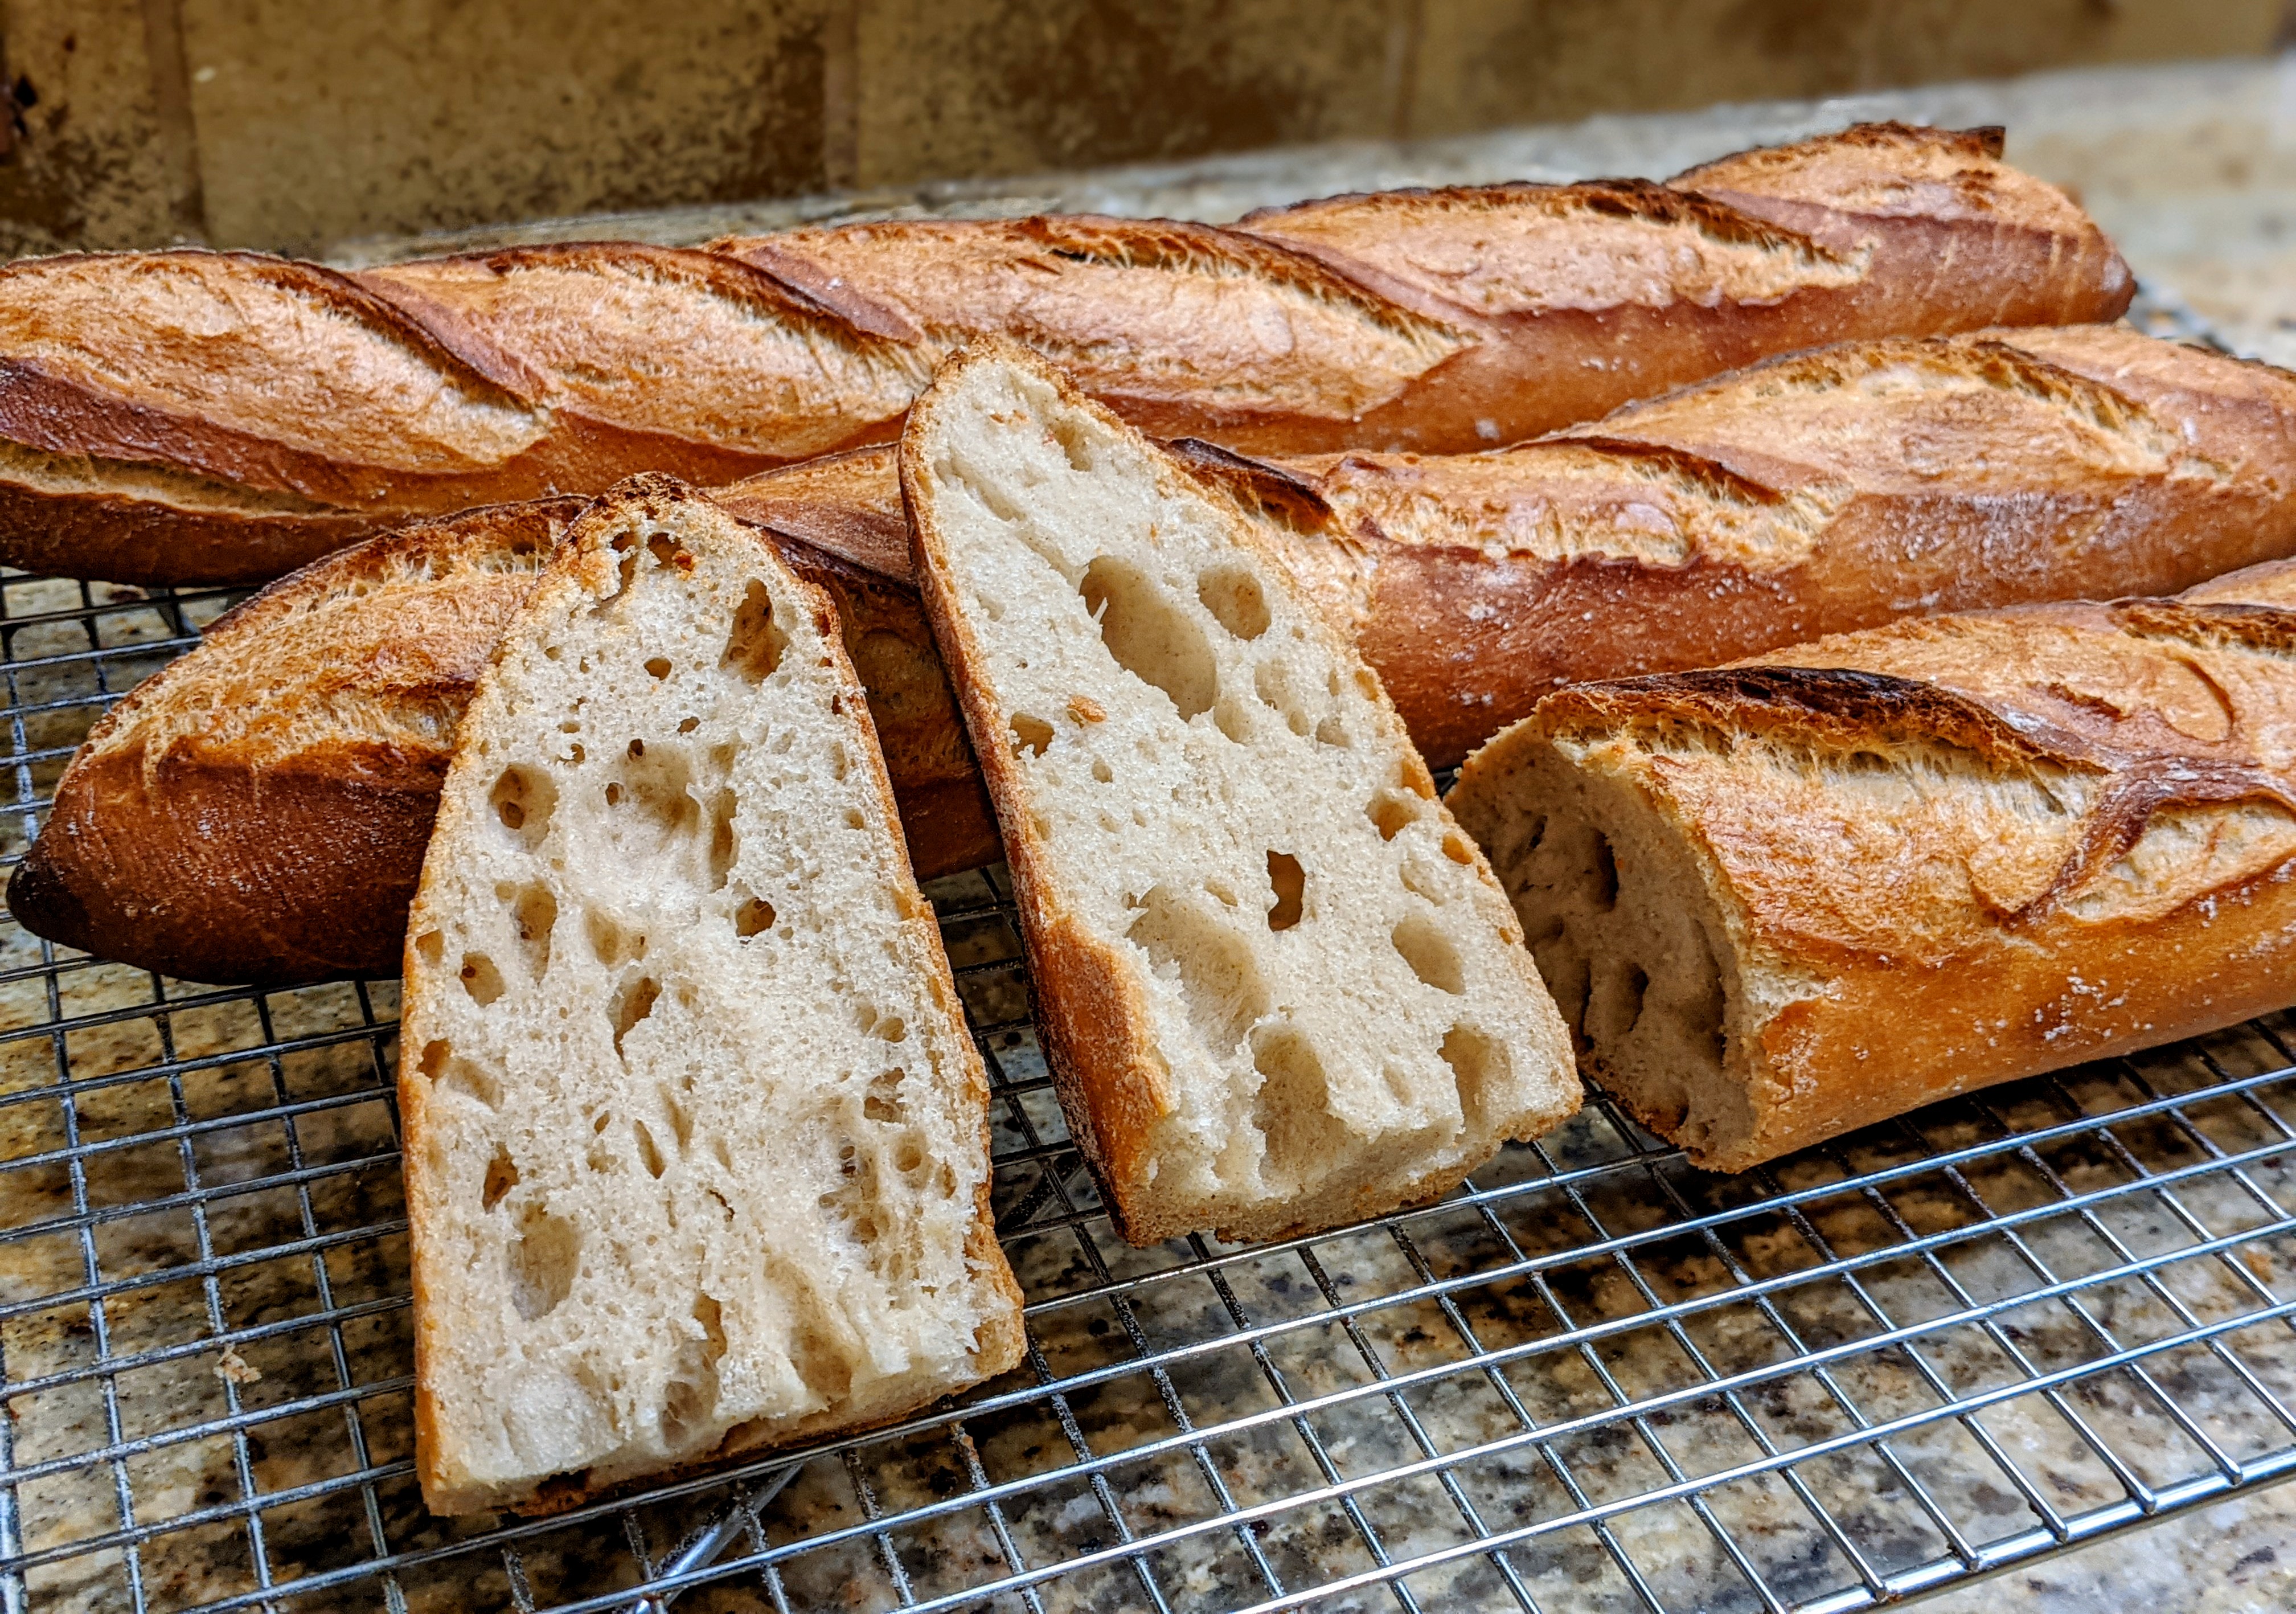
As you can see from the pictures above, it worked! I was able to use one dough to create baguettes and batards, and by extension, boules. The crumb is not perfect for either loaf. Though I got big holes with the baguettes, they’re not as numerous as in my regular baguettes. With the batards, which are huge, the crumb isn’t really open with big holes, but the interesting thing is that I got HUGE oven spring out of these loaves – lots of little holes working together to make the loaves expand! And the texture is exactly how I like it.
So while the loaves aren’t absolutely perfect, they’re pretty good in their own right, so I will most likely proceed with this dough. Here’s the formula/process:
The Night Before…
Before constructing the dough, I had to make my levain. For this, I didn’t want my levain to be particularly sour, so I used a 1:5:5 ratio: 100 grams mature starter, 500 grams water, 250 grams high-extraction flour, 250 grams AP flour. I made this at about 9pm the previous night. Since it was like a feeding it would take about 9-12 hours to fully develop in my < 70° kitchen. Long story short, it took 12 hours before it got really bubbly and active.
NOTE: You don’t have to use an active starter for this. I used a completely spent starter that was ready for feeding. The microbes are still alive, so I’m just feeding them when I make the levain. Then I feed the remaining culture in my jar and put it away. I’m not of the school of using my starter directly. I prefer to use a “mother” that I then create child batches of levain to give me more options.
Day 1 – Dough Build
The basic, overall formula that I used is this:
1/3 High-extraction flour* 2/3 AP Flour
3:1 ratio to total flour used in levain
Water
71% – factoring in the water in the levain
Salt
2%
Instant Yeast**
0.02%
Levain
All of it
* That 1/3-2/3 blend of high-extraction to AP flour gives me a protein content of 12.7%, that of regular bread flour. ** This is a minuscule amount just to give the starter a little boost, just in case it was too spent.
With the exception of the instant yeast, you may probably notice that this is a riff on the basic 1-2-3 sourdough recipe, though technically, the hydration is a little lower. Remember, I was trying to achieve a happy medium that could be used for different kinds of loaves.
Autolyse – Combine the flour and water (reserve a little to help break up the levain later), and let soak for at least 30 minutes.
Mix – Break up the levain with the reserved water, then add it to the autolysed dough along with the instant yeast. Mix a little, then sprinkle salt evenly over the mass, then continue mixing until all ingredients are incorporated and there are no dry ingredients and no large lumps. Mix until you create a well-incorporated shaggy mass.
Stretch & Fold – Do two sets of stretch & folds every half-hour in the first hour after mixing. This is to build strength and make sure all the ingredients are well-distributed, so make sure you stretch and fold to the point where the dough doesn’t want to be stretched any longer. Since it was a bit cool that day, I did three sets just to make sure that everything was well-combined because I saw little activity in the dough.
Coil Fold – After the S&Fs, I wanted to be much more gentle with the dough so it wouldn’t degas significantly so I switched to coil folds for the next hour and a half. By the time I finished the third set, it was clear that I was getting enzymatic activity in my dough, so I let it rest for 30 minutes, then popped it into my retarder fridge.
Retard – Retard the dough for at least 24 hours, or until the dough has expanded 50-75%.
Day 2 – Making the Loaves
I couldn’t do all my loaves at once because 1) The timing would get screwed up; 2) Different loaves require different bulk fermentation times. But that’s an advantage! With baguettes, you want to start pre-shaping at about 50% expansion. Because you need a nice, long runway for intermediate and final fermentation. So with that in mind, early on Day 2, I scaled out what I’d need to make three 400-gram baguettes, so 1.2 kilos, then returned the rest of the dough to my retarder because I wanted to do a longer bulk for my batards.
I went through my regular baguette process, then once I finished baking my baguettes, I set my oven back to the proper temp, then removed the rest of the dough to create my batards. For those, I pre-shaped into tight balls, then bench rested for 30 minutes. I then shaped the loaves and put them in their proofing baskets and they proofed at room temperature for 2 hours (the dough was pretty cold so that probably accounted for the long, slow proof – which is NOT a bad thing).
Final Thoughts
All in all, I’m quite happy with the results. However, I am going to up the hydration to 73% or maybe up to 75% the next time I do this. Even with just 1/3 high-extraction flour in the final dough, the water absorption of that flour is high because of all the bran that at 71%, it felt like working with a 67-68% dough: pliable but a little stiff.
In ancient Chinese philosophy, the Yin and the Yang denote a duality in life; how seemingly opposite forces can actually be connected and interdependent. In physics, this can be expressed as Newton’s Third Law that states the for every action there is an equal an opposite reaction.
Back when I was in high school physics class, my teacher gave us a word problem describing a boat with a single sail, and at the stern of the boat, sat a wind machine that could generate enough force to fill the sail and move the boat.
Mr. Calvelli, my physics teacher, went on to elaborate on the weight of the boat and the friction of the hull against the water. Then he asked a simple question: How much force must be generated by the wind generator to move the boat?
It was obviously a trick question because of Newton’s Third Law. No matter how hard the wind generator worked, or how efficient the sail was (it was assumed it was 100% efficient), the boat would stay in place because the force of the wind blown forward would be negated by the force that would propel the boat backward.
Sorry, I was reminiscing and took a detour… So what does this have to do with baking bread?
I’m actually going to turn to other anecdotal experience for this. I spent the better part of the first half of my life studying martial arts. I then moved onto – believe it or not – ballet, which I did for about 10 years. In studying both disciplines, there was a yin-yang nature that always fascinated me. On the one hand, I had to be absolutely focused on what I was doing at the time (yin). But on the other, I had to be completely aware of everything outside of me (yang).
When I started getting into making artisan bread, I realized that to master the craft, I had to apply that focus-awareness type of approach to my baking. Take mixing ingredients for example. On the outside, it’s a simple, pedestrian step. But it’s not enough to just go through the motions of getting the ingredients together. You have to be aware of how the mixing will affect the dough further into the process.
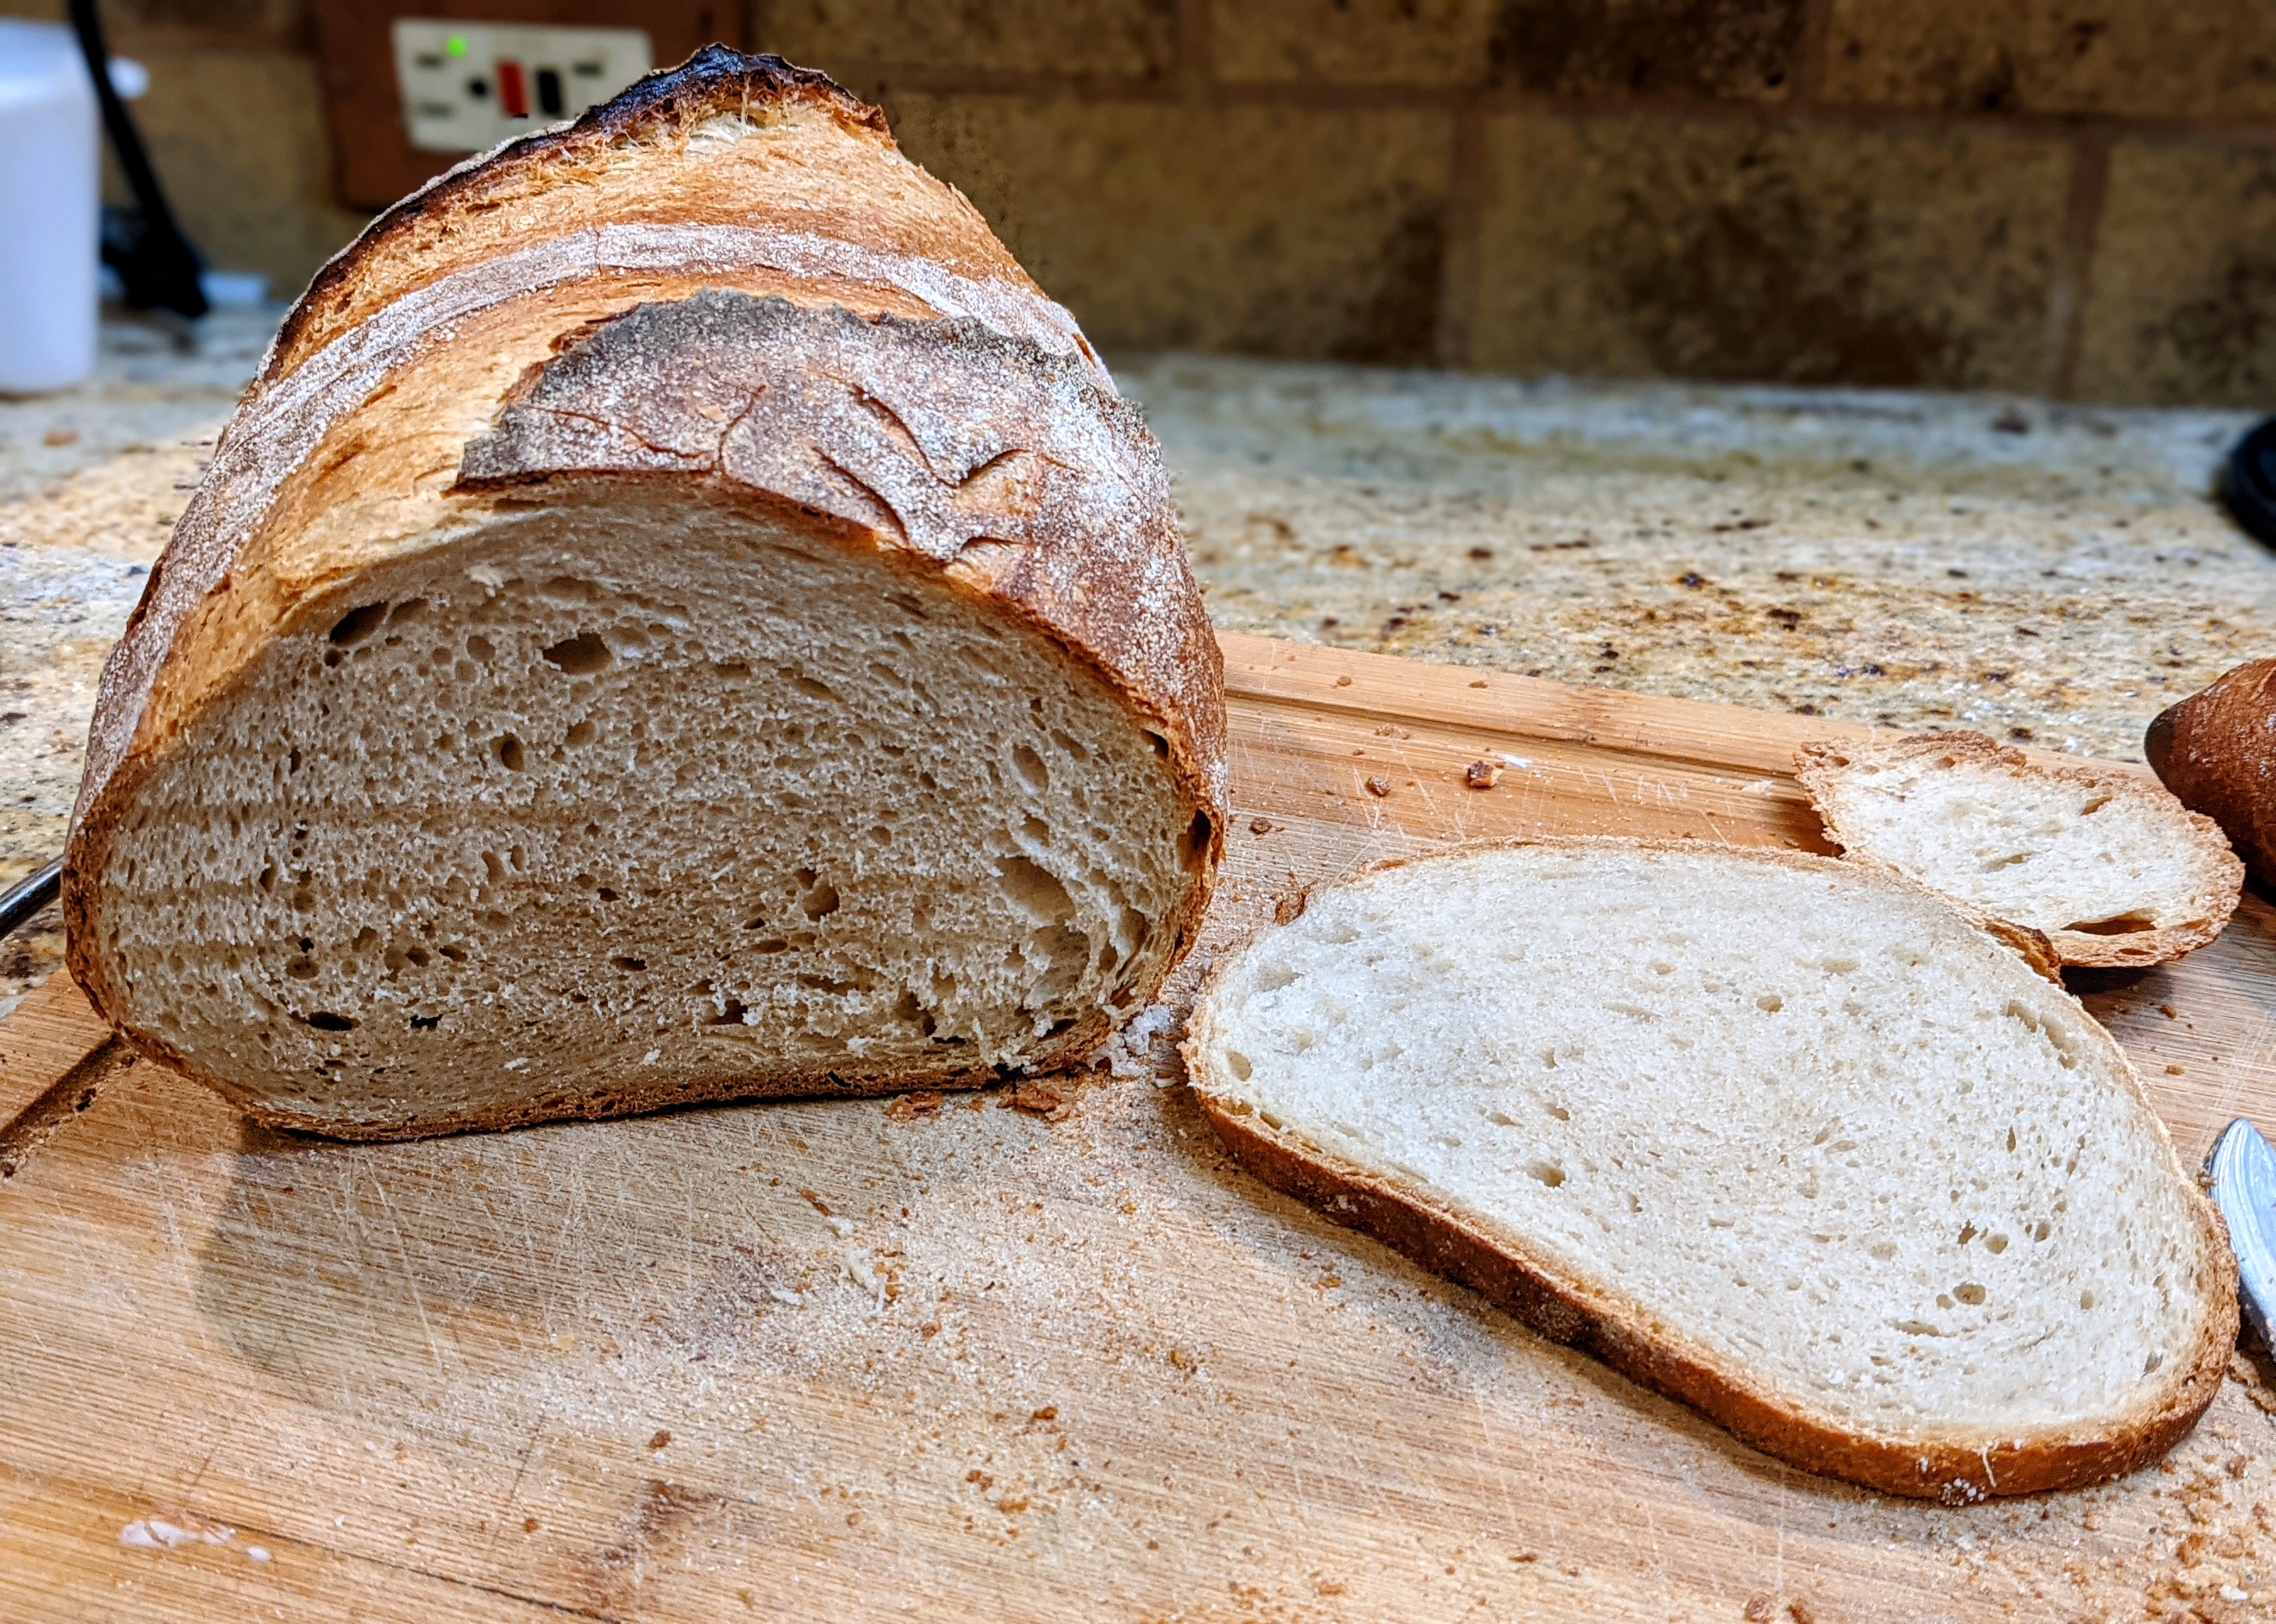
For instance, yesterday I mixed ingredients for two different types of bread. The first was a roasted garlic levain bread, the second was a traditional long-fermentation sourdough. I used the exact same flour blend for both bread, and they both had the same hydration at a little over 70%. But I mixed them completely different.
The garlic loaf used both levain and a tiny bit of yeast, so I fully mixed and did initial kneading with my mixer. With the traditional sourdough, which used nothing but natural leaven, I was much more gentle and mixed to a shaggy mass, then did stretch and folds over the course of a few hours. Both mixing actions required absolute focus to get the dough to the right state. But at the same time, I had to be cognizant and aware of what I’d have to do following those actions. So… yin and yang.
Though I used mixing as an example, it applies to every step of the process. Of course, this could be extended to other things out of bread-making, but I’ll stick with bread-making…
I can’t stress the criticality of this yin-yang in bread-making. With respect to focus, it’s not about concentrating on something to the exclusion of everything else – that would defeat awareness of other things. But at the same time, it’s not letting yourself get distracted. On the other side of things, we need to be simultaneously aware of our surroundings and our dough and respond to the infinite variables.
So what’s the point of all this?
Simply that for those of us who’ve immersed ourselves in the craft, it’s not about just crafting a single loaf, but the same kind of loaf consistently. As Bruce Lee put it…
I fear not the man who has practiced ten-thousand kicks once, but I fear the man who has practiced one kick ten-thousand times.
~Bruce Lee
To put a finer point on it, in “Bread,” Jeffery Hamelman wrote:
…if we acquire the skill to make a dozen or a hundred or a a thousand loaves, the next level of proficiency is to be able to make them consistently. And that for both the professional and the home baker, is probably the greatest challenge: to be able, day after day, to adjust to the specific needs of the day’s doughs, to factor in and accomodate the slight changes in ambient temperature and humidity, as well as the degrees of ripeness of the poolish or biga or soudough and the tolerance of the dough during fermentation…
~Jeffery Hamelman
It’s fine to say this, but the backdrop is this idea of the yin-yang of making bread.
Happy baking!
BTW… I’ve been writing this entry while baking and I just pulled the garlic loaves out of the oven! The traditional sourdough loaves have at least another day in my retarder.
I’ll provide a recipe later on, but I adapted it from Jeffery Hamelman’s book, “Bread.” His recipe uses bread flour, but I used a high-extraction/AP flour blend.