So… You Want an Ear… There’s More To It Than Just Shaping and Fermentation

Of course, if you don’t get those right then you’ll never be able to achieve an ear. But I don’t want to get ahead of myself…

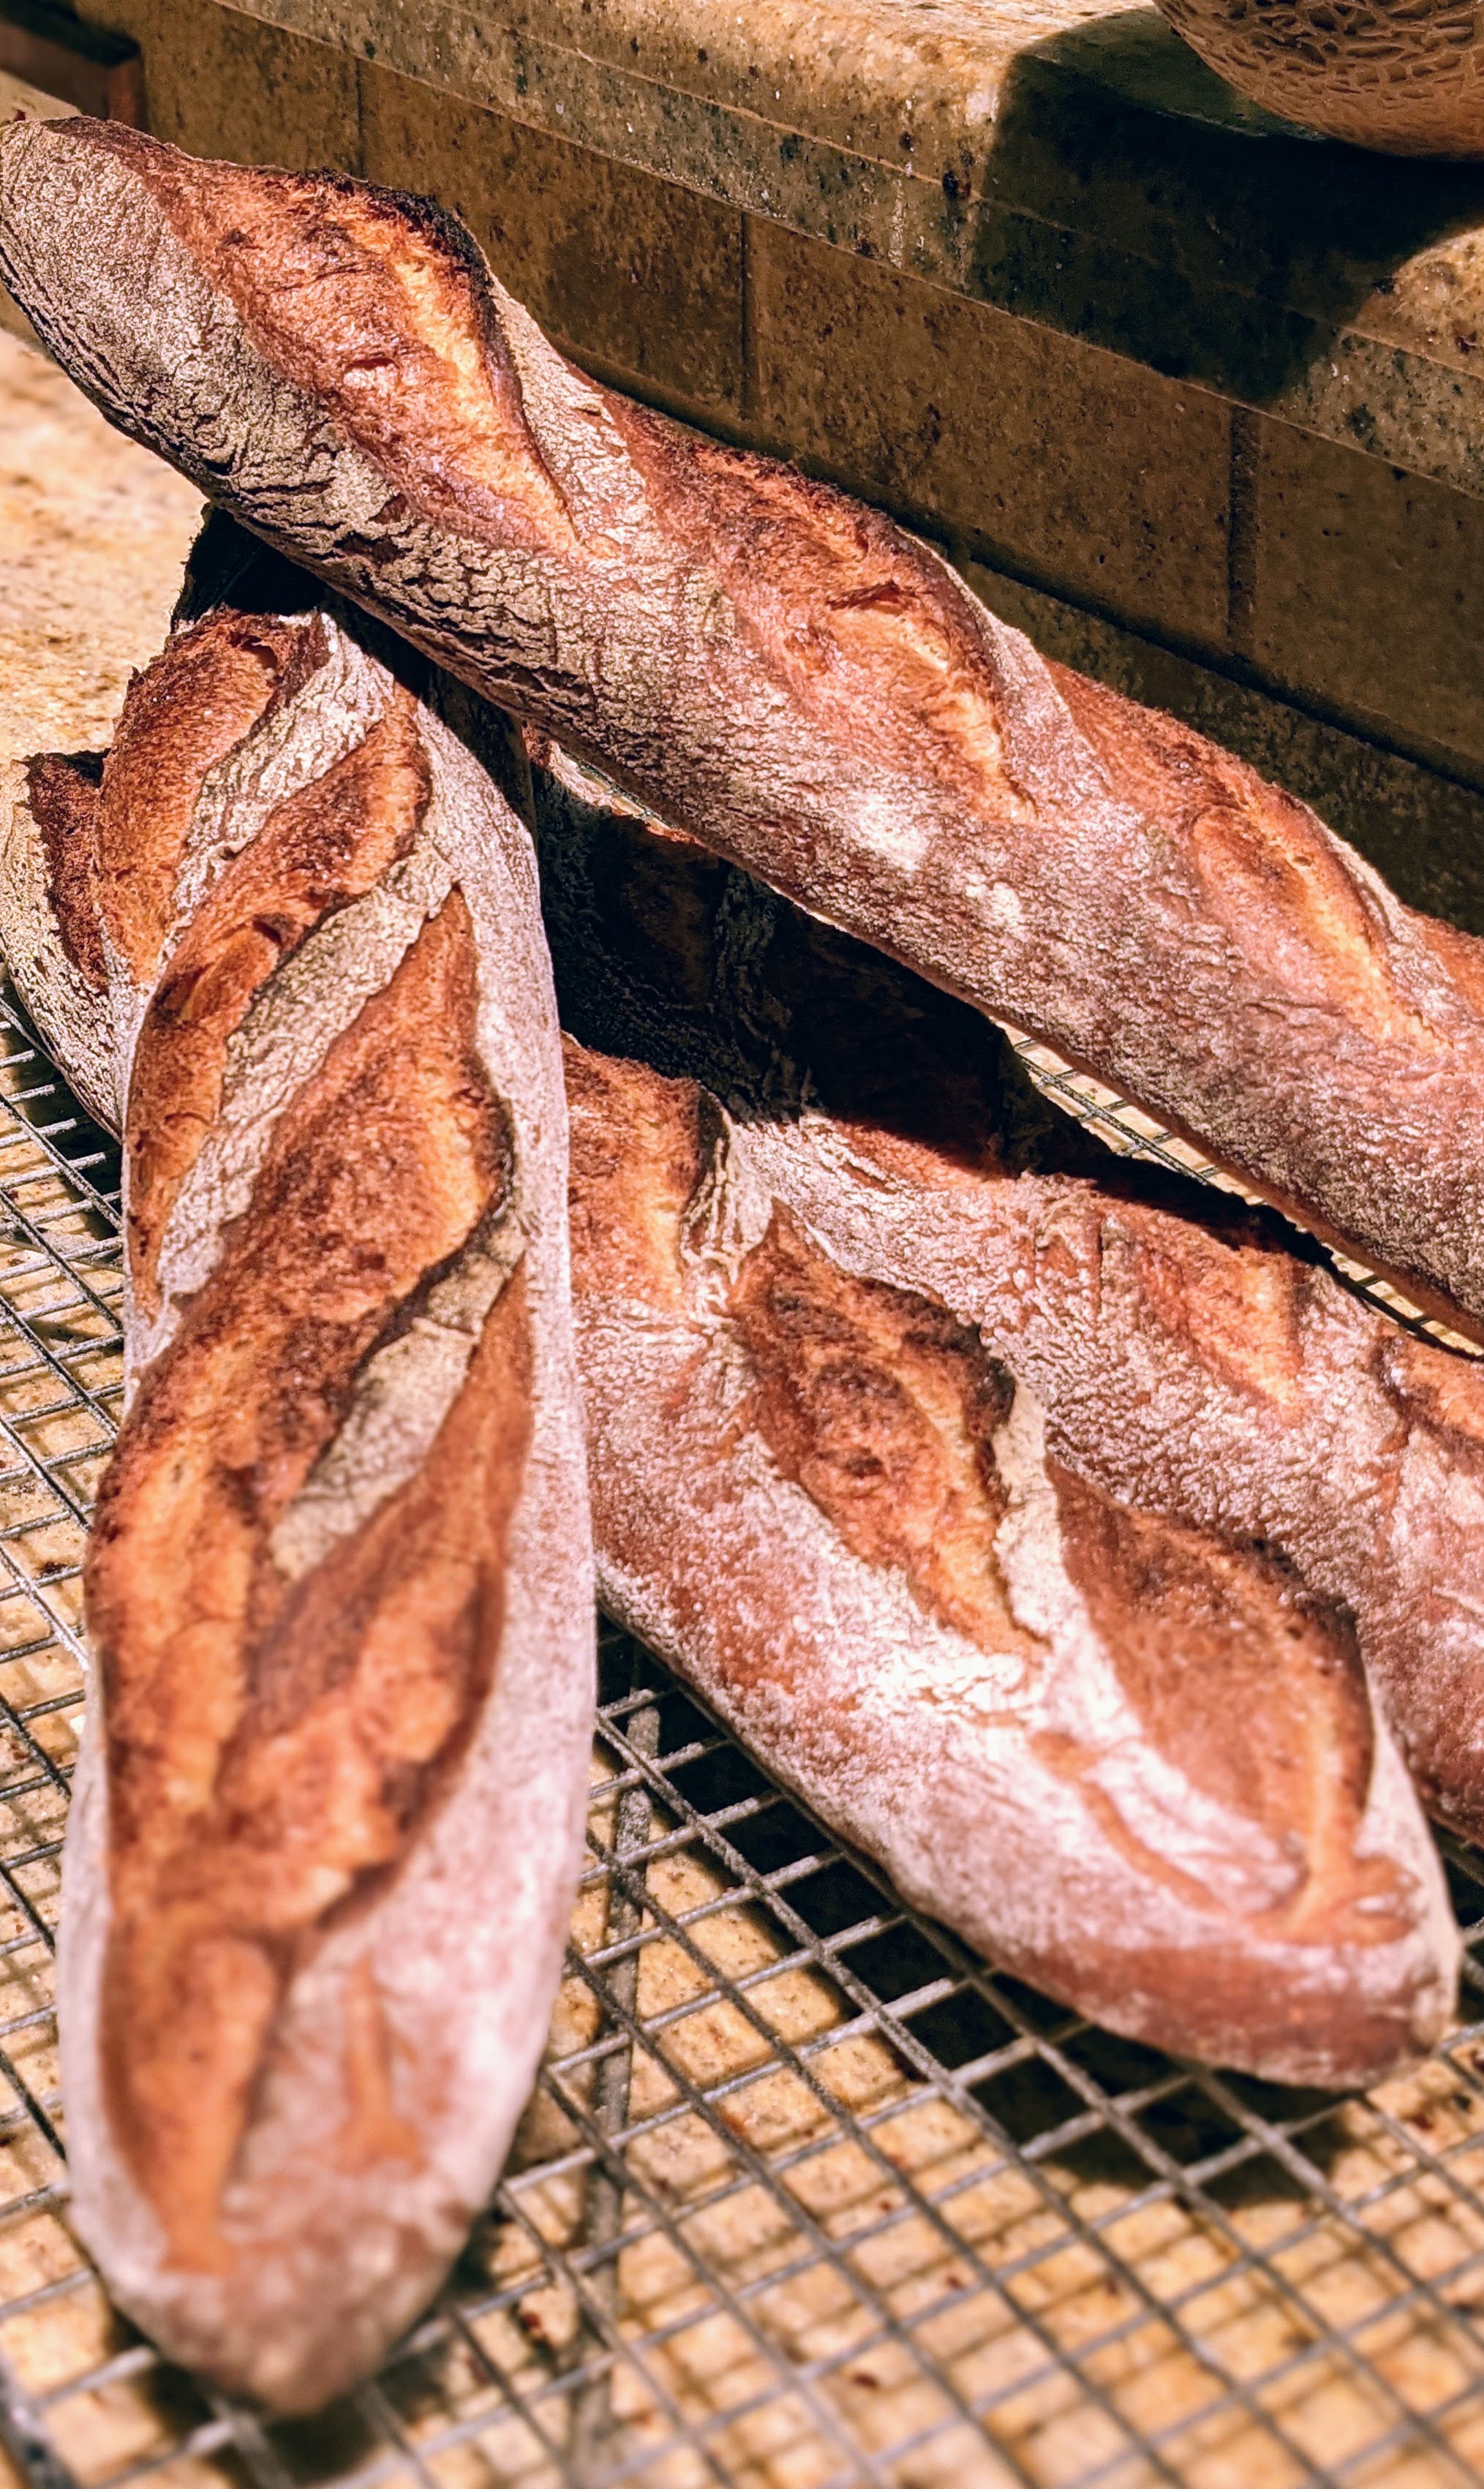
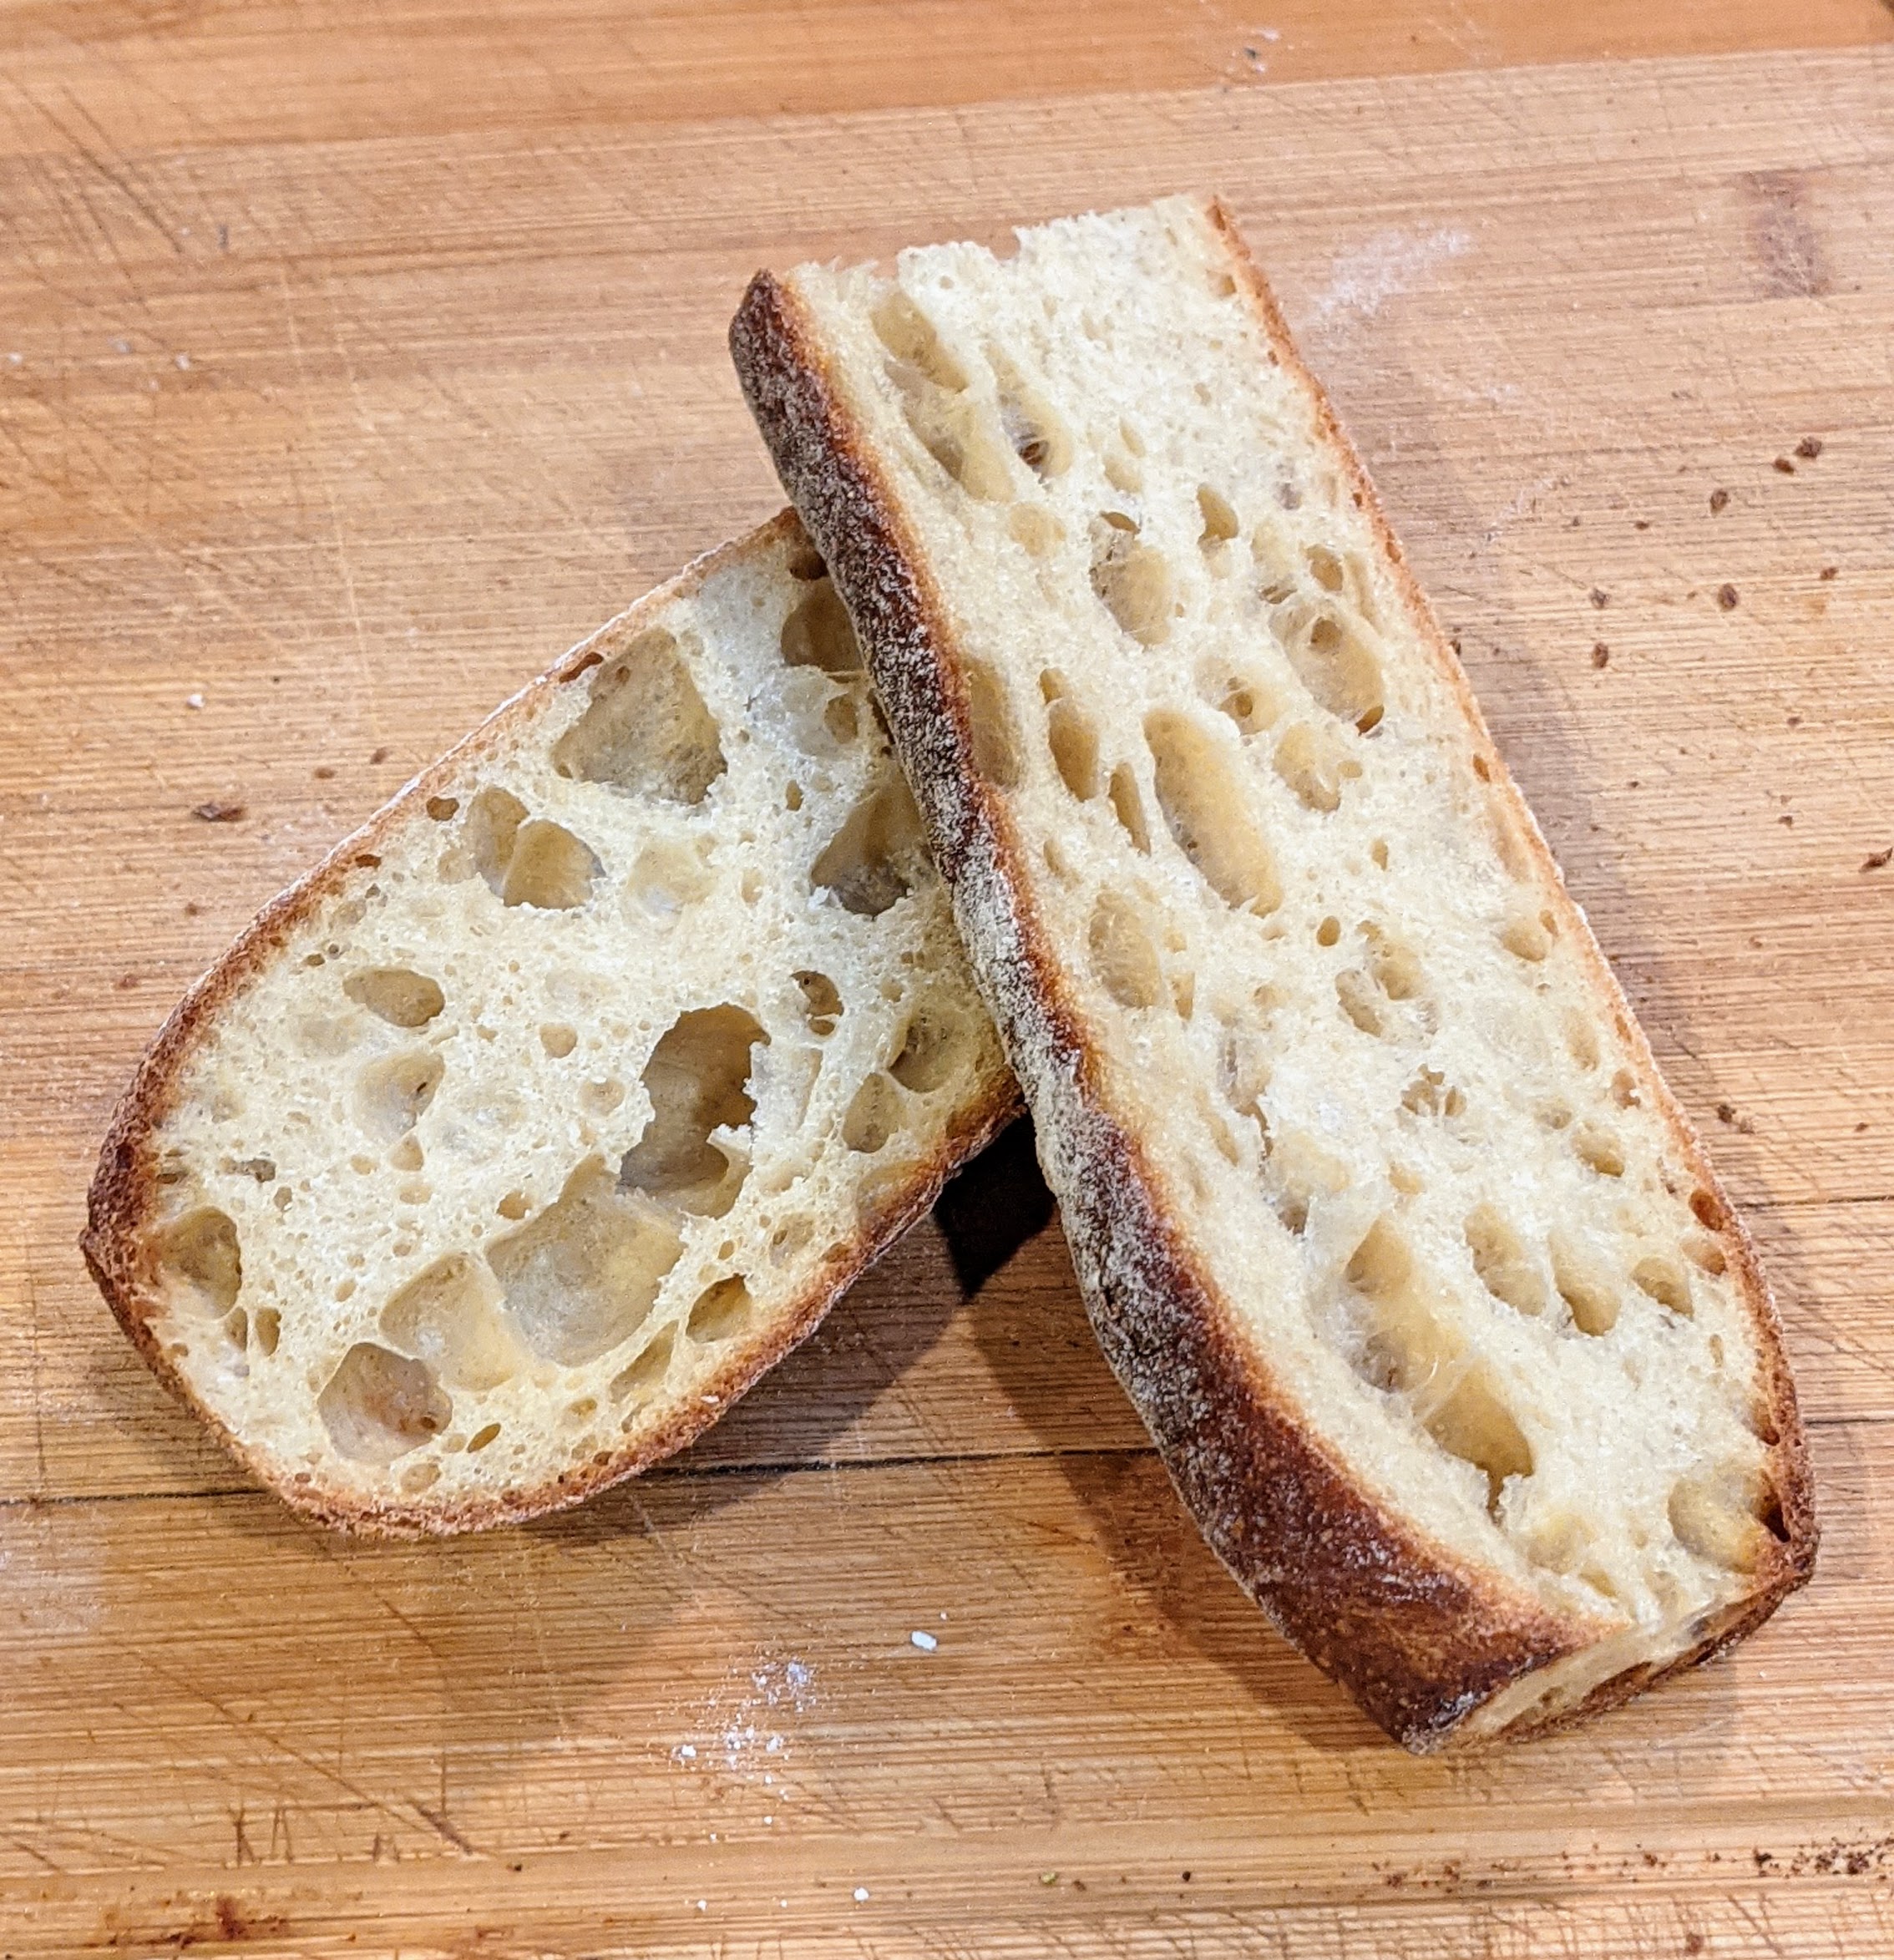
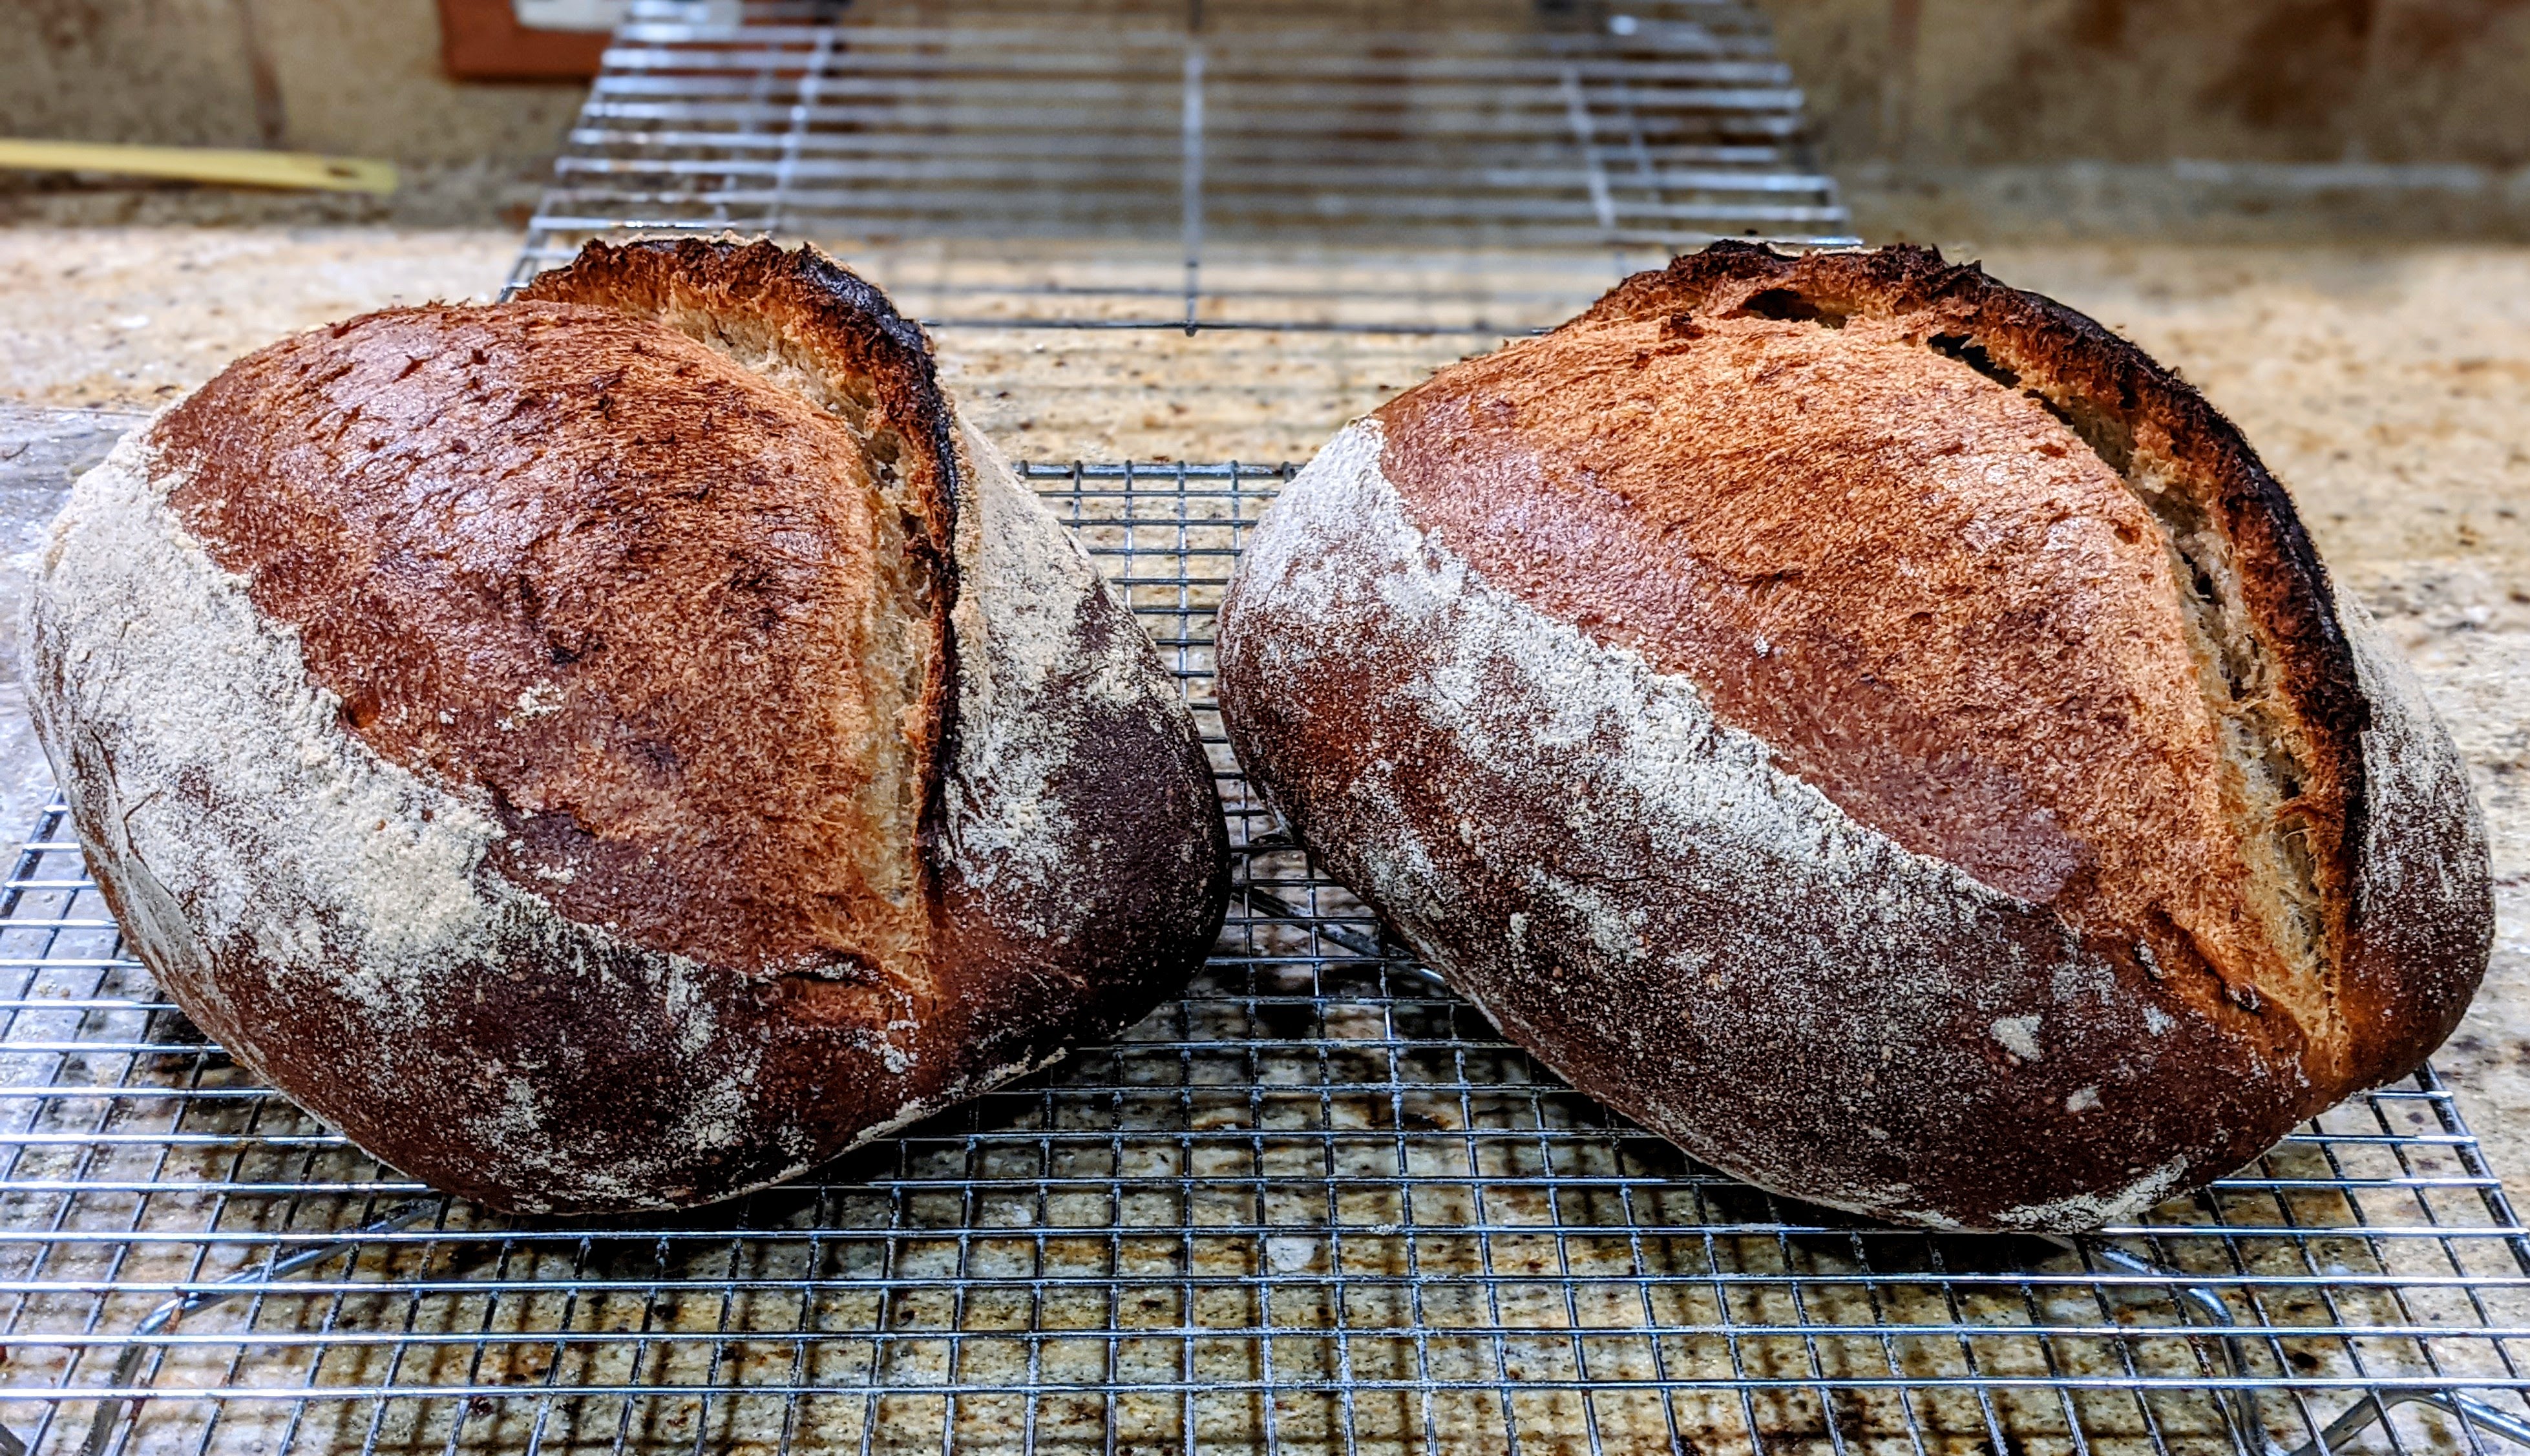
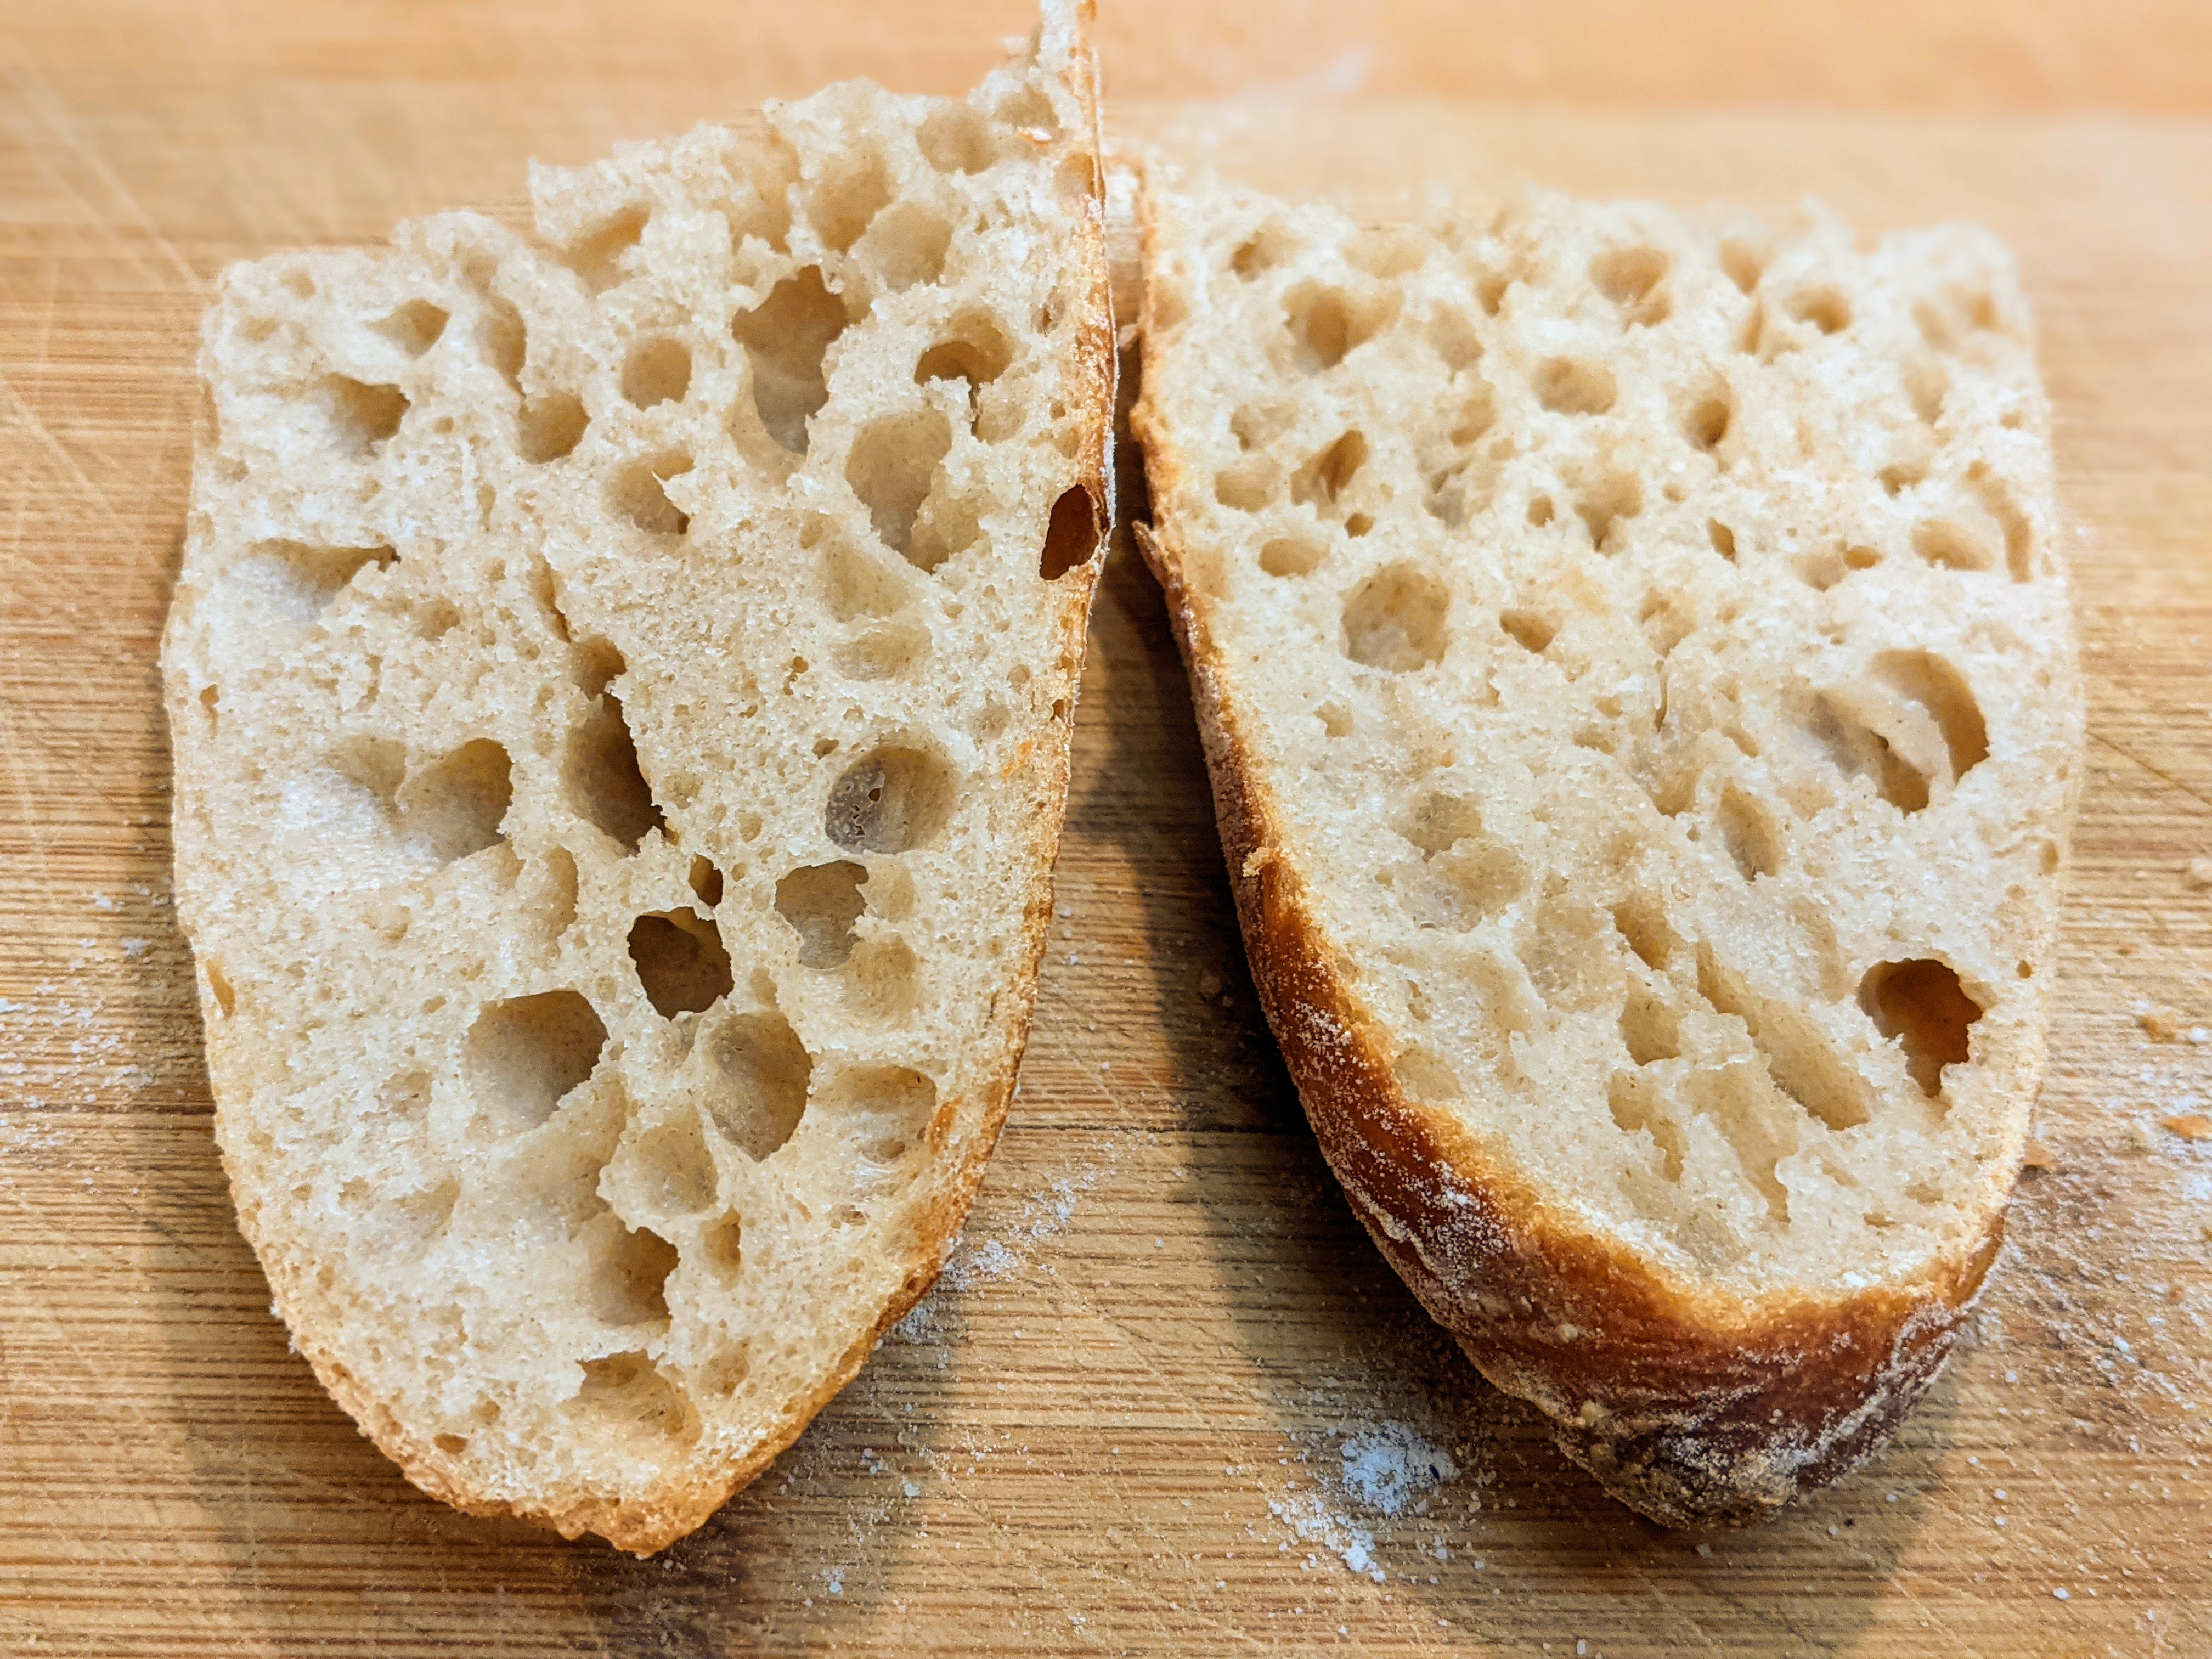
The pictures of the loaves above and the one below were made using the exact same formula (85%/15% Bread/Rye flour, 75% hydration, 2% salt), processed and fermented in the same way, and shaped using the exact same technique. They are all 1-kilo loaves. The crumb of the loaves in all three pictures looks similar to the picture below. They are all moderately open with a complete rise throughout the interior. They were also scored using the same lame and same scoring technique.

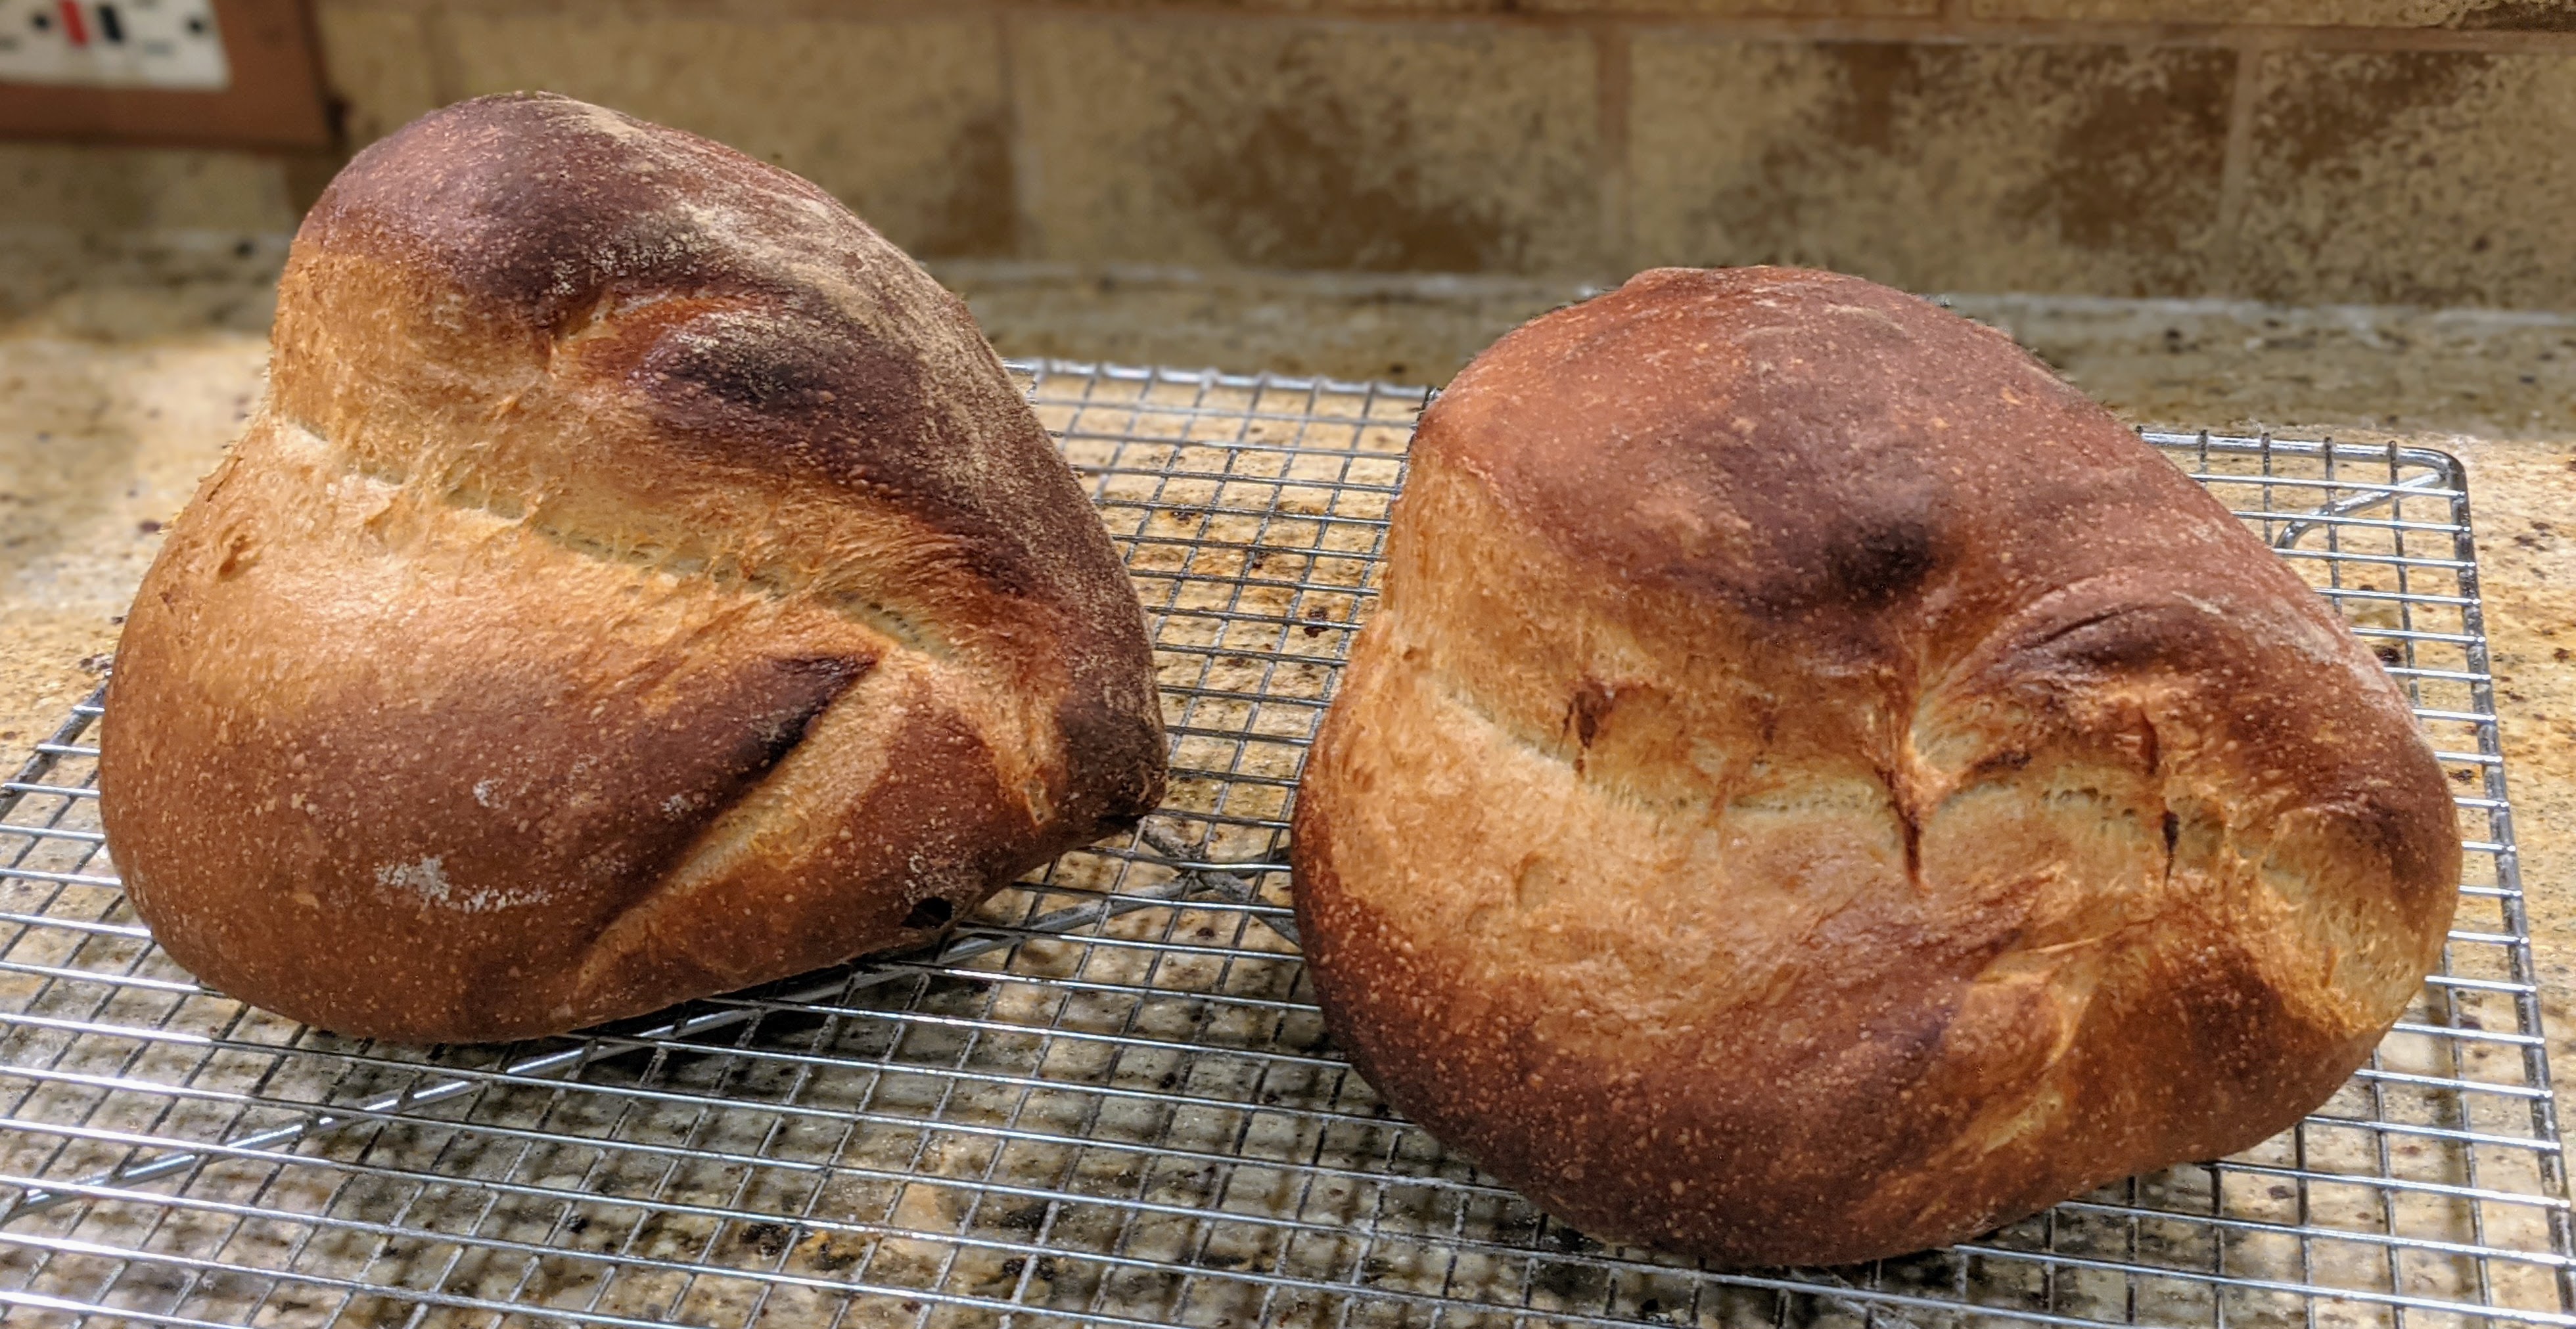
But as you can see in the top-right picture above, my loaves didn’t form ears. Most people would immediately say that I needed to create more skin tension. Sorry, that’s not it. Others would say I didn’t let the loaves ferment long enough. Sorry, that’s not it either. Still, others would say that I didn’t have enough steam, and the crust hardened before it could form an ear. Nope. So what’s the answer?

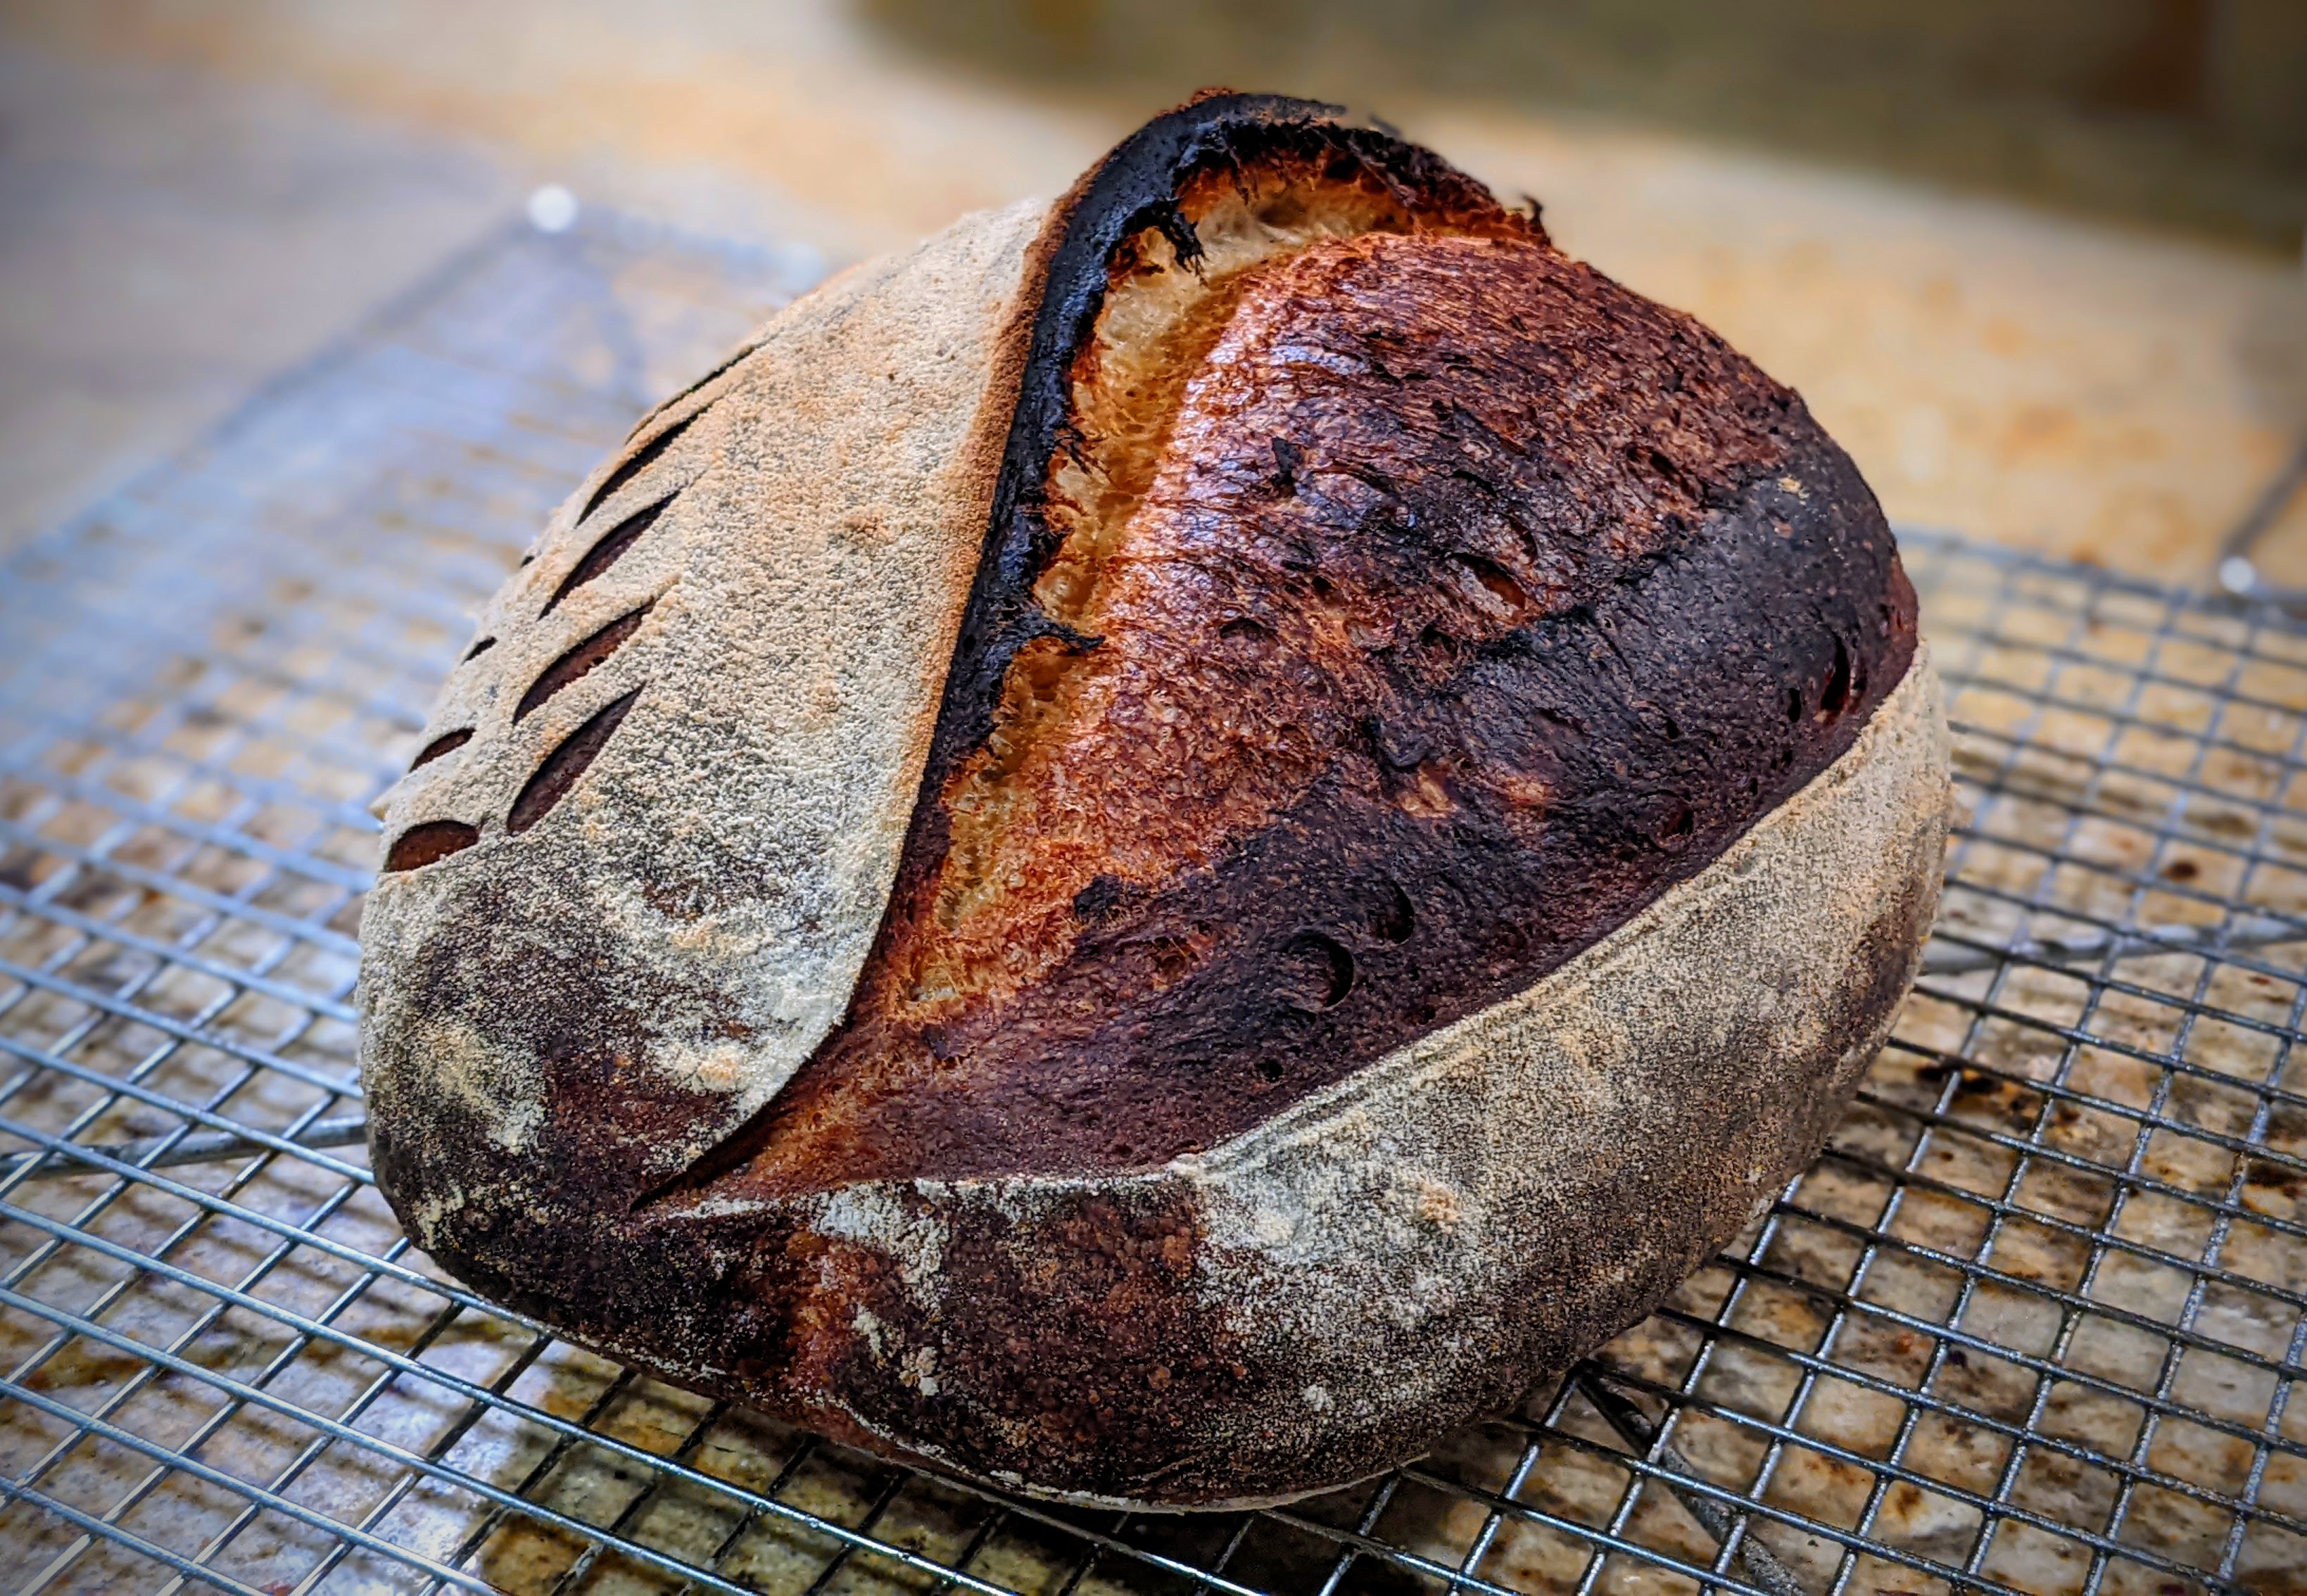
The loaves in the top picture were made from the same batch of dough, but the loaf on the left was part of a batch that was baked after the two on the right. What happened was that my stone had not come to temp, thus the ambient temperature was higher than that of my stone. As a result, the bottoms of the loaves did not expand as fast as the rest, and the exposed surfaces literally ballooned during baking, destroying any chance of forming an ear.

What also led me to this conclusion was that since the bottoms of the loaves were not as hot as the rest of the loaves, the yeast activity took longer to come to a close on the bottoms of the loaves. As a result, the exposed crusts set before the bottoms were done and one of the loaves literally sprung a leak as dough burst through a crack in the crust! Now THAT was funny!

When I removed the loaves from the oven, I laughed out loud because the loaves were HUGE and as I mentioned above, one of the loaves had leaked and a rather large protrusion was sticking out the back! On the other hand, the loaf at the top-left and the other in its batch came out as expected because my stone had come up to temp by then. Ugh! So I’ve learned my lesson and have an infrared thermometer on its way to me so I can ensure that my stone has come to temp.

The point of this is that as with other things I’ve written about in the past, there are several variables that will affect the outcome of a bake. Even in a commercial bakery, though conditions tend to be much more consistent than in a home kitchen, there’s variability in the environment. So you have to take the time to know your environment so you can achieve consistent results from bake to bake.

This is why I get a little irritated at some YouTubers who entitle their videos, “The Last _________ Recipe You’ll Ever Need,” or some nonsense like that. Though there are helpful tips in those videos, the vloggers invariably fail to mention their kitchen conditions and talk about how to deal with variances. For instance, baking bread on a hot day versus a cold day in a home kitchen, or failing to mention what their optimal dough temperature is!

Look, I realize that processing and shaping dough is challenging, and mastering just those things are probably the first things you need to accomplish to become proficient in bread baking. But as you get deeper and deeper into it, you realize things like temperature, or in my case, the stone equalizing with the oven affects the dough and the outcome of the bake.

As for developing an ear, I hate to break it to you, but that is NOT a sign of mastery. It is a sign that your loaf expanded, but don’t think that just because your loaf didn’t form an ear, you somehow failed. There are lots of gatekeepers in the home-baking world, especially in sourdough circles who believe that these things are important. They’re not.

But here are some rules of thumb that you can follow:

  • You don’t have to make a super-deep cut into your loaf when scoring. It’s more important that you maintain a shallow angle with your lame. For the loaves above, my cuts were about 1/2″ deep.
  • Also, understand that the purpose of scoring is NOT to make an ear. The purpose of scoring is to control where the loaf expands. Otherwise, your loaf will expand unevenly.
  • Make sure your dough is fully fermented. And no, it’s not just bulk fermentation. Yes, you want a thorough bulk fermentation, but you have to make sure there’s food left for the yeast for final fermentation. This is why Chad Robertson only takes his loaves out to about 30%-50% volume expansion in bulk fermentation. With his long, cold, final fermentation, he needs to make sure there’s food left for the little beasties.
  • Of course, shaping is absolutely critical. But you don’t have to get super-tight skin to get an ear. And though others may stress the importance of tight skin, the purpose of shaping is to orient the gluten strands.
  • Speaking of orienting the gluten strands, in order to orient them in the first place, you need to build strength in the dough but make no mistake, depending on the flour, the amount you stretch and fold will vary wildly. I use bread flour that is very high in gluten content (>13.5). Though I usually cut it with some other kind of flour, if I bake with it as the only flour, my dough only takes two stretches and folds before it has built up strength. On the other hand, if I use pastry flour that is made from soft red wheat, I have to do 4-6 stretch and fold sessions before it has built up strength. The point of this is that you should never overdo your folding. Fold until the dough can hold its shape for a while before it relaxes. Then leave it alone!
  • Finally, especially if you’re using a baking stone or steel, make sure your surface is equalized with the ambient temp of your oven. This is much less of an issue if you’re using a Dutch oven, but even when using a Dutch oven, you need to preheat it. That said, I saw a video where Chad Robertson was giving a master class and was using several Dutch ovens. He was popping them in the oven cold! But he was using a commercial convection oven to bake, so it’s likely the Dutch ovens came up to temp pretty fast.
Advertisement

Delayed-Fermentation Technique for Yeasted Dough

Surprisingly enough, I’m not going to provide a recipe here but talk purely about a technique I’ve been using to bake the last few batches of my baguettes. The technique has totally changed my approach to baking baguettes, let alone baking straight dough with yeast. Based on the Pain a l’Ancienne technique of using ice water at mixing time to inhibit yeast activity, the technique employs temperature to affect the dough, providing yet another means to develop flavor.

Those who bake sourdough are familiar with retarding fermentation for flavor development. But that typically occurs during final fermentation after the yeast has mostly finished its job of expanding the dough. Contrast this with the Pain a l’Ancienne technique where the yeast doesn’t get a chance to metabolize all that much from the get-go, allowing the amylase enzymes to break down the starches into sugars and letting the bacteria do their thing in producing organic acids and other by-products.

With the delayed fermentation technique, we mix with ice water; that’s right. Ice water.

The end result is that lots of sugars are released into the dough – more than the yeast can metabolize – and the result is a relatively darker crust due to the sugars caramelizing and a much more rich flavor from the organic acids released by the bacteria! So here’s the technique…

I highly recommend using a mixer for this technique. This will serve two purposes:

  1. It will take a lot less time than mixing by hand and doesn’t give the dough a chance to warm up significantly.
  2. It allows you to get some good gluten development before you put the dough into the fridge.
  • First off, mix all the dry ingredients together with the paddle attachment.
  • Make ice water and make sure you make enough that will meet your recipe’s requirements.
  • Attach the dough hook, then add all the ice water needed for your recipe to the bowl.
  • Starting with the slowest speed, start bringing all the ingredients together. Once the dough starts to come together, stop the mixer, then scrape down the sides of the bowl. Continue mixing until there are no dry ingredients. In some cases, you may have to scrape the bottom of the bowl and flip the dough to make sure you get everything.
  • Turn the mixer up another notch to work the dough. Let it run for at least two minutes or until the dough starts climbing up the hook. That should give you plenty of gluten development to start with.
  • Transfer the dough to a sealable container. I put my dough in a glass mixing bowl that I then place in a jumbo Ziploc bag.
  • Put the dough in the fridge for 8 to 24 hours. It will probably rise just a tiny bit, but nothing significant.
  • Remove the dough from the fridge and allow it to almost double. This can take anywhere from 2 to 4 hours.
  • Divide and preshape. Bench rest for 20-30 minutes until the dough has relaxed enough to be shaped.
  • Shape the dough into your desired shape and final ferment. This can take anywhere from 1 to 3 hours depending on the hydration and your ambient temp. My baguettes this morning took only 45 minutes for final fermentation. Poke test the dough for readiness.
  • Bake as normal.

Though I listed a bunch of steps, the process isn’t all that complicated. But the results are astonishing. This process is a keeper!

Don’t Just Fold Your Dough!!! STRETCH and Fold It!

This is going to be a short one…

After reading lots of forum posts from people saying things like, “I stretch and fold my dough like Ken Forkish says in Flour Water Salt Yeast, and my dough still seems like batter,” then seeing replies from other folks about lowering hydration, I thought I’d address it here.

Before you even think about playing with hydration numbers, look to your stretch and fold technique first. Most beginning bakers only fold the dough, but they don’t actually stretch it. You have to stretch your dough to its extents without tearing it, then fold it over.

For example, look at the picture to the left. As you can see, I’m really stretching the dough. And though it’s difficult to tell from the picture, I’ve actually pulled the dough out about 12″ from the base dough ball. Then I folded it over the main mass. While stretching the dough, I could feel the dough strengthening.

Also, another point of confusion with stretching and folding dough is the number of times you should do it during a session. As a rule of thumb, I will do stretches and folds until the dough no longer wants to be stretched, and as I stretch the whole dough mass wants to come along. For the stiffer, lower-hydration dough, that could be 3 to 4 stretches and folds. But for wetter dough, like the 82% dough shown in the picture, that could be 12-15 times!

Forkish talks about turning the dough over onto its folds after the end of a folding session. You really can only do that when you’ve created lots of tension through stretching.

What about protein content?

Though related, it’s a slightly different topic and yes, a soupy, soppy dough could be the result of using flour that can’t support the hydration levels called for in a recipe. But I’ve found that developing dough strength – or lack thereof – tends to be the culprit.

A New Way to Bake?

The other day, I watched a YouTube video by FoodGeek who did an experiment in which he turned his oven off during the first 20 minutes to see how it affected oven spring. He apparently learned it from a bakery that swore by this method. The results of the experiment were pretty amazing. In both cases (Dutch oven and baking stone) where he turned his oven off, the oven spring with both loaves was magnificent, especially with the Dutch oven loaf that had huge holes.

I was going to do that myself with my latest bake but instead decided to just lower the temp of my oven during the first 20 minutes. The reason for this was that my oven doesn’t retain heat very well, so turning off my oven entirely would cool it down way too much for my liking. And the results? well, they were pretty amazing as you can see in the pictures above.

The first thing I noticed when my loaf came out of the oven, was that it was nice and puffy all around. Compare that to this loaf that I baked earlier from the same batch of dough:

No doubt, that has a great oven spring as well, but you can tell that it’s not quite as much as the loaf up top as its ends slope down a little more severely though both have excellent crumb structures.

Here’s the technique I used:

  1. Preheat oven to 485°F for an hour to ensure my stone has come fully to temp.
  2. 5 minutes before baking, add water to my steaming container to make sure the loaf enters a steamy environment.
  3. Quickly transfer the loaf to my stone.
  4. Immediately turn the oven down to 400°F and set the time to 20 minutes.
  5. After 20 minutes, remove the steaming container, vent the steam, then bake at 425° for 40 minutes until the bottom third of the crust is a deep mahogany in color.

So why do I think this works so well? I think the main reason is that the lower temp means the loaf comes up to temp much more slowly, which allows the yeast to stay in their super-active zone (between 90°F and 140°F when they begin to die off). Combined with the steamy environment, that lets the loaf expand – a lot!

Admittedly, I’m going to have to do this a few more times. I’ll be making baguettes next, so I’ll attempt the technique with those. I’ll keep you posted!

Happy Baking!

A “New” Steaming Method

When I started making artisan bread, I thought it was weird that to get a crispy crust you needed to bake with steam. It seemed so… contradictory. But, as I later learned, steam allows the dough to expand, preventing the crust from hardening too soon and promoting a full oven spring. Once the steam is removed, then the crust is allowed to set and harden. In the end, the crust is comparatively thinner because it wasn’t allowed to harden early. So you get a thin, crispy crust as opposed to a thick, hard crust.

After hundreds of bakes this past year, the seals on my ovens have started wearing out. I first noticed it a couple of weeks ago when my sourdough loaves, which normally get great oven spring, weren’t rising much vertically and by the time I’d remove my steaming containers, all the water would be gone and the loaves we much darker at that point than before.

After trying a bunch of things with my dough and process to correct the problem – to no avail, by the way – I happened to look at my oven seals and laughed. They’re pretty worn down which explained why I wasn’t retaining steam. Unfortunately, my ovens are older models, so I’m not sure if I can even get seals for them. No matter, I had to figure out a way to produce good steam in my ovens.

So I did a search and came across a bunch of different methods: Lava rocks in a pan. Cast iron skillet with boiling water (I was doing a variant of that, but using a broiler pan underneath my stone). Then I saw that one person used cheap, terry cloth shop towels soaked in water that she popped into the microwave before baking, then placed in bread pans. OMG! I knew I had to try it!

After trying it, I couldn’t believe how much steam this method produced, so I thought I’d share the process here!

Note that all this happens about 5-10 before I pop the loaves into the oven. This ensures that the dough enters a humid environment.

The Towels

It’s best to use terry cloth towels because they retain water much better than tea towels. When I first started using this technique, I used an old worn-out towel that I cut up. I have since purchased some cheap shop multi-purpose terry cloth towels from Home Depot for ten bucks. I use four of them for baking and the rest for cleaning. They work great!

Prep the Towels

Loosely roll up the towels into logs, place them in a microwave-safe bowl, and pour water over them to completely saturate them. Then pop them into your microwave and zap them for 4-5 minutes on high. They should come out steamy. If not, then zap them for another minute.

Transfer to Loaf Pans

Transfer the towels to loaf pans and pour any remaining water from the bowl over the towels.

Place the Pans in the Oven

I put my pans on the top rack of my oven to ensure they’re in the hottest part of it. The steam will come down from the top and envelop the loaves as shown. I also have a broiler pan that sits on the floor of my oven that I also put water into.

The Results

Thus far I’ve baked ciabatta and baguettes with this steaming technique and they’ve come out wonderful! But I knew that the real test would be to bake bread with a lot of whole-grain flour. The loaves to the left are 40% Kamut/10% Whole Wheat and 50% High-protein flour. The oven spring on them was incredible! I realize the loaf on the left is a little misshapen. That’s because of handling before baking, not because of the oven spring.

I’m just diggin’ this technique! Before I realized what was going on, I started thinking, Have I lost my touch? Luckily, I haven’t. But based on this, I really am going to have to save my pennies to get a dedicated bread oven.

Still Splitting Hairs

In my previous post, I quoted the following originally from a New York Times article:

Mitchell Davis of the Beard Foundation believes that the bagel, like ketchup, is a product ill served by current food trends. ‘‘The effect of artisanship does not always produce a better result…’

While that article focused on bagels, the same can be applied to bread. Having done a real deep-dive into ancient bread making techniques over the last several months, I’ve developed a sensitivity to innovating too much. As I mentioned in my article, when I bake bread based on traditional recipes, I do my best to stick to the traditional ingredients and techniques.

Take, for instance, the humble baguette. While technically, it has only been recognized as a specific loaf called a “baguette” for only a couple of hundred years, it is steeped in a tradition of French long loaves that date back a few hundred years. And in 1993, the French government ratified into law (known as the Décret Pain) the ingredients that define the class “pain de tradition Française” of which baguettes are a part, as being made of flour, water, salt, and yeast.

That said, there is a little grey area with the leavening agent as Article 2, Section 2 states:

Fermented with yeast suitable for breads (Saccharomyces cerevisiae) and a starter, in the sense of article 4 of this Decree, or either yeast or a starter;

That kind of opens the door to using a sourdough starter to leaven the bread. But the general interpretation of a “starter” seems to be more along the lines of using a poolish, which is a yeasted starter.

Now, why does this even matter to me at all? Simply because what I’ve learned about baguettes is that they’re not defined by their shape, but by their dough. I know, you see a long, thin loaf of bread with diagonal scoring along the length, and you immediately say, “baguette.” And I suppose that to the consumer, it doesn’t matter. But now, when I see “sour” or “sourdough” preceding “baguette,” I know, based on my research, that loaf is technically “pain au levain” or bread risen with a levain.

Furthermore, circling back to “the effect of artisanship does not always produce a better product,” I’ve often found myself innovating for innovation’s sake. It’s not that the end product is bad by any means. But at least for me now, when I call a certain bread a particular type, I want to make sure that I’m not coloring outside the lines.

One of the things I was concerned about when making my baguettes was the mix of flours I was using. I typically use a combination of 60% high-extraction flour and 40% AP flour – both unbleached, so the crumb of my bread tends to be on the brown side. Luckily, the Decret Pain states in Article 2, Section 1:

Made only from a mix of wheat flours suitable for making bread, safe water and cooking salt.

I admit that I’m being a bit parochial. It’s actually a little out of character for me to so strictly observe tradition. If you knew me as a contemporary Catholic liturgical musician, you’d know that I’m not much of a traditionalist. Even in my career as a software engineer, I forged my path in technology as a visionary and innovator.

But with bread, it’s a completely different story. Don’t get me wrong, I have a few different types of bread that I make that are innovations on traditional recipes. But when it comes to making traditional bread, I’m pretty parochial. I have a real “if it ain’t broke, don’t fix it” attitude.

Some might say it’s limiting. But there’s a lot to be said about mastering the traditional techniques. As I journey forward in bread making (and yes, I have aspirations of eventually doing this professionally), I want to make sure that my technique is steeped in tradition.

Plus, some of the techniques are just downright difficult to master. Take the ancient Italian bread, Pane di Altamura, for instance (shown to the left). This is 100% durum wheat bread from the Altamura region of Italy. It is a very distinct-looking loaf, sporting a pompadour of sorts. The dough itself, like pretty much all Italian bread, is uncomplicated, as is the dough processing. But learning to shape that bread is a different story altogether. It has taken me several bakes to even approach what it should look like.

There are no instructional videos that teach how to shape Pane di Altamura, so I’ve had to watch slowed-down videos, of which there aren’t very many. And though the bread is distinguished by the region where it comes from, different bakers achieve the pompadour in slightly different ways. But luckily I did run across a video that had a close-up view of how one baker shapes his bread and I’ve been using that.

The point to this is that with this particular bread, there’s really no room for innovation. I suppose I could eventually tweak things here and there, but before I can do that, I need to master the basics first.

Speaking of tweaking, a few months ago I had a realization that I got to the point where I was innovating so much that I wasn’t getting consistent results. I was making tweaks everywhere. But it wasn’t until I stopped myself and stuck with a method that I started getting consistent results.

This was evident in my baguettes. I was trying a lot of different techniques and my results, while tasty, weren’t consistent at all. I now focus on two production methods depending on when I want to bake. I use a pointage en bac or slow rise method for flavor development that I learned from Chef Markus Farbinger (which is also my normal two-day method) or, if I want a same-day bake and a more grain-forward taste, I use the baguettes de tradition method that Jeffrey Hamelman presents in his book “Bread.”

But in both cases, I use the same shaping technique that I learned from Chef Farbinger. Now, no matter what dough development technique I use, my baguettes come out looking the same. It’s comforting because as simple as the ingredients are in baguettes, they’re probably the most challenging bread to get right. And shaping is absolutely critical, which is why I use the same technique for both dough production methods. Besides, if it’s good for a master chef, it’s certainly good for me. 🙂

Don’t get me wrong. I’m not at all against innovation. But as with anything in life, you have to be well-versed in the foundational aspects of different bread before you can branch out. But here in America, it’s almost expected to “do your own thing” and there’s this seemingly pervasive attitude to innovate for innovation’s sake. And I think that’s where many people run into the proverbial brick wall or worse – they come up with some pretty funky creations (the funkiest I’ve seen are blue croissants).

At least for me, I do heed those words Mitchell Davis wrote: The effect of artisanship does not always produce a better result.

Arnold Palmer: “The Road to Success Is Always Under Construction”

Those who know me know I have kind of an obsession about golf. I learned the game kind of late – at 18 years old – but from the moment I picked up a club, I was hooked. Absolutely hooked. I even moved to Las Vegas in the hopes of eventually becoming a PGA teaching pro. That didn’t happen for me for lots of reasons but my love for the game of golf has never wavered.

One of my golf idols throughout my playing career has been Arnold Palmer. To me, he was a man of the people. Though he had four green jackets from winning The Masters four times, he was always known to be totally accessible to his fans. But not only that, he carried a wisdom with him that he readily shared.

Arnie’s words of wisdom that I shared in the title of this post have inspired me through the years. I don’t remember when he said them (and I realize this quote is also attriuted to Lily Tomlin), but I remember that when I heard them, it was during a particularly difficult time in my life where I was struggling to figure out what I wanted to do. And upon hearing those words, I was inspired; inspired to keep on charging forward, to keep on working. To never quit.

I’m at that point with my bread making right now. I’ve started working with more difficult formulations and techniques and while the bread is coming out delicious and to the untrained eye it looks fine, I’m not satisfied. I’m not getting an ear with my many of my loaves as of late and it bugs me.

But this afternoon, I sat down at the TV to watch the Arnold Palmer Invitational golf tournament and right before a commercial break, they showed a statue of Arnold Palmer with the quote right next to it. I just smiled because I knew that though I’m frustrated right now, I just have to keep on working at it.

Plus, I realized that I should know better. I’m working with much more advanced formulations and techniques and I need to practice before I get the results that I’m expecting I should get. It’s a road that’s definitely under construction!

Happy Baking!

Flour Makes SUCH a Difference!

Look at the loaves above. I just pulled the loaves in the left-hand photo out of the oven. I baked the loaves on the right about two weeks ago. I used the exact same process for each set: Long autolyse, 24-hour bulk ferment, 24-hour final proof. The difference? The loaves on the right used 30% King Arthur 100% Whole Wheat flour, while the loaves on the right used 30% Azure Standard 100% Whole Wheat Flour. The Azure Standard flour is Unifine milled, so it’s A LOT finer. The KA flour is pretty smooth, but you can definitely feel the bran particles in it.

When I was shaping the loaves on the left yesterday morning, I knew I wouldn’t get an ear. I knew the oven spring would be good, but I knew I wouldn’t get an ear just the same. The reason, is that I couldn’t develop a really taut skin without tearing the dough. And no, the dough wasn’t at all over-fermented. I wouldn’t have gotten the spring that I did if the dough was over-fermented.

But as I’ve mentioned previously, course, whole-grain flour contains lots of bran particles that cut the gluten strands. You have to be extra, extra gentle handling the dough! For instance, I did six rounds of stretch and folds, but by the third set, I had to switch to coil folds because I knew how delicate the dough would be due to the bran in the flour.

By no means is this a complaint. I was expecting this. But it is definitely a lesson in how different flour types – or brands of the same flour type – affect the resulting loaves. That said, I’m okay with how the loaves turned out. But I have to admit that I would’ve been totally pissed off if they didn’t spring. It would’ve indicated a break in my technique and that’s a totally different story! 🙂

Want Great Oven Spring? Don’t Proof Your Dough All the Way!

When I first started getting into artisan bread baking, like many, I sought out lots of help online in forums and from various blog posts. I’m so thankful for all the information that’s readily available, but I found that especially with final proofing (aka final fermentation), there’s a lot of misunderstanding or lack of clarity as to when your loaves are ready to bake.

Before I go on, obviously there are several factors that contribute to great oven spring including kneading or folding, shaping, and hydration. But I feel one area that’s oven overlooked is final proofing. If you get this wrong, the other factors won’t matter.

Admittedly, there’s a bit of instinct that you have to develop over time with knowing the right time to bake. And there are useful tests you can do like the finger dent test. But I thought I’d offer up a bit of a cerebral, perhaps intellectual discussion to provide a background.

Let me just start out by saying that you never want to fully proof your dough when you’re doing your final proof; that is, you never want to take your dough to the point at which the yeast has nothing to feed. The reason for this is that once you pop your loaf into the oven, there’s a huge increase in yeast and enzyme activity up to about 140° F. During this period of accelerated activity, the starches swell and gas production from that fermentation is super-accelerated, contributing to oven spring.

Now of course, hydration plays a huge role in this as well as a highly hydrated dough allows for better extensibility. But it’s that initial kick of the yeast and bacteria at the outset of baking that gets you your spring.

But that’s assuming there’s food for the yeast and bacteria…

If you take your dough out to 100% fermentation, there’s no more food left on which the microbes can feed. This is why over-proofed loaves barely spring up at all because it’s only the steam that’s working to extend the dough – not to mention that the gluten also breaks down and you lose all dough strength.

As Master Baker Jeffery Hamelman puts it in his wonderful book, “Bread: A Baker’s Book of Techniques and Recipes,” ϯ

As a rule, bread should not be 100 percent risen at the time of the bake. Just as we will fall onto our noses if we lean over 100 percent, so too will the loaves tend to collapse if they receive a full 100 percent proofing before the bake. It is difficult to quantify with unvarying certainty the perfect degree of rise, since there are so many variables involved; however, 85 to 90 percent rising is a fair approximation to begin with. With careful and consistent observation of each bread, the baker’s eyes and hands will soon learn the parameters that work best.

So now that we have a background on why we shouldn’t go to full fermentation, let’s put this within the context of the finger dent test. With the finger dent test, the conventional wisdom is that it is one of the most effective way of determining how ready – or not – your dough is to bake. I use it all the time. Essentially the way it works is this: You push the tip of your finger about a centimeter into the dough. If the dent pops back immediately and goes away within several seconds, your dough isn’t ready. If it springs back partially ϯϯ and the dent slowly goes away but not entirely, then it’s likely ready. If the dent stays put, you’ve over-fermented your dough.

Do you sense the “but” in this?

This is a great test and I use it for practically every loaf of bread I make. But because it’s inexact, it takes practice to get right, and is also highly dependent on the flour you use. Different flour and flour blends make the springiness factor a challenge. A strong flour will almost invariably be more bouncy than a weaker flour – at almost all stages of fermentation. A weaker flour, like AP will have a lot of give naturally and may fool you into thinking your proofing is done.

Unfortunately, the only way I know – and according to a few professional bakers I’ve both read about and spoken with – of determining a dough’s doneness is learning through trial and error. As Chef Markus Farbinger puts it, it takes time and practice to develop an instinct about your dough.

Essentially, there’s just no empirical way to teach this. Eventually, you’ll come to know the ultimate endpoint of the dough you make. But frankly, that’s half the fun! And who doesn’t need an excuse to bake?

Another thing to consider is that different loaves respond differently to the amount of proofing. Even though Chef Hamelman recommends 85 to 90 percent as a guide, that’s really only a rough approximation. With baguettes, I’ve learned to only take them to the lower end of that range, perhaps even short of 85%. There have been too many times I’ve ended up with flat baguettes because I’ve taken them too far in proofing. And it’s easy to do because baguettes don’t have that much internal structure built into their dough.

On the other hand, with boules and batards, I tend to take them a bit further. I’m personally not after numerous huge holes, but an even distribution of moderately-sized holes, so I’ll tend to take them to about 90% proofing. I realize that I’m playing with fire because that requires some careful monitoring before it’s too late. But because I use fairly high-protein flour I can afford to do this because their structures are strong.

As I mentioned above, this is one contributing factor to great oven spring. But because it is the last step before a loaf gets put in the oven, it is critical to get this right.


ϯ Hamelman, Jeffrey, Bread: A Baker’s Book of Techniques and Recipes (2nd Edition), John Wiley & Sons, Inc., 2013.

ϯϯ The important thing to note here is that the dent should spring back a bit but not totally go away. If the dent stays in place and doesn’t move at all, then your dough’s overfermented.