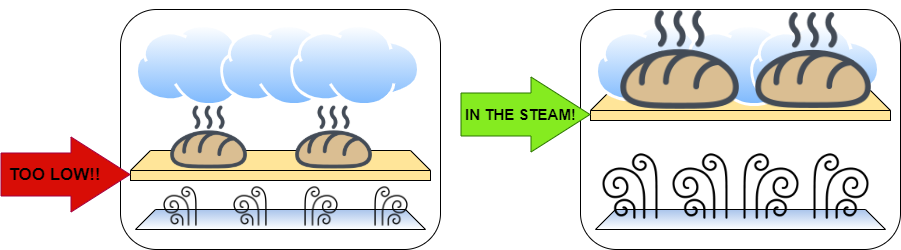
When I read Tartine Bread by Chad Robertson, he recommended using a Dutch oven for baking as that would create a steamy environment that promoted oven spring. He further asserted that as domestic ovens were designed to vent steam, he wasn’t able to trap enough steam to get a good oven rise.
Then I saw a video the other day comparing results baking with a Dutch oven vs. a baking stone. Luckily the guy didn’t say one was better than the other, but I totally disagreed with his conclusions that one is better suited for everyday baking (Dutch oven) and the stone is much better for baking multiple loaves. Irrespective of his results, when I saw his oven setup, it didn’t surprise me that his loaf baked on a stone didn’t have as much oven spring as his Dutch oven.
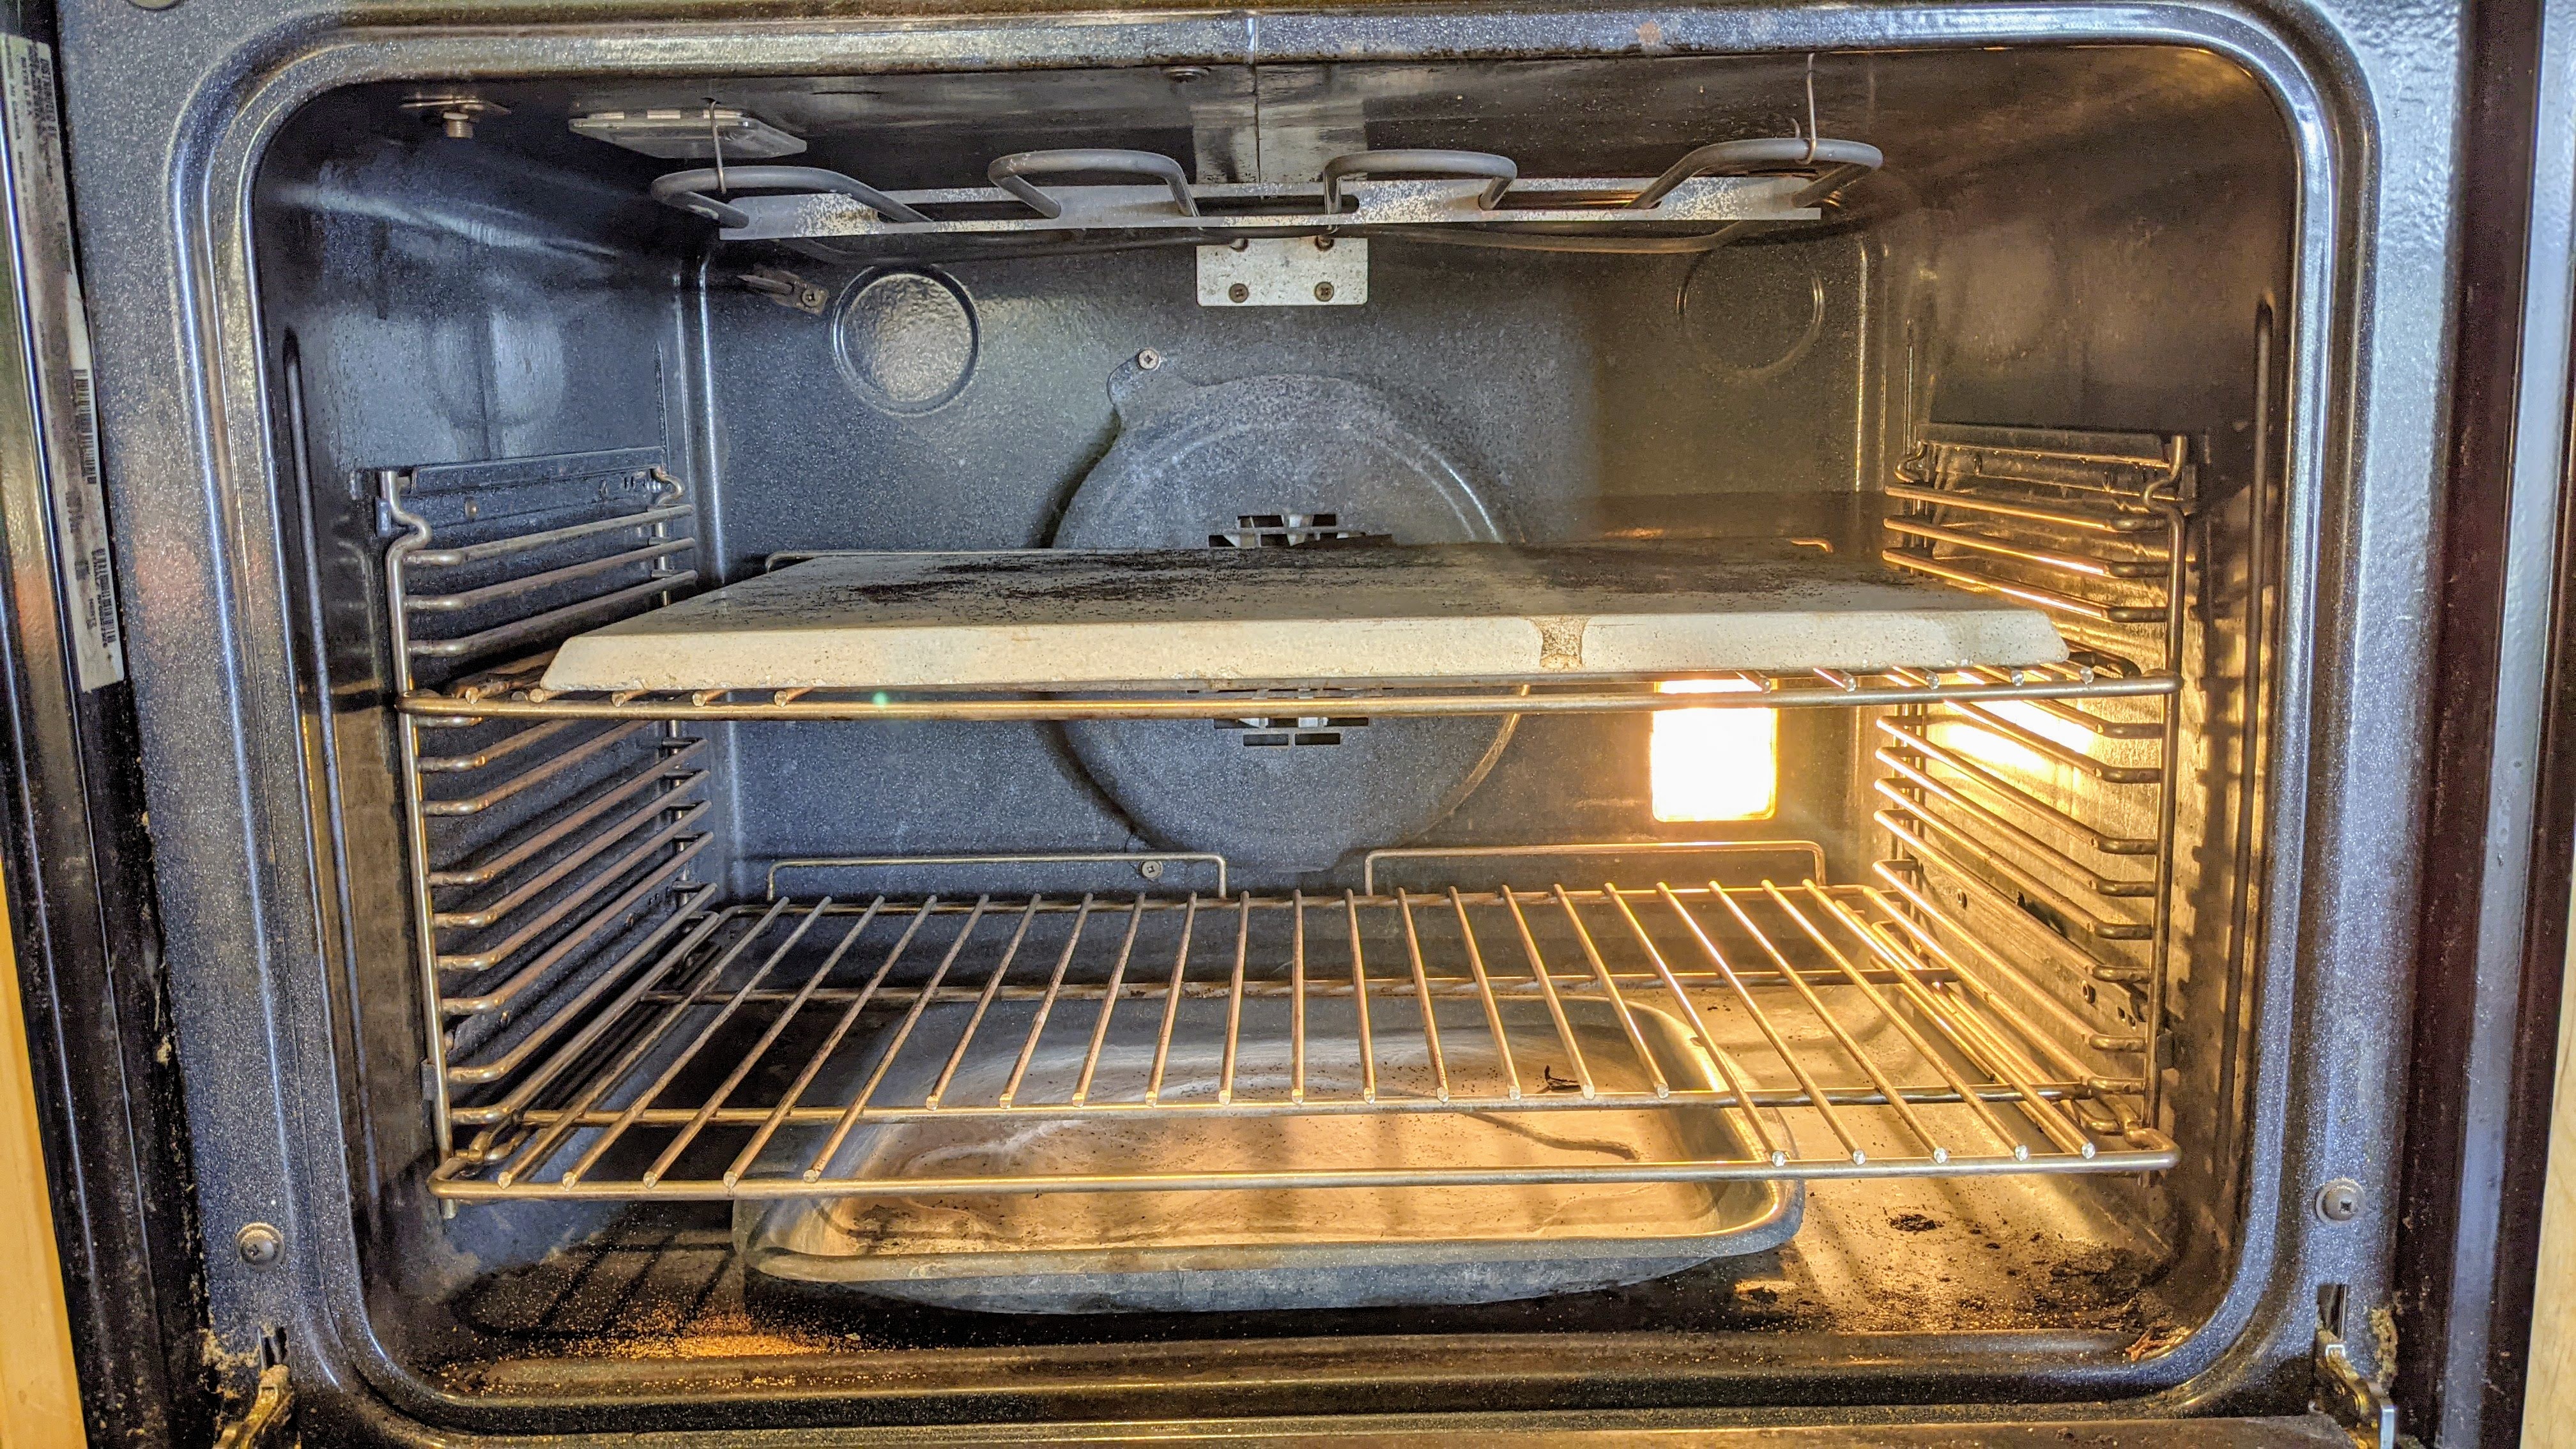
So… based on what Chad Robertson and on what that video showed, I have one thing to say: They probably didn’t set up their ovens correctly and have their stones appropriately positioned in the oven to catch the steam. It’s physics. Heat makes things rise, so the steam is going to collect in top half – or at least in the case of my oven – the top 30%-40% of the oven. If you have your stone too low, your dough will not get enough steam and your oven rise will seriously suffer. Take a look at the diagram below:
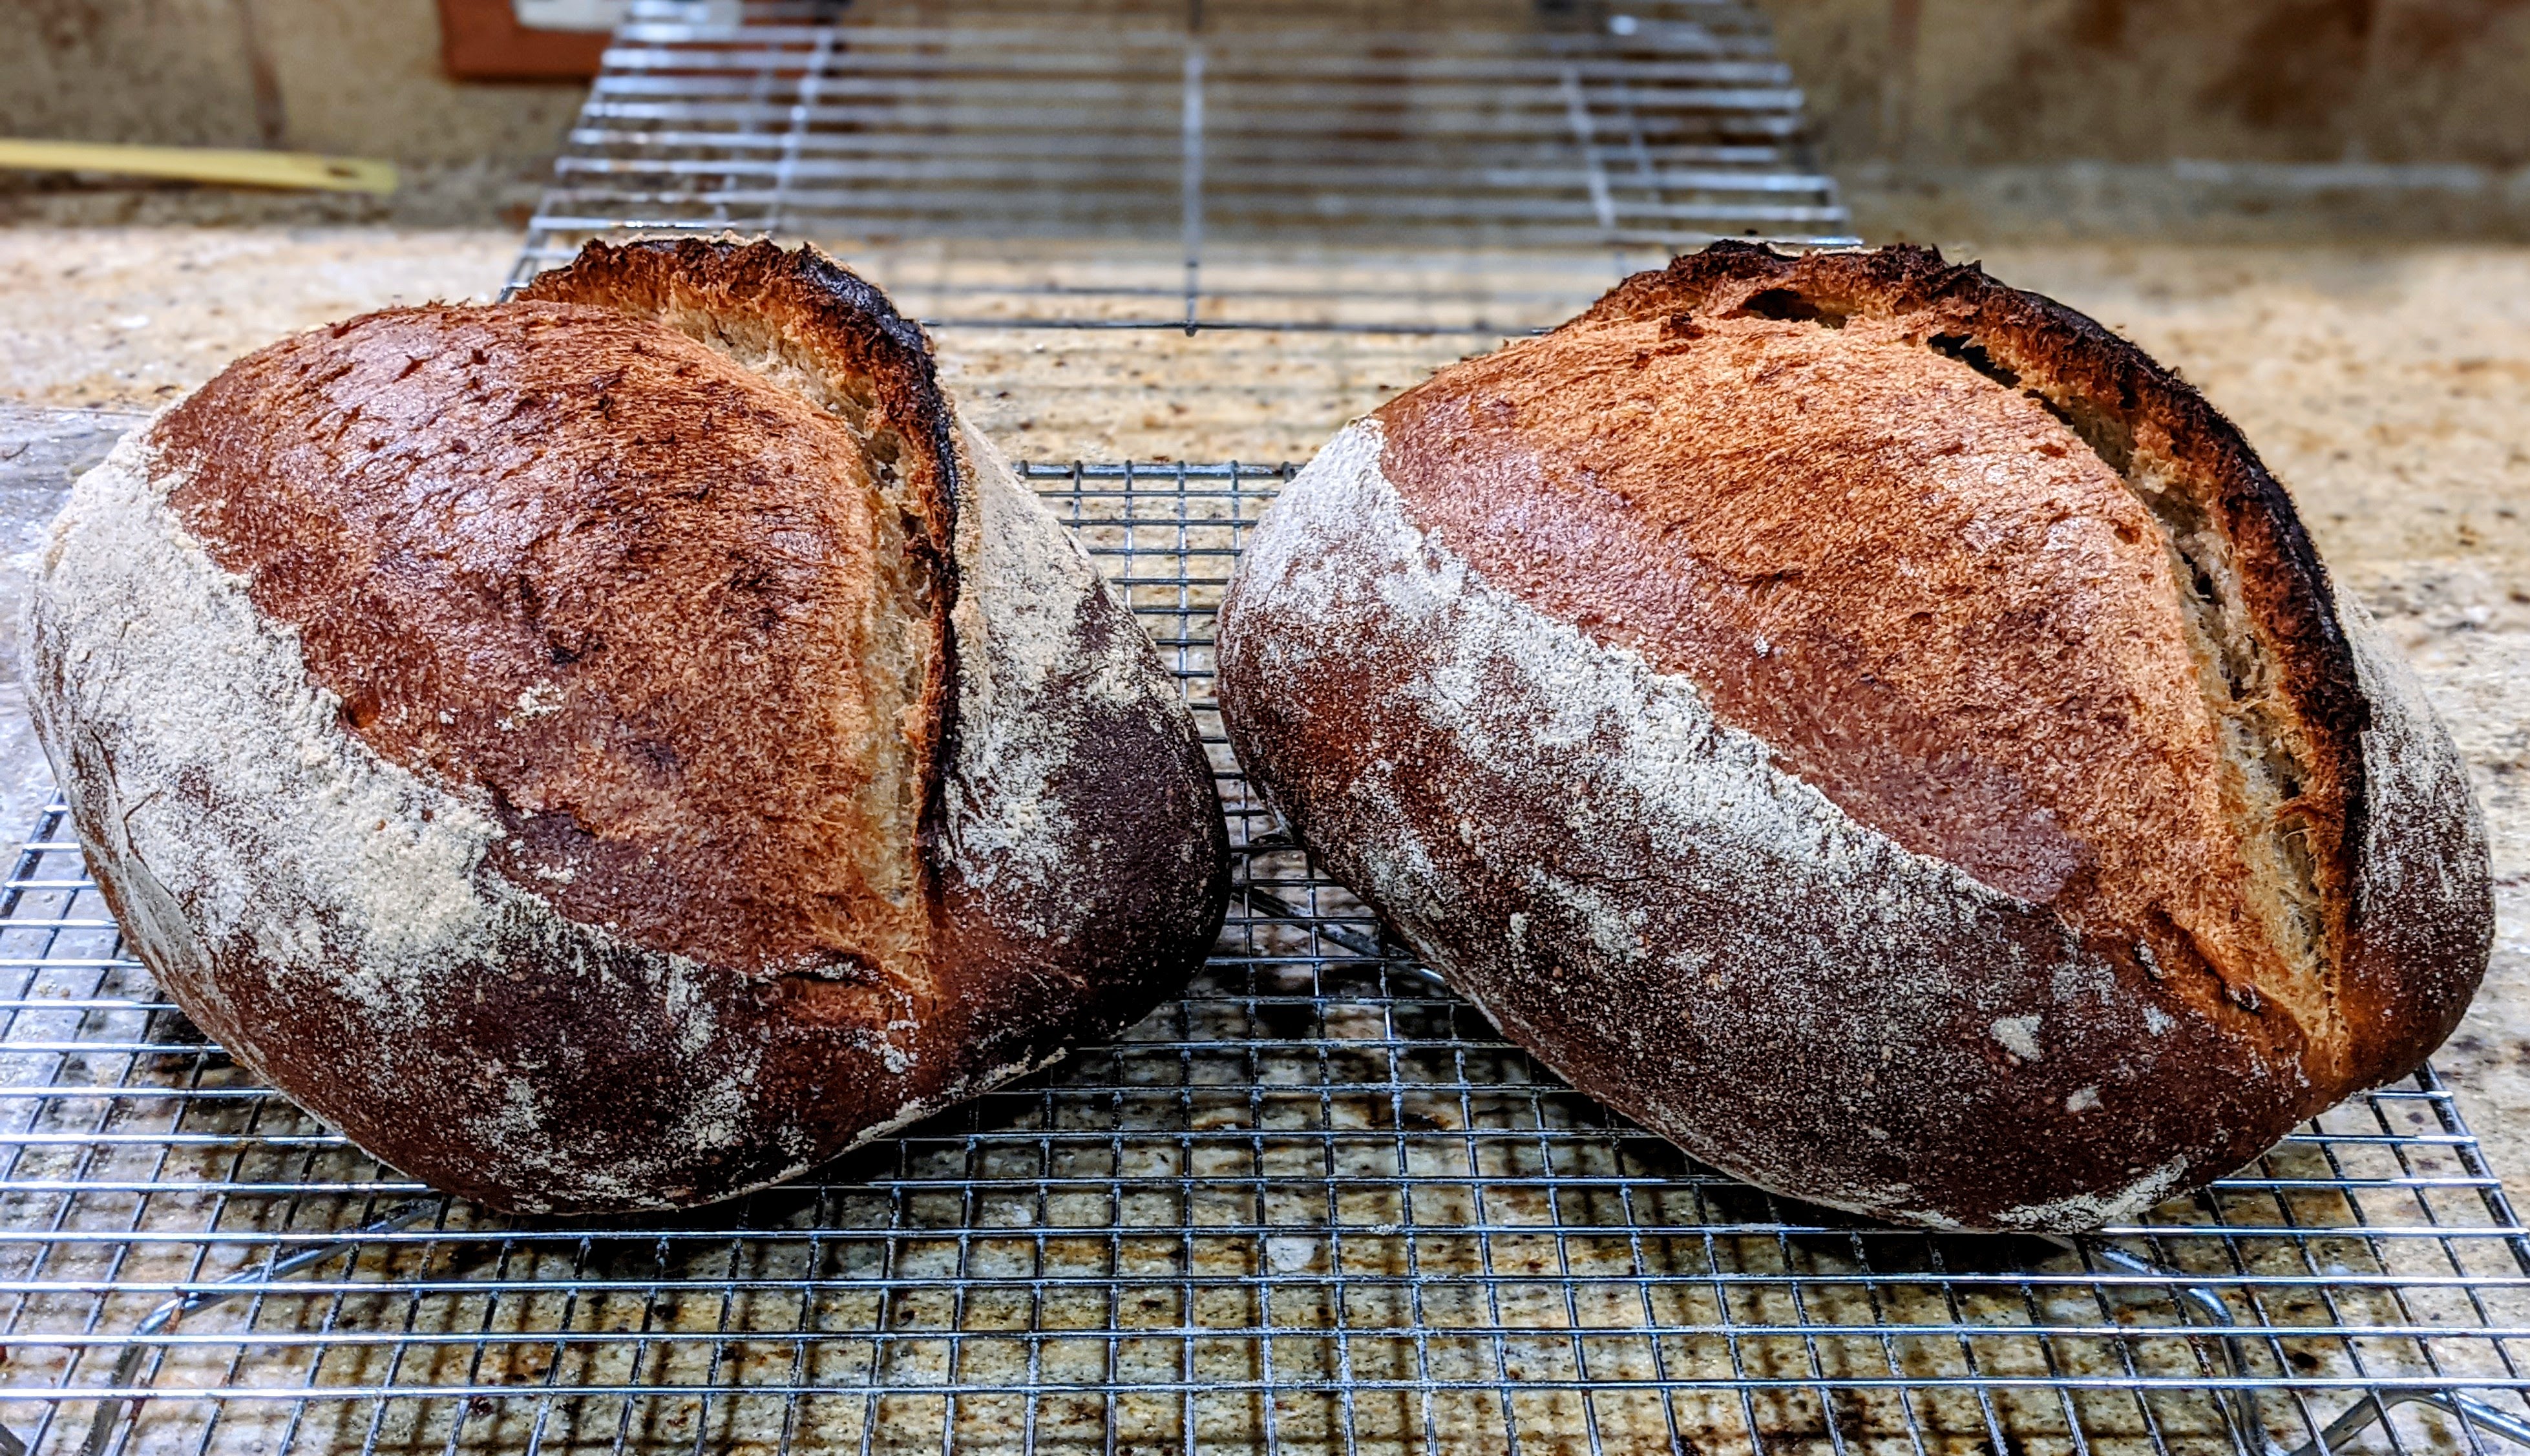
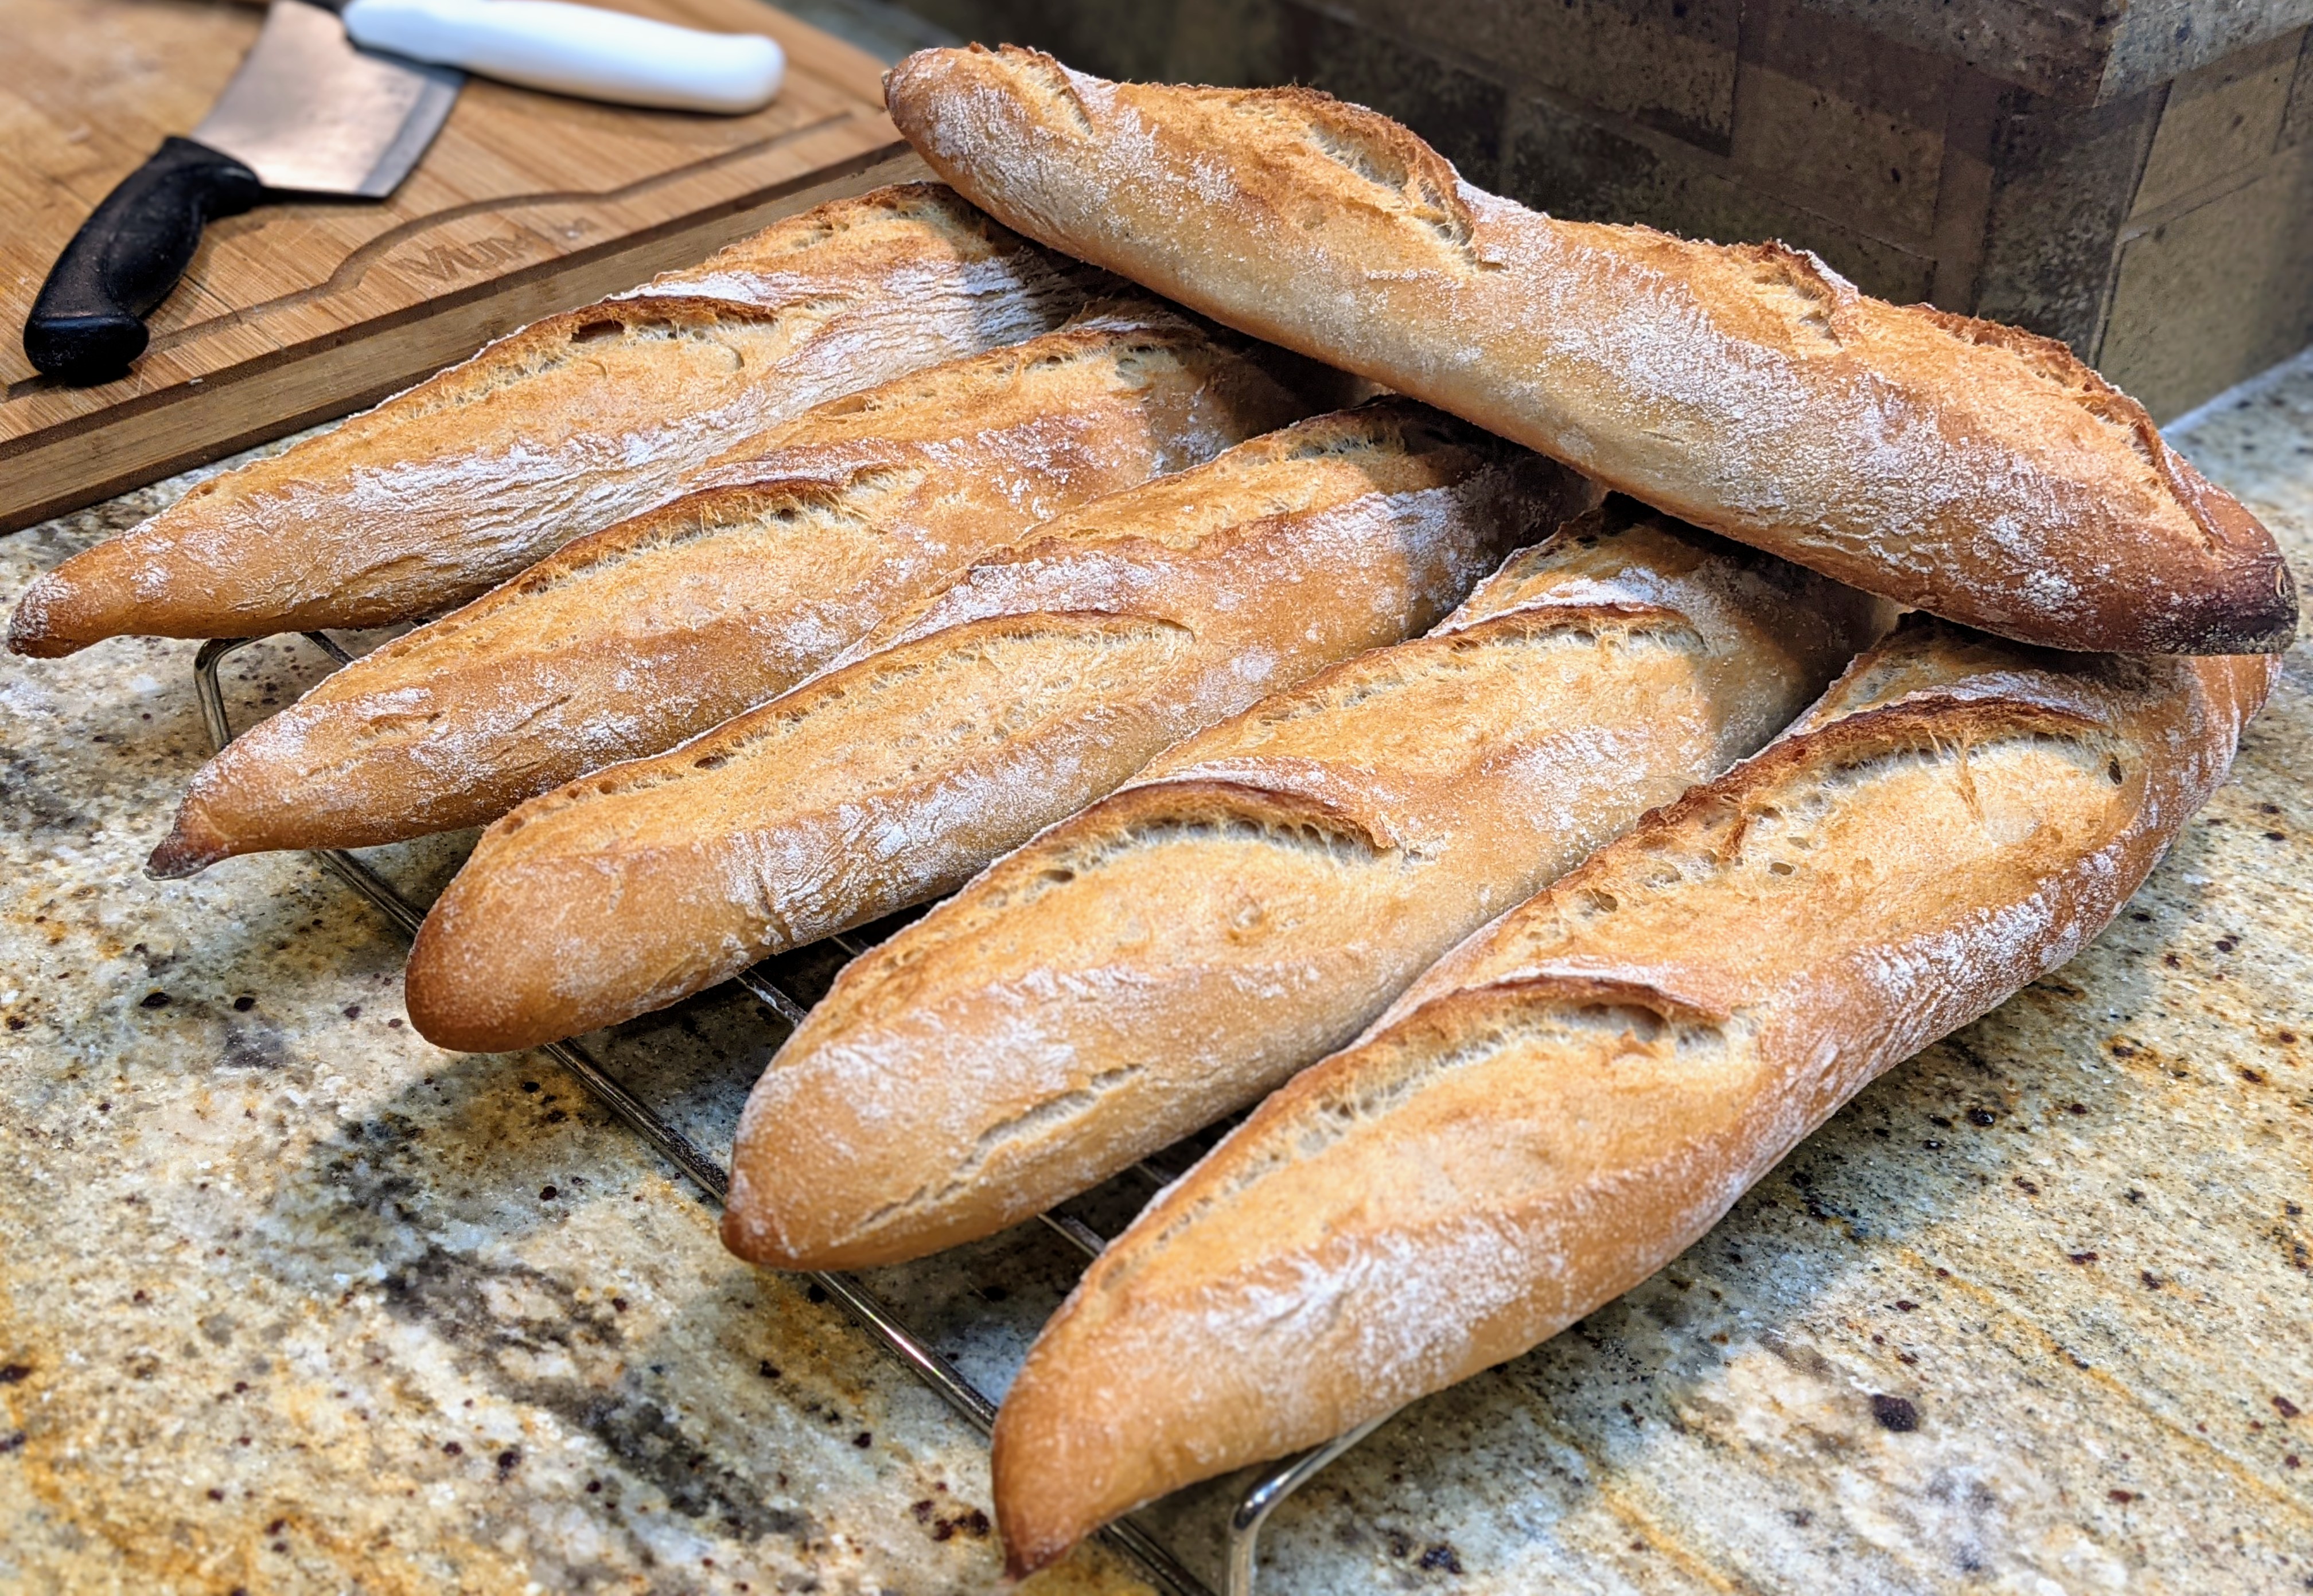
With my stone correctly positioned, I get GREAT oven spring because my baking stone is placed so that my loaves catch the steam! Check out the bread that I’ve made in the last few days…
And here’s how my own oven is set up:
When I bake ciabatta and baguettes, I move the stone one notch up as they are low-profile loaves and I want to make sure they’re in the steam. In addition to my broiler pan, I also use two loaf pans with water-soaked towels in them to provide even more steam. I had to do this because my oven is very good at venting moisture, so I have to produce more steam at a faster rate than the rate my oven can exhaust it.
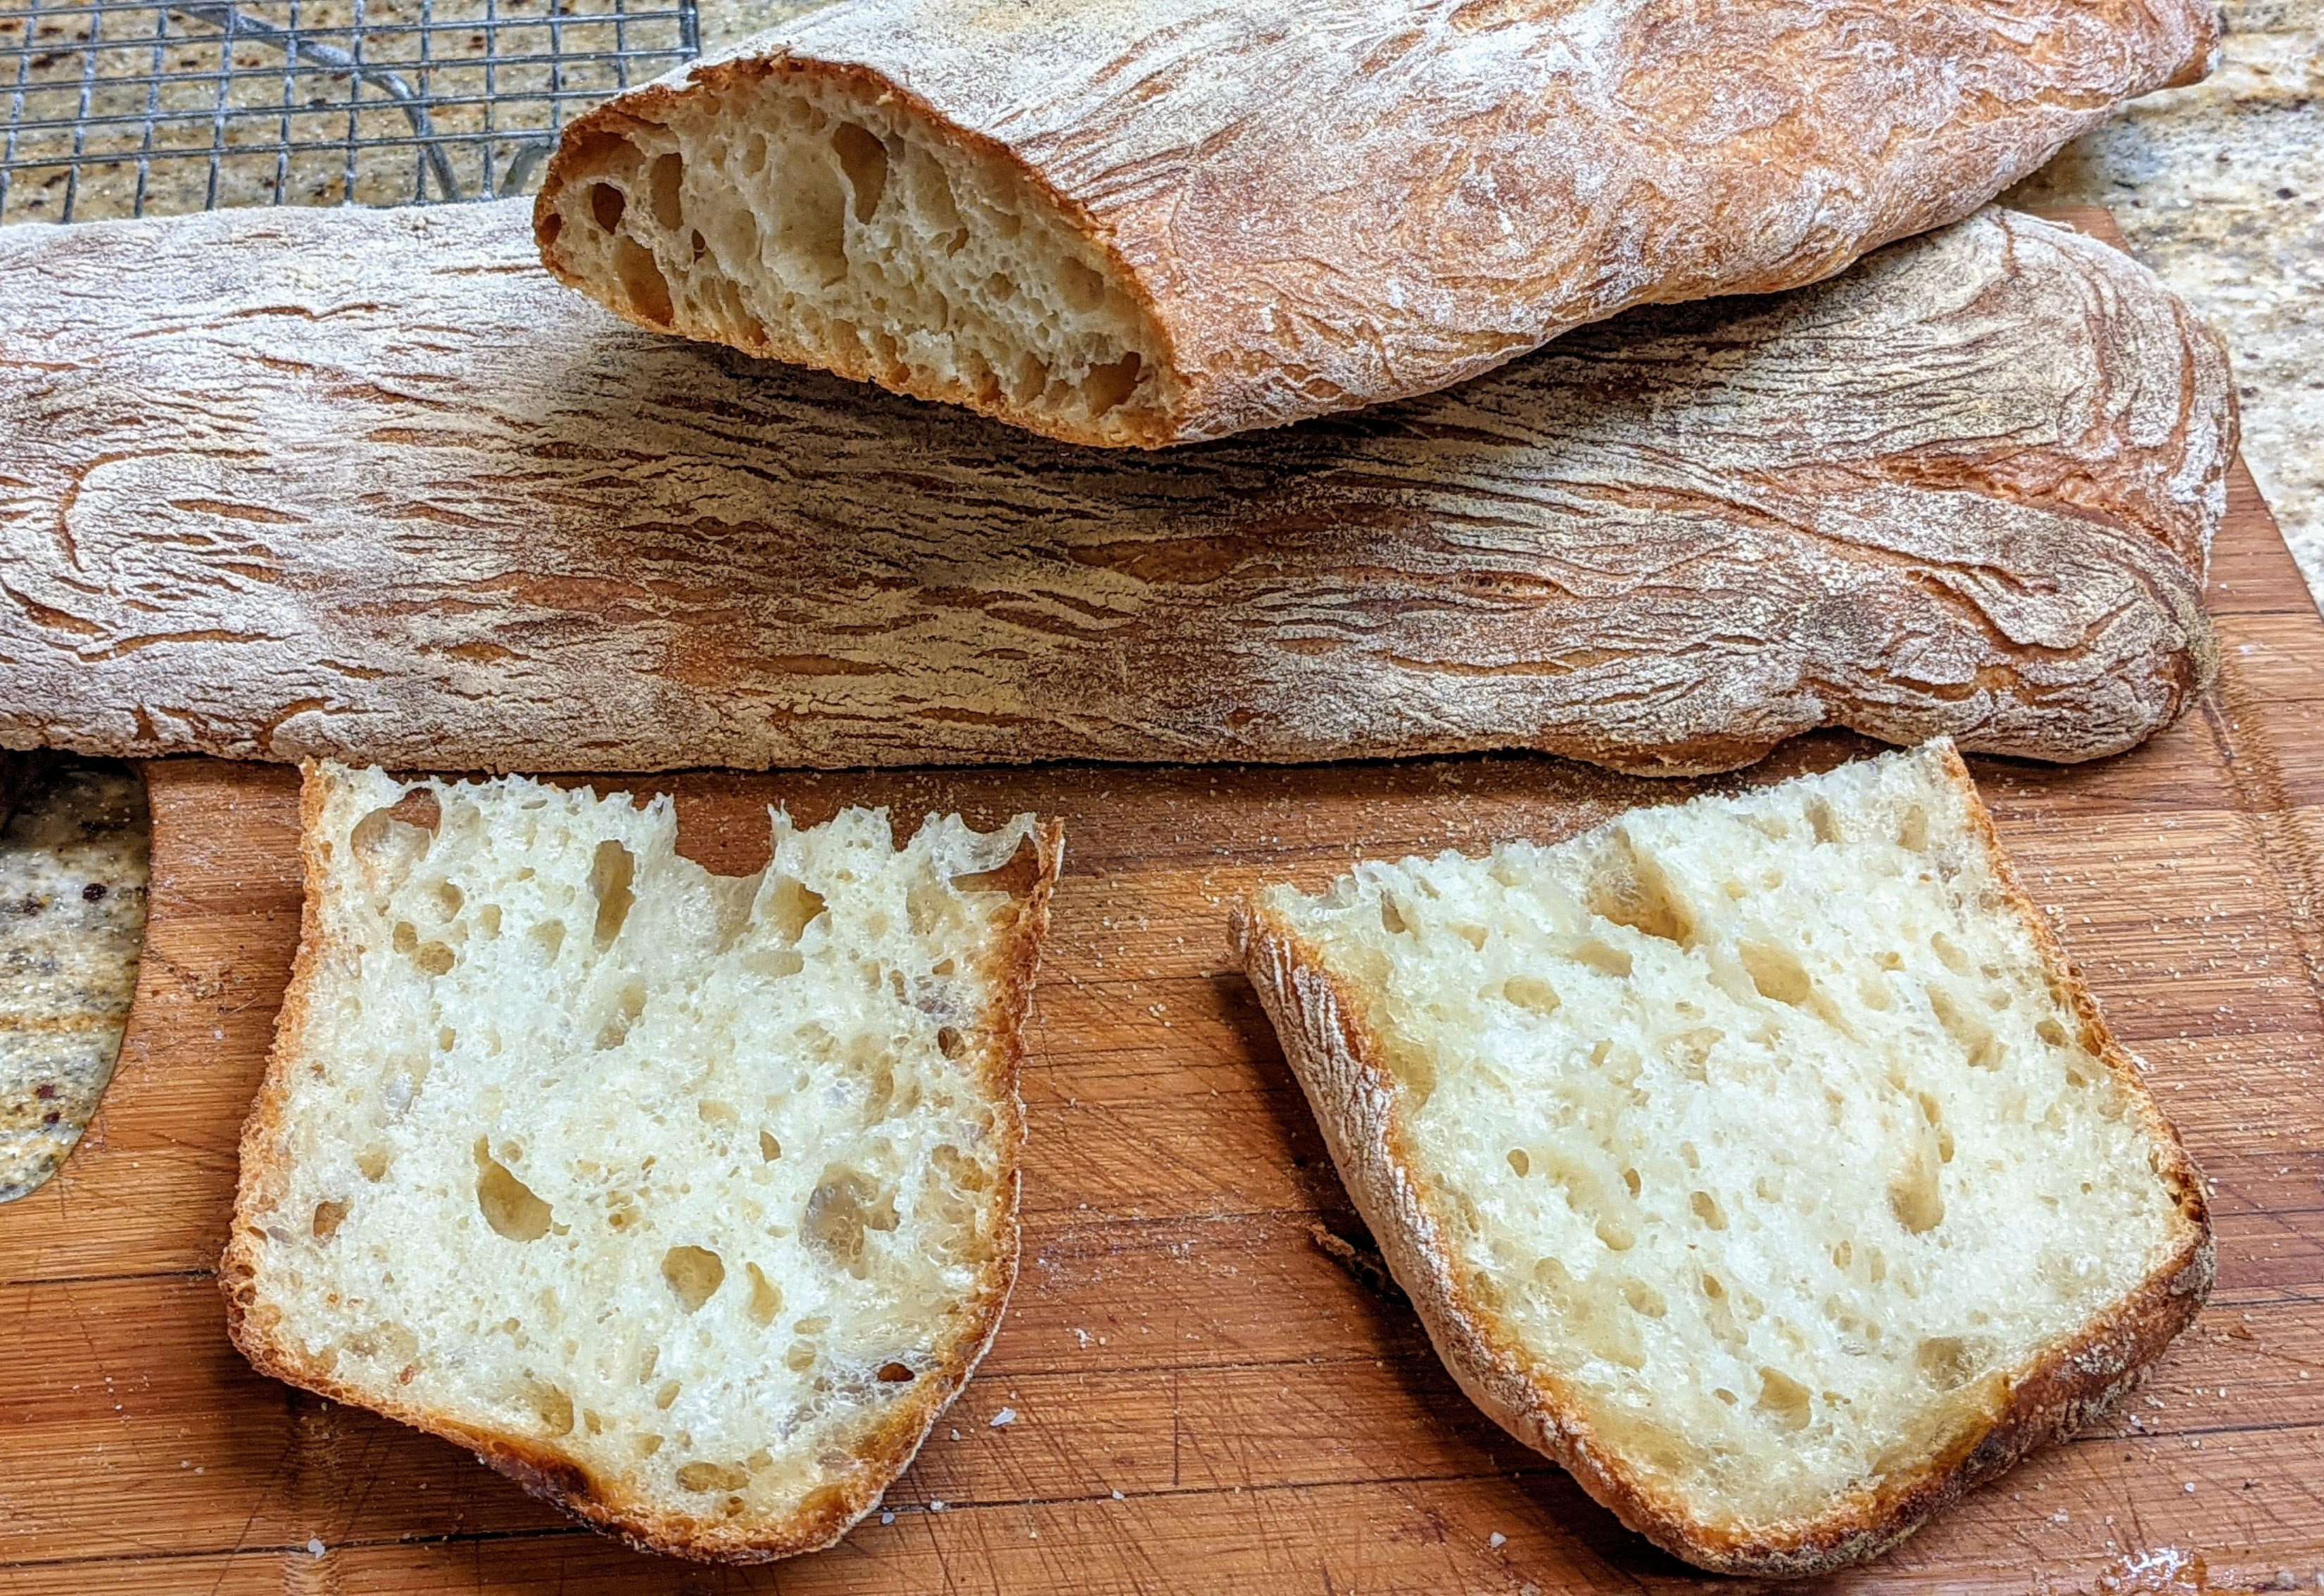
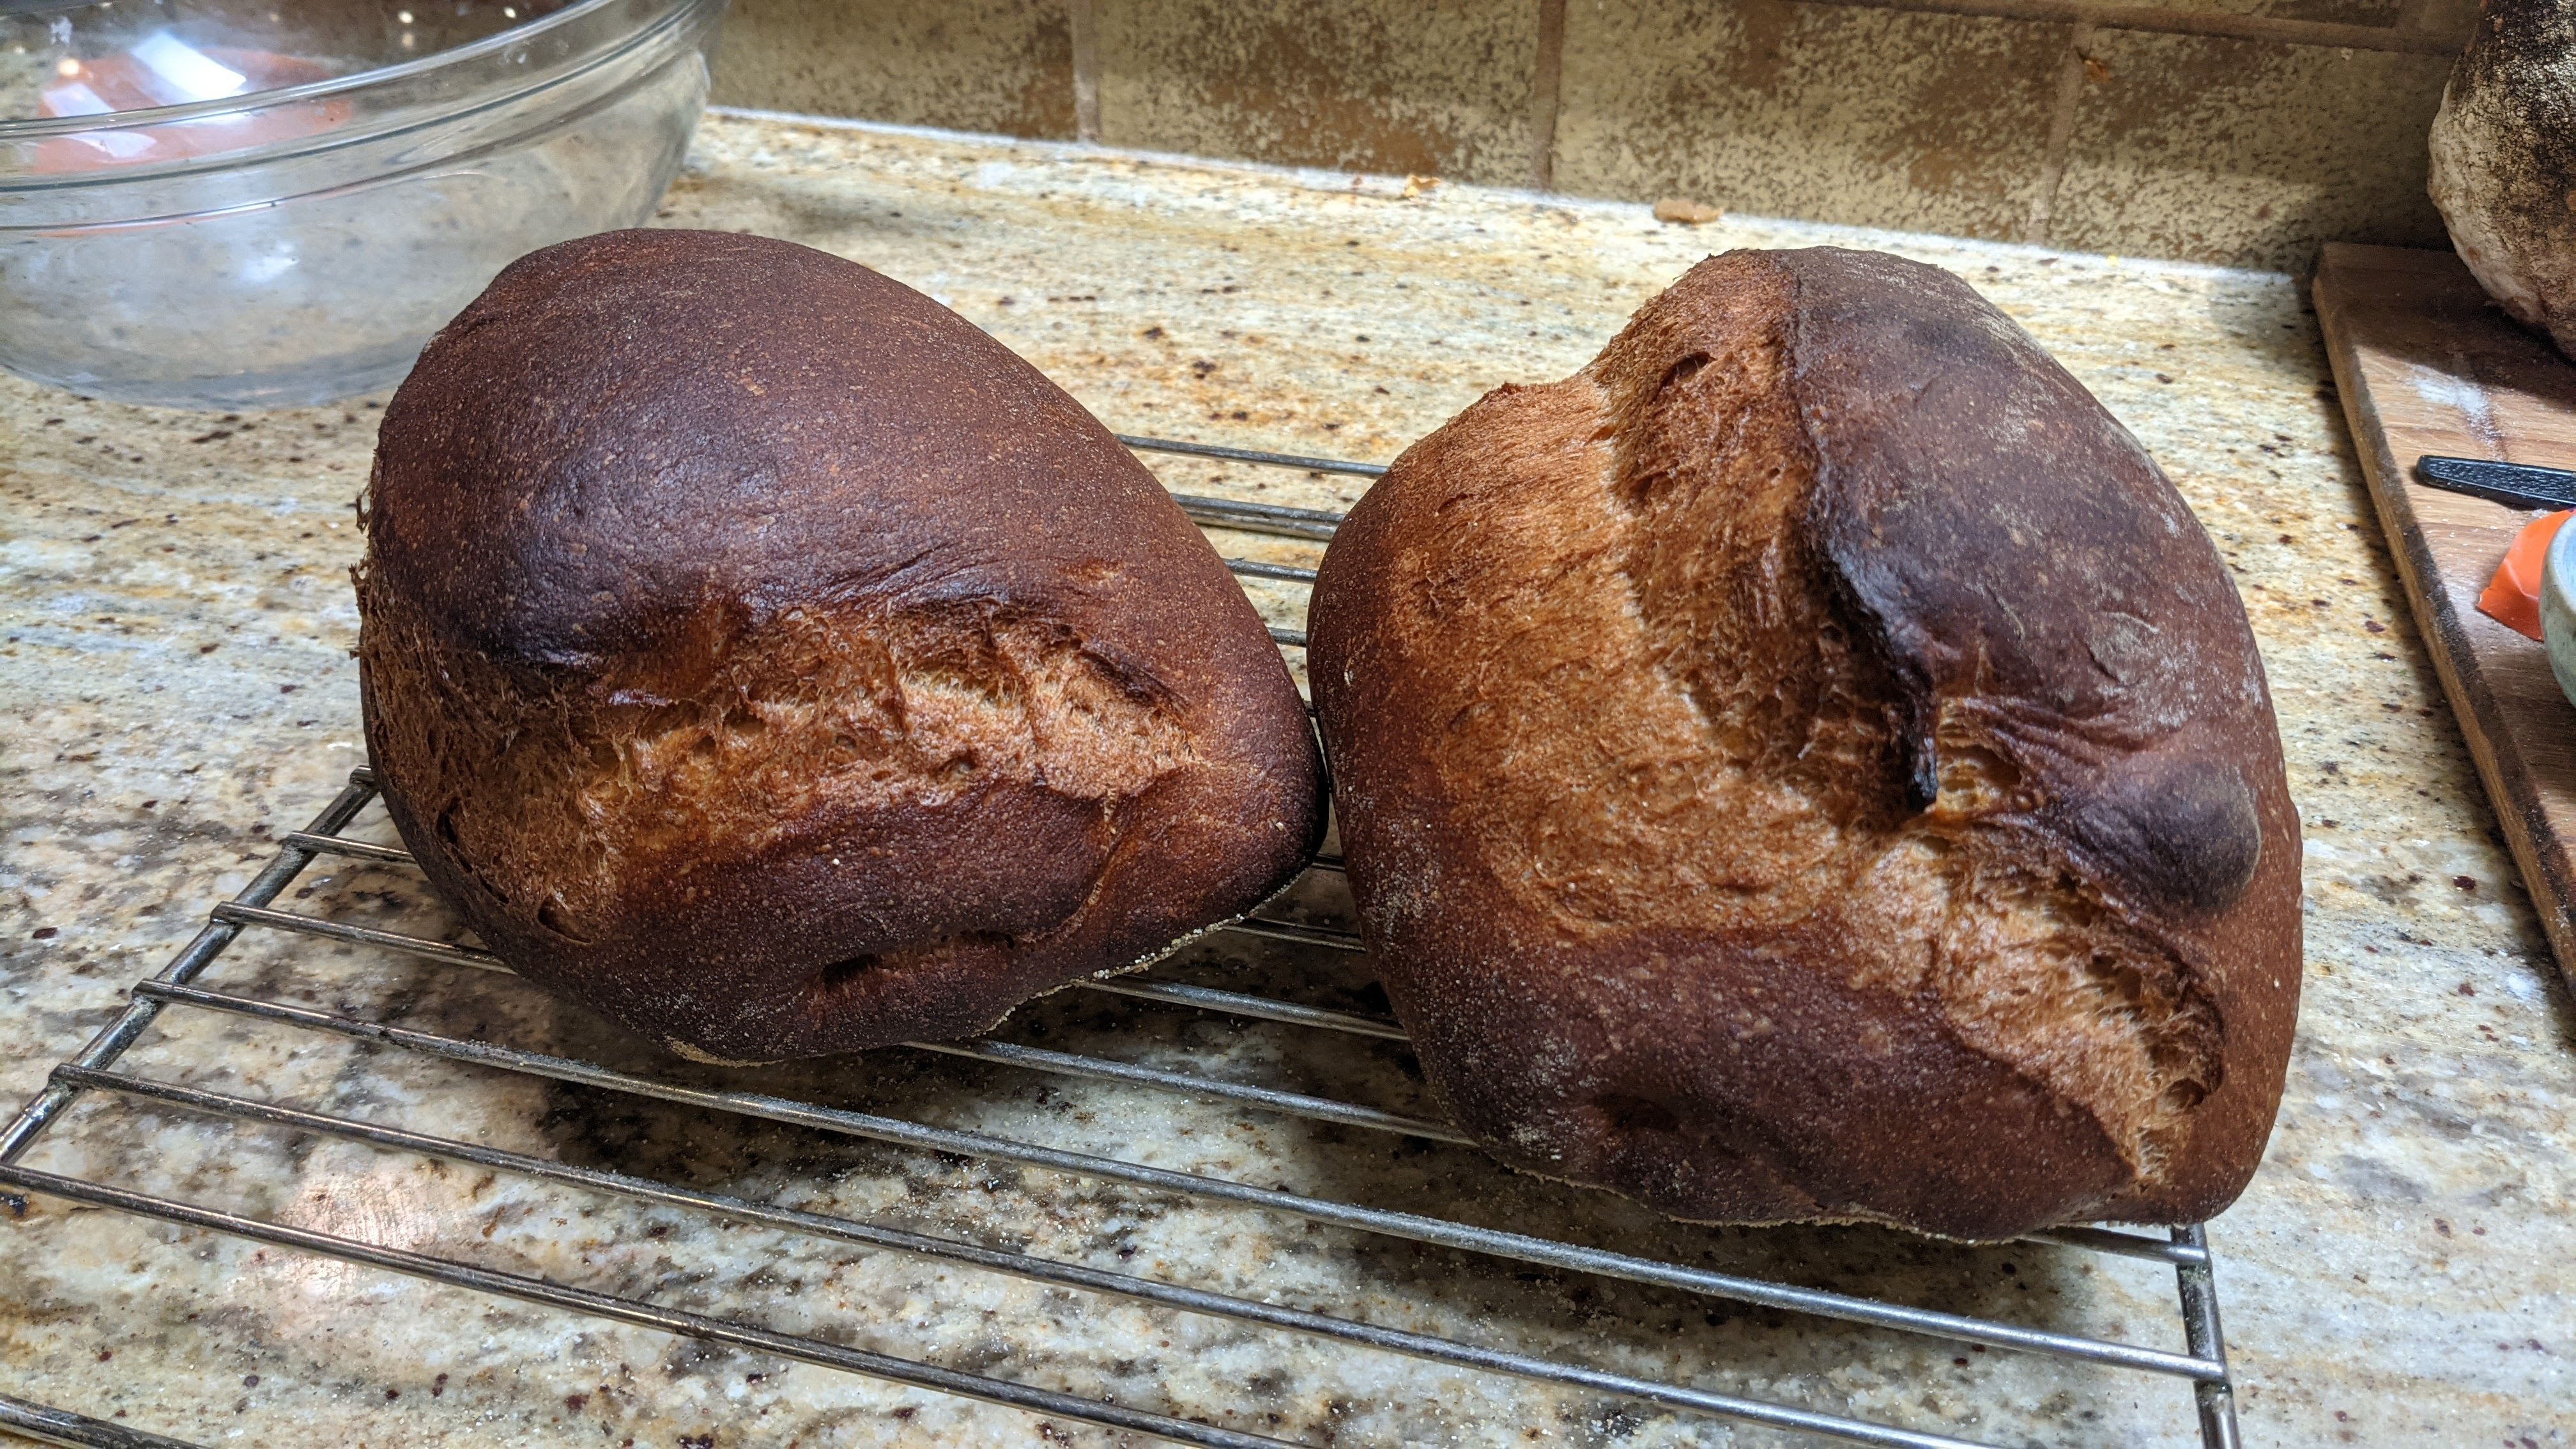
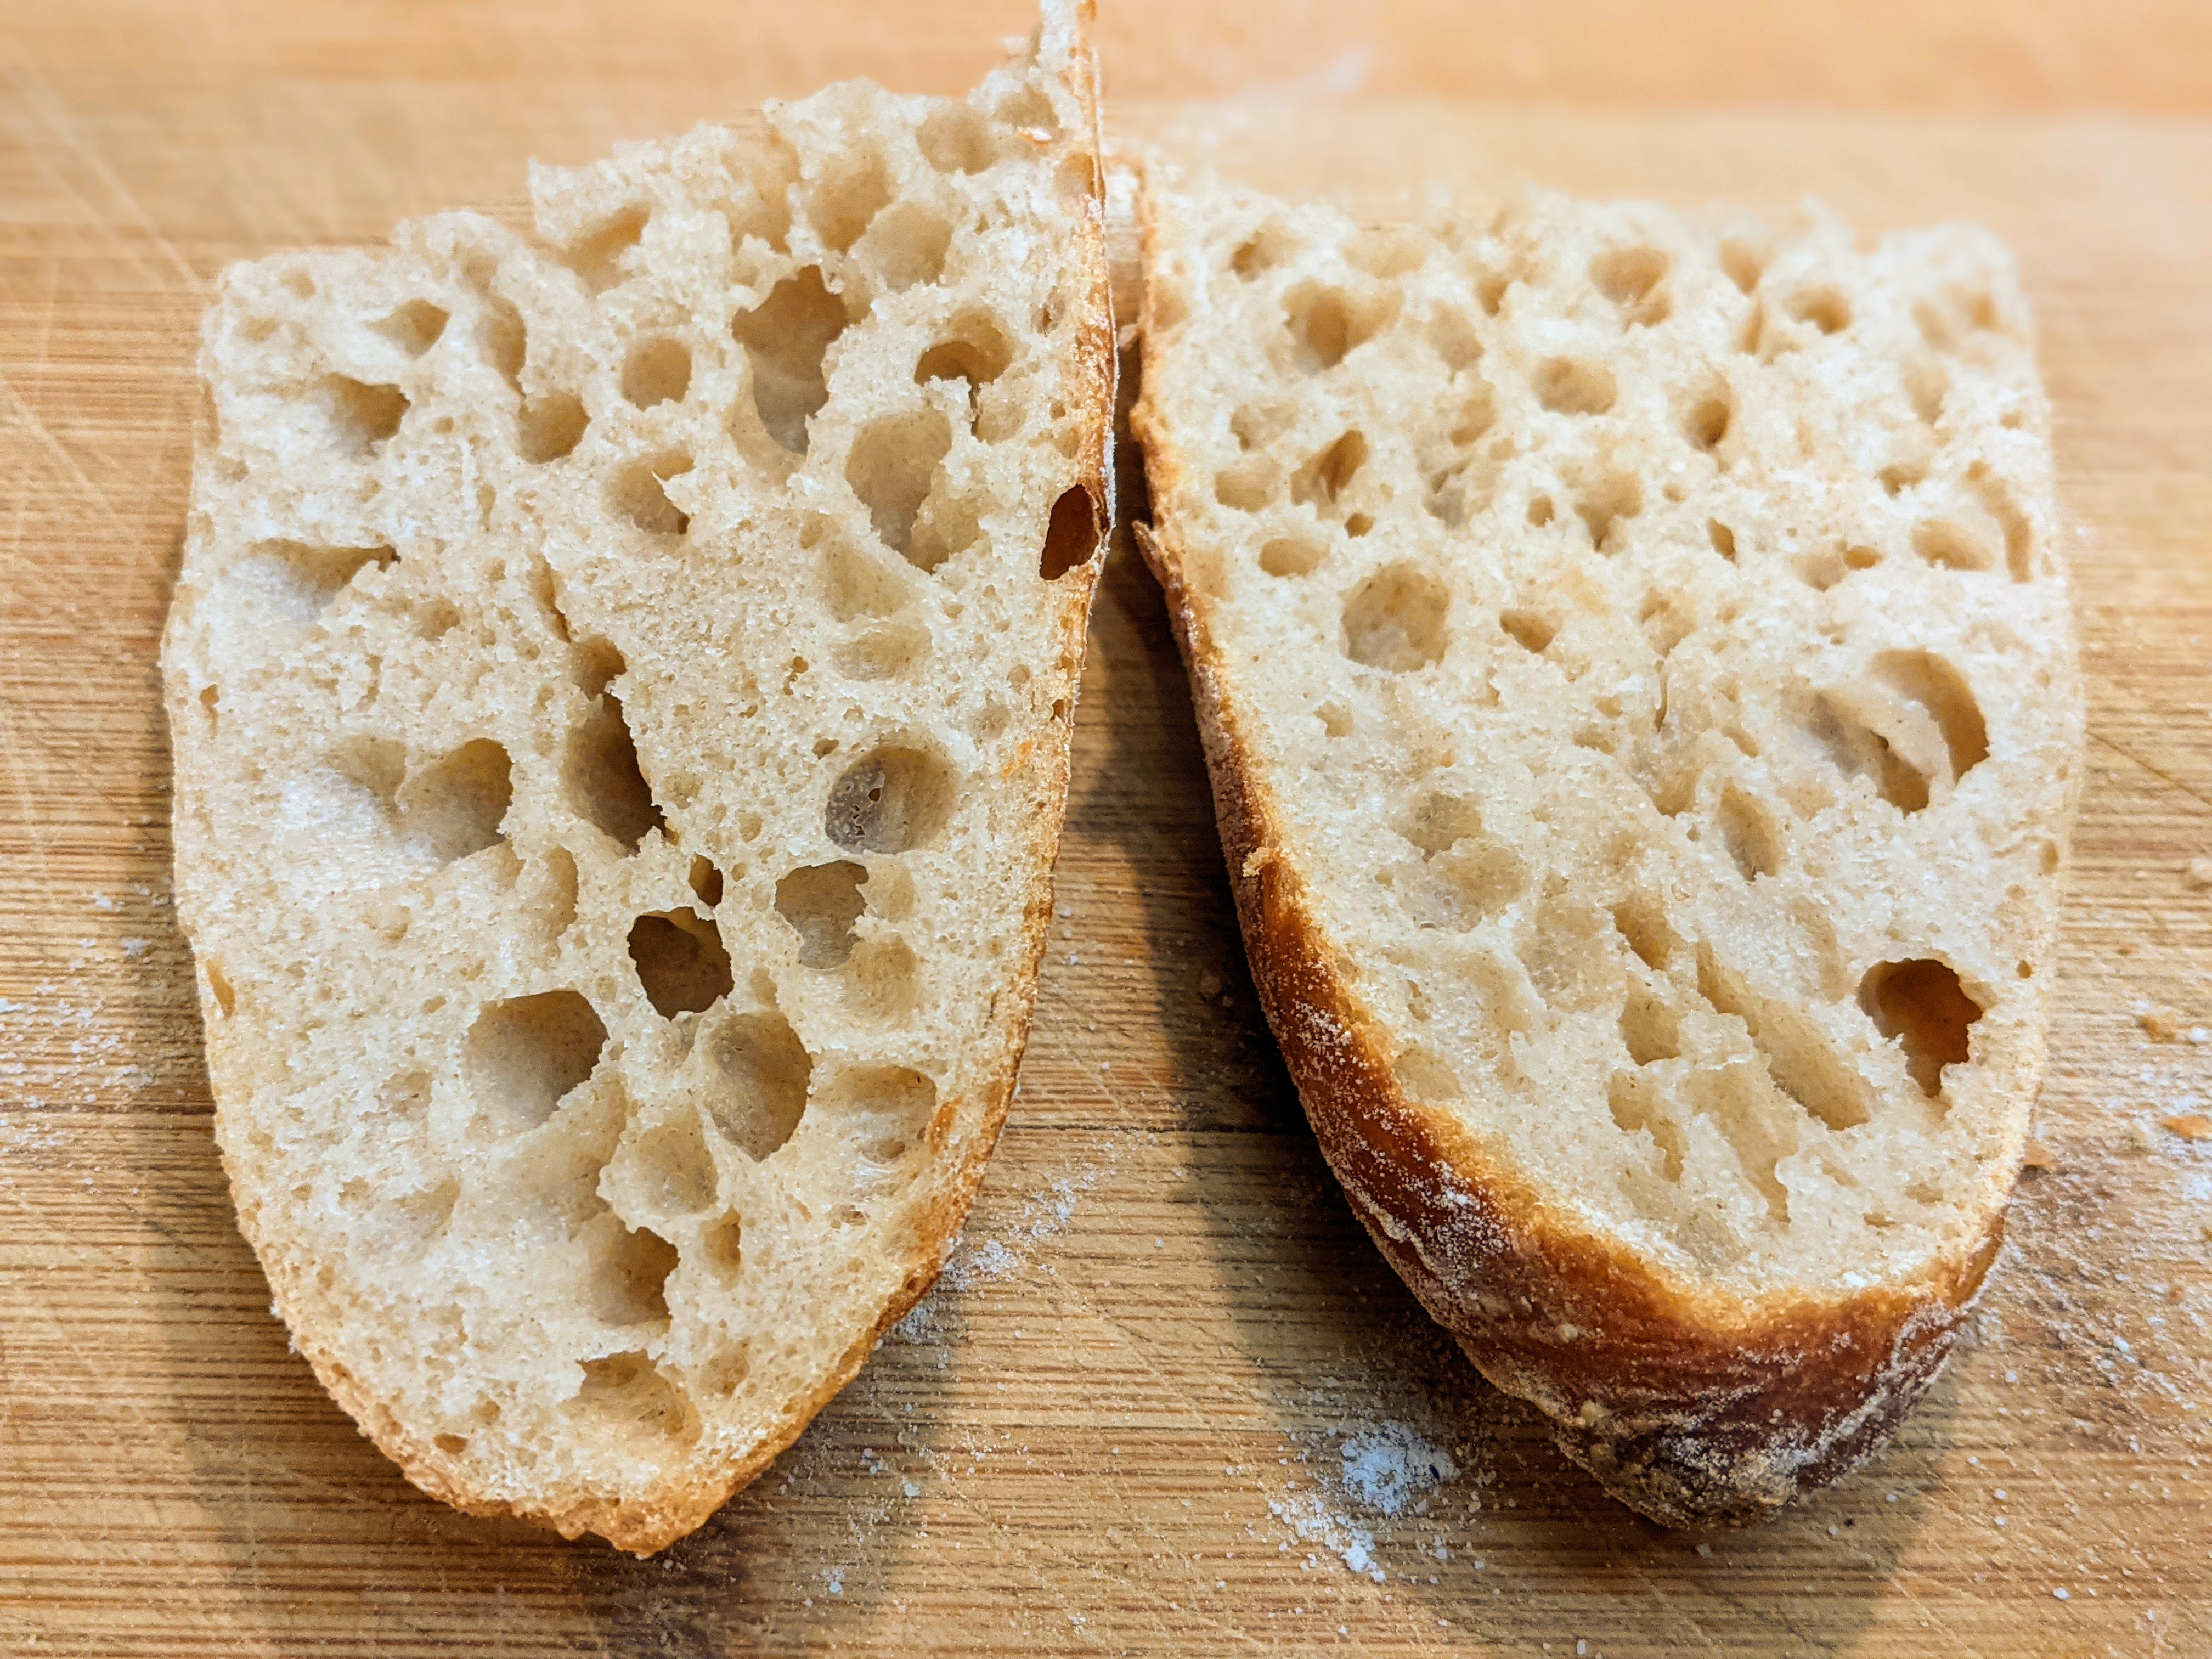
Look at the loaves above. I just pulled the loaves in the left-hand photo out of the oven. I baked the loaves on the right about two weeks ago. I used the exact same process for each set: Long autolyse, 24-hour bulk ferment, 24-hour final proof. The difference? The loaves on the right used 30% King Arthur 100% Whole Wheat flour, while the loaves on the right used 30% Azure Standard 100% Whole Wheat Flour. The Azure Standard flour is Unifine milled, so it’s A LOT finer. The KA flour is pretty smooth, but you can definitely feel the bran particles in it.
When I was shaping the loaves on the left yesterday morning, I knew I wouldn’t get an ear. I knew the oven spring would be good, but I knew I wouldn’t get an ear just the same. The reason, is that I couldn’t develop a really taut skin without tearing the dough. And no, the dough wasn’t at all over-fermented. I wouldn’t have gotten the spring that I did if the dough was over-fermented.
But as I’ve mentioned previously, course, whole-grain flour contains lots of bran particles that cut the gluten strands. You have to be extra, extra gentle handling the dough! For instance, I did six rounds of stretch and folds, but by the third set, I had to switch to coil folds because I knew how delicate the dough would be due to the bran in the flour.
By no means is this a complaint. I was expecting this. But it is definitely a lesson in how different flour types – or brands of the same flour type – affect the resulting loaves. That said, I’m okay with how the loaves turned out. But I have to admit that I would’ve been totally pissed off if they didn’t spring. It would’ve indicated a break in my technique and that’s a totally different story! 🙂
When I first started getting into artisan bread baking, like many, I sought out lots of help online in forums and from various blog posts. I’m so thankful for all the information that’s readily available, but I found that especially with final proofing (aka final fermentation), there’s a lot of misunderstanding or lack of clarity as to when your loaves are ready to bake.
Before I go on, obviously there are several factors that contribute to great oven spring including kneading or folding, shaping, and hydration. But I feel one area that’s oven overlooked is final proofing. If you get this wrong, the other factors won’t matter.
Admittedly, there’s a bit of instinct that you have to develop over time with knowing the right time to bake. And there are useful tests you can do like the finger dent test. But I thought I’d offer up a bit of a cerebral, perhaps intellectual discussion to provide a background.
Let me just start out by saying that you never want to fully proof your dough when you’re doing your final proof; that is, you never want to take your dough to the point at which the yeast has nothing to feed. The reason for this is that once you pop your loaf into the oven, there’s a huge increase in yeast and enzyme activity up to about 140° F. During this period of accelerated activity, the starches swell and gas production from that fermentation is super-accelerated, contributing to oven spring.
Now of course, hydration plays a huge role in this as well as a highly hydrated dough allows for better extensibility. But it’s that initial kick of the yeast and bacteria at the outset of baking that gets you your spring.
But that’s assuming there’s food for the yeast and bacteria…
If you take your dough out to 100% fermentation, there’s no more food left on which the microbes can feed. This is why over-proofed loaves barely spring up at all because it’s only the steam that’s working to extend the dough – not to mention that the gluten also breaks down and you lose all dough strength.
As Master Baker Jeffery Hamelman puts it in his wonderful book, “Bread: A Baker’s Book of Techniques and Recipes,” ϯ
As a rule, bread should not be 100 percent risen at the time of the bake. Just as we will fall onto our noses if we lean over 100 percent, so too will the loaves tend to collapse if they receive a full 100 percent proofing before the bake. It is difficult to quantify with unvarying certainty the perfect degree of rise, since there are so many variables involved; however, 85 to 90 percent rising is a fair approximation to begin with. With careful and consistent observation of each bread, the baker’s eyes and hands will soon learn the parameters that work best.
So now that we have a background on why we shouldn’t go to full fermentation, let’s put this within the context of the finger dent test. With the finger dent test, the conventional wisdom is that it is one of the most effective way of determining how ready – or not – your dough is to bake. I use it all the time. Essentially the way it works is this: You push the tip of your finger about a centimeter into the dough. If the dent pops back immediately and goes away within several seconds, your dough isn’t ready. If it springs back partially ϯϯ and the dent slowly goes away but not entirely, then it’s likely ready. If the dent stays put, you’ve over-fermented your dough.
Do you sense the “but” in this?
This is a great test and I use it for practically every loaf of bread I make. But because it’s inexact, it takes practice to get right, and is also highly dependent on the flour you use. Different flour and flour blends make the springiness factor a challenge. A strong flour will almost invariably be more bouncy than a weaker flour – at almost all stages of fermentation. A weaker flour, like AP will have a lot of give naturally and may fool you into thinking your proofing is done.
Unfortunately, the only way I know – and according to a few professional bakers I’ve both read about and spoken with – of determining a dough’s doneness is learning through trial and error. As Chef Markus Farbinger puts it, it takes time and practice to develop an instinct about your dough.
Essentially, there’s just no empirical way to teach this. Eventually, you’ll come to know the ultimate endpoint of the dough you make. But frankly, that’s half the fun! And who doesn’t need an excuse to bake?
Another thing to consider is that different loaves respond differently to the amount of proofing. Even though Chef Hamelman recommends 85 to 90 percent as a guide, that’s really only a rough approximation. With baguettes, I’ve learned to only take them to the lower end of that range, perhaps even short of 85%. There have been too many times I’ve ended up with flat baguettes because I’ve taken them too far in proofing. And it’s easy to do because baguettes don’t have that much internal structure built into their dough.
On the other hand, with boules and batards, I tend to take them a bit further. I’m personally not after numerous huge holes, but an even distribution of moderately-sized holes, so I’ll tend to take them to about 90% proofing. I realize that I’m playing with fire because that requires some careful monitoring before it’s too late. But because I use fairly high-protein flour I can afford to do this because their structures are strong.
As I mentioned above, this is one contributing factor to great oven spring. But because it is the last step before a loaf gets put in the oven, it is critical to get this right.
ϯ Hamelman, Jeffrey, Bread: A Baker’s Book of Techniques and Recipes (2nd Edition), John Wiley & Sons, Inc., 2013.
ϯϯ The important thing to note here is that the dent should spring back a bit but not totally go away. If the dent stays in place and doesn’t move at all, then your dough’s overfermented.
I lurk a lot in online bread baking forums in search of tidbits of information and insights that will help me improve my skills. And though I’ve finally reached a point where I can consistently make a pretty good loaf of bread, I’ve refrained from contributing to public forums. But that doesn’t mean I don’t want to share, which is one of the reasons I devoted this blog to bread baking. A large part of this blog is a diary of the things I discover, the other part of it is sharing the lessons I learned. And a HUGE lesson I’ve learned is this:
With no-knead bread, if you want good oven spring, you have to have achieve sufficient dough strength so the gluten network retains the gases to promote forming gas pockets and be strong enough to hold the dough’s general shape in the first 10-15 minutes of baking.
Just baked yesterday. I did 7 folds over 3 1/2 hours!
Okay, for the experienced baker, this is a given. But for many folks like myself up until recently, it wasn’t an intuitive thing. I now know how to feel that my dough has strength and the telltales, but when I first started making bread, I was just following the recommendations in the recipes I’d follow.
Specifically, I’m talking about the recipes in Flour Water Salt Yeast (“FWSY”) by Ken Forkish, which seems to be the “reference” book for many home bakers. It surely was mine when I first started out. I still follow many of the principles Ken lays out in the book, but after having created dozens upon dozens of loaves over the last few months (I bake atleast two loaves a day), I realized that there was one discussion that was missing in the book, or more implied rather than specifically called out and that is developing dough strength and why it’s important.
On page 35 of FWSY, he has a page devoted to folding. The salient point of the section is in the first paragraph:
Doing this [folding] several times during the bulk fermentation of the dough helps organize the dough’s gluten network, which allows it to holod on to gases produced as the dough ferments… The more complexly knit this network of gluten becomes, the more strength the dough has.
That nails it. And for a more experienced baker, the implication is clear: Developing dough strength gives you a better rise and oven spring.
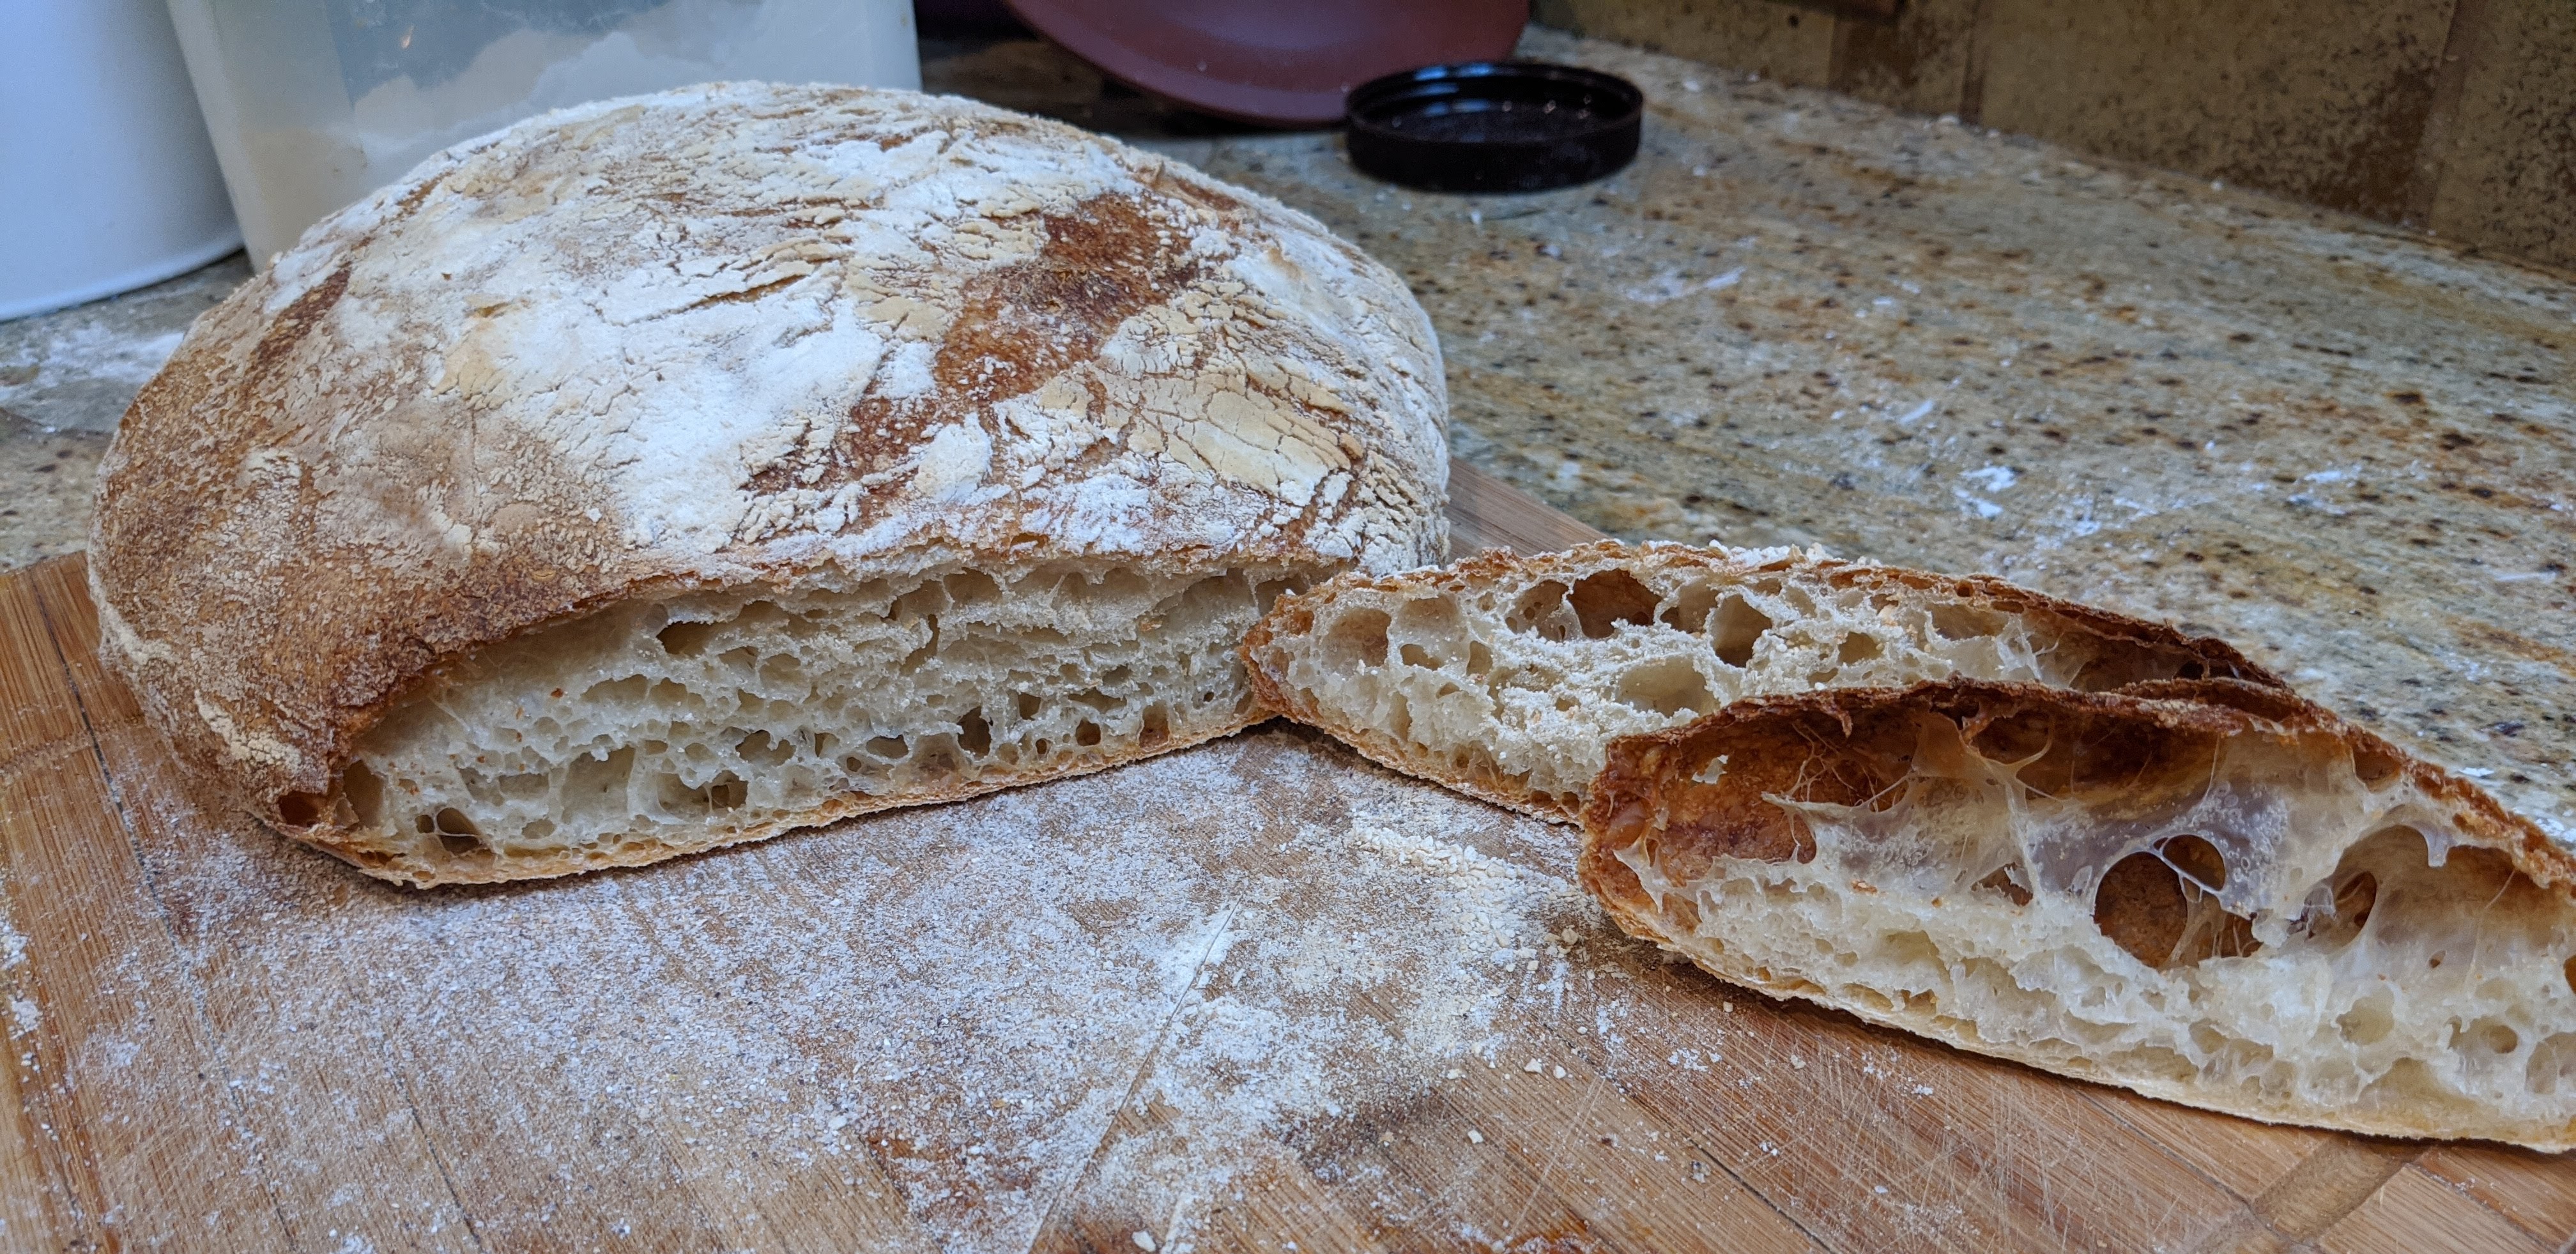
But for the beginning baker following recipes, they don’t have the experience and, more importantly, haven’t developed the feel for dough strength. So like me, they’ll just follow the recommendations as in the Saturday White Bread which specifies just two folds. But that’s assuming you’re using AP flour or white bread flour. But even with those flours, if you haven’t sufficiently folded the dough and developed the gluten network, even those will collapse or spread out in the oven like the loaf shown below:
As you can see, the crumb on that loaf actually wasn’t all that bad. At first, I thought it was a proofing issue, but if it was, I would’ve gotten a really weird, uneven rise. So after doing a bit of research, I learned that I hadn’t developed enough strength in my dough.
I have to admit that I kind of scratched my head at that discovery because I followed the Saturday White Bread recipe in FWSY absolutely closely. But two folds was just not enough. As a dough expands in the oven, you should get both horizontal AND vertical rise. If you don’t get much vertical rise, it means the gluten network isn’t strong enough to support the vertical height. Also, if you look at the loaf, it’s also not scored on the top. That also could be a contributing factor as there may have not been enough give in the top skin, which forced the bread to expand outward instead of up, but that’s another discussion altogether. For now, we’ll just focus on developing dough strength.
How Do You Know Your Dough Has Strength?
I’m just going to start off by saying that there is no magic number to the amount of folding you need to do. Even Ken Forkish says in the last paragraph of “What Is Folding?” on page 35:
The recipes in this book each give guidance on the time and number of folds recommended, usually specifying a range, such as three to four folds. However, I don’t want to be overly hard and fast with rules about this. When working with your douh, you’ll be able to see the physical change after you’ve folded it. If, based on what you observe, you want to give it one more fold, go ahead and do it.
I remember reading that last line and saying out loud, “What the f$#k am I supposed to observe?” But despite that, I went on reading because I thought he might delve a littler deeper into the observation. Unfortunately, that’s about as far as he went with it.
So I had to do a bit of research and did a lot of baking and have a couple of telltales that I use to make sure I’ve developed enough strength in my dough.
The first test is a common one that you’ll probably see online – a lot. It’s known as the windowpane test. Basically, you take a hunk of your fermenting dough and stretch it. If you can stretch it into a thin membrane (window) without it tearing, then you have good dough strength.
But there’s also a way to feel the strength developing when you’re doing your stretch and folds that I use to gauge how far along my dough is. When it’s time to do a stretch and fold, if, when you do the first stretch, the dough stretches really easy and you can stretch it to two times the width of the dough ball, it’s likely not strong enough. And when you finish the last fold, if the whole dough ball doesn’t want to come along when you pull, you don’t have enough strength in your dough.
Furthermore, when you stretch and fold, you’re supposed to turn the dough over onto the folds after you’ve formed a ball. You should be able to do this easily if your dough is strong. But if you finish and the rest of the dough settles back, then you don’t have enough strength and you’ll need to do more rounds of folds.
That said, if you’re working with a super high-hydration dough (like above 80%), your dough will have a tendency to collapse, no matter what you do. But when you stretch high-hydration dough, the dough mass should come along with your stretch. If it shows signs of tearing, you’ll need more folds.
For this very reason, as opposed to following the guidelines in FWSY, I’ve taken the Tartine Bakery approach where they do 6 folds over the course of 3 hours, doing one every half-hour. I know, that’s very involved. By the time you do the last stretch and fold, you can really feel the resistance!
Folding Forms the Foundation
A lot of emphasis is put on shaping and creating a taut skin to get a good oven spring. No doubt, it is critical. But if you don’t have the good foundation of a well-developed gluten network with which to start, you won’t get as good an oven spring. It’s really the combination of a well-developed gluten network AND a nice, tight skin that will give you great oven spring, at least as far as structure is concerned. There are other factors as well, but those are beyond this particular discussion.
For me, I started getting great oven spring when I started to trust what I was feeling in the dough as I folded it. Was it too easy to stretch? Did it feel like tearing? Or did it put up some resistance and want me to take the whole dough ball in one pull? These questions led me to fold the dough more than the prescribed or suggested amount of folds in FWSY, and since then, I haven’t had to worry that my loaves will collapse, even with really wet dough. And especially now that I’m using a whole wheat and high-extraction flour combination, those extra folds have worked wonders with my oven spring.
I thought that maybe it was my folding technique that was flawed. But as I mentioned in a previous article, this is exactly what they do at Tartine Bakery!
Now all that said, I’m only sharing what works for me. You may do fewer folds and still get great results. The great thing about making bread is that though there is a certain exactitude to the process, there’s also a lot of variability. So what may work for some, may not work for others and vice-versa.