When I first started making high-hydration loaves (75%+), they were disastrously flat. And since I was baking on a stone, I didn’t have the luxury of the sidewalls of a Dutch oven to save me. So I had to learn how to build structure into my dough.
And I learned all sorts of techniques, from proper folding to shaping method and even getting a better sense of how my dough was fermenting. And as a result, my loaf height seriously improved.
But I had run across some posts online where people had made beautiful high-hydration loaves and mentioned that they were using high-protein flour – almost to a person. And that got me thinking that if I could combine my development and shaping techniques with good, strong flour I could improve the structure of my loaves even more.
So I went on a quest for high-protein flour and that first led me to Azure Standard Unbleached Bread Flour Ultra-Unifine. This is my #1 flour, and I absolutely love it. At 14.7% protein, it develops plenty of strength and my loaf structure immediately improved as a result. But as a it is a high-extraction flour, it has a very grain-forward flavor profile. Mind you, it’s not a bad thing, but too much of a good thing can be bad as well. So I always cut it with a little King Arthur bread or AP flour.
But that kind of bugged me because I knew that was reducing the protein levels in my loaves. Look, they still came out great, but I’m the type of person that doesn’t just want to get the job done, I want it done right and with no compromises in quality.
It’s how I approach music and performance. For instance, when I first took on the role of musical director for the youth and young adult Mass at my church, the musicians initially balked at me requiring a two-hour rehearsal prior to service. But I explained to them that even though we were volunteers, that didn’t exempt us from providing a high-quality product that enhances the prayer experience. Mistakes and misalignment would only serve to detract from that. And after seeing the results of that kind of commitment, they got it. Now, twenty-five years later, we’re still going strong – a bunch of old farts rocking with God! 🙂
Sorry for going off on a tangent…
Anyway, I wanted to find a high-protein flour that had less of a grain-forward flavor. So after trying a few different ones, I ran across this wonderful flour from a small mill in Illinois called Janie’s Mill. They produce a high-protein flour from Glenn wheat, which is a hard spring wheat. And at 17% protein, it was sure to provide plenty of structure – even up the protein levels of my high-extraction flour!
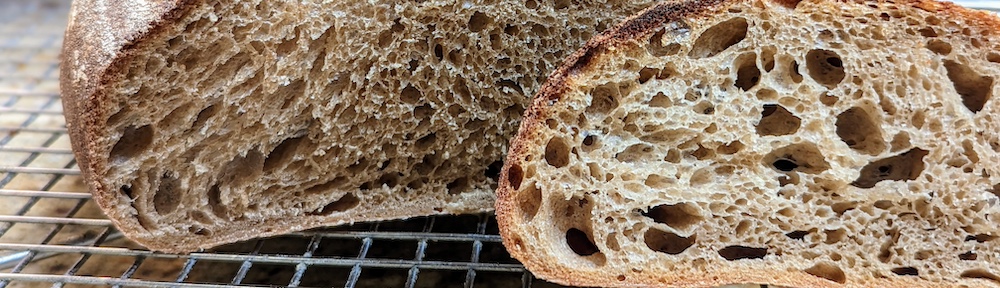
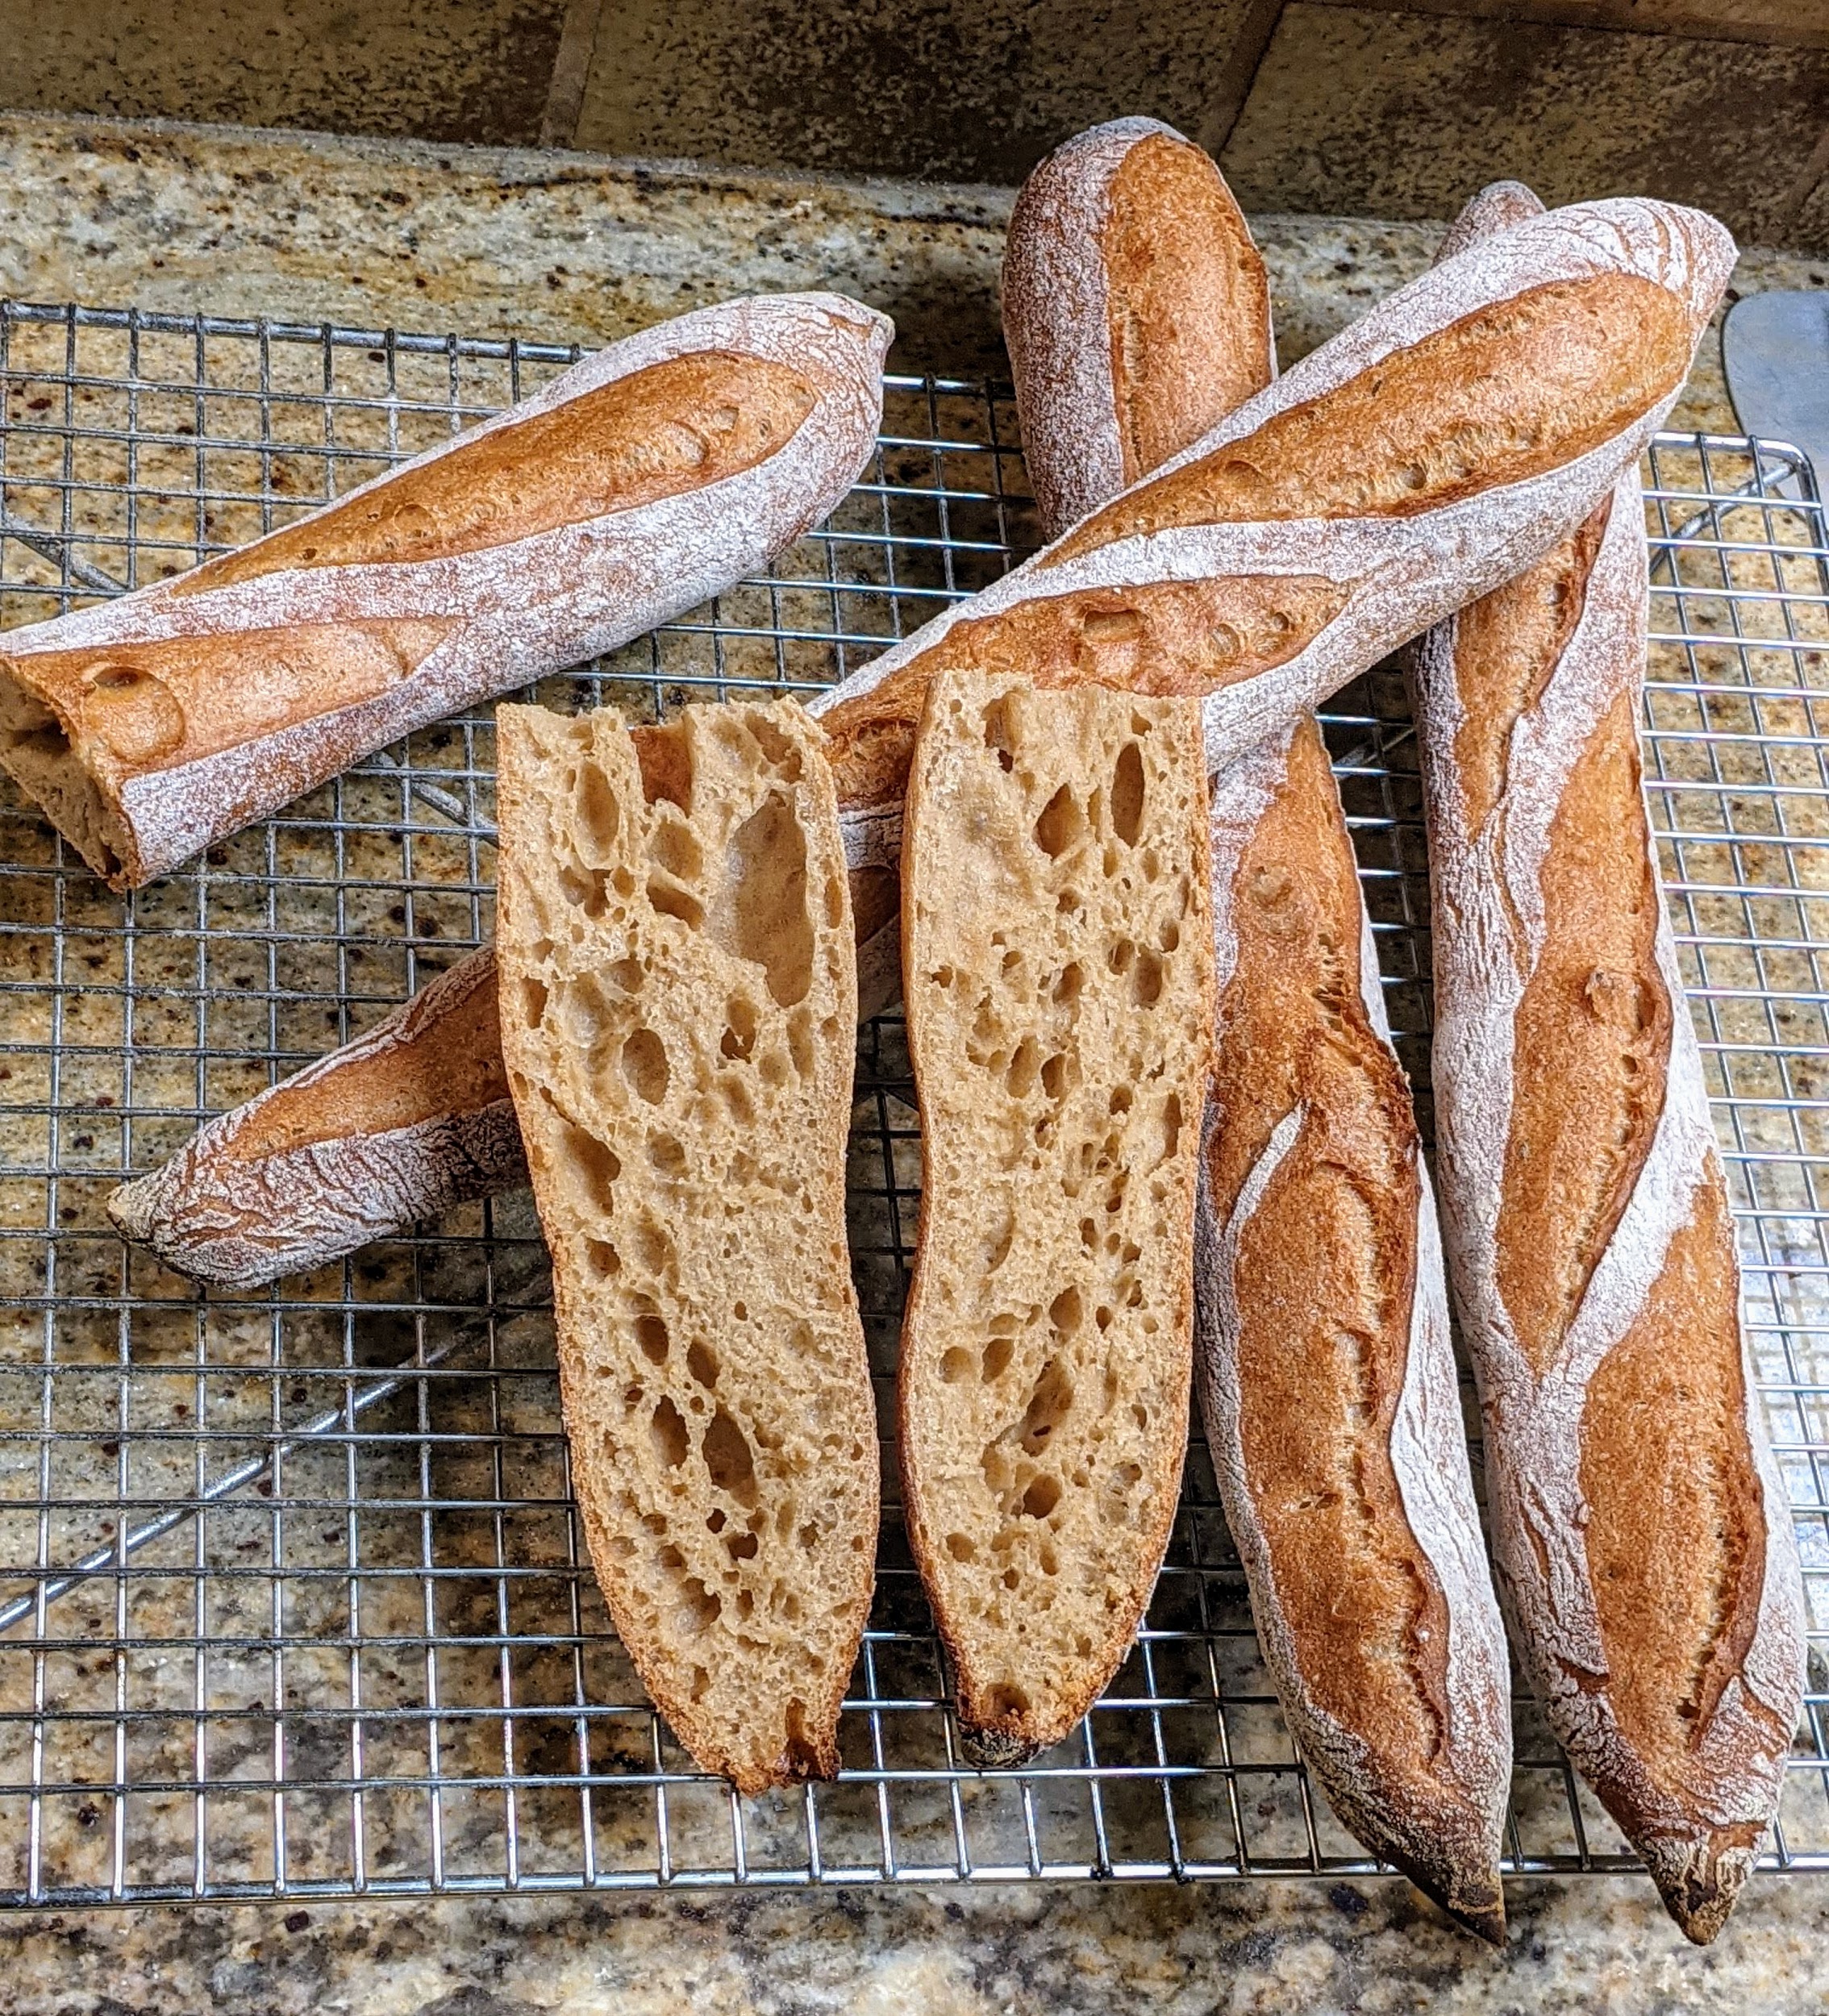
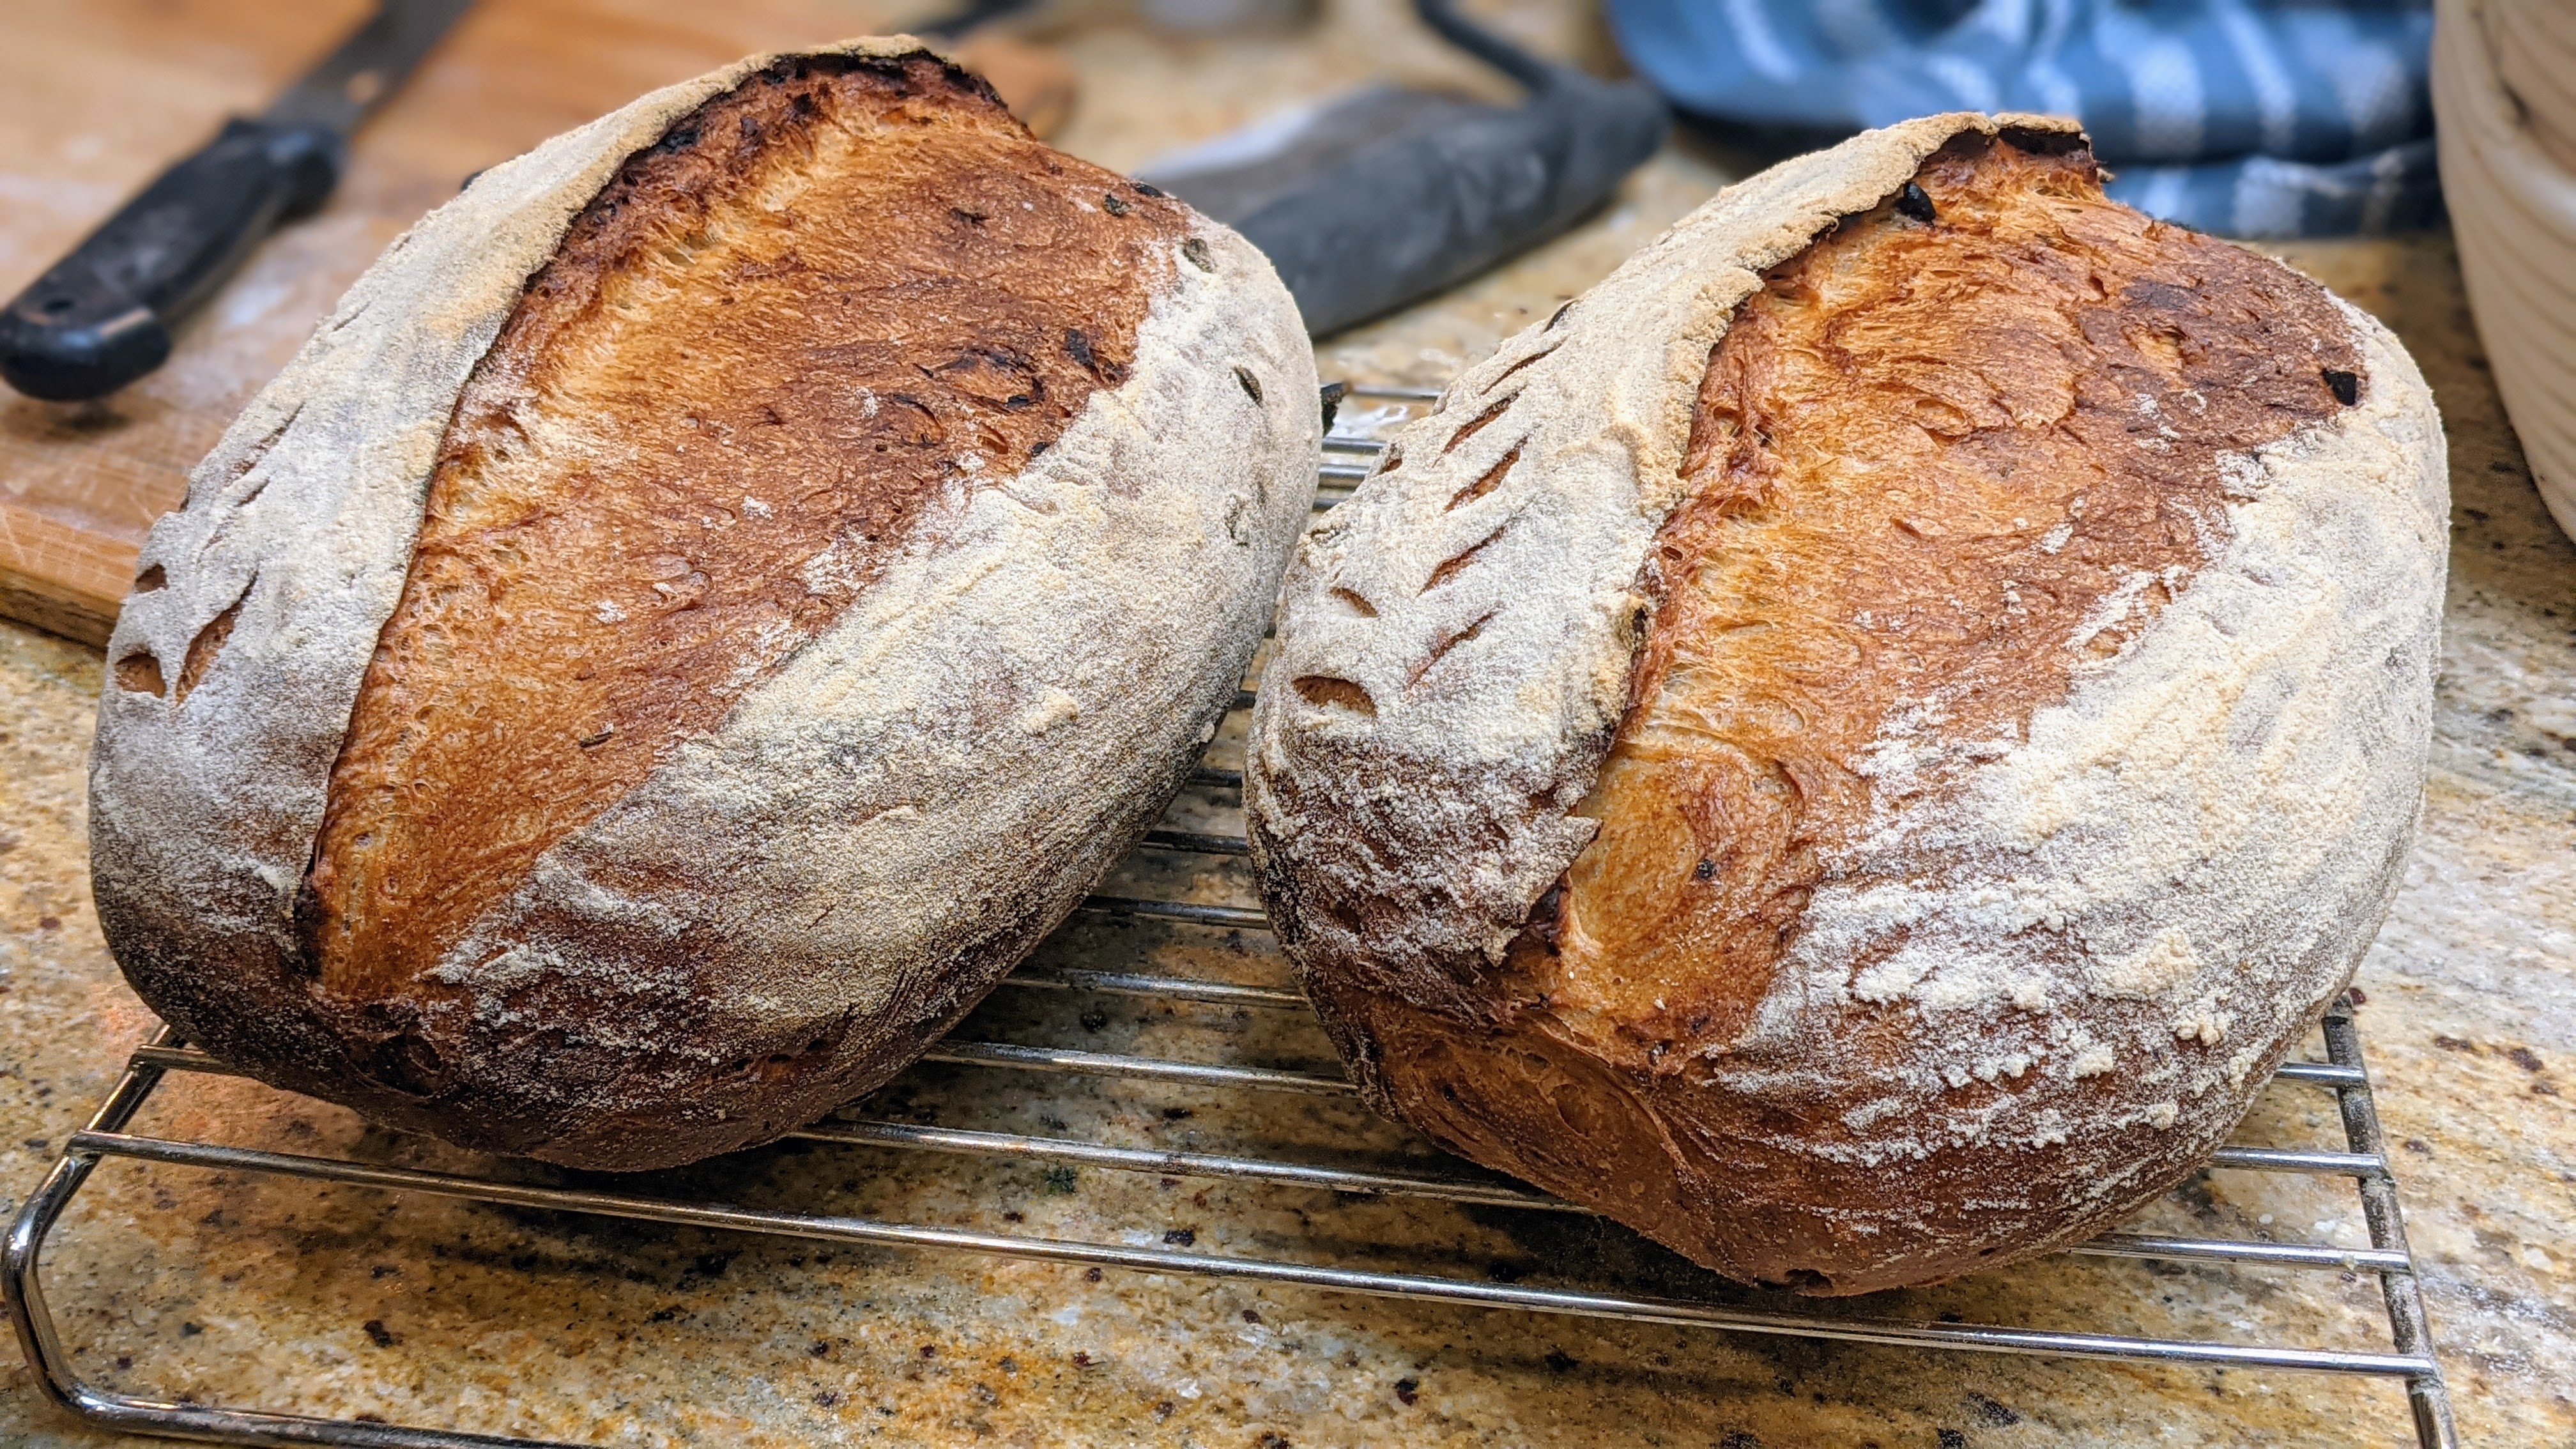
The flour arrived about a week ago, and I’ve baked a few loaves with it. This is wonderful flour to with which to work. And the bread that I’ve made with it has a gorgeous, nutty flavor profile and the crumb is pleasingly chewy. Notice how dark the crumb is in the picture to the left. That actually surprised me because the flour is very light in color, as is the dough. But it browns with baking. VERY cool!
My next test will be to cut it with my high-extraction flour to see how that performs. I’ll probably start with a 50/50 blend, then go from there.
I’ve included the nutrition information card to the right. When I saw the 6g per serving size of 35g, I nearly flipped! Just on that number alone, I knew I had to try it. And now that I’ve baked with this flour a few times, it’s going to be a regular part of my flour blend.
Mind you, this flour is NOT cheap. Actually, it’s pretty expensive at $48 / 25lb bag. I bought two bags, plus a small bag of Red Fife flour and it set me back over $100. But it’s great flour, totally organic and GMO-free and most of all, it’s produced by a small, independent mill. I think it’s important to support the little guy.
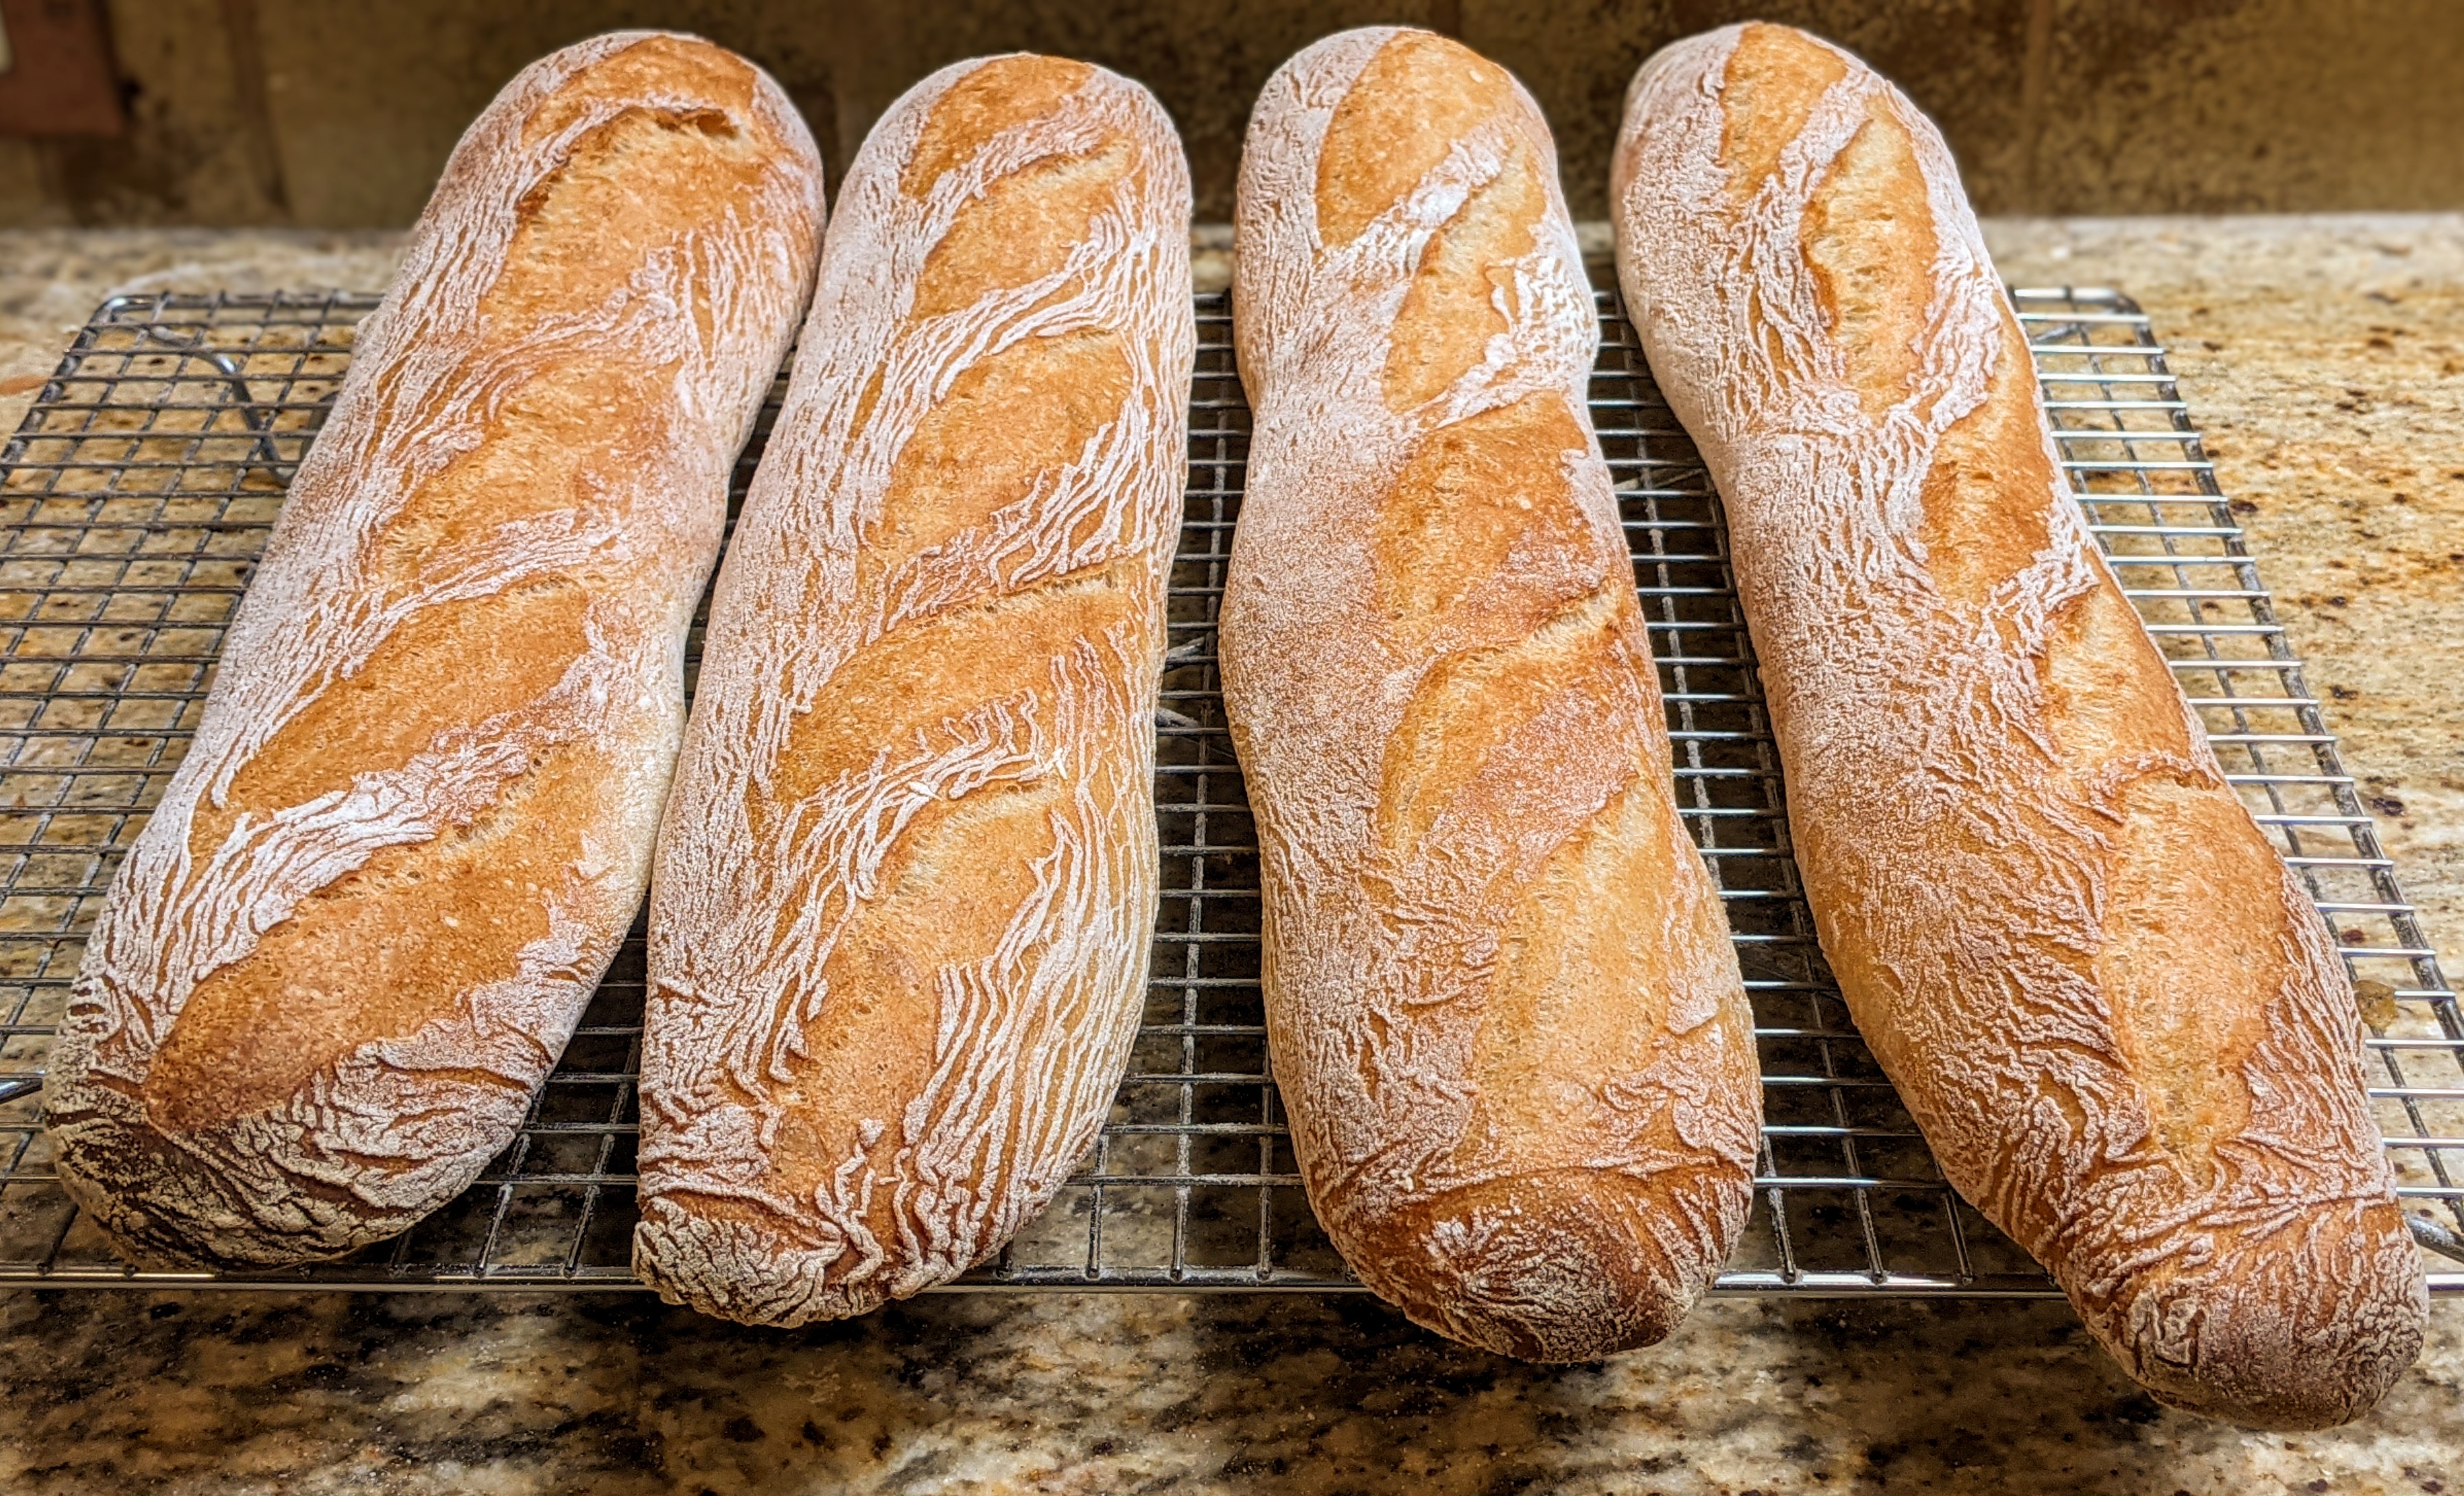
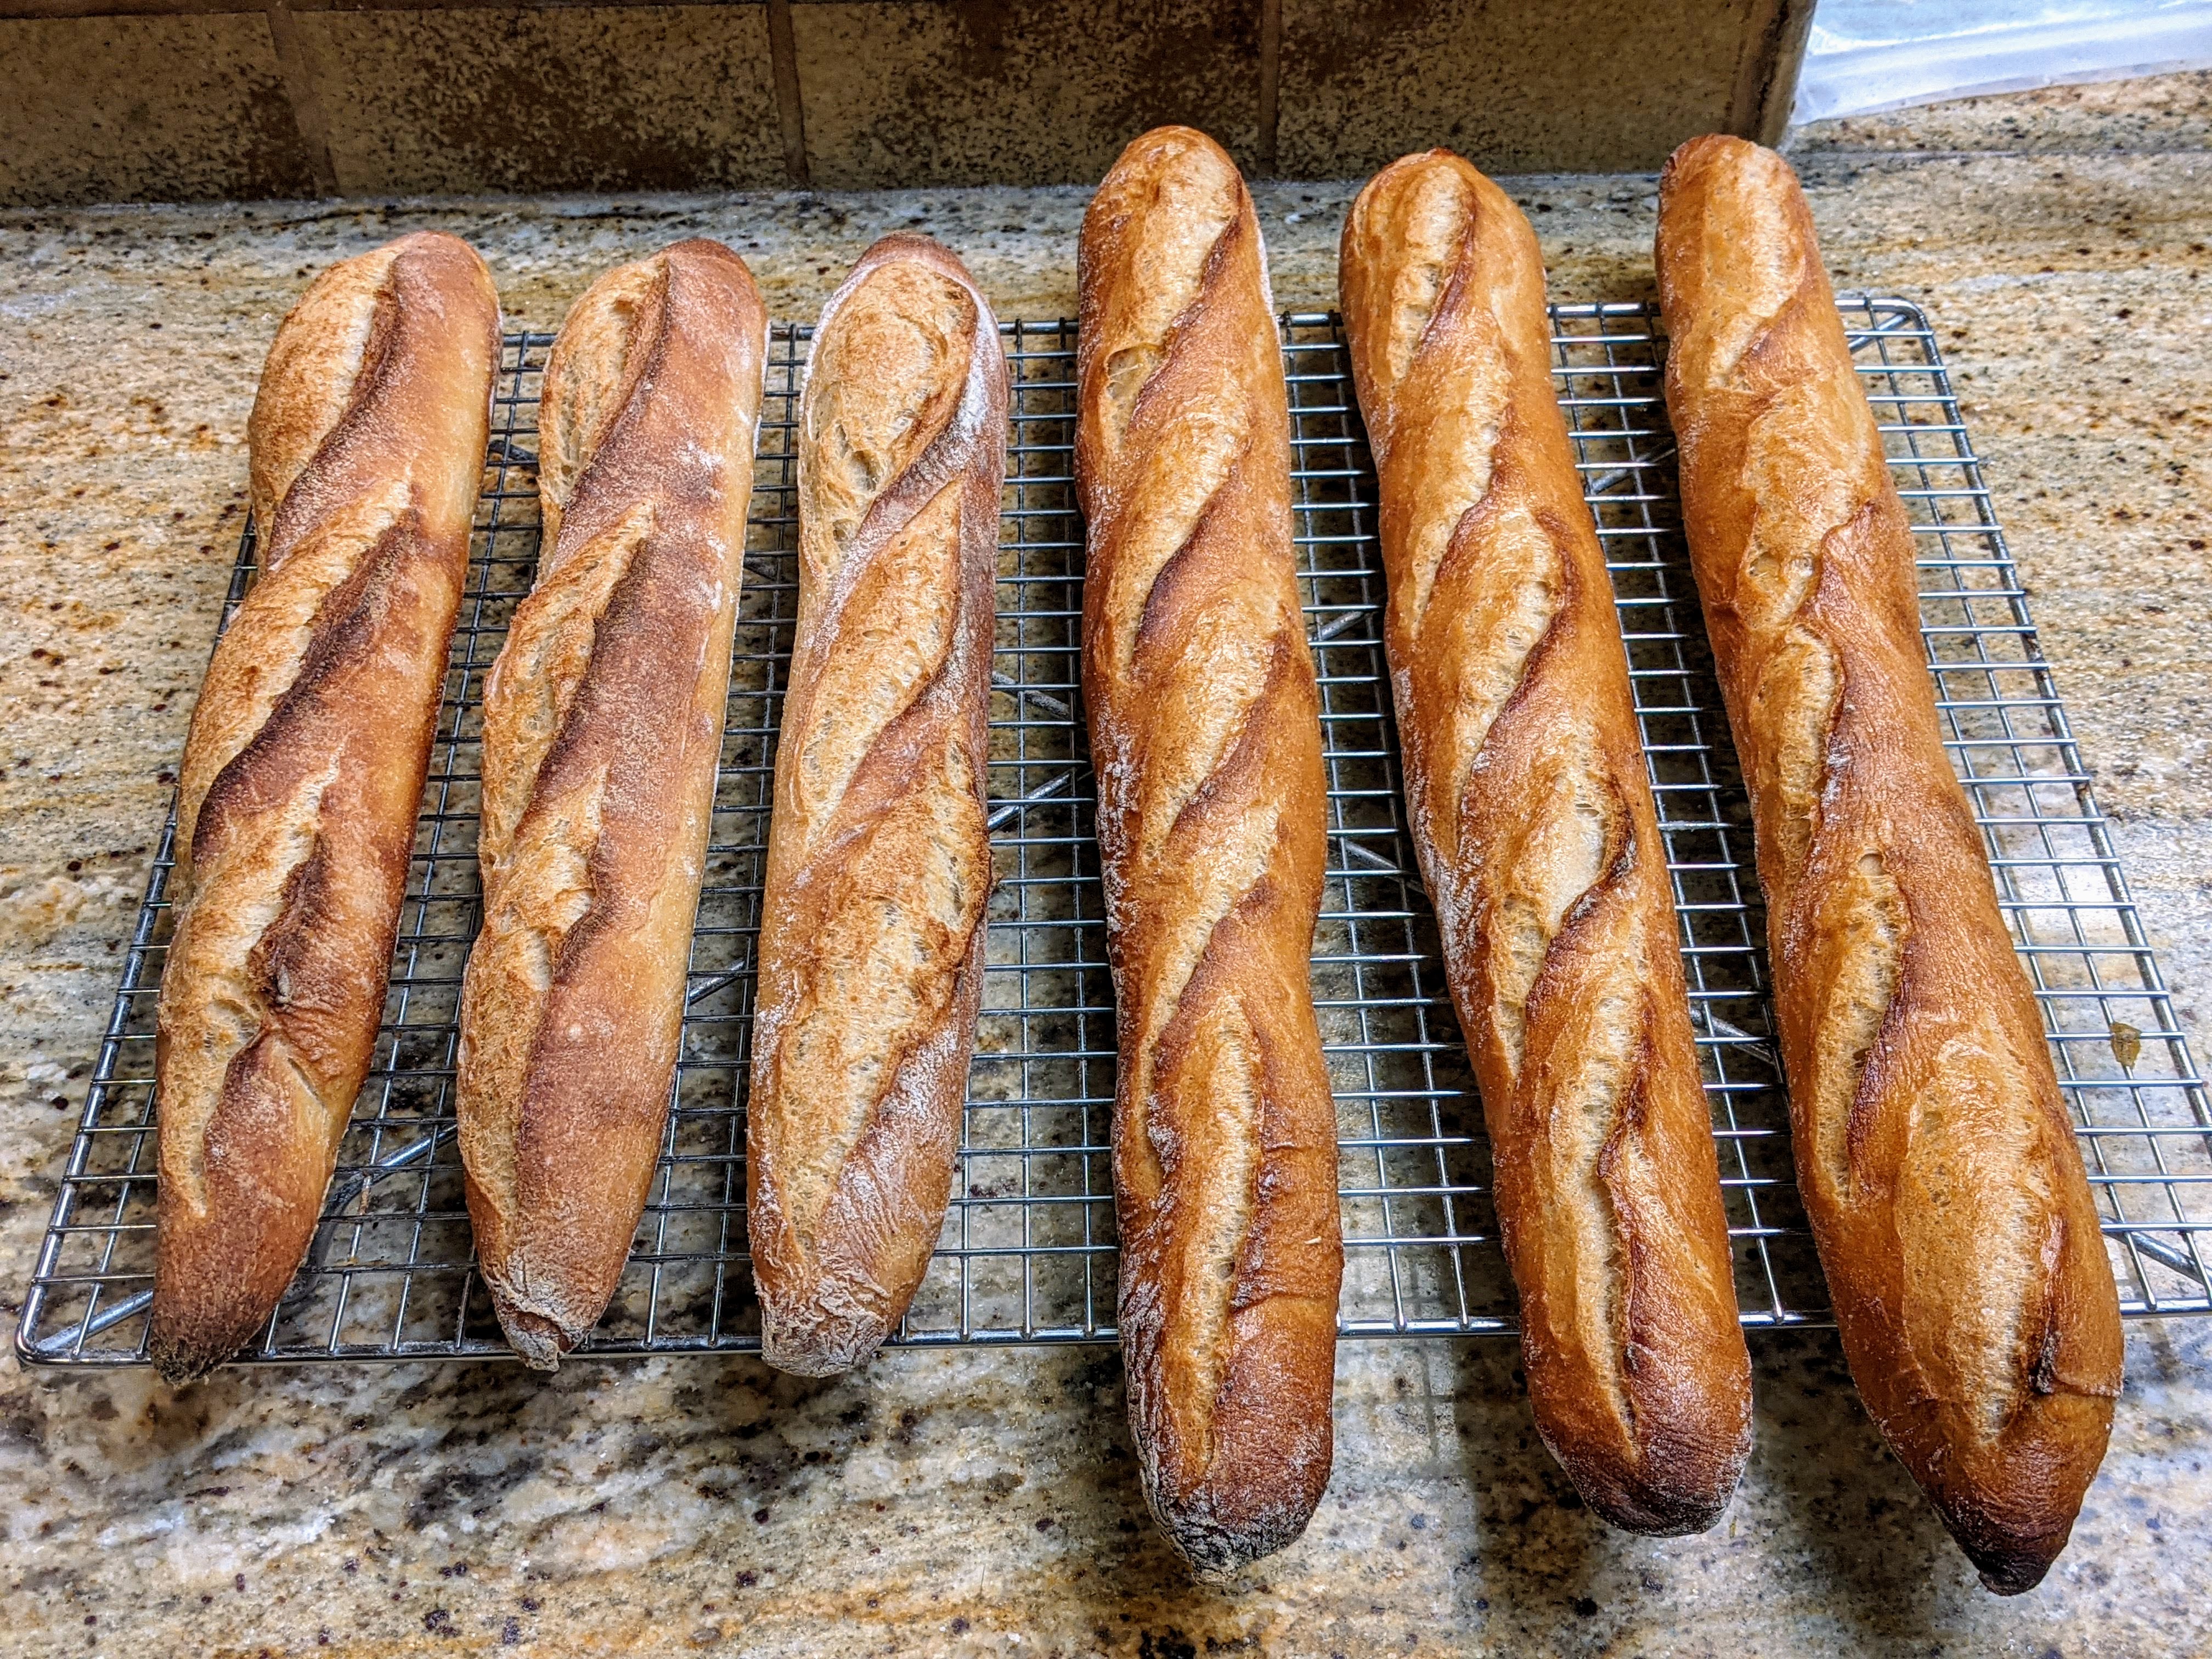
As I’ve often mentioned in the past, baguettes are my favorite bread to make. Nothing gets me in the zone as much as making baguettes. The reason for this is that though they seem so easy to make at first blush, they’re actually incredibly difficult to get right. For me at least, making baguettes requires me to be on my game every step of the way; forcing me to be absolutely mindful of what I’m doing because one misstep can result in total disaster. Which explains why I haven’t released a sourdough baguette recipe until now. I’ve had quite a few disasters and I didn’t want to publish a recipe until I had a few successful runs.
As with all my baguettes, I make them for the express purpose of being a platform for sandwiches. But they work just as well for tearing up and dipping into olive oil and balsamic vinegar. They’re also optimized for baking in a domestic oven, so they’re more demi-baguettes than full-sized 60-80 cm loaves.
Also, these use a hybrid rising technique using a levain and some yeast. Yeah, yeah, yeah, I can hear the sourdough purists out there screaming, but I prefer the results of the hybrid technique over a pure levain-risen dough. I’ve baked several permutations and I have to be honest: While I love the flavor profile of a pure levain-risen dough, it’s far too extensible, and backing off the hydration creates too tight of a crumb. The small amount of commercial yeast used here helps open the crumb. But that said, you still can choose to not use any commercial yeast. The process will take longer and the crumb may not be as open.
This can be up to a two-day process, depending on how long you want to do the bulk fermentation. But unlike a poolish baguette where you make the poolish the day before then mix, shape, and bake the final dough the next day, with this you’ll build the levain and mix the final dough on the same day, then either bake that day or cold ferment overnight. Let’s get to the formula:
Overall Formula
Flour
100.00%
Water
76.00%
Salt
2.00%
Yeast
0.50%
Total Percentage
178.50%
Levain
Preferment Flour % of Total
25%
Hydration %
100%
Levain Flour
192.5
Levain Water
192.5
Levain Required for Recipe
385
Final Dough
Flour
577
Water
392
Salt
15
Yeast
4
Levain
385
Total Yield
~1374g total dough 4 X 340g loaves (60 cm) 6 X 226g loaves (40 cm)
Optimal Dough Temp
76°F
Levain. Build a levain to yield the amount you’ll need for the bake. With these baguettes, the flour of the levain represents 25% of the total flour needed in the recipe, which would be 192.5g out of a total of 770g. Your levain will be ready when it passes the float test.
As far as the type of starter to use, for baguettes, I normally use one based on AP flour as I want less sourness in my dough. But you can use any flour to evoke different flavor profiles.
NOTE: I’m not going into building a levain as there are plenty of resources available for making and building a 1:1 (flour:water) starter. As for how much you should make,while the requirement for this recipe is 385g of levain, make more than that – like 400g – to account for evaporation and levain sticking to your mixing utensil.
Initial Mix/Autolyse. Reserve 50-75g of the water. In the remaining water, break up the levain until it’s fully dissolved, then add the flour and combine well, being careful not to develop the gluten much. Autolyse for at least 20-30 minutes on up to an hour (remember, there’s starter in this, so you don’t want fermentation to progress too far).
Final Mix. Sprinkle the yeast over the dough. Dissolve the salt into the reserved water, then mix in the, salt, and reserved water into the dough until well incorporated with no large lumps. The dough should be shaggy.
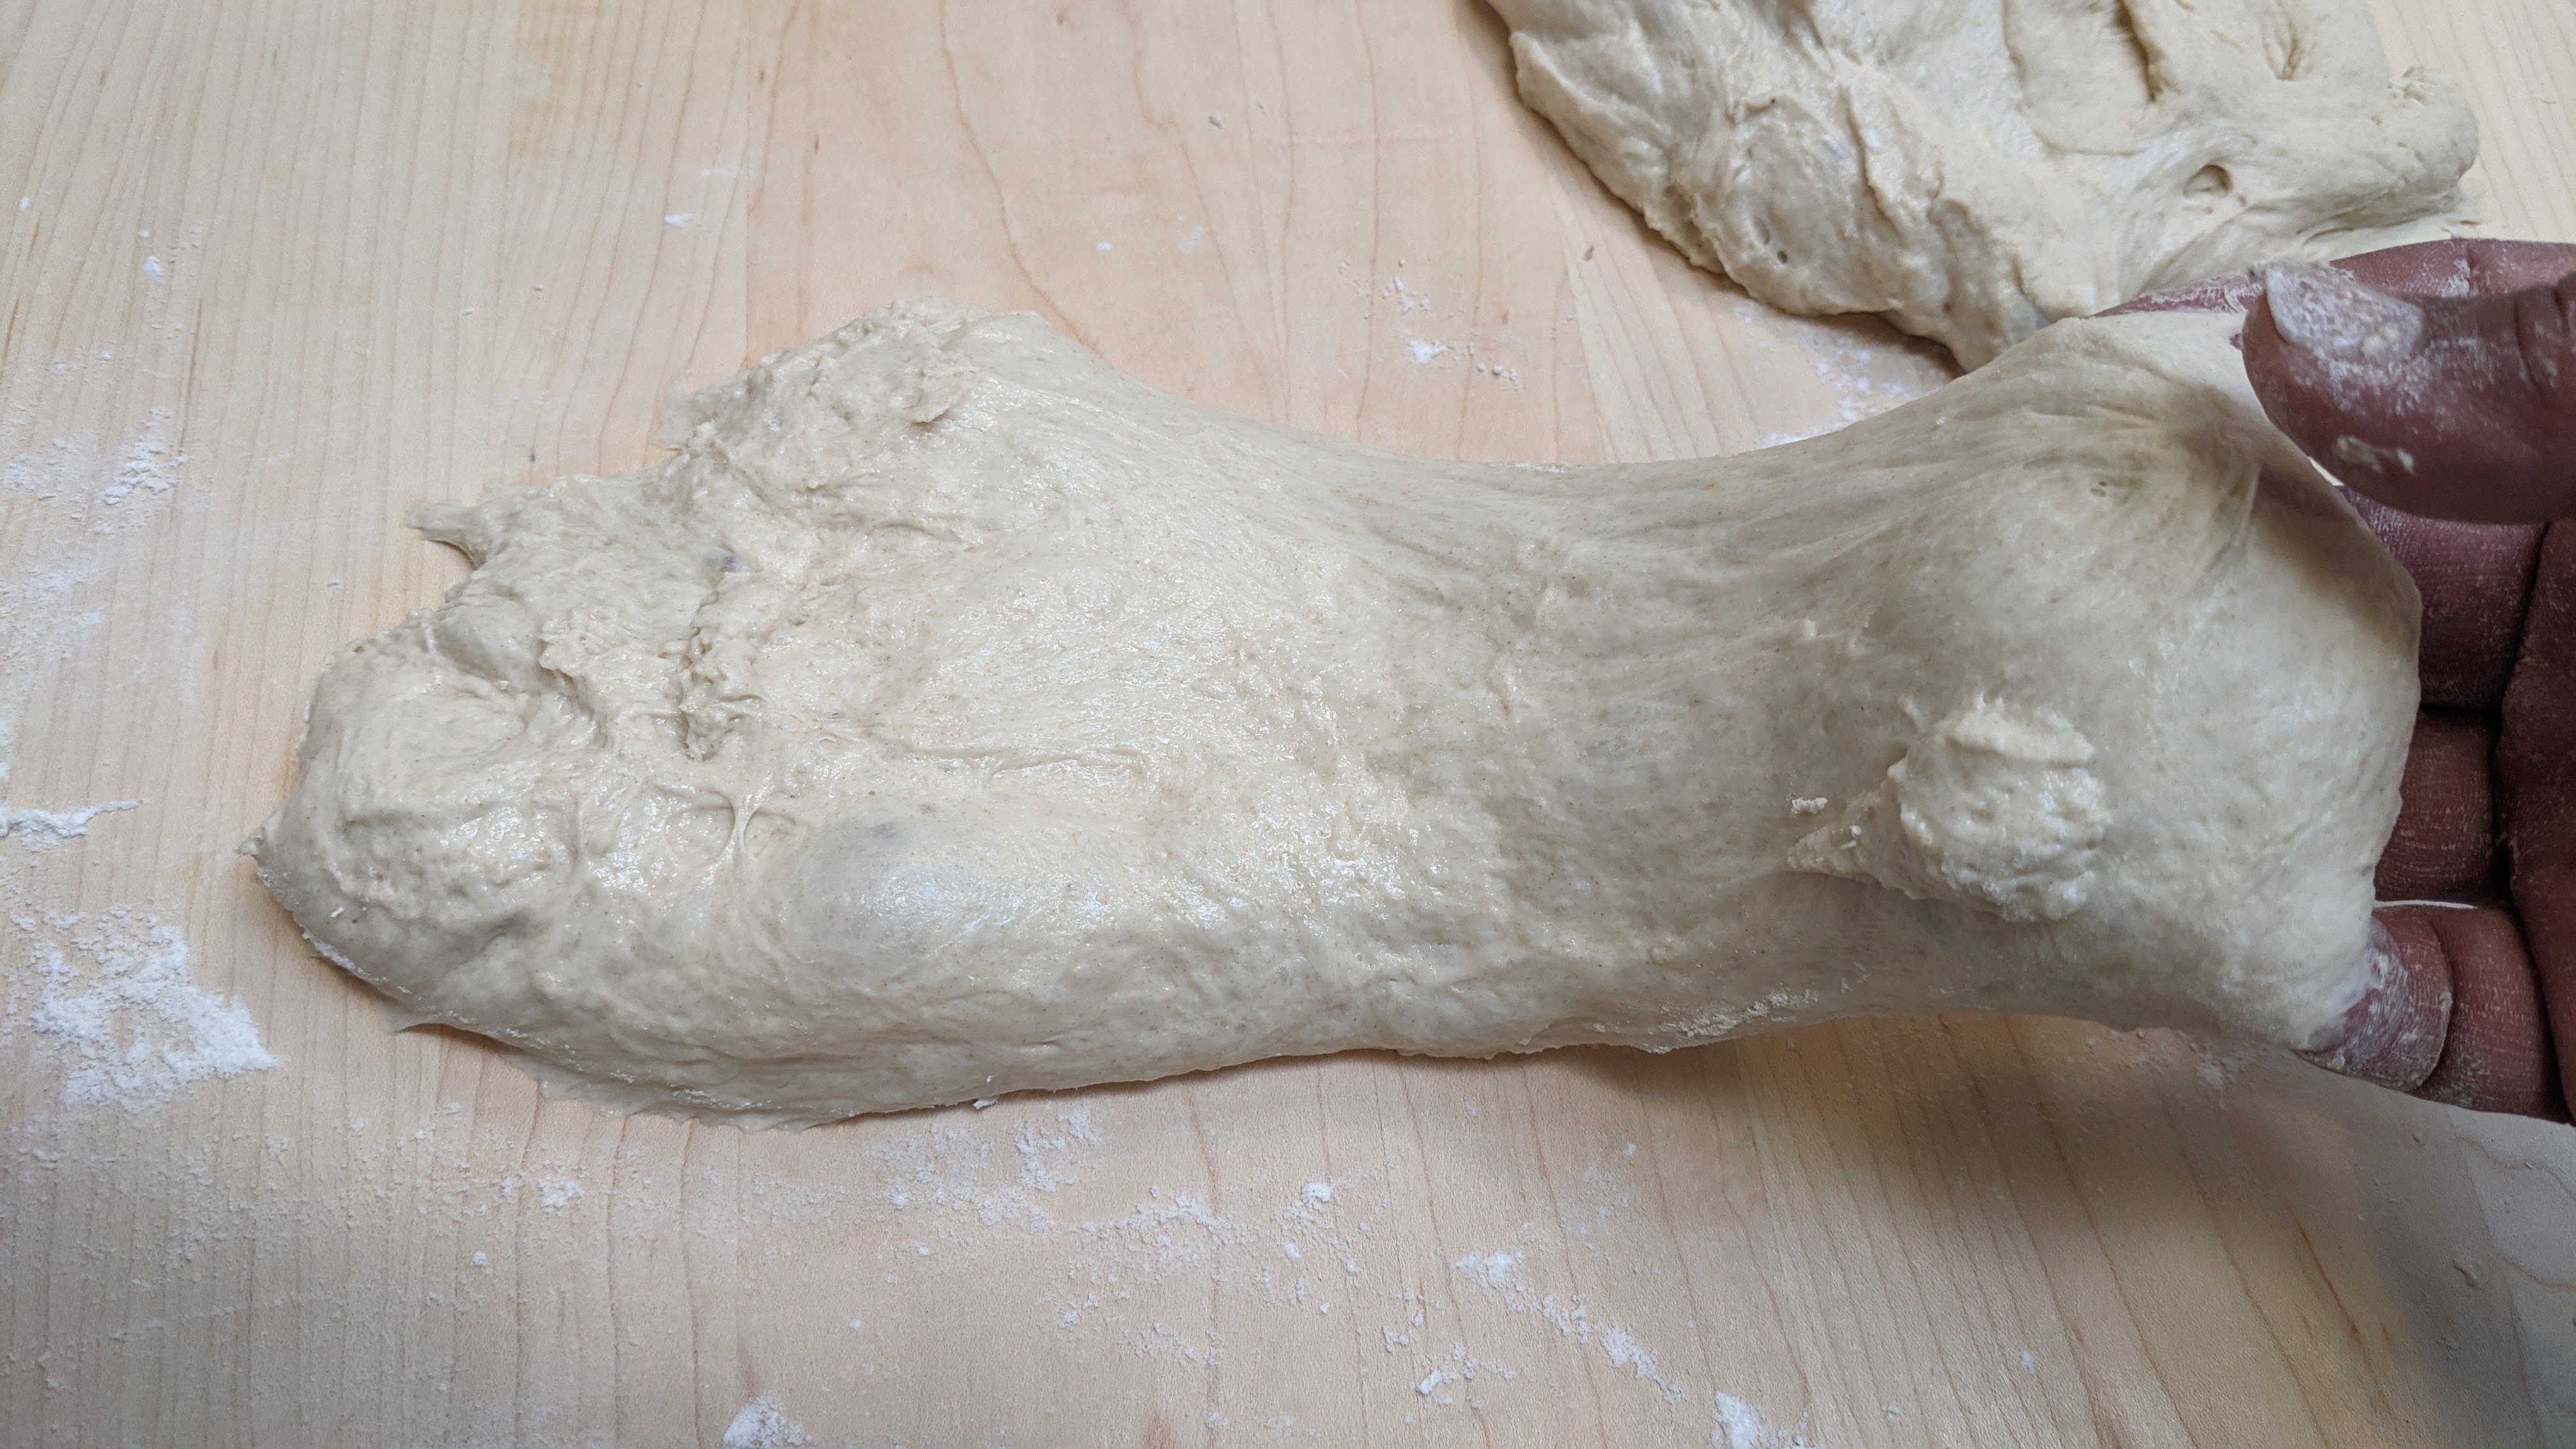
Folding. Gently stretch and fold 3 times in the first hour at 20-minute intervals. By the third fold, the dough should be smooth and supple, with bubbles forming. When you do your stretches, try to be as smooth as possible, but do make sure to stretch the dough to its full extent. This is important, especially with baguettes because you only have a narrow window – one hour – in which to build dough strength.
I love this part of the process because the dough goes from this ugly, uneven mass and transforms into a smooth, luxurious and structured dough.
Bulk Fermentation. 1-2 hours depending on room temp. Or you could pop the dough into the fridge for a long, cold nap. In either case, take the dough out to about 75-80% and NOT doubled as you might see in other recipes. You don’t want to take it too far.
Divide and Shape. Pour dough out onto a floured surface and gently tug it into a rectangle of even thickness. Scale out 4 X 340g pieces. Letter fold each piece, making sure to stretch the sides out when folding, then roll each piece out into a jellyroll shape, and seal the seam. Place seam-side-up on a well-floured couche and let relax for at least 20 minutes (maybe more depending on how tightly you rolled the logs). After resting, shape the logs into baguettes.
Final Fermentation. 1-1½ hour. This could be shorter in warm weather.
Bake. Transfer loaves to a loading board or baguette pan. Score, then bake at 500°F for 8-10 minutes with steam (baguette should just start getting color). Remove your steaming container, then bake at 425°F for 12-15 minutes on convection if you have a convection setting, otherwise bake at 435°F for 12-15 minutes. Bake longer to a deep russet color, but beware that because of the acid in the dough, you don’t want to take these out too far as the crumb will dry if baked too long.
NOTE: You could technically leave out the commercial yeast, especially if your levain is super-active. With its flour representing 25% of the total flour, there will be plenty of yeast to rise the dough. However, if you do this, lengthen the time between folds to 30 minutes and be super gentle with your folding. Consider doing a coil fold for the final fold. Pure sourdough dough is much less forgiving than one that has commercial yeast. Also, final fermentation time will increase as the density of yeast in a levain is much less than that of commercial yeast.
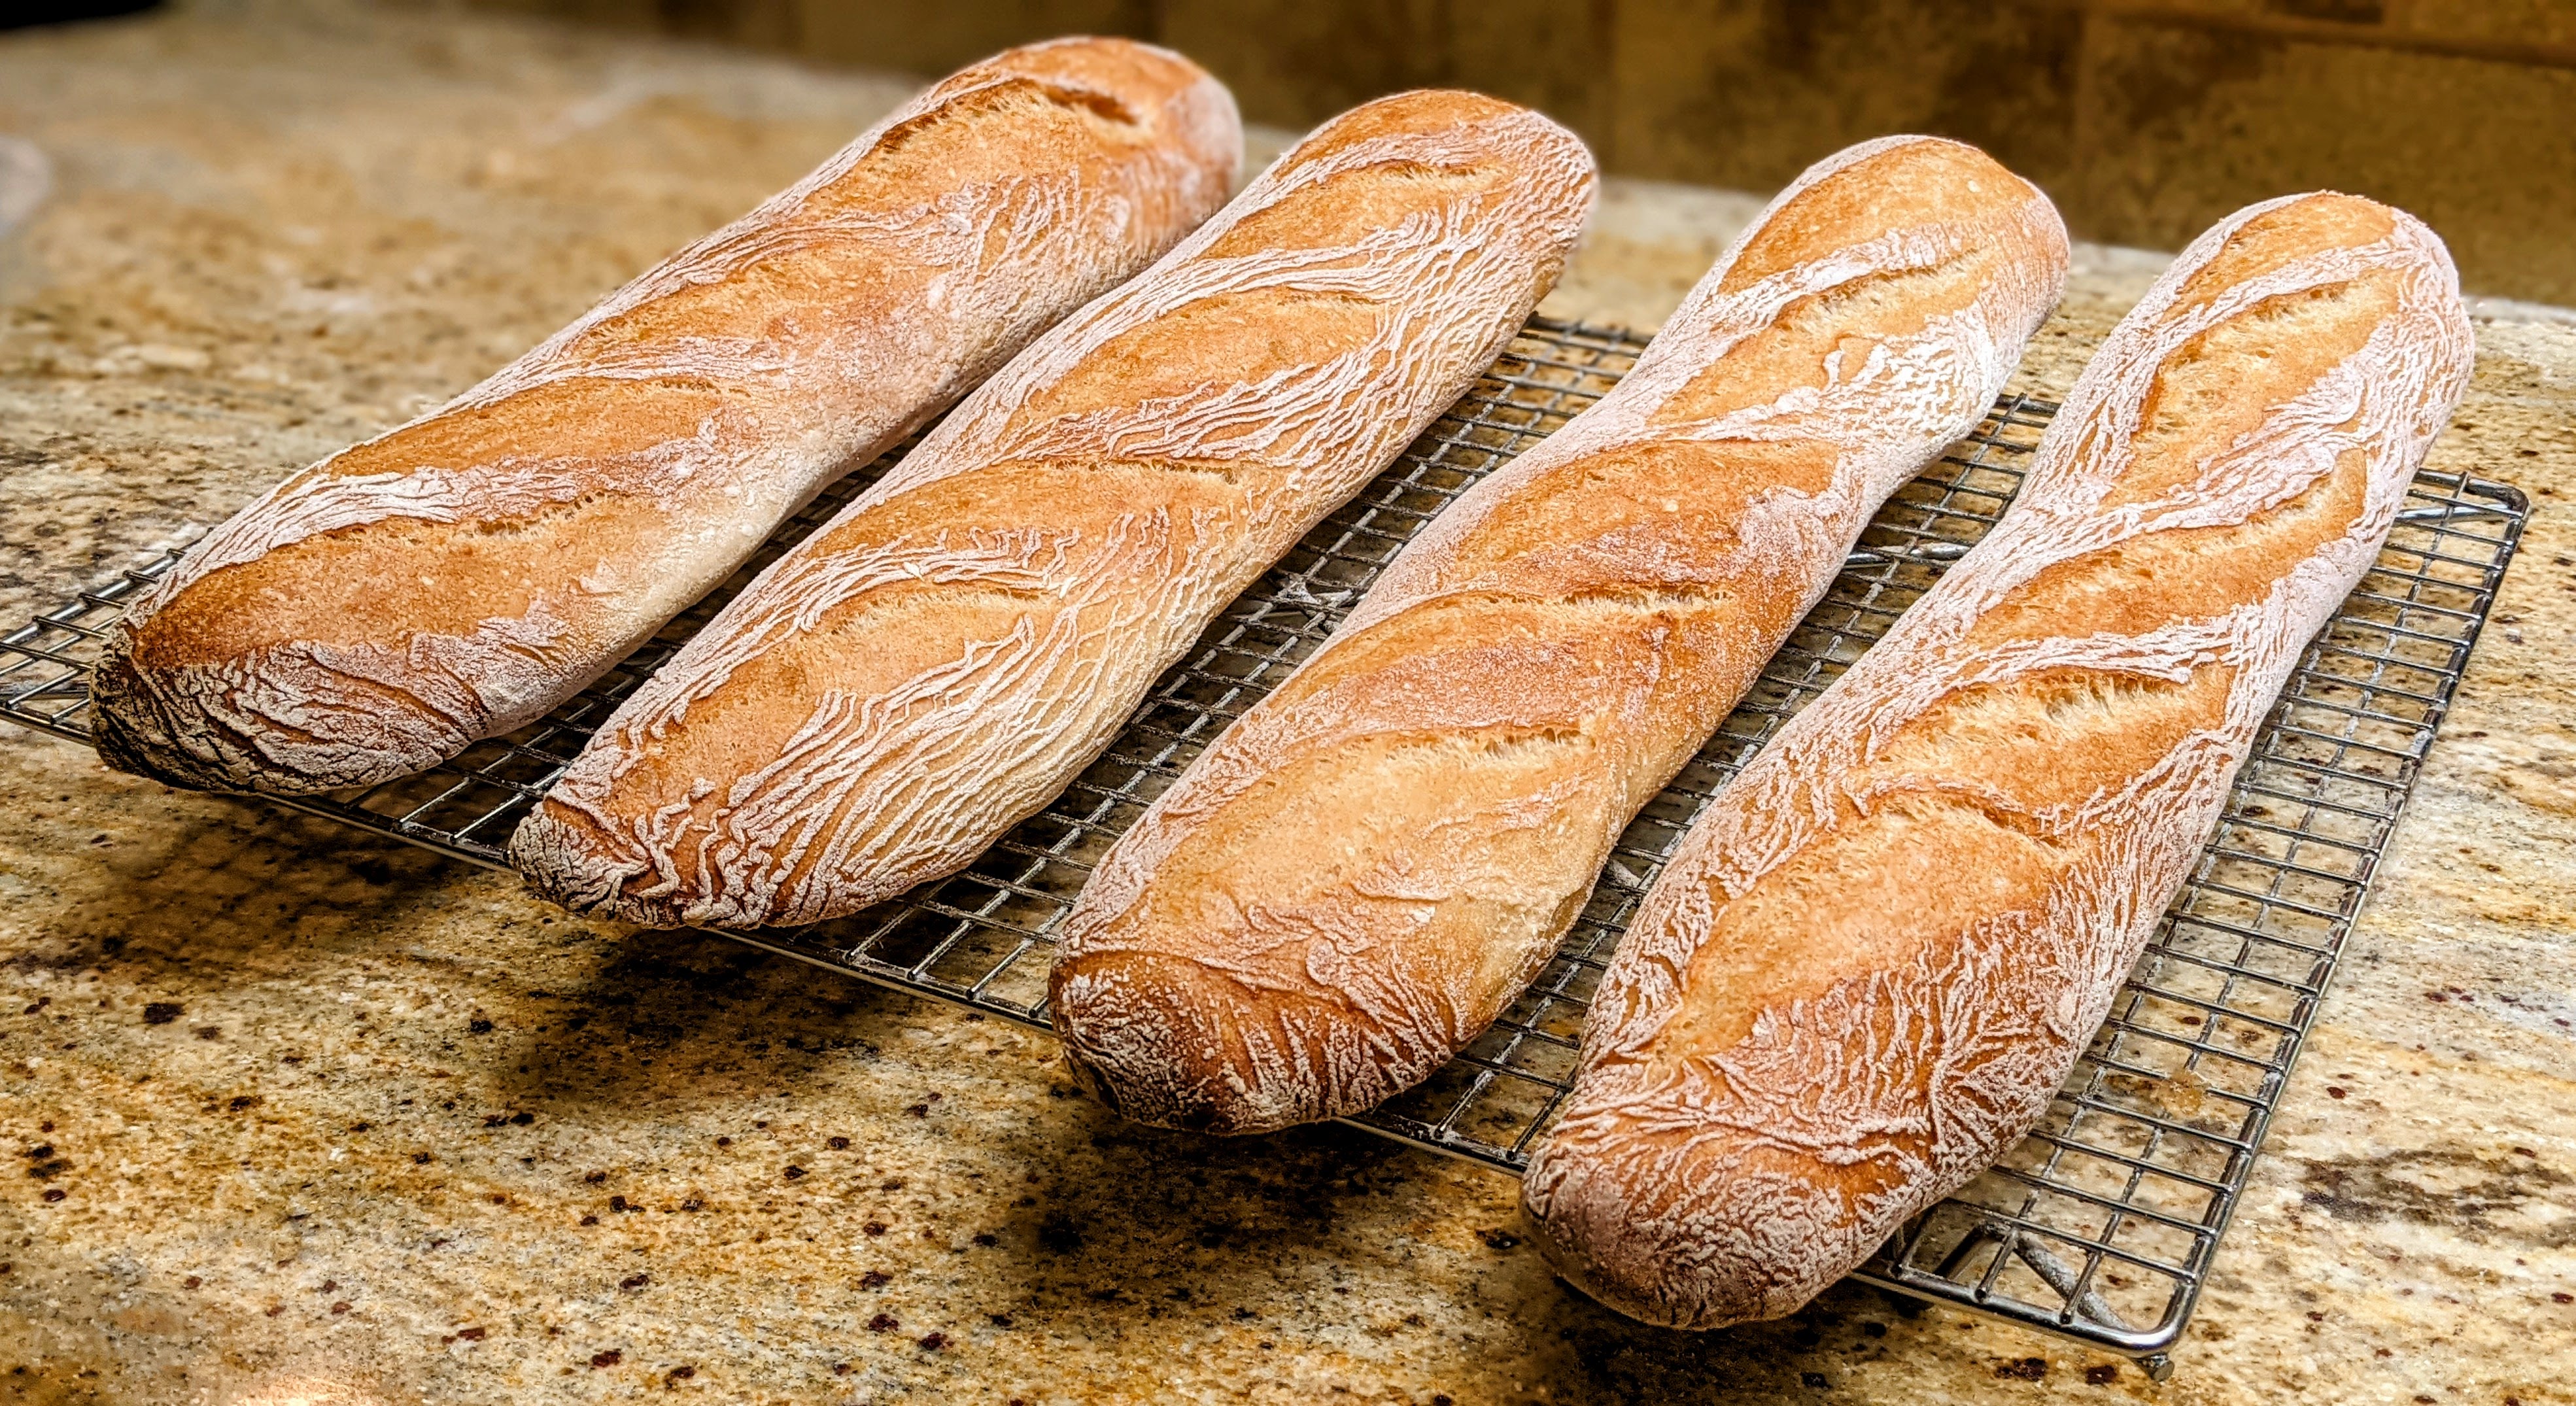
Okay, I admit it. I’m a baguette freak. I make baguettes at least once or twice a week. And up until this past week, I’ve been experimenting with different methods from baguettes made with a poolish to paté fermenté to levain. But to tell you the truth, my favorite baguette to make is based on the slow rise or pointage en bac method; a method similar to the one Master Baker Markus Farbinger teaches in his baguette and ciabatta video series.
So what is the pointage en bac method? Simply put, it’s a straight dough that slowly rises in the fridge. Traditionally, it was retarding the shaped dough. The technique has its roots in busy French bakeries where bakers wanted to provide baguettes throughout the day. After all, baguettes are best eaten within the first hour or two of baking – and they’re MUCH better warm! However, that had an issue of the shaped loaves collapsing, so to prevent that, the bakers would add dough conditioners to help the shaped loaves maintain their structure. Not a fan.
However, as Jeffrey Hamelman put it in “Bread,” the close cousin to this technique is to create a huge batch of dough then separate it into several batch buckets and allow the individual batches to bulk ferment in a cold environment. From a production standpoint, this has huge advantages because all the baker has to do is pull a bucket from the retarder, then shape and bake as opposed to whipping up another batch of dough. This is the method that Chef Markus Farbinger teaches in his baguette video series, though he only makes a single batch.
I prefer this technique simply because it keeps things simple: Throw all the ingredients into a mixing bowl, let it ferment for an hour, fold the dough, cover it, then pop it into the fridge for 6-18 hours. I’ve even used a third of the amount of yeast called for and let it ferment for over 24 hours to develop flavor. It’s a very flexible technique that can easily be adjusted to accommdate different schedules.
AND if you’re going to be baking in separate batches, it’s an ideal method. For instance, in the next couple of days, I’m going to have to make a few batches for an upcoming graduation party. I’m going to make a huge batch of dough, then separate it into separate batches. When the dough’s ready, I’ll take a batch from the fridge, shape it, then bake it. While those loaves are in the oven, I’ll remove the next batch from my fridge, shape them, then let them go into their final fermentation. By the time the previous batch is finished and the oven comes back to temp, the next batch should be ready to bake.
What makes it possible is retarding the dough. Yes, the later batches will be slightly more fermented, but there shouldn’t be too much of a flavor difference between the batches. Let’s get to the formula/recipe, shall we?
Note that the final dough will produce 4 loaves at 335g apiece. With the baking method, the finished loaves will have be approximately 250 grams, which is the official French weight for a baguette (those French are very exacting about their bread standards).
Formula
Ingredient
Baker’s %
Final Dough
AP Flour (11-12% protein)
100%
763g
Water
75%
573g
Salt
2%
15g
Yeast
0.3%
2g
Total Yield (Accounts for about 1% weight loss during processing)
1353g
Optimal Dough Temp
76°F
Target dough temp: 78-80°F
The yeast amount can be varied. Go up to 5g if you intend to just bake them that day, but 2g and an overnight cold rest yield the best flavor!
Process
This is one of the few doughs that I make where I mix entirely by hand mainly because I only make enough dough to make 4 X 330g pieces for a single batch. I use a mixer if I’m doing multiple batches.
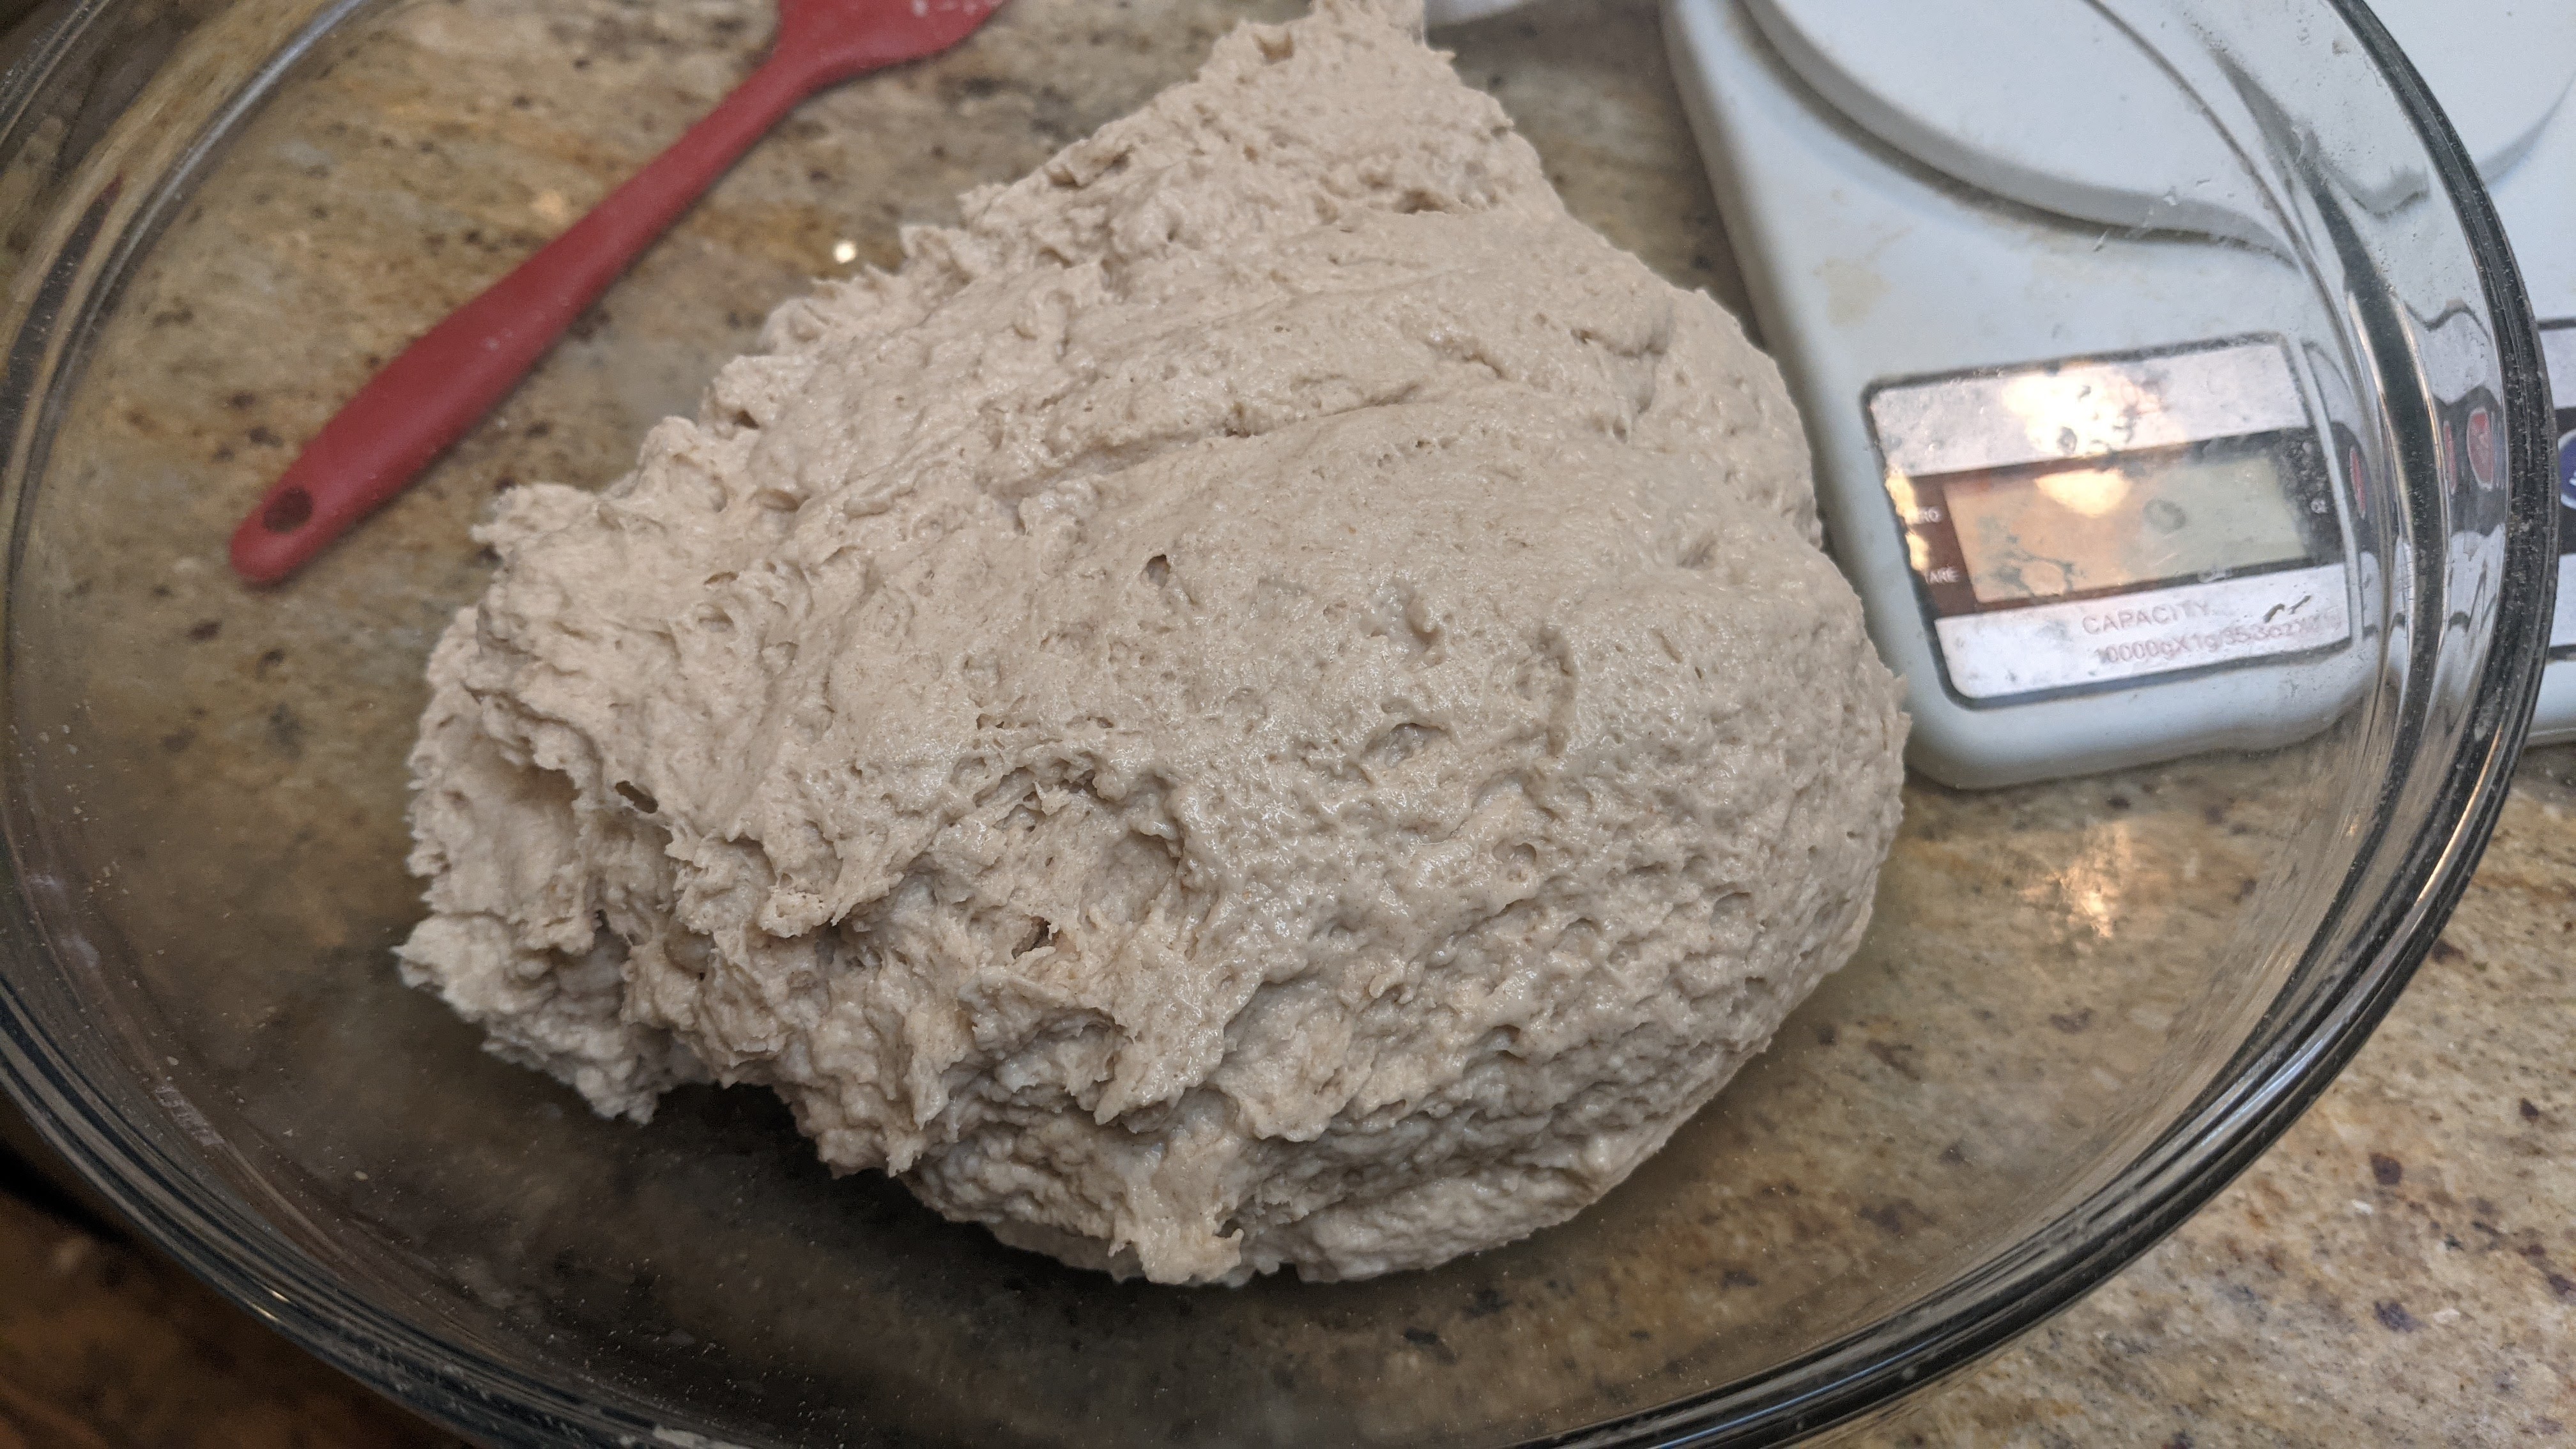
Mixing. Use a mixer or mix by hand and mix to a shaggy mass with no large lumps. As I mentioned above, I almost always mix by hand for a single batch, though I use a Danish dough whisk – that’s a must-have tool. Make sure though to sift the flour if you mix by hand.
Shaggy mass with very little gluten development. The folds at 20-minute intervals will build the strength and has-retention properties of the dough!
Bulk Fermentation: 6-18 hours. 1 hour @ room temp; the rest of the time in the fridge.
Folding. Fold 3 times at 20-minute intervals for the first hour to develop the gas-retention properties of the dough. This is gentle folding. Though I do stretch and folds I do my best to not press down on the dough too much when folding a flap over. After the third fold, pop the dough into the fridge for a long, cold rest, or until the dough has expanded around 50%. It’s best not to let it go too much further than this.
You may notice that this folding schedule is different from my original instructions of letting the shaggy mass sit for an hour, then doing a single fold and popping it into the fridge. But once I started making Baguettes de Tradition, I’ve preferred this folding schedule because it ensures equal distribution of the yeast and salt AND the dough develops lots of strength, especially if I mix by hand so I now use this folding schedule for all the baguettes I make.
Divide and Shape. Dump your dough out onto a lightly floured surface, tug the dough into a rough rectangle with even thickness throughout, then scale out 335g pieces. Preshape each piece by letter folding it, then rolling it like a jelly roll into a log. Seal the seams, then set aside on a well-floured couche – seam-side-up – for 20-30 minutes to relax the dough (this could be longer if you rolled the log tight, but don’t go over 45 minutes). After resting, shape the dough into baguettes, returning each piece to the couche, giving ample room for the loaves to expand.
There’s technically no official weight and length, though in general, the accepted final weight and length of a finished loaf is around 250g and 60cm in length. After a lot of tweaking with different weights, I found that a 335g dough weight is optimal to achieve the 250g finished weight.
Final Fermentation. 30-minutes – 1 1/2 hour depending on ambient temp. This is where feel is extremely important. While traditionally “doubling” is a decent visual cue, that will take the loaf close to full fermentation and leave very little room for expansion in the oven. And with a dough like this, which is wet and narrowly shaped, the finger dent test isn’t revealing because when you poke into it, most of the time, the dent will remain – even in the early stages of the final fermentation. So it’s best to check the loaves every 30 minutes. The loaf will be ready when it feels like poking a marshmallow.
65% AP flour / 35% Kamut flour. Whole grain flour will limit spring but will provide tons of flavor!
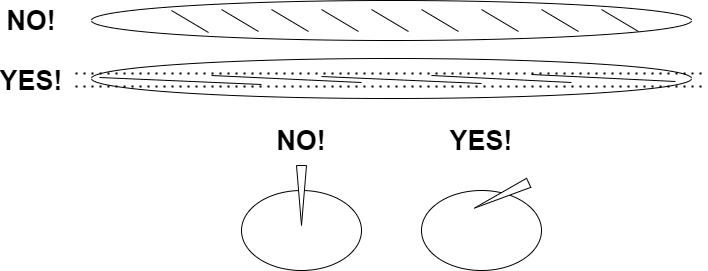
Score. Score the loaves according to the diagram below. Do not score on the bias! Even though the scoring may appear to be on the bias, the slashes are actually fairly parallel, with just a few degrees of deflection down the middle third of the loaf. Though there’s no rule governing how many slashes you make, aesthetically, an odd number looks better.
Scoring should be done within the middle third of the loaf, with each slash overlapping roughly 1/3 of the previous slash. Your blade angle should be about 20-degrees to the surface of the dough.
Bake. Bake at 475°F/250°C for 12 minutes with steam. Remove steam container, then bake for 12-15 minutes at 435°F/225°C, or if you have a convection setting, 425°F/220°C. These baguettes really benefit from a full bake.
As I mentioned previously, my favorite bread to make is a baguette. And I think the primary reason is that I love to make sandwiches out of baguettes! To me, happiness is a great sandwich made with great bread. But I was SO excited because I think I finally found the perfect flour blend for my baguettes!
Yeah, yeah… I’m always tweaking. Well, not for my boules and batards any longer. I have the flour blend down for that. But with my baguettes, I’ve been trying to strike a good balance between texture, taste, and especially, nutritiousness. I didn’t want to do a pure white flour baguette, but I also didn’t want the bread to be as heavy as my 75-25 high-extraction/whole wheat blend. So I decided to lighten it up. But instead of using bread flour, I decided to use regular old AP flour, and the results were magnificent!
Before I get into the recipe, especially if you’re new to making baguettes, the formula and process may seem a bit daunting. But I wanted to include as much detailed information as possible because there’s a lot to know and frankly, baguettes are one of the hardest breads to make well. I’ve learned how to make baguettes through a lot of trial and error plus a variety of sources, both online and from books. What I’m presenting here is kind of a conglomeration of all the stuff I’ve learned.
Flour That I Use
In general, I use high-quality and if possible organic flour. For common AP flour, it’s almost always King Arthur or Bob’s Red Mill. Both offer consistent quality for baking (though I’ve recently taken to using Central Milling organic AP flour – it’s very nice).
For my baguettes, I use a blend of flour that is predominantly unbleached AP flour. By using a substantial amount of AP flour, I lower the protein content slightly. The one thing I found about baguettes is that you don’t want a real tight internal gluten structure. You want a nice, taut skin when shaping, but internally, you don’t want nearly as much dough strength as you would a boule or batard – just enough dough strength to hold the bubbles together.
Azure Market Organics Unbleached Bread Flour, Ultra Unifine, Organic – In its place you can use a Type 85 flour or another high-extraction flour. And make sure that the flour is ground fine- to extra-fine. If you can’t find any high-extraction flour, no problem. Just use regular bread flour. However, one of the main reasons I suggest using high-extraction flour is that it retains most of the natural yeasts, oil, and microbes that are essentially removed from white flours; not as much as whole grain flour, but certainly much more than white flour. They will add more complexity to the overall flavor of the bread!
As for 100% whole-wheat flour, you should sift it before mixing. Retain the bran, then sprinkle it over the shaped loaves right before baking. It’ll give the tops of the baguettes a rustic look.
AP Flour – I struggle with this because technically you could use standard grocery store brands like Gold Medal or store label AP flour. King Arthur, Bob’s Red Mill, and Azure Standard are 11.5% to 11.7% protein. It’s really not that much difference in protein amount, but it makes a world of difference in oven spring and dough strength!
Bleached or Unbleached Flour?
My preference is to use unbleached flour which is aged naturally as opposed to bleached flour which uses chemical agents to speed up the aging process. From a taste perspective, you shouldn’t notice any differences. Texturally, it is said that unbleached flour has a denser grain and tougher texture, but I’ve only used unbleached flour, so I couldn’t tell you the difference.
Without further ado, here’s the formula.
Overall Formula
Flour
100%
Water
75%
Salt
2%
Yeast
0.43%
Total Percentage
177.43%
Poolish*
Flour
100%
200
Water
100%
200
Yeast
0.16%
0.3
Flour of the poolish represents 25% of the total flour (see below Final Dough)
*It’s a good idea to make more poolish than you actually need. There will always be some loss due to evaporation and dough sticking to your mixing utensil. So even though the dough technically calls for 190g of flour/water (380g poolish), I’d use at least 200g flour and water each.
Final Dough
Flour
572g AP flour (75%): 428g, High-extraction (25%): 143g
Water
381g
Salt
15g
Yeast
5g Use half if bulk fermenting cold
Poolish
380g
Yield
1340g (+ 13g wiggle room) 4 X 335g (60cm) loaves 6 X 225g (40cm) loaves
Optimal Dough Temp
76°- 80°F
Total Flour (incl. poolish)
762g
Total Water (incl. poolish)
572g
Instructions
Day 1
Prepare the poolish 6-12 hours before you intend to mix the final dough. I usually make it the evening before my bake, but also, since I’m an early-riser, I’ll make the poolish at 5-6am, then mix the final dough in the afternoon.
Day 2
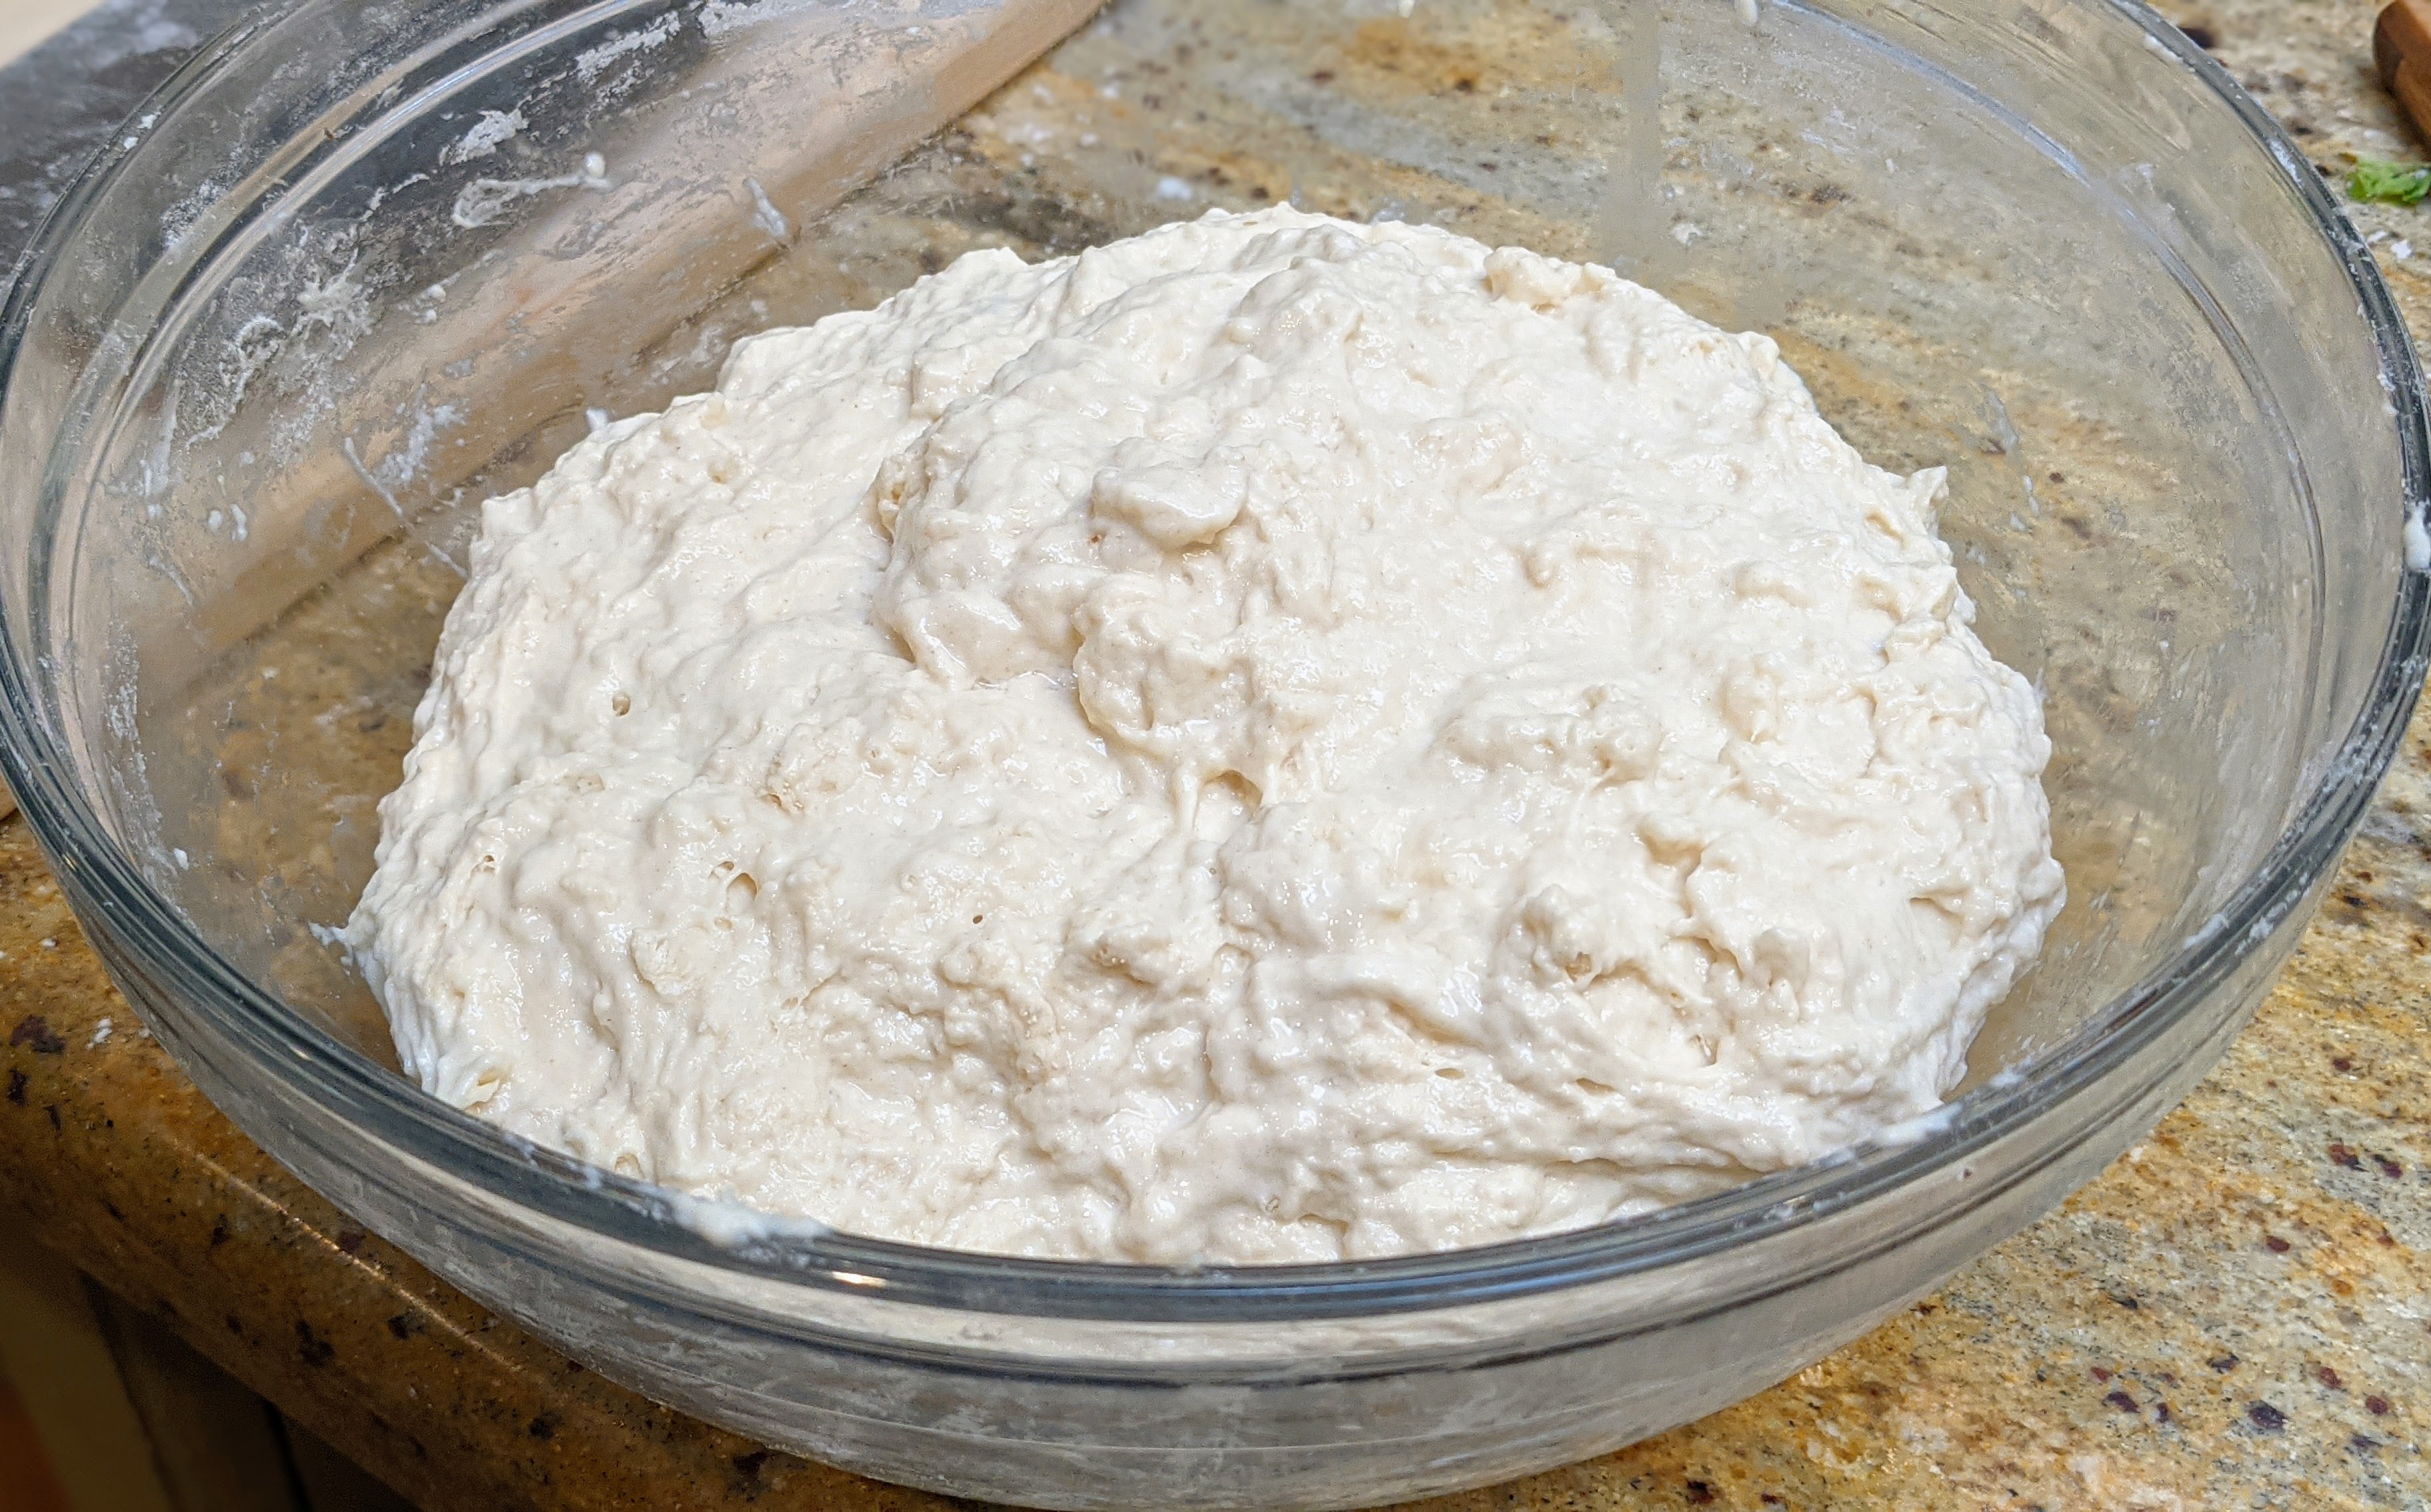
Mixing. Break up and completely dissolve the poolish into the water. In a separate bowl, thoroughly combine all the dry ingredients. Then mix the wet and dry ingredients together. Mix until all the ingredients are combined with no large lumps. If mixing by hand, a Danish dough whisk works great! If using a mixer, mix on the slowest speed and regularly scrape down the sides. Mix until you form a well-combined, but shaggy mass as shown to the left.
Bulk Fermentation. 2 – 2½ hours. Take the dough to no more than 50% of its original size. Though you can take it to double, you want some food for the final ferment, and doubling cuts it real close. Rolling out the baguettes will degas the dough, so you want to have enough yeast activity for the shaped dough to rise.
Folding. Fold three times (stretch and fold in the bowl), every 20 minutes in the first hour. I want to stress that you need to be very gentle with the folding. Definitely stretch the dough but be very careful to not tear it or degas it too much! Stretch and fold until the dough no longer wants to be stretched then stop. By the end of the third folding session, your dough will be smooth and luxurious, as in the picture to the right. You will see bubbles formed just beneath the surface of the dough.
(optional) Cold Bulk Fermentation. After the first hour, you can pop the dough into your fridge for some further flavor development. With this amount of commercial yeast though, I wouldn’t recommend doing this for more than 6-8 hours. You want to make sure the dough is still well-domed when you remove it from the fridge. The reason for this is commercial yeast – even at 36°F- 39°F – are pretty hardy little buggers. They’ll certainly slow down, but unlike indigenous yeast, they’re like little Energizer Bunnies! 🙂 That said, if you want to do an even longer cold bulk fermentation, cut the yeast in half or even down to a quarter of what I listed and you can cold bulk for a couple of days!
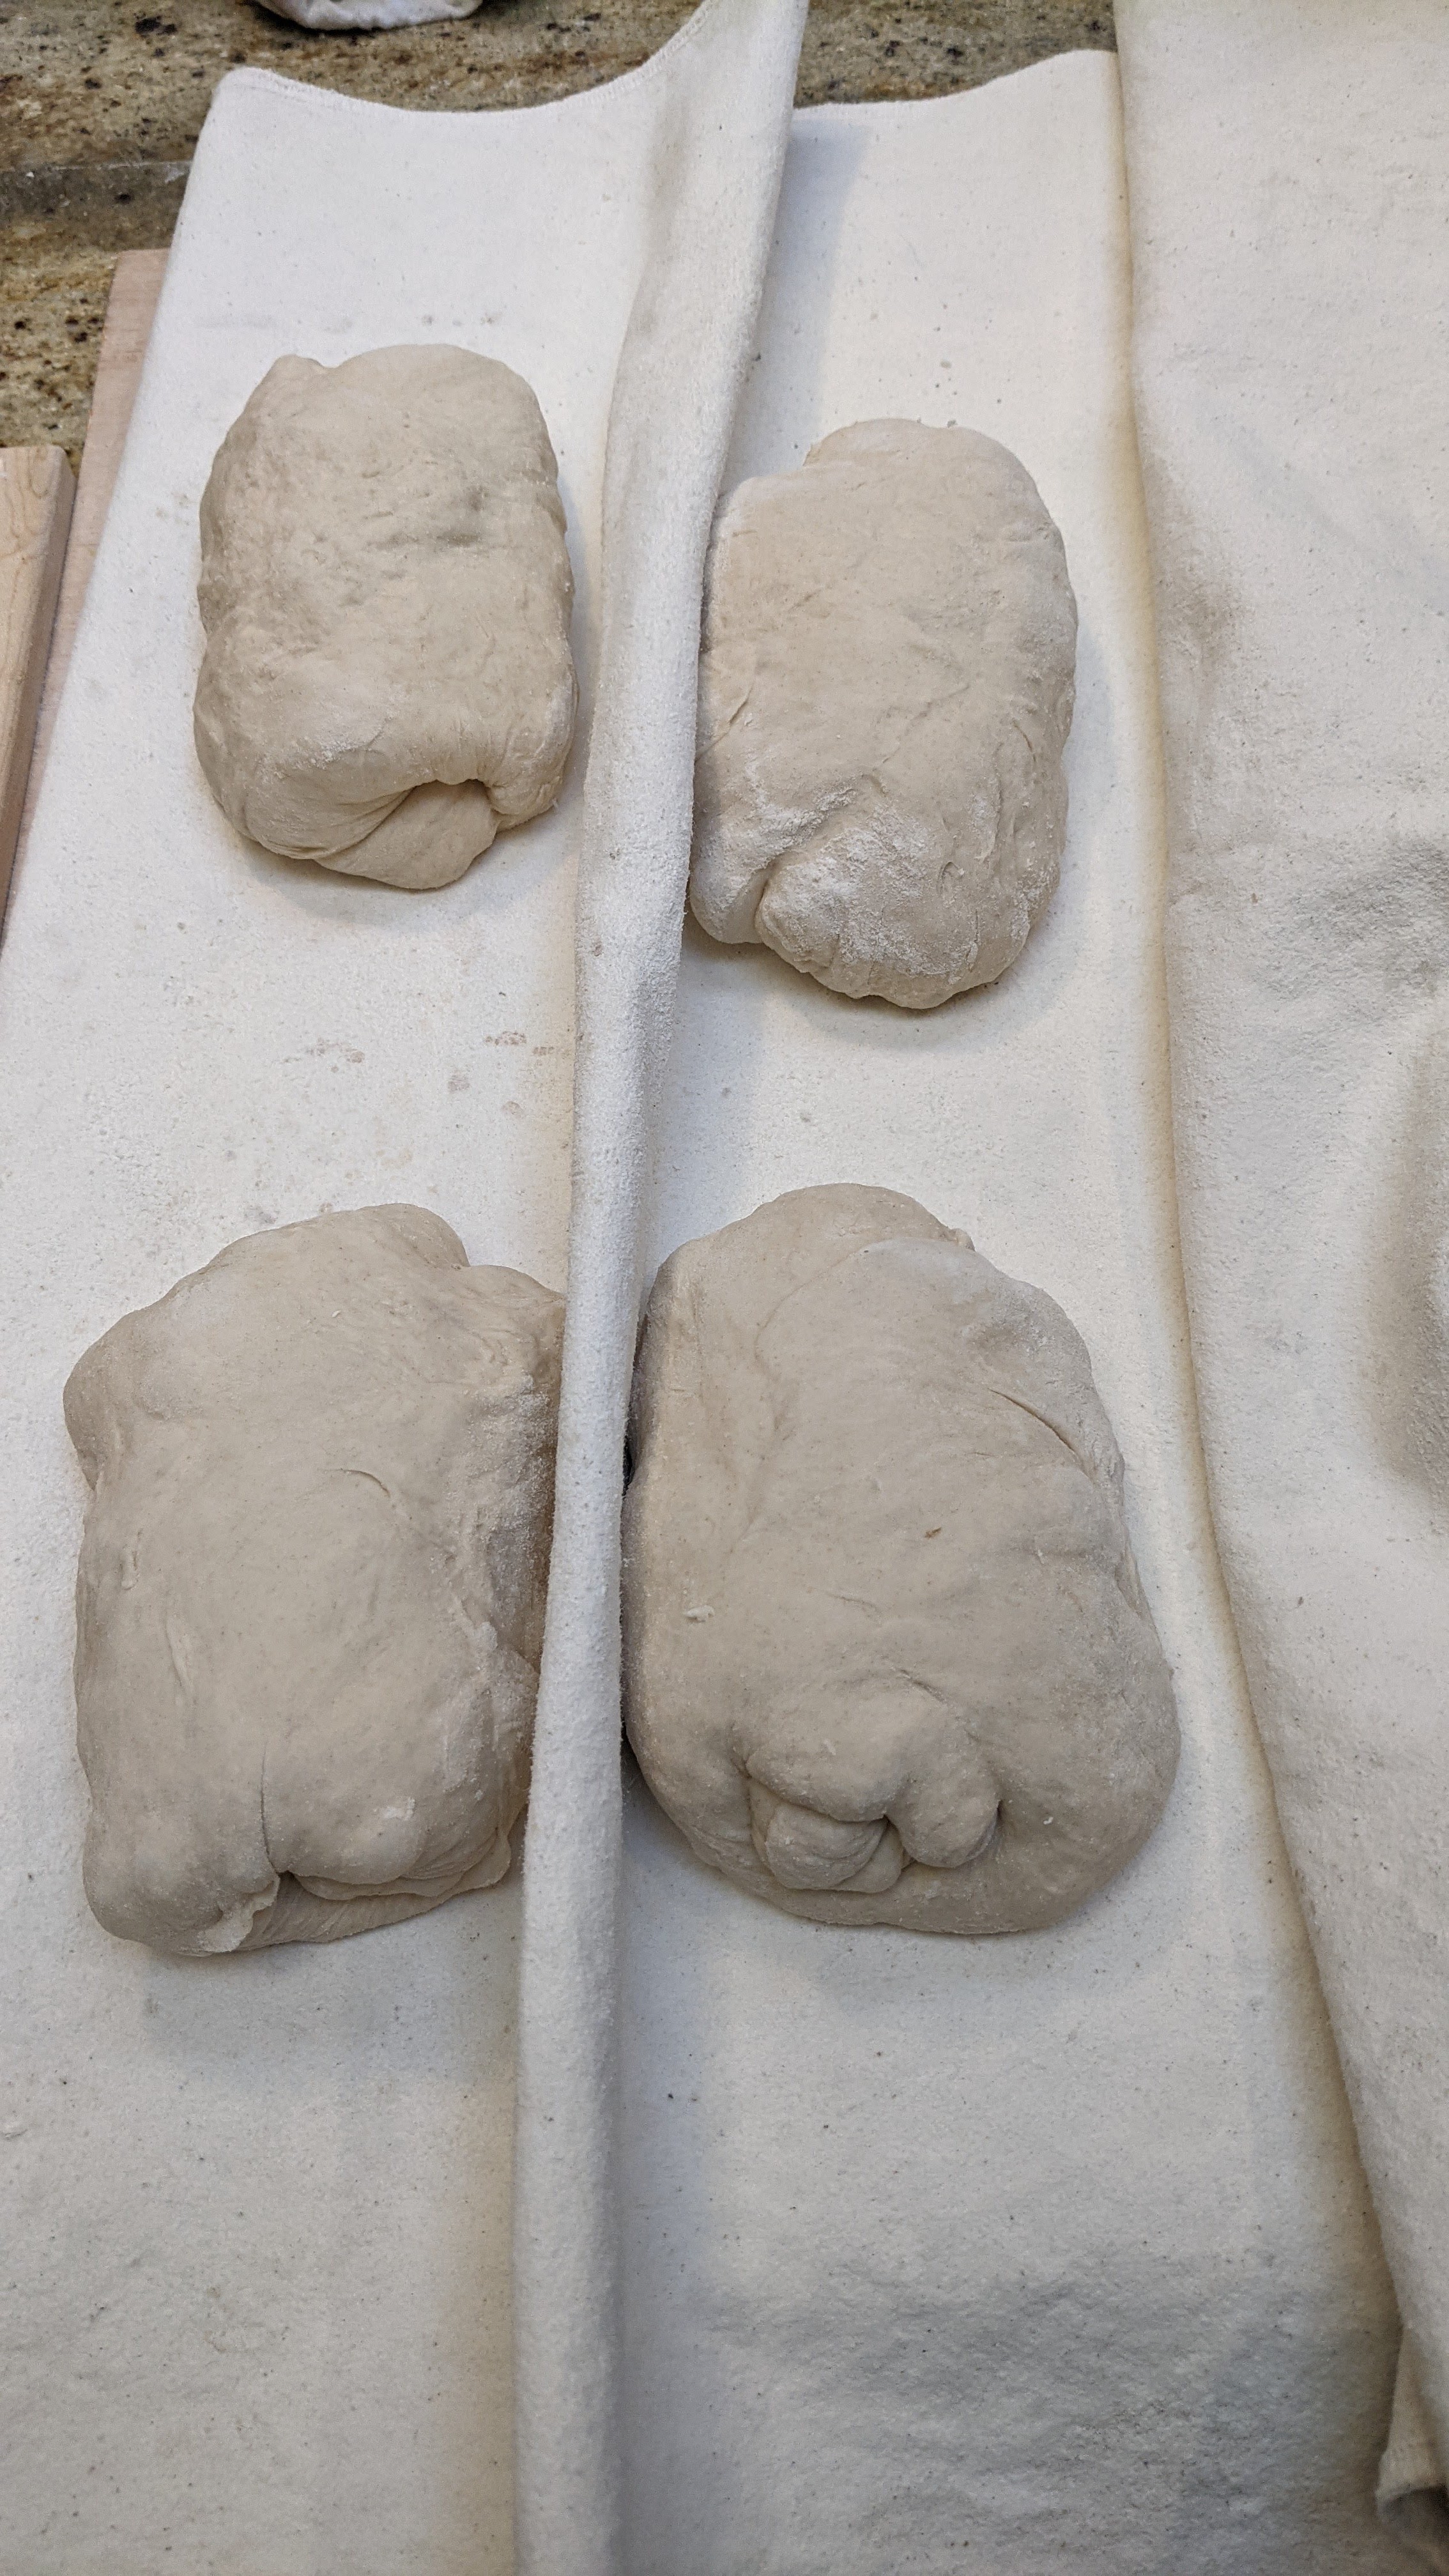
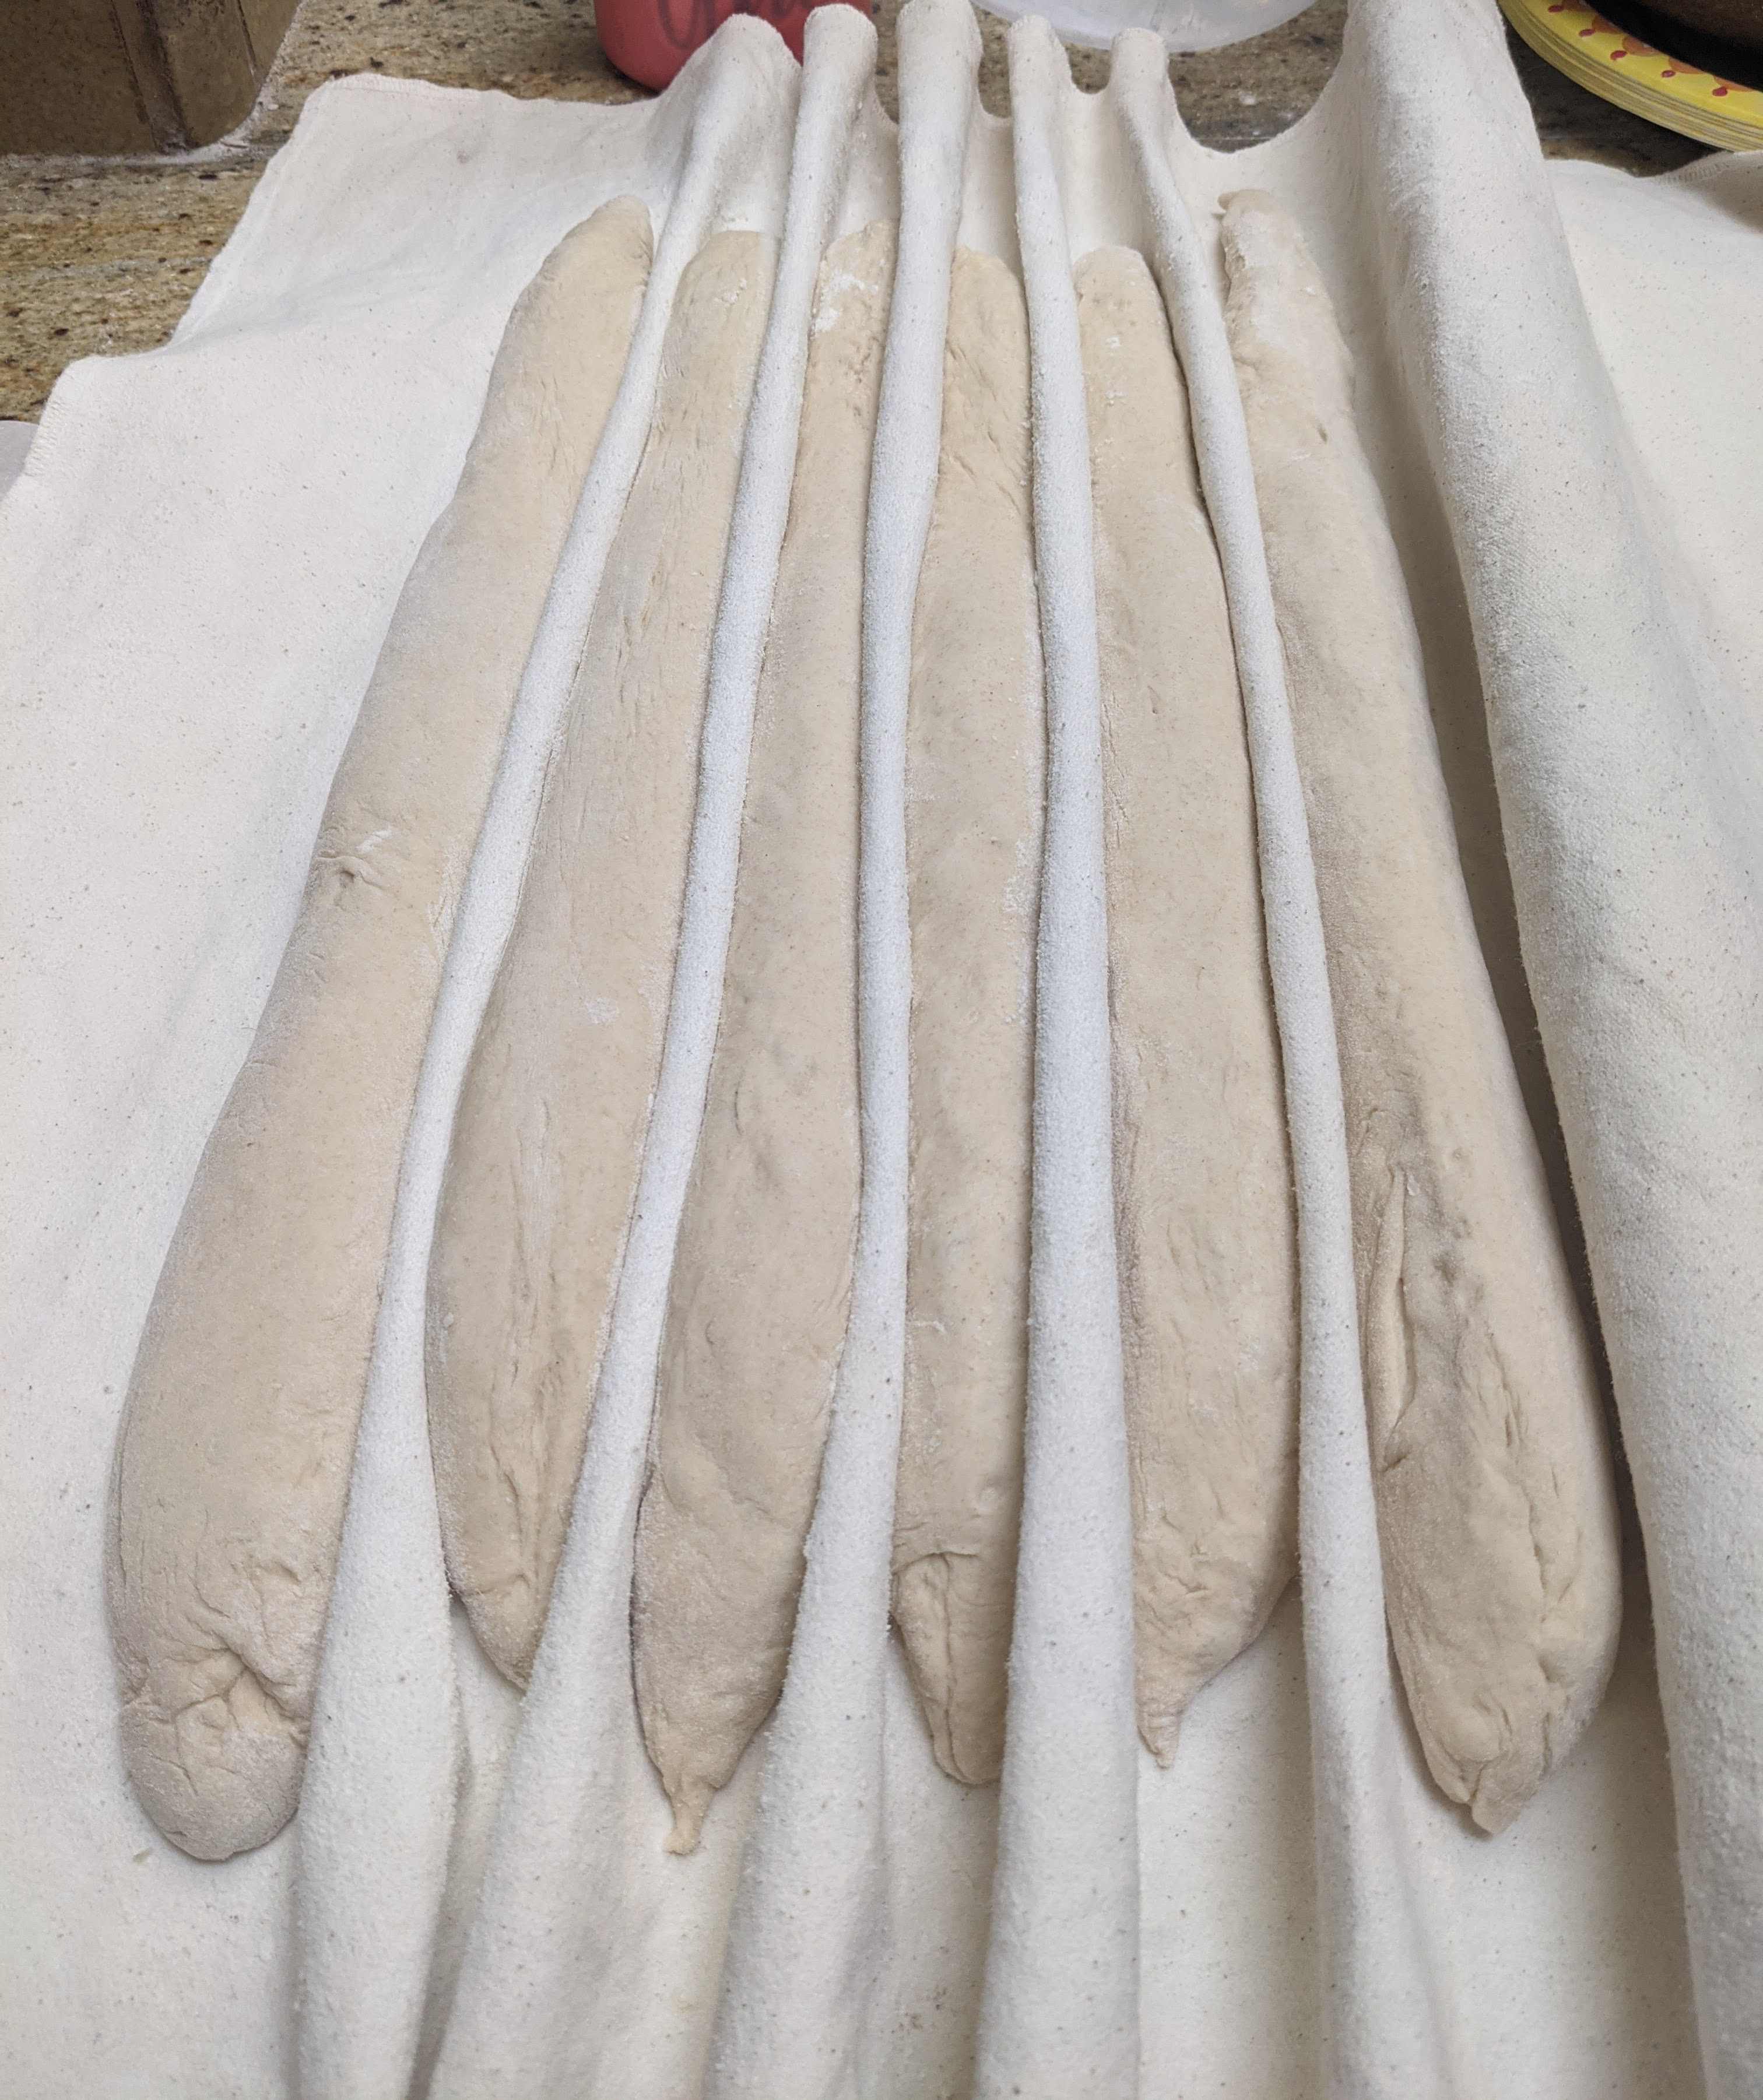
Divide and Pre-shape. Gently pour the dough out onto a lightly floured surface. Tug it into a rectangle, then divide it into 4 X 335g pieces for standard 60cm baguettes or 6 X 220g pieces for 40cm baguettes. Letter fold each piece by gently pulling out the sides and folding to the middle, then jelly-roll it perpendicular to the letter fold seam to form a rough, short log. Seal the seam, then place on a well-floured couche, seam-side-up (on the left). Allow the dough to relax for 10-30 minutes depending on how tightly you rolled the initial log. The dough should be very relaxed before you shape, otherwise, it will fight you!
Shaping. After the bench rest, shape the logs into baguettes about 15-20″ depending on the size of your oven (I have a baking stone, so I roll mine out to 24″). and return to the couche for final fermentation. Make sure to leave lots of room in between the pieces to prevent tearing during the final ferment. You’ll know the dough’s relaxed enough when you can stretch it and it doesn’t fight you. If you find the dough fighting you, let it sit for a few minutes then resume shaping.
Final Fermentation. 1 – 1½ hour. This could be shorter or longer depending on the weather! Use 1 hour as the baseline, but during warm weather, check the progress of the loaves at 30 minutes.
Bake. Transfer the loaves to a transfer board, score, then bake at 475°F for 12 minutes with steam. Release steam (remove your steaming container), turn down oven to 425°F and bake another 15-20 minutes until you achieve a rich, russet color. Personally, I’m not a fan of taking baguettes out to super-dark. The crust at that point becomes too hard to be enjoyable. But that’s just me.
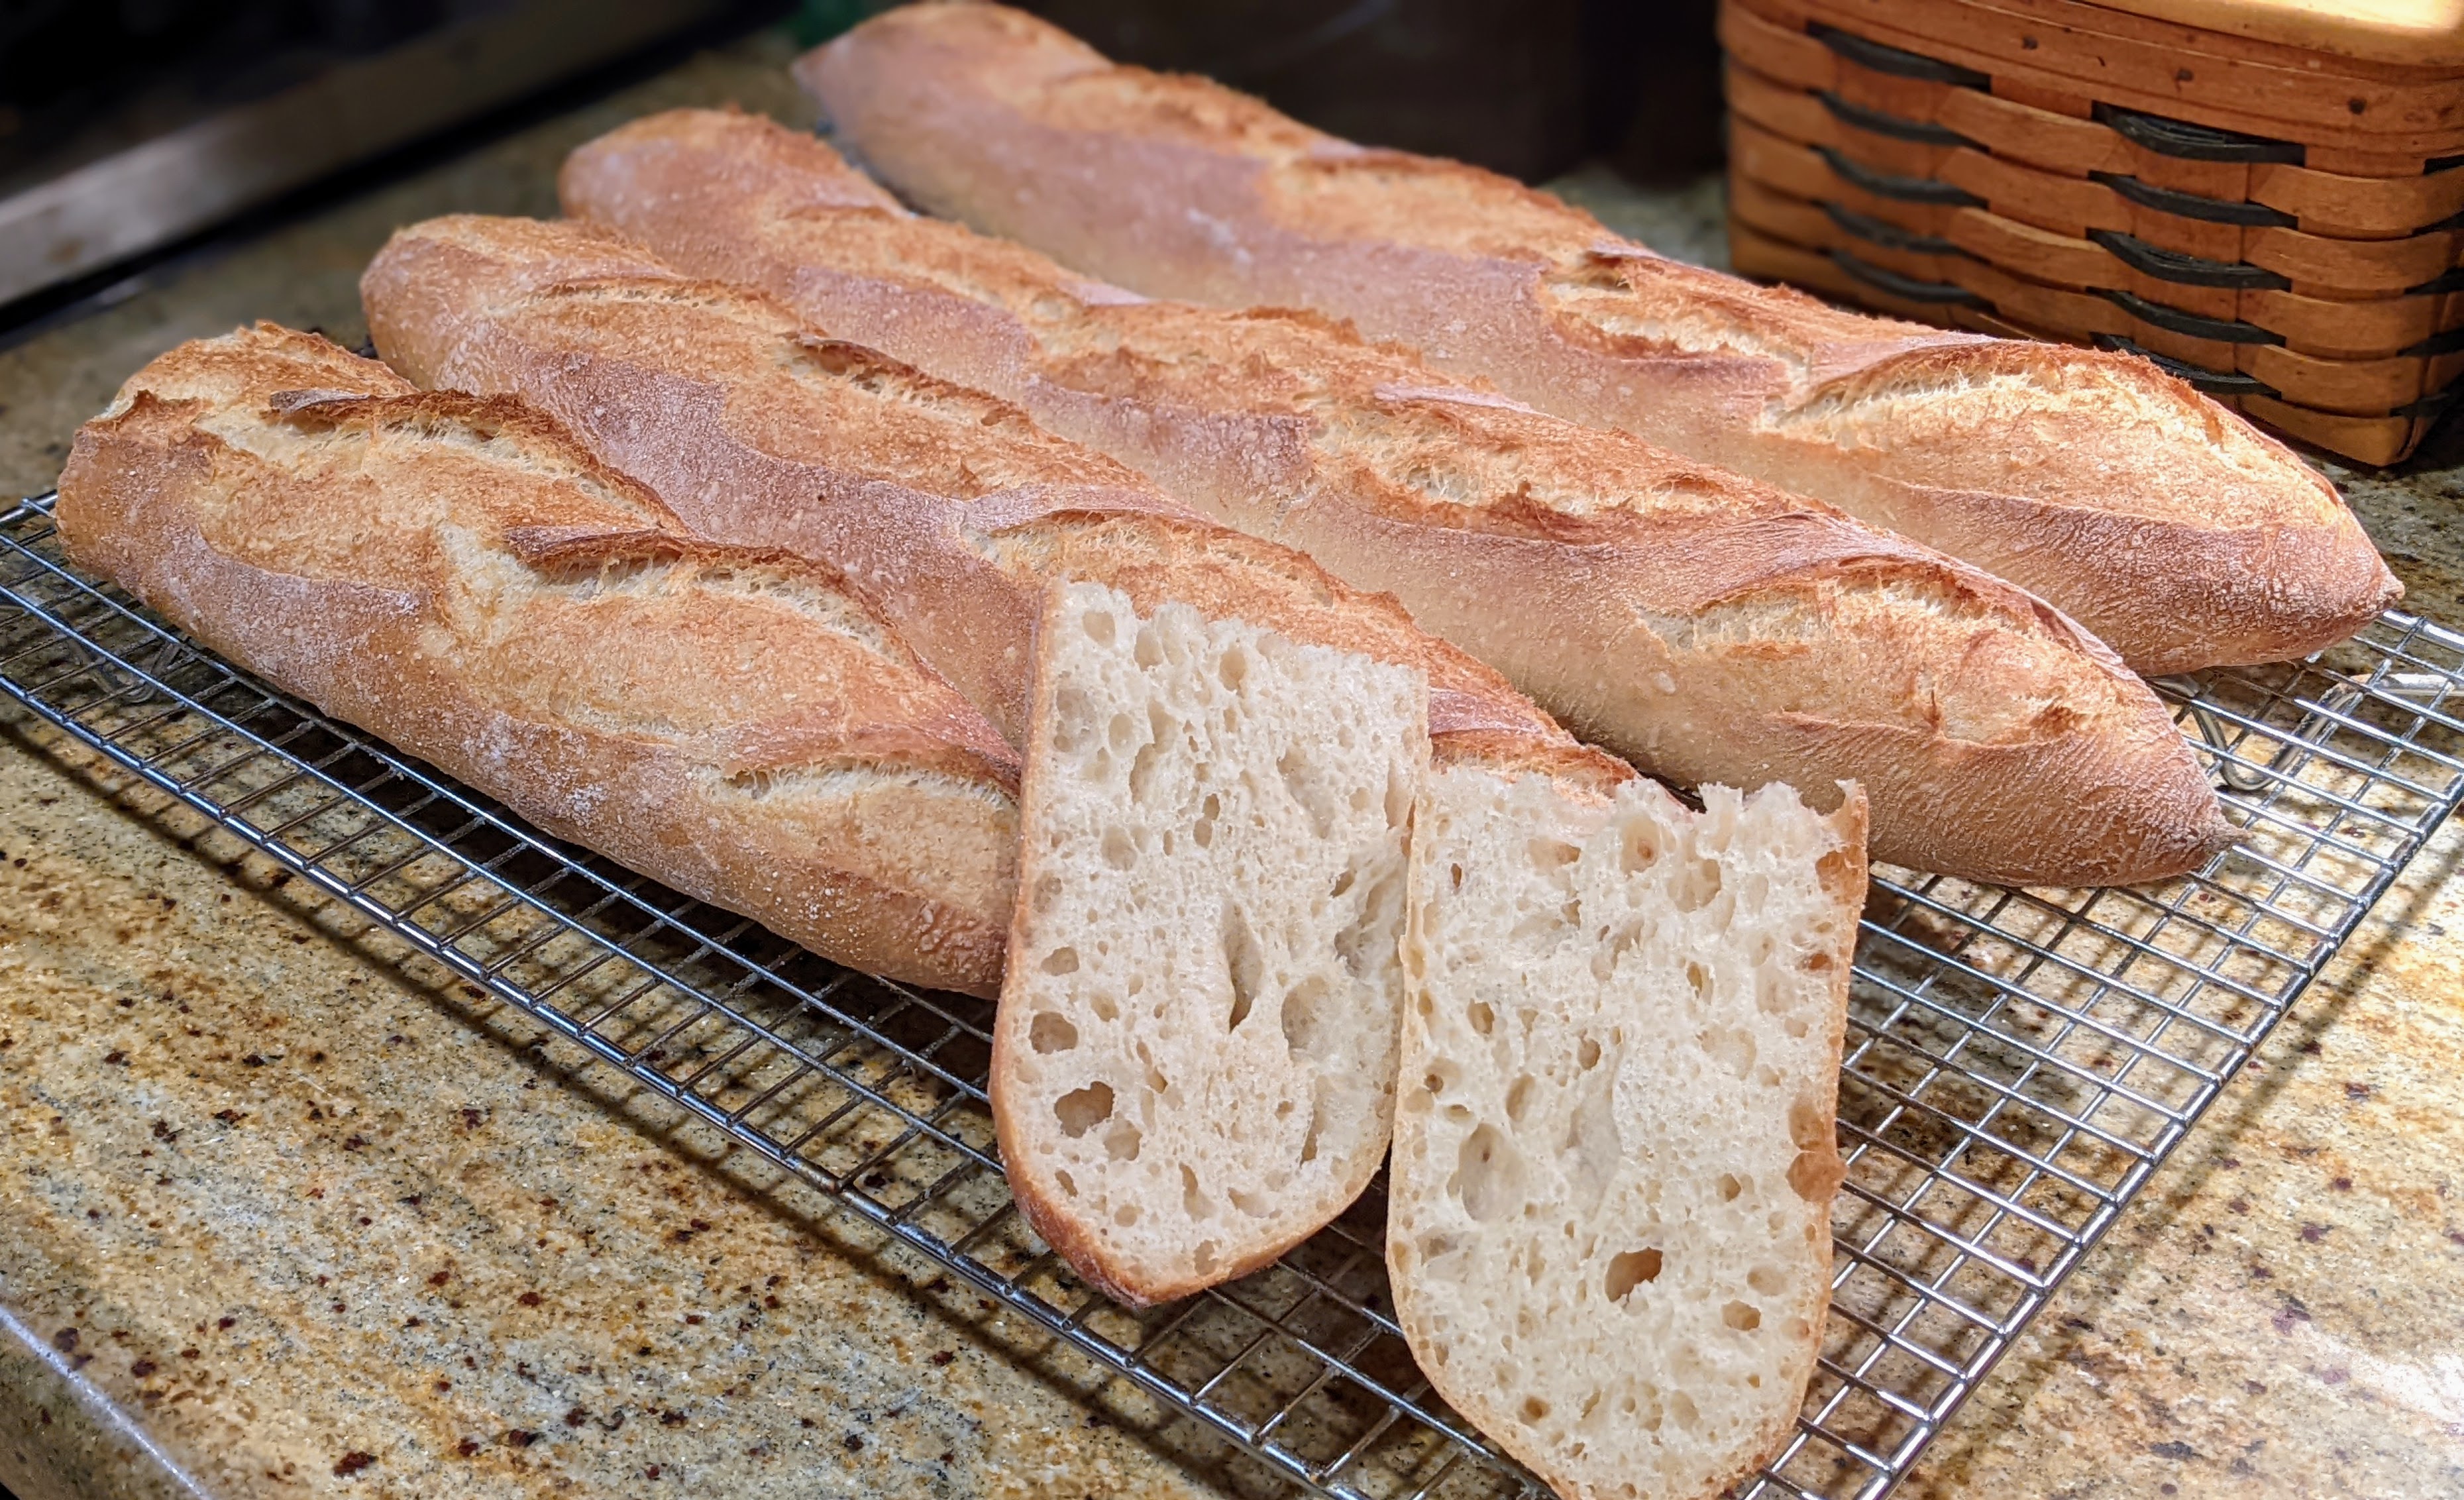
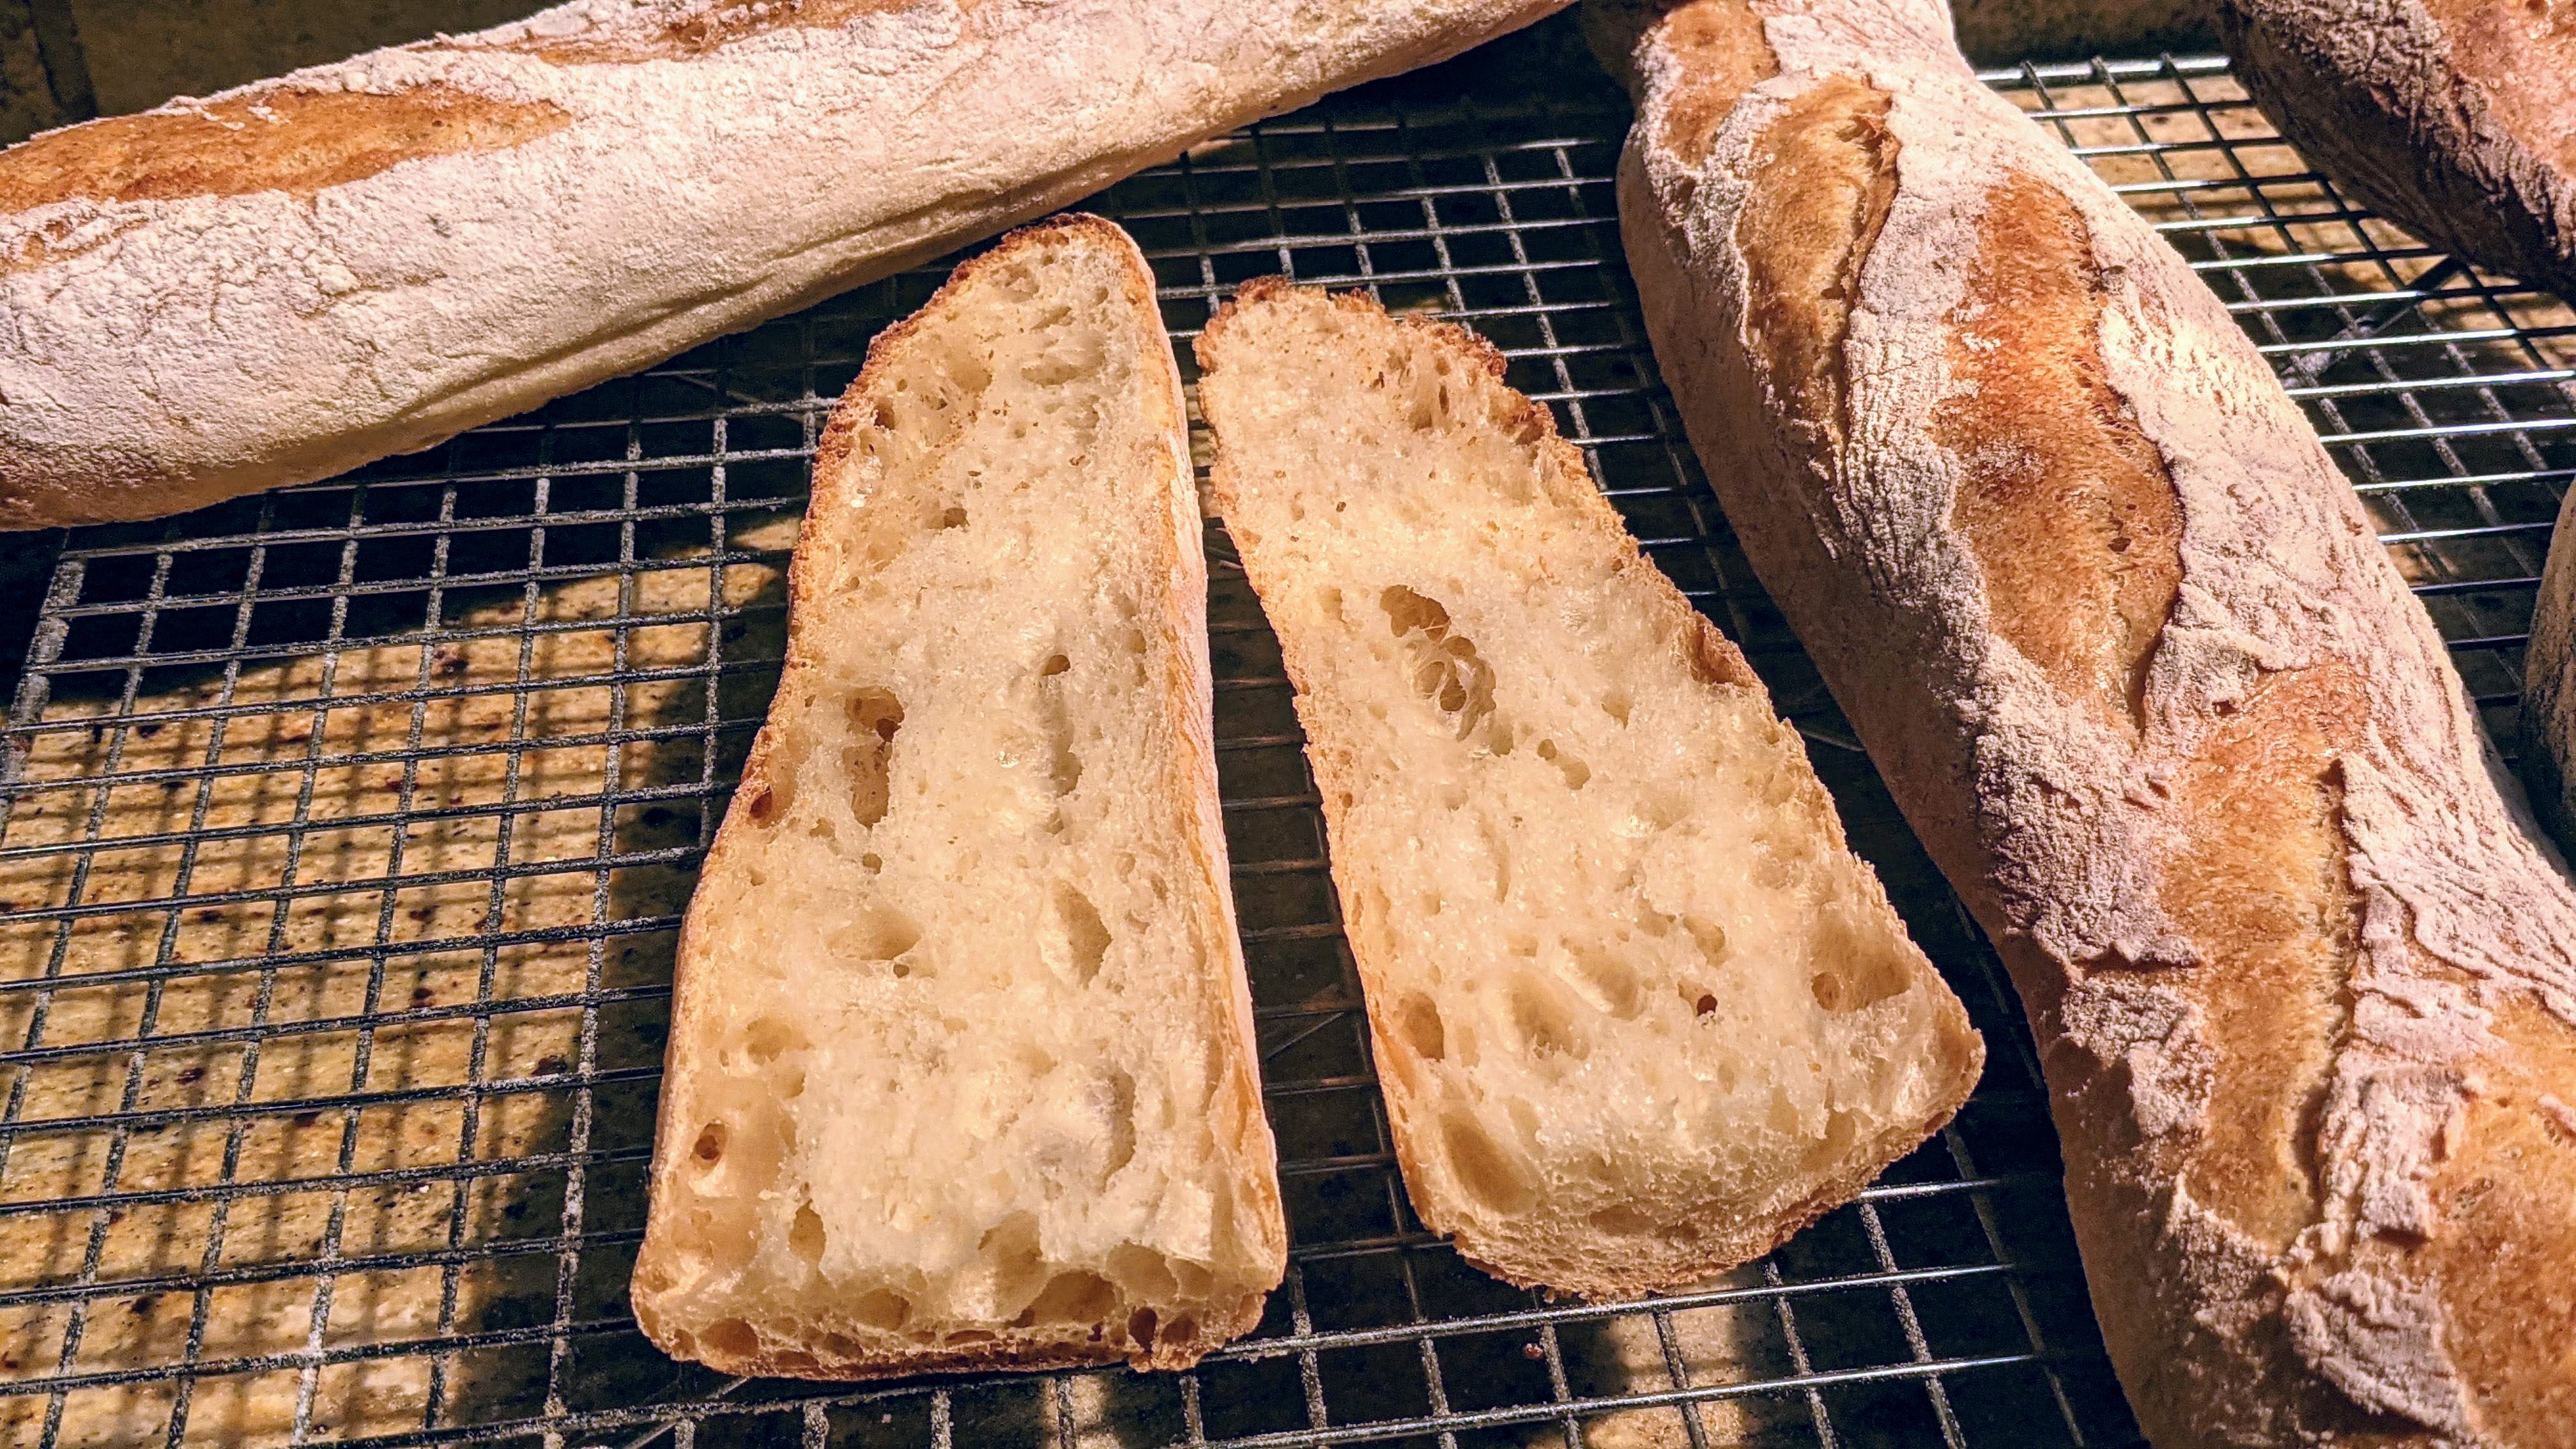
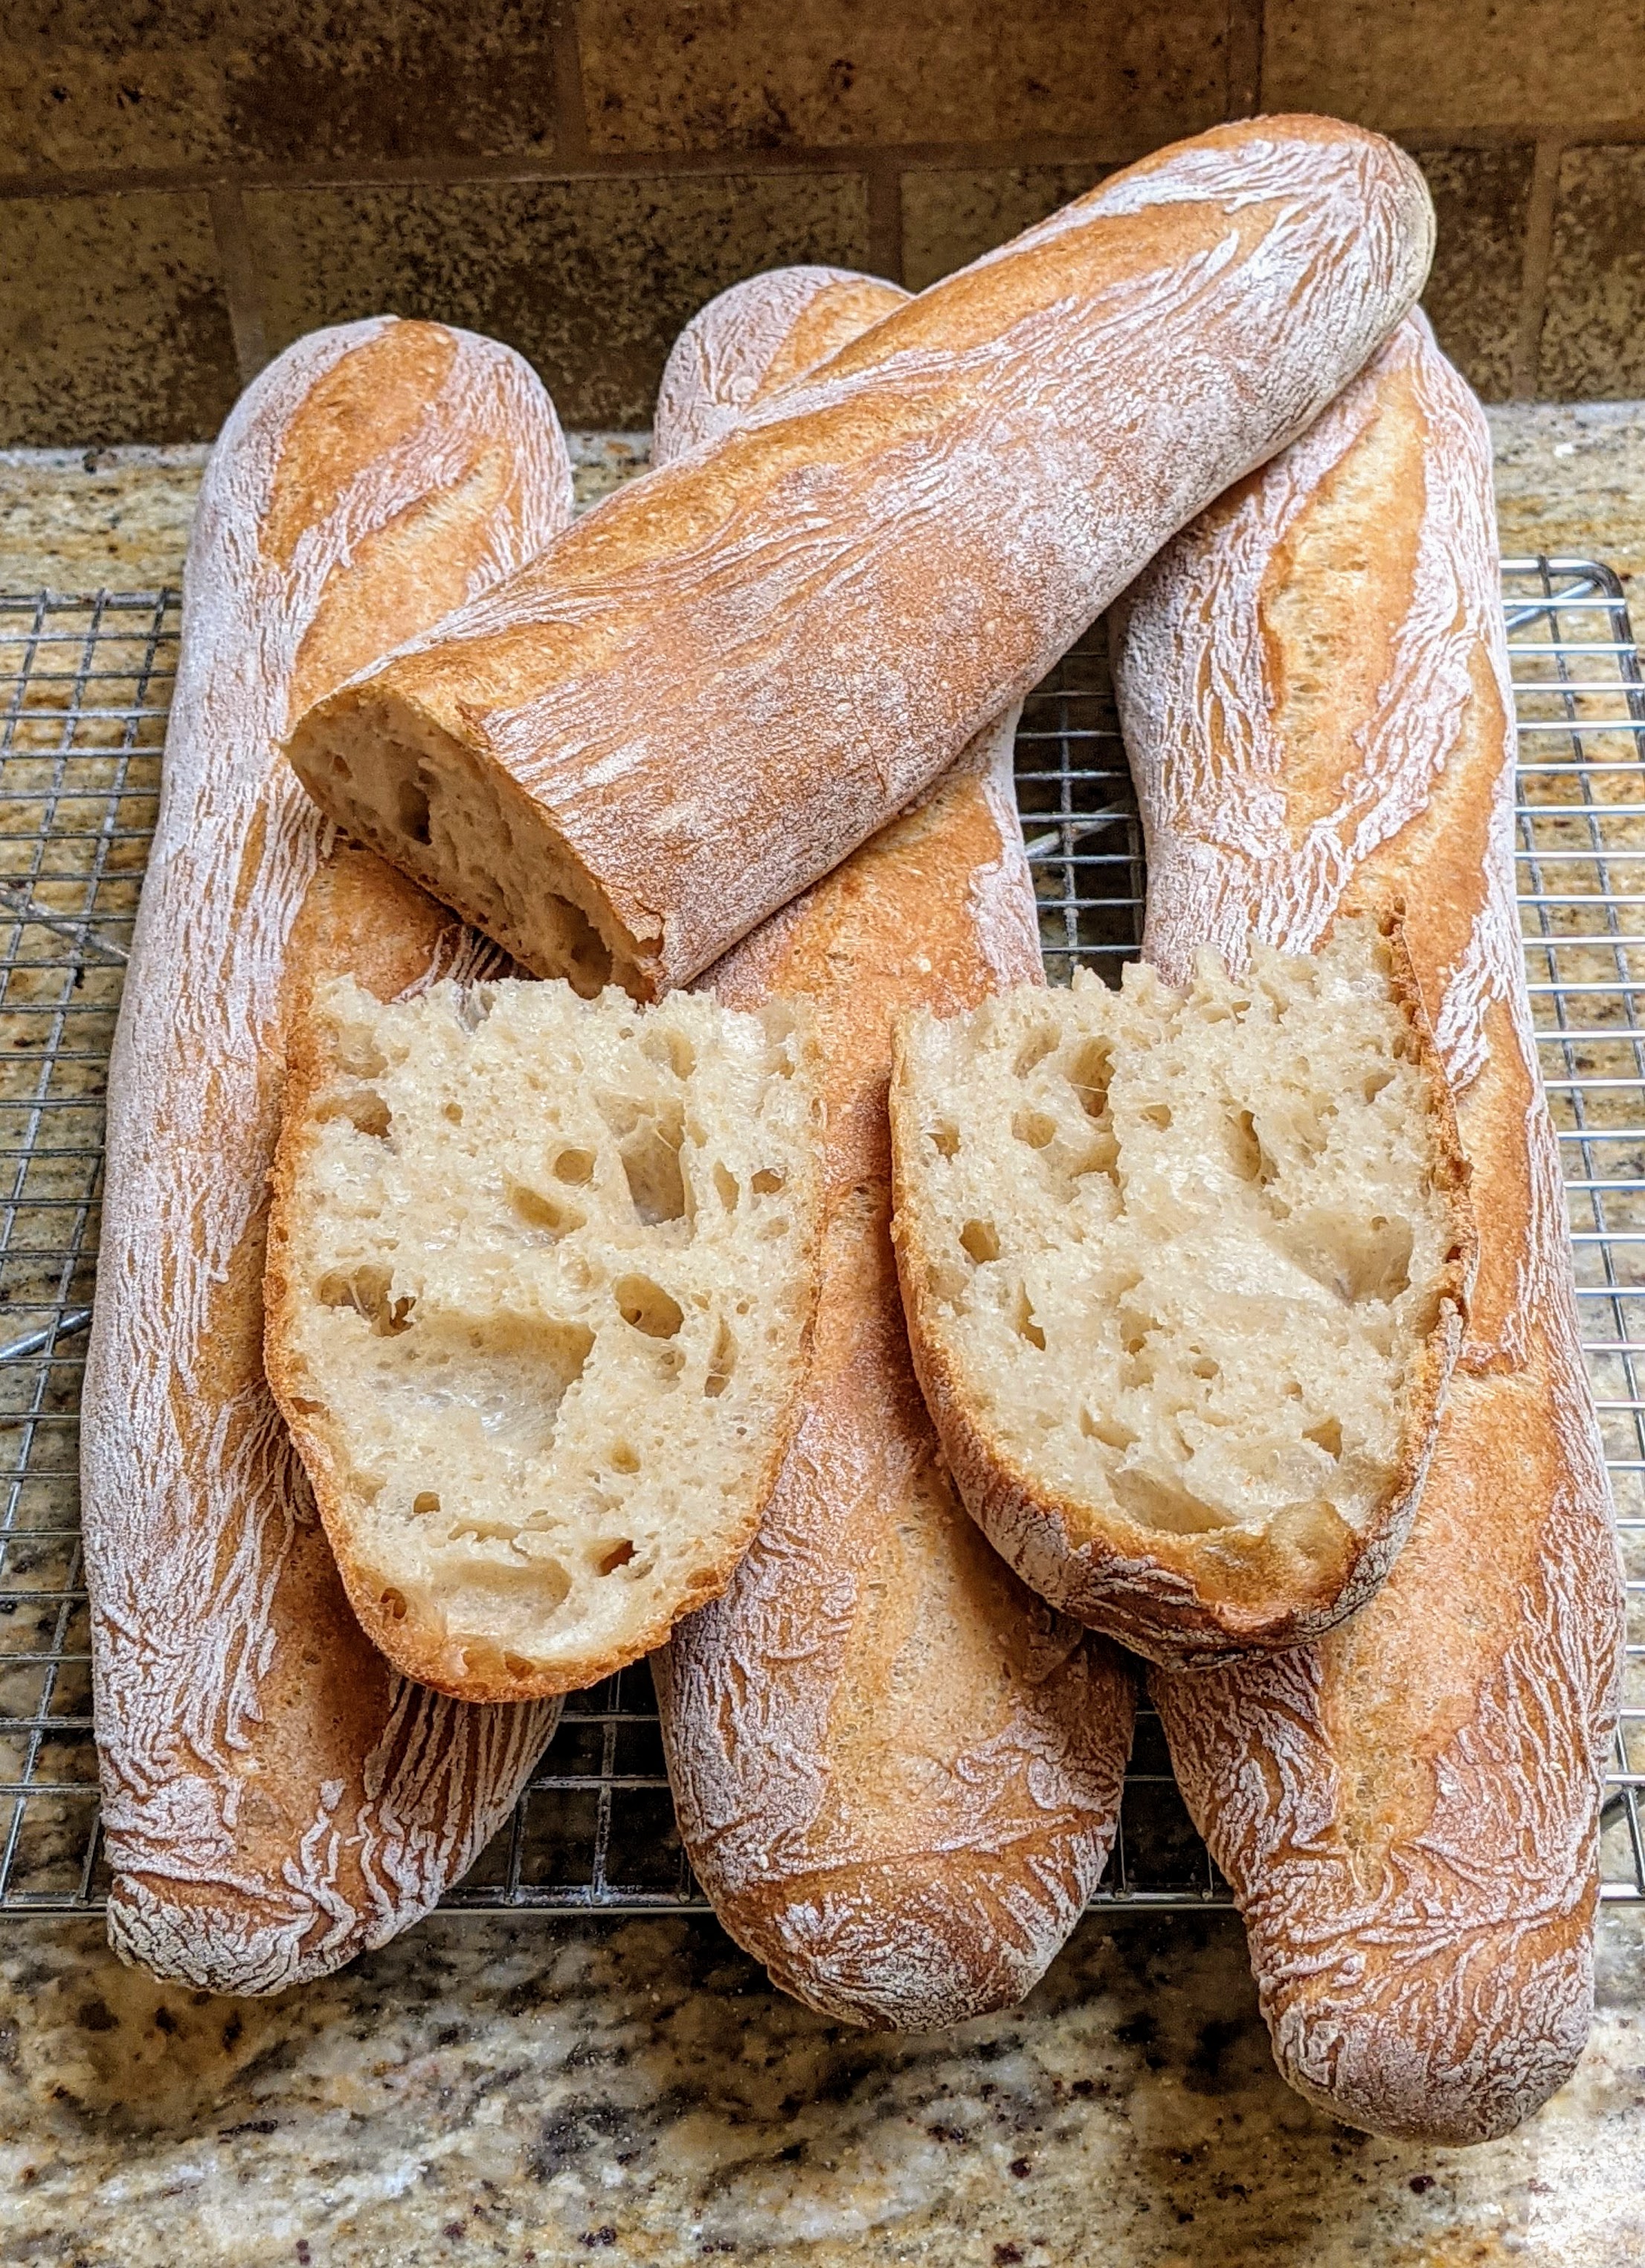
The ideal baguette will have various sized holes that dot the crumb.
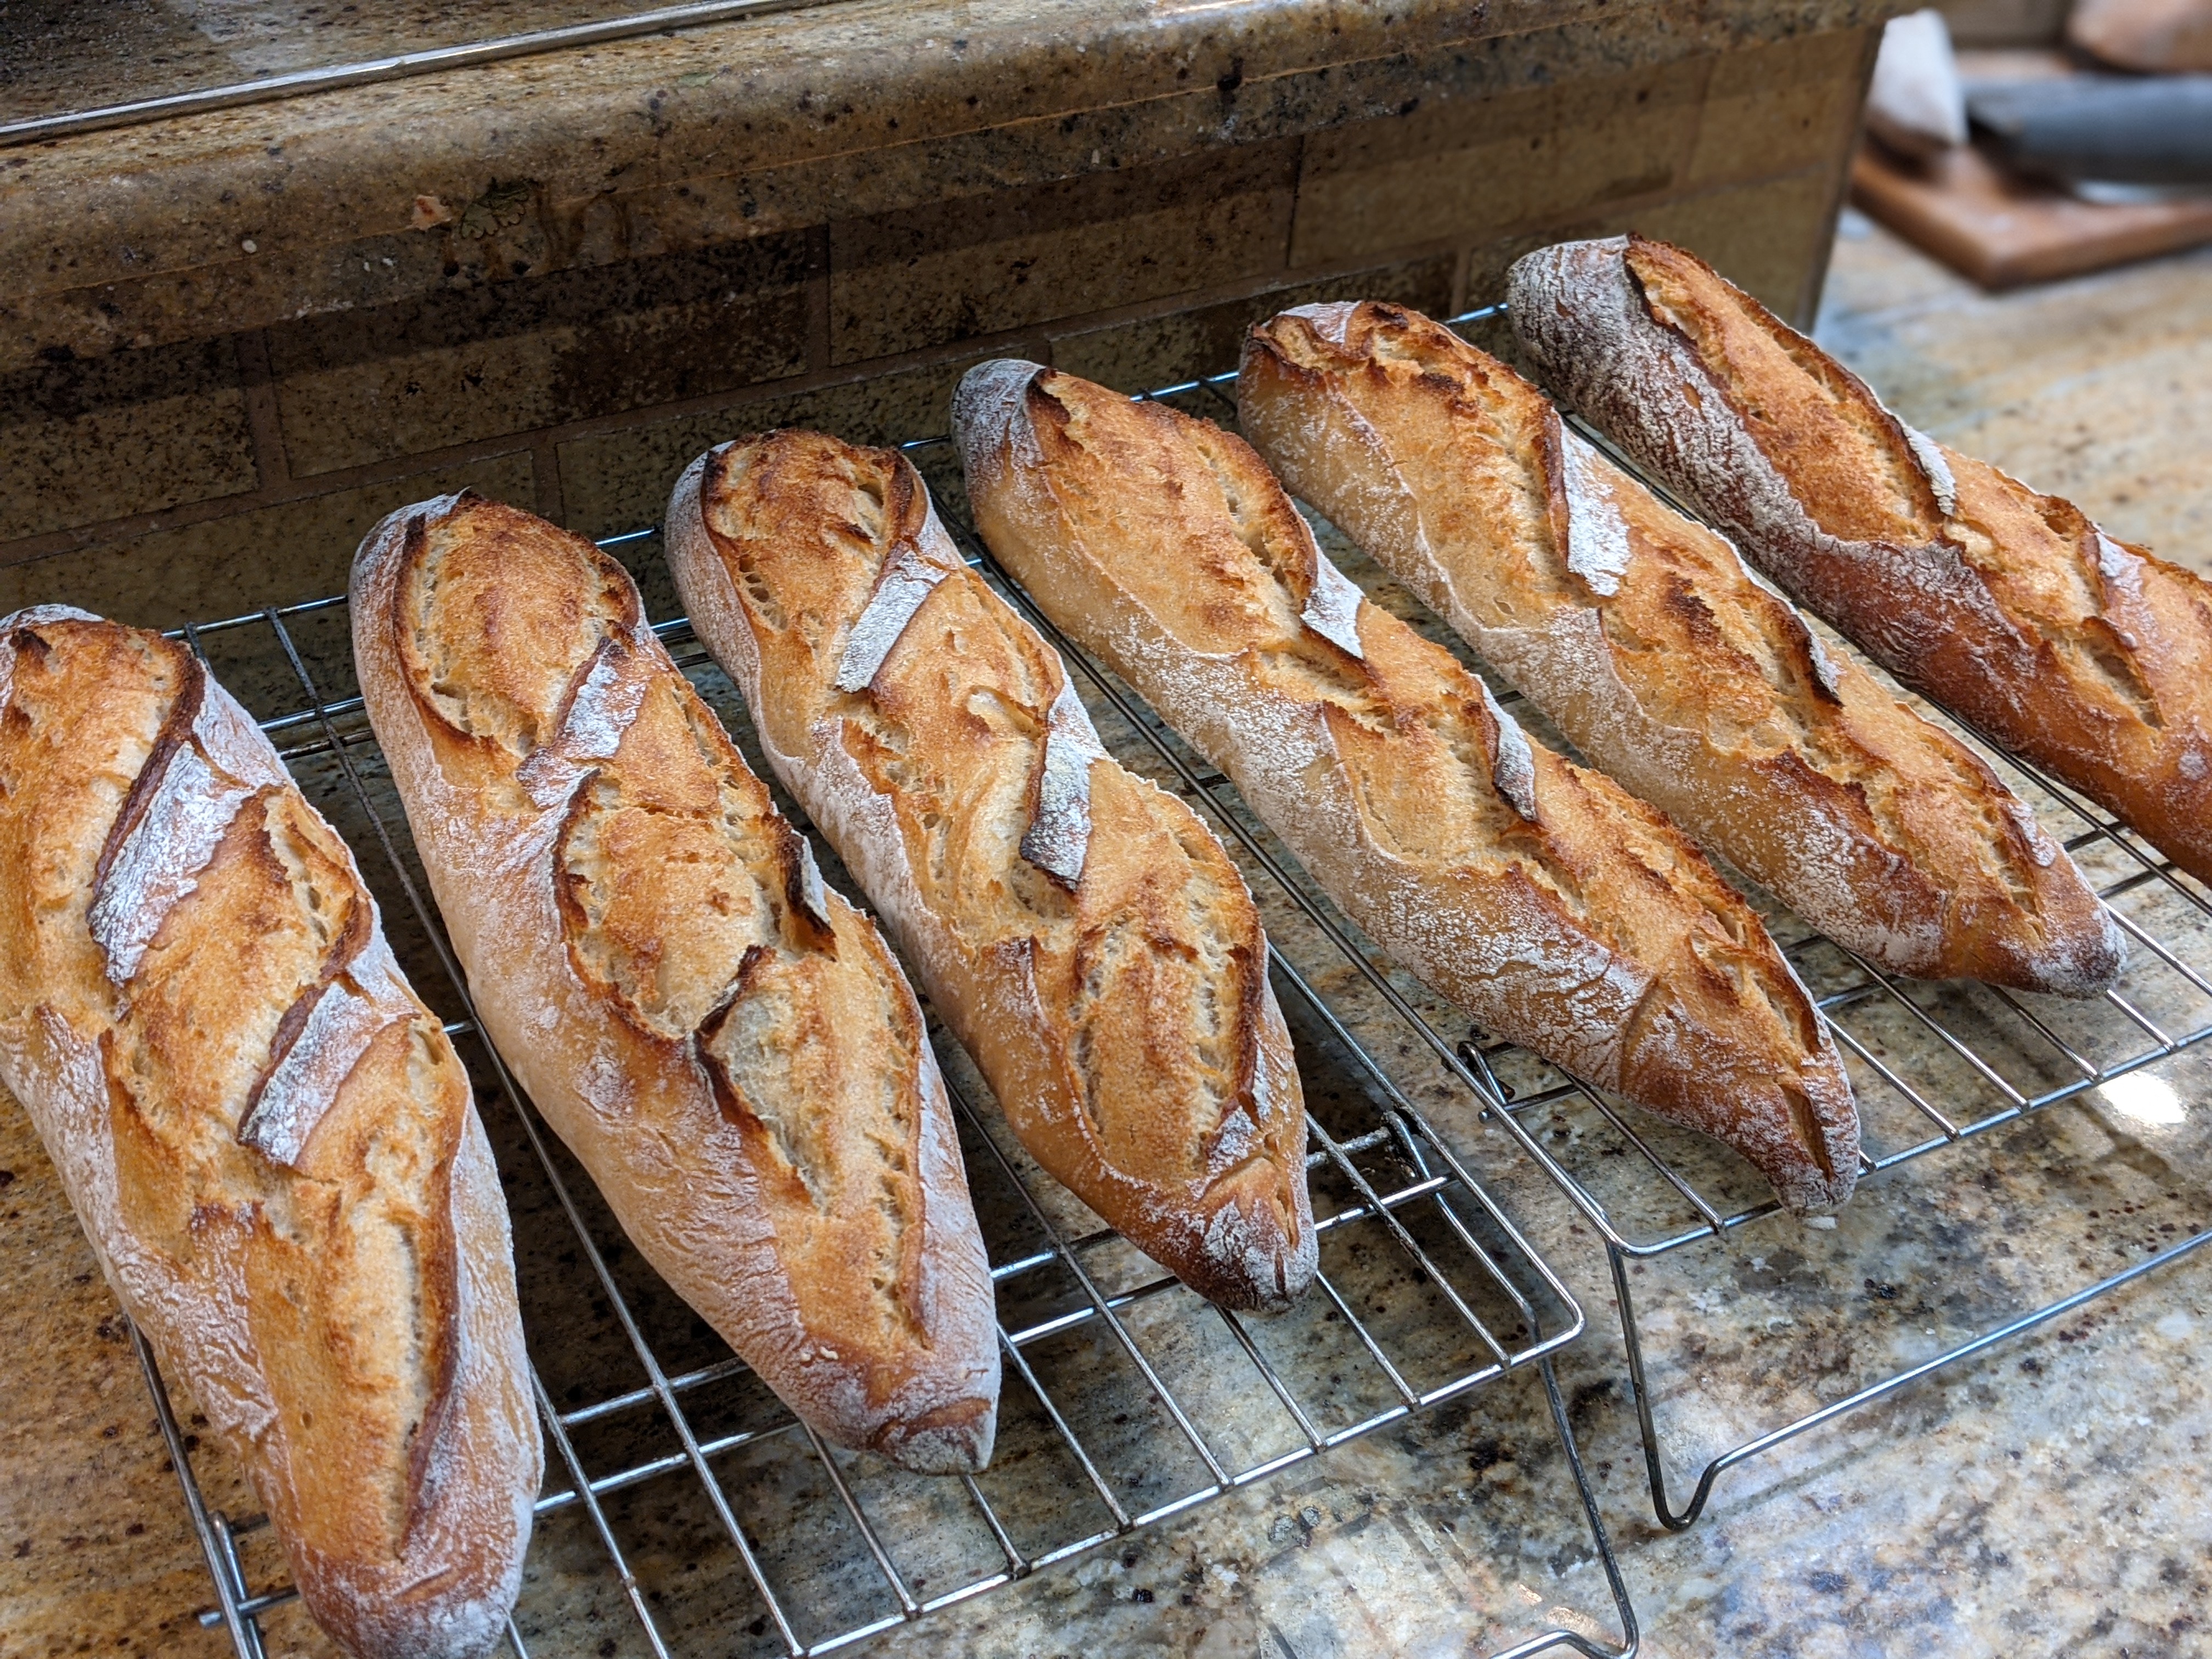
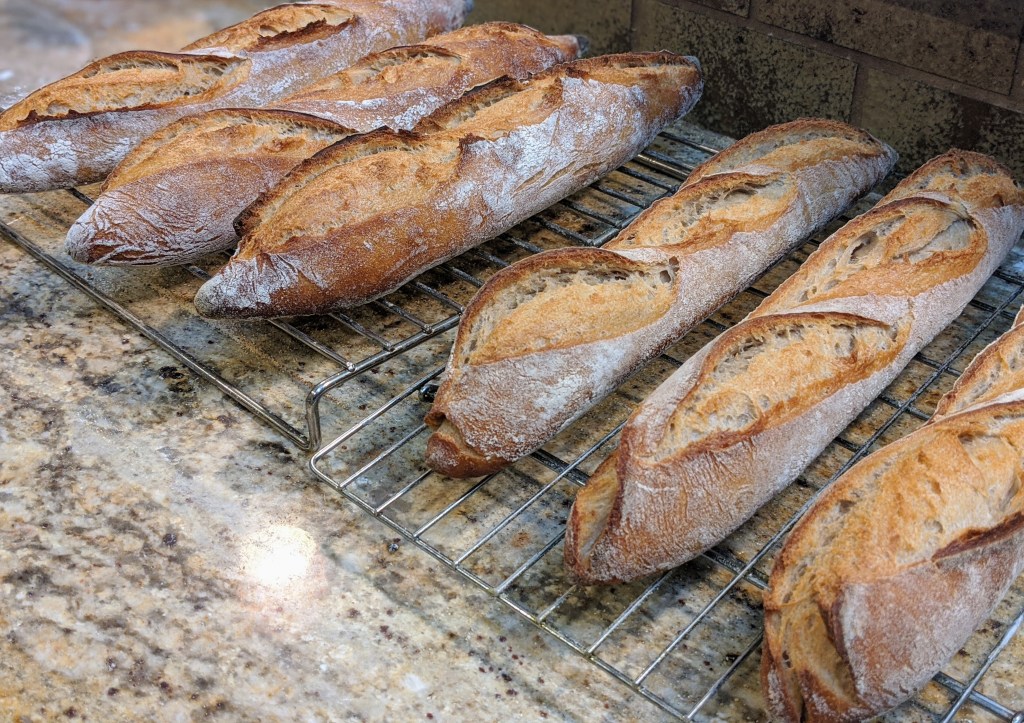
I allowed these demis to get a bit of a skin, thus they formed ears.
Notes
You might be wondering where I got the 380g of poolish. That represents 50% of the total flour, including the poolish flour. To calculate total flour for any formula, take the the Total Dough Weight divided by the Total Formula %, so 1353 / 177.43% = 762. Technically, 50% of that is 381, but I like nice, round numbers.
You can replace the poolish with sourdough starter. But make sure it’s at peak activity (passes the float test) and is nice and bubbly. The process will slow a bit because the yeast density of starter is not nearly as high as with commercial yeast.
The pre-shape step is absolutely critical, not just in starting to orient the gluten strands but it also acts as an intermediate fermentation stage, however short.
When shaping baguettes, make sure your hands are lightly floured lest the dough sticks to your palms and tears the skin. You need to avoid that! And remove any rings!
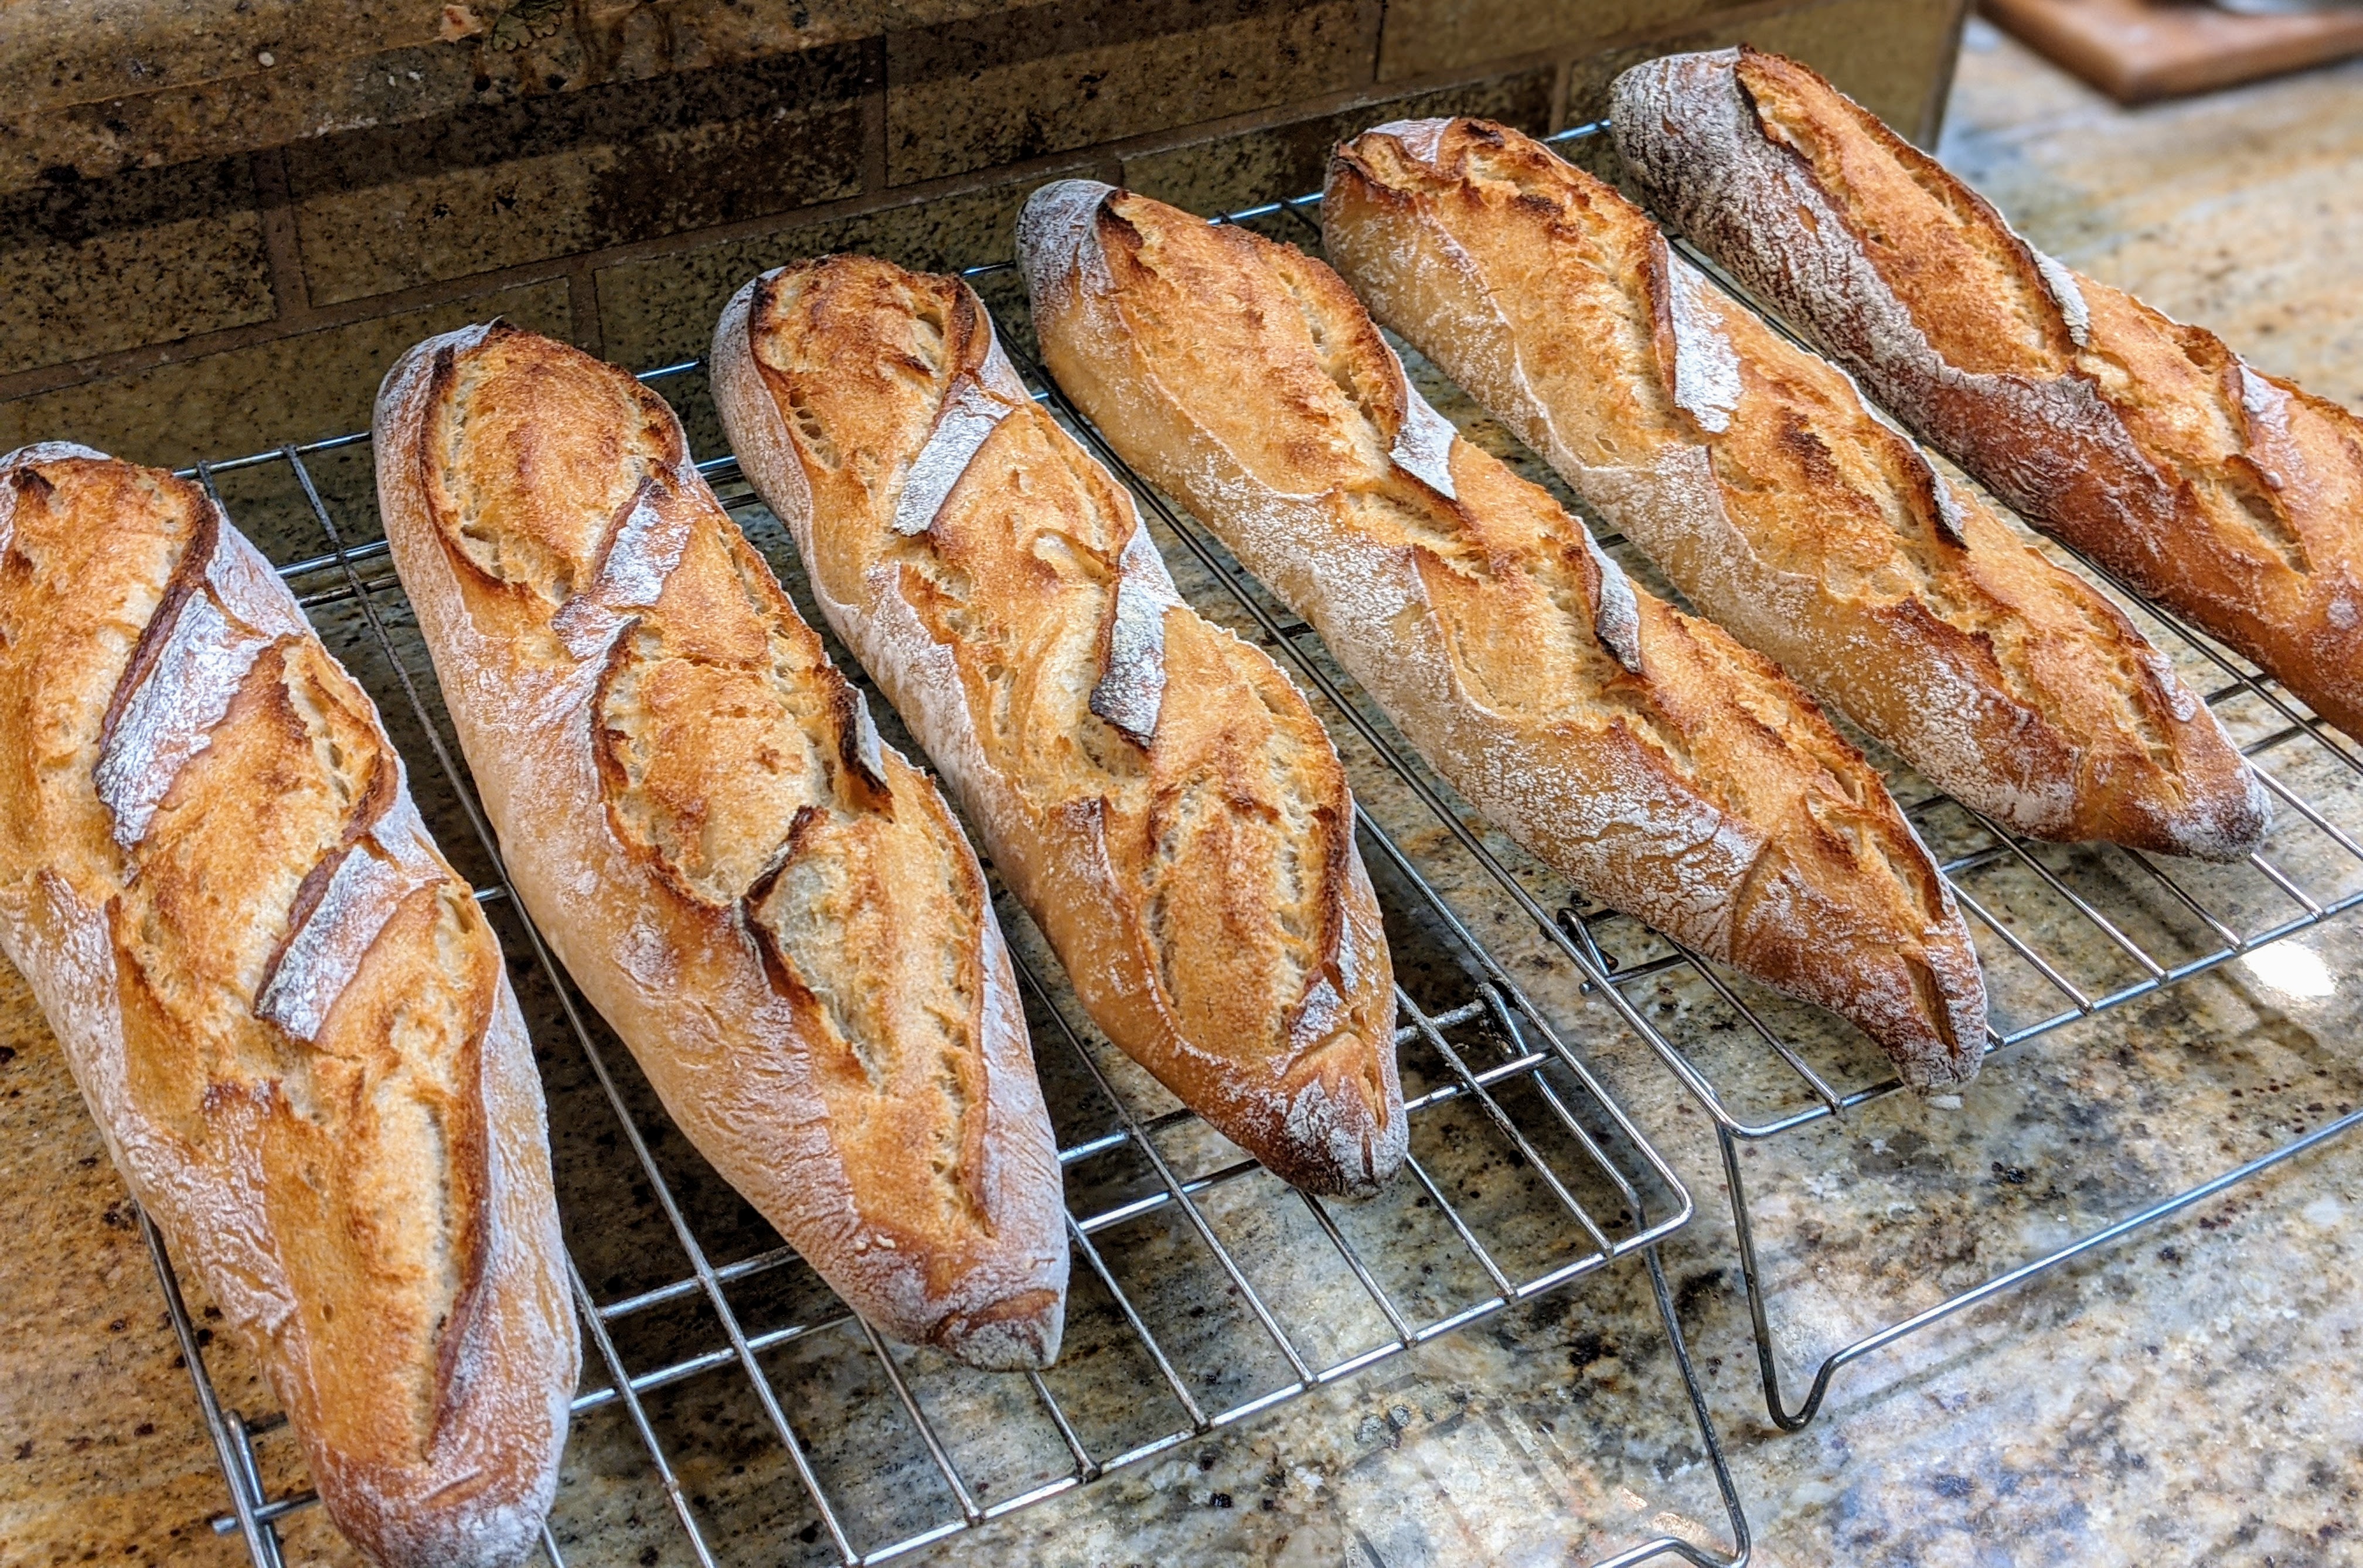
Having made hundreds of baguettes, I’ve learned not to put too much importance on forming ears on the loaves as you can see with the loaves above. I actually cold-fermented the shaped loaves before I baked them because I had other loaves in the oven. They kind of formed a skin even though I had them covered. And though they were delicious, they were pretty crunchy. The aesthetic that I go for now is to get a moderately crunchy crust, but not to go overboard.
It is ULTRA-important that you don’t take the final fermentation all the way to the finish. You actually want to get to about 85-90% fermentation, then bake. This’ll ensure that you get great oven spring. Otherwise, the loaves will be flat.
As mentioned above, if you want to do a longer cold bulk fermentation, use less yeast. I’d start out by using half the yeast. But you could treat the bulk like pizza dough and use even less and take a couple of days for bulk fermentation. If you do that, use less than a gram of yeast.
What If I Can Only Bake Half the Shaped Loaves at a Time?
If you don’t have room to bake all the loaves at once, then pop the other loaves into your refrigerator while the other loaves bake. Once your oven comes back up to temp after the first batch, remove the extra loaves from the fridge and place them on your board.
You could also pop them in the freezer, but I don’t recommend doing that for more than 30 minutes.
It’s funny how we sometimes stumble upon a technique, not really knowing it was a technique in the first place! One of the things that I started to do a few months ago to fine tune the hydration and temperature of my dough was to hold back a small amount of the total water in my formula (about 50g – 100g, depending on the bread I was making), then add it in during folding. I had no idea that this was technique called bassinage.
When I started doing this, my thinking was that with high-hydration dough, gluten development was challenging when the dough was really wet. So I’d hold back some of the water and let bulk fermentation start with the lower amount of water to promote the formation of gluten as I had read somewhere that a drier environment helps gluten form much more easily.
Now as I write this, I’m laughing because it never even occurred to me to include this in the formulas I share. And I didn’t think anything of it because formulas I’d learn from prominent bakers such as Jeffrey Hamelman never even mention this in their formulas! But it’s an actual technique that the French call eau de bassinage, or bathing water.
I looked up the term in Hamelman’s “Bread” book and as he explains:
It is often difficult to mix wetter doughs to adequate gluten development when using a planetary mixer (such as a Hobart or KitchenAid). One tactic that is effective is the following: When mixing the final dough, hold back a portion of the liquid (hold back more or less liquid depening upon the total hydration of the dough). This technique (called bassinage in French) can also be used with spiral mixers for wet doughs. The gluten will develop more readily in this drier environment. When the dough has attained the degree of strength you seek, turn off the mixer. Make an opening the place where the dough hook enters the both of the dough. Pour the rest of the liqui into this hold, turn the mixer back on, and mix just until the liquid is incorporated. I find this to be an effective technique when I mix at home, not just for notoriously we doughs like ciabatta, but for many other doughs as wel, especially those whose hydration is abouve about 70 percent.
Hamelman does this during mixing, but when I started researching this technique for this article, I found that different people do it at different stages. For instance, one baker I found does it to incorporate the salt and yeast after autolyse. Another does it as I do during the first fold, adding a little water at a time to the bottom of the container and folding the dough over it. No matter what stage bassinage is performed, one thing is common: Gluten formation takes place beforehand.
I have to do a bit more research into this as I’m interested in the food science behind the technique. But from what I’ve been able to gather thus far, as the gluten has already formed, the added water acts as a lube of sorts to help the dough become more extensible as the water molecules penetrate the dough and get in between the gluten strands. Pretty cool.
All that said, I don’t do this will all my bread – not even all the high-hydration bread I make. But if I know I’m coil folding a dough, I usually fold in water during the first folding session, or when I feel that sufficient gluten development has taken place.
When I first started baking bread 40 years ago, I riffed on a recipe that listed the exact amounts I’d need for each ingredient, like 4 cups of bread flour, etc.. Then when I started getting into artisan bread, recipes became formulas, showing the relative amounts of the ingredients expressed as percentages. For instance:
Flour
100.00%
Water
76.00%
Salt
1.80%
Yeast
0.75%
Total
178.55%
The first time I saw that, my immediate reaction was, “WTF?” And my heart raced with anxiety. Nowadays, when I’m either recalling a recipe/formula, or even developing a new one, the percentages are all I think about.
As was explained to me, the percentages in a formula represent the ingredient amounts relative to the flour, which is always at 100%. So if we take the formula above, if I have 1000g of flour, then the amount of water I’ll need is 76% of that or, 760g. Easy, right?
But what about that “Total” item?
To be honest, I really didn’t pay too much attention to that figure until I started thinking about actual dough production and yields. At the time, I was starting to make bread to fulfill orders for luncheons and such. For instance, to feed a 200-person luncheon, I’d have to make 8 loaves scaled out to 1200g apiece, which mean that I needed to produce 9.6kg of dough.
The way I’d calculate how much I’d need was kind of a crapshoot. I’d start out with 5 kilos flour, then I’d apply the bakers percentages to get a weight. If we use that formula above, this would get me close to 9kg. So I’d go to 5.5kg and recalculate… It was tedious to say the least.
Thinking that there had to be a better way, I started doing some research and discovered that the total percentage in a formula is probably the most important number. This is because it is a representation of the total dough. Here’s a simple way to visualize what that means:
If you take the total percentage from the formula above, as Jeffrey Hamelman puts it in his book, “Bread,” (paraphrasing) that no matter what weight of dough we’re producing, there are 178.55 units that make up the dough. 100 of those units are flour, 76 of those units are the water, etc.
Without getting too technical about it, with that number, we can easily calculate the ingredient amounts we need for any given amount of dough we want to produce. In “Bread,” Hamelman talks about the conversion factor and using it to finding the amount for each ingredient.
Conversion Factor = Target Dough Weight / Total Percentage
So if I want to create a dough that weighs 1200g, given the formula above, the conversion factor would be:
Conversion Factor = 1200 / 178.55 which would be about 6.72
Multiplying each item percentage as a whole number by the conversion factor would give me the needed weight. For example, my flour weight would be 6.72 X 100 or 672g.
I have a simpler approach which basically accomplishes the same thing, but it’s more direct as I calculate the flour directly. Instead of coming up with the conversion factor, I just divide my target dough weight by the percentage, but expressed as a regular number. In this case,
Flour Weight = 1200 / 1.7855 = 672
From there, I just multiply the formula percentage relative to the flour weight. So the water I need would be:
Water = 672 X 76% = 511
Both methods will get you to the same place, but I like to shortcut my calculations as much as possible.
Let’s calculate the amounts we’ll need:
Target Dough Weight 1200g
Percentages
Amounts
Flour
100.00%
672
Water
76.00%
511
Salt
1.80%
12
Yeast
0.75%
5
Total
178.55%
1200
With this method in hand, I now completely focus on how much dough I will need for a given bake, be it a single loaf or several. As long as I have an accurate formula, I will always be able to get the exact amount of ingredients I’ll need.
But that said, I usually add about a 0.5%-1% fudge factor to my total dough weight because weight will always be lost during processing, so if I need 1200 grams to make 4 X 300 gram loaves, I’ll usually calculate my dough weight to 1210 grams. You’ll have loss due to evaporation or dough sticking to tools, etc. With this fudge factor, you can be guaranteed that you’ll get the exact dough weights you’ll need for each loaf.
This is yet another versatile dough that can be used for different kinds of bread. I’ve made baguettes from this dough, mini cheese-filled boules, dinner rolls – and it’s also one of my favorite formulas for making hand-shaped batards! But it really shines for making French bread, producing a thin, crispy crust and a light, airy, pillowy crumb riddled with holes that is the perfect platform for sandwiches, or eaten warm, to hold little pools of butter. Gluten development with this dough is relatively light as compared other loaves; a little more than baguettes and a whole lot less than boules and batards. So somewhere in the middle.
As the title says, this bread uses a poolish which, truth be told, is my favorite ferment with which to work. Done right, a poolish imparts a distinct nuttiness and just a bit of tang upon the flavor profile of the bread. But it also adds extensibility to the dough. When I work with a poolish-based dough, it feels so luxurious. I jokingly call it a “sexy dough.”
But sexy as this dough may be, to be fair, I should offer up a bit of a caveat. This is NOT a dough you want to work with if you haven’t worked with high-hydration dough yet. At 76% hydration and using predominantly bread flour, it’s slack and sticky. Any manipulation of the dough needs be done precisely and with quick movements, lest you find your hands covered in muck. This is further exacerbated by the moderate – and perhaps by others’ standards minimal – gluten development. But though I issued that warning, don’t let that intimidate you. As with anything, practice makes perfect. Let’s get to the formula:
Overall Formula
Bread Flour (unbleached)
100%
907g
Water
76%
689g
Salt
1.8%
16g
Yeast (Instant)
0.4%
3.6g
Total Yield
1616g
Optimal Dough Temp
76°F
Poolish
Bread Flour* (unbleached)
100%
302g
Water
100%
302g
Yeast (instant and relative to the poolish flour)
0.2%
0.6g
*The amount of flour you use for the poolish should be 33% of the total flour of the recipe.
Final Dough
Bread Flour* (unbleached)
605g
Water
387g
Salt
16g
Yeast
3.4g
Poolish
604g
*I use my standard 75-25% Bread / High-Extraction flour blend
Make the Poolish
You’ll make the poolish 12 to 16 hours before you mix the final dough. Since I’m an early riser, I usually make it between 4pm and 6pm, so I can start mixing the dough at aroun 6am the next morning. I will make it later as the weather warms up. You’ll know the poolish is ripe and ready when its surface is riddled with bubbles – and you can actually see bubbles actively forming plus, when you uncover it, you get a nice whiff of alcohol.
To make the poolish, simply combine the flour, water, and yeast into an appropriate size bowl and mix until smooth. It’s better to use a larger container rather than a small one as the poolish will expand. I’ve woken up to a container whose lid literally exploded and spewed dough all over my counter. In any case, let the poolish sit at room temperature on your counter.
Dough Development
Mixing. You can mix by hand or with a mixer. First, pour your water into the poolish container, then with a spatula loosen the poolish from the sides of the container. Then dump the water and poolish in your mixing bowl. It will slide right out! Add the flour, salt and yeast then mix until all dry ingredients have been incorporated and you form a shaggy mass with no large lumps. If you use a mixer, mix for no more than 3 minutes on low speed. You want little to no gluten development.
Bulk Fermentation: 2 1/2 to 3 hours.
Folding. Let the dough rest for the first hour, then fold it until you start feeling tension building in the dough. Rest for another hour and then fold again. You should start feeling plenty of tension by this time. Let the dough rest another half hour, then you’ll be ready to scale. However, if, after several folds, the dough still feels a little too slack, rest it for 45 minutes, do another set of folds, then take the fermentation out to the full 3 hours.
Technically, you could do the folding in half-hour intervals right after mixing and reduce the bulk fermentation to 1 1/2 hours. But there’s a lot to be said about the flavor development that takes place in the full 2 1/2 hours.
Divide and Shape. Pour the dough out onto a well-floured surface. With this wet dough, you want to be generous with the flour. I normally don’t recommend this, but this is a slack dough! Divide the dough into 400g pieces, then preshape into blunt, compact logs, rolling them up like jelly rolls. Rest the rolls for 20 minutes on a well-floured couche, seam-side-up. Once the rolls have sufficiently relaxed, shape them as you would baguettes, but be as gentle as possilbe when rolling them out – you want to shape and not degas. Place each shaped loaf seam-side-up onto a couche, providing a generous fold between each loaf to allow plenty of room for proofing.
Final Fermentation. 1 – 1 1/2 hour. Note: On warmer days, check the loaves after 30 minutes. This is a bread that I will take out to about 90% full-fermentation. It’s cutting it close, but the flavor development and bubble development in this last phase makes it worth the risk. Admittedly, the first few times I made this bread, I over-fermented the loaves and they came out pretty flat, but once I found the sweet spot – yowza! They were incredible!
Bake. Transfer the loaves to a loading peel and score as you would a baguette though perhaps not quite as deep. I personally don’t like pronounced ears on these fatties. 🙂 Bake at 500°F with steam for 12 minutes. Remove steaming container, then reduce oven temp to 425°F and bake for another 12-15 minutes or until the crust is a deep golden brown. You don’t want to take this bread out to chocolate as it will create too thick of a crust.
Notes:
When shaping, even though you’re rolling the dough out with your hands to form a cylinder, do your best to not press too hard. Be firm, yet gentle in your motions and coax the dough into shape. Because it’s so wet and also due to the moderate gluten development, the dough will tear if you try to muscle it into shape.
When scoring, be absolutely quick and assertive with your blade. It’s not necessary to create an ear and besides, even with a super sharp blade, with this slack of a dough, you won’t be able to dig in. After you score, don’t worry if the loaves appear to deflate. As long as you didn’t beat the shit out of them during shaping, they’ll pop right back up in the oven. 🙂
Though I make lots of different bread, this is my foundational sourdough formula. The flour in the levain represents 20% of the total flour in the formula. This gives me a lot of flexibility with how mellow or how sour I want the bread as I adjust the sourness by the length of the proof. If I want a sharper tang, I will retard the finished dough for up to 36 hours. If I want just a slight tang, I’ll do a same-day bake. As I mentioned, this is my foundational formula in that it provides a platform on which I will add different add-ins or just bake it plain. I love the versatility of this dough!
But not only that, because of the hydration of the dough, I’ve even made baguettes from this dough, adding 0.75% yeast in the final dough to give it some extra oomph during final proofing. Or, I’ve even added some sugar (about 3%) to the final dough to make rolls. Like I said… versatile!
Overall Formula
Bread Flour
80%
High-Extraction Flour
20%
Water
75%*
Salt
1.8%
*If I replace the high-extraction flour with whole-wheat flour, I will up the hydration to 77% and for baguettes, I will up the hydration to 76%.
Levain Build
Bread Flour
100%
Water
100%
Mature Starter
20%
Final Dough
Bread Flour
546g
High-Extraction Flour
182g
Water
500g
Salt
16g
Levain
364g
Total Yield
1608g
Optimal Dough Temp
78°F
This will yield two 800g loaves with a little to spare for loss and evaporation during dough development.
Make the Levain
Build a 100% hydration levain several hours before you build the final dough using some mature starter and equal parts flour and water (such as 1:5:5 ratio starter to flour and water). You’ll know the levain is ready when you see lots of bubbles on the surface of the culture – much like the bubbles that form with pancakes on griddle. This could take up to 12-16 hours to mature.
I personally use a mother culture that I keep in my fridge alongside a botanical water starter. The cool thing about using both my mother culture and the botanical water to build my starter is that the microbe density is so great, my levain is usually ready in less than 4 hours depending on the weather!
Final Dough Development
Mixing. Sift the flour and salt together and thoroughly combine. Dissolve the levain in water to make a slurry, then add it to flour-salt mixture, then mix thoroughly by hand or in a mixer on low speed until all ingredients have come together and you form a shaggy mass with no large lumps.
Bulk Fermentation: 2 1/2 to 3 hours (or more or less depending on the weather). Fold the dough twice within the first hour making sure you build good strength in the dough – it should fight you a little by the time you’re done folding. Then let it rest (covered) until it has almost doubled but don’t take it much further than that. You’ll want to leave plenty of runway for the final fermentation. For home bakers, I don’t recommend using the proof setting on your oven as it is normally too warm and things happen a bit too fast – at least for my liking.
Dividing and Shaping. Divide the dough into 800g pieces then preshape into rounds then cover and bench rest seam-side-down for 15-20 minutes until the dough has sufficiently relaxed. Shape into boules or batards and place into appropriate proofing containers.
Final Fermenation. If you want to do a same-day bake, final fermentation should be about 1 1/2-2 hours depending on the weather. The finger dent test will tell you when the loaves are ready to bake. Otherwise, let the final fermentation get started for about 30 minutes, then cover the containers and pop them in the fridge. My last batch (shown in the pictures above) took about 30 hours to get to bake-ready. But whether you do a same-day or retarded proof, you really need to have patience in this step and allow the fermentation to get to 85-90% to ensure optimum flavor development.
Bake. Score your loaves as you see fit. I use a baking stone to kind of mimic a hearth, so I bake at 500°F for 15 minutes with steam, then 425°F dry using convection for 25-30 minutes until I get a milk chocolate-brown bottom and deep-golden brown top with dark chocolate edges on the ears. If you’re using a Dutch oven, preheat your oven to 500°F, then turn it down to 475°F. Bake covered for 20 minutes, then uncovered for another 20-30 depending on how dark you want the crust.
One of the greatest compliments I ever received was from a friend’s mom who excitedly remarked when I brought her a few baguettes, “Wow! What bakery did you get these from?!” I told her they were from Dawg House Bakery. She replied, “Hmm… I’ve never heard of it,” to which I replied, “You’re looking at it and I’m the head baker.” She giggled then said, “They look SO professional!” She couldn’t have said anything nicer! But I did tell her that as with anything you build, if you have the right tools combined with good technique, it’s not hard to achieve a professional look.
Just to set things straight from the get-go, I’m not going to cover a recipe here or any dough development or shaping techniques. I’ve written lots of articles on making baguettes already. But what I am going to cover is what you do and what you need to have after you’ve done all the dough development and shaping; things that I’ve found tend to be glossed over in most articles – or even many books that I’ve read!
Tools
There are three critical items you’ll need: 1) A decent lame; 2) A baker’s couche; 3) A transfter/flip board. While I’ll discuss the importance of these items individually, you can purchase all of them at the San Francisco Baking Institute. The prices are fantastic – I wish I had known about their shop a lot earlier. I would’ve saved quite a bit of money.
Lame
I use a UFO lame from Wire Monkey (www.wiremonkey.com). But there are others out there that are far less expensive. A lame is essentially a mounted razor blade used to score loaves. More than any other bread, I’ve found this to be a critical tool for scoring baguettes.
Couche
You’ll read some articles that say you can use a large tea towel or a couche. I myself prefer a linen couche because I’ve found that it holds flour much better than a tea towel. It has become an invaluable tool for proofing long and free-form loaves.
Transfer Board
Out of all the three tools I’ve mentioned, a transfer board is the most important. With the lame and the couche, you can get away using alternatives, but having a tranfer board took my baguettes over the top. The reason is that I can flip the loaves onto the board at once, and not risk stretching or tearing my loaves.
Also, and perhaps even more importantly, I can use it to straighten my loaves once I’ve transferred them to my loading board. That’s a trick I learned from observing professional bakers. I was wondering how they straightened their loaves so nicely. I found that they do with a transfter board! For me, it was a total game-changer in the visual presentation quality of my baguettes.
If you don’t get the other two items, definitely get one of these. I made my own by cutting a sanded/finished quarter-inch birch plywood board to about 24″ X 5″. I used the remainder as my loading peel. With both, I regularly treat them with food-safe beeswax to keep them smooth and protected from moisture.
Properly Scoring Baguettes
I included this section in a previous article, but it deserved to be placed in this.
An earmark of a good-looking baguette is the scoring. It may or may not have ears, but it’s distinctive with what appear to be diagonal slashes across the top. When you’re new to making baguettes – this included me when I first started making them – there’s a mistaken belief with scoring that the loaves are scored in a diagonal fashion. Technically, they are, but not nearly at the extreme angles that many beginners score them. I’ve seen otherwise gorgeous, straight loaves online whose aesthetics were essentially ruined by improper scoring.
To be honest, there’s no big secret or special technique to score baguettes. Just remember this: Use shallow angles! The diagram below illustrates the angles you should be using:
In both the top and the cross-sectional views, the proper scoring and blade angles are much more shallow that what most might think. From the top, the lines are long, starting from the center of the loaf, and deflecting just a few degrees. The blade angle from the cross-section is absolutely critical as it creates a flap which will produce that distinctive ear that you see in the picture immediately above.
Especially with baguette scoring, you need to be assertive in your strokes. Avoid making choppy motions with your scoring and do your best to be as smooth as possible. Also, aesthetically – and according to Master Chef Jeffrey Hamelman – an odd number of scores is much more appealing to the eye than an even number.
As I mentioned above, with the right tools, getting that professional look is not at all that difficult to achieve!
This is an absolutely wonderful bread that I learned to make from Jeffrey Hamelman’s book, “Bread.” The garlic, rosemary, and levain combine together to create an incredibly complex and delicious flavor profile that can be enjoyed alone, with a little butter, or as a dipping platform into olive oil or a savory sauce. It’s one of my family’s favorite kinds of bread that I make and a loaf never lasts more than a day – it’s that addictive.
When you see the formula, don’t be fooled by the low hyration rate. The mashed, roasted garlic and oil more than make up for the lack of water to make the dough more slack than its hydration will indicate. Also, you’ll notice that in addition to a levain, the formula calls for yeast. I will provide a short discussion on making the bread with little to no yeast.
Here’s the formula:
Baker’s %
Example (g)
Flour
100.00%
713
Hydration %
65.00%
472
Salt
2.00%
18
Yeast
0.90%
8
Olive Oil
5.00%
45
Garlic
7.00%
62
Rosemary
0.50%
4
Stiff Levain
40%
285
Totals
180.4%
1608
Optimal Dough Temp
75°F
Though I listed the levain as 40% in the formula, its flour represents 20% of the total flour in the recipe.
For the numbers that I provided, this will yield two 800g loaves with about 8g of extra dough for loss during processing.
Make the Stiff Levain
A stiff levain is simply a low-hydration levain. This one is 60% hydration. To make it, I just converted 100%-hydration mature starter culture to a 60% levain. I did this by taking 100g of mature culture, added 200g of flour and 100g water.
Hamelman says to do the final build of the levain 12 hours before making the final dough. However, in my case, my culture is extremely healthy and it literally almost tripled in volume in 3 hours! But I wasn’t prepared to bake late at night, so I just popped the levain in the fridge to completely slow it down.
Roast the Garlic
If you use whole bulbs of garlic, cut off 1/2″ from the top to expose the cloves then sprinkle olive oil on top to keep them moist, then wrap in foil. I normally just have loose cloves on hand, so I just measure out what I need then place them in some foil with a little olive oil. In either case, roast the garlic at 400°F for 30-40 minutes.
Mix the Final Dough
Once the garlic has cooled, mash it and set it aside. Measure out the amount of levain you’ll need, then in your mixing bowl, break it up into the water until it’s fully dissolved. If you’re using a stand mixer, just use the dough hook on the 2 speed.
Once you’ve created a smooth slurry with the levain and water, add all the ingredients together and mix until everything is incorporated forming a shaggy mass that has both the garlic and rosemary reasonably evenly distributed.
For this small amount of dough, I just mix by hand using a Danish dough whisk. It saves me from having to clean my mixer. 🙂
Bulk Ferment
Hamelman says bulk fermentation is 1-2 hours. But in my experience – at least in my kitchen – it takes more like 2-3 hours. In any case, after an hour, give the dough a fold. Personally, I’ve found it valuable to gently knead the dough in the bowl at this point, being careful not to tear it while I press into the dough.
Let rise until nearly doubled. This may take a little while, especially on a cool day.
Divide and Shape
Having made this bread many times, I’ve found that the optimal scaling weight for these loaves is 800g. This will produce loaves with a finished baked weight of approximately 1 1/2 pounds. After scaling, pre-shape into rounds and bench rest the balls for 20-30 minutes until the dough has sufficiently relaxed.
Final Fermenation
Shape the loaves into boules or batards. At this point, you have a couple of alternatives:
Ferment at room temp for 1 – 1 1/2 hours (or until they pass the finger dent test).
Rest for 20-30 minutes, then pop them in the fridge for 8-12 hours.
The second option is more of a timing thing rather than a flavor development thing. The garlic and rosemary are already intensely flavorful and the a long rest, while allowing for the development of organic acids will not have that much of an affect on the overall flavor. So I just normally bake the loaves the same day I make the final dough.
Bake
Hamelman recommends baking the loaves at 460°F under normal steam for 30-40 minutes. But I just bake the loaves the same way I bake boules and batards at 500°F for 20 minutes with steam, then 425°F for 25-30 convection. If you’re using a Dutch oven, just bake the loaves as you normally would for boules and batards.
Cool for at least 3 hours before cutting!
Pure Sourdough Method
If you don’t want to use commercial yeast, things will take a much longer time. At 65% hydration, fermentation will take a while – at least twice as long. To be honest, I don’t have exact timings on this because they vary based on the weather. But in general, I’ve found that it takes double the time. Your best bet is to use standard telltales (windowpain, finger dent tests, etc.).
I know that’s not much instruction, but truth be told, this is a bit more advanced of a recipe than just simple sourdough or straight dough, which is why I didn’t include my normal step-by-step instructions. I’ve assumed a certain experience in baking.