The other day, I got a shipment of my favorite flour, Azure Market Organics Unbleached Bread Flour. I’ve written about it several times, so I won’t go into detail about it. But if you’ve read this blog, you know I love this flour! It’s so flavorful and wonderful to work with, but until recently, it was out of stock at Azure. They finally got it back in stock and I immediately ordered it. I feel like a kid in a candy store!
I’m excited because this flour has been integral to my flour blends, and with it unavailable, I’ve had to use alternatives. That hasn’t been too much of an issue, but any time you change things up, you need to adjust to the change, and sometimes it takes a few times to get comparable results to what you’re used to, as you tweak hydration, preferment amount, fermentation times, etc. But baking with this flour? It’s like putting on a pair of broken-in shoes. It’s just comfortable, which in turn makes my dough development process comfortable and familiar.
And I’ve realized that a very large part of my progression as a baker has been getting familiar with my ingredients. When you’re used to working with different ingredients, you just know how they’ll react and you can execute your process without having to apply too much conscious thought. Things just become automatic.
I once got in a great conversation with a professional chef. He said that the fundamental difference between him and a home chef is that he knows his ingredients so well that he doesn’t have to think about what he’s cooking. He can just focus entirely on creating his dishes. But more importantly, he said he gets the reps in that build that familiarity. It’s the same way with baking. When you’ve put in the reps, you just know, and as they say, when you know, you know.
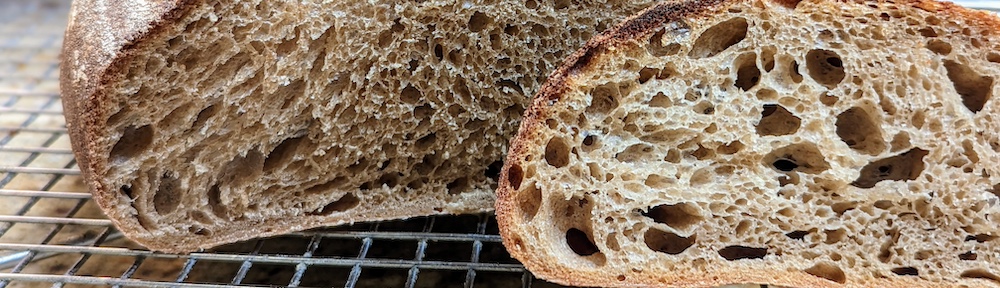
As soon as I got my flour, I made the dough for the loaf above. With that loaf, I used a 500% hydration starter (yes you read that right) to ferment a 75-25 Bread/AP flour blend. Final hydration was around 75%. That’s just a basic loaf. But this was a bit of a challenge because I couldn’t do as long a bulk fermentation as I normally do because of time constraints. But knowing this blend and recipe so well, I knew that I could make up for it by doing an extra-long final fermentation. So, this loaf spent about 18 hours in my fridge.
When I checked it baking through my oven’s window, I just smiled and gave a sigh of pure satisfaction. I just nodded and said, “Mm-mm-mm, how sweet it is!” Then when I removed it from the oven, I was giddy. I saw how much the loaf had expanded, and I knew it was going to turn out great. Yes, it has a nice, open crumb, but more importantly, the dough was fully fermented and in no place was dense. So satisfying…
Like many other bloggers, I often talk about experimenting with different ingredients. I think that’s part of the process of developing skill. And while experimentation is great, getting reps in and learning what ingredients work best for you is just as important.
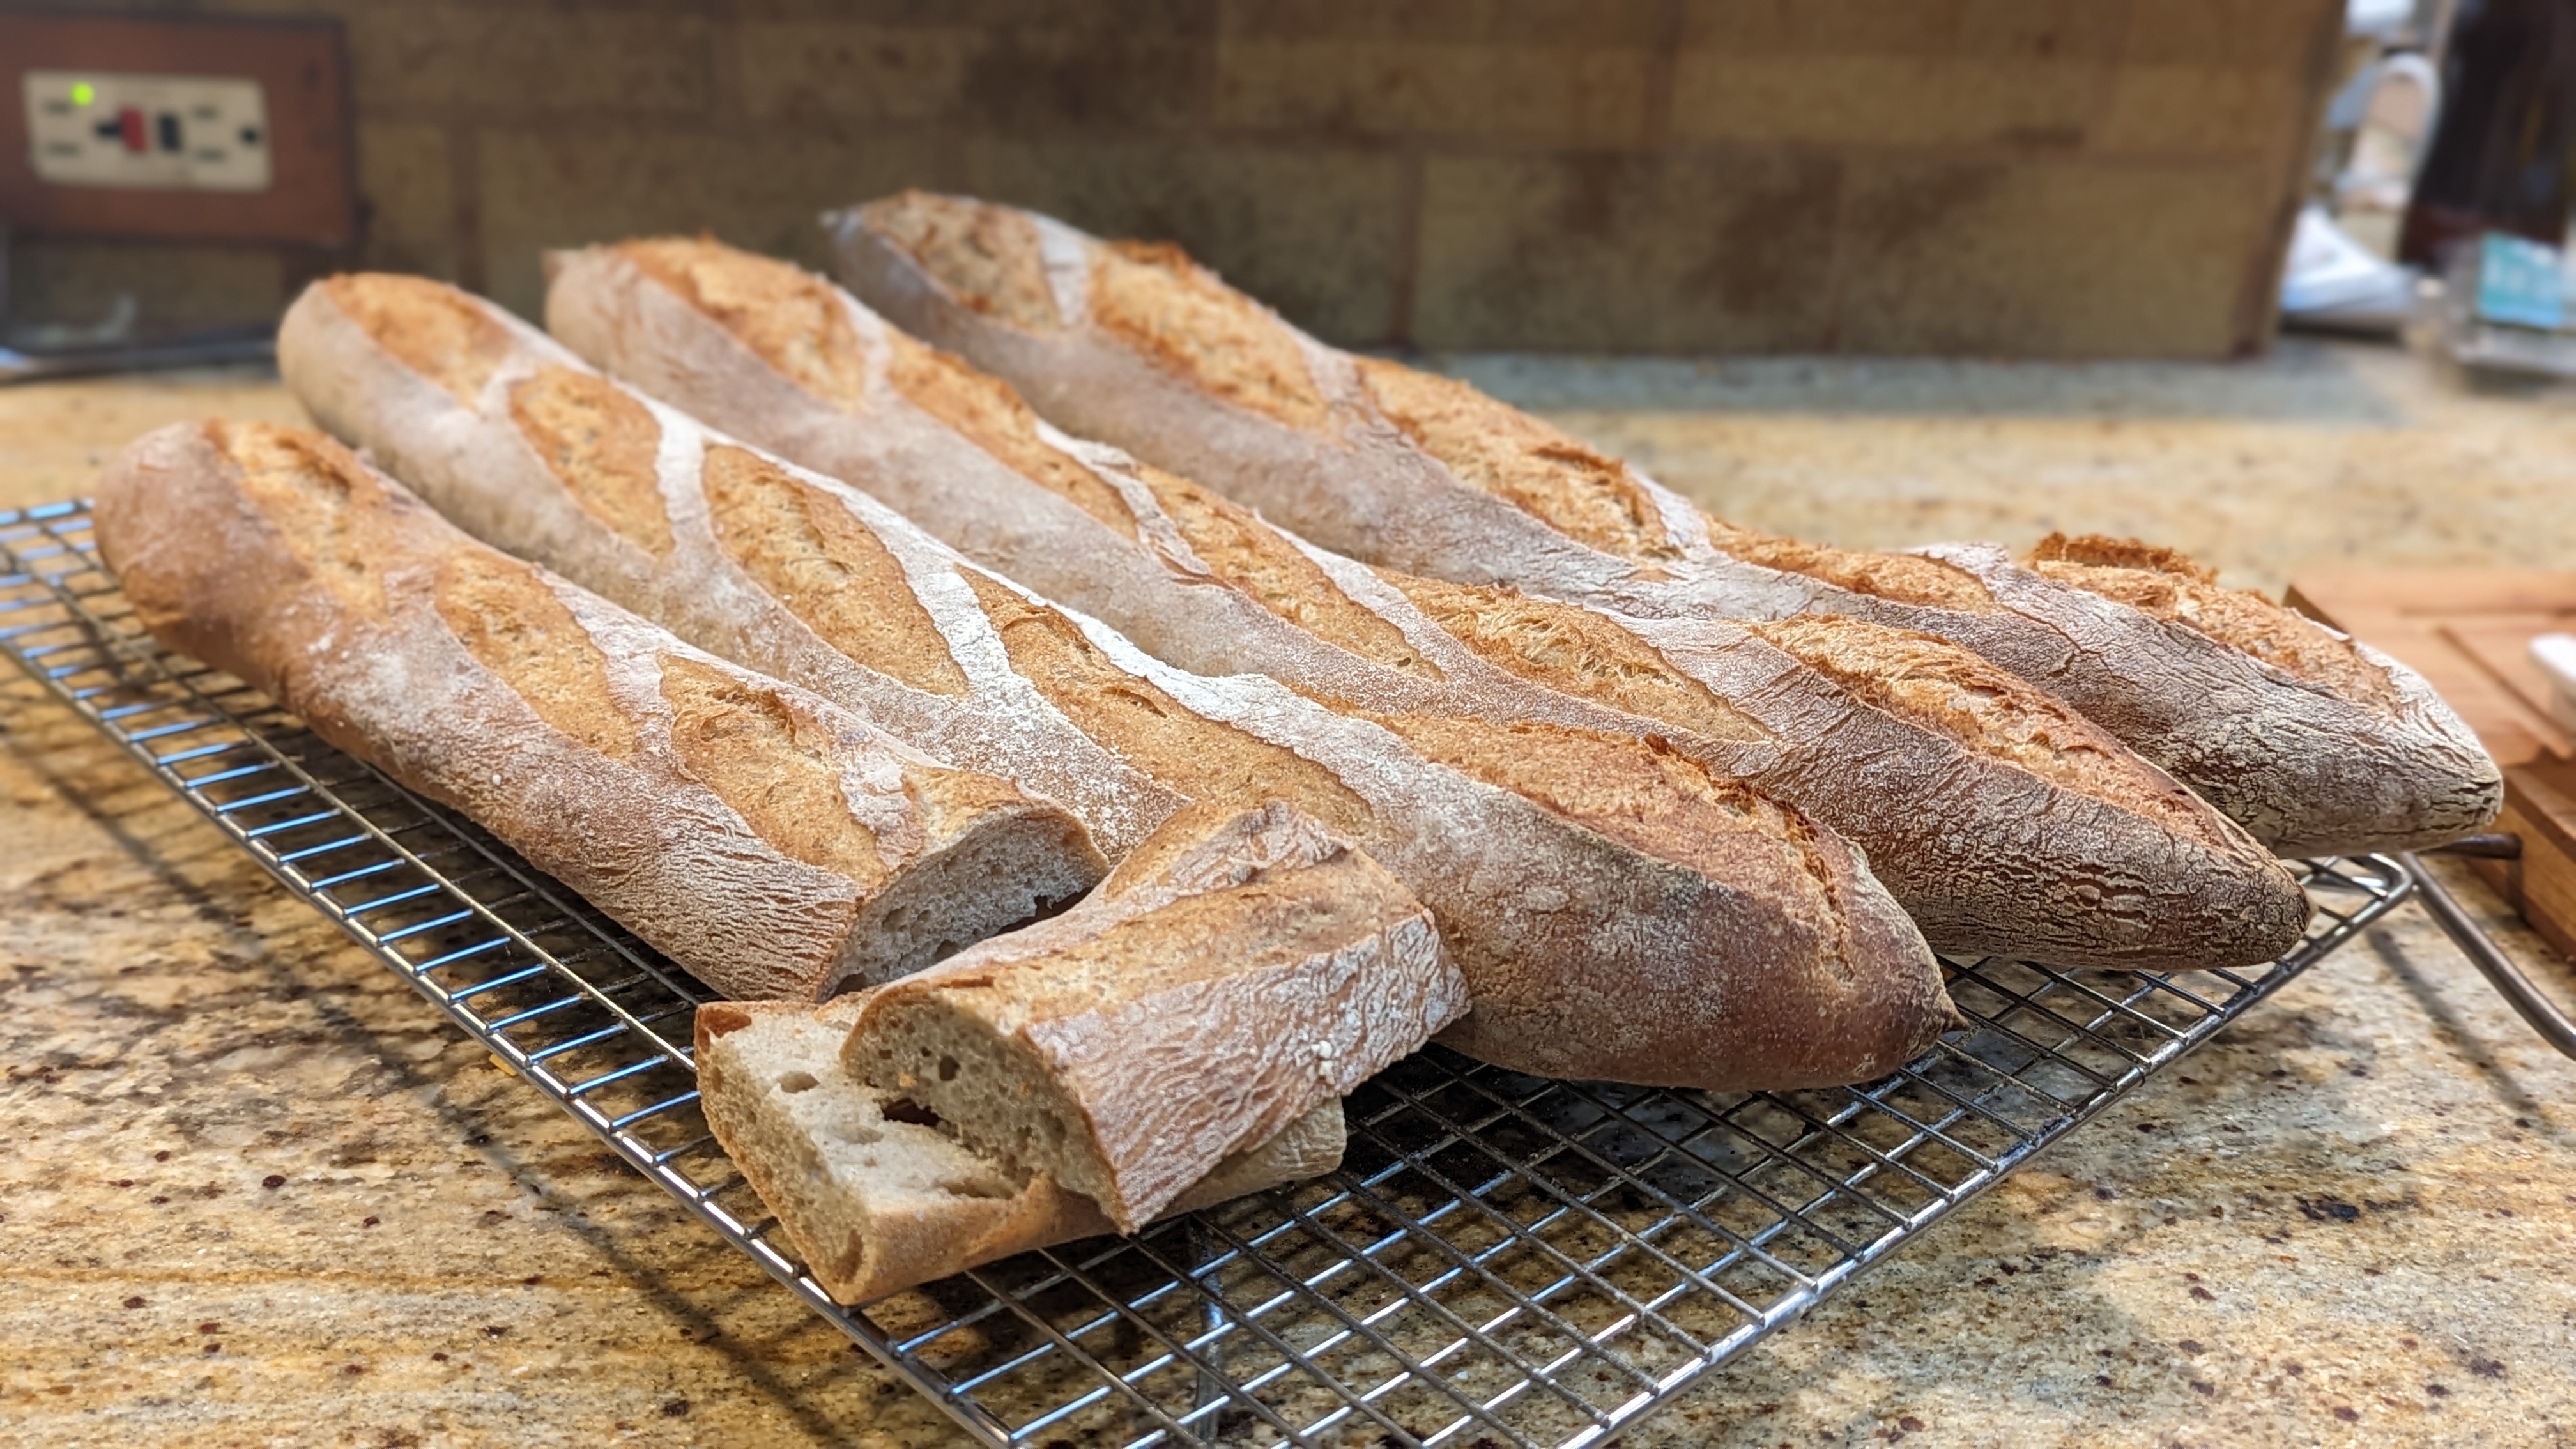
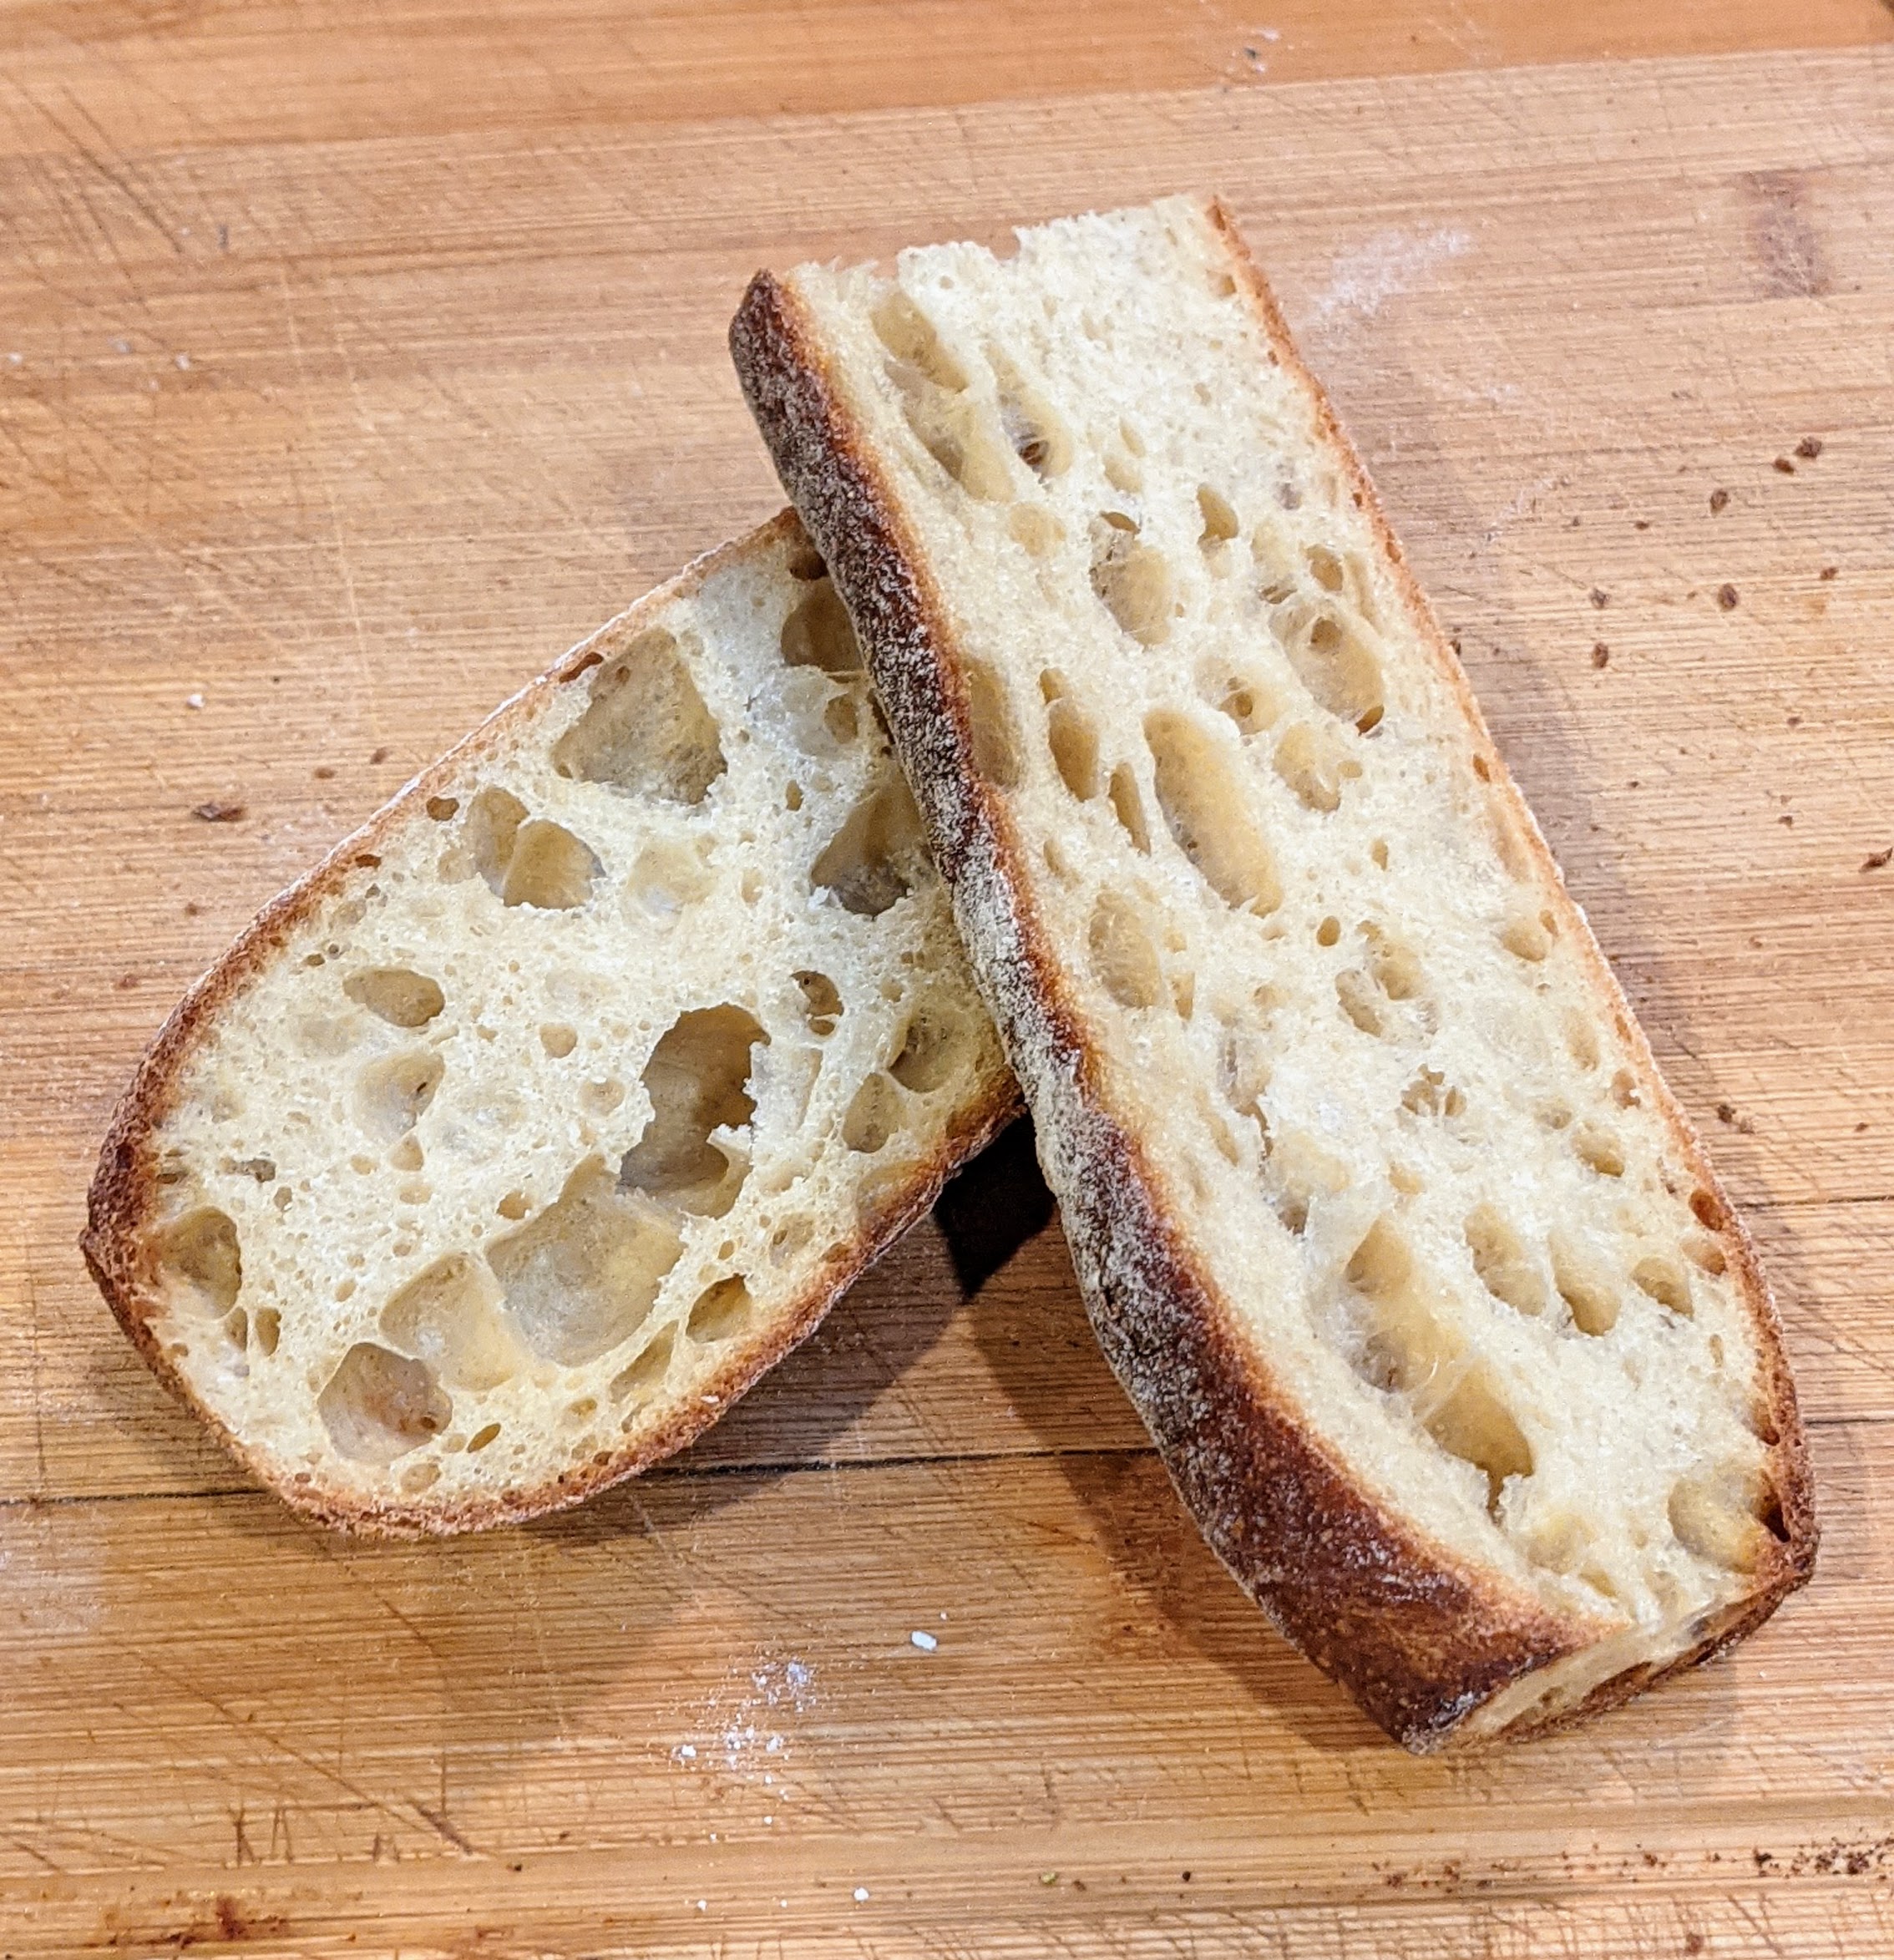
…than pulling baguettes out of the oven, picking one up, and immediately noticing that it weighs far less than how it looks. That goes for any bread, but for baguettes, it’s a crucial quality because it’s an indicator that the loaves had great oven spring which, in turn, means that the crumb will be light and airy.
I baked the loaves in the picture above yesterday. For those, I used a rye poolish, with the flour of the rye accounting for 25% of the total flour. I knew that even with 25%, the bran in the dark rye flour that I use can cut up gluten strands. But I handled the dough much more gently, making sure I didn’t tear it, and only folded it once as the bread flour I use has over 14% protein – gluten forms up fast.
I still took a hit on the overall openness of the crumb, but the crumb still came out light despite the lack of numerous large holes. I knew when I pulled them out just by looking at them, that they had sprung up quite a bit. And though I didn’t expect a super-open crumb due to the whole-grain rye, with that kind of volume expansion, I didn’t have to worry about the crumb being dense and chewy.
Then picking that first one up… I just smiled in satisfaction. It was a good bake.
I recently had a conversation at a party with a friend and fellow home baker who started our conversation by saying, “Oh, I never make yeasted bread. It’s just too simple and it tastes so bland.” Then after wolfing down several pieces of baguette that I had brought to the party she remarked, “This bread has a slightly sour tang to it. What kind of sourdough starter did you use?”
Willing myself to not roll my eyes, I smiled and said, “That’s a yeasted loaf. No sourdough. In fact, I didn’t even use a poolish.” I SO wanted to be snarky. But I behaved myself, and instead took a more conciliatory stance: “On the surface, sure, a straight dough is very simple to make. But there are lots of things you can do to completely transform it.”
Of course, she asked, “How?” So I spent the next several minutes – actually, it was more like an hour in total – discussing different ways I’ve learned to affect the flavor of my bread. But while some things I’ll share below are specific to yeasted bread, there are a couple of nuggets that could be used for any bread that you make. Note that though they’re numbered, the tips aren’t in any particular order.
1. Move beyond white flour
Like many, my first real bread book was “Flour Water Salt Yeast” by Ken Forkish. There was a section in the book where he talked about finding a flour to call your own. I was just starting out making no-knead bread at the time, so I didn’t pay too much attention to that section. I just wanted to learn the technique. But literally within a month, I was starting to get bored of making white bread. So I started experimenting with different blends of flour. Here are a few blends that I use:
This has the sourest flavor as I make my levain using whole wheat flour that has lots of bacteria in it.
Sourdough 2
60% Kamut 40% High-Protein Bread Flour
This is a difficult one to make as Kamut has a different kind of gluten. But the flavor it produces is nutty and the crumb texture is super-soft.
Sourdough 3
60% High-Extraction Bread Flour 40% White Whole Wheat
The crumb structure on this one is not very open, though the crumb is super-soft due to the white whole wheat flour that also imparts a subtle sweetness to the flavor.
Baguette 1
50% AP Flour 25% Bread Flour 25% Kamut or Rye
Kamut and Rye both add nuttiness to the flavor and the bread flour provides chew.
Baguette 2, Ciabatta
75% AP Flour 25% Kamut or Rye
This is actually the blend I use the most for baguettes and ciabatta.
I use this for my sourdough baguettes. As with Sourdough #1, the levain is made from whole wheat.
NOTE: All flour I use is certified organic
While fermentation will certainly drive flavor, I’ve found that the most significant impact on bread flavor comes from the flour blend that’s used. If you do create a blend, keep in mind that your processing technique may change as different flour has different protein content or, in the case of Kamut or rye, will not create gluten, or at least a protein that contributes to the dough structure. It may take you a couple or a few times baking with the blend before you get it down.
Note above that I list 25% Kamut or Rye. This is because both of these flours behave similarly in that they contribute very little if any to the dough structure. But they dd some incredible taste to the bread! Kamut adds a
2. Play With Hydration
Hydration affects the texture and density of the bread. And while texture and density aren’t flavors, they can affect our perception of flavors. For instance, a heavy, dense bread concentrates flavors, while an airy, light crumb tends to have much subtler, more delicate flavors. With the bread I make, I try to strike a balance between flavor concentration and texture. The crumb of my boules and batards isn’t super-open, but it’s still light and airy – it just doesn’t have a lot of big holes. To achieve consistent results, I’ve had to play with the hydration. But as a rule of thumb, the more whole-grain flour I use, the more water I’ll add. For instance, the hydration for Baguette 1 is 76%, while the hydration for Baguette 3 is about 80% (these are a challenge to shape).
3. Retard Bulk Fermentation
People who make sourdough are well-versed in long, slow fermentation and the flavors it can impart as the bacteria in the flour (and in the air) get a chance to release organic acids into the dough, and the enzymes have time to break down starches and convert them to sugar. We can do the same with yeasted dough. For instance, with my Pointage en Bac baguettes, I start bulk fermentation at room temp, then slow it down in a fridge that’s set to about 39℉ – 42℉. This doesn’t completely stop yeast fermentation, but it significantly slows it down to allow the enzymes and bacteria to better compete for resources.
Lately, I’ve been really getting into the Pain a l’Ancienne technique of delaying fermentation from the get-go for my baguettes. This involves using ice water at mixing to prevent the yeast from metabolizing. I then further retard in the fridge set at 36℉ for up to 48 hours. Yeast fermentation is allowed to occur only after this long rest in the fridge. This makes for an absolutely complex-tasting bread!
4. Retard Final Fermentation
While retarding final fermentation follows the same basic principles as retarding bulk fermentation, it’s a little trickier because we’re using commercial yeast. Commercial yeast has been literally bred to be fast-acting and resilient, even in harsh environments.1 So timing when you place your dough into your fridge is critical. I’ve found that as a rule of thumb to always place my loaves in the fridge once the dough has expanded about 50%. It takes a while for the dough to equalize to the cold environment, so you have to have enough runway to account for the yeast activity while the dough cools. I’ve found that if I let it get past that point, my dough will be overproofed when it comes out of the fridge. So now, if by chance I let it get past that point, I just let it finish and bake the bread.
That caveat aside, once the dough equalizes, you mitigate the competition from the yeast and the bacteria and enzymes can do their thing. Pizzaiolo’s know this technique very well, with some letting their pizza dough undergo cold fermentation for up to five days!
5. Salt Stress Yeast
When yeast is placed into a saline environment, it undergoes what is called osmotic shock. During this period, the fungus ceases fermentation while it builds up protection against water from being leached from its cells. Once that protection has been built, the yeast then can go about its business converting sugars into gas and it also becomes impervious to later osmotic events.
I now only use salt-stressed yeast when I’m making dough for Baguettes a l’Ancienne or other bread where I want to delay bulk fermentation simply because once I remove the dough from the fridge, I don’t want the yeast to undergo osmotic shock. I want it to start producing gas bubbles ASAP. The thing about pre-stressing the yeast is that it produces glycerol. An increased presence of glycerol has been shown to increase fermentation activity and also increase the gas-retention abilities in the dough.2 Gas is flavor!
6. Be Gentle With Your Dough
As of late, I’ve been doing my best to handle my dough in a much more gentle fashion. After a couple of batches where the bread turned out a little dense, I realized that the loaves were turning out that way because of how I handled the dough. I was degassing it by being too rough. So I made a conscious decision to handle the dough in a much gentler fashion. For instance, look at the ciabatta in the picture above. With that batch, I did my best to be gentle with the dough and the results, as you can see above, pretty much speak for themselves.
When you see a professional baker manipulating dough, it looks as if they’re throwing it around. But I realized that they’re just going fast because they’ve done it thousands of times. I started picking up speed myself as I got used to the particular tasks, but I realized that I also increased the physical pressure I was placing on the dough. By being aware of how I was manipulating the dough, I’ve greatly improved the texture and density of my crumb. And as with hydration, texture, and density affect flavor.
7. Experiment with Different Sourdough Cultures
A sourdough culture has the potential to affect the flavor of the bread in a variety of ways. The more starter you use, the more the grain of the culture affects the flavor. The less you use, the rising will be slower and flavor development will come predominantly from the bacteria in the final dough. But where the culture originates from can also play a factor as the combination of yeast and bacteria differs from region to region.
For instance, when I cultivate a culture from my immediate vicinity, the resultant bread isn’t very sour and the rising action is moderate. On the other hand, when I’ve made cultures from longan fruit, those microbes go crazy. The rising action is much higher and the microbes impart both sweet and sour flavors, though the sweetness could very well be coming from the fruit juice itself. If I make a starter from an original San Francisco sourdough culture, the bread has the distinctive San Francisco sourdough tang. Contrast that with a starter from Eastern Europe that has a very sour flavor.
By the way, if you’re interested in cultivating international cultures, look no further than Sourdoughs International. They have a collection of dry starters from all over the world and even have an Egyptian culture from antiquity that was captured from an unearthed ancient bakery at the foot of the Giza pyramids. It’s on the way to me as I write this!
But even if you don’t experiment with different starters, varying the amount of starter you use will affect the flavor of your bread. Note, that your rising times may vary wildly if you do this, so you’ll have to eyeball how your dough rises. And also note that the more starter you use will not necessarily make your rising go faster. In fact, the higher acidity may very well slow down fermentation. As always, use your senses – especially your sight and touch – to monitor your dough’s progress.
The one thing that really excites me about using different starters is that all of them vary in their microbe density. Some starters, such as the Giza starter I mentioned, seem to have a high density of bacteria, so the bread comes out particularly sour. On the other hand, one of my Italian starters is much more balanced and I’ve trained it to favor the yeast and other microbes in the starter that release esters, giving it a slight banana-like aroma (that’s actually frickin’ amazing, btw).
8. Use a Levain AND a Poolish
In my ever-popular Tartine Bread Baguettes post, I shared how Chad Robertson uses both a poolish and a levain to ferment his baguettes. I’ve used this technique for different kinds of loaves other than baguettes, and I love it! The levain adds the sour component to the flavor profile, while the poolish provides a nuttiness, plus a much more powerful rising action than the levain due to the commercial yeast. I’ve found this technique to be ideal for lower-hydration dough. It can get a little crazy with high-hydration dough as things will happen a lot faster, but it’s still manageable.
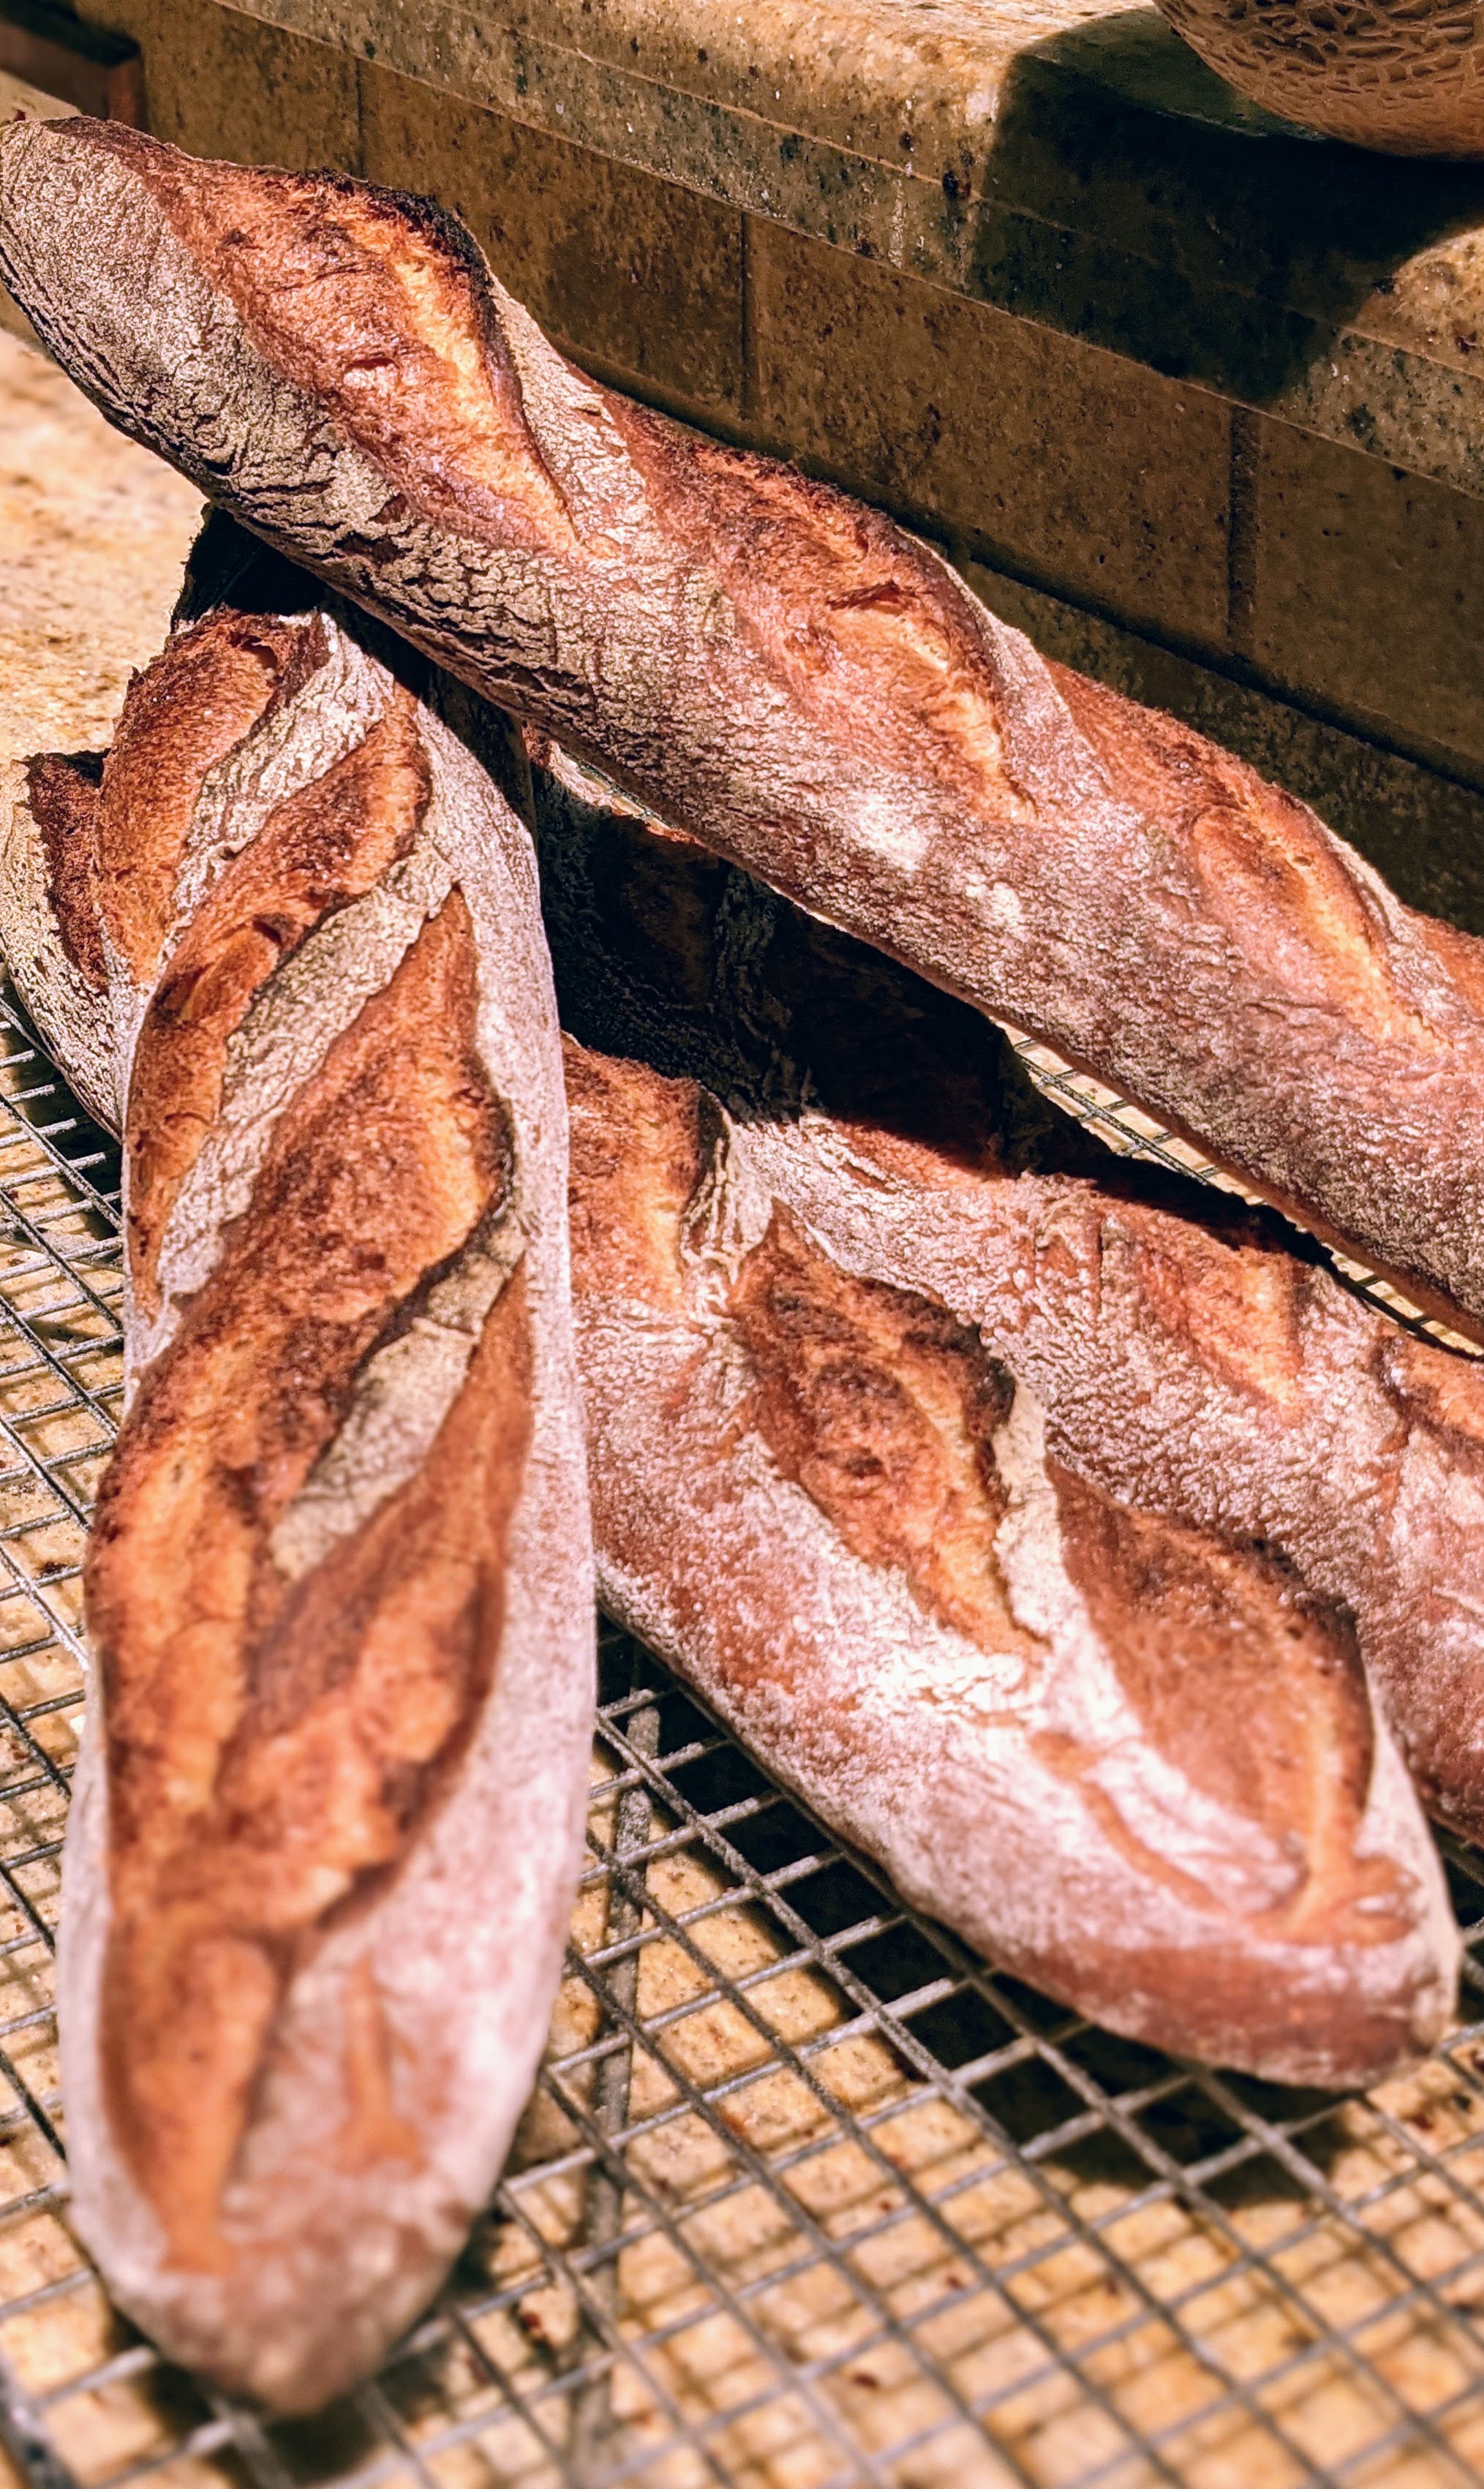
At least for me, using this technique almost invariably produces a chewy crumb. And that is an awesome thing because the chewiness gives you time to savor all the toothsome goodness that the preferments bring to the bread. Combining this technique with different blends of flour makes for an incredibly complex flavor profile. In the picture immediately above, I used a blend of 10% Rye, 40% High-extraction, and 50% Organic, Unbleached AP Flour. It was a powerful combination!
9. Vary Your Bake Times
Out of all the different techniques, this has the potential of really messing up your bread if you’re not attentive. If you read or participate in bread-baking forums, you’ll occasionally see references to the Maillard Reaction. Put simply, this is the browning process when heat is applied to food and how it affects taste. With respect to bread, as the crust browns, it opens up a whole new world of flavor. The nuttiness you get from a baguette or other crusty bread is due to the Maillard reaction.
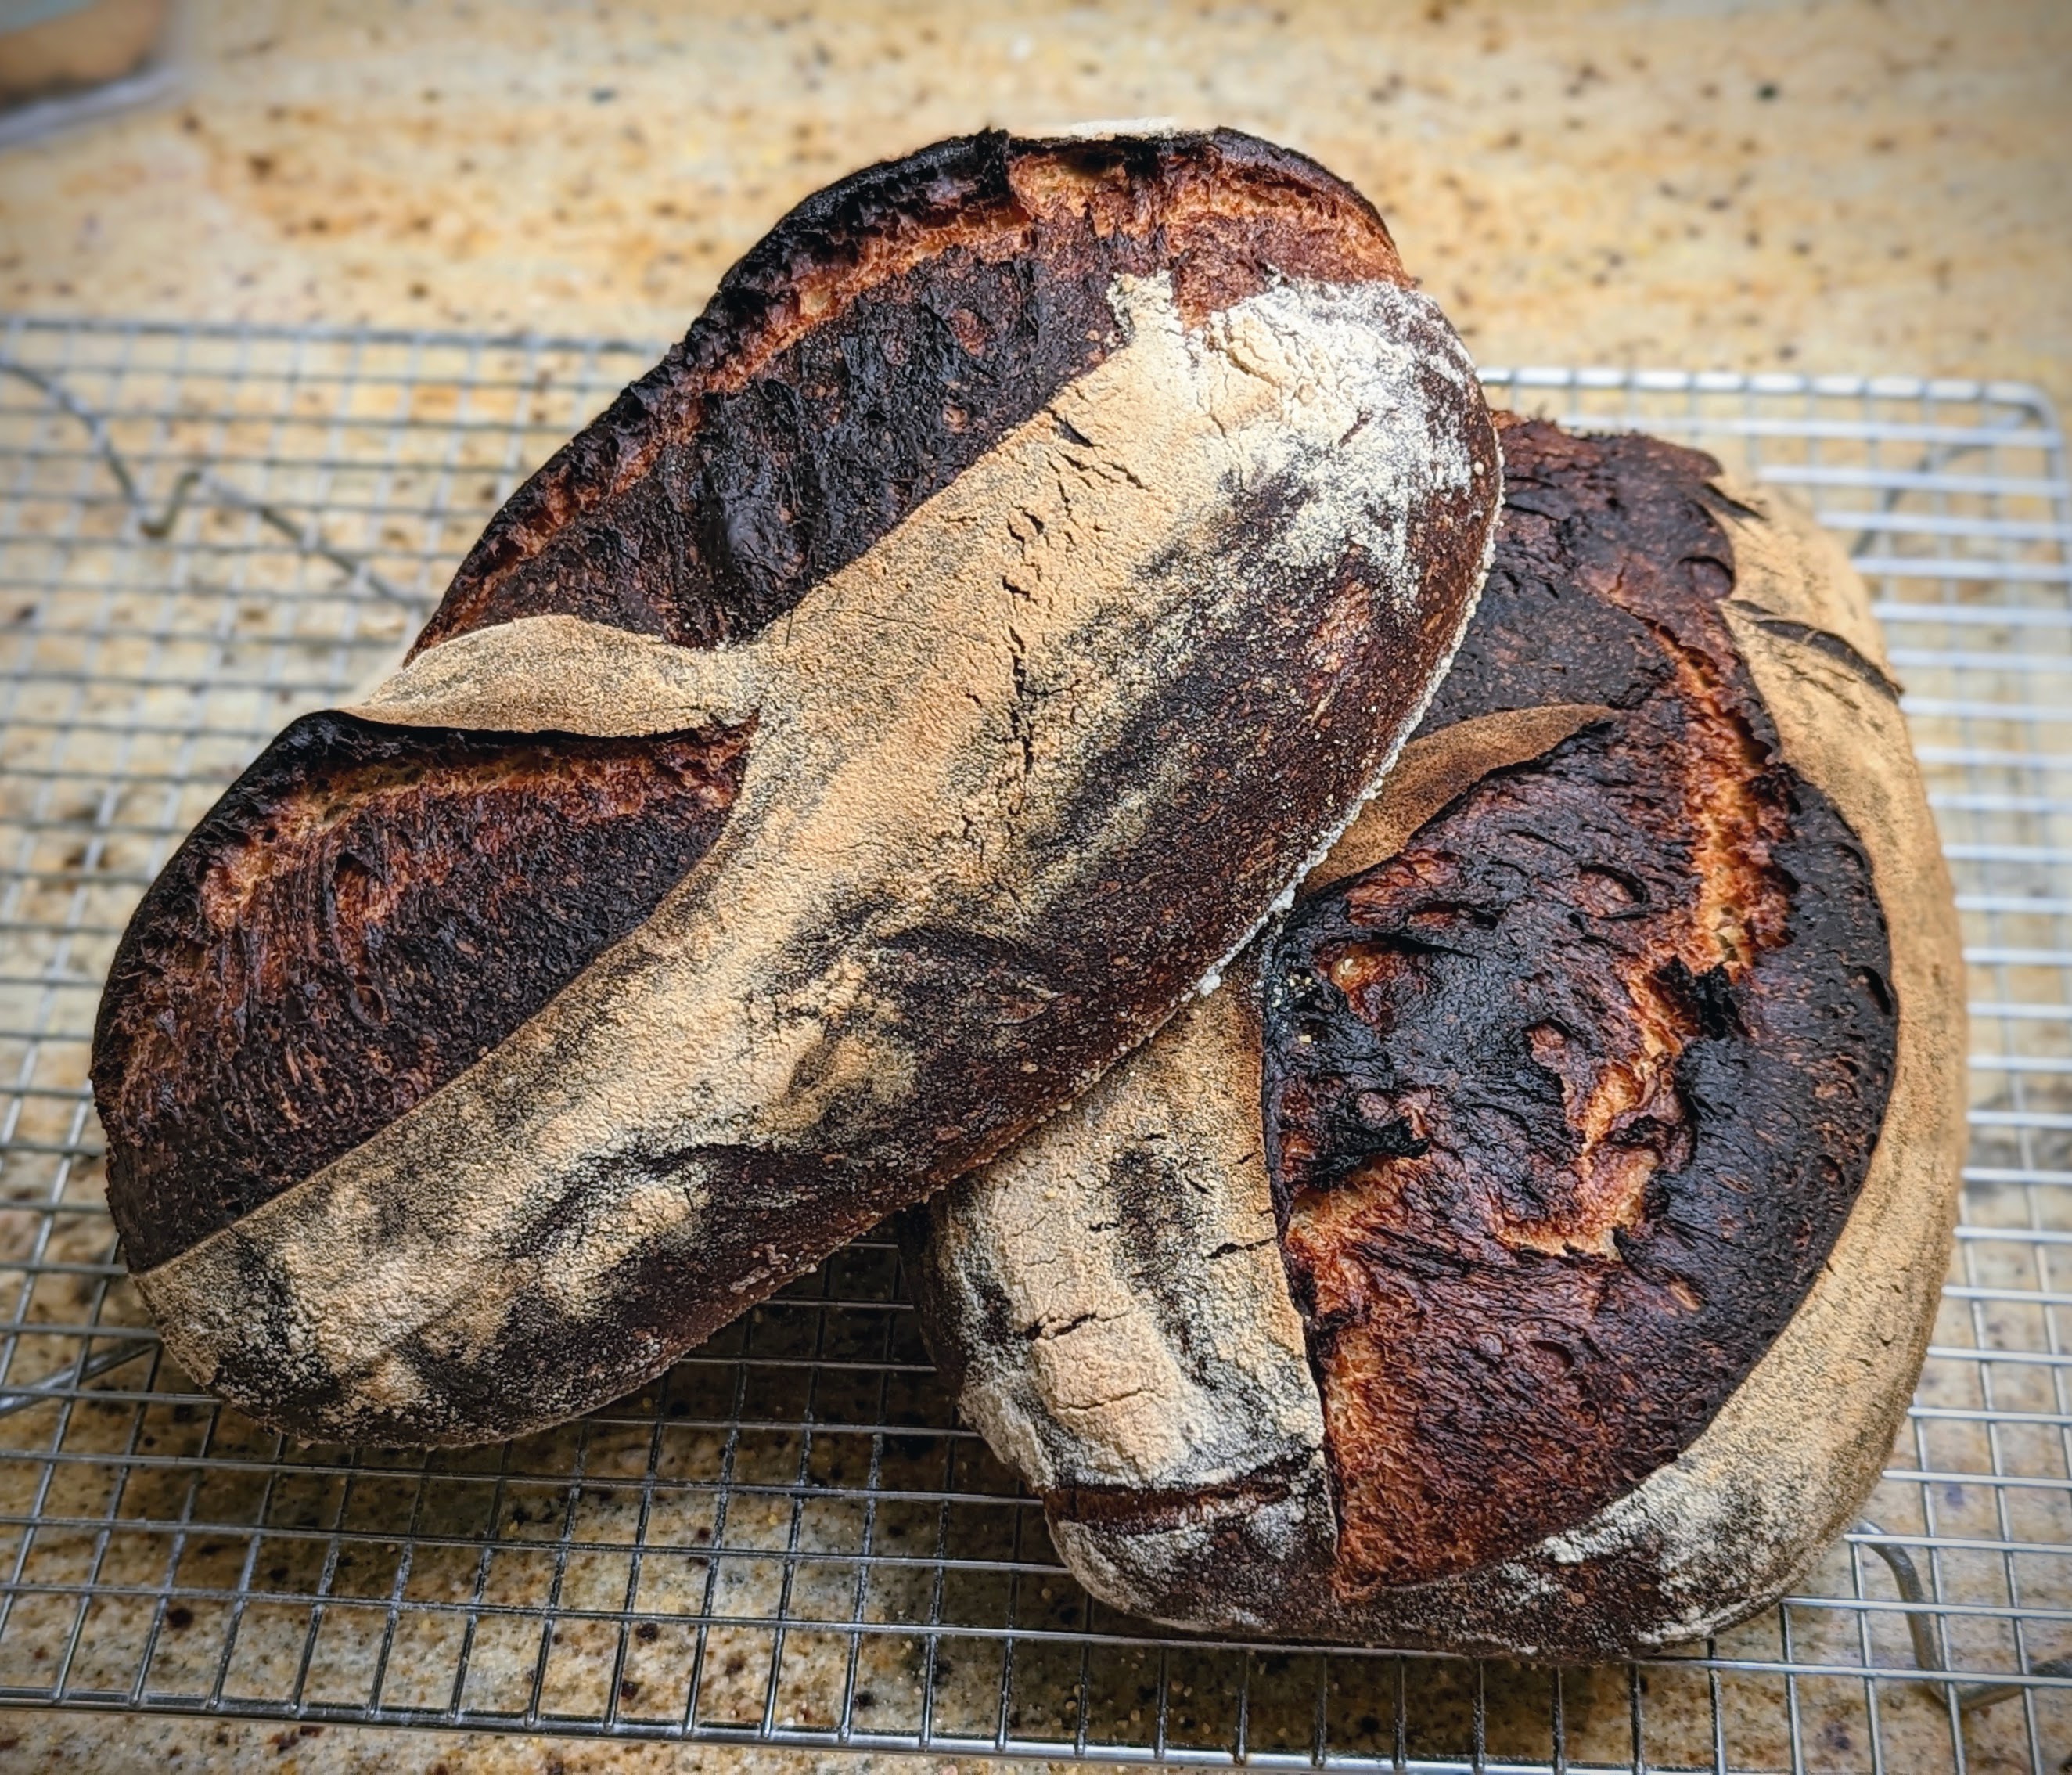
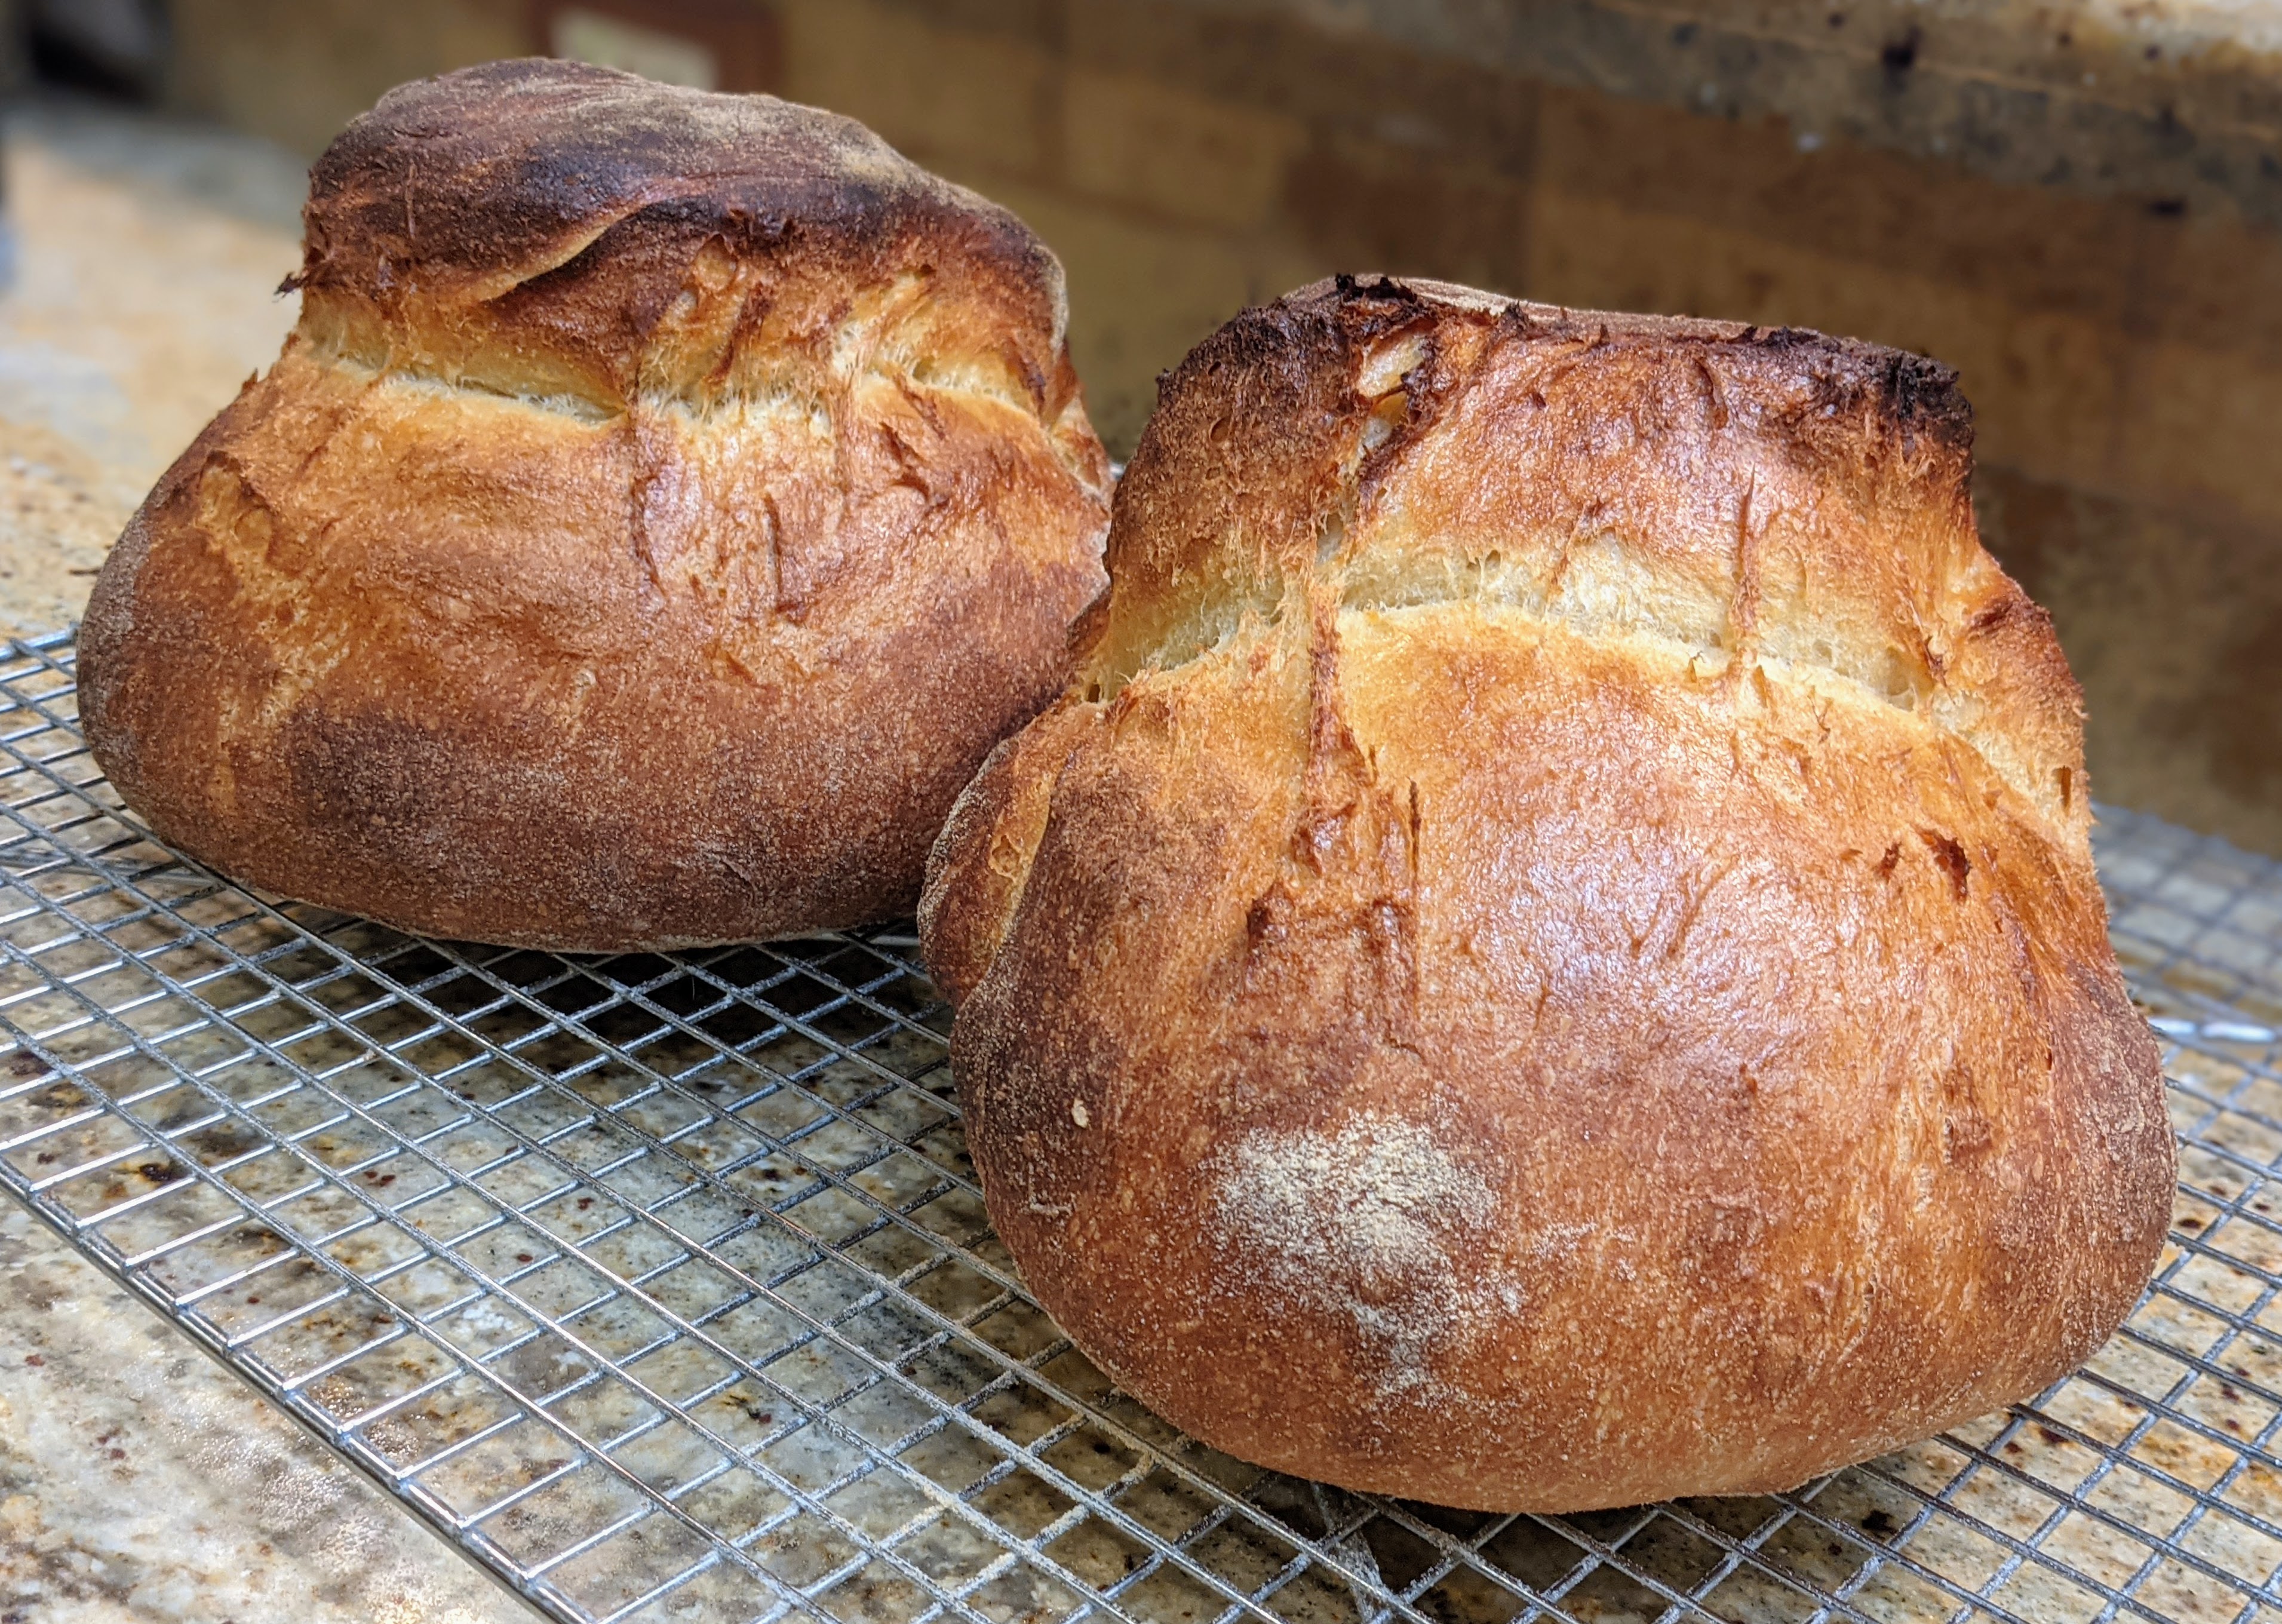
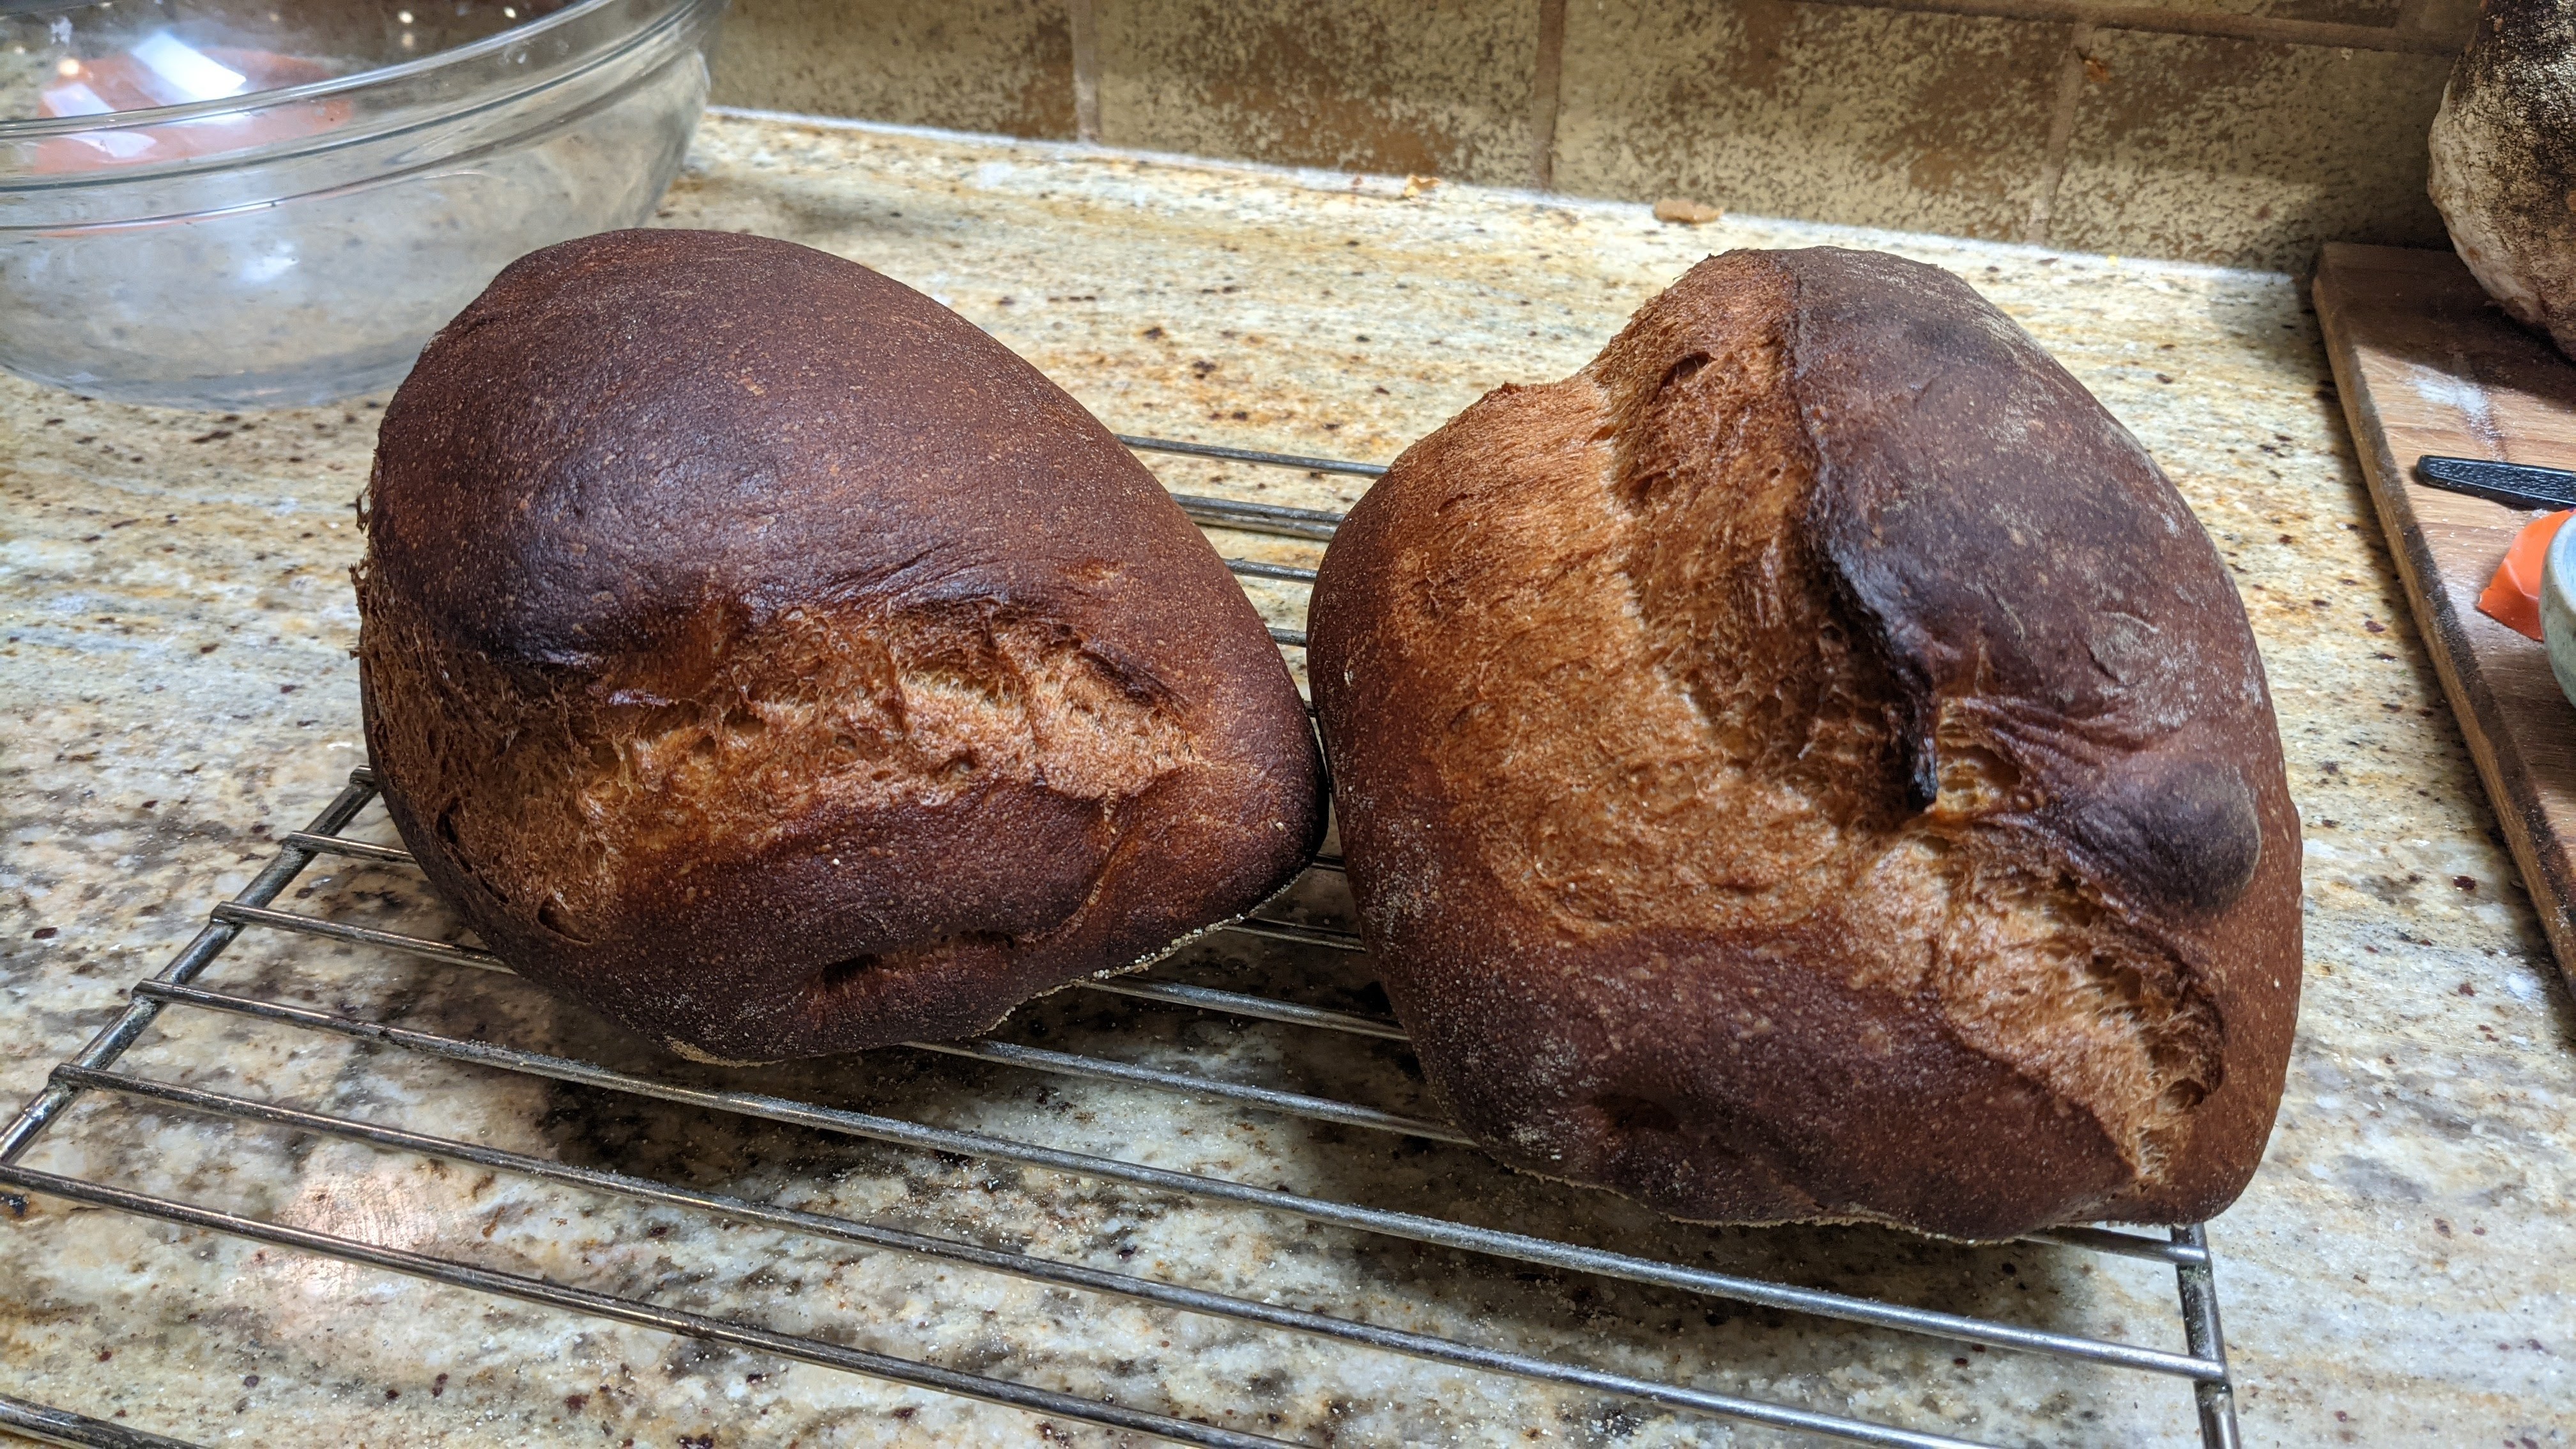
There is a thing in artisan bread circles to bake the crust to a really deep color – or at least part of it. For instance, take a look at the loaves below:
Some folks might look at these loaves and say I burned them, but they tasted anything but burnt. In fact, those loaves were absolutely packed with flavor! There is a real depth and complexity in the flavor of bread when it is baked long enough to get this dark. I’ve literally baked hundreds of loaves, so I know just how long to bake them to achieve this effect. But I will admit that it took several burnt loaves before I got my own technique down. Even if you lengthen your bake time, there’s no guarantee you will actually like it. But give it a try.
To achieve this, bake at your normal temp. For most folks, this is going to be at 250ºC/475ºF. Lengthen your initial time at that temperature by 5-10 minutes to start with. Then once you get to the desired darkness, immediately reduce the heat in your oven so cooking continues, but browning doesn’t. For me, that’s 425ºF.
10. Vary Your Salt
Salt is one of those universal flavor components used in pretty much every food. And varying it can sometimes have dramatic effects on your bread. I typically use 1.5% or 2% salt in my bread, and never go beyond 2% with sourdough as salt attenuates the yeast action and really slows things down with natural yeast.
And no, contrary to popular belief, salt does NOT kill yeast. In order for it to kill yeast, it has to be in a super-high concentration. I don’t know how this myth originated, but it’s wrong. Do a search on “salt stressed yeast” and you will find peer-reviewed research papers on the subject and yeast’s tolerance to salt. Sorry, but science rules here…
With yeasted bread, it is possible to up your salt to 3-5%. If you salt-stress the yeast before mixing, you can go up to some crazy saltiness. But I’ve found that beyond 3%, the bread is too salty. See the section above “Salt Stress Yeast.”
On the other extreme is using no salt. Tuscan bread is saltless and it is insipid. The popular story behind this is that apparently, back in the Middle Ages, salt was heavily taxed, so the Tuscans chose to use it sparingly and stopped putting it in their bread (by the way, no one really knows the true story). To this day, bread in Tuscany is saltless. But they make up for it by making rich and flavorful sauces meant for dipping bread into.
Personally, I’ve made Tuscan bread and sorry, I’ll be sticking with adding a bit of salt to my dough…
On Additives
All the techniques I shared above focused entirely on producing flavor in the dough naturally. But you can use additives such as roasted garlic, herbs, nuts, dried fruit, etc. I don’t consider doing that cheating, but additives could hide what could be rather insipid bread without it. So my advice with using additives is to not start using them until you can produce great-tasting bread that can stand on its own.
The low-hanging fruit to produce more flavorful bread is to experiment with different flour blends. For me, once I started doing that, it changed the game entirely for me. Using whole grain pretty much forced me to up my hydration. But then that got me thinking about modifications to the fermentation process. What a rabbit hole! But stuff like this gets me out of bed every morning. There’s always something to tweak!
1Money, Nicholas P., The Rise of Yeast: How the Sugar Fungus Shaped Civilization Oxford University Press, 2018
2Elham Aslankoohi, Mohammad Naser Rezaei, Yannick Vervoort, Christophe M. Courtin, Kevin J. Verstrepen, Glycerol Production by Fermenting Yeast Cells Is Essential for Optimal Bread Dough Fermentation, Plos One March 2015
Sometimes I just want some basic bread; something I don’t have to work too hard at. But by the same token, I don’t want to make just plain, white bread because that’s just boring. As I wrote in a previous article, there are lots of ways to make bread more flavorful. But my primary way of accomplishing that is to use various blends of flour.
In this case, I’m using a blend of 50% Fine-ground whole grain semolina and 50% bread flour. The bread flour I’m using is Bob’s Red Mill Artisan Bread Flour. This is a wonderful flour that has a nice, high protein content of 13.7%. This is one of my favorite flours to use in conjunction with whole-grain flour as the higher protein content ensures that I can build plenty of structure in the dough. The semolina flour adds sweetness and corn-like flavor and a gorgeous, natural yellow color to the crumb that looks like an egg was added to the dough.
The best thing about this bread is that it is absolutely straightforward and easy to make! So without further ado, let’s get into the recipe.
Formula
Flour (50% Fine-Ground Semolina, 50% Bread Flour)
100.00%
Water
80.00%
Salt
2.00%
Yeast
1.00%
Final Dough
The following recipe will make 2 1-kilo loaves:
Bread Flour
552g
Fine-ground, Whole-grain Semolina Flour
552g
Water
883g
Salt
22g
Yeast
11g
Total Yield
2020g
Note: The recipe makes 1% more than the 2 kilos to account for possible loss during processing.
If you really want to make things easy on yourself, do your mixing in a mixer, especially if you opt to use a delayed fermentation.
Mix. Combine all the dry ingredients and mix well enough so there’s even distribution. Add all the water and mix until smooth with moderate gluten development.
(optional) This recipe really lends itself to delayed fermentation. If you want to do that, use ice water to mix your dough. As recommended above, use a mixer and mix at medium-low for a few minutes to get gluten development started. Once the dough starts climbing up your hook, you will have mixed and kneaded it enough. Then put the dough in the fridge for up to 24 hours. The rest of the process is the same as below once you remove the dough from the fridge.
Bulk Fermentation. How long bulk fermentation will take depends on the ambient temperature of your kitchen. But it should generally take 1 1/2 to 2 1/2 hours. However, if you delayed fermentation, count on at least a few hours to allow the yeast to wake up. The dough will have finished bulk fermenting when it has expanded almost 35-40% of its original size.
Folding. You only need to fold this dough once, 30 minutes after mixing. If you did a delayed fermentation, there’s no need to fold.
Divide and Shape. Divide the dough into two 1-kilo pieces. Shape the loaves as you would batards, but roll them out into logs. I use 14″ bannetons for proofing but you could also just proof the loaves on a well-floured couche. Alternatively, you could just place the loaves on a large baking sheet that is covered with parchment paper. You’ll both proof and bake on the sheet.
Final Fermentation. As with bulk fermentation, final fermentation will vary based on the ambient temp of your kitchen. The loaves will be ready when they pass the poke test.
Bake. Bake at 425°F with steam for 20 minutes. Remove the steaming container after 20 minutes then bake at 400°F for 20-30 minutes to cure the loaves and reduce moisture in the crumb.
Because semolina is whole-grain flour, don’t expect large holes to form. But that’s okay. Your loaves will spring and have a wonderfully soft crumb!
Surprisingly enough, I’m not going to provide a recipe here but talk purely about a technique I’ve been using to bake the last few batches of my baguettes. The technique has totally changed my approach to baking baguettes, let alone baking straight dough with yeast. Based on the Pain a l’Ancienne technique of using ice water at mixing time to inhibit yeast activity, the technique employs temperature to affect the dough, providing yet another means to develop flavor.
Those who bake sourdough are familiar with retarding fermentation for flavor development. But that typically occurs during final fermentation after the yeast has mostly finished its job of expanding the dough. Contrast this with the Pain a l’Ancienne technique where the yeast doesn’t get a chance to metabolize all that much from the get-go, allowing the amylase enzymes to break down the starches into sugars and letting the bacteria do their thing in producing organic acids and other by-products.
With the delayed fermentation technique, we mix with ice water; that’s right. Ice water.
The end result is that lots of sugars are released into the dough – more than the yeast can metabolize – and the result is a relatively darker crust due to the sugars caramelizing and a much more rich flavor from the organic acids released by the bacteria! So here’s the technique…
I highly recommend using a mixer for this technique. This will serve two purposes:
It will take a lot less time than mixing by hand and doesn’t give the dough a chance to warm up significantly.
It allows you to get some good gluten development before you put the dough into the fridge.
First off, mix all the dry ingredients together with the paddle attachment.
Make ice water and make sure you make enough that will meet your recipe’s requirements.
Attach the dough hook, then add all the ice water needed for your recipe to the bowl.
Starting with the slowest speed, start bringing all the ingredients together. Once the dough starts to come together, stop the mixer, then scrape down the sides of the bowl. Continue mixing until there are no dry ingredients. In some cases, you may have to scrape the bottom of the bowl and flip the dough to make sure you get everything.
Turn the mixer up another notch to work the dough. Let it run for at least two minutes or until the dough starts climbing up the hook. That should give you plenty of gluten development to start with.
Transfer the dough to a sealable container. I put my dough in a glass mixing bowl that I then place in a jumbo Ziploc bag.
Put the dough in the fridge for 8 to 24 hours. It will probably rise just a tiny bit, but nothing significant.
Remove the dough from the fridge and allow it to almost double. This can take anywhere from 2 to 4 hours.
Divide and preshape. Bench rest for 20-30 minutes until the dough has relaxed enough to be shaped.
Shape the dough into your desired shape and final ferment. This can take anywhere from 1 to 3 hours depending on the hydration and your ambient temp. My baguettes this morning took only 45 minutes for final fermentation. Poke test the dough for readiness.
Bake as normal.
Though I listed a bunch of steps, the process isn’t all that complicated. But the results are astonishing. This process is a keeper!
The other bread that I love to bake on a regular basis besides baguettes is ciabatta. This is yet another super-simple dough and like baguettes, requires a bit of finesse to get a good result. That good result is a loaf that feels light as a feather when you pick it up and whose crumb is open and airy.
With this version, I thought I’d change it up a bit and use a white flour blend but I also added a roasted garlic paste to the mix to give it a bit of a garlic kick.
Formula
Flour
100.00%
Water
82.00%
Salt
2.00%
Yeast
0.50%
Garlic
5.00%
Poolish
AP Flour
200g
Water
200g
Yeast
0.40g
Final Dough
AP Flour
369g
Bread Flour
185g
Warm Water (~95°F)
421g
Salt
15g
Yeast
4g
Garlic
37g
Poolish
369g
Total Yield
1400g 2 X 700g loaves
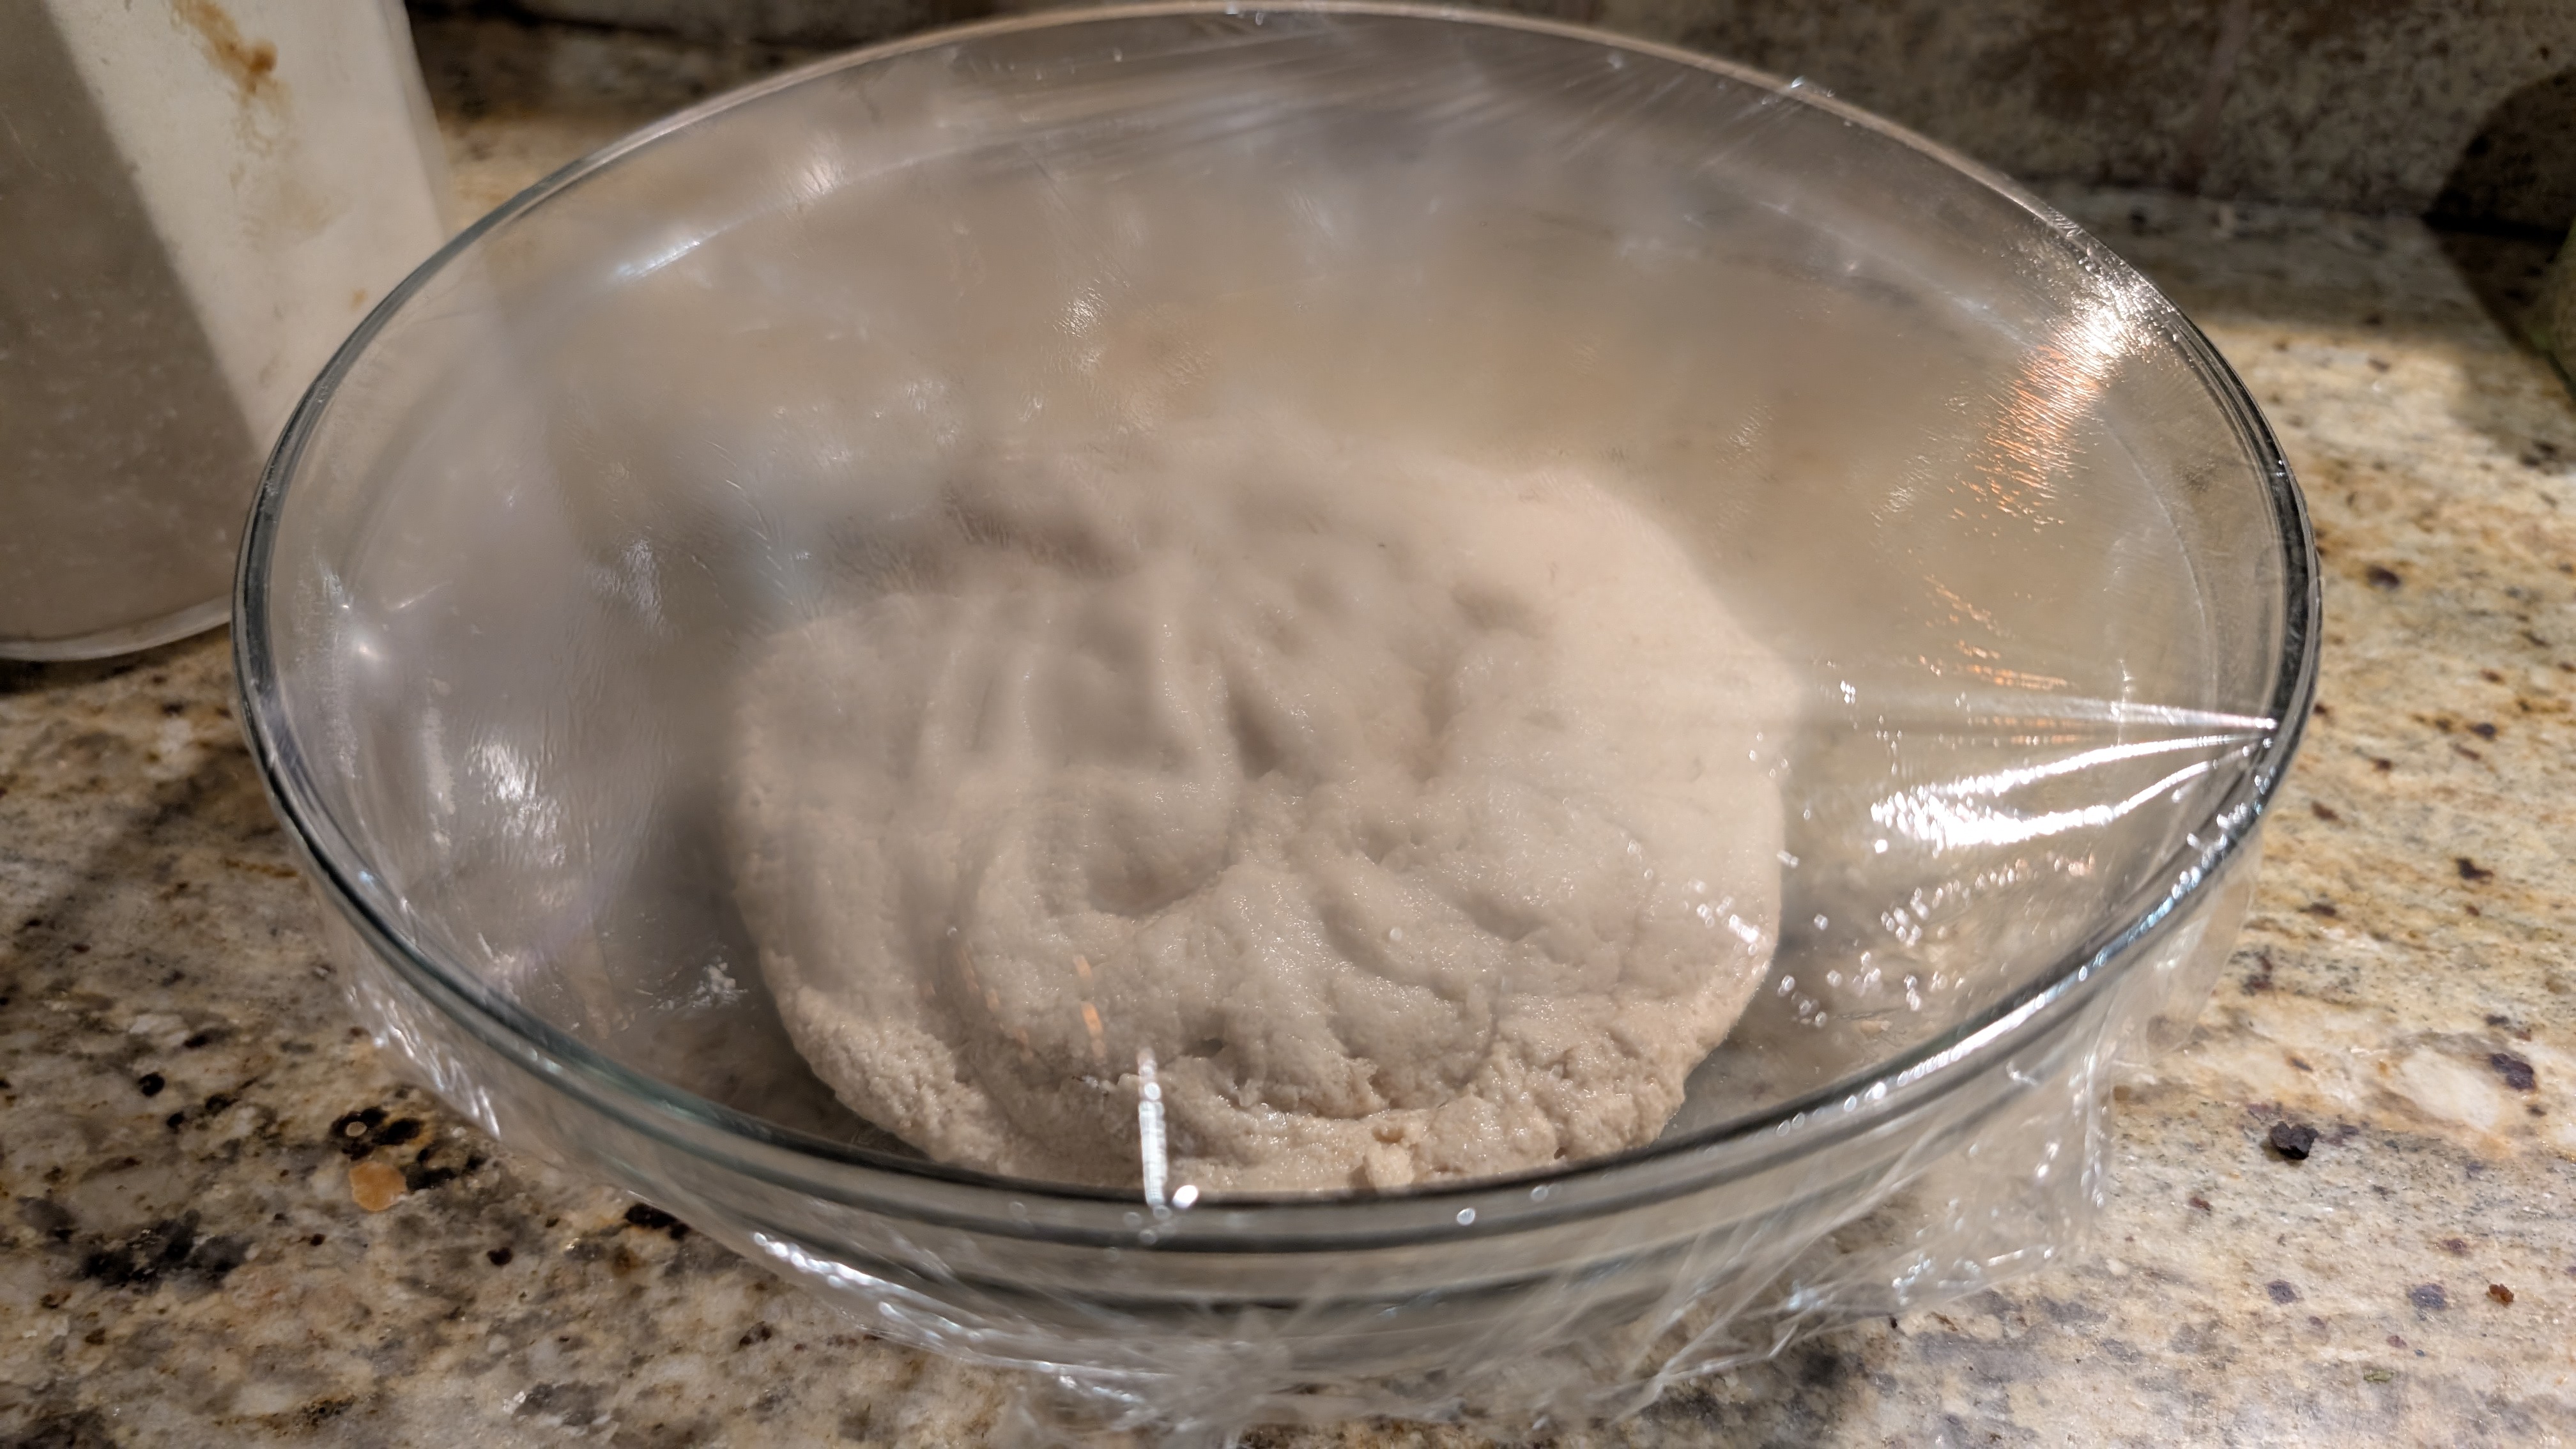
Make the Poolish. The night before, make a 400g 100% hydration poolish. Cover tightly with plastic and let it sit overnight on the counter. By morning, it should be filled with bubbles and slightly domed on top. Don’t worry if it has collapsed or you see a bit of hooch around the edges.
I highly recommend using a mixer. This is a very wet dough and while you could mix it by hand, you’ll get a more uniform consistency with a mixer.
Roast the Garlic. You can do this at any time. Just have it ready for when you mix. I use peeled garlic drizzled with olive oil then loosely wrap it in foil. I roast the garlic at 375℉ for 30-35 minutes to where it’s fork-tender. After roasting, transfer to the garlic to a bowl and mash it well.
Mix. Add all the dry ingredients to the mixing bowl. Mix on low speed with the paddle attachment. While that’s mixing, loosen the poolish from its container by pouring the water around the edges of the dough mass. Stop the mixer, then add the poolish-water mixture to the bowl. Switch to the dough hook and mix at low speed until the dough (it’s more like batter) starts coming together. Stop the mixer again and add the roasted garlic mash. At this point, mix at medium-low until smooth and the dough starts climbing up the hook a bit.
At this point, you can transfer the dough to another bowl (I like to use a glass mixing bowl going forward) or just let it rest in the bowl for 45 minutes.
Bulk Fermentation. About 2 hours at 70℉ ambient temp.
First Fold. After 45 minutes, fold the dough in the bowl. Make sure you stretch the dough adequately enough to feel the tension building in the dough. After several folds, rest for 45 minutes.
Second Fold. Generously flour your work surface (and I mean generously), then pour the dough out. With closed fingers, work your hands under the dough and shape it into a rough rectangle less than an inch thick throughout the mass. To make it easier to understand, the long side should be the East-West side. Take one of the long sides, stretch it out away from the sheet, then fold it back over almost to the end. Gently pat the dough down, then repeat with the opposite end. Do the same for the North and South sides. When you do the North-South side, you may notice that the dough fights you a little. This is a good thing! It means the gluten strands are aligning and you’ve built strength in the dough. Gently roll the dough mass onto the seams and let it rest for several seconds to seal.
Transfer the dough seam-side-down to a well-oiled bowl. You can use the same mixing bowl, but this time, you need to oil it down. Cover the bowl and let the dough double in volume. At around 70℉, this will take about 30-45 minutes.
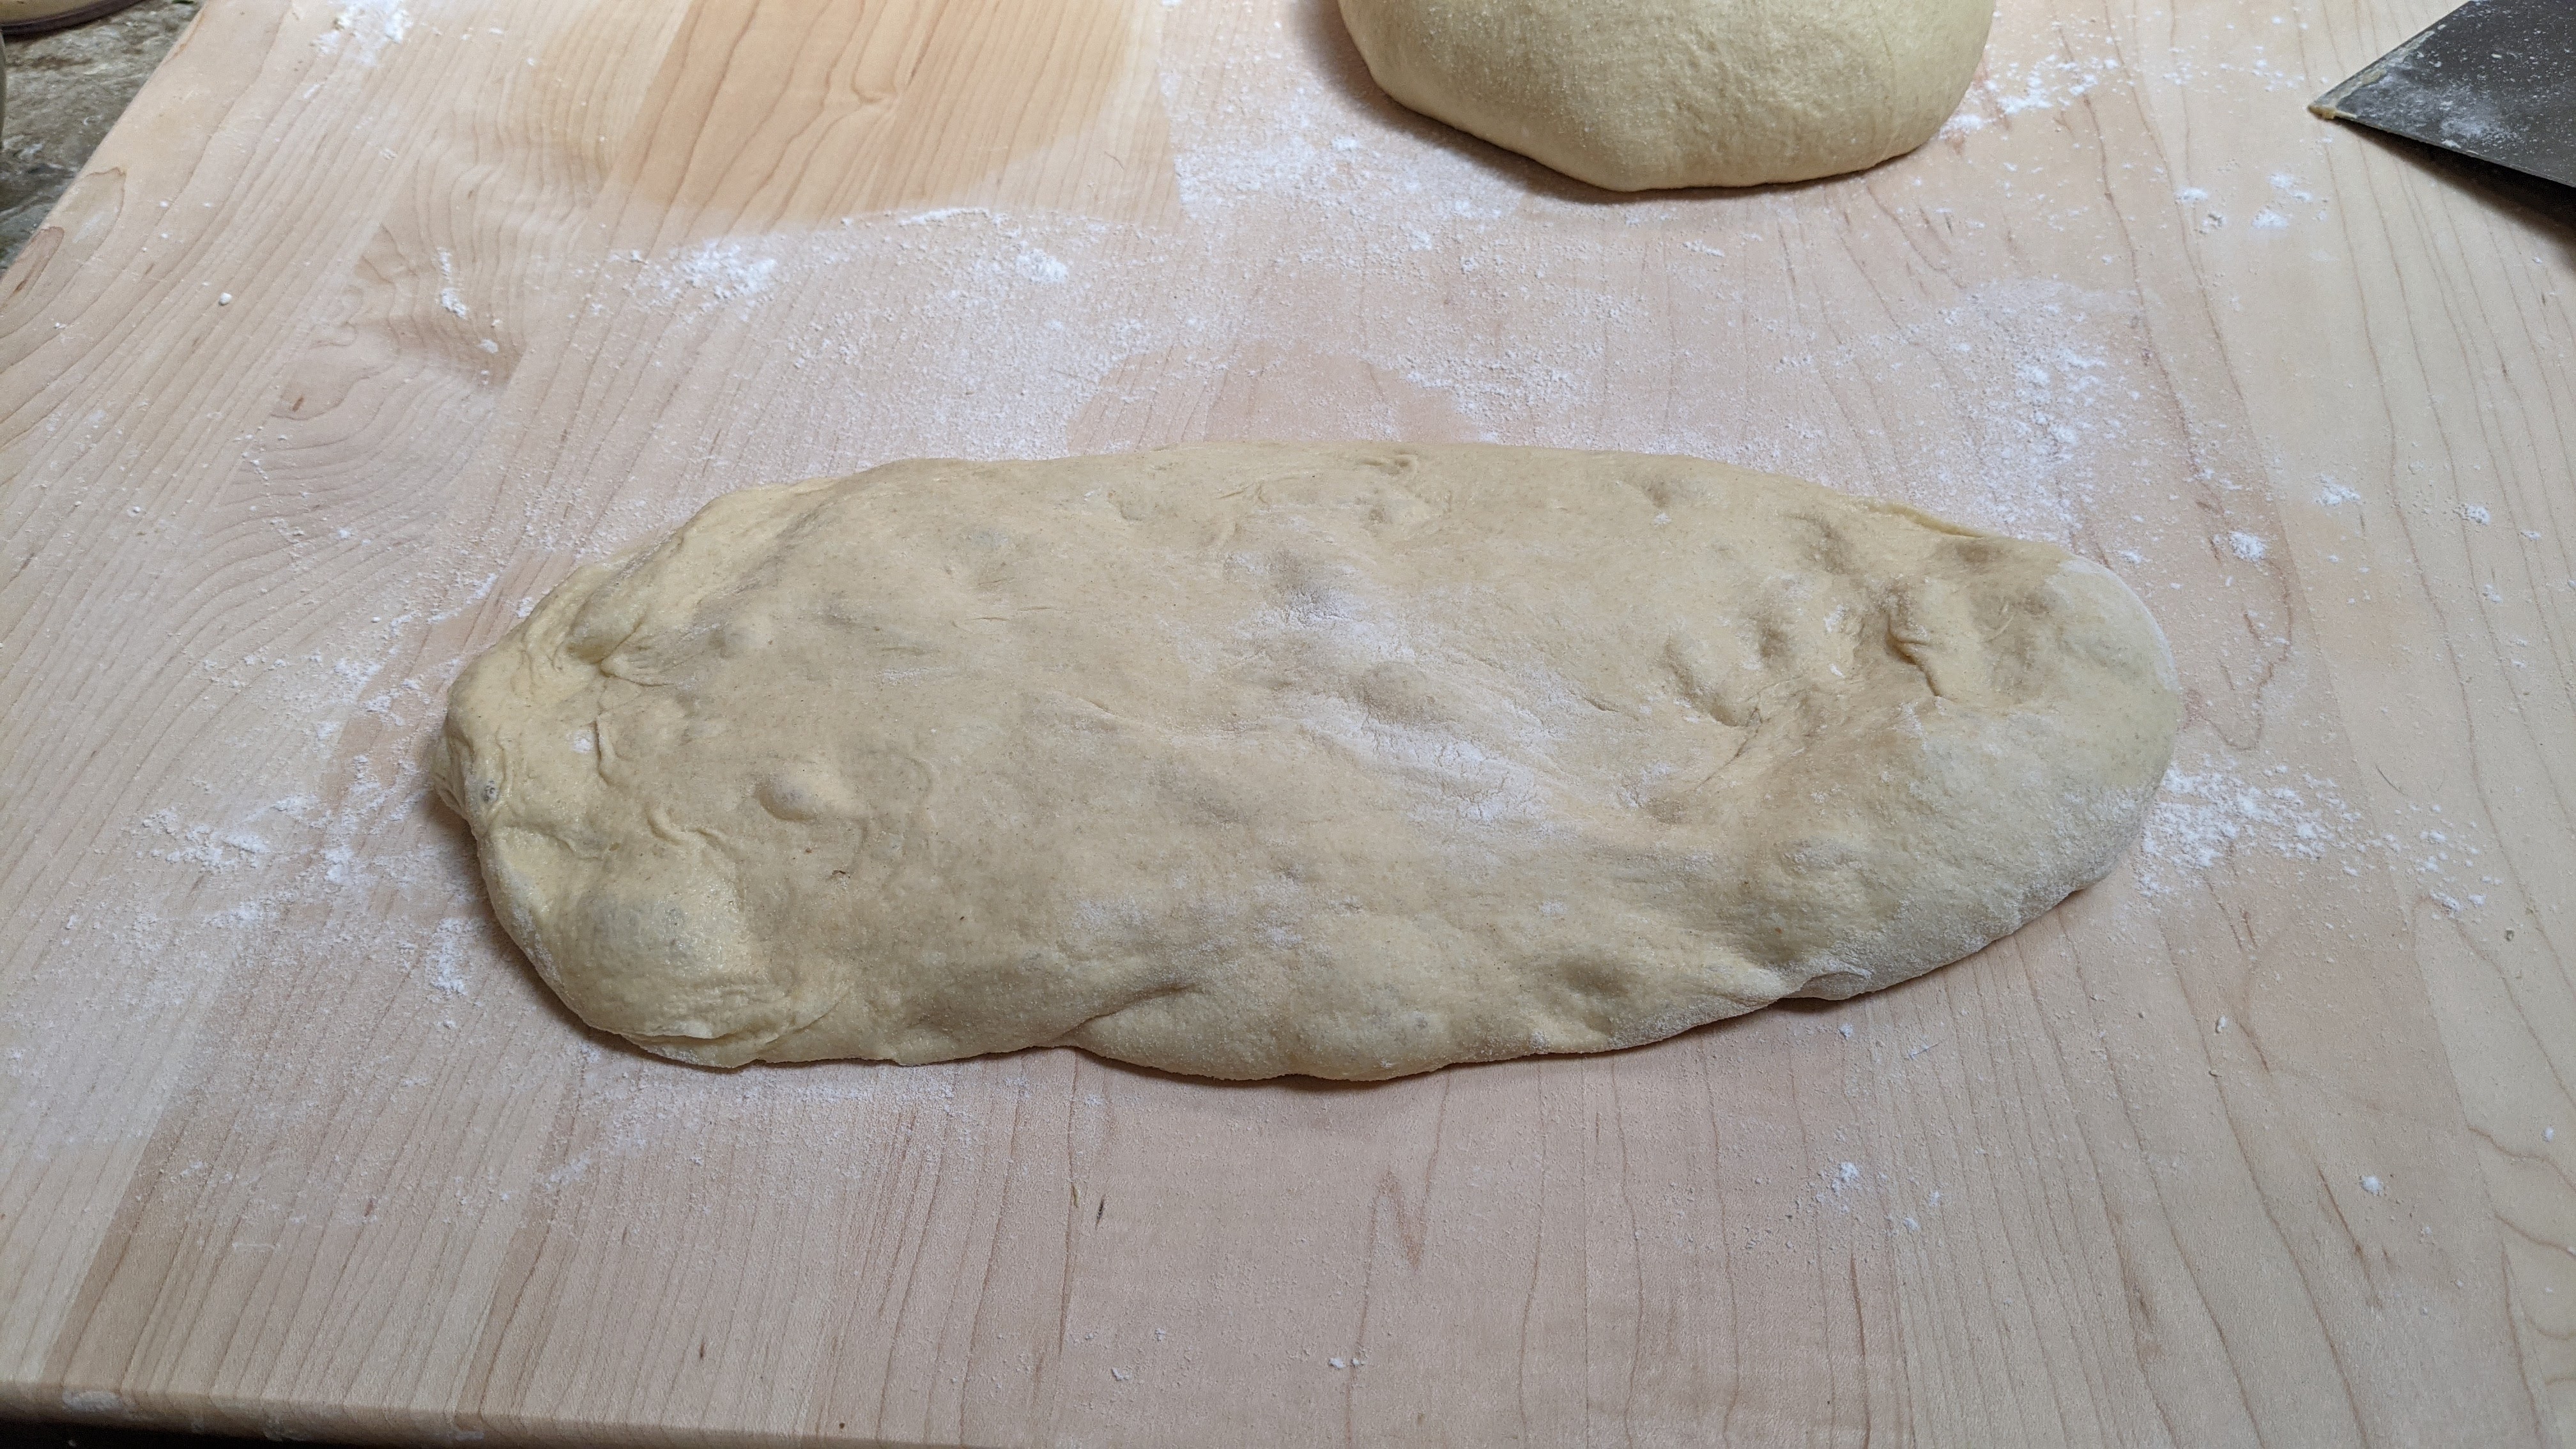
Divide and “Shape.” At this point, I personally like to scale my dough, but you can eyeball it as well. As with the second fold above, transfer the dough seam-side-up onto a generously floured surface. Work the mass into a rectangle with even thickness, then cut the dough in half. With ciabatta, there’s really no shaping. What I like to do is take a piece, gently work it into a slightly long rectangle, then transfer it to a generously-floured couche. Once on the couche, I’ll tug it into the final rectangle shape I want.
Final Fermentation. This can take as little as 15 minutes or up to 30 minutes depending on your ambient temperature and yeast activity. The purpose of this step isn’t for more expansion, but to let the dough relax before baking to ensure that the bubbles will expand in the oven.
Bake. Bake at 475℉ with steam for 12 minutes. Remove steam/steaming container, then bake for 12-15 minutes at 425℉.
Ever since I got Carol Fields’ book, “The Italian Baker,” I’ve been wanting to make this bread. It is a truly ancient bread from the Puglia region of Italy and documented by Horatio as far back as the first century BC. The most notable loaf shape has a bit of a pompadour on the top (not sure about the history behind the shape). But that said, the DOP doesn’t certify the bread by shape, but rather by ingredients and structure (e.g. the crust must be 3 mm thick).
Now truth be told, this recipe is technically NOT true Pane di Altamura because it is a “protected” bread under the Denominazione di Origine Protetta, which specifies that the flour must come from the Puglia region. Plus, the high mineral content water of that area apparently contributes to the distinctive taste of the bread. But even still, I believe we can get pretty close to the original. All I know is that the two loaves I made today are gone. My family ate one loaf, and the family to whom I gave the other loaf demolished the bread! This will definitely be a regular part of my repertoire from here on out!
Durum Flour
I get my durum flour from Azure Standard (and no, this isn’t an affiliate link). This is certified organic and milled using the Unifine method, which creates a finer texture while retaining the nutrients as it uses no water that could leach off the nutrients. Note that you can’t just use any “semolina” flour. Most semolina flour is too coarse to make bread. You have to make sure the grind is extra-fine.
Update 9/16/2025:I realized after looking at the formula and final dough numbers last night that everything was way off, so I reviewed Ms. Fields’ recipe and found that she didn’t make a 72% hydration biga, but a 96% hydration biga. That makes sense considering the high absorption of the durum flour. Then I re-ran the numbers through my dough calculator and now everything checks off.
Overall Formula
Flour
100.00%
Water
90.00%
Salt
2.00%
Yeast
0.25%
Total %
192.25%
Biga Formula
Durum Wheat Flour
100%
Water
96%
Yeast
0.5%
Biga
Durum Flour
276g
Water
265g
Yeast Required
1.4g
Total Weight
542.4g
Final Dough
Durum Flour
505g
Water
440g
Salt
15g
Yeast
1.6g
Biga
491g
Total Yield
1453g
This is a least a two-day process! In my experience, the biga alone takes a full day to mature because of the small amount of yeast used. Note that technically you could dispense with the rest of the yeast in the final dough since the biga will have plenty of yeast in it. But it’s there to help boost rising.
Fresh-mixed biga. Even at 96% hydration, the dough feels like a 75% hydration dough! Look at how it stands up. And this was taken a few minutes after mixing!
Make the Biga. The night before you bake, make a 96% hydration biga. Use room temperature water, then let it rise in a cool place for 6-24 hours. You’ll know the biga is ready when it is nicely domed at the top and is filled with bubbles and according to Carol Fields, it should be triple in volume. If it’s done before you’re ready to bake, just pop it in the fridge. It’ll keep for up to a week.
Biga Pro Tips:
One trick I’ve used in the past is to treat the biga like pizza dough. Once I mix it, I’ll let it stand at room temperature for a couple of hours, then I’ll retard it in my fridge for 48-72 hours. When I’m ready to bake with it, the biga is pungent with yeasty, acidic goodness. I use what I need then feed what’s left, let it sit on the counter for a couple of hours, then pop it into the fridge.
Another thing you might try is to make a levain with 50g of mature starter and 250g of durum flour and 240g water, respectively, then let that triple in volume. When I do this method, because the durum is such a hard wheat, I use about 1% diastatic malt powder to help the natural yeast metabolize. This also has a nice effect on the crumb, making it soft and fluffy.
Either of these methods creates what Carol Fields calls “Biga Naturale.”
If you REALLY want to get traditional, from what I’ve been able to gather in my research, Italian bakers use a pâte fermentée method in that they use part of the previous bake’s mixed dough as the preferment for the coming bake. Once they’ve mixed the new dough, they break off part of that batch, then set it aside to be used as the leavening agent for the next bake. They call this the “mother” and in one video I saw, a baker said his “mother” was over 100 years old!
If you want to apply that to this recipe, make the biga as instructed, but immediately add the rest of the final dougn ingredients to create one big dough. Mix it thoroughly, then break off 500g of that dough then put it aside in the fridge to ferment and use for later. To maintain the 90% hydration going forward, adjust the flour to 500g, the water to 450g, the salt to 10g and yeast to 1g in the final dough.
Initial Mix. Measure out the necessary amount of biga that you’ll need into your mixing bowl. Add all but 50 grams of the water to the biga, then break up the biga. When the water turns milky white, start adding the flour in a few batches. As with many of the Italian breads I’ve learned to make, I use a mixer for this step. Mix until all the ingredients are incorporated and the dough starts coming together. Don’t freak if you see that the dough is a bit crumbly. It will come together, and gluten strands will eventually form.
Autolyse. Durum is hard wheat and semolina flour takes a while to absorb the water, so it benefits from an autolyse. Autolyse for 30-60 minutes (use the longer time in cold weather). BTW, we’re doing a fermentolyse here because we mixed in the biga. For those unfamiliar with the term, it just means to let the dough rest to give the flour time to hydrate and start forming gluten.
Final Mix. Dissolve the salt into the reserved water. Add the yeast to the dough, then lightly incorporate. Finally, add the salt and work it into the dough until all the liquid is absorbed. If using a mixer, mix on low speed (but I recommend working the saltwater into the dough by hand first).
Knead. Lightly knead the dough in the bowl or turned out onto an unfloured work surface. This is done simply to ensure that all the ingredients are distributed evenly with moderate gluten development. Get the dough to a smooth, even consistency. If using a mixer, the dough should easily pull away from the sides of the mixing bowl. Knead until you feel the dough has developed good strength.
Alternatively, you can mix to a shaggy mass, then fold the dough a few times during bulk fermentation. But unlike sourdough, we’re not looking for an open, lacy crumb. This bread’s crumb is somewhat dense and moist. From what I’ve been able to gather, most Italian bakers – professional and home bakers both – just knead the dough to a smooth consistency with ample gluten development.
Bulk Fermentation. Allow the dough to double, yes, double. This will take up to 3 hours or more with the small amount of yeast that’s used. But that’s a good thing as it helps develop the flavor!
Divide and Pre-Shape. For this recipe, divide the dough into two 720g pieces (or you can eyeball halfing the dough). Pre-shape into rounds, then bench rest for 45-minutes to an hour to fully relax the dough and let it puff up a little. In warmer weather, this will be shorter – maybe 30 minutes.
Final Shape and Fermentation. As I mentioned, while there is no standard for the shape, traditional Pane di Altamura is best recognized for its pompadour or high form. Study this video clip to shape the loaves. Of course, that baker makes it look easy. And having made this several times, I’ve finally gotten it down. But it does take practice. Here’s another approach. This is quite a bit easier. The only thing I’d do differently is to press down the fold as the baker does in the first video. This will give a more pronounced shape to the pompadour by steepening the backside of the loaf. Place in a warm place and allow the dough to expand about 25%-30%.
Bake. Bake at 485ºF/250ºC for 50-60 minutes. Use steam for the first 15 minutes to promote oven rise. I’ve never baked this bread in a Dutch oven, but it technically could be done. Start with the lid on for the first 15-20 minutes of the bake, then remove the lid and finish the bake. Note that at least with my oven, baking at full temp like that for that long will burn the bread. So, once I remove my steaming containers, I turn the oven down to 425ºF/200ºC to finish the bake. The crust should be chestnut brown, with little to no black.
NOTE: If you have trouble retaining steam in your oven, spray water over the loaves right before you place them in the oven and spray again about 5 minutes later.
Step-By-Step Shaping of a Pane di Altamura Loaf
After updating the post, I decided to add a step-by-step shaping guide. This was just as much for my edification as it was for sharing what I’ve learned.
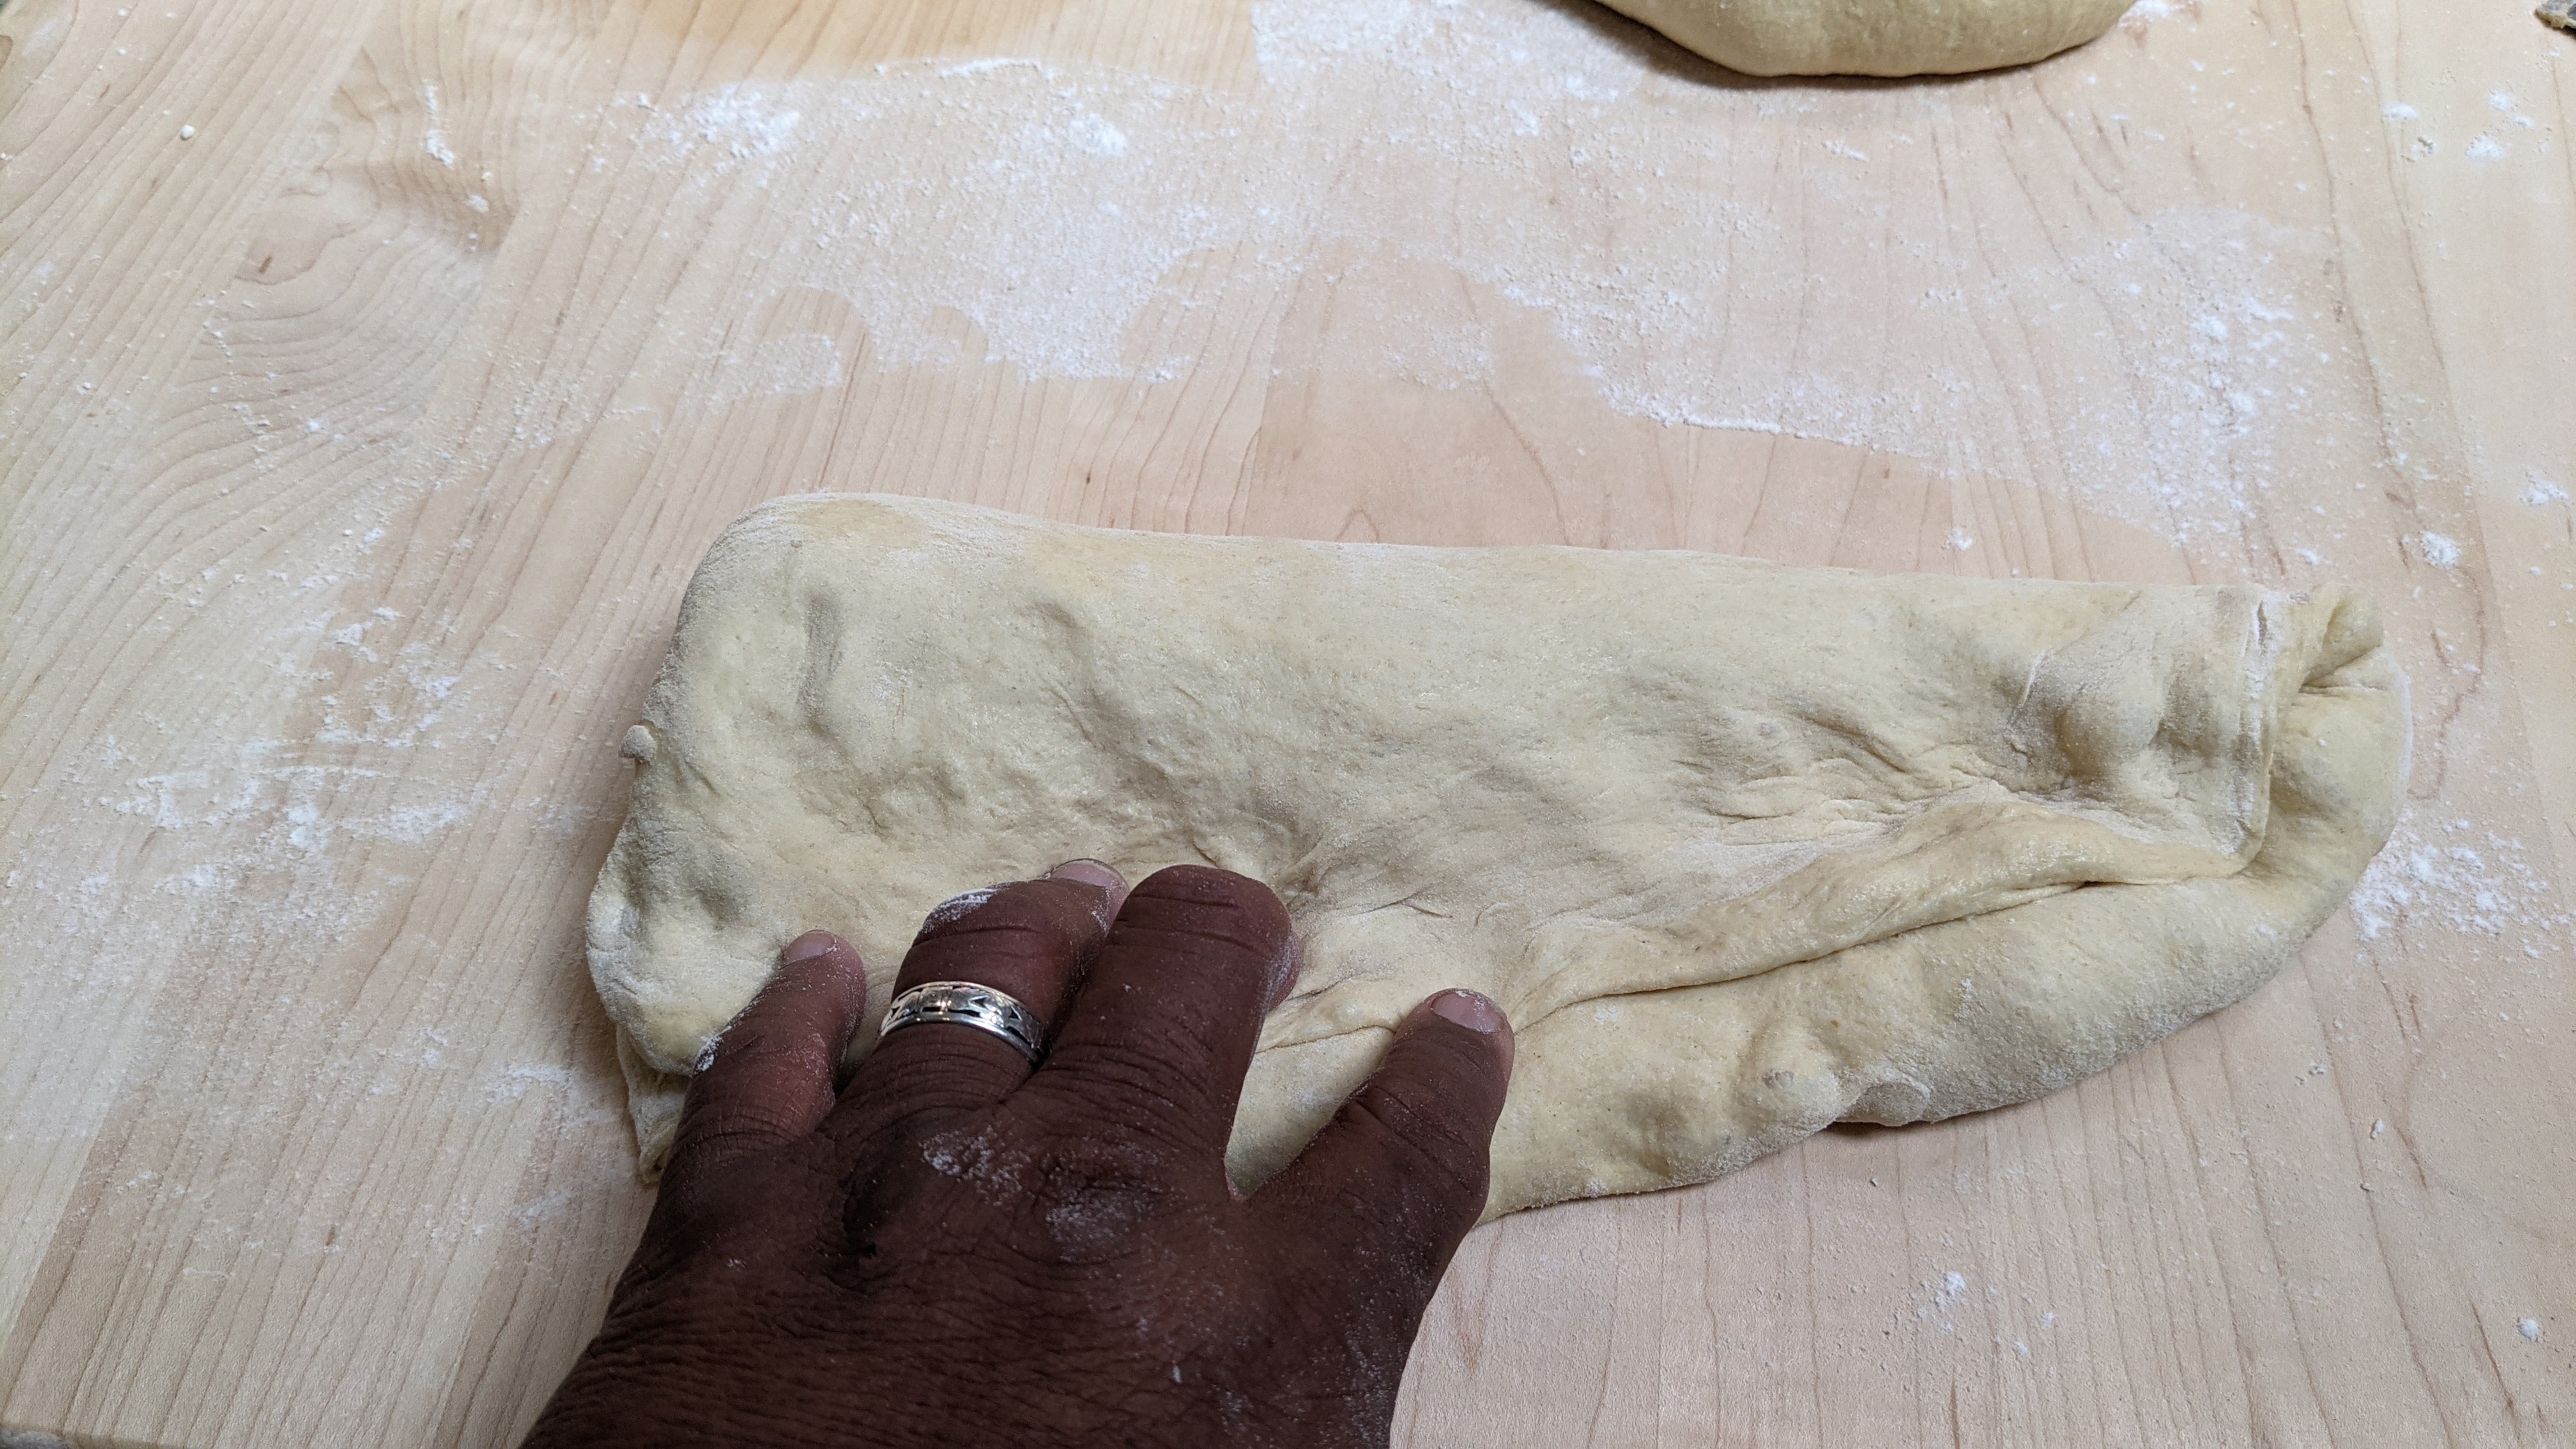
First, lightly flour your work surface, then gently flatten the pre-shaped dough. Pick it up, and gently toss it between your hands to elongate it into a long oval.
Next, fold one end about 20-25% over the end and gently seal the seam.
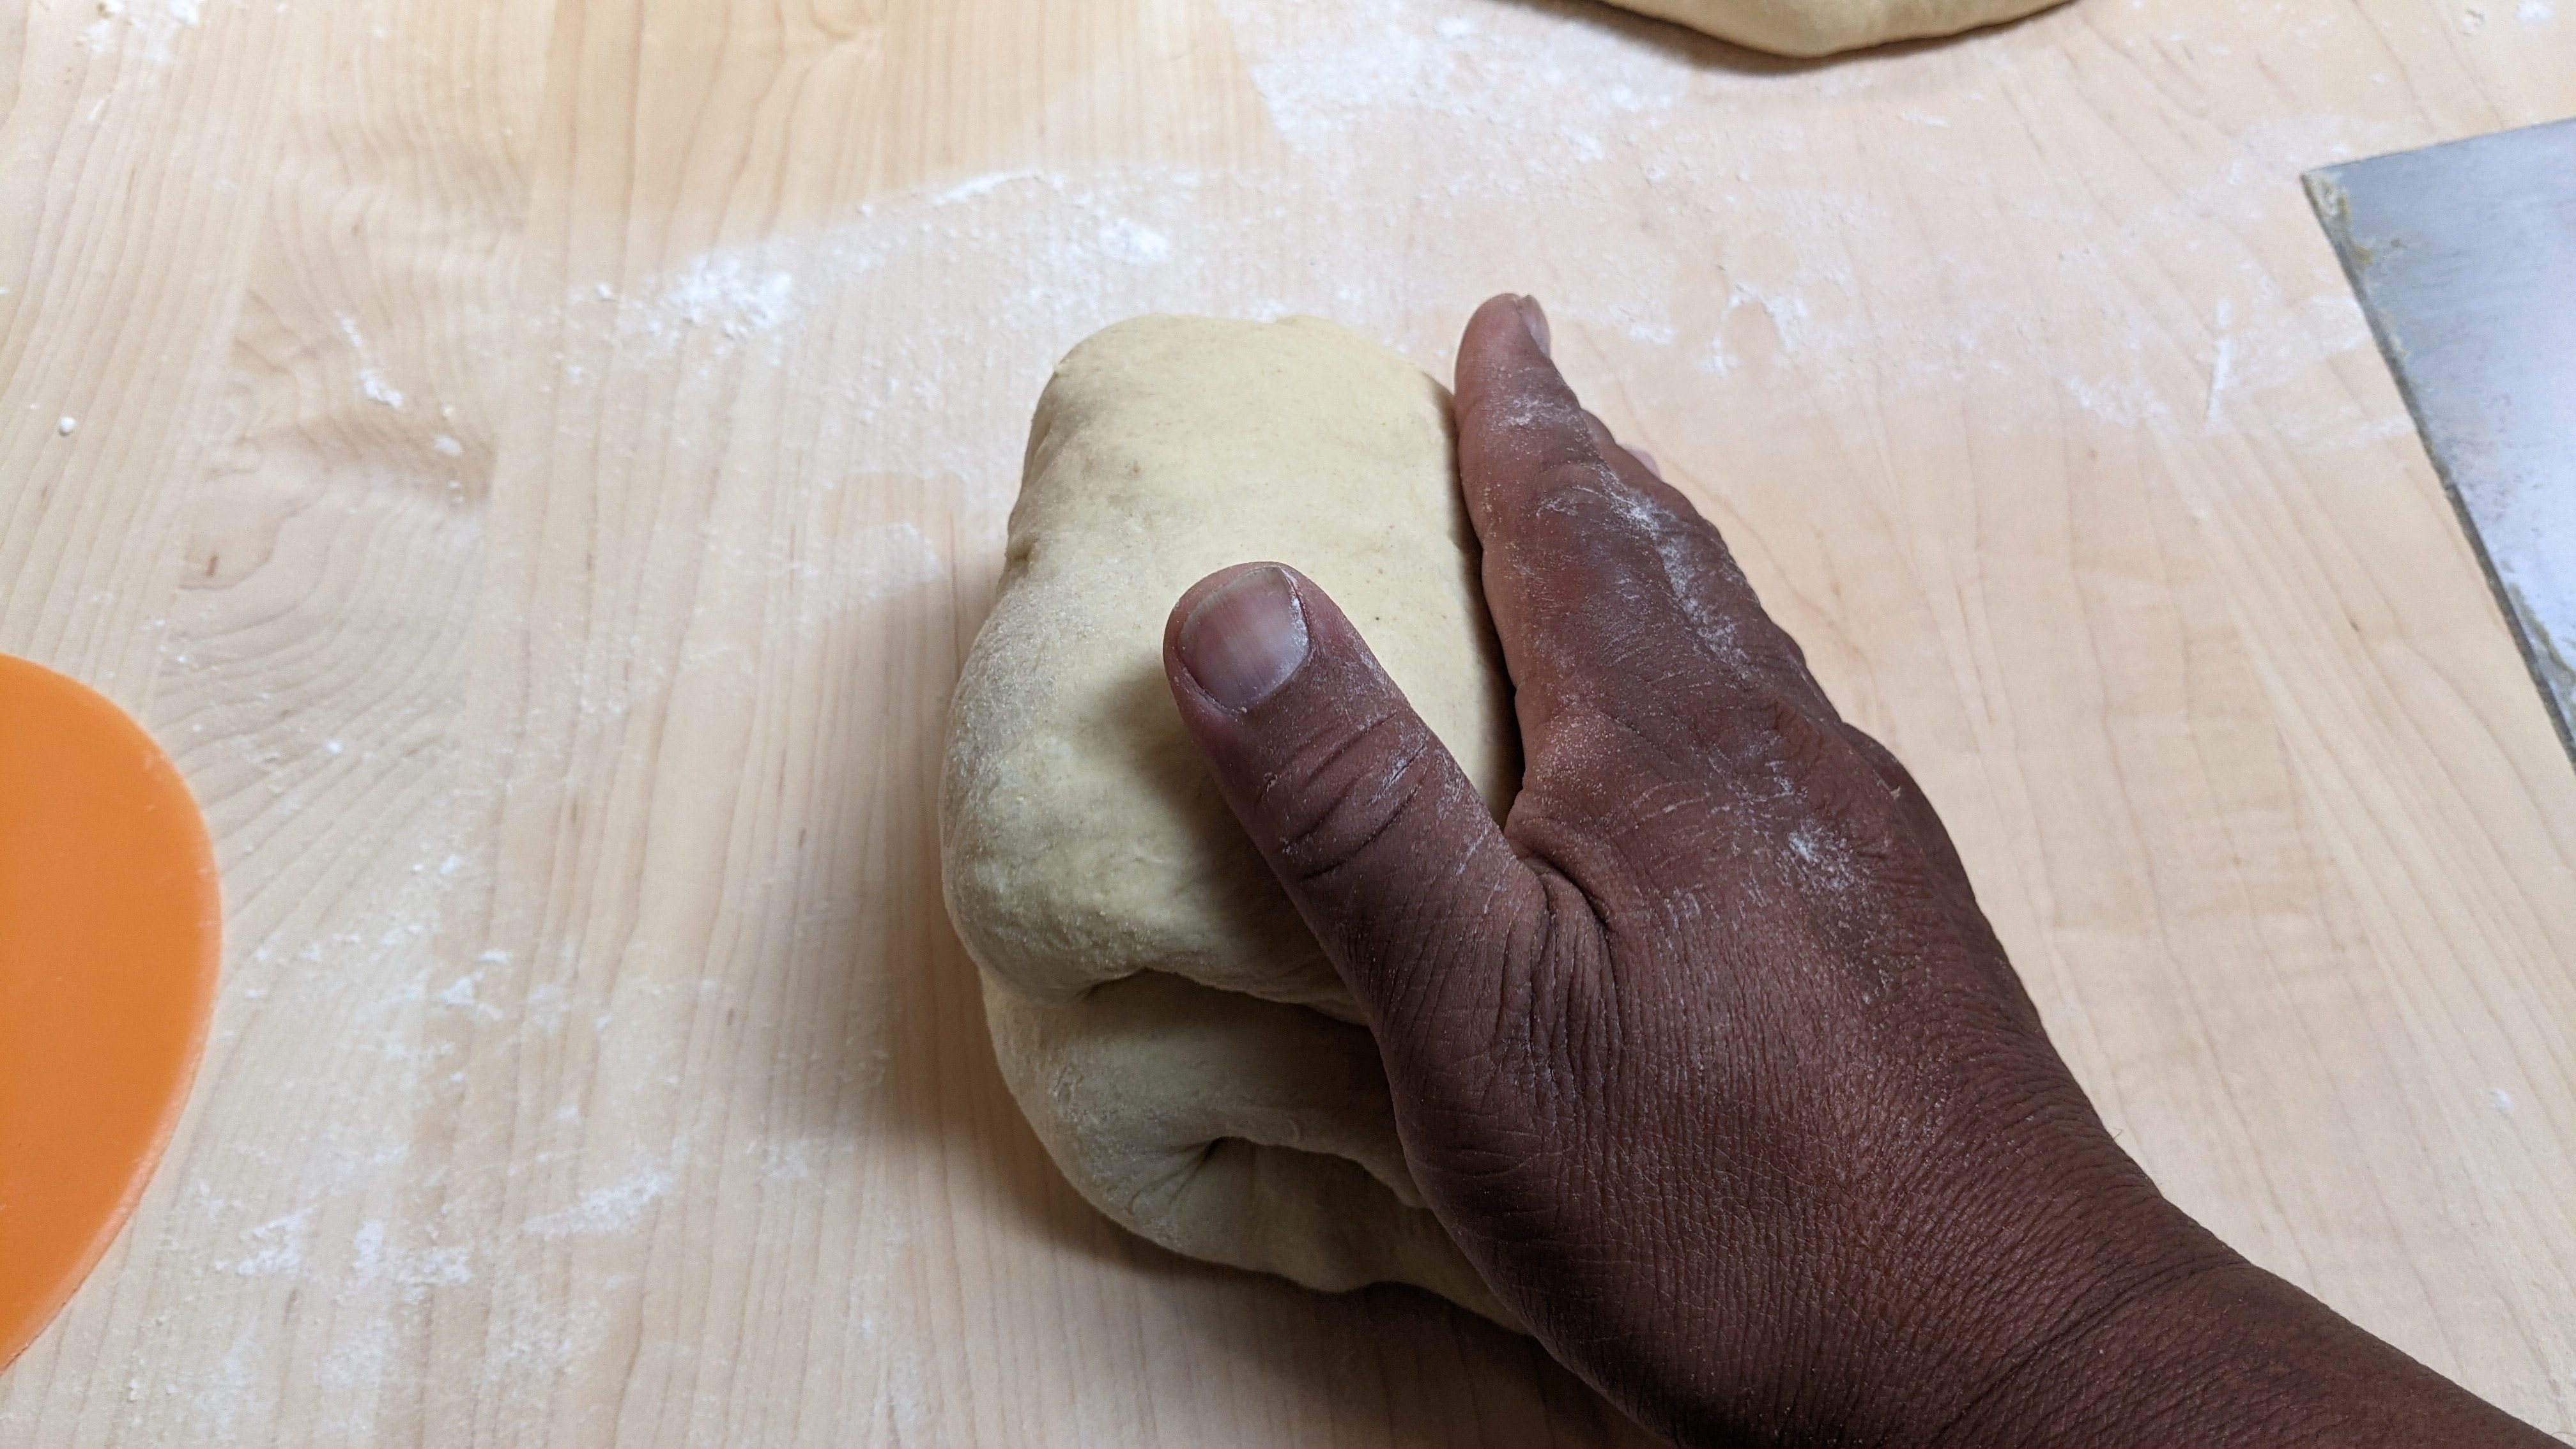
Pull the top down about 2/3 and overlap the dough. Use your fingertips to seal the seam.
Pull the bottom up about halfway, then gently rock the roll back and forth then seal the seam.
Gently flatten the log, then bring the two ends to the middle. Make a channel with one hand to seal the seams.
Place both palms together and place them in the channel, then pull the ends apart. Don’t worry if you tear the dough a little. Stretch out until the middle to about 1cm thick. This will help form the crease.
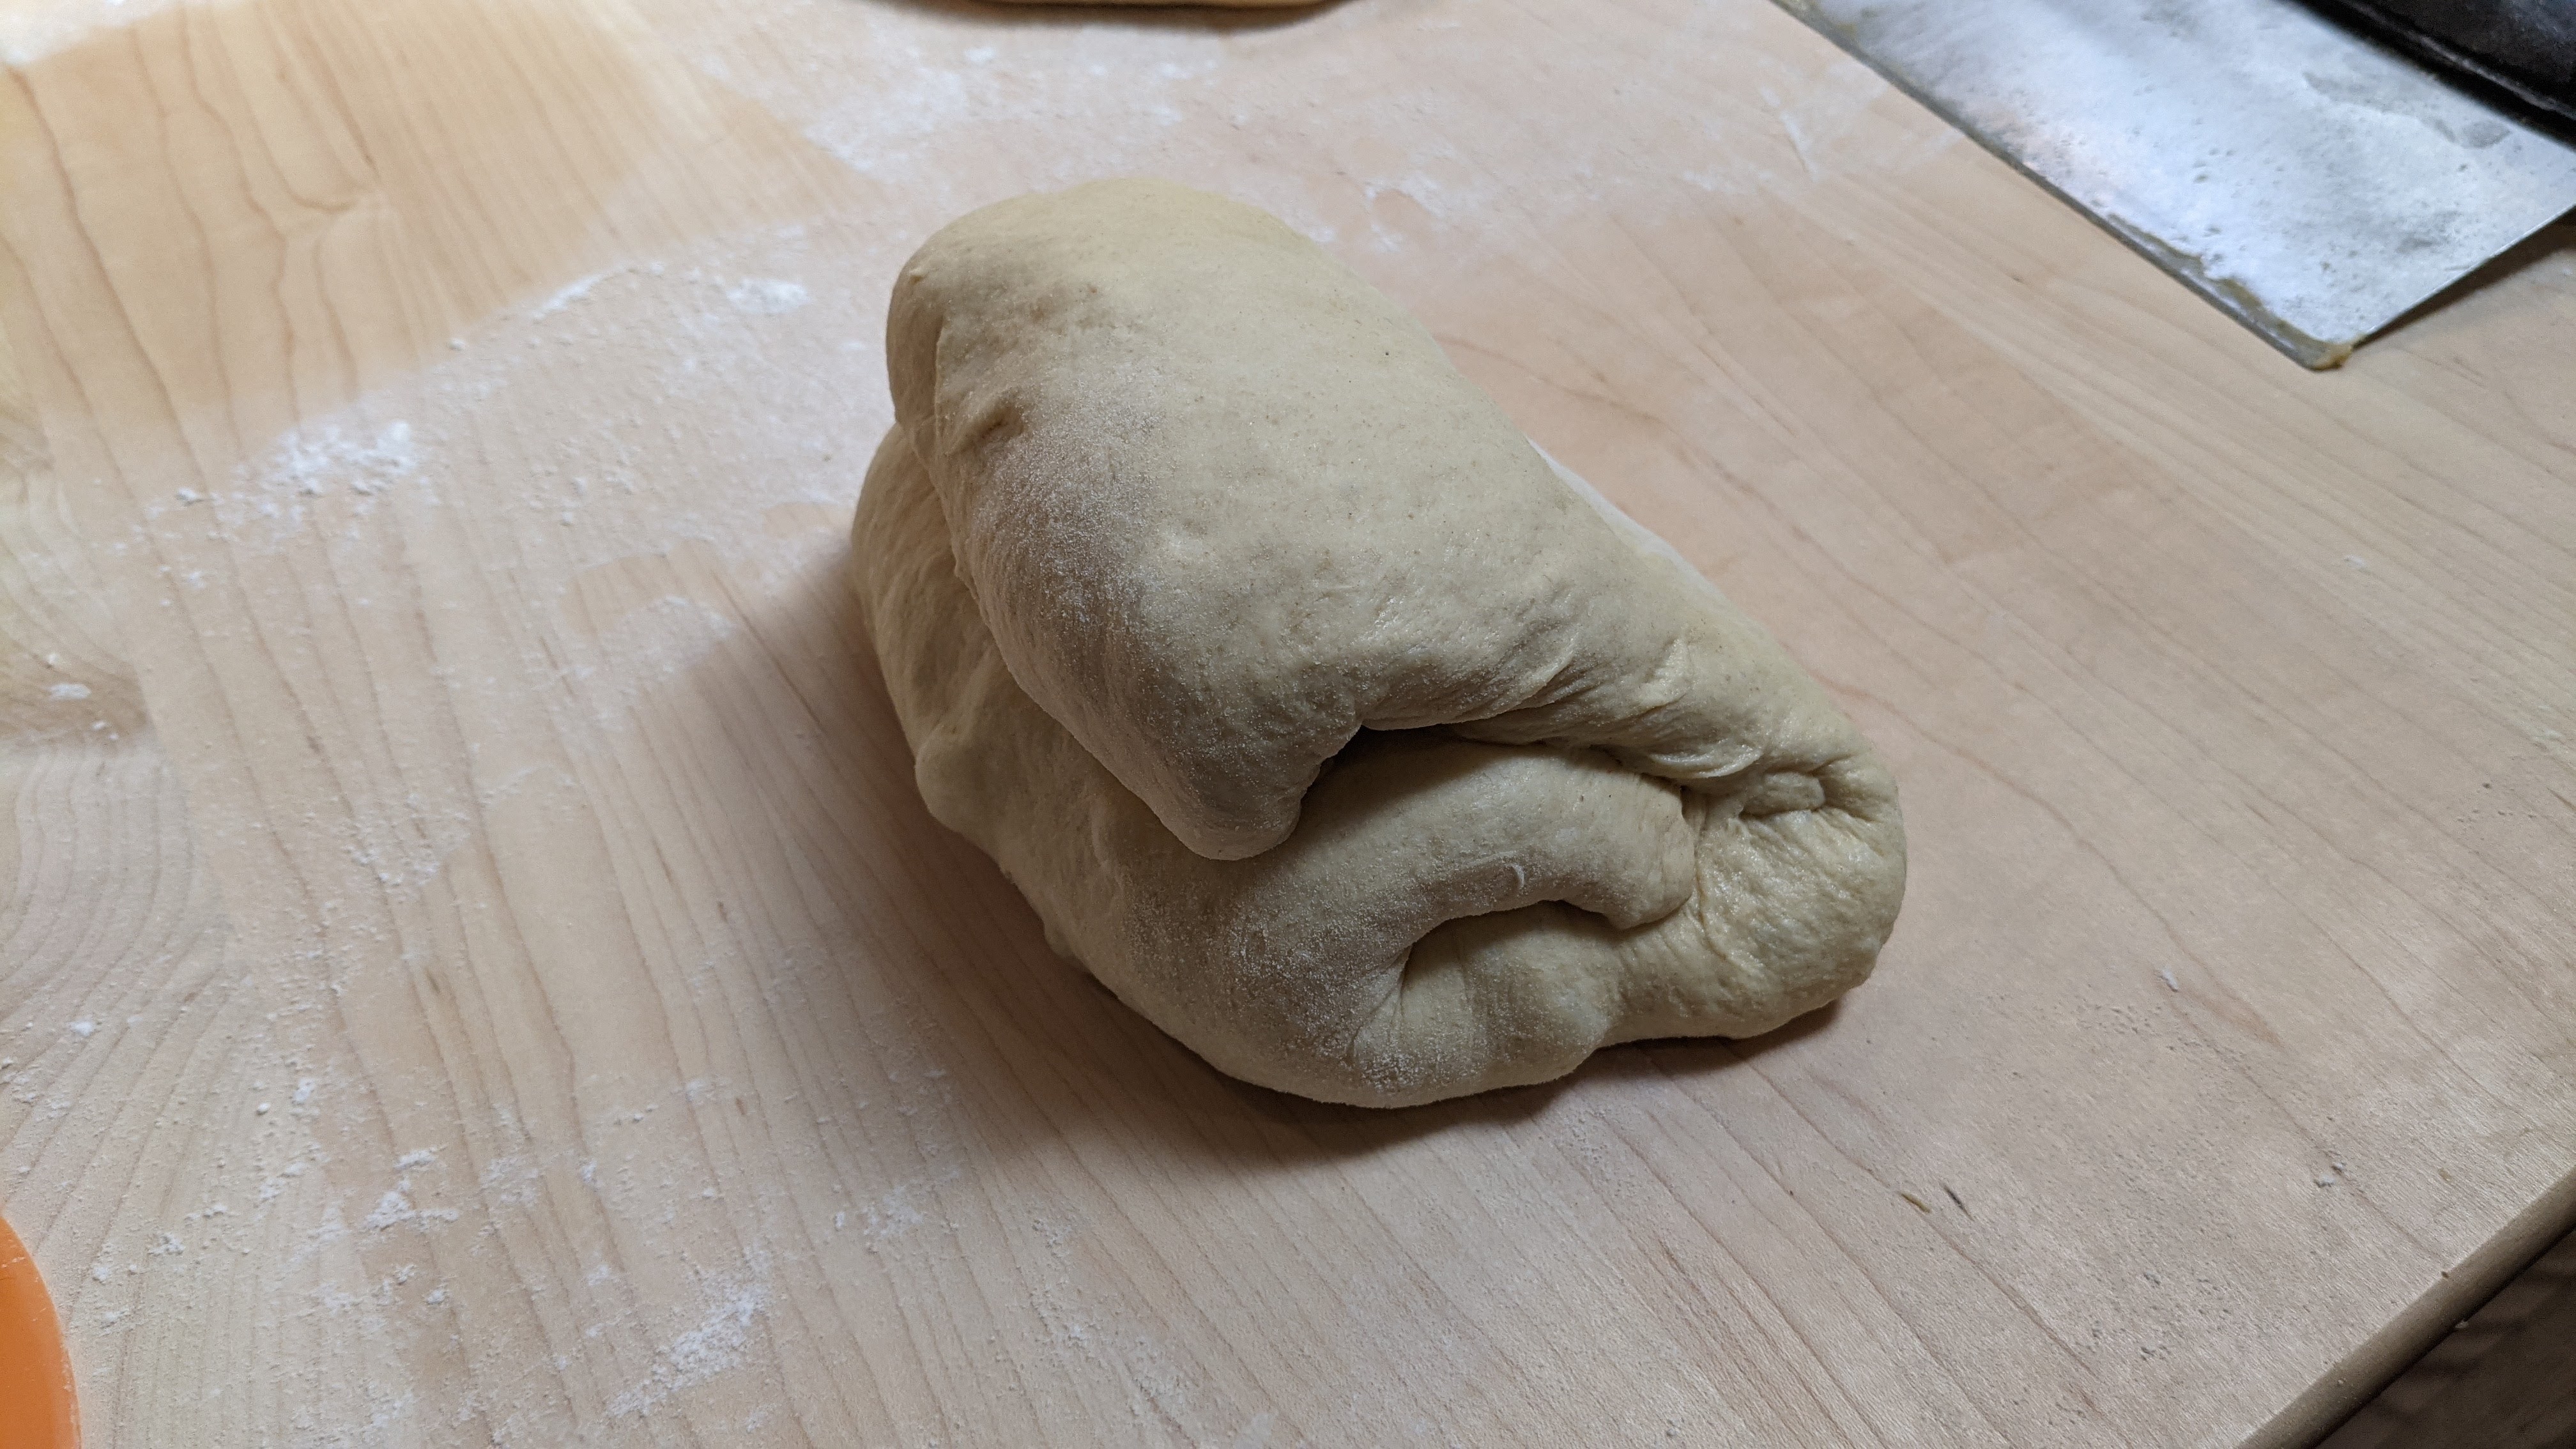
Take the smaller end and fold it over the fat end of the dough. Then press down the fold to create a bit of a crease.
The shaped loaf should have a slightly triangular shape from the side.
In the oven, the loaves will pop up with a steep side and look like the bread erupted on the top. It’s a cool effect!
You can make a much more pronounced pompadour by narrowing the top half and shaping it into a cylinder. I did this to mimic some of the pictures I had seen, but it made cutting the bread a little problematic. So, my more practical side took over and I just overlap. As long as I get a triangle cross-section, it’s all good!
Kamut flour has become a staple in my flour blends. It adds a nuttiness to the flavor of the bread and as it has a different kind of gluten than wheat gluten, provides a softness to the crumb that is very pleasing. You don’t get a really open crumb with Kamut since it is a whole-grain flour, but as it has under 12% protein, you’ll still get some very nice oven spring and expansion.
For baguettes, my flour blend is as follows: 50% AP Flour, 25% Bread Flour, and 25% Kamut. I use half of the Kamut (unsifted) to make a poolish and I sift the other half for the final dough. Let’s get to the recipe!
Formula
Flour
100.00%
Water
75.00%
Salt
2.00%
Yeast
0.38%
Total %
177.38%
Poolish
Kamut Flour (unsifted)
105g
Water
105g
Yeast @ 0.3%
0.31g
Note: This is more than what’s needed just to make sure there’s enough.
Final Dough
Kamut
95g
Bread Flour
191g
AP Flour
381g
Water @ 95°-100°F
477g
Salt
15g
Yeast (instant)
3g
Poolish @ 25% of Total Flour
191g
Total Yield
1353 4 X 335g loaves
Total Flour
763
Total Water
572
Make the Poolish. Combine the ingredients and mix well, then cover and set aside, until poolish about doubles. It’ll be ready when it passes the float test. This can take up to 6 hours on cool days. With a Kamut poolish, you won’t see a lot of bubbles on top, but you will see lots of bubbles on the sides and bottom of your container.
You can also make the poolish the day before and stick it in the fridge. This will allow the organic acids to really develop. Not only will you get lots of flavor from this, but it will also add extensibility to the dough.
Mix. In a separate bowl, combine all the dry ingredients (yes, even the yeast and salt) and mix well until everything is nicely distributed. Add all but about 50g of water and make a shaggy mass that has no dry ingredients. Cover and rest for 15 minutes, add the reserved water, and work it into the mass. Once all the reserved water has been incorporated, mix until you have no large lumps in the dough.
Bulk Fermentation. About 1 1/2 – 2 hours. Look for about 50-75% expansion (not doubling)
Folding. Fold the dough twice within the first hour.
Divide and Preshape. Scale-out 335g pieces. Shape either into taut balls or roll into jelly rolls, then set aside on a well-floured couche. Rest for 20 minutes.
Preheat your oven to 500°F
Shape and Final Fermentation. Shape into baguettes and place onto a well-floured couche. Check the loaves at 45 minutes. When you poke test, the hole should fill in slowly.
Bake. Bake with steam at 460°F for 12 minutes. Remove the steaming container, and reduce oven temp to 400°F. Bake for 15-20 minutes to harden the crust and bake out most of the water from the crumb.
Ever since I learned Jeffrey Hamelman’s Roasted Garlic Levain bread, I’ve used roasted garlic in a number of recipes. But up until now, I didn’t think about using it in ciabatta. There is nothing like the smell of garlic roasting in the oven, and when incorporated into the dough and baked, the result is a luxurious and delectable bread that you’ll want to make all the time!
Since I go on long airplane trips several times a year, I’ve learned to bring my own food as opposed to buying the crappy food they now serve – and you have to purchase – on the plane. Tomorrow, my family is traveling to New York City to attend our daughter’s graduation from Fordham University this weekend, so true to form, I made sure to have sandwiches for the trip.
Normally, I make fat baguettes, but this time I wanted to make ciabatta. But to put a twist on it, I thought I’d add roasted garlic and give the bread a little kick. The formula and recipe are below:
Formula
Flour
100.00%
Water
81.00%
Cream
0.80%
Salt
2.00%
Yeast
1.00%
Olive Oil
4.00%
Garlic
6.00%
Total Percentage
194.80%
Final Dough
Flour My blend: 30% Kamut Flour, 30% Bread Flour, 40% AP Flour
622g
Warm Water (about 100°F)
504g
Cream or Half & Half
5g
Salt
12g
Yeast
6g
Olive Oil
25g
Garlic (peeled)
37g
Total Yield
1,212.00 2 X 600g loaves (+1% due to process loss)
Process
Because this is such a super-wet dough, I highly recommend using a stand mixer.
Roast the garlic. Weigh out the garlic you need then place the cloves in a square of foil with a little olive oil (don’t worry if you have too much garlic – personally, I usually exceed the required amount by a few grams). Cinch up the foil, the roast at 400°F for 30 minutes. The garlic should be slightly brown and mashable. Transfer to a small bowl, and mash up the garlic with the oil. Don’t worry if there are harder bits. Just break them up.
Mix. If you’re using a flour blend, thoroughly mix the different flour types together first (the mixer paddle is perfect for this). Add the salt and yeast, then continue mixing for several seconds until all the ingredients are evenly incorporated.
By the way, it’s a myth that salt kills yeast. It doesn’t, at least not at this low concentration, and especially if both are dry. Besides, if salt did kill yeast, once you add salt to a yeasted dough, it shouldn’t rise!
In a separate container, combine all the liquids. Attach the dough hook, then turn on your mixer to slow, then slowly add about 75% of the liquid. Allow the dough to form. Once the dough starts climbing up the hook, slowly add the rest of the liquid until all the ingredients are combined (make sure to use a spatula to get all the oil out of the container). Once the liquid is incorporated, add the roasted garlic. Turn the mixer up to medium-low and mix until the dough is smooth (it’s more like a batter at this stage).
At this stage, you can transfer the dough to a standard mixing bowl or just keep it in the mixer’s bowl.
First Fermentation. Let the dough rest for 30 minutes. Then using a wet hand, do a series of stretches and folds. The dough at this point will still be quite wet. But using hand like a spoon, scoop under the dough and pull up. Eventually you will feel the dough strengthening a bit.
Second Fermentation. Again, let the dough rest for 30 minutes. Then pour it out onto a well-floured surface. You have to be pretty generous with the flour. Letter fold the dough. Once you’ve finished the pattern, pat the dough down, then letter fold it again. Once you’re done, roll it over onto its seams, then transfer it into a well-oiled bowl.
I’d start preheating my oven at this point – my oven is slow to come to temp, so I start preheating after the first fermentation.
Third Fermentation. Finally, let the dough rest 20 minutes. You should see some expansion of the dough mass with bubbles starting to form on the surface. Pour the dough out oil-side-up onto a well-floured surface. Divide the dough into two pieces. Personally, I eyeball it, but still scale out one of the pieces to 600 grams. At this point, handle the dough gently. You don’t want to degas it too much!
Final Fermentation. Gently tug the two pieces into rectangles, then transfer them to a couche or well-floured dish cloth. Let the loaves rest for 20 minutes.
Bake. Transfer the loaves to a loading board generously covered with cornmeal. Load your oven, then bake the loaves at 460°F with steam for 15 minutes. After that, expel the steam, then finish baking at 400°F for 20 minutes.
If you don’t use a baking stone, you can bake the ciabatta on a regular baking pan.
Like many baking enthusiasts, during the pandemic lockdown, I watched A LOT of baking videos to learn different bread baking techniques. I started out watching regular YouTubers. Some are great like Sune, the Foodgeek, but as with any social media platform, the real good stuff takes some searching. So eventually, I found pros like Markus Farbinger, Jeffrey Hamelman, and Chad Robertson (I read the latter two’ book as well). But then I discovered and also followed Scott Megee, Master Baker of Australia and owner/proprietor of The Artisan Crust in Victoria, Australia. And I tried out his easy version of ciabatta.
In short, this bread rocks! Not only is it easy to make, but despite not using a preferment at all, it’s delicious! The trick is using really good olive oil – first cold-pressed is the best. Don’t make the mistake of using “first pressed” or “cold-pressed” olive oil. It has to be “first cold-pressed” as that is the real deal extra virgin olive oil. Of course, there’s lots of chicanery in the olive oil business, so it’s never entirely clear.
For me, I use California extra virgin olive oil produced by the Sciabica family. I originally became familiar with them through the Dominican Sisters. Each year, they have the olives harvested from the grounds of their convent in Mission San Jose, and the Sciabica family presses and processes their olive oil.
As for the Sciabica family olive oil, though I usually purchase 1.5-liter boxes directly from them, in California, you can also find their oil in grocery stores under the “Mission Trail” brand. This is a very nice oil made from olive trees in Northern California. It’s wonderfully fruity with a peppery finish.
Okay, let’s get to the important stuff!
Overall Formula
Flour AP Flour: 50% Bread Flour: 25% Kamut Flour: 25%
100.00%
Water
76.00%
Salt
2.00%
Yeast
0.50%
Olive Oil
3.00%
Total %
181.50%
Final Dough
Flour* AP Flour: 501g Kamut Flour: 167g
668g
Water
508g
Salt
13g
Yeast
3g
Olive Oil
20g
Total Yield
1212g 2 X 600g loaves
Optimal Dough Temp
82°F (28°C)
*You can use your own blend or just use AP flour. I wouldn’t recommend 100% high-protein bread flour as it would make the crumb chewy.
Mix: Mix all the dry ingredients together thoroughly. Reserve 20% of the water and combine it with the oil. Then mix the dry ingredients together with 80% of the water. Mix until smooth and you achieve a bit of gluten development. Once the initial mix has come together, slowly add the oil and water mixture and work it into the dough (this is known as bassinage). Mix until smooth, then transfer to a lightly oiled bowl. Cover the container, then let the dough rest for 45 minutes.
Note: I recommend using a mixer for ciabatta (Hey! The Italians do!), but you can certainly mix the dough by hand.
Process. At this point, it’s a lot easier to learn Scott Megee’s technique by watching his video:
Note that where I started the video, Scott is measuring the temperature of the dough and it reads 23°C. But his recipe actually lists the optimal dough temp to be 28°C.
Bake. Bake with steam for 20 minutes at 450°F. Then finish baking for another 20 minutes without steam. If the crust color seems a little dark after the first 20 minutes, reduce oven temp to 400°F. Internal dough temp should be 200°F to ensure the dough is fully cooked.