I just finished the second feeding of my mother starter to make some sourdough dough this morning. Afterward, I asked myself, what kind of flour blend do I want to use? Then it occurred to me that I hadn’t used a Kamut blend in a while. I love bread that has Kamut in it. It’s my favorite flour as it brings a nuttiness and a hint of sweetness to the flavor profile. Plus, if you’ve read this blog previously, you’d know that Kamut has some incredible nutritional benefits as well. But that aside, any bread I’ve made with Kamut has an incredible flavor! For this bake, I’m using the following formula/recipe:
Formula
Flour
100.00%
Water
75.00%
Salt
1.80%
Total
176.80%
Final Dough
Flour 1
628g
Flour 2
343g
Water
686g
Salt
21g
Levain
343g
Levain weight is 30% of total flour
This is a straight-forward dough and frankly, the formula is a master formula I use as a master formula for most of my bread. If I use predominantly whole-grain flour, I will up the percentage to 85% or more depending on the flour.
As for processing, it’s straight-forward as well:
Mix the flour, starter, and water, reserving 100g of the water.
“Fermento-lyse” for up an hour.
Dissolve salt into the reserved water, then do the final mix to incorporate the salt.
2-4 stretch and folds on the bench at 45 minute intervals. I always play it by ear with the folds because Kamut’s gluten is very delicate, and it is easy to tear, so I try not to do any more than I need to. Also, the windowpane test is reliable with this flour, especially if I’m using a large amount of kamut. What I’m looking for is the folded dough to maintain its shape for several seconds after folding.
Shape into batards or boules and usually do an 18-24 hour final fermentation.
For my oven, I bake at 460° for 35-40 minutes with the first 15 minutes with steam.
Last week, I finally was able to procure a 25 lb. bag of KamutTM flour. For months, so many producers were out of it, and those that did have it, like Whole Foods, sold it in much smaller quantities than I needed and for a premium price. So, as soon as I saw that Azure Standard had it back in stock, I immediately put in an order!
Since I discovered it, KamutTM flour has been an integral component in most of my flour blends. I’ve mentioned using it several times since I started this blog, but when I baked my first loaves of it after many months of not having it, I sat down and asked myself, “Why do I love this flour so much?” I realized that there are lots of reasons, so I thought I’d share them here.
Before I go on, let me answer the obvious question for those who don’t know what it is: What is KamutTM? KamutTM isn’t a type of wheat but a trademark name for the Khorasan strain of wheat. It is an ancient grain that was discovered in an ancient Egyptian burial chamber after World War II and the grains ended up in the hands of a Montana wheat farmer who cultivated them. The trademark name is important because:
It ensures that the grain comes from the original seed stock and is both unmodified and unhybridized and completely non-GMO.
It is also 100% certified organic.
These are important distinctions as they provide a guarantee of origin, purity, and quality.
Nutritionally, unlike regular wheat, Kamut has a high intrinsic energy as it has a higher lipid content than regular wheat. But it is also high in both protein and fiber and contains several essential minerals and vitamins such as niacin and manganese that contribute to its overall high nutritional value.
But the science-y stuff aside, another thing I love about this flour is the romance behind its history. As I mentioned above, the grain was found in an ancient burial chamber in Egypt after World War II, and though classified as Khorasan wheat, it has also been called “King Tut’s Wheat” or Pharoah’s Wheat” based on its origin.
And baking with flour that comes from wheat that has a provenance dating back thousands of years makes me think of what it was like baking back then. Sourdough was discovered in ancient Egypt around 3000 BC, and it’s cool to me to bake with grain whose origins date back that far. I admit it. I’m a hopeless romantic, dreaming of the “old days” and what it was like baking with those ancient hearth ovens with that original grain.
Plus, historians believe the discovery of sourdough was purely accidental. Accidental or not, it changed the world! Up to that point, bread was flat and dense. But the addition of yeast literally gave rise to a completely new form of bread that was then adopted by the Greeks and Romans, then spread to the rest of the world. Did it start with Khorasan wheat? Maybe. I have no idea. But who cares? It was used back then and that was all I needed to know to want bake with that ancient grain.
But other than the romantic history, I love KamutTM flour for what it brings to the loaves that I make with it. When combined with a high-extraction or whole-grain flour, it helps soften the crumb. This is because even though it forms gluten when mixed with water, its gluten is much more delicate than regular wheat.
And that delicateness was a challenge to work with at first as it introduced a trade-off with the soft crumb: The dough also became prone to tearing. It forced me to learn how to handle the dough more gently. Until then, I hadn’t realized how ham-handed I was with my dough. My stretch and fold sessions were relatively rough affairs compared to how I stretch and fold now; not that I’d completely rip the dough apart, but it certainly wasn’t with the deliberate care I take now. And that skill has carried over to other dough made with different flour blends.
Of course, as KamutTM is flour, and flour is food, what about its taste and texture? As I mentioned above, its gluten provides a smooth, almost velvety feel to the crumb. It also has a nutty flavor that contributes to the overall complexity of the flavor profile.
Working with KamutTM Flour
If you want to work with KamutTM, I recommend starting with a smaller quantity first to try it out. Whole Foods usually carries 1-pound bags from Bob’s Red Mill. That’s enough to make two 1-kg 60% Bread Flour/40% Kamut loaves @ about 85% hydration.
Other than that, here are a few things to keep in mind when working with Kamut:
I’ve found that Kamut’s starches break down pretty easily. So, if you use a rye-based starter, be extremely watchful of your bulk fermentation. The loaves I made above used a 25% rye starter inoculation and bulk fermentation happened a lot faster than with normal bread flour. That amount of starter is going to speed things up anyway, but it was about twice as fast as normal with the Kamut present. I had to turn down the temperature on the fridge I use for cold final fermentation to about 39℉, where I normally have it set around 42-44℉ to favor lacto-fermentation. Of course, an alternative is to use less starter, but I really wanted a more pronounced tang.
And since Kamut’s starches break down pretty easily, I do not recommend using a real high temperature for baking. The loaves I baked above were baked at 460℉ for 20 minutes with steam, then 425℉ for another 22 minutes dry. Because of all the released sugars, that bread finished with a dark crust!
As I mentioned above, the type of gluten that is formed with Kamut is a lot more delicate than with the hard red wheat that’s normally used in baking. When you’re folding your dough, be very mindful of the extent to which you pull the dough. My advice is to only pull to the point where you feel some resistance, then fold the dough over. You may have to fold more times than you normally would during a session to ensure you’re building structure, but you’ll also ensure that you’re not tearing your dough.
Kamut is a “thirsty” flour, so I recommend a healthy autolyse or fermento-lyse of at least 45 minutes. This will ensure that your flour is well-hydrated.
As far as hydration percentage is concerned, you’ll have to experiment. The bread flour I use is particularly high in protein at around 15%, and though the Kamut from Azure Standard is about 11.7% protein, I can still push my hydration way past 80%, though I typically don’t exceed 85%. Even then, it still handles like a 72% hydration dough with regular bread flour.
If you make bread with 100% Kamut, best treat it like rye and bake it in a pan or a Dutch oven to prevent it from spreading out. It won’t spread out nearly as much as rye, but its gluten is not very strong.
And speaking of strength, bear in mind that most Kamut flour is whole-grain flour, so don’t expect to get big holes. You’ll get plenty of spring, but just not a lot of voids in your crumb.
You might consider sifting the flour through a fine mesh to capture the germ and husk. These are like little knives that will cut the gluten strands. And with Kamut’s weaker protein bonds, removing that stuff will help with your rise. I usually sprinkle the germ on top of the loaves before I place them in the oven.
Kamut flour has become a staple in my flour blends. It adds a nuttiness to the flavor of the bread and as it has a different kind of gluten than wheat gluten, provides a softness to the crumb that is very pleasing. You don’t get a really open crumb with Kamut since it is a whole-grain flour, but as it has under 12% protein, you’ll still get some very nice oven spring and expansion.
For baguettes, my flour blend is as follows: 50% AP Flour, 25% Bread Flour, and 25% Kamut. I use half of the Kamut (unsifted) to make a poolish and I sift the other half for the final dough. Let’s get to the recipe!
Formula
Flour
100.00%
Water
75.00%
Salt
2.00%
Yeast
0.38%
Total %
177.38%
Poolish
Kamut Flour (unsifted)
105g
Water
105g
Yeast @ 0.3%
0.31g
Note: This is more than what’s needed just to make sure there’s enough.
Final Dough
Kamut
95g
Bread Flour
191g
AP Flour
381g
Water @ 95°-100°F
477g
Salt
15g
Yeast (instant)
3g
Poolish @ 25% of Total Flour
191g
Total Yield
1353 4 X 335g loaves
Total Flour
763
Total Water
572
Make the Poolish. Combine the ingredients and mix well, then cover and set aside, until poolish about doubles. It’ll be ready when it passes the float test. This can take up to 6 hours on cool days. With a Kamut poolish, you won’t see a lot of bubbles on top, but you will see lots of bubbles on the sides and bottom of your container.
You can also make the poolish the day before and stick it in the fridge. This will allow the organic acids to really develop. Not only will you get lots of flavor from this, but it will also add extensibility to the dough.
Mix. In a separate bowl, combine all the dry ingredients (yes, even the yeast and salt) and mix well until everything is nicely distributed. Add all but about 50g of water and make a shaggy mass that has no dry ingredients. Cover and rest for 15 minutes, add the reserved water, and work it into the mass. Once all the reserved water has been incorporated, mix until you have no large lumps in the dough.
Bulk Fermentation. About 1 1/2 – 2 hours. Look for about 50-75% expansion (not doubling)
Folding. Fold the dough twice within the first hour.
Divide and Preshape. Scale-out 335g pieces. Shape either into taut balls or roll into jelly rolls, then set aside on a well-floured couche. Rest for 20 minutes.
Preheat your oven to 500°F
Shape and Final Fermentation. Shape into baguettes and place onto a well-floured couche. Check the loaves at 45 minutes. When you poke test, the hole should fill in slowly.
Bake. Bake with steam at 460°F for 12 minutes. Remove the steaming container, and reduce oven temp to 400°F. Bake for 15-20 minutes to harden the crust and bake out most of the water from the crumb.
As I’ve shared in the past, I’ve been baking bread for over 40 years, but it wasn’t until the pandemic lockdown that I had the time to devote to developing my artisan bread baking skills. And looking back over the last almost two years, it’s daunting to think that I’ve literally spent hundreds of hours mastering the craft; and I still consider myself a mere fledgling artisan bread baker.
Like many during the lockdown, my initial instruction came from Ken Forkish’ excellent book, Flour Water Salt Yeast. Though not very technical it helped me start getting a feel for the dough development process and for that, I’m ever grateful. I still refer to it for recipes.
On one such occasion recently, I revised the section where Ken wrote about making a dough you can call your own. I wrote about that a few months ago and while I still make lots of bread with my reference flour blend, soon after I wrote that article, I started making more and more use of Kamut flour.
Kamut is actually not a type of flour but a brand. The actual wheat type is known by its common name of Khorasan (Triticum polonicum) and is an ancient grain that can trace its roots to ancient Mesopotamia in an area known as the Golden Crescent. The kernel of this grain is roughly three times the size of most modern wheat varieties. And while it contains gluten, it’s of a type that is much more digestible than other wheat varieties and it is packed with B-vitamins.
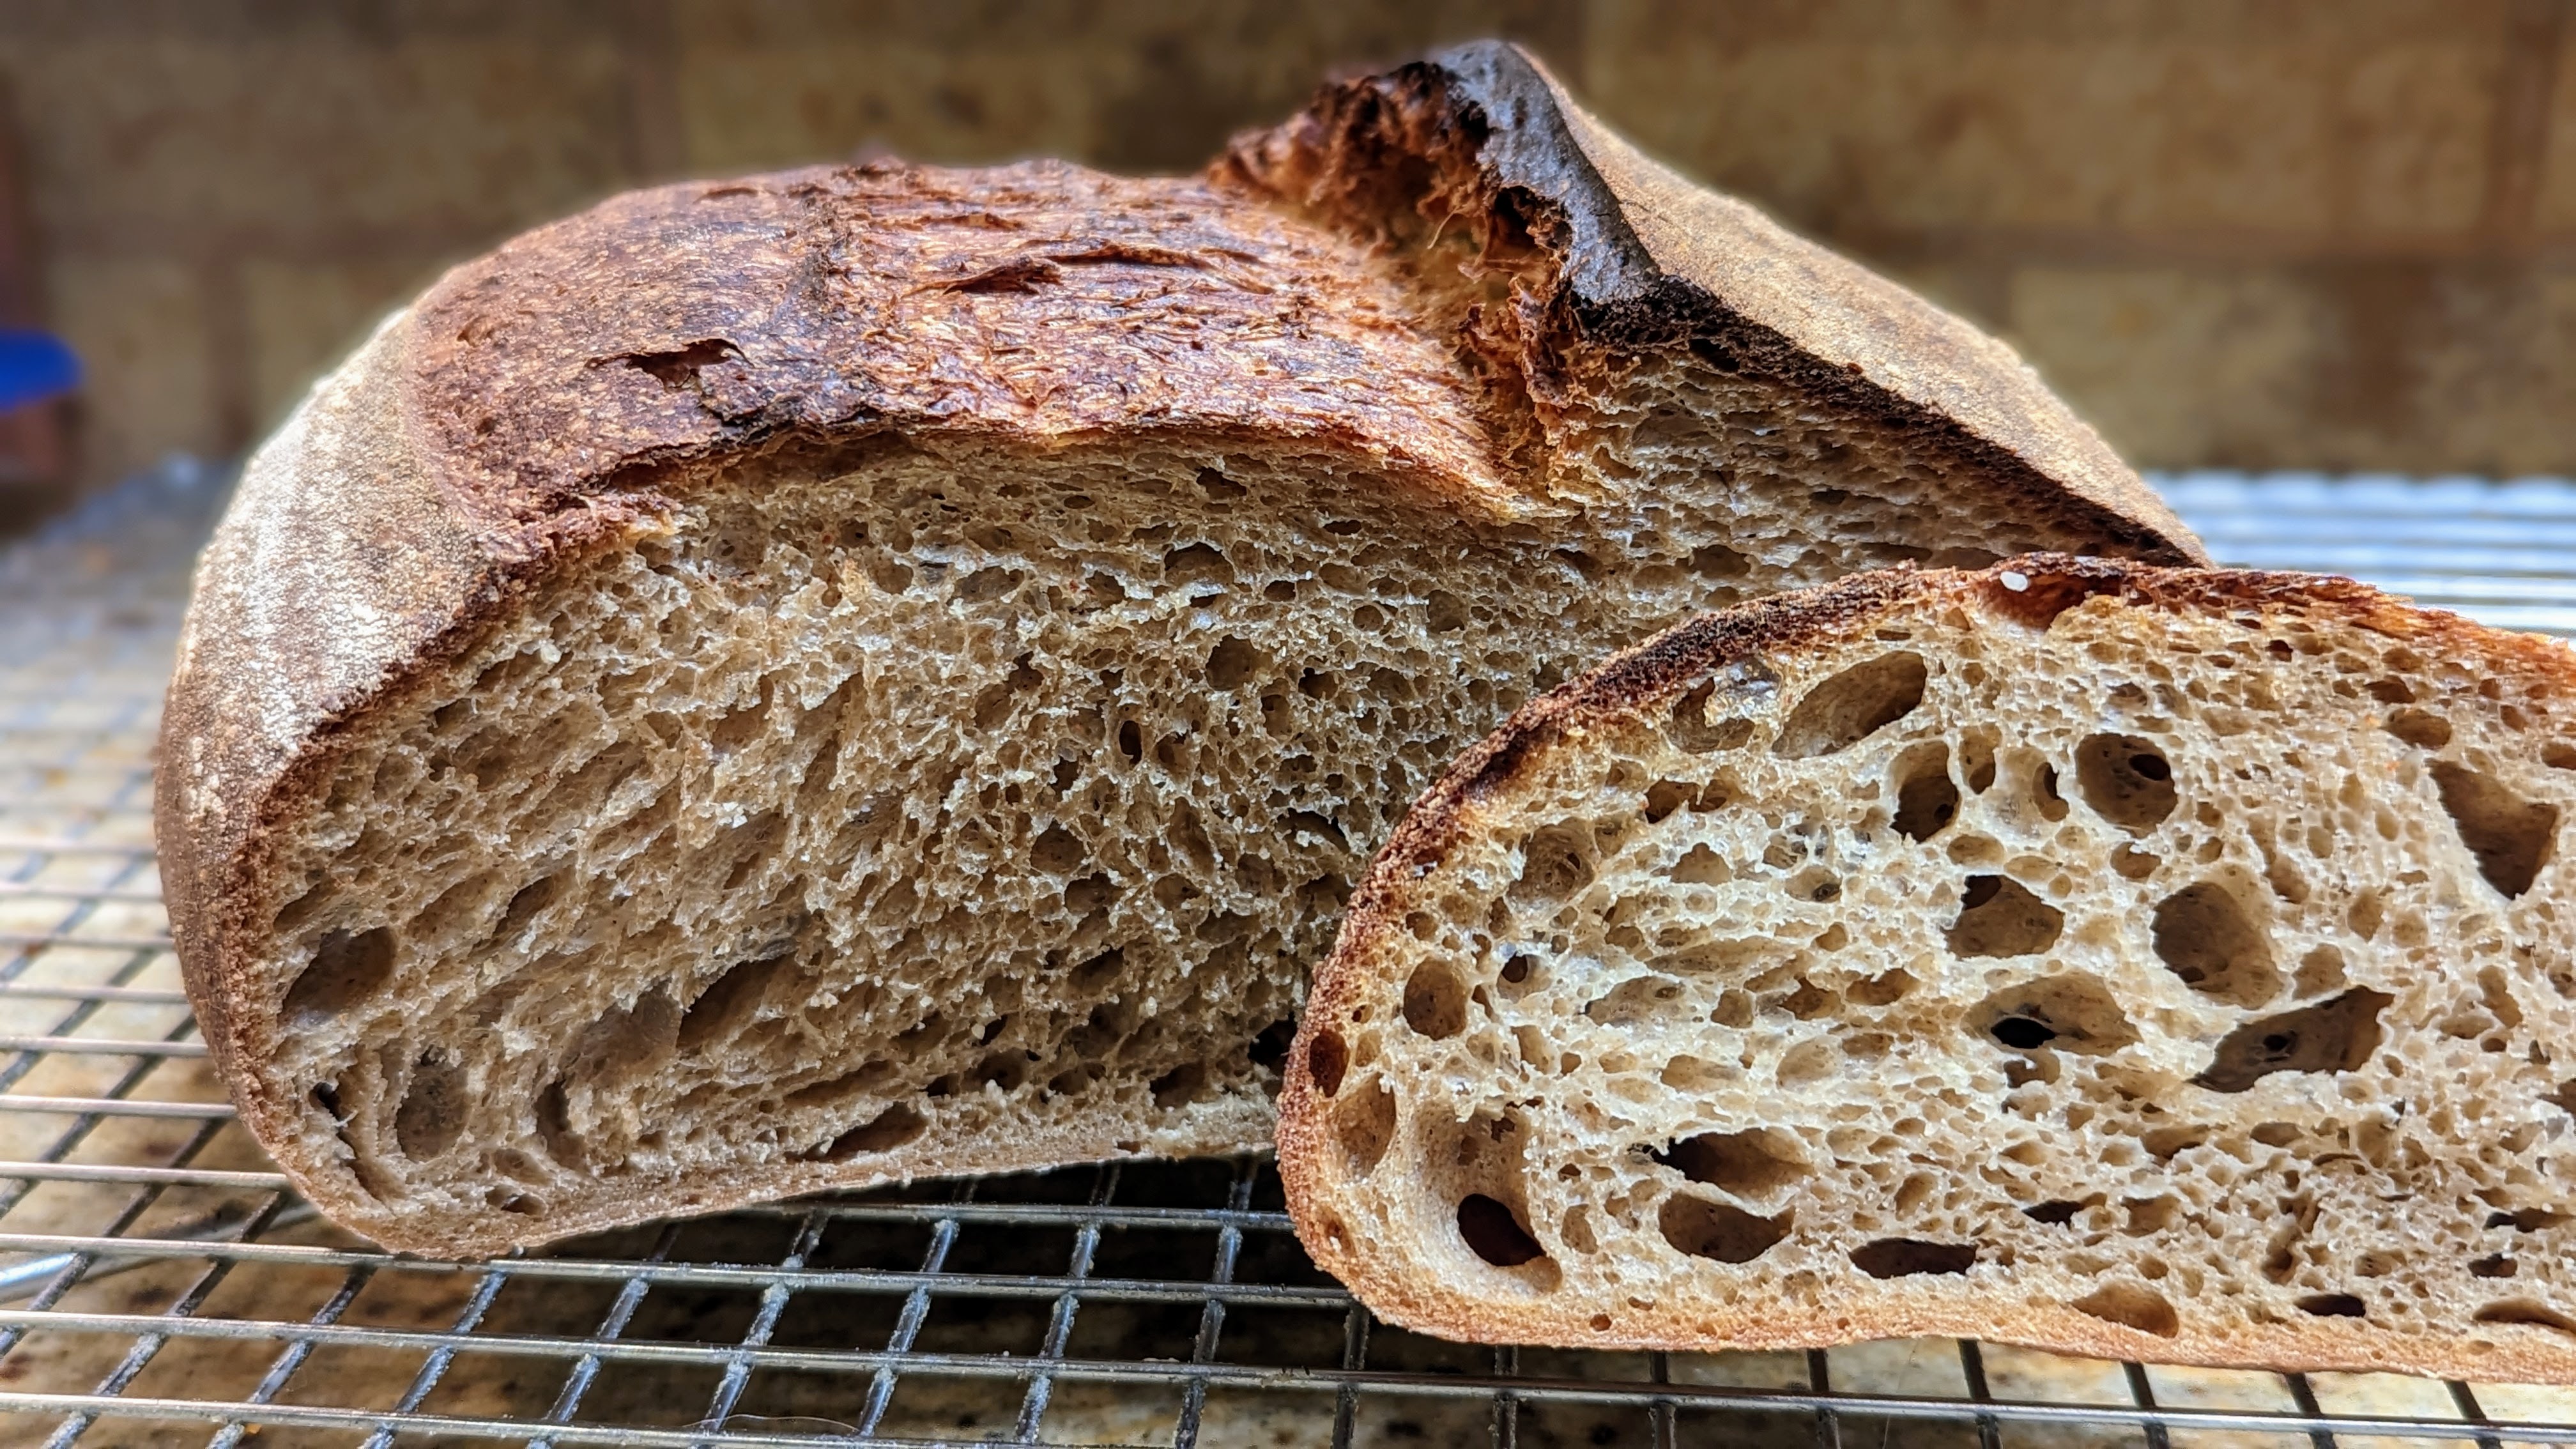
Health benefits aside, Kamut has a wonderful flavor when incorporated in a flour blend. The bread that results has a slightly nutty flavor and when risen with a natural leaven presents a lovely fruity aroma. The crumb of bread made with Kamut is soft yet springy with a wonderful chewy texture. And as it is a rather thirsty flour even after a full bake (as shown above), the crumb retains a bit of moisture. Bread that I make using Kamut are among my most favorite.
But the main reason I love making bread with Kamut in the flour blend is that it is super-hard with which to work. The gluten that is formed with Kamut is incredibly delicate. And even though the Kamut flour I use has about 12% protein content, which you’d think could accommodate higher hydration, the delicate nature of Kamut’s gluten can a bit of an inhibitor to taking it above 75% hydration.
In light of that, Chad Robertson says in Tartine No. 3 that he takes his 60% Kamut dough past 90% hydration. But looking that the pictures, I believe he compensates by making smaller loaves though his recipe implies making 1-kilo loaves. Based on experience, medium-format loaves with that kind of hydration using that much Kamut will not have much vertical rise. You’ll get nice holes – which is what Tartine bread is known for – but not much vertical rise. For example, look at the pictures from Tartine No. 3 of the 60% Kamut bread below:
You’ll notice that there’s not much vertical rise in the cross-section. It’s a beautiful crumb that’s consistent with a highly hydrated dough. And though I don’t know how big those loaves are from the picture, I have made this recipe and experimented with 93% hydration for the 1-kilo loaves. Even though I built up lots of dough strength, they still spread out a lot. So I’m thinking that the loaves shown in the picture to the left above are significantly smaller than 1-kilo loaves so they retain some vertical rise.
As for me, I do a 40% Kamut, 30% Bread Flour, and 30% High-extraction Flour. The hydration is 75%. That blend and hydration offers the best balance of flavor and dough strength to give me great oven spring and a reasonably open crumb.
And given that Kamut’s gluten is so delicate, I’ve taken to final proofing at 39-40°F for up to 36 hours to allow plenty of time for the gases to expand in the dough. I’ve also learned to bake very gently during the first 20 minutes with steam at 400°F. Once I remove the steaming container, I up the temp to 425°F and bake for 35 minutes until I get a nice tri-color crust.
I mentioned above that I love working with Kamut because it’s a difficult flour with which to work, but I think another big reason is that it has taken me so long to master this blend and make consistently good loaves with it. And that in itself has been a revelation into the intricacies of bread baking. There are so many variables. And while it’s possible to establish methods that are common to many different kinds of bread, working with Kamut, I’ve had to make slight adjustments to my basic methodologies to accommodate the flour.
But I have to say that mastering this blend has given me an immense amount of satisfaction. And that satisfaction is what keeps me going and keeps me exploring!
I made the loaf above a few days ago. It tastes great. It has a great texture. It is flat! Flat! FLAT!!! F$%k!!! The worst of it is that I knew it would turn out like this because it was WAY too hydrated for the protein content of the flour I used. Well… serves me right for following a recipe without compensating for the ingredients I had on hand.
That loaf is Chad Robertson’s 60% Kamut loaf from his Tartine No. 3 book, which focuses entirely on baking bread with whole grain flour. In his recipe he mentioned, “Due to the high protein in Kaumut flour, this dough can take a lot of water.” Stupid me, I took that at face value and made the bread straight from the recipe before checking on the actual protein content of the Kamut flour I have.
My Kamut flour is only 11.7% protein, the same protein content as AP flour. And I upped my hydration to 92% based on his notes in the book that say he usually takes the hydration up past 90%.
STUPID! STUPID! STUPID!
I’m actually laughing as I write this because it’s SUCH a rookie move. And I admit that I probably let my excitement over Chad Robertson doing a recipe with one of my favorite flours get the better of me. And in my zeal, I pushed through the process and didn’t spend enough time studying. Oh well, lesson learned.
This time around, there are a few things I’m going to do to make this a successful bake:
I will use vital wheat gluten to up the protein content of my flour to provide more mechanical strength. I did some research and I saw Kamut flour ranging in protein content from 15% to 17%.
One thing I missed in Chad Robertson’s instructions was that he does a fermented autolyse in that he performs his autolyse with the starter incorporated into the flour and water. I will do that this time around. That will really get the yeast in my starter going!
I will also stick with his basic 85% hydration to start out with. If the dough is still a little stiff at this level, I will do a bassinage in one of my folding sessions to give time for protein to build up first.
As much as it is frustrating, I love the learning process. I may swear a lot in the process, but damn! A good finished product trumps any failures!
As I mentioned in my previous entry, I love baking with Kamut flour! It’s such a dream to work with and most importantly, it just produces damn good tasting bread! In light of that, I thought I’d share my formula for making sourdough with 40% Kamut flour. With that in mind, here is the overall formula:
Overall Formula
Flour (40% Kamut, 10% Whole Wheat or Rye [from starter], 50% Any other combination of flour)
100%
Water
78%
Salt
1.8%
Notice in the formula, there is no entry for the starter. This is because the starter’s flour and water are always figured into the overall hydration. It is NOT a separate ingredient.
Final Dough
Flour
809
Water
611
Salt
16
Levain
180
Total Yield
1616g 2 X 800g loaves with some extra for process loss
Optimal Dough Temp
76°F
Total flour is about 900g
Make the Levain. Make a 100% hydration levain. I use a hybrid scrapings method of leftover mature starter from my fridge and botanical starter and whole grain flour (for me it’s usually white whole wheat but I will use kamut at times).
Mix. Reserve about 50g of the water and dissolve the salt into it. Mix the flour and remaining water and autolyse for at least 30 minutes (you can autolyse longer if you want). Once autolyse is finished, fold the starter into the dough, then add the salt water and thoroughly mix until everything is well incorporated.
Folding. 2-4 folds at half-hour intervals. You want to be gentle with the folding since you’re using a whole grain flour. Windowpane test after each fold to determine dough strength. If at any point it’s sufficient, stop folding and let bulk fermentation complete.
Divide and Pre-Shape. This recipe yields 2 X 800 gram loaves, so scale the pieces out then shape into rounds. Once shaped, bench rest for 20-30 minutes until the dough has relaxed.
Shape and Final Fermentation. Shape into rounds or ovals (I love to free-form batards). Once shaped, you can let the loaves proof for 1-2 hours at room temp, or pop them into the fridge for 8-16 hours. Note that if your fridge is particularly cold or your yeast really slows down in the cold, it may take longer.
Bake. Bake at 485°F/250°C for 15 minutes with steam. Remove steaming container or purge steam, then bake at 425°F/220°C on convection if you have it; otherwise, 435°F/225°C for 25-30 minutes. Bake until the bottom half of the loaves is a nice mahogany.
I love working with ancient grain flour. To me, there’s a certain romance to working with grain that bread makers have used for thousands of years. To think that I’d be working with flour made from grain that bakers from ancient civilizations used makes my mind wander back to those ancient times and what it would have been like to bake back then.
Kamut, which is the commercial name for Khorasan wheat is an ancient grain that I discovered several months, but with which I only started recently baking. Its exact origin is unclear, but it is named after a historical area called “Khorasan” which was a region in what is known as the Fertile Crescent in the Middle East. The predominant civilizations that occupied that area were the Mesopotamians and Sumerians. If they were cultivating and using that grain, we’re talking about a grain that was used thousands of years ago! And we’re talking about 5,000+ years ago. I don’t know about you, but to me at least, that’s incredibly exciting!
But other than the romanticism I’ve assigned to the grain, baking with Kamut flour is incredible. Similar to durum flour, it absorbs water slowly, so it requires an autolyse period. And like durum flour, once hydrated, it forms a luxurious, highly pliable dough. And again, like durum or other whole grain flour, it absorbs a lot of water. Most of the bread I make with it is in the 78-82% hydration rate range. Even at those levels, the dough is very workable and not too tacky.
Interestingly enough, Kamut has a lower protein content than durum and whole wheat. The Kamut flour I use from Azure Standard, is rated at 11.7% protein, which is along the lines of King Arthur or Bob’s AP flour. So I often mix it with a little vital wheat gluten to get the protein content to around 14%. The reason for this is that even though it is milled to a super-smooth consistency, it still is a whole grain and will tend to cut the gluten strands. Admittedly, I’m still experimenting with how much vital wheat gluten I add.
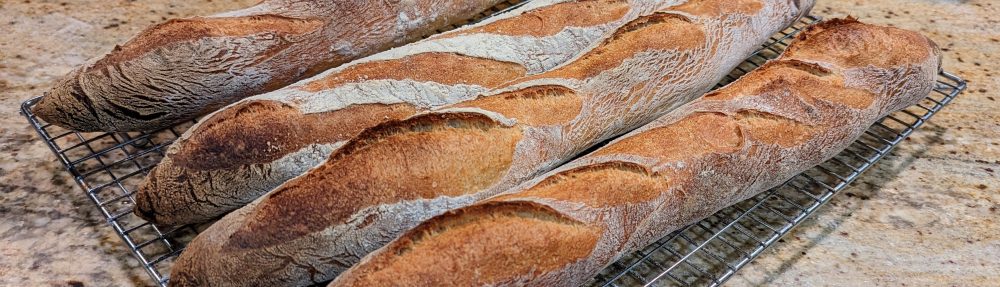
As far as baking is concerned, see the loaves in the picture above? They were all made with 40% Kamut flour. The baguettes used 20% high-extraction and 40% AP Flour, whereas the batards used 10% whole wheat (from the starter), 30% high-extraction, and 20% AP Flour. For the batards, with that much bran in the dough, I wasn’t expecting large holes. But look at the oven spring of those loaves! It’s absolutely incredible. The batards exploded in the oven. The crumb, though not possessed of big holes was still really light and airy. And the texture – OMG, the texture – was absolutely fabulous!
And don’t get me started on the taste. Kamut flour adds a slight sweetness and a definite nuttiness to the flavor of the bread. Even though it’s whole grain flour, you don’t get that grain-forward taste. The taste is akin to macadamia nuts, and it’s addictive. I gave one of the loaves to a friend who brought it over to her aunt’s for a small luncheon. The ladies loved it so much they ate over half of it at lunchtime, then according to my friend, they polished it off at dinner. That loave was not small, weighing in at over 2 1/2 pounds.
It also helped that the sourdough was made from a nectarine botanical starter I had just cultivated. The fruity notes in the starter definitely integrated well Kamut’s nuttiness. Even my family who has gotten pretty used to having artisan bread around loved that loaf. Many sandwiches and avocado toasts were made.
Along with durum, Kamut flour will most likely be a regular blending flour for me. Technically, I could do 100% Kamut, but it’s relatively expensive at $1.57/pound. Contrast that to Durum, which is $0.94/pound. I’ve got to stretch it to make it last. Plus, I can only get it in 25-lb bags, which is a bummer. I’d love to be able to get 50-lb bags. But Kamut has limited cultivation in the US, so it’s definitely not as available as other flour.
I’m so glad I discovered Kamut. Like I said, It’ll be part of my regular flour blend from here on out!