No matter what endeavor I take on in life, there has to be some meaning attached to it. As a career software engineer, I didn’t want to code just for coding’s sake, I wanted to build cool stuff that had affected people in a positive way; either by automating monotonous, manual tasks, or providing impactful information to help impact the world around them.
So when I started seriously considering opening a micro-bakery out of my home, I didn’t want to just make any old bread. And quite honestly, I didn’t want my bread to be about me as a baker; rather, I wanted my bread to be a statement of nutritiousness and, of course, tradition. The rebel in me wanted to break the chains of the conveniences in our society to which we’re all accustomed. My thought was that while I’m all for progress, in some cases, older is better, and with bread, older is also better for you.
So when I started putting my micro-bakery together, I made a conscious effort to seek out communities and organizations of like-minded individuals. I met plenty of enthusiasts such as myself, but it was difficult to find organizations whose ethos and narrative aligned with my own with respect to bread. Then I stumbled upon The Real Bread Campaign.
Established in 2008 in the UK, Real Bread has a very simple ethos:
Real Bread has nothing to hide. It is made with simple, natural ingredients and NO additives. Simple, eh?
from Real Bread – About
Once I read the About page, I knew this was an organization I wanted to support and after a few months of lurking, I finally recently joined as a paying member to literally put my money where my mouth is. And I can also add the Real Bread Loaf Mark to my marketing materials which is totally cool.
The concept of baking “real bread” is easy. No additives. Period. This means no chemical dough conditioners such as ascorbic acid. Ingredients must all be natural. Here’s an excerpt:
What is Real Bread?
Everyone has his or her own idea of what Real Bread is. Here’s the Real Bread Campaign’s basic definition:
Made without the use of so-called processing aids or any other additives*
In fact, we believe this should be a key criterion in the legal definition of bread full stop.
Why should bakers who make bread in a time-honoured, natural way have to qualify it with ‘real’, ‘artisan’, ‘craft’ and the like? We say let’s reclaim the name bread and leave it to the industrial loaf fabricators to come up with a new name for their additive-laden products.
Amongst the additives not used in Real Bread making are: Baking powder and other chemical leavening; ascorbic acid; xanthan gum; added enzymes or any other so-called ‘processing aids’ – that exclusion applies to any addtives in the flour or mix you use.
…and by bread, we mean any additive-free crusty bap, bagel, bialy, injera, wrap, khobez, baguette, chleb, naan, chapatti, roti, stottie cake, lavash, ruisleipä, ciabatta, bara brith, Staffordshire oatcake, tortilla, paratha, porotta, pitta, pida… the list goes on.
NB All genuine sourdough is Real Bread but not all Real Bread has to be sourdough.
*The only exceptions we make are the four so-called ‘fortificants‘ added to most UK milled flour by law.
The phrase, “All genuine sourdough is Real Bread but not all Real Bread has to be sourdough” is an important one because handmade bread risen with commercial yeast counts, so long as you don’t add stuff to it.
So what has this meant to me?
Though the guidelines are fairly simple and straightforward, this has meant so much to me beyond the guidelines because it helps reaffirm my own particular ethos of creating delicious and nutritious bread that’s simply flour, water, salt, and yeast.
But the whole concept of “real bread” also keeps me mindful of the wholesomeness of the ingredients I use, especially flour. I only use certified organic flour or use flour from producers who responsibly source their grain – read no-GMOs and sustainably farmed wheat. The flour I use is NEVER bleached or bromated. I will even source directly from the mills!
And in going to the source, I do my best to support the small, independent farms and mills. Yes, the flour’s a bit more expensive, but the quality is top-notch and I’m going around all the middlemen and the huge agribusiness conglomerates.
And I know that this may sound a little New Age, airy-fairy, but in baking bread in traditional ways, there’s a certain Zen to it all. Zen isn’t dogmatic nor religious. It’s the direct experience of the natural order of things – at least from a fairly simplistic perspective. “Real Bread” provides a framework for the Zen of breadmaking as we follow the natural order of how dough is risen. Yeah, like I said, it’s a little airy-fairy, but at least for me, it’s a real experience.
I may actually write a piece on the Zen of breadmaking. I’ve been mulling that concept for a few days now… Stay tuned…
Finally, making “real bread” has helped me be patient with the process – any process. Where I used to be very reactive, I’m much more measured and observant first and that allows me to respond to situations in a much more relaxed manner. Since I’ve been baking, my stress level has really dropped!
Whether or not you join the organization, I recommend reading through the website. There’s lots of useful information there to help anyone wishing to bake real bread.
When I started making artisan bread, I thought it was weird that to get a crispy crust you needed to bake with steam. It seemed so… contradictory. But, as I later learned, steam allows the dough to expand, preventing the crust from hardening too soon and promoting a full oven spring. Once the steam is removed, then the crust is allowed to set and harden. In the end, the crust is comparatively thinner because it wasn’t allowed to harden early. So you get a thin, crispy crust as opposed to a thick, hard crust.
After hundreds of bakes this past year, the seals on my ovens have started wearing out. I first noticed it a couple of weeks ago when my sourdough loaves, which normally get great oven spring, weren’t rising much vertically and by the time I’d remove my steaming containers, all the water would be gone and the loaves we much darker at that point than before.
After trying a bunch of things with my dough and process to correct the problem – to no avail, by the way – I happened to look at my oven seals and laughed. They’re pretty worn down which explained why I wasn’t retaining steam. Unfortunately, my ovens are older models, so I’m not sure if I can even get seals for them. No matter, I had to figure out a way to produce good steam in my ovens.
So I did a search and came across a bunch of different methods: Lava rocks in a pan. Cast iron skillet with boiling water (I was doing a variant of that, but using a broiler pan underneath my stone). Then I saw that one person used cheap, terry cloth shop towels soaked in water that she popped into the microwave before baking, then placed in bread pans. OMG! I knew I had to try it!
After trying it, I couldn’t believe how much steam this method produced, so I thought I’d share the process here!
Note that all this happens about 5-10 before I pop the loaves into the oven. This ensures that the dough enters a humid environment.
The Towels
It’s best to use terry cloth towels because they retain water much better than tea towels. When I first started using this technique, I used an old worn-out towel that I cut up. I have since purchased some cheap shop multi-purpose terry cloth towels from Home Depot for ten bucks. I use four of them for baking and the rest for cleaning. They work great!
Prep the Towels
Loosely roll up the towels into logs, place them in a microwave-safe bowl, and pour water over them to completely saturate them. Then pop them into your microwave and zap them for 4-5 minutes on high. They should come out steamy. If not, then zap them for another minute.
Transfer to Loaf Pans
Transfer the towels to loaf pans and pour any remaining water from the bowl over the towels.
Place the Pans in the Oven
I put my pans on the top rack of my oven to ensure they’re in the hottest part of it. The steam will come down from the top and envelop the loaves as shown. I also have a broiler pan that sits on the floor of my oven that I also put water into.
The Results
Thus far I’ve baked ciabatta and baguettes with this steaming technique and they’ve come out wonderful! But I knew that the real test would be to bake bread with a lot of whole-grain flour. The loaves to the left are 40% Kamut/10% Whole Wheat and 50% High-protein flour. The oven spring on them was incredible! I realize the loaf on the left is a little misshapen. That’s because of handling before baking, not because of the oven spring.
I’m just diggin’ this technique! Before I realized what was going on, I started thinking, Have I lost my touch? Luckily, I haven’t. But based on this, I really am going to have to save my pennies to get a dedicated bread oven.
As I mentioned in my previous entry, I love baking with Kamut flour! It’s such a dream to work with and most importantly, it just produces damn good tasting bread! In light of that, I thought I’d share my formula for making sourdough with 40% Kamut flour. With that in mind, here is the overall formula:
Overall Formula
Flour (40% Kamut, 10% Whole Wheat or Rye [from starter], 50% Any other combination of flour)
100%
Water
78%
Salt
1.8%
Notice in the formula, there is no entry for the starter. This is because the starter’s flour and water are always figured into the overall hydration. It is NOT a separate ingredient.
Final Dough
Flour
809
Water
611
Salt
16
Levain
180
Total Yield
1616g 2 X 800g loaves with some extra for process loss
Optimal Dough Temp
76°F
Total flour is about 900g
Make the Levain. Make a 100% hydration levain. I use a hybrid scrapings method of leftover mature starter from my fridge and botanical starter and whole grain flour (for me it’s usually white whole wheat but I will use kamut at times).
Mix. Reserve about 50g of the water and dissolve the salt into it. Mix the flour and remaining water and autolyse for at least 30 minutes (you can autolyse longer if you want). Once autolyse is finished, fold the starter into the dough, then add the salt water and thoroughly mix until everything is well incorporated.
Folding. 2-4 folds at half-hour intervals. You want to be gentle with the folding since you’re using a whole grain flour. Windowpane test after each fold to determine dough strength. If at any point it’s sufficient, stop folding and let bulk fermentation complete.
Divide and Pre-Shape. This recipe yields 2 X 800 gram loaves, so scale the pieces out then shape into rounds. Once shaped, bench rest for 20-30 minutes until the dough has relaxed.
Shape and Final Fermentation. Shape into rounds or ovals (I love to free-form batards). Once shaped, you can let the loaves proof for 1-2 hours at room temp, or pop them into the fridge for 8-16 hours. Note that if your fridge is particularly cold or your yeast really slows down in the cold, it may take longer.
Bake. Bake at 485°F/250°C for 15 minutes with steam. Remove steaming container or purge steam, then bake at 425°F/220°C on convection if you have it; otherwise, 435°F/225°C for 25-30 minutes. Bake until the bottom half of the loaves is a nice mahogany.
One would think that with the bread craze that has swept the world during the pandemic lockdown, that sourdough is the only bread being made and that the only bread that qualifies as artisan can only be made with a starter. That’s bullshit of course because doing something in an artisan way has less to do with the ingredients or materials and much more to do with craftsmanship.
When I make ciabatta, I typically use a biga or a poolish. But sometimes, I just want some bread. So as I do with Baguettes de Tradition, I’ll just whip up a batch of dough in early in the morning, and have fresh, hot bread for breakfast. No, it doesn’t keep, but at the small quantities I make, it’s gone in less than a day.
One might think that a straight dough can be bland and boring. But done right, a bread made from straight dough can be absolutely wondrous. And I will submit that while a same-day straight dough bread may not have the depth of flavor of one made with a preferment or employing a slow-rise, cold bulk ferment, employing great technique will go a long way toward making up for that.
That said, one way to add a little flavor complexity is to use a flour blend. Though I list using unbleached AP flour in the formula, my flour is actually a blend of 30% high-extraction flour and 70% AP flour. The high-extraction flour lends a nuttiness to the overall flavor of the bread, plus an ever-so-slight grainy texture to it making it seem much more substantial than it actually is.
Especially with ciabatta, the crisp, crackly, and crunchy crust combined with the light and airy crumb, redolent with large holes can create a magical bread. A full bake that activates the Meillard reaction (but not taking it to super-dark) can add flavors that would otherwise not be present on lightly baked loaves.
Overall Formula
Unbleached All-Purpose Flour
100.00%
Water
75.00%
Salt
2.00%
Yeast
1.50%
Milk (optional – see below)
10%
Olive Oil
4.00%
MILK?!!! No, I’m not kidding. It actually makes the dough fluffy and soft. This is perfect for sandwiches. You can dispense with the milk though and replace it with water. Definitely do the bassinage stage described below, so mix to an initial 75% hydration, then take it up to 85% with the reserved water.
Final Dough
Unbleached All-Purpose Flour*
525
Water
394
Salt
10
Yeast
8
Milk**
52
Olive Oil
21
Yield
2 X 500g loaves 4 X 250g loaves
Optimal Dough Temp
76°F
*Preferably organic and definitely > 11% protein. You can use Bob’s Red Mill or King Arthur. I use Azure Market AP Flour. **If you don’t want to use milk, that’s okay, just use all water, but milk will help with the fluffiness of the bread.
If you use a baking stone, preheat your oven to 485°F / 250°C to ensure your stone’s hot by the time you’re ready to bake. Things happen pretty quick with this bread, and you don’t want to get to final fermentation and have to wait for your oven to warm up.
Mixing. I recommend using a stand mixer if you have one, but this can be done by hand as well – it just takes longer. Sift the dry ingredients together then add the water. If using a mixer, mix on slow speed to incorporate all the ingredients then go to the second speed until mixture is smooth and the dough climbs to the top of the dough hook as the gluten is starting to form at this point. Rest for 20 minutes.
Bassinage. Once the dough has rested (you may also notice bubbles forming), fold the milk (or water if you decide not to use milk) into the dough until it is fully incorporated. This will get it to 85% hydration. But since the gluten started developing with the thorough mixing, there’s already strength in the dough and it will not feel like a soupy mess. You can actually feel the gluten strands! Once the liquid has been fully incorporated, drizzle the olive oil over the dough, and mix it in well.
Again, I use a stand mixer for this because it’s much more effective at getting the milk and olive oil incorporated.
You want to be gentle with folding and lamination steps. What we’re trying to do is build the gas retention properties of the dough in these steps.
Folding. Once the milk and olive oil have been incorporated, rest the dough for 20 minutes then do a set of stretch and folds. Don’t just do the standard four-fold North-South-East-West. Stretch and fold until you feel the tenacity of the dough building. Rest for 20 minutes.
Laminate. Liberally flour your work surface then gently pour the dough onto it. Gently tug it into a rectangular shape that is about 1/2″ to 3/4″ thick. Letter fold the dough in an NSEW pattern 3 times, gently pressing and flattening the dough between folds. After the last letter fold, roll the dough onto the seam (no need to seal) and shape it into a round. The dough ball should hold together and not collapse too much (don’t worry, it will collapse a bit because of the hydration). Place the dough into a well-oiled bowl seam-side-down (I just wipe down my bowl then spray it with olive oil). Rest for 20-30 minutes (or more) until the dough ball has almost doubled in size.
After laminating, you can go directly to dividing or shaping after the 20-30 rest, or retard the dough in your fridge for a few hours. With this much commercial yeast though, I recommend that your fridge temp is between 36°-40°F. You really want to slow the yeast and promote the lacto- and acetobacillus activity. That said, alternatively, you could use a bit less yeast, say 4 grams and retard the dough for an even longer period of time.
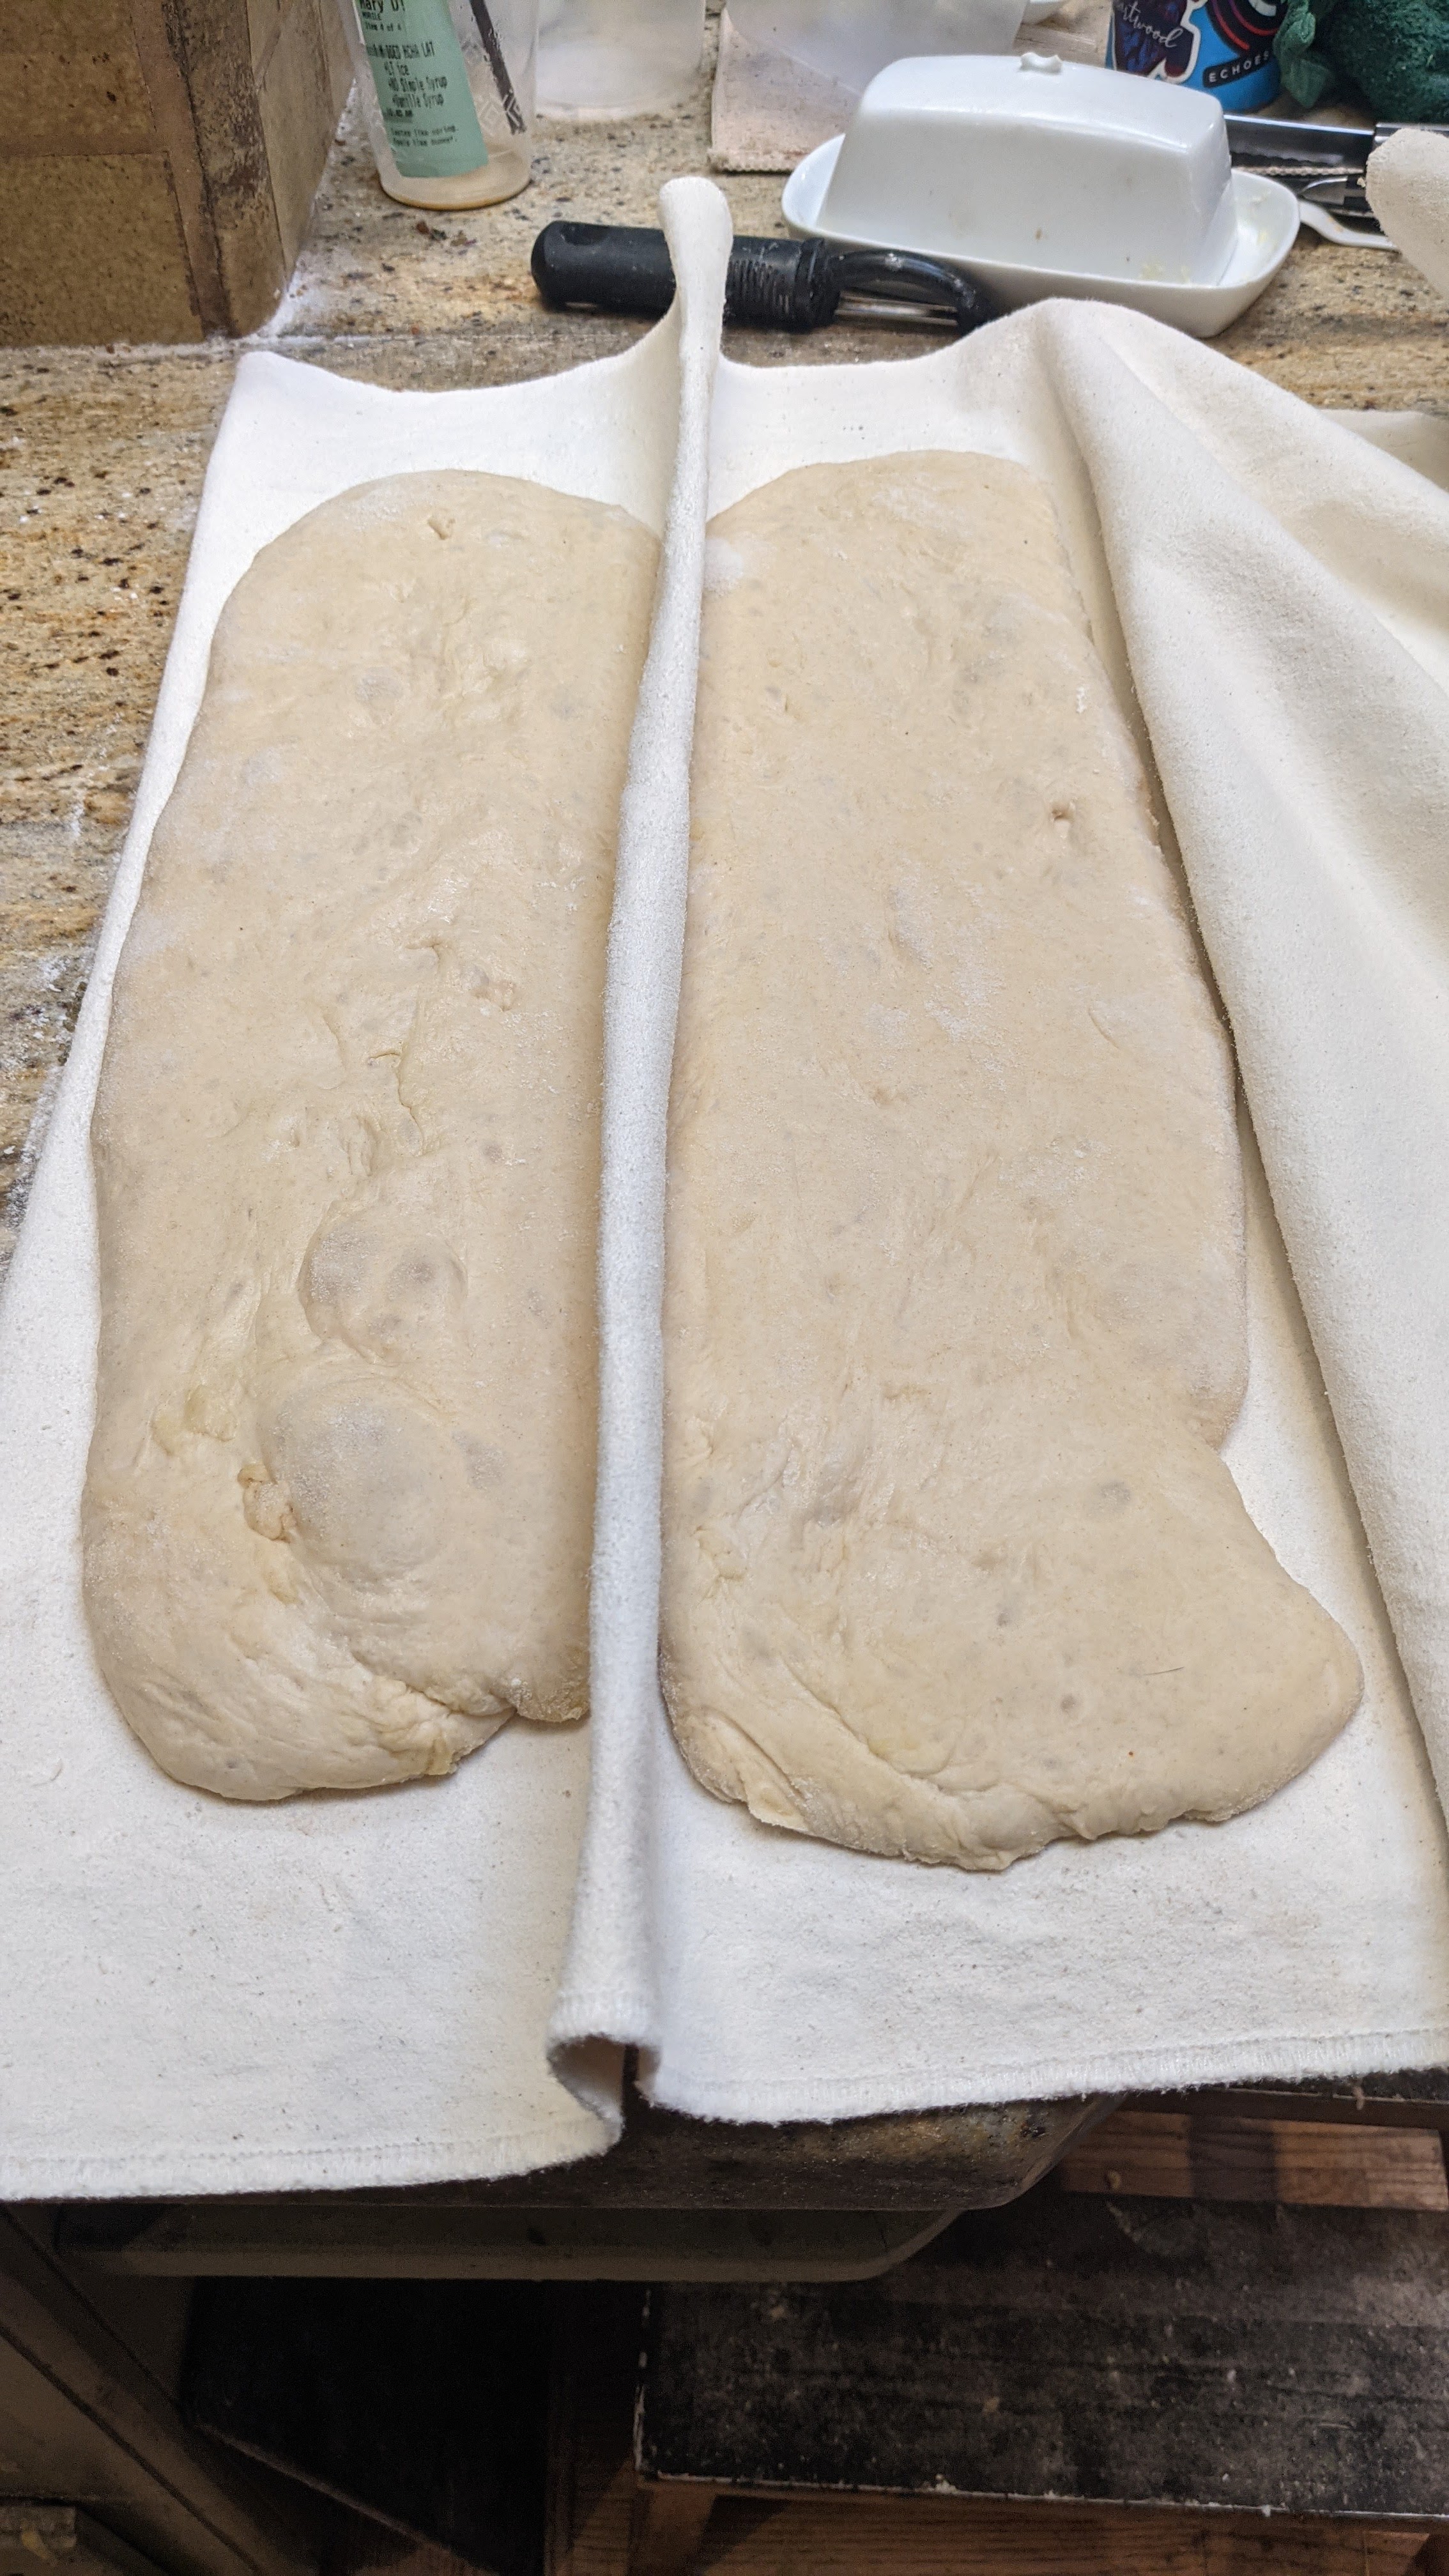
Divide and “Shape.” Again, liberally flour your work surface then pour your dough onto it. Gently tug it into a rectangle, then divide it into two equal pieces (or four if you want to make sub-sized buns). I’m kind of anal about things being even, so I actually scale out my pieces to 500 grams apiece. Gently tug each piece into long rectangles, then transfer to a well-floured couche (as shown to the right). Once you transfer them to the couche, flour your fingertips and gently dimple the loaves to promote even rising – and prevent over-rising, believe it or not – for the final ferment.
Final Fermentation. Cover the loaves and allow them to ferment for 30 minutes or until the dough is nice and relaxed and puffy.
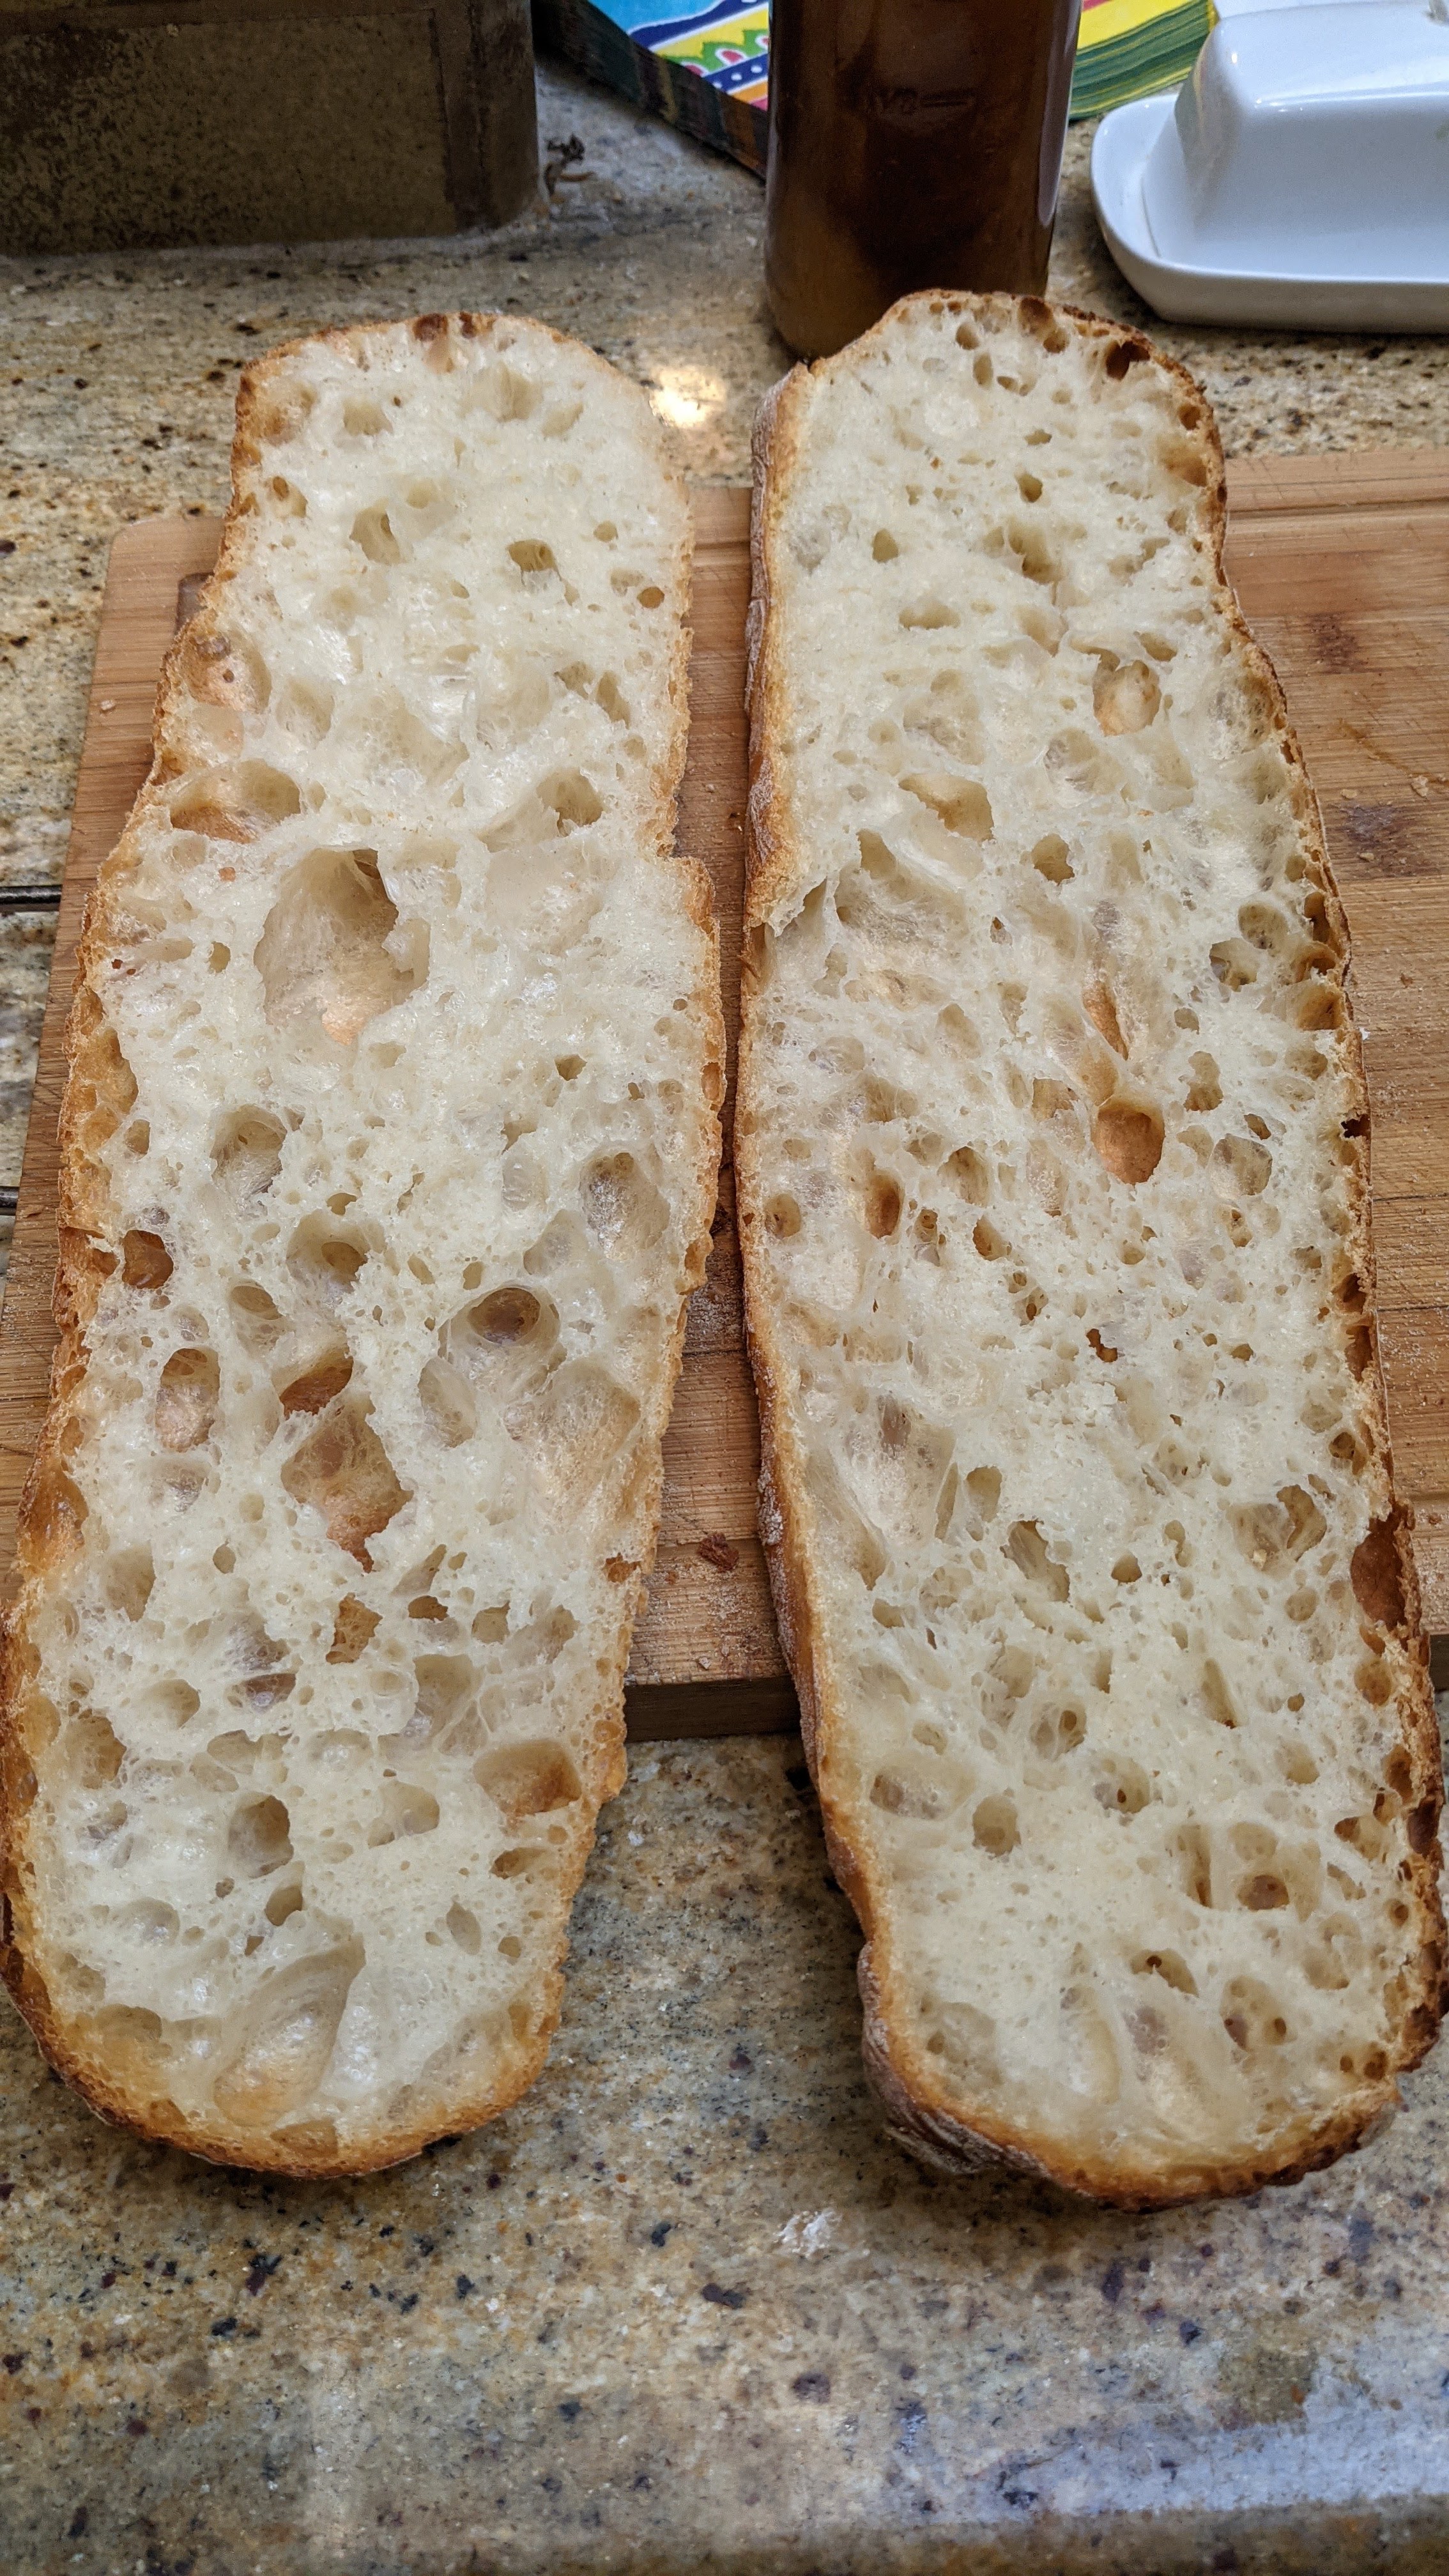
Bake. Liberally sprinkle semolina or rice flour over the loaves while they’re on the couche, then flip them onto your transfer board. Bake the loaves with steam at 485°F for 12 minutes. Remove your steaming container, turn your oven down to 435°F, then bake for 20-25 minutes or until the crusts are a deep golden brown. You don’t want to go out to dark brown/black with these as the dough doesn’t have enough complexity in flavor to compensate for a super-dark crust. That’ll be the predominant flavor and the bread will taste like burnt toast. Not good. However, a deep golden-brown crust will also be relatively thicker lending a nice, textural quality. I realize that this veers from the traditional thin crust of ciabatta, but I love the textural contrast between the crunchy crust and the soft, pillowy crumb.
These are best eaten warm, so let cool for 30 minutes, then enjoy!
I don’t really think about it because I’ve made it so much, but ciabatta’s a challenging dough with which to work because of its hydration level. You have to make quick, precise movements with a dough like this. But the handling of the dough is mitigated by the bassinage. I just can’t stress enough how important that step is!
When first mixing the dough, it’s at a workable 75%. This allows us to work it and develop the gluten and thus dough strength early on in the process. Once the milk and olive oil are added, even though dough may appear to be a smooth batter, if you pull on it, you’ll see that it actually transforms into a highly extensible dough with all the wonderful gas-retention properties we expect! (Read: big holes)
And let me re-emphasize that the craftsmanship put into making bread like this is tantamount to its quality. But be that as it may, as a straight dough, it doesn’t really have a lot of complexity in flavor. That said, done right, it becomes a canvas on which you can build wonderful dishes.
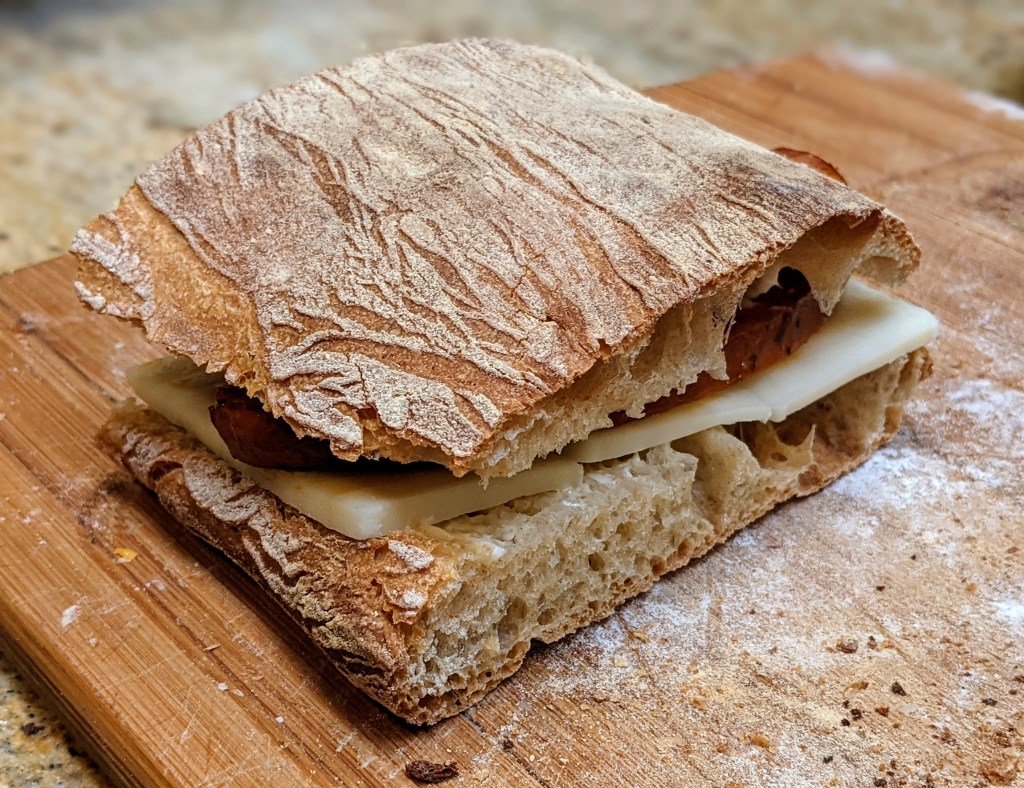
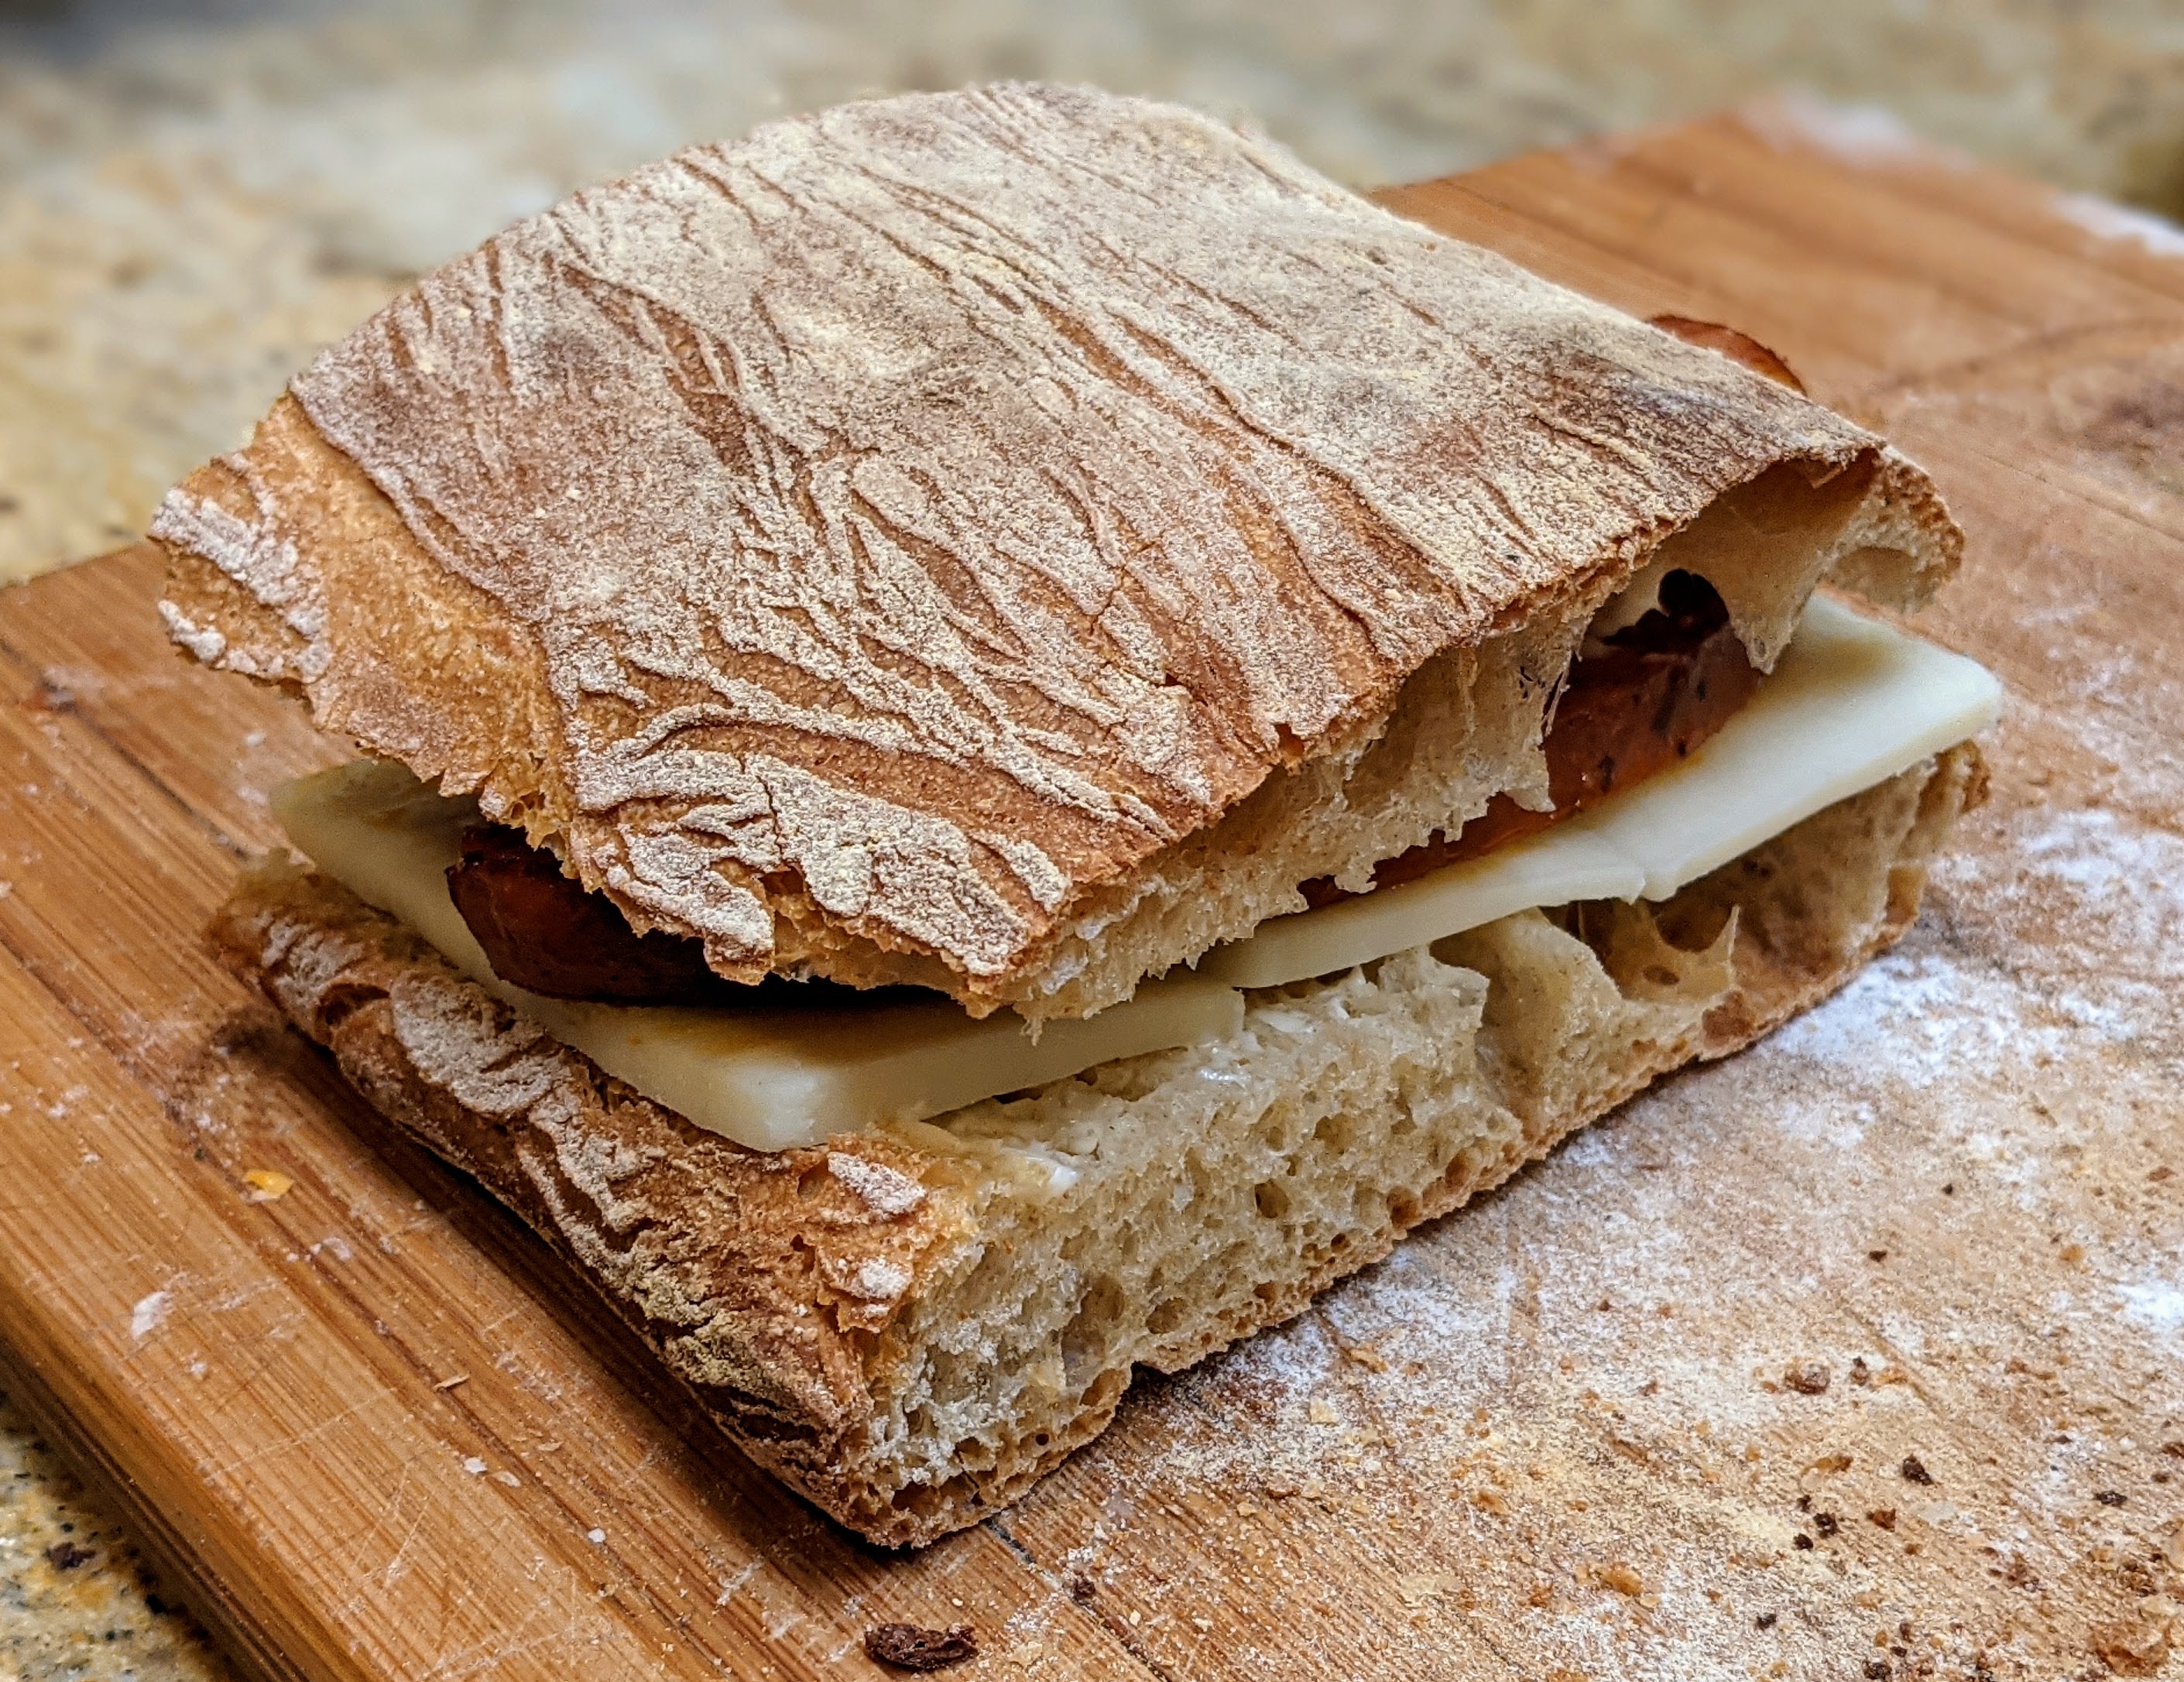
I love using this bread for dipping into a fine olive oil (my preferred brand is Segreto from Italy that I have my daughter bring from New York City) mixed with a well-aged balsamic vinegar. I’ve used this bread for bruschetta as well. And let’s not forget that its very shape lends itself for wonderful sandwiches! Gawd! I’m getting hungry just thinking about these things! 🙂
The following is meant to be taken tongue-in-cheek. Every now and then my “outside voice” surfaces and I need to vent. 🙂
…I will not mix dough with my bare hands if I can avoid it, but if you want to do it, go right ahead! That doesn’t mean I use a mixer every single time. I don’t. But I do use a Danish dough whisk for mixing up batches of dough, both large and small when I’m mixing by hand. It’s incredibly efficient and it keeps things – as in my hands – neat and clean! Plus, it’s just so much faster at getting ingredients incorporated with each other. No scraping dough off my hands, or rubbing them with flour to remove the dough. No brushing my fingernails to get all the dough out from under them.
Now I realize that there seems to be this romance about mixing the dough with your hands. Ken Forkish talked about getting close to the dough and feeling how it transforms, same thing with Chef Markus Farbinger in his video series. The way they present compels you to always mix by hand. And that said, I’m a big advocate of that when you first start out. It’s important to feel that transformation. But from lots of experience now, I can look at a dough mass and pretty much know how it will feel. So mixing by hand? Hell no! I’d rather be clean.
Stretch that dough!
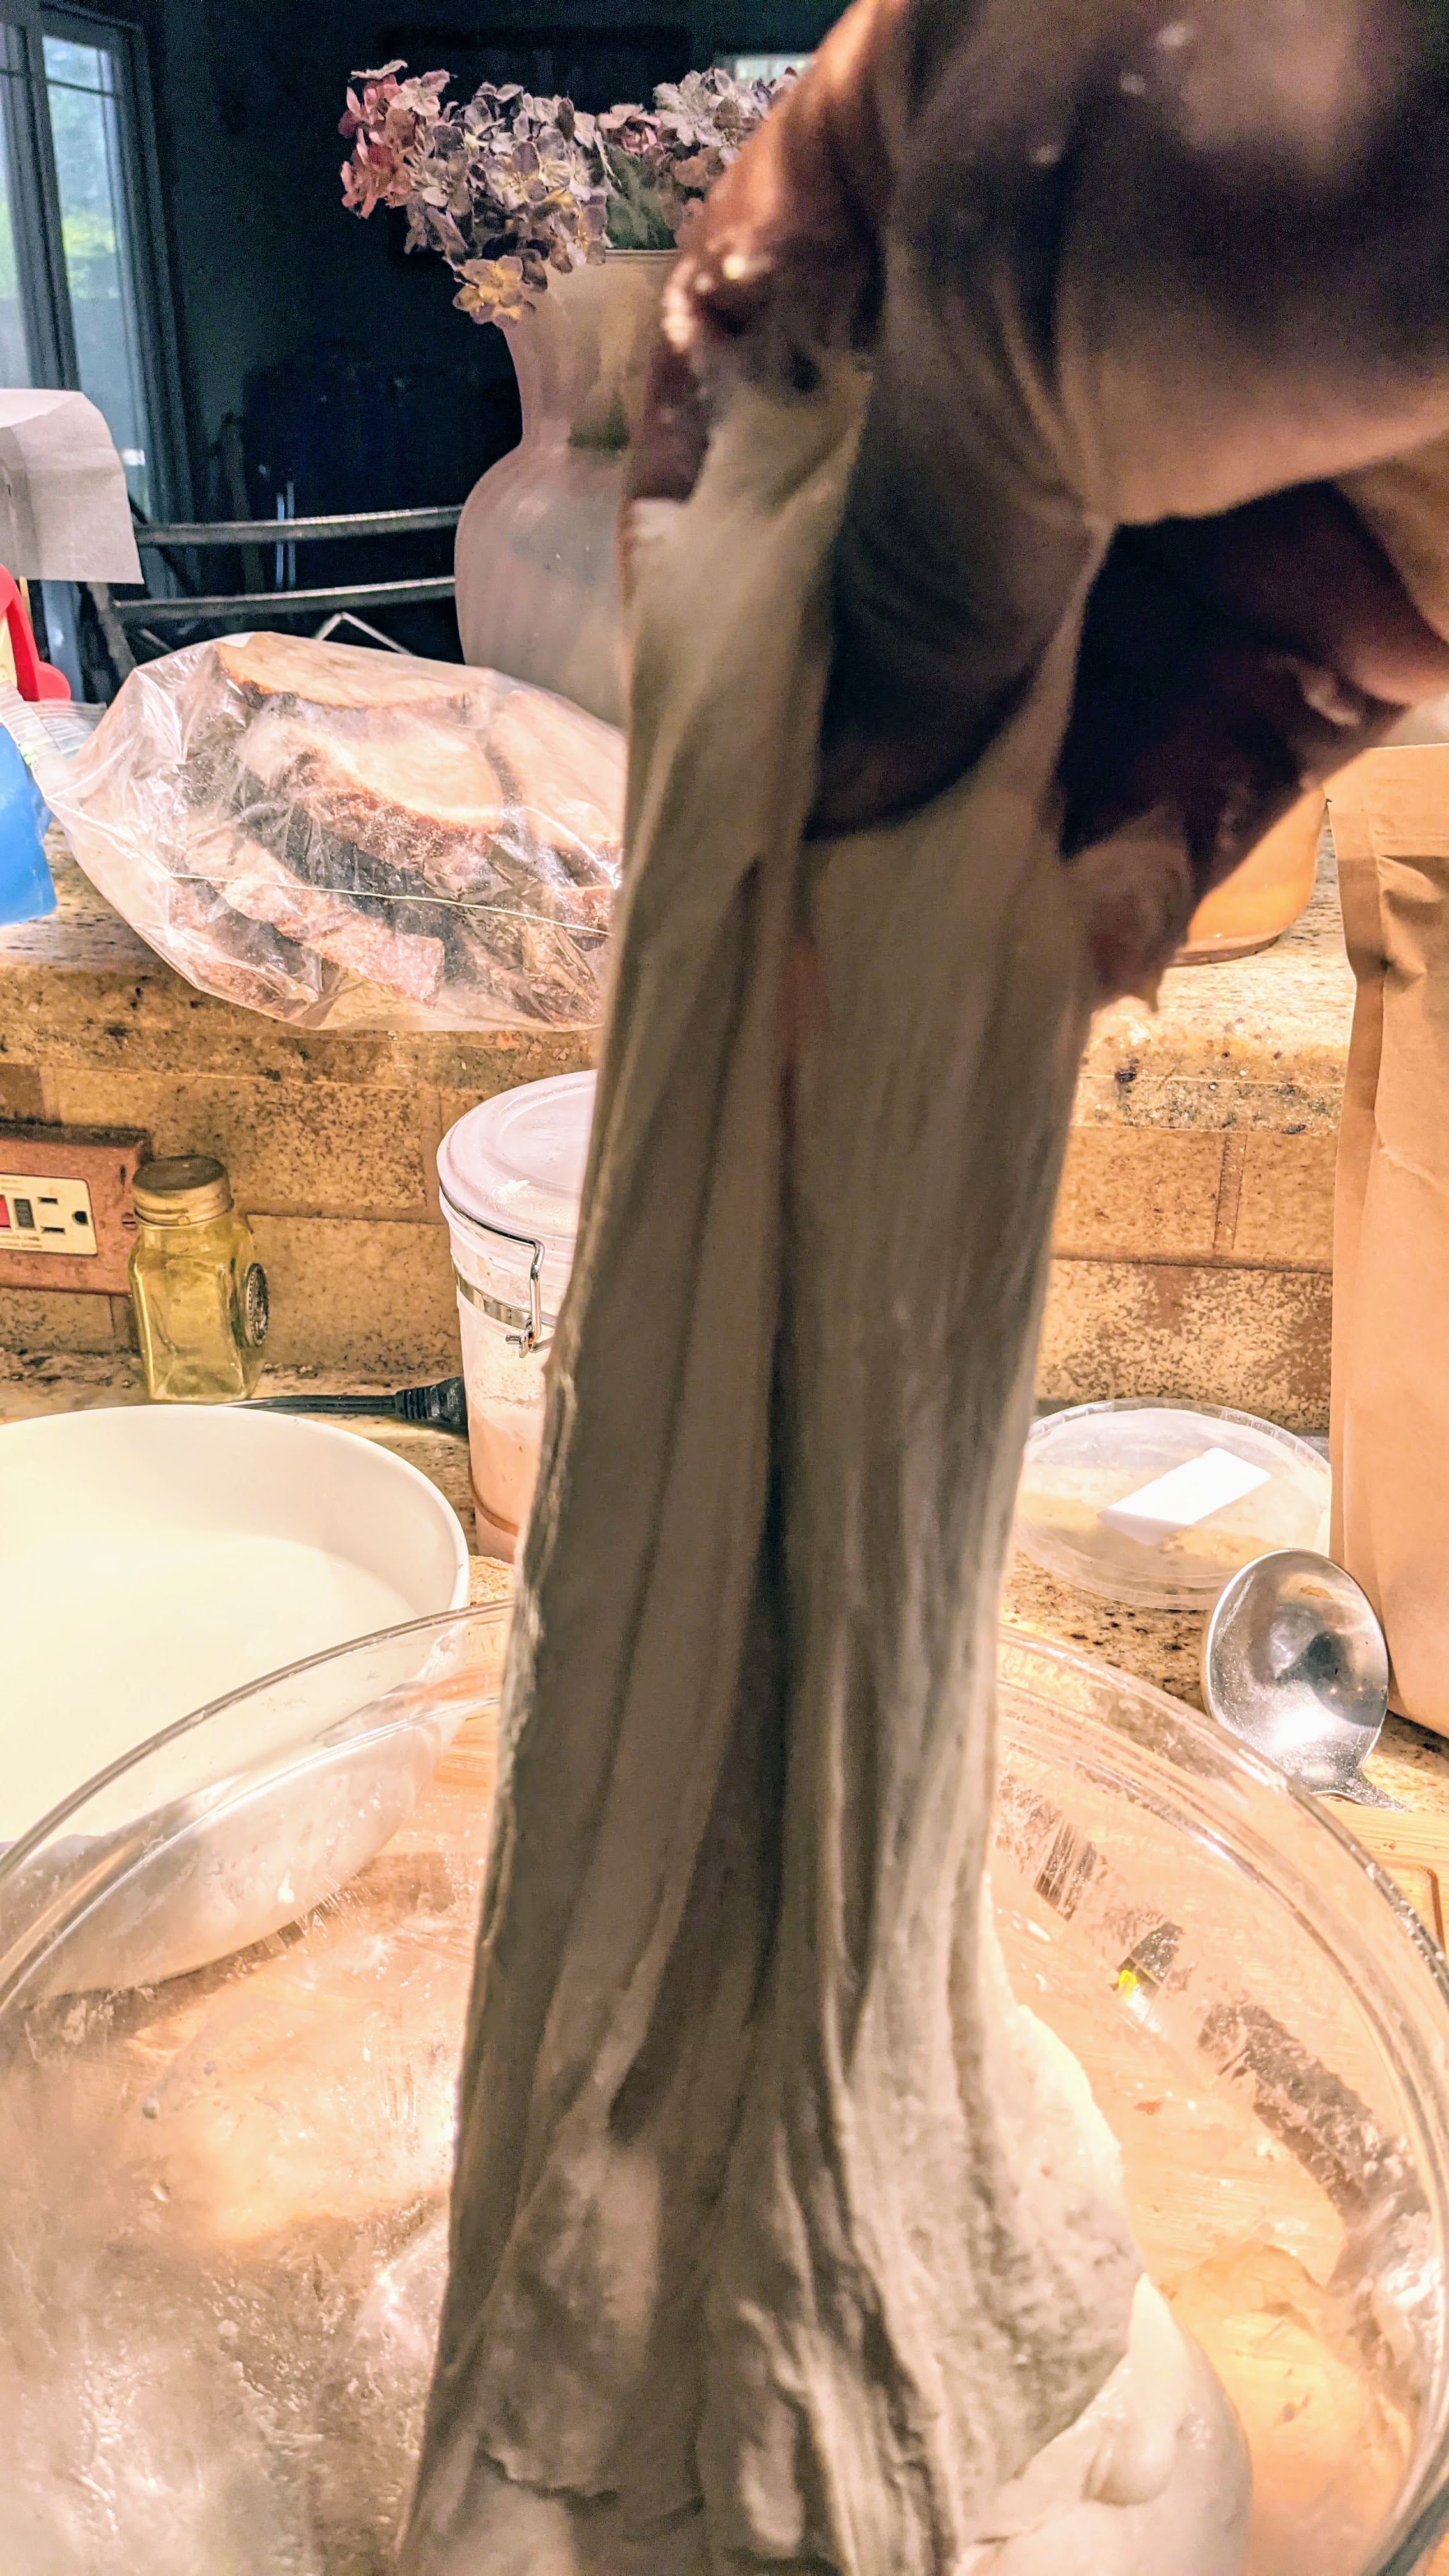
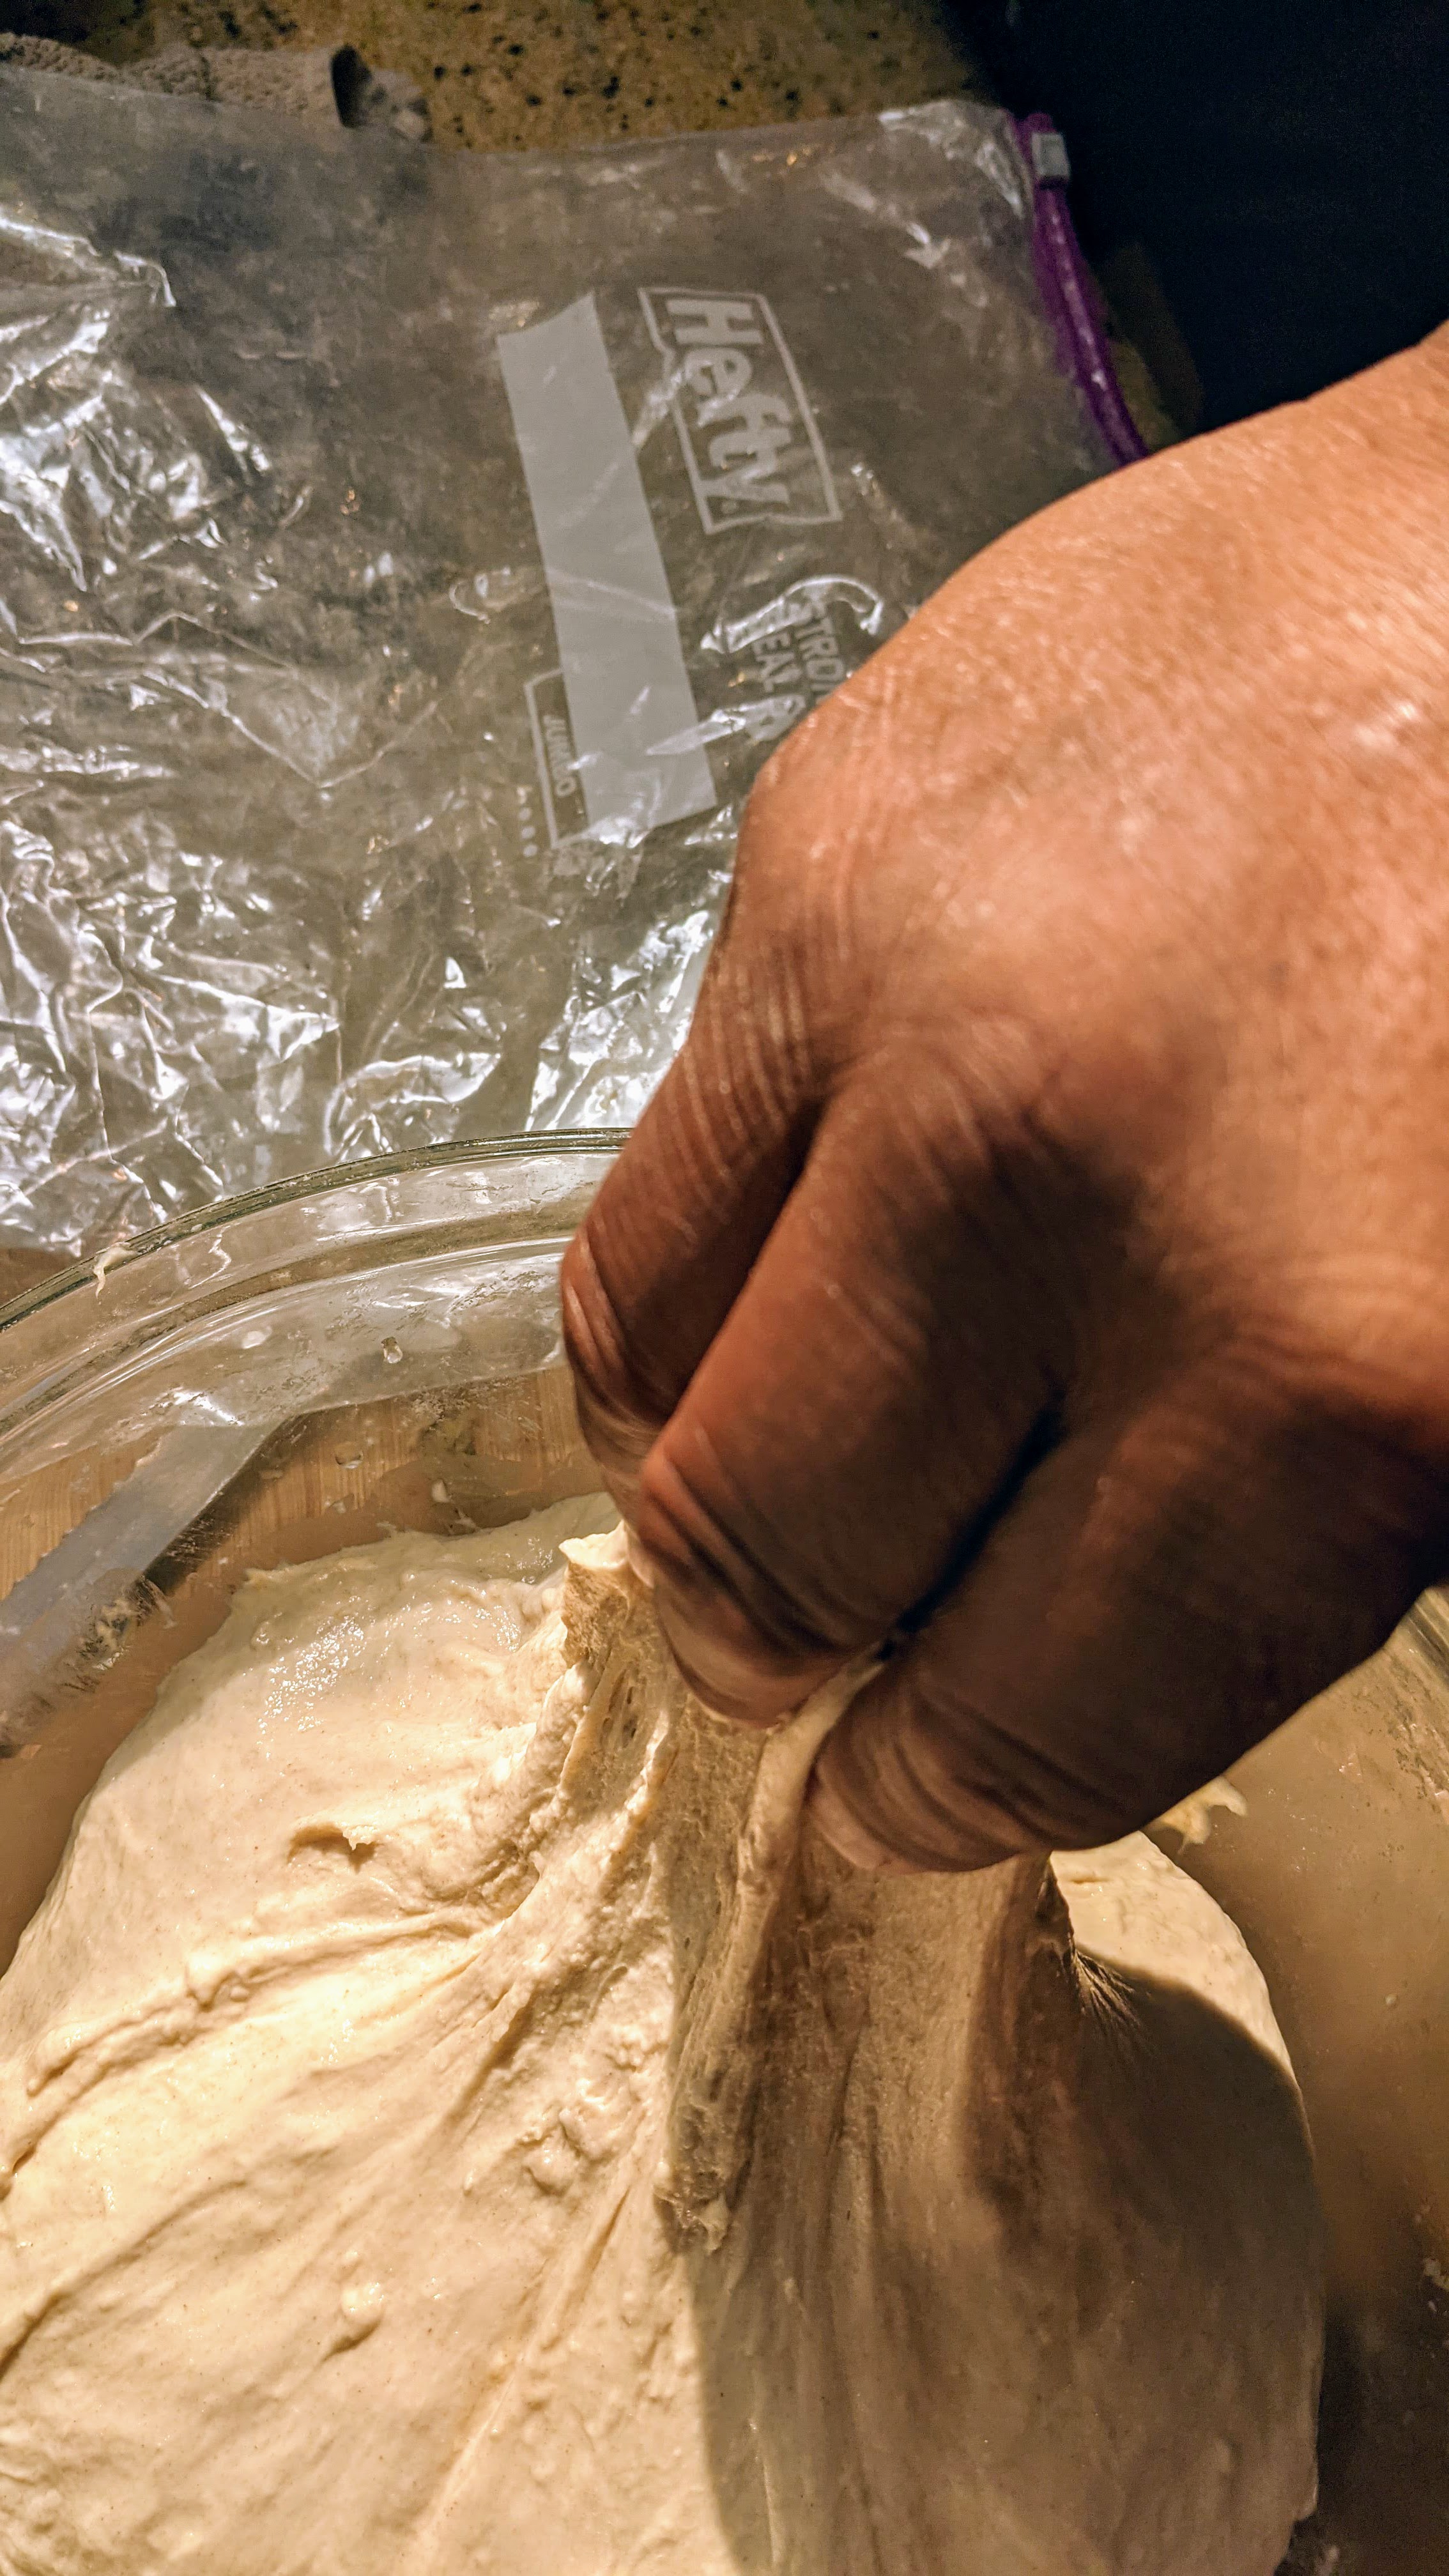
…If the instructions say to stretch and fold your dough, STRETCH YOUR DOUGH! The whole point of doing the stretch and folds – and especially the stretching – is to align the gluten molecules to help build strength and structure in the dough. If all you’re doing is folding over the dough mass and not stretching the dough, you will not develop sufficient structure. So stretch your dough as far as it will go without tearing it. (BTW… I love the extensibility of my baguette dough to the left, and no, not because it looks phallic)
Close your fingers!
And for goodness’ sake, use closed fingers when tugging on your dough! (see picture to the right). I’ve spoken with so many people that say they keep tearing their dough when they stretch it. When I point out that they should be using closed fingers, it’s usually the culprit.
…Yes, I use a stand mixer. So sue me!This is REALLY tongue-in-cheek but I recently spoke with someone who kind of scoffed at the idea of me using a stand mixer to mix my ingredients. But once I explained that I was mixing a few 3-kilo batches, they changed their tune quickly. Look, I’m not against hand-mixing but when I’m on a schedule doing a big bake, I have to be as efficient as possible. If I can cut down some time by employing some automation, as long as it doesn’t impact the quality of my product, I’m going to use it! And make no bones about it: I chuckle when I see these chefs talk about mixing by hand and I see a 40-liter mixer in the background.
…There’s more to bread than frickin’ sourdough!. And yes, it really is okay to use commercial yeast. Okay… I admit that this is really my outside voice coming out, but I have to say that this is a subject that gets me mildly annoyed. The positive thing about the shutdown was that it got lots of people into making bread – especially sourdough. But it also created what I call sourdough zealots who think that EVERY bread has to rise with a sourdough starter otherwise it’s not real bread. Which is bullshit, of course. Baguettes and ciabattas typically use commercial yeast as leavening agents as do many many other types of beloved bread.
Also, you have to understand that while you can indeed replace commercial yeast with sourdough starter, you have to change a few things. First of all, if you’re going after a specific yield, both your flour and water amounts change. Furthermore, rise times will change with sourdough, generally getting longer. The recipes and formulas were developed with the stated ingredients. My advice is to master the process with the commercial yeast first, then make the tweaks to the formula. It’s not as cut and dry as it seems.
…You need to make your bread look good too… I know that the most important thing in making bread is that it tastes good. But the implication of the word artisan means that there is a certain visual aesthetic to the bread. For example, I can’t stand looking at misshapen baguettes. It’s like fingernails scratching a blackboard to me. And mind you, this is just me, but I want my bread to both taste and look good. It’s not about achieving a “professional” look per se. It’s about reflecting and demonstrating the craft behind the bread. For me, it just has to be aesthetically pleasing to the eye. After all, we bakers spend hours creating our bread. How it looks should reflect the work we put into it.
…You dough doesn’t have a disease that requires inoculation… I’ve quipped on this in the past so I won’t rant on it too much. But coming from a microbiology background, the term inoculation has a specific meaning and that is to introduce a pathogen (or antigen) into a living organism to trigger its immune response to create antibodies. Unfortunately, lots of people have bandied about this term in the sourdough world so much, seemingly in an effort to use big words, that it’s now common. When you mix sourdough starter into a dough, what you’re doing is feeding the starter not trying to trigger an immune response!
This past weekend, my wife and I camped with other couples and families on the Northern California coast at MacKerricher State Park near Fort Bragg to celebrate the 4th of July. What a great place! Just a few hundred yards from the ocean, it was calming to hear the constant pounding of the surf, and the copious fog – at least for me – gave a sense of coziness rather than casting a pall over our festivities.
Food was as plentiful as it was delicious and, of course, I brought some bread.
Unbeknownst to anyone but me, this was going to be a major test for me as a baker. It would be the first time I gave bread to total strangers as I only knew a couple of people there and those that I did know I hadn’t seen for at least ten years! Most of the bread I’ve given away has been to friends and family and while I’ve gotten some great feedback, well, they’re friends and family. They’re always supportive.
And yes, for those that are in the know, I do give bread to shelters, but I never get any feedback as I drop it off and go home. But this time, people that I didn’t know at all would eat my bread and I could see their expressions. Needless to say, there was a little part of me that was nervous.
Why all the fuss? Simply because I needed to get affirmation that people I didn’t know at all enjoyed my bread. It’s one thing when friends and family rave about it. It’s an entirely different matter when there’s no personal attachment to it. And getting that kind of feedback was important to me because I’m going down a path with my baking that’s going to involve some serious financial investment. So I needed to see reactions to make sure that it wasn’t my own hubris that was driving me down this path.
On purpose, I brought loaves that were slightly flawed. Normally, the ear on my loaves is much more pronounced, and the crust quite a bit more crunchy, with a moderately open crumb. The ears didn’t form as well because the crusts set too quickly. I think after hundreds of bakes, the seal on my oven is giving up and I’m literally losing steam. That also affected the crumb. It was still airy with a nice chew, but because the crust set, the crumb didn’t have a chance to open up more so I ended up with lots of smaller holes.
Bringing bread that I knew was not to the aesthetic quality of my ideal was akin to something I learned from my late father when he took photography classes. Instead of bringing his best shots to class for critique, he’d bring, in his words, just okay shots so he’d receive feedback on what was wrong in the shots, and more importantly, get the affirmation that what he felt was wrong with the shots were the correct observations.
So I did a similar thing with my bread this weekend. I figured that if people responded positively to bread that did not completely live up to my standards I would know that even on an off day, my bread would still be good.
Admittedly, that’s playing with fire because it would be easy to let the positive reaction get to my head and just keep on putting out just okay product. But I’m not about “just okay.” To me, there’s always room for improvement. That’s not to say that I’m a perfectionist. I do my best to not be one. But knowing that I can always improve drives me to always get better. And with those loaves (they’re pictured above), I can do better.
So what was the reaction? Generally positive and what I was hoping to get. I wasn’t expecting anyone to rave about it. My expectations were much more humble. And though folks gave great verbal reviews, I was looking at their facial expressions and those little micro-expressions that speak WAY more than words ever could. And thankfully, I didn’t see any crinkled noses. 🙂 Finally, I left the bread out on my cutting board as much as I could. If people just left it alone, then that would be plenty of feedback. But luckily they didn’t. Whew!
For me, this weekend was very impactful. I feel confident now that I can move forward with my plans!
When your friends start giving you gifts that reflect your obsession. In this case, it’s bread. The figurine to the left was given to me by one of my oldest friends this past weekend in commemoration of the recent passing of my father. Thoughtful as ever, she thought that this would provide me comfort in my time of emotional vulnerability. It’s quite a special piece. It’s a Lladro entitled, “Our Daily Bread.” I love it!
I’ve placed it on the bar in my kitchen that overlooks my work area. It really does provide me comfort, and it’s an affirmation for me as an artisan bread baker, however fledgling I may be.
Yet, I do have to laugh a bit because as my friend shared with me, “I had a hard time choosing what to give you because I know of your three passions: Music, Whiskey, and Baking. But I figured this would have a bigger impact.” She couldn’t have been more correct.
Look, I love playing music. I still play professionally part-time and being a musician is an integral part of my identity. Heaven knows I love a good bourbon or rye, and I have lots of gift bottles to show for it. I enjoy consuming whiskey or whisky. But bread… well… that’s a different animal altogether, and I still haven’t figured out what that is. I do know that I’m obsessed with it.
Maybe baking bread appeals to that nurturing part of me. I like to feed people. I do most of the cooking in my house. Bread is almost an extension of that. But then, upon closer inspection, my bread baking even goes beyond that. It’s also an incredibly creative process. And that appeals to the artist in me. But there’s also a very scientific side to it. And that appeals to the engineer in me. I guess I should just be satisfied that it checks so many boxes for me. It has the same appeal to me as playing guitar. But with bread, I can eat the fruits of my labor.
As I do most mornings, I woke up early – before 6 AM – to start my day. I turned on my oven as I had two batards that fermented in my fridge overnight that I’m going to bring on a camping trip this weekend. Normally, I start doing baking things first thing in the morning, but today, I thought I’d sip my coffee and have some breakfast while watching the Tour de France (I’ve been watching it for most of my life every year at this time). So I got a little into the program.
I lost track of time getting engrossed in the race, but nevertheless, I got up, got my loading board out, then went to my retarding fridge and turned my loaves onto the board. It was then that I remembered that I had to drive my son to the airport at 8 AM!
Obviously, I couldn’t put my loaves back into the baskets lest I degas them, so just took my whole board and put it back into my retarding fridge with the turned-out loaves on it. In the back of my mind, I was a little worried that the loaves might collapse outside their baskets, but nevertheless, I had to throw some proper clothes on and get my ass ready to go!
But even with that thought, I said to myself, This is going to be a good test of my new shaping technique. Those loaves didn’t really expand out that much when I turned them out, so they might just turn out okay once I bake them.
It took well over an hour for me to return from the airport so the first thing I did when I walked in the house was to get my loaves out. Then I got some steam going in the oven and scored my loves. I popped them into the oven, then set my timer for 20 minutes.
Curious, about 10 minutes into the bake, I did a no-no and peaked into the oven to see how the loaves were doing. And I’ll be damned if they didn’t spring up quite nicely! So I was a happy camper for sure!
Granted, I was using a rather strong, high-protein flour, but those loaves were close to 80% hydration, so I had to rely on my shaping to give them good internal structure. This is a new technique that I developed a couple of months ago, having gotten frustrated with the way my batards were turning out when I upped the hydration of my dough. I loved the more open crumb, but they were collapsing a little, and I didn’t want that. So I started working with a couple of different approaches and found one that I now use for all my batards.
Essentially, it involves gently tugging the dough into a rough rectangle, pulling the corners to towards the center and overlapping the dough, essentially stitching them. Then I do a standard push-roll shape to tighten the skin, perpendicular to the stitch seams. Once I do that, I jelly-roll the dough perpendicular to the seam, then seal that seam (I got this from pre-shaping baguettes). What I end up with is almost a ball that I then place into an oval basket. When the dough relaxes, it will relax out to the ends of the oval, but the middle will always be higher.
I’m still perfecting the technique, but I’m loving the results! It creates a strong internal structure that really holds up!
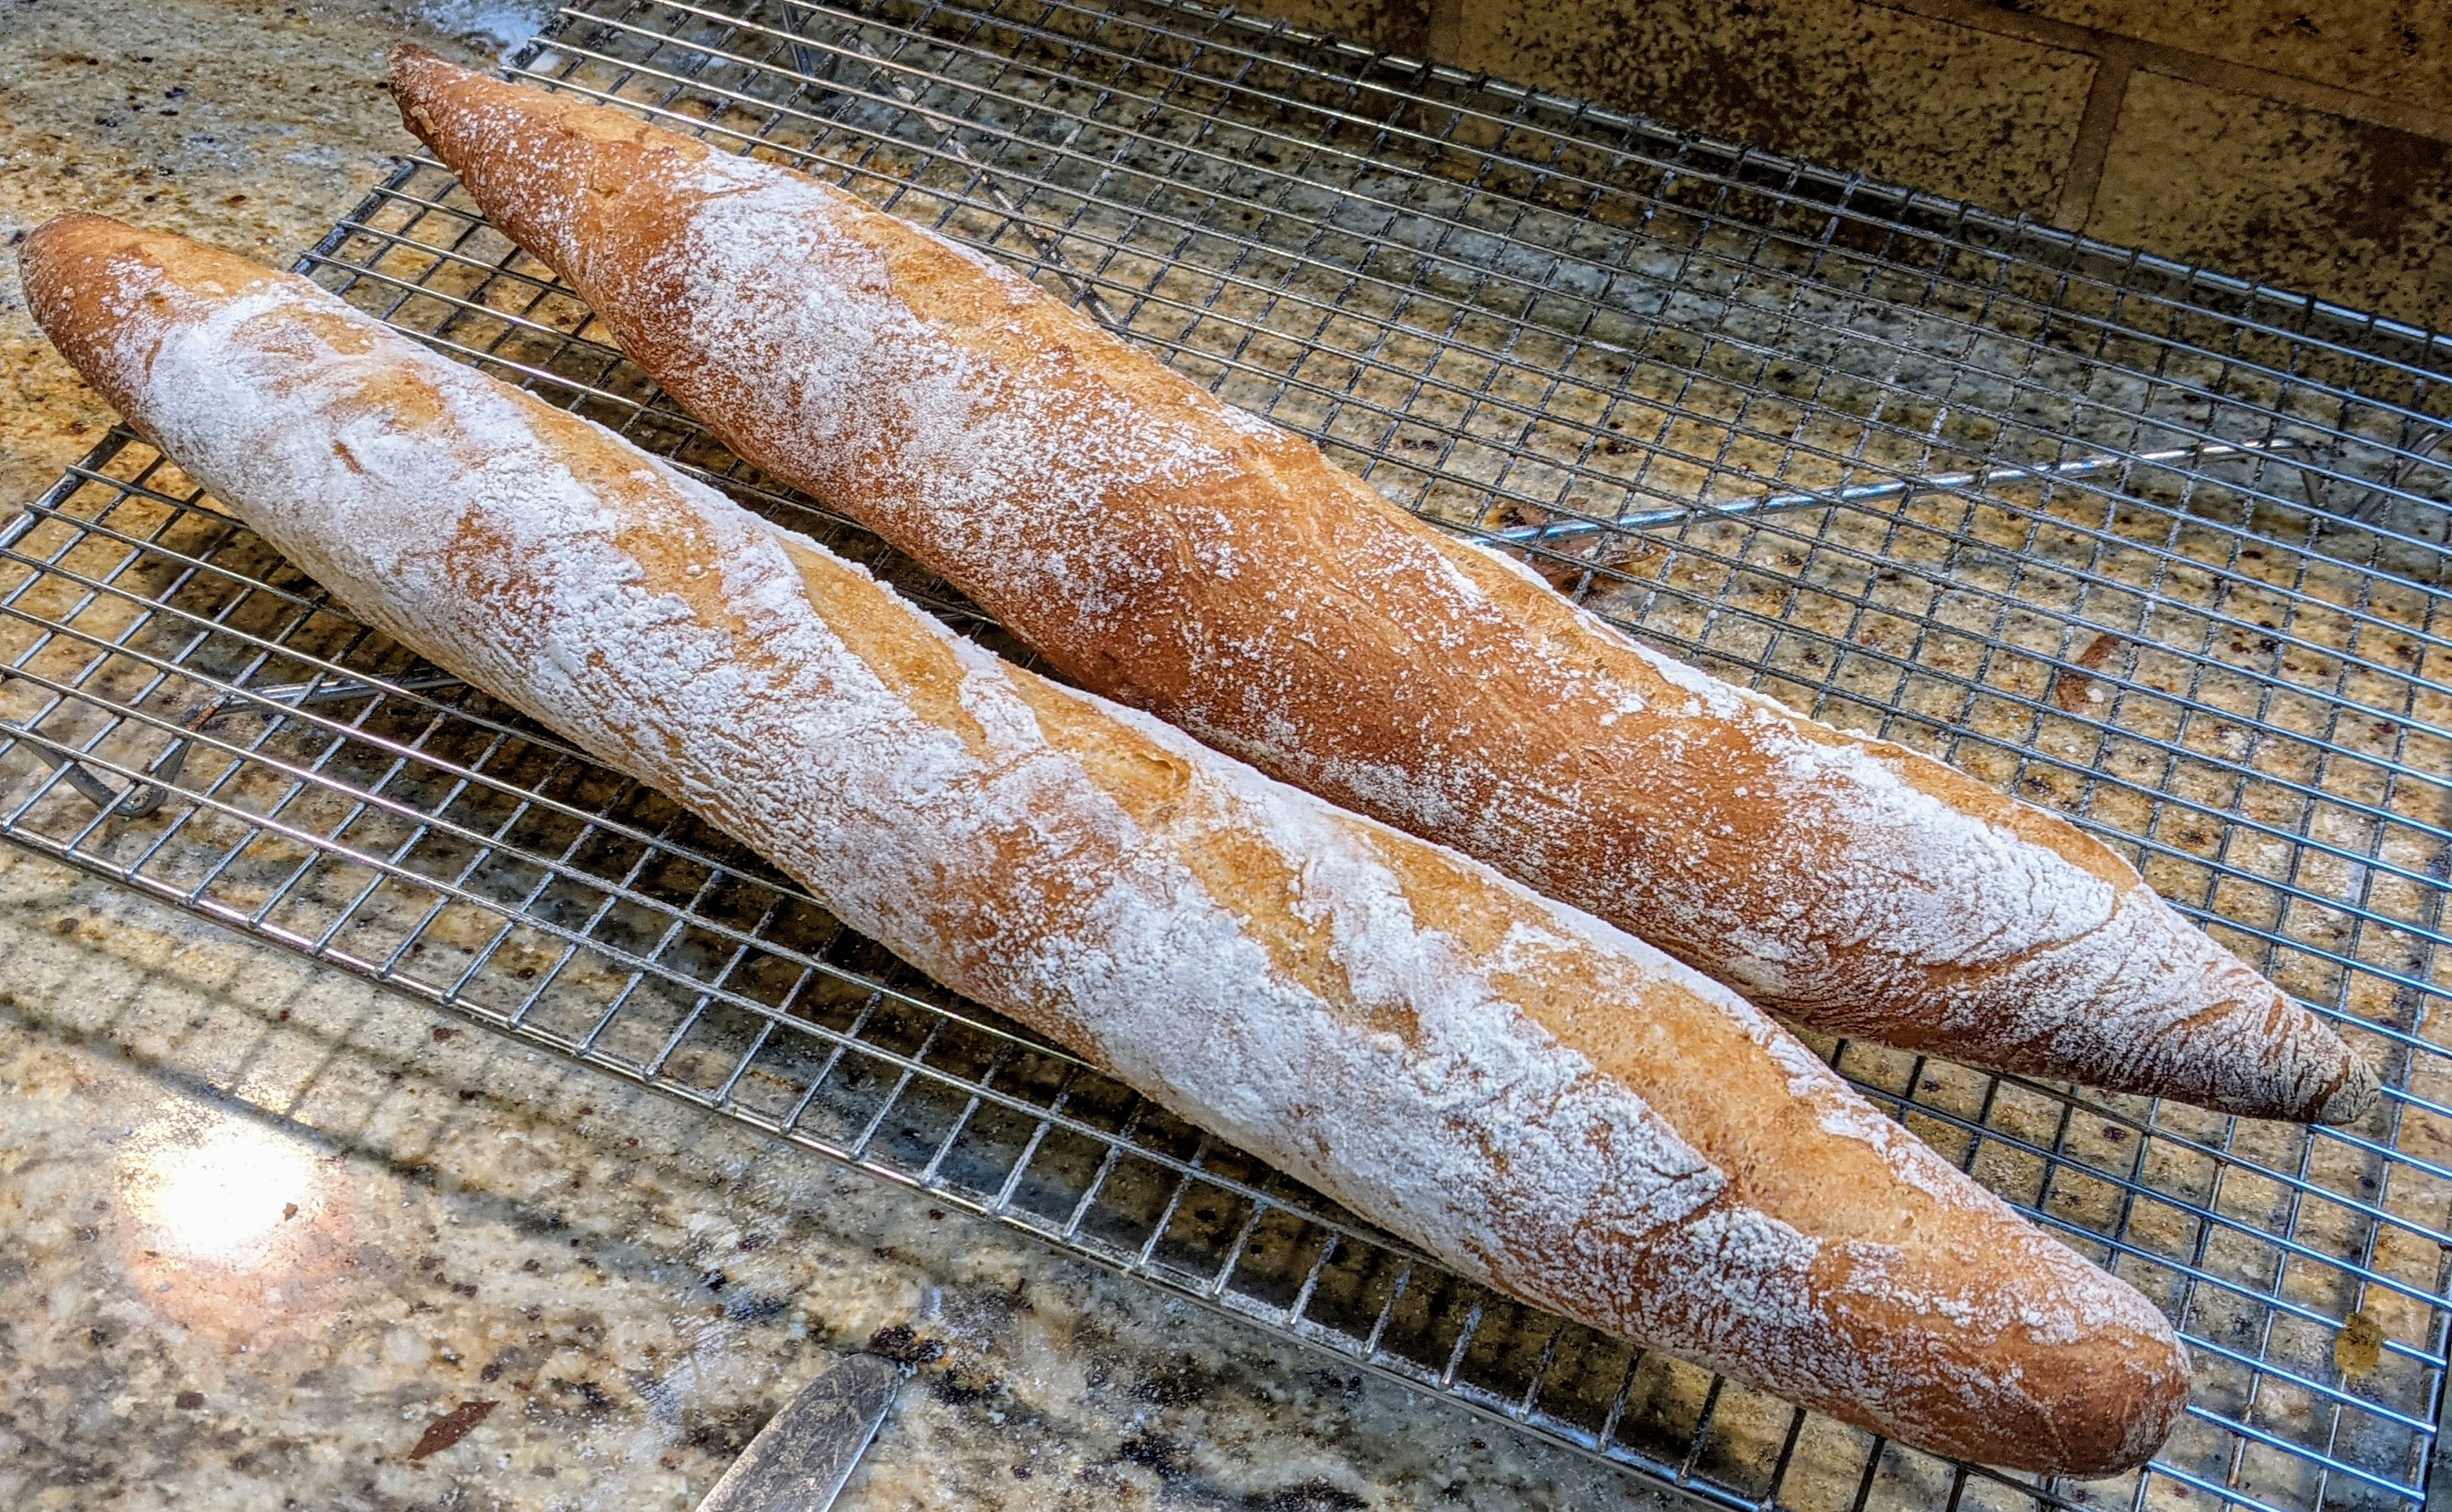
The way I learned to make baguettes was from Master Chef Markus Farbinger, who uses a slow rise or pointage en bac method. It is a straight dough, but bulk fermented and retarded overnight. This allows the amino acids and lacto- and acetobacillus bacteria to develop, while retarding the activity of the yeast. The results, as shown in the picture to the left, are pretty magnificent.
But I learned another technique called Baguettes de Tradition from Jeffery Hamelman’s book, “Bread” that he learned from Japanese bakers. This is a straight dough that differs rather significantly from slow-rise baguettes. First of all, these baguettes are baked in just a few hours from the final mix, so you’re working with room-temperature dough. Second, where I would normally use an 11.7% protein AP flour mixed with about a third high-extraction flour, this recipe calls for 100% bread (strong) flour. And finally, this is a wetter dough than what I’m used to using at 76% hydration.
As Hamelman puts it: “…a baker could be excused for concluding that the dumpster and not the belly is the destination for the bread.” This is because mixing is done gently, so after mixing – even using a stand mixer – there’s virtually no gluten development! The dough just comes apart. But with the folding schedule, the gluten develops quickly, and by the last fold, the dough is luxuriously smooth and supple – and strong.
Chef Hamelman warns that this is a challenging bread and certainly not one for beginners. I can attest to this as the dough at this hydration using pure bread flour is tacky and will easily stick – especially since you’re handling a room temperature dough. So keep your hands floured when shaping and use quick motions!
But the end result is pretty fabulous. You will notice right away when the loaves come out of the oven, that you will not get pronounced ears. This is because with these particular baguettes, you minimize the creation of a skin during shaping. The crumb is significantly different from my other baguettes in that there were not many huge voids. But that could be more of a function of how I handled them during shaping. But in spite of that, the texture of the crumb is magnificent, redolent with numerous pockets.
Overall Formula
Ingredient
Bakers %
Bread Flour
100%
Water
76%
Salt
1.8%
Yeast
.75%
Total
178.55%
Final Dough
Flour
769
Water
585
Salt
14
Yeast
6
Total Yield
4 X 340g pieces
Optimal Dough Temp
76°F
Especially with this recipe, before you get started, I highly recommend sifting your flour to avoid creating lumps which are a pain to get out, especially if you’re mixing by hand.
Mix. Combine flour, salt, yeast in a mixing bowl and mix thoroughly until all the dry ingredients are well incorporated. Whether or not you use a stand mixer, gradually add the water until you form a shaggy mass, then stop. I know that it might not make any sense, but believe me, the end result will be pretty amazing!
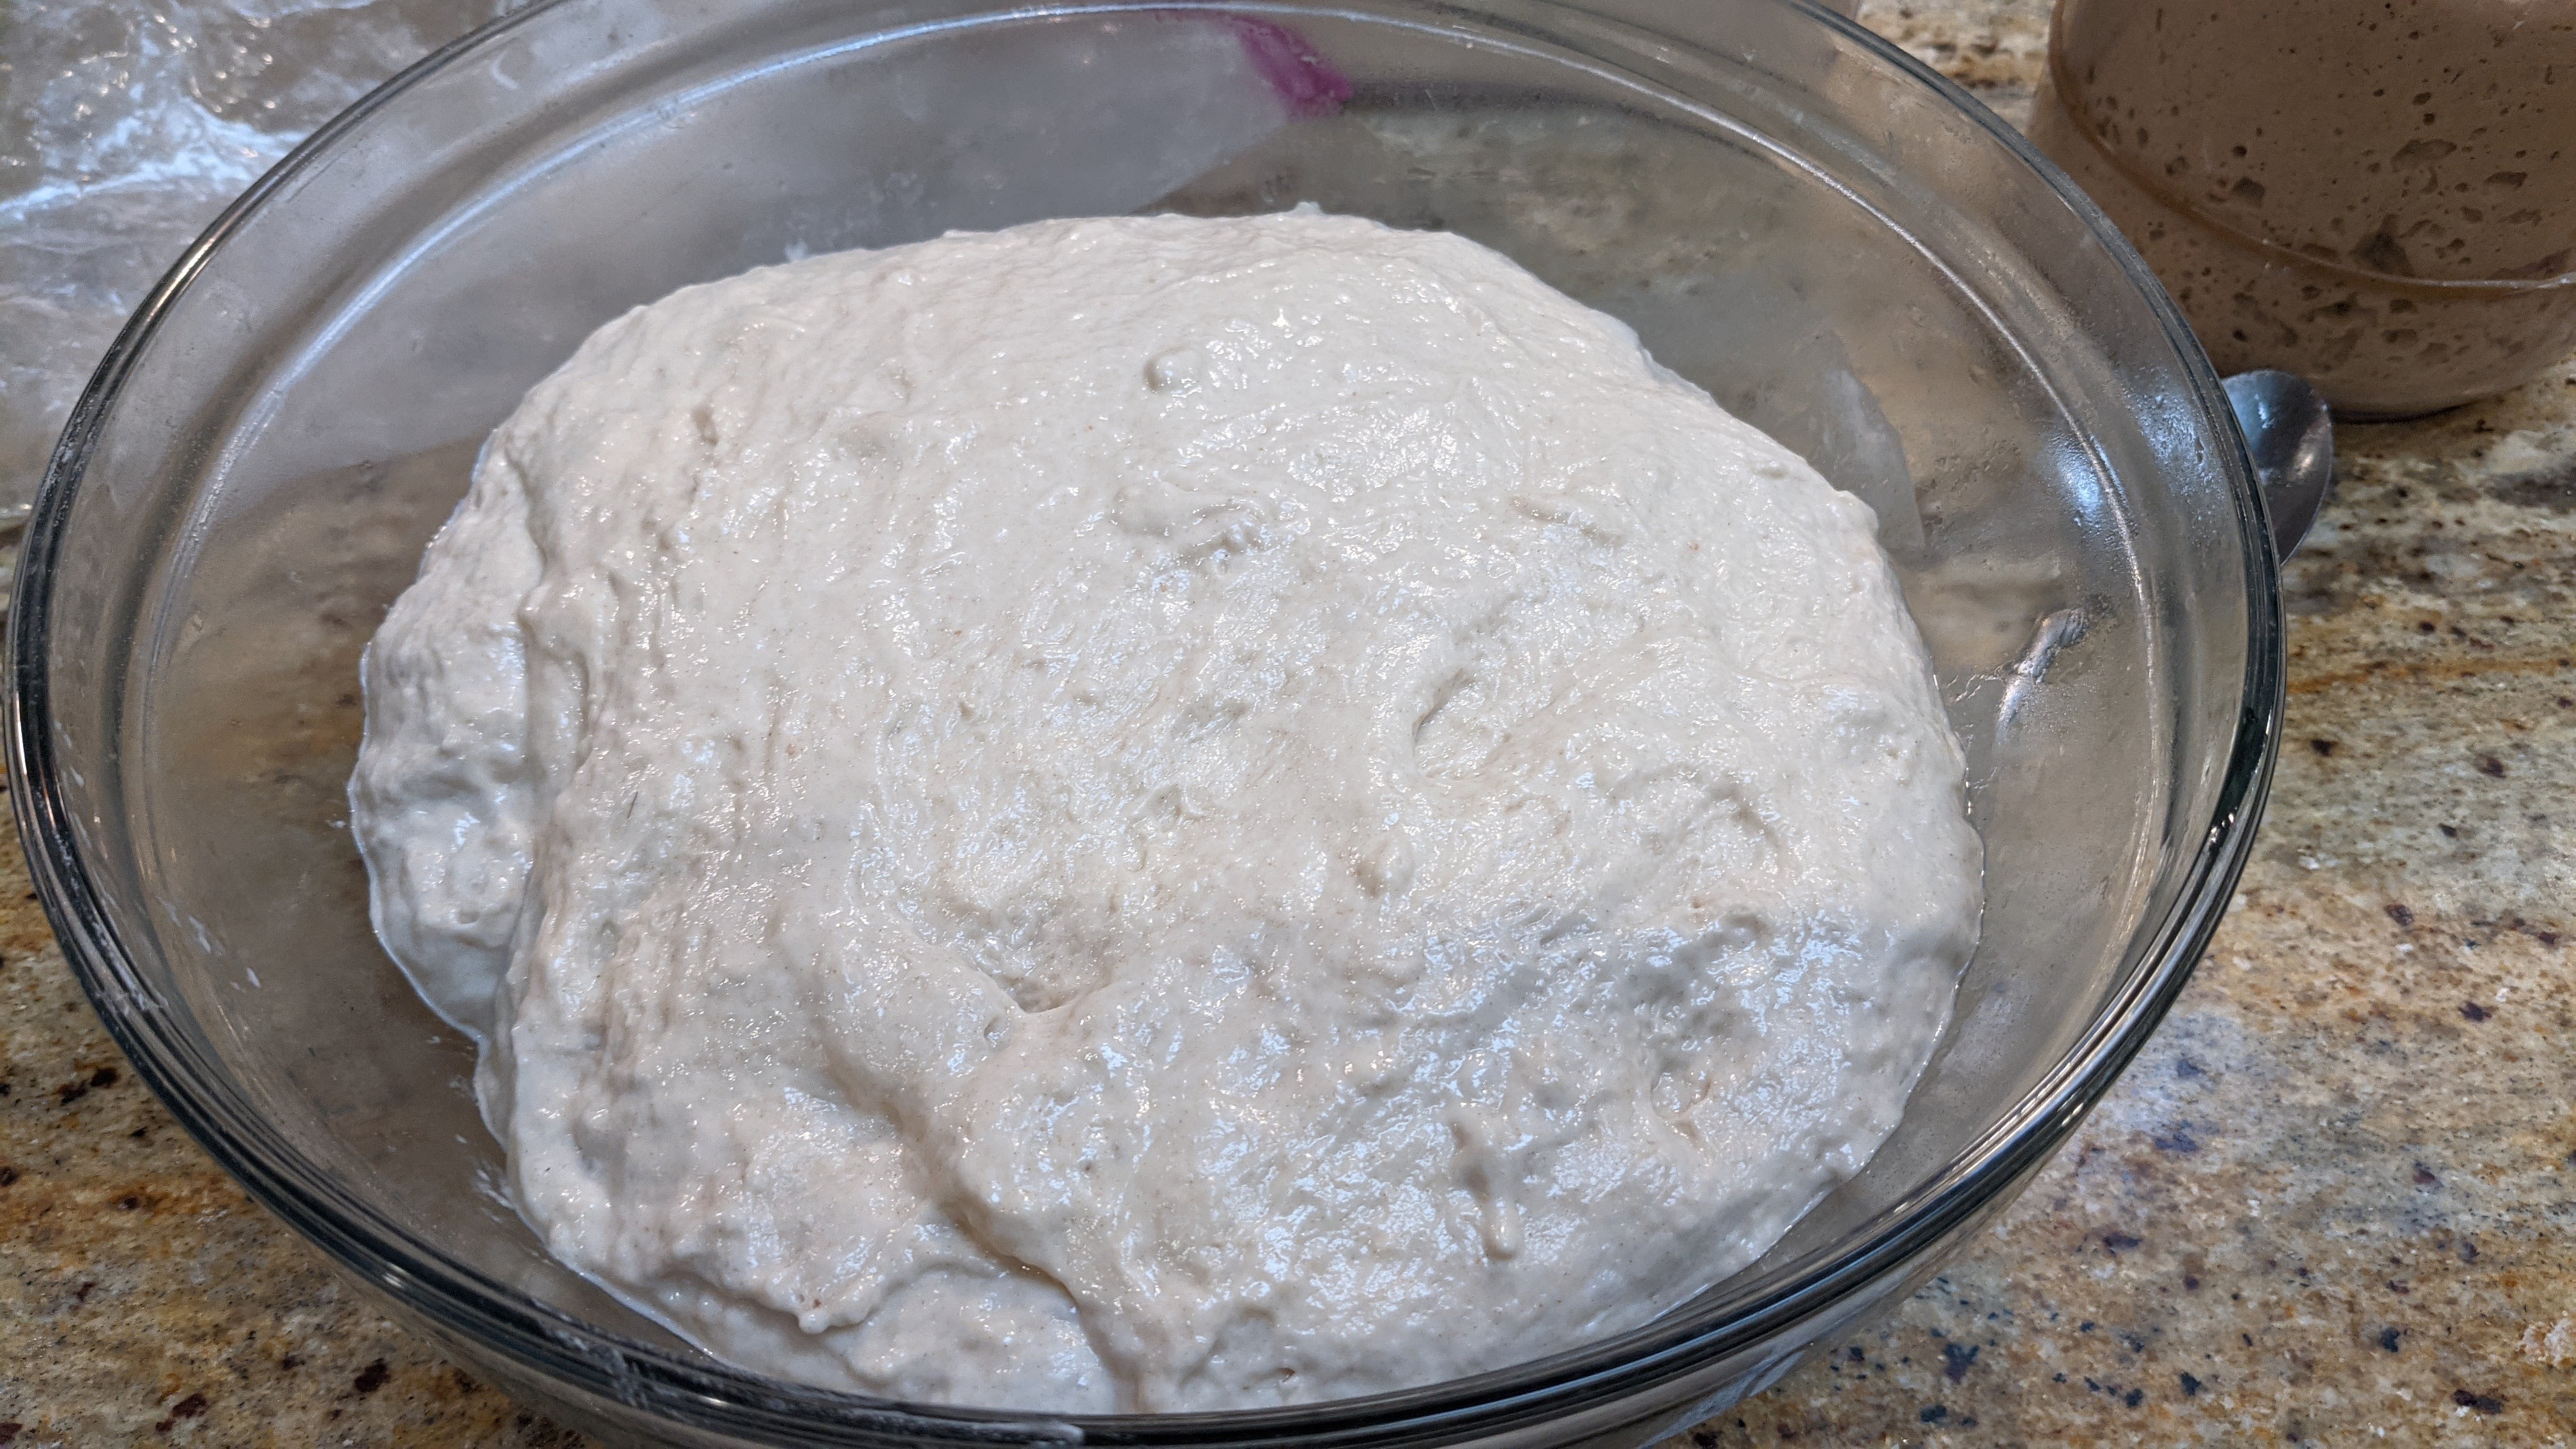
The dough is a shaggy mass after the initial mix
Bulk Fermentation. 1.5 to 2.5 hours (could be shorter) depending on the ambient temp of your kitchen. I know it’s a wide margin, but on hot days, things will happen quickly! Do not take bulk fermentation out too far, otherwise, you will shorten the final fermentation, and a lot of the final magic of creating nice holes happens there. I recommend 50%-75% volume expansion.
Right before the second fold. The dough has already started puffing up and is well-domed at the top!
Folding. During the first hour, gently stretch and fold the dough at 20, 40, and 60 minutes, being careful not to degas the dough too much. For each folding session, make sure to stretch the dough to its extent without tearing it and feel the tension and tenacity build up in the dough – eventually, it will fight you and not want to be stretched. When you’ve finished folding, turn the dough onto the seams. By the end of the third fold, you will have a very luxurious and supple dough! I never cease to be amazed by the transformation, plus the gentle, but frequent folding in the first hour really helps build the gas-retention properties of the dough. As such, I use this folding technique for all the baguettes I make!
Pro Tip: Wet your folding hand often!
By the end of the third fold, the dough is super-strong and smooth, with proonounced bubbles inside. This picture was taken about a minute after I turned it over on its folds to show how well it holds together.
Divide and Shape. Divide the dough into 4 equal pieces (for this recipe, they’ll be 340g). Gently letter fold each piece, pulling one side over two-thirds of the dough, then repeating that on the other side. Roll against the seam like a jelly roll, seal the seam, then place seam-side-up on a well-floured couche. Let rest for 15-30 minutes ensuring the dough has sufficiently relaxed before shaping. Shape into baguettes then transfer back to the couch for final fermentation.
Final Fermentation. 30-90 minutes depending on ambient temp. No matter how gentle you are, shaping a baguette is a bit of a violent affair on the dough. This is why you want to leave as much room for final fermentation to let the dough recover from the shaping process. Use the poke test at about 30 minutes to see how fast the dough pops back up. If it’s real quick and leaves no mark, then it’s not ready. Check it after 15 minutes to see how things are progressing. It’s a real feel thing with baguettes!
After final fermentation, baguette loaves should be puffy. Note that the skin on these is very delicate so scoring must be quick and decisive. You cannot pause the blade.
Bake. Bake at 475°F with steam for 15 minutes. Remove the steaming container, then bake at 425°F with convection (if you have it) for 15-20 minutes. If you don’t have a convection setting, finish the bake at 435°F. When you remove the loaves from the oven, check how they weigh in your hands. They should feel lighter than they look and the crust should not be soft. It will soften a bit later but fresh out of the oven, it should be firm and a bit crackly. If you feel they still have a little mass or if the crust is soft, pop them back into the oven for a few minutes.
Finished product. I kind of messed up on the shaping of these, but they generally turned out fine. The crust should have a slight sheen and the crumb should be riddled with holes of various sizes.
Notes
Though I provided specific ingredient amounts in the table above, I always work backwards in figuring out how much of the ingredients I need. For instance, for my oven, my standard batch is 4 baguettes scaled out to 335g apiece. So I know I’ll need 1340g of dough. I always add a fudge factor of about 1% due to loss during processing, so I’ll up that to 1350g. Given that, I can easily calculate the flour I’ll need by dividing the total yield of 1310g by the total of the percentages – in our case here it’s 178.55%. So 1310 / 178.55% = 734g of flour. From there, I can just use the ingredient percentages to figure out the amounts for the rest of the ingredients.
As far as scaling out the pieces is concerned, officially, a baguette should be 60 cm in length and weigh 250 grams. I’ve found through experimentation that I can get there if I scale the baguettes to 335 grams. However, I myself prefer a little bit wider baguette, so I scale my dough out to 340 grams. But as a rule of thumb, I use a factor of 5.5 or 5.6 and multiply that by the length of the baguette I want to make. This factor is basically dough weight/centimeter. 40cm demi baguettes typically scale out to 220g.
As with any high-hydration white flour dough, this dough is tacky! I can’t stress enough the quick, definitive movements I had to make to work with this dough. I also had to make sure that during shaping I was dipping my hands in my pile of flour to prevent sticking.
About a week ago, I did a book review on Paul Barker’s “Naturally Fermented Bread.” At the time, I had already started building a ferment from a mixture of apples and pears and waiting for it to mature so I could make a starter from it.
Well after a few days, it finally matured enough where it was nice and fizzy and with a pleasantly sour taste. So I made a test starter with it to see how active it actually was, and lo and behold, that test starter expanded like nothing I’ve ever seen! And once I built it into a full starter that was ready for baking, I’ve been absolutely amazed at the activity in this starter. I can’t feed it fast enough!
And as for using it for baking, well, I can dare say that I’m going to be hard-pressed to use any other kind of starter from here on out. There are two main reasons for this:
As opposed to cultivating the yeast that’s on flour – the traditional way – with a botanical starter, I’m essentially cultivating and harvesting the wild yeast that is on the particular botanical that I’m using. This could provide the opportunity to introduce a different strain of yeast, but more importantly, a botanical starter imparts its own flavor charateristics that add to the complexity of the aroma and flavor of the bread.
But the big thing for me is that there is NO discard! That’s such a huge thing! With a traditional starter, you chuck 1/2 the starter everyday. When creating a botanical starter, you never discard. You just build it up then use it (I’ll get into maintenance techniques below).
Here are some examples of what I’ve baked with my apple/pear botanical starter thus far:
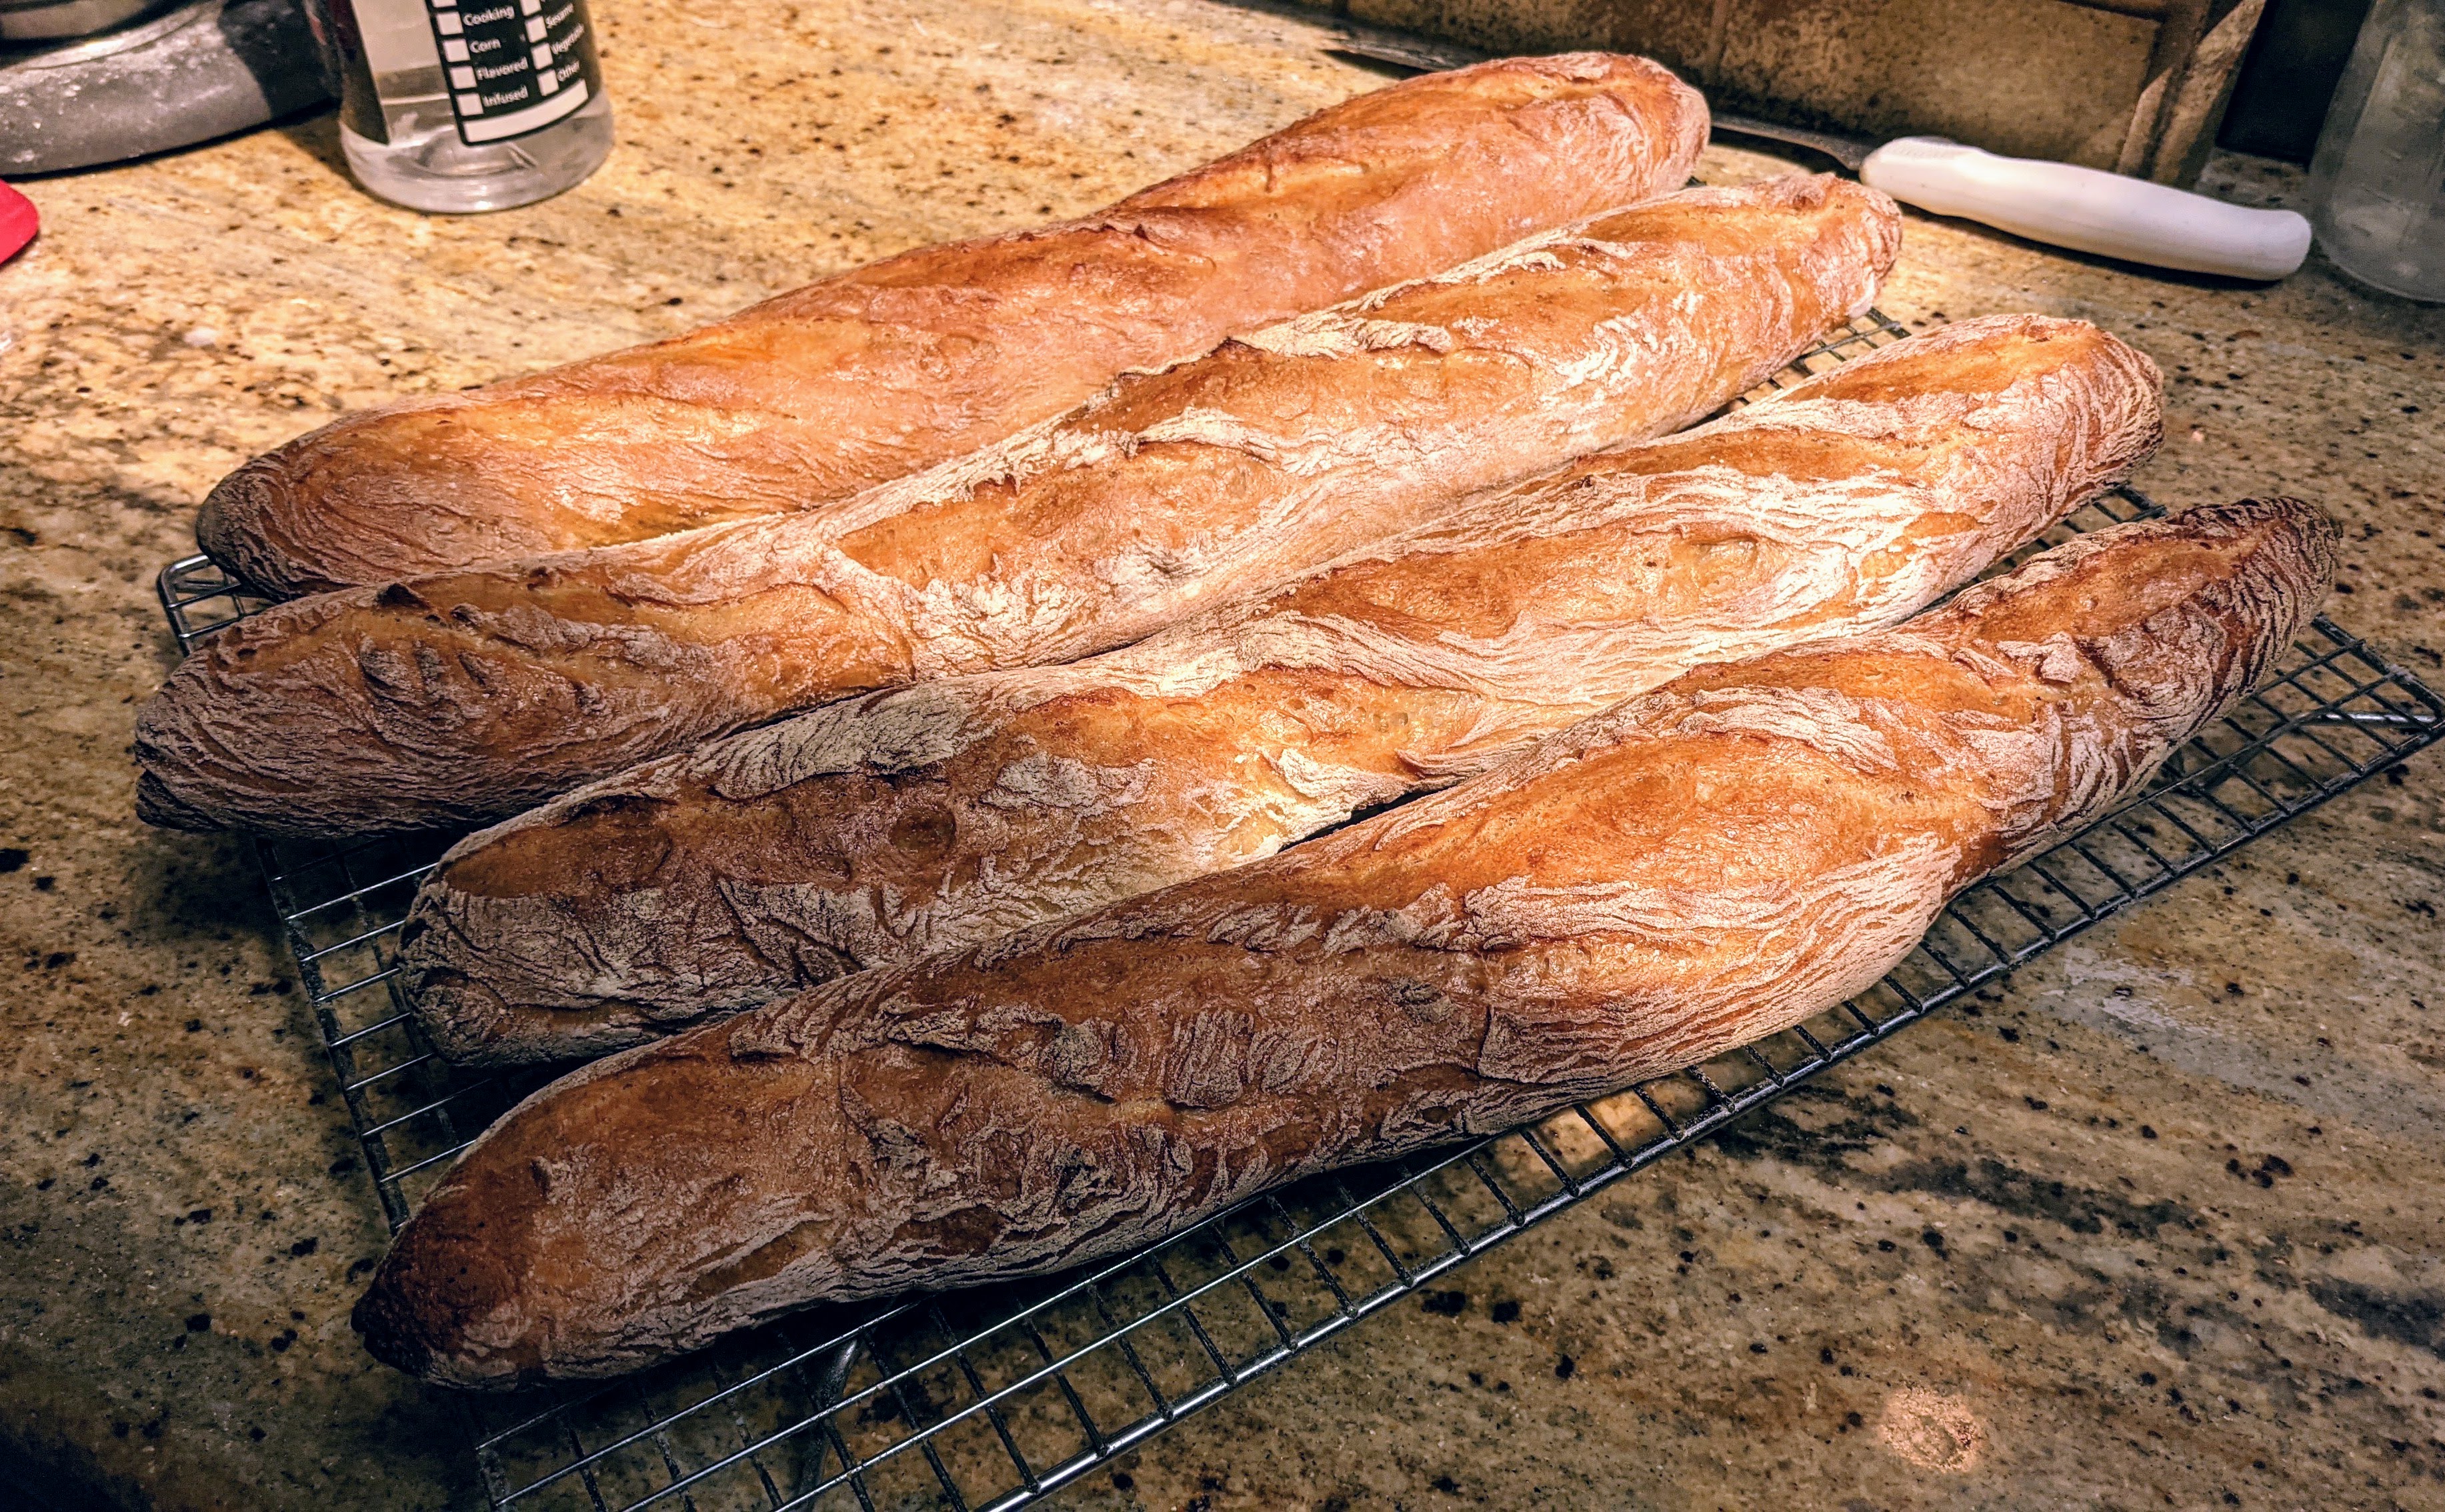
Whether I made baguettes or batards, the oven spring of the loaves has been outstanding! I was particularly impressed with the crumb of the baguettes I made because I thought I over-proofed them, but the yeasts kicked in once I put the loaves in the oven, and they sprung up nicely!
And the batards were made with 40% white whole wheat and they just exploded! In the picture above, I placed a ruler in front of the loaves to give you an idea of their size. These were proofed in 10″ bannetons! Like I said, they exploded in the oven!
I’m really having a hard time containing my excitement over this! I feel as giddy as I did when I took my very first loaf out of my Dutch oven. The sheer pleasure of making bread… There’s nothing like it!
In light of that, I thought I’d share how to make an apple starter. But to give credence and recognition where I learned the technique, I still recommend getting “Naturally Fermented Bread” by Paul Barker. He has made ferments from fruits, vegetables, and even edible flowers! He’s a real inspiration! Plus his recipes in the book are pretty unique. So without further ado, let’s get started.
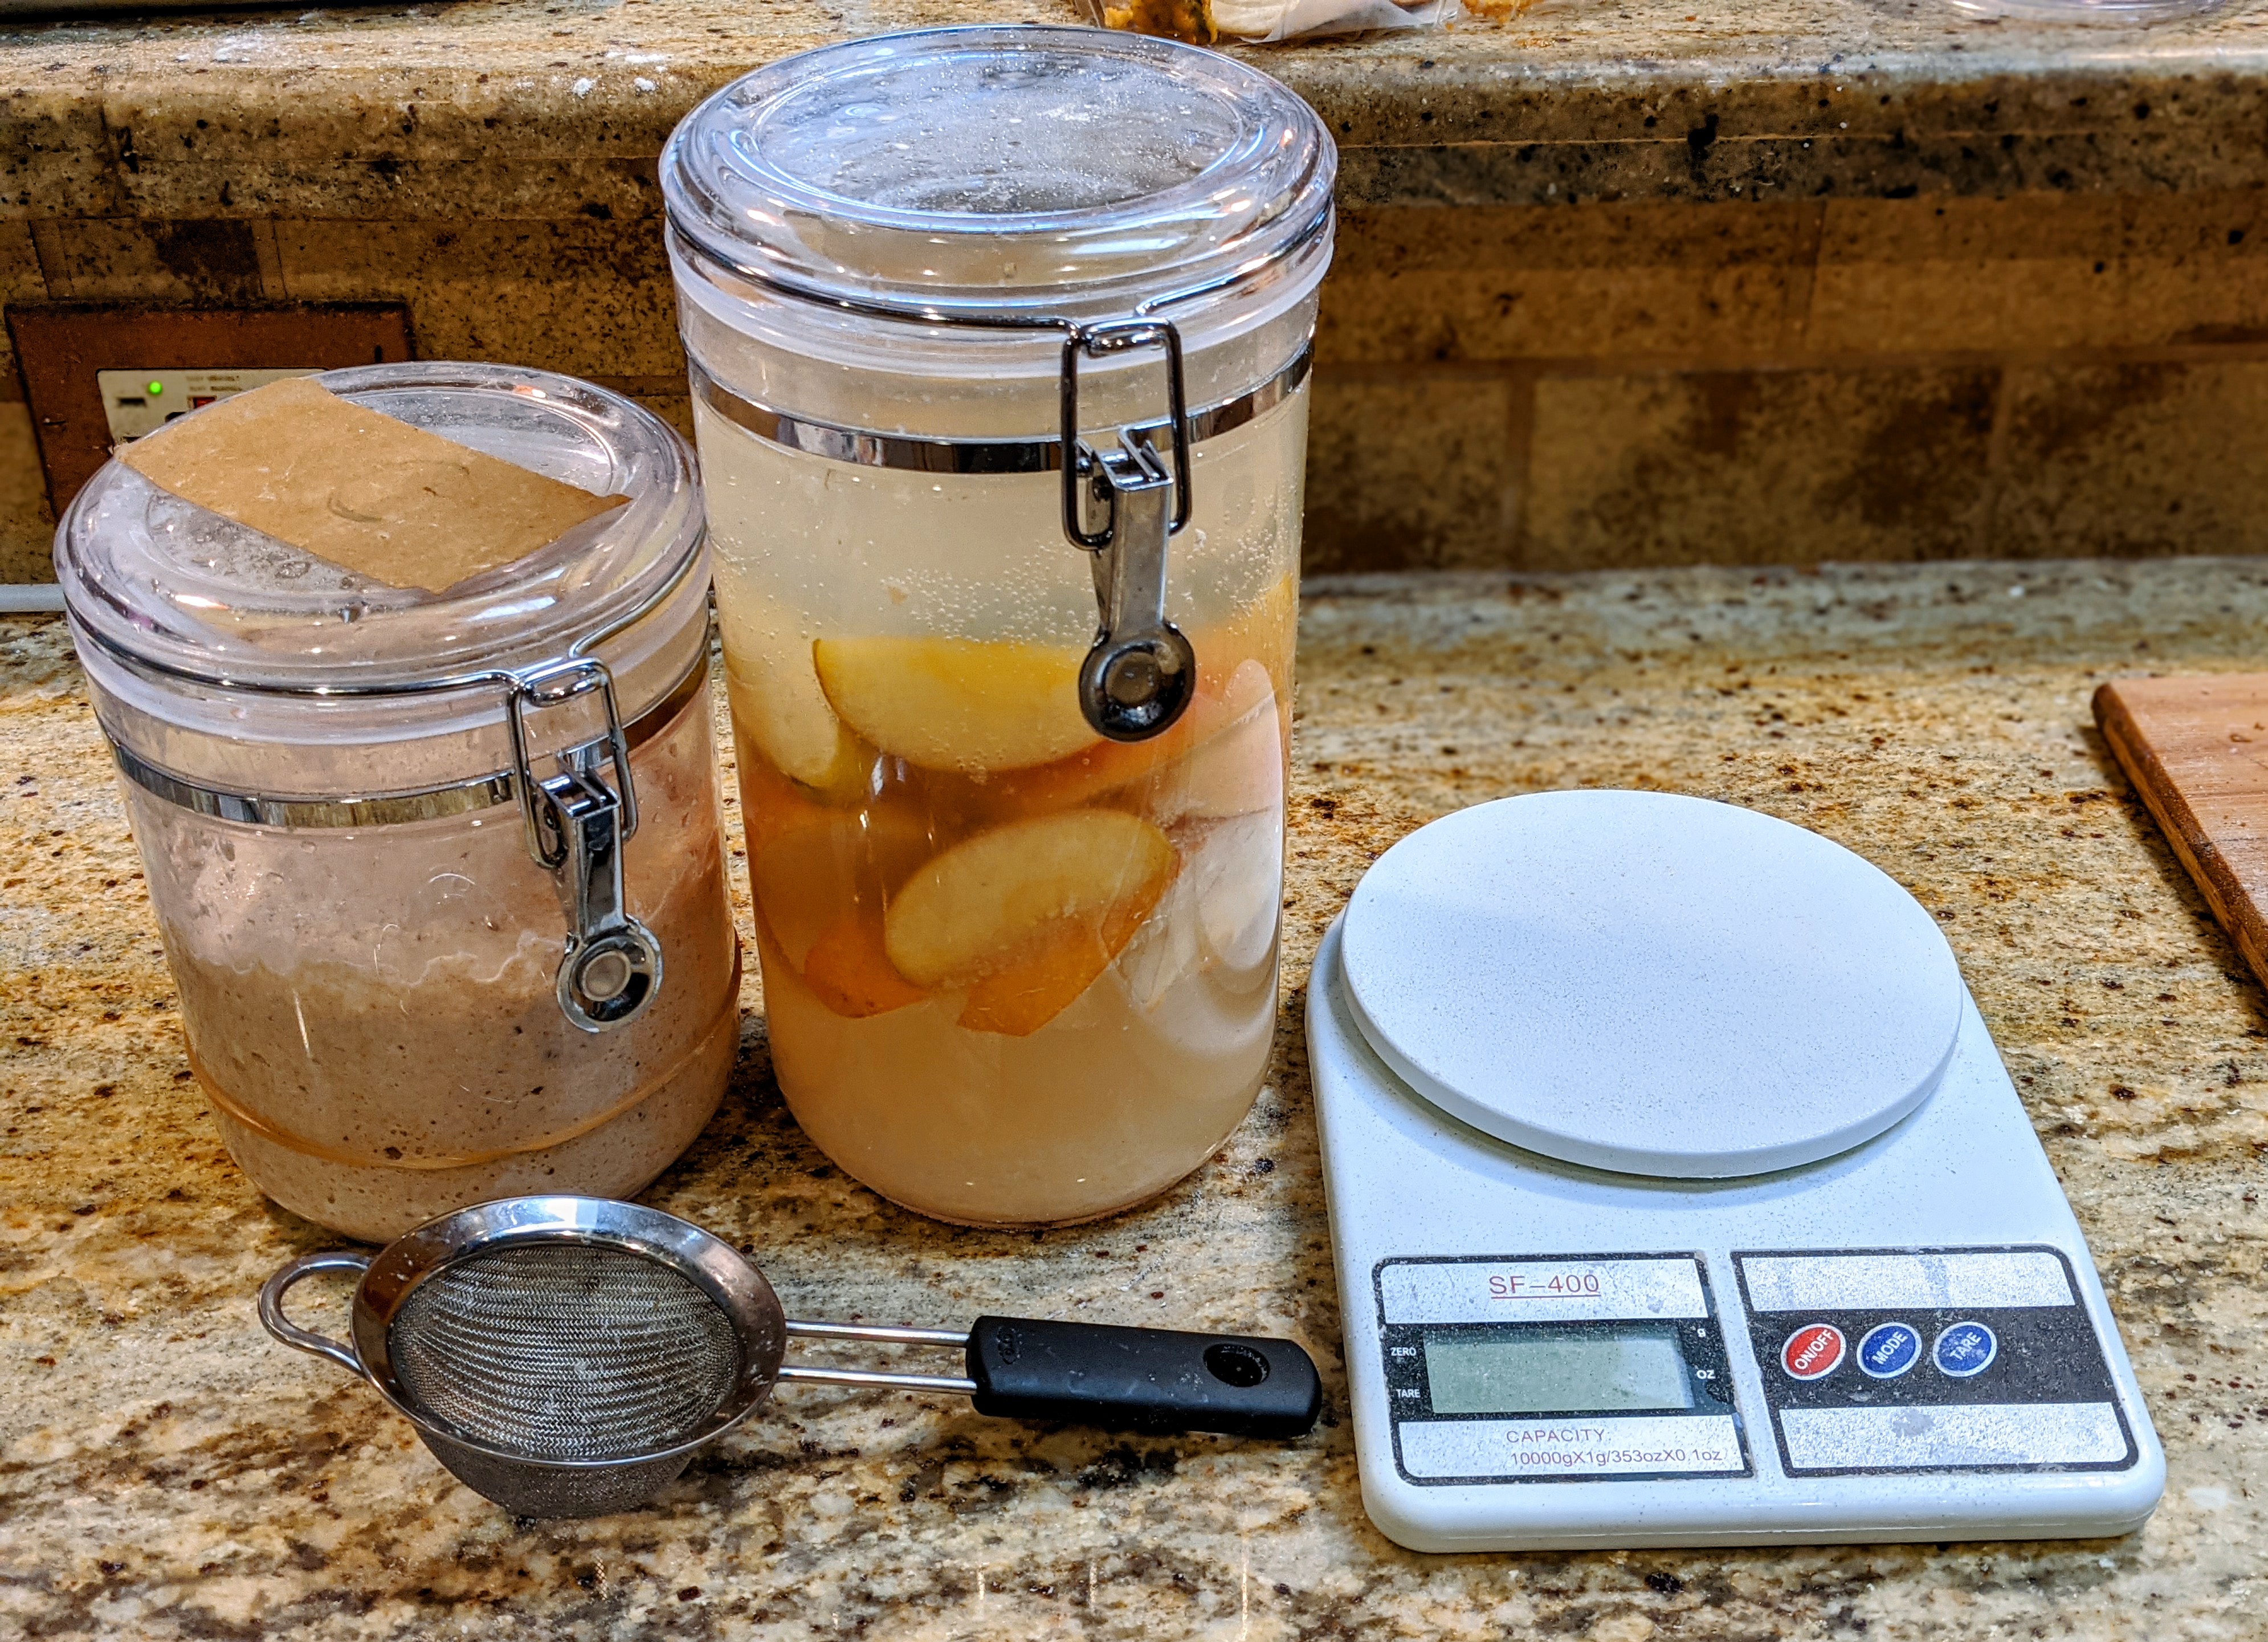
Equipment
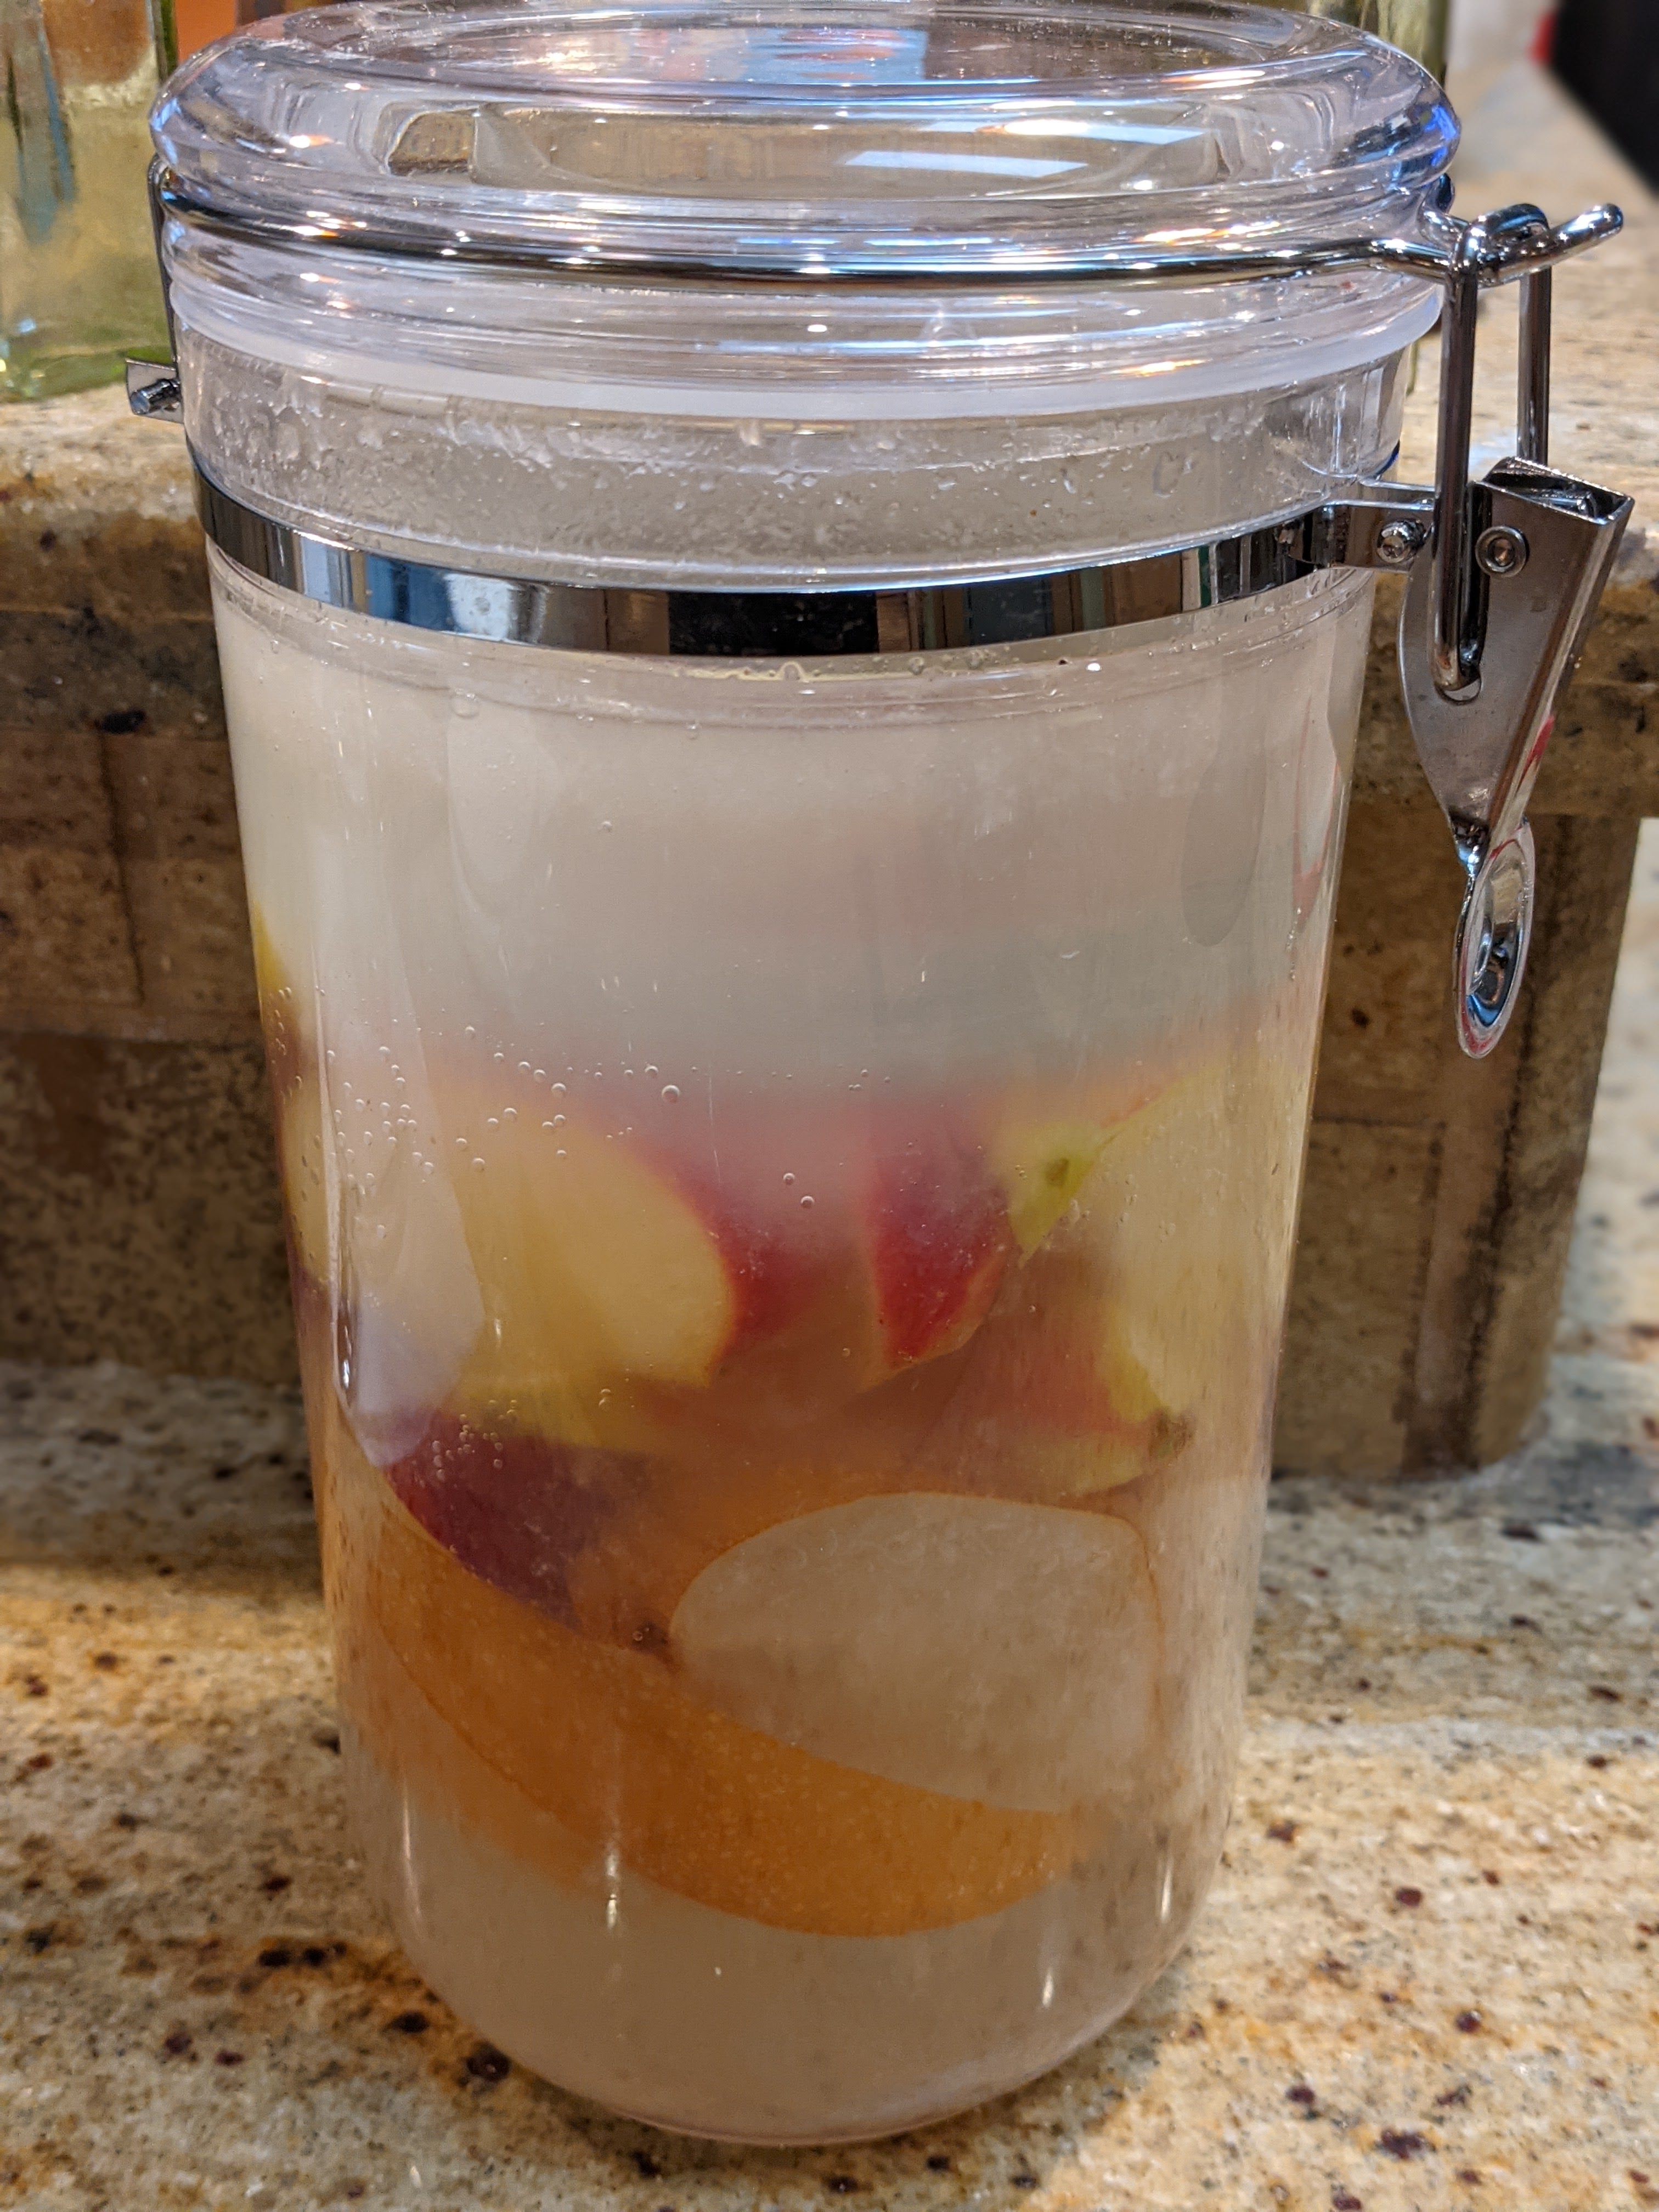
At the time I took this picture, that starter had already peaked and was starting to recede. Active AF!
The great thing about making a botanical starter is that if you’re already baking, you most probably have everything you need to get started. Since I was already canning and baking, I had plenty of jars available to me, but Paul Barker did suggest that Kilner-type containers seemed to work best. So I actually got a few food-safe plastic containers (I’m going to be building a couple of different ferments) with Kilner type tops at my local TJ Maxx. They were only a few bucks each, so it wasn’t a big investment.
I have two sizes of container. The larger one is a 2-liter container, while the smaller one is 1.4-liter. As you can see from the picture above, I use the 2-liter for the fruit ferment and the smaller container for the levain (yeah, it’s a lot because I bake practically every day).
You’ll need a nice, fine-mesh strainer to strain the fermentation liquid when you use it for a starter or a recipe to trap the particles. I use the same strainer that I use to dust my transfer boards and loaves. This is probably something you already have.
The other thing to have is a decent digital scale. If you’re baking with any regularity, you already have one, but if not, it’s an absolute necessity.
Ingredients
I used two apples and a large Asian pear for my ferment. Paul Barker recommends starting with apples in his book because of the natural sugars they contain that will feed the yeast.
If you want to use vegetables, you can help the fermentation along by dissolving a teaspoon of natural honey in the water. I stress natural because there’s a lot of crap honey out there. I use local honey only.
As for flour, I use either a whole-grain rye or wheat. My personal preference is white whole wheat that I source from Stafford County Mills in Kansas. With shipping, it costs a little more, but I can’t speak enough about the quality of that flour!
The Process
As a rule of thumb, whether you’re using fruits or vegetables, you want to use a ratio of 2:1 water to botanical. The exception to this is when using flower petals (which I haven’t used just yet, but will in the spring when my roses bloom). For that, I’ll need to refer to the book. Here’s the process.
Prepare the ferment
Take a couple of apples and wash them off to remove any dirt or insects, and remove the stems as well. DO NOT SCRUB! You want to keep the yeasts on the skins!
Cut the apples into eight pieces (no need to core).
Place the apples into your fermentation container.
Pour tap water into the container, leaving a couple of inches at the top.
NOTE: If your tap water is chlorinated, you should set aside the water you need for 24 hours to evaporate the chlorine. Otherwise, you can use filtered water. I know that lots of people recommend using bottled water, but the plastic waste just kills me!
Weigh down the fruit with either a wide fermentation weight or a small, ceramic saucer. In my case, I use a heavy, low-profile rocks glass. The point of this is to force the fruit into the water to prevent mold.
Fermentation
A quick stir should produce an abundance of bubbles. That’s how you know the ferment is active!
Fermentation will take at least three days, but it’s better to wait for four days. Though my ferment seemed really active on the third day, when I tasted the water, it was a little weak-tasting. But by the end of the fourth day, the ferment was super-fizzy and tart. Super-fizzy means it’s nearly as fizzy as a beer, which is kind of what you’re making. You’re not looking for it to create a head of foam, but you want some nice carbonation in it.
Twice each day, burp your container to release any built up gases, then stir up the contents with a wooden spoon to evenly distribute the microbes. As the ferment progresses, your water will become very murky. That’s okay! You want that to happen!
Also, you may notice a ring of white foam that has formed at the top of water. Do not clean that! It’s yeast. You’ll want to mix that back into the water.
Make a Test Starter
If your water is murky and fizzy and smells a little sweet and sour (sweet is from the esters, sour is from acetic acid that are by-products of fermentation), then most likely you’re ready to build a starter. But you have to do a test first just to make sure.
So strain 50g of yeast water into a small bowl, then add 50g of flour. Mix until well-incorporated then let it sit for a few hours. If after 3 or 4 hours the mixture is bubbly, then it’s ready to be built up. If it’s only just a little bubbly, cover it tightly with plastic (I put the bowl into a Ziploc bag) and put it in a cool place out of direct sunlight. Let your ferment go for another 12 hours or so or until the test starter has lots of bubbles.
When I first made my test starter, I had very little activity, so I just covered it up as I instructed above.
First feeding
To your original 100g of starter, add 100g strained yeast water and 100g of flour and mix thoroughly. Let stand for another 12 hours.
Second Feeding
Finally, to your existing 300g of starter, add 50g strained yeast water and 50g flour. This should double in about 5-6 hours and will be ready for baking. Use the float test to determine readiness.
NOTE: The times listed are approximate and highly dependent on the ambient temperature of your kitchen. I live in a fairly temperate climate, so I listed the times that work for me. But if you’re in a warmer climate, things will happen a lot faster. What you’re going to look for is your starter to double in size and it passes the float test.
Important Notes
If you bake infrequently, like every week, you can just repeat the process above and build up a new starter a couple of days before you bake. If you do this though, the fruit ferment will become much more active after 4 days, so you’ll have to monitor your starter.
Since I bake everyday, I actually did one more extra feeding of 50g flour and yeast water so I had 100g left which I then fed 200g flour and yeast water so I’d have a levain to use the next day. I didn’t want to spend a couple of days rebuilding a new levain. And if you look at the picture above, you can see that the levain has almost quadrupled! I fed it at 10 pm last night and it was like that when I came out to the kitchen at 7 am! What gives it a kick is that yeast water and the sugars in it. There’s lots of food for the yeast to multiply!
Another alternative to not building up a new levain is to do what I did above with the extra final feeding. Use 400g of levain, then immediately put the remainder in the fridge. When you’re ready to bake, let the levain sit at room temp for a couple of hours, then feed it to get the amount of levain that you’ll need for your bake.
If you don’t want to make so much starter, you can certainly half the amounts or scale them as you see fit.
At first, especially when your starter’s brand new, the speed at which it expands may not seem fast. But you’ll be using some of the fermentation water in the recipe so don’t worry if the starter’s not as active. But this is why I’m cultivating a starter as opposed to creating one from scratch every time I want to bake. It is so fast-acting now that it is built up.
Also, once you’ve established the starter, you can continue to use it as a regular starter after the yeast water has expired. I still use my original apple starter that I just feed every day like a traditional starter (more on that below).
Using the Starter In Recipes
Use a levain made from a botanical starter like any other levain. Though I often keep a mother, with some bakes, I just use all the starter up. And since my botanicals are fairly mature and dense with microbes, it’s easy to get a levain going that I can bake within a few hours. The point to this is that there isn’t any real secret to using a botanical starter.
Maintaining the Ferment
Eventually, you’ll want to get rid of the fruit. I normally discard the fruit after a week-and-a-half to two weeks, then reserve the remaining liquid – even with all the extra particulate matter in it. This liquid can be maintained for several weeks.
Like any starter, whether botanical or flour-based, your ferment needs regular feeding. If I’m regularly using my starter; that is, every day, I feed it first thing in the morning with a spoonful of honey and let it get active for about an hour. I then make a levain out of it with 100g flour and 100g botanical starter. Once that doubles (usually in a couple of hours), I’ll measure out the botanical water and flour to get the amount of levain I’ll need for the bake. Then once that has doubled, I’ll mix my dough.
But if I let it sit for a few days, then like with a traditional starter, it’ll need a couple to a few feedings to get it fizzy again. I’ll feed it first thing in the morning, then check it after a few hours. If it shows signs of activity, I’ll feed it again.
Update 4/17/2021: Since I’ve been baking with my botanical starters for a while now, once I chuck the fruit and strain the liquid, I feed it with a tablespoon of honey, let it sit at room temp for a few hours, then I pop it into the fridge. When I’m ready to use it again, I just add it and an equal amount of flour to my leftover flour starter and make a levain. It’s so active now that even cold, the levain triples in just a few hours!
Also, as above, once I’ve exhausted half the liquid, I feed it again by mixing a tablespoon of honey in some warm water, then fill up the container, let it rest for a few hours, then pop it back into the fridge. There’s no fruit left in the liquid – it’s purely yeast water now, but that stuff is active! 🙂
What About After Botanical Water Has Been Used Up or Expired?
Someone on a forum had mentioned that it bothered them that this technique didn’t perpetuate the starter like a regular starter. That’s totally understandable. After all, I’ve spent the whole time talking about making a starter culture using the botanical water as the liquid for the levain. But think about this: When botanical water is added to flour what is essentially happening is that the flour is getting inoculated with yeast and microbes. So as opposed to cultivating the yeast that’s on the surface of the flour, we’re giving the yeast that we’ve developed in water some food. In other words, we’re creating a culture. And once that culture is established, it will thrive as long as it’s fed.
I just snapped the picture to the left. This is my culture from my apple starter. After I used up most of it for yesterday’s bake, I was left with only 50g that I put in the fridge the other day.
Yesterday evening, I pulled it out of the fridge, and I didn’t even let it come to room temp. I added some lukewarm tap water and some flour (about 300g each) and mixed it all up. Mind you, I was testing out how the remaining starter would work without being fed botanical water, and also, I didn’t let it warm up because I was thinking it would just take a long time to expand. Those beasties in the culture are ravenous! That culture is thriving and the microbes are incredibly active – even without using a booster of botanical water!
And to be completely honest, part of why I did this was because my botanical water started smelling a little funky with sulfur notes yesterday afternoon. I aired it out and fed it and the smell is gone, but I didn’t want to chance to introduce offputting notes into my dough. Needless to say, I’m pretty amazed at how well the culture performs!
What to Do When the Culture Gets Weak
Eventually, once you chuck the fruit and just have liquid left, it will start losing its strength after a couple to a few weeks, no matter how much honey you feed it. I found that my longan fruit starters last the longest, while apple and grape starters start pooping out after a couple of weeks. In that case, I strain about a quarter of the liquid into a new container then add fruit and water to get my 2:1 liquid to fruit ratio. Within a couple of days, there’s lots of activity and I can then make a levain from it.
New Horizons in Baking
Using botanicals like this is opening up whole new horizons in baking for me! I love fermenting all sorts of fruits and veggies, but I have a real passion for fermenting hot peppers from Habaneros to Carolina Reapers. I’m looking forward to fermenting my next batch of hot peppers and using the fermentation water in my dough! It’s time for fiery sourdough!