About a week ago, I did a book review on Paul Barker’s “Naturally Fermented Bread.” At the time, I had already started building a ferment from a mixture of apples and pears and waiting for it to mature so I could make a starter from it.
Well after a few days, it finally matured enough where it was nice and fizzy and with a pleasantly sour taste. So I made a test starter with it to see how active it actually was, and lo and behold, that test starter expanded like nothing I’ve ever seen! And once I built it into a full starter that was ready for baking, I’ve been absolutely amazed at the activity in this starter. I can’t feed it fast enough!
And as for using it for baking, well, I can dare say that I’m going to be hard-pressed to use any other kind of starter from here on out. There are two main reasons for this:
- As opposed to cultivating the yeast that’s on flour – the traditional way – with a botanical starter, I’m essentially cultivating and harvesting the wild yeast that is on the particular botanical that I’m using. This could provide the opportunity to introduce a different strain of yeast, but more importantly, a botanical starter imparts its own flavor charateristics that add to the complexity of the aroma and flavor of the bread.
- But the big thing for me is that there is NO discard! That’s such a huge thing! With a traditional starter, you chuck 1/2 the starter everyday. When creating a botanical starter, you never discard. You just build it up then use it (I’ll get into maintenance techniques below).
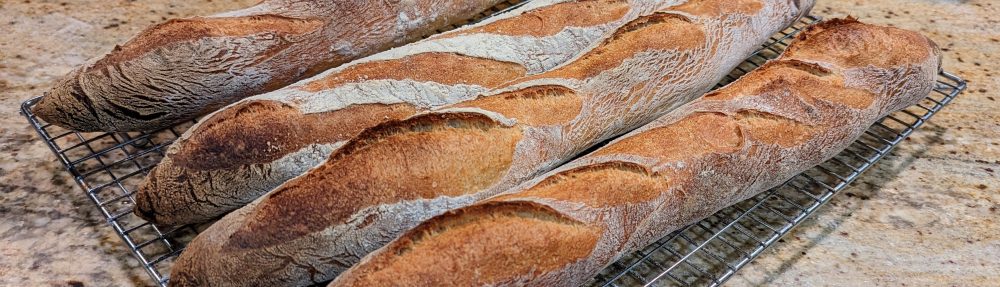
Here are some examples of what I’ve baked with my apple/pear botanical starter thus far:


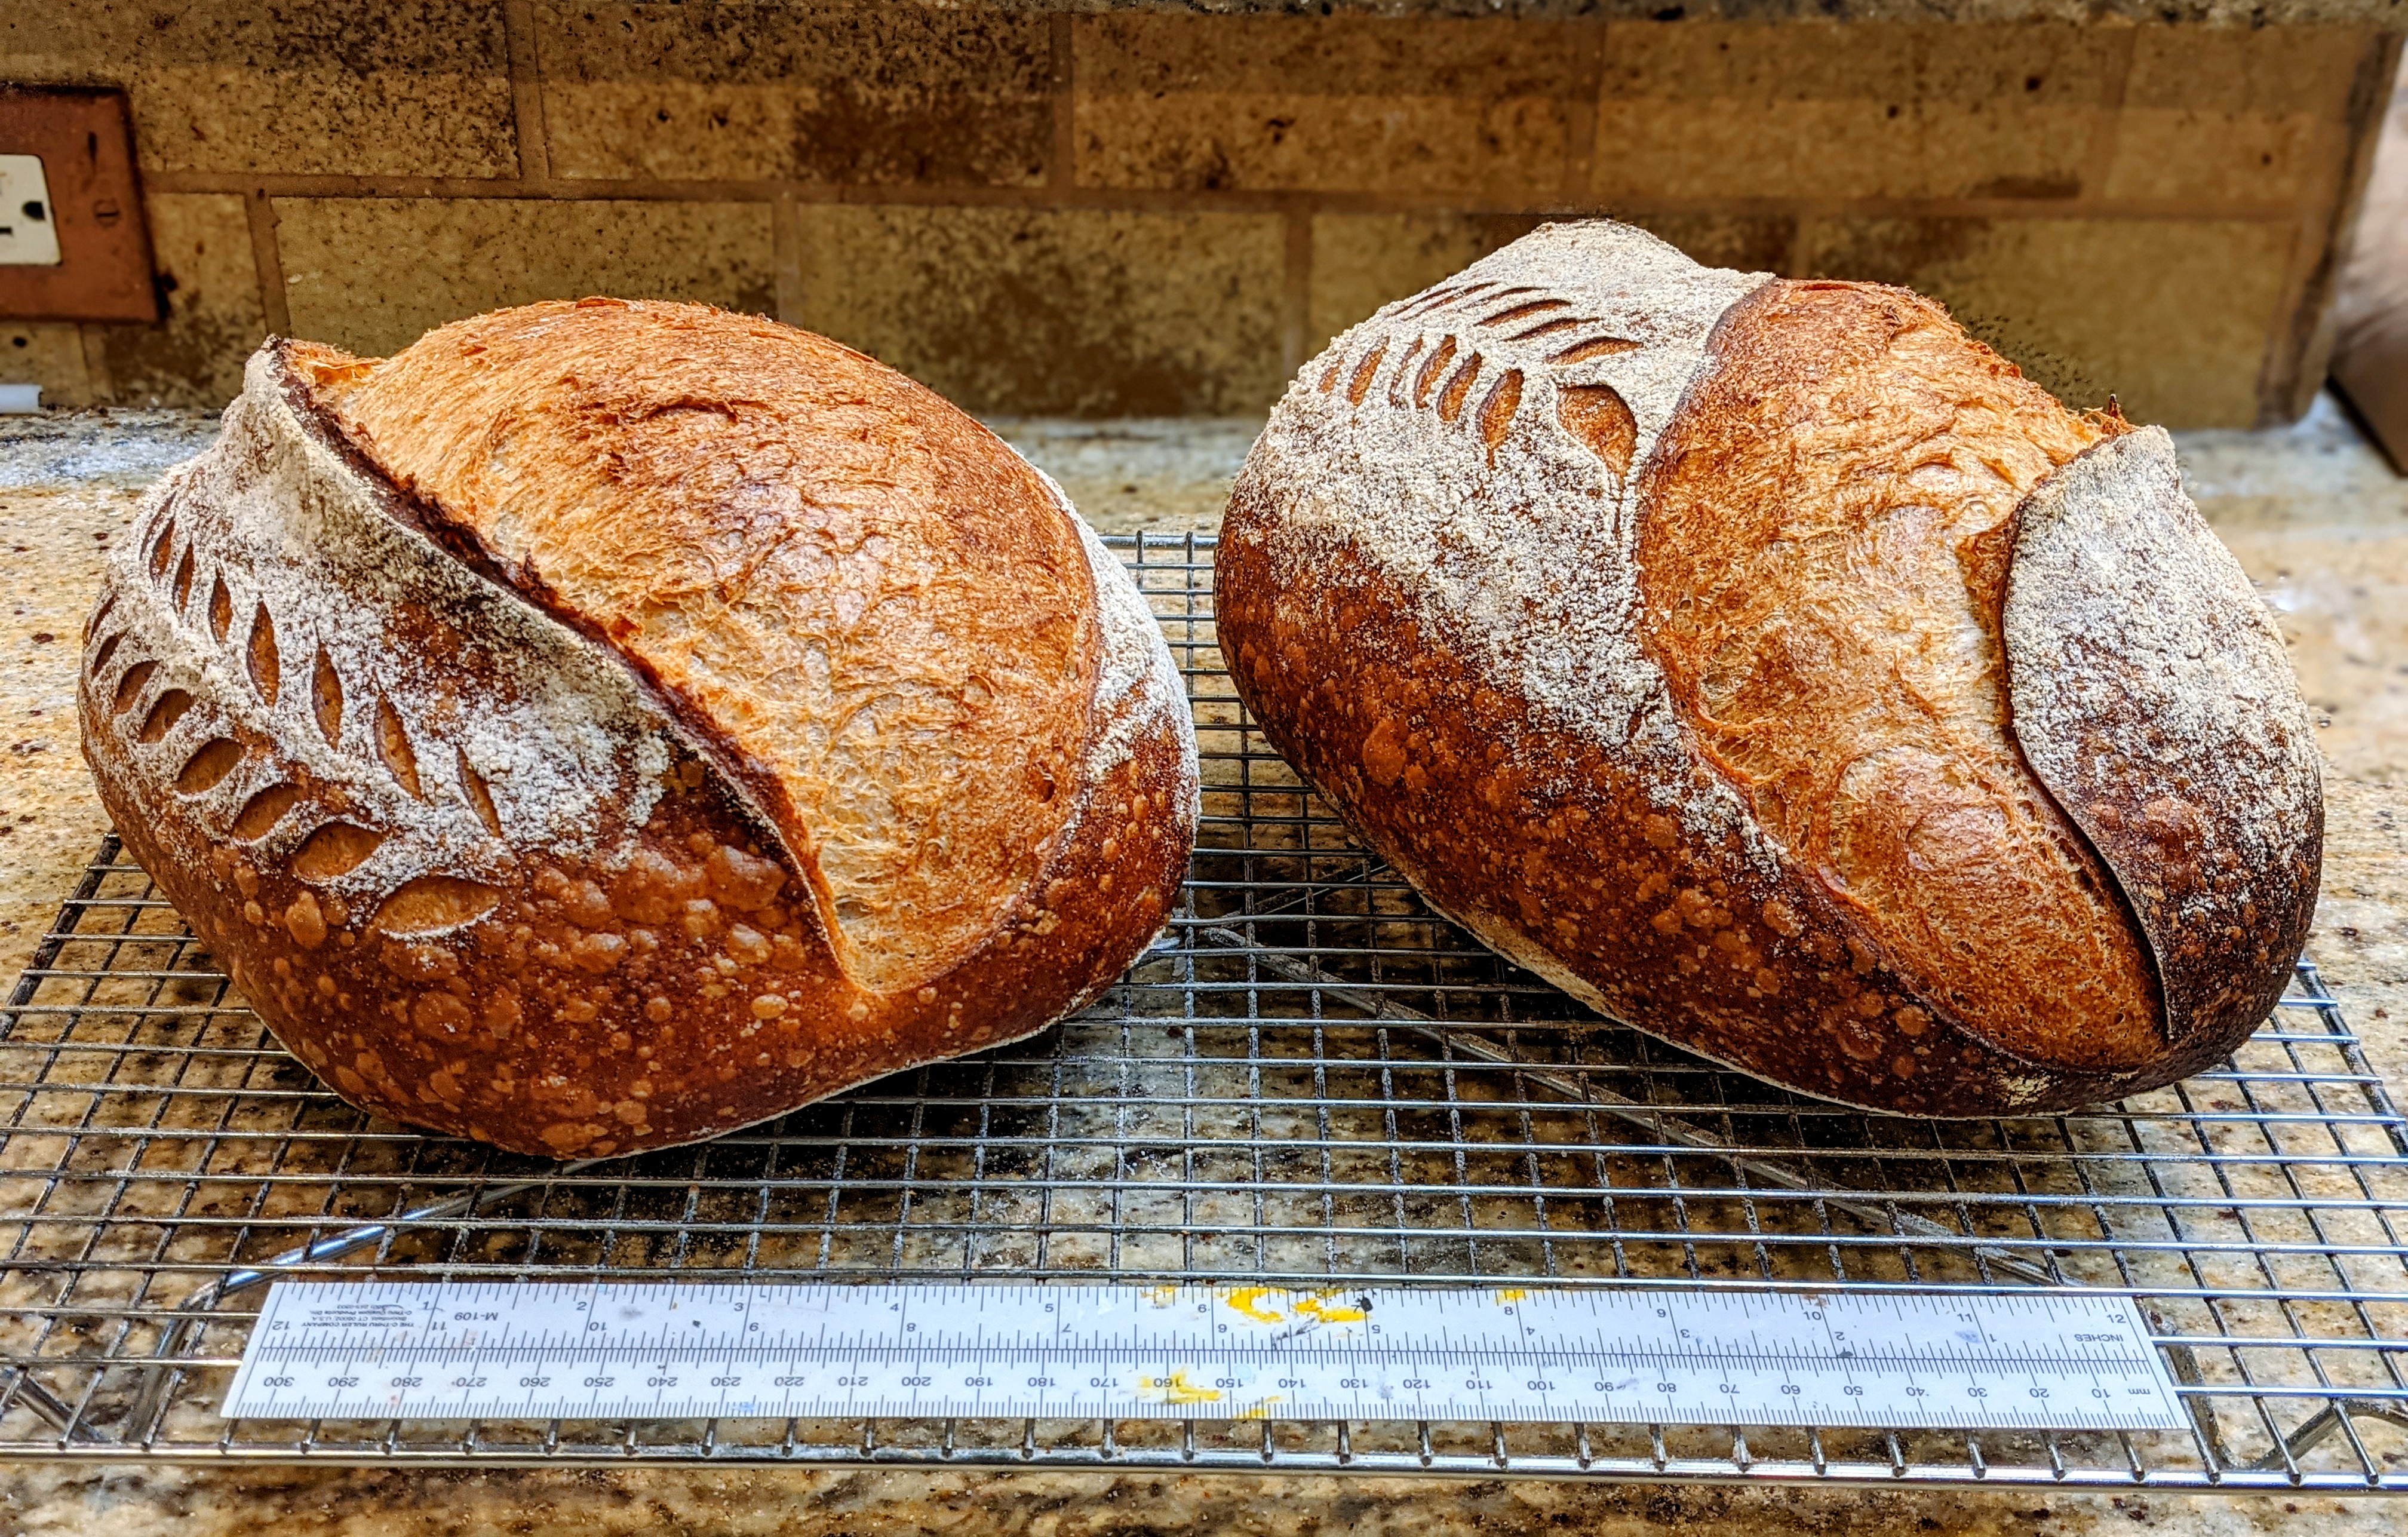
Whether I made baguettes or batards, the oven spring of the loaves has been outstanding! I was particularly impressed with the crumb of the baguettes I made because I thought I over-proofed them, but the yeasts kicked in once I put the loaves in the oven, and they sprung up nicely!
And the batards were made with 40% white whole wheat and they just exploded! In the picture above, I placed a ruler in front of the loaves to give you an idea of their size. These were proofed in 10″ bannetons! Like I said, they exploded in the oven!
I’m really having a hard time containing my excitement over this! I feel as giddy as I did when I took my very first loaf out of my Dutch oven. The sheer pleasure of making bread… There’s nothing like it!
In light of that, I thought I’d share how to make an apple starter. But to give credence and recognition where I learned the technique, I still recommend getting “Naturally Fermented Bread” by Paul Barker. He has made ferments from fruits, vegetables, and even edible flowers! He’s a real inspiration! Plus his recipes in the book are pretty unique. So without further ado, let’s get started.
Equipment
The great thing about making a botanical starter is that if you’re already baking, you most probably have everything you need to get started. Since I was already canning and baking, I had plenty of jars available to me, but Paul Barker did suggest that Kilner-type containers seemed to work best. So I actually got a few food-safe plastic containers (I’m going to be building a couple of different ferments) with Kilner type tops at my local TJ Maxx. They were only a few bucks each, so it wasn’t a big investment.
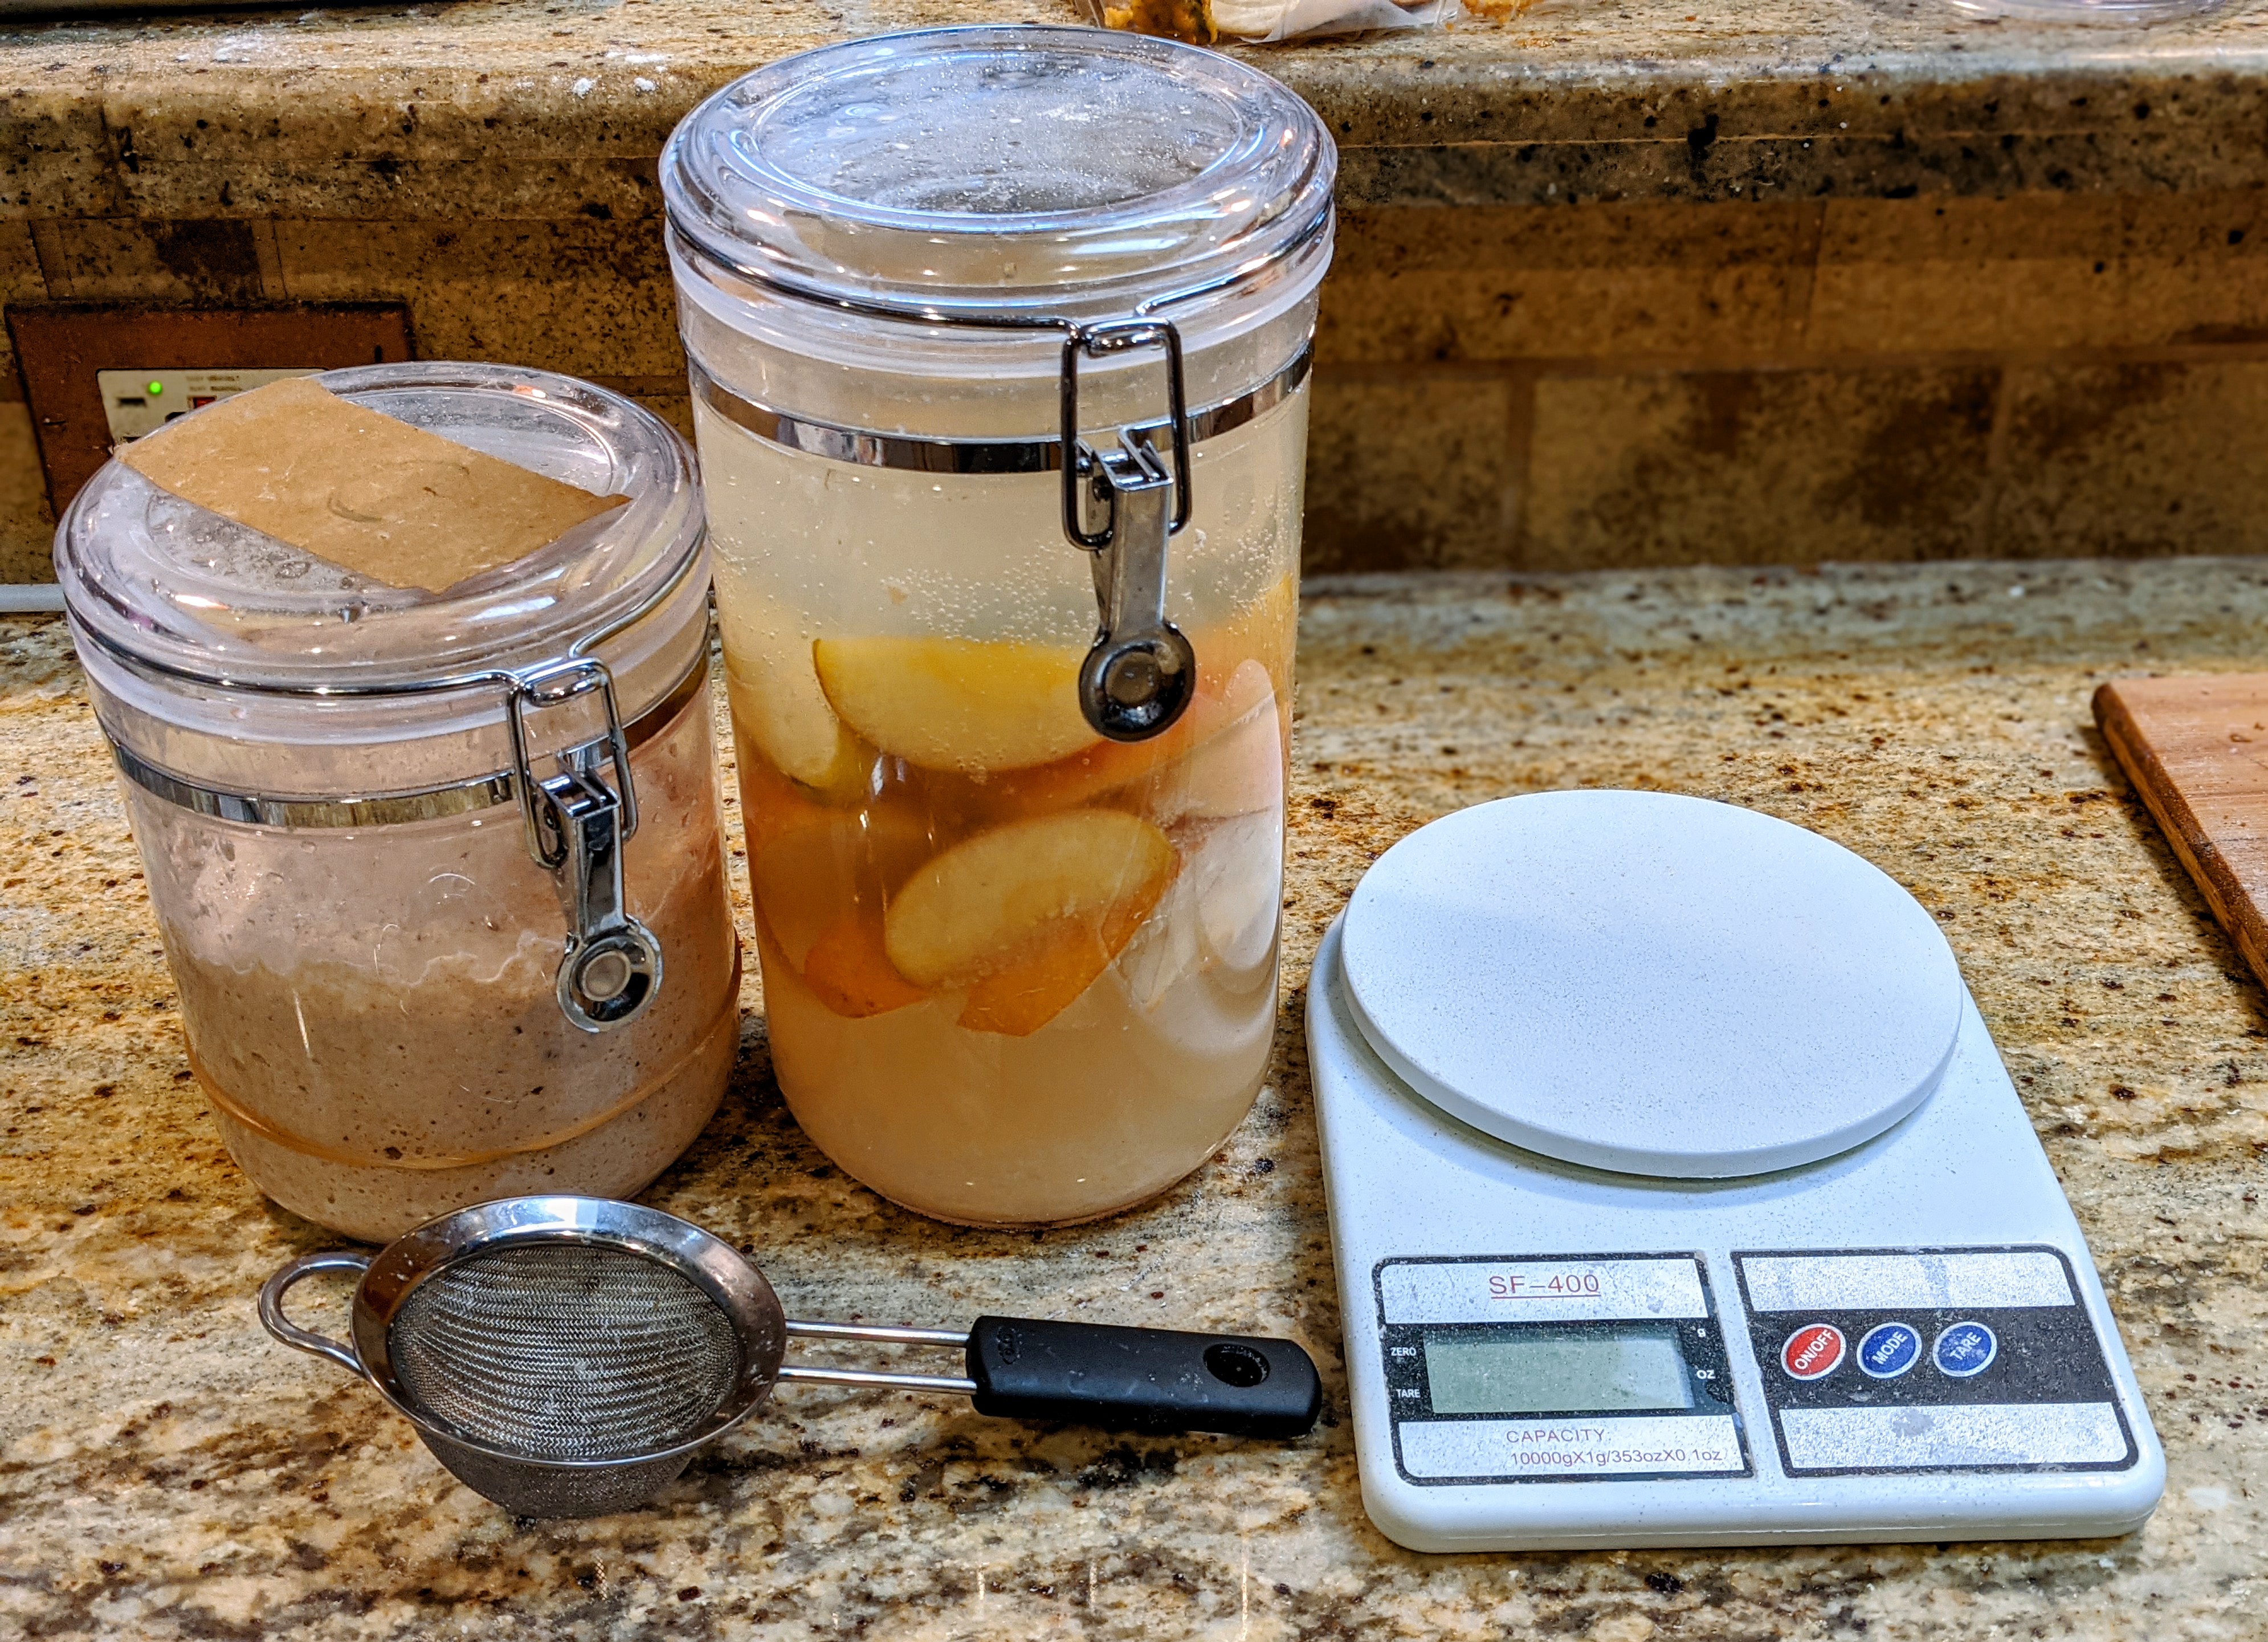
I have two sizes of container. The larger one is a 2-liter container, while the smaller one is 1.4-liter. As you can see from the picture above, I use the 2-liter for the fruit ferment and the smaller container for the levain (yeah, it’s a lot because I bake practically every day).
You’ll need a nice, fine-mesh strainer to strain the fermentation liquid when you use it for a starter or a recipe to trap the particles. I use the same strainer that I use to dust my transfer boards and loaves. This is probably something you already have.
The other thing to have is a decent digital scale. If you’re baking with any regularity, you already have one, but if not, it’s an absolute necessity.
Ingredients
I used two apples and a large Asian pear for my ferment. Paul Barker recommends starting with apples in his book because of the natural sugars they contain that will feed the yeast.
If you want to use vegetables, you can help the fermentation along by dissolving a teaspoon of natural honey in the water. I stress natural because there’s a lot of crap honey out there. I use local honey only.
As for flour, I use either a whole-grain rye or wheat. My personal preference is white whole wheat that I source from Stafford County Mills in Kansas. With shipping, it costs a little more, but I can’t speak enough about the quality of that flour!
The Process
As a rule of thumb, whether you’re using fruits or vegetables, you want to use a ratio of 2:1 water to botanical. The exception to this is when using flower petals (which I haven’t used just yet, but will in the spring when my roses bloom). For that, I’ll need to refer to the book. Here’s the process.
Prepare the ferment
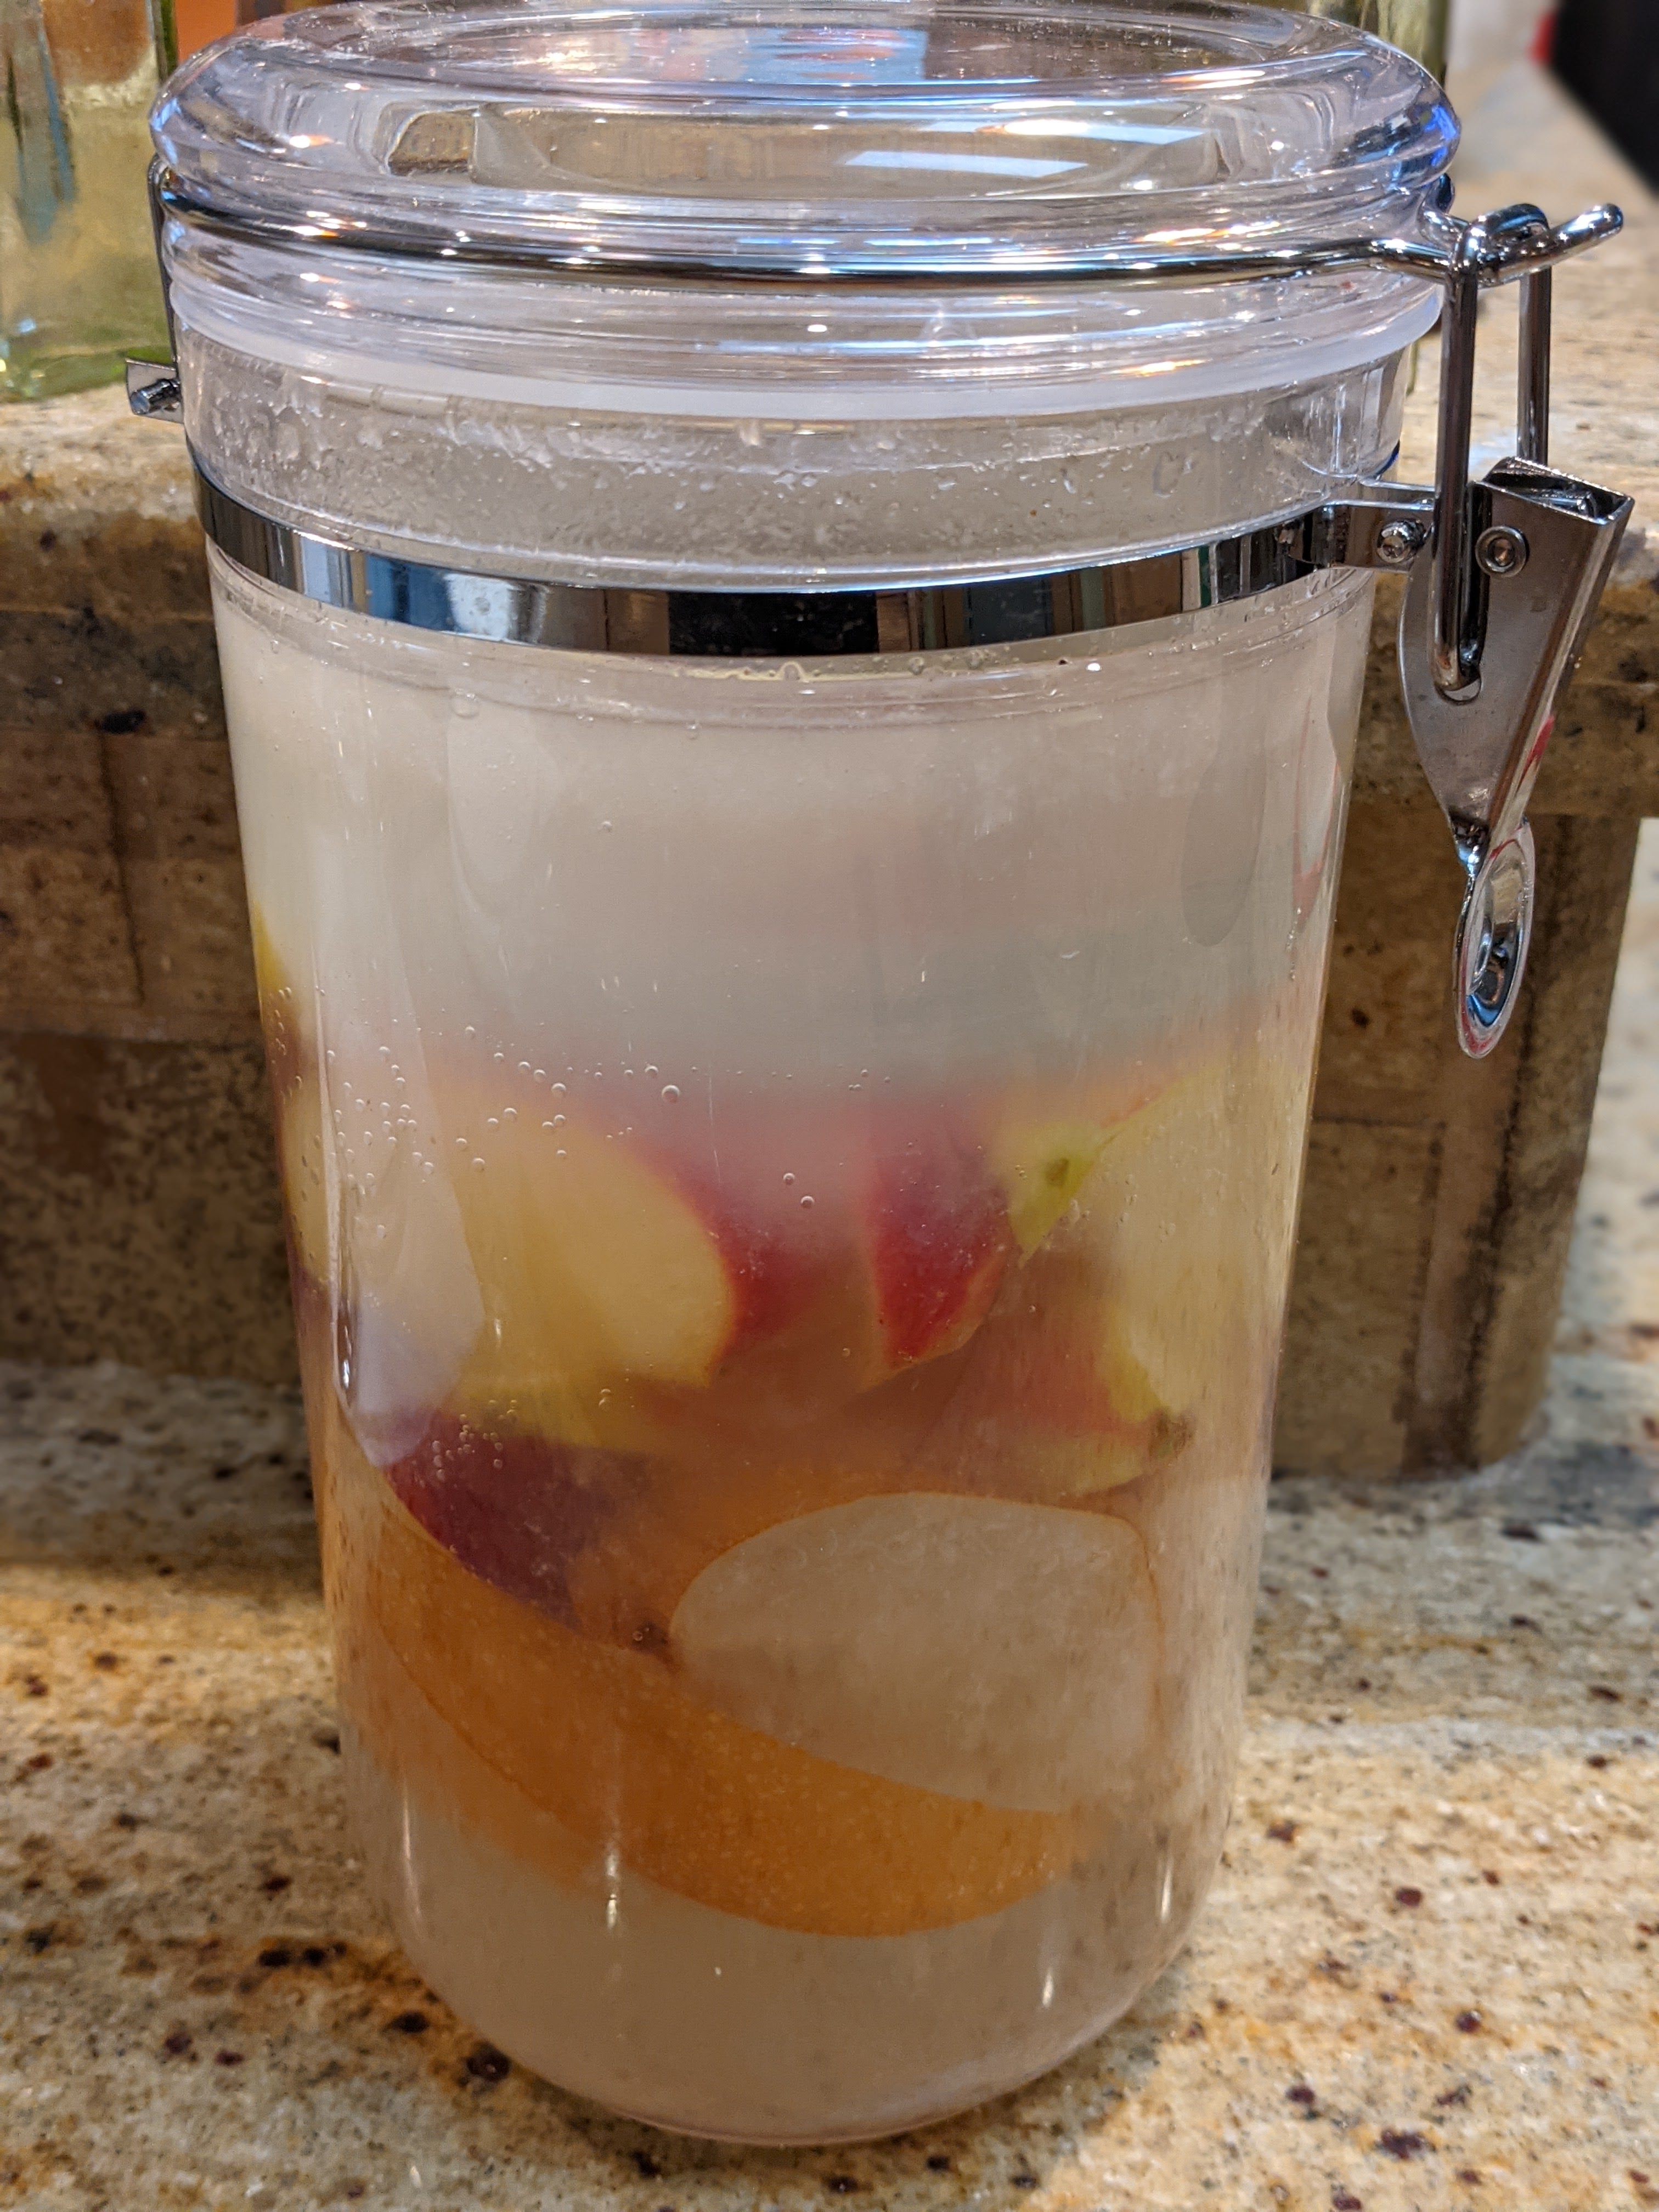
- Take a couple of apples and wash them off to remove any dirt or insects, and remove the stems as well. DO NOT SCRUB! You want to keep the yeasts on the skins!
- Cut the apples into eight pieces (no need to core).
- Place the apples into your fermentation container.
- Pour tap water into the container, leaving a couple of inches at the top.
- NOTE: If your tap water is chlorinated, you should set aside the water you need for 24 hours to evaporate the chlorine. Otherwise, you can use filtered water. I know that lots of people recommend using bottled water, but the plastic waste just kills me!
- Weigh down the fruit with either a wide fermentation weight or a small, ceramic saucer. In my case, I use a heavy, low-profile rocks glass. The point of this is to force the fruit into the water to prevent mold.
Fermentation

Fermentation will take at least three days, but it’s better to wait for four days. Though my ferment seemed really active on the third day, when I tasted the water, it was a little weak-tasting. But by the end of the fourth day, the ferment was super-fizzy and tart. Super-fizzy means it’s nearly as fizzy as a beer, which is kind of what you’re making. You’re not looking for it to create a head of foam, but you want some nice carbonation in it.
Twice each day, burp your container to release any built up gases, then stir up the contents with a wooden spoon to evenly distribute the microbes. As the ferment progresses, your water will become very murky. That’s okay! You want that to happen!
Also, you may notice a ring of white foam that has formed at the top of water. Do not clean that! It’s yeast. You’ll want to mix that back into the water.
Make a Test Starter
If your water is murky and fizzy and smells a little sweet and sour (sweet is from the esters, sour is from acetic acid that are by-products of fermentation), then most likely you’re ready to build a starter. But you have to do a test first just to make sure.
So strain 50g of yeast water into a small bowl, then add 50g of flour. Mix until well-incorporated then let it sit for a few hours. If after 3 or 4 hours the mixture is bubbly, then it’s ready to be built up. If it’s only just a little bubbly, cover it tightly with plastic (I put the bowl into a Ziploc bag) and put it in a cool place out of direct sunlight. Let your ferment go for another 12 hours or so or until the test starter has lots of bubbles.
When I first made my test starter, I had very little activity, so I just covered it up as I instructed above.
First feeding
To your original 100g of starter, add 100g strained yeast water and 100g of flour and mix thoroughly. Let stand for another 12 hours.
Second Feeding
Finally, to your existing 300g of starter, add 50g strained yeast water and 50g flour. This should double in about 5-6 hours and will be ready for baking. Use the float test to determine readiness.
NOTE: The times listed are approximate and highly dependent on the ambient temperature of your kitchen. I live in a fairly temperate climate, so I listed the times that work for me. But if you’re in a warmer climate, things will happen a lot faster. What you’re going to look for is your starter to double in size and it passes the float test.
Important Notes
- If you bake infrequently, like every week, you can just repeat the process above and build up a new starter a couple of days before you bake. If you do this though, the fruit ferment will become much more active after 4 days, so you’ll have to monitor your starter.
- Since I bake everyday, I actually did one more extra feeding of 50g flour and yeast water so I had 100g left which I then fed 200g flour and yeast water so I’d have a levain to use the next day. I didn’t want to spend a couple of days rebuilding a new levain. And if you look at the picture above, you can see that the levain has almost quadrupled! I fed it at 10 pm last night and it was like that when I came out to the kitchen at 7 am! What gives it a kick is that yeast water and the sugars in it. There’s lots of food for the yeast to multiply!
- Another alternative to not building up a new levain is to do what I did above with the extra final feeding. Use 400g of levain, then immediately put the remainder in the fridge. When you’re ready to bake, let the levain sit at room temp for a couple of hours, then feed it to get the amount of levain that you’ll need for your bake.
- If you don’t want to make so much starter, you can certainly half the amounts or scale them as you see fit.
- At first, especially when your starter’s brand new, the speed at which it expands may not seem fast. But you’ll be using some of the fermentation water in the recipe so don’t worry if the starter’s not as active. But this is why I’m cultivating a starter as opposed to creating one from scratch every time I want to bake. It is so fast-acting now that it is built up.
- Also, once you’ve established the starter, you can continue to use it as a regular starter after the yeast water has expired. I still use my original apple starter that I just feed every day like a traditional starter (more on that below).
Using the Starter In Recipes
Use a levain made from a botanical starter like any other levain. Though I often keep a mother, with some bakes, I just use all the starter up. And since my botanicals are fairly mature and dense with microbes, it’s easy to get a levain going that I can bake within a few hours. The point to this is that there isn’t any real secret to using a botanical starter.
Maintaining the Ferment
Eventually, you’ll want to get rid of the fruit. I normally discard the fruit after a week-and-a-half to two weeks, then reserve the remaining liquid – even with all the extra particulate matter in it. This liquid can be maintained for several weeks.
Like any starter, whether botanical or flour-based, your ferment needs regular feeding. If I’m regularly using my starter; that is, every day, I feed it first thing in the morning with a spoonful of honey and let it get active for about an hour. I then make a levain out of it with 100g flour and 100g botanical starter. Once that doubles (usually in a couple of hours), I’ll measure out the botanical water and flour to get the amount of levain I’ll need for the bake. Then once that has doubled, I’ll mix my dough.
But if I let it sit for a few days, then like with a traditional starter, it’ll need a couple to a few feedings to get it fizzy again. I’ll feed it first thing in the morning, then check it after a few hours. If it shows signs of activity, I’ll feed it again.
Update 4/17/2021: Since I’ve been baking with my botanical starters for a while now, once I chuck the fruit and strain the liquid, I feed it with a tablespoon of honey, let it sit at room temp for a few hours, then I pop it into the fridge. When I’m ready to use it again, I just add it and an equal amount of flour to my leftover flour starter and make a levain. It’s so active now that even cold, the levain triples in just a few hours!
Also, as above, once I’ve exhausted half the liquid, I feed it again by mixing a tablespoon of honey in some warm water, then fill up the container, let it rest for a few hours, then pop it back into the fridge. There’s no fruit left in the liquid – it’s purely yeast water now, but that stuff is active! 🙂
What About After Botanical Water Has Been Used Up or Expired?
Someone on a forum had mentioned that it bothered them that this technique didn’t perpetuate the starter like a regular starter. That’s totally understandable. After all, I’ve spent the whole time talking about making a starter culture using the botanical water as the liquid for the levain. But think about this: When botanical water is added to flour what is essentially happening is that the flour is getting inoculated with yeast and microbes. So as opposed to cultivating the yeast that’s on the surface of the flour, we’re giving the yeast that we’ve developed in water some food. In other words, we’re creating a culture. And once that culture is established, it will thrive as long as it’s fed.

I just snapped the picture to the left. This is my culture from my apple starter. After I used up most of it for yesterday’s bake, I was left with only 50g that I put in the fridge the other day.
Yesterday evening, I pulled it out of the fridge, and I didn’t even let it come to room temp. I added some lukewarm tap water and some flour (about 300g each) and mixed it all up. Mind you, I was testing out how the remaining starter would work without being fed botanical water, and also, I didn’t let it warm up because I was thinking it would just take a long time to expand. Those beasties in the culture are ravenous! That culture is thriving and the microbes are incredibly active – even without using a booster of botanical water!
And to be completely honest, part of why I did this was because my botanical water started smelling a little funky with sulfur notes yesterday afternoon. I aired it out and fed it and the smell is gone, but I didn’t want to chance to introduce offputting notes into my dough. Needless to say, I’m pretty amazed at how well the culture performs!
What to Do When the Culture Gets Weak
Eventually, once you chuck the fruit and just have liquid left, it will start losing its strength after a couple to a few weeks, no matter how much honey you feed it. I found that my longan fruit starters last the longest, while apple and grape starters start pooping out after a couple of weeks. In that case, I strain about a quarter of the liquid into a new container then add fruit and water to get my 2:1 liquid to fruit ratio. Within a couple of days, there’s lots of activity and I can then make a levain from it.
New Horizons in Baking
Using botanicals like this is opening up whole new horizons in baking for me! I love fermenting all sorts of fruits and veggies, but I have a real passion for fermenting hot peppers from Habaneros to Carolina Reapers. I’m looking forward to fermenting my next batch of hot peppers and using the fermentation water in my dough! It’s time for fiery sourdough!
HAPPY BAKING!

Pingback: Welcome! | The Dawg House!
Really enjoy studying your information! So very detailed and informative. Wanted to see if you have used the botanical water or starter with wheat pulp bread. I have been experimenting with sprouted wheat pulp bread and have been adding my botanical water in place of just tap water. I am not an experienced sourdough baker and am looking for guidance. It seems like this would be a very healthy direction for sprouted pulp bread to go. I thought the pulp (dough) may be too heavy but not after reading this post. Grateful for any insight you may have, Priscilla
With botanical starter, the yeast density is relatively lower than a standard flour-based starter. It’ll just take a little more time to get things going. But that’s not a bad thing. You just have to make sure that the starter is ready. As suggested, take equal parts botanical and flour and create a test starter out of it. It should double in volume in a day or less.
I haven’t used sprouted wheat, but as long as enzymes can break it down into sugars, a yeast culture will thrive, so you should be able to use it.
Can you share how you’re preparing your sprouted wheat? I’d like to experiment with that myself.
Hey, yes of course!
I am using Einkorn wheat. I am pretty sure it is very fresh as well. I purchased the latest bags from Blue Bird Mills in Winthrop, Washington.
I rinse the grain lightly then soak in filtered Yellowstone river water ( don’t laugh…it is amazing water…I live right by Yellowstone National Park). My soaking time is relatively quick, only 8 hours.
After this time I drain and rinse every few hours for around 23 hours. This last time I experimented by placing the large glass jars (that are tilted at an angle in a bowl) on my mantle above the wood stove. The temperature was around 75 degrees F. Within 3 hours of placing on the mantle, I saw small roots peeking out.
I have learned it is crucial not to let the roots grow much past the visible first sighting. I have made some terrible mushy bread by letting the grains sprout too long.
When I decide to stop the rooting process I try to directly start grinding to a pulp. I’ve learned no not let the grains dry back out again. You could put them in the fridge if need be. I have a dry mill and a meat grinder set up in my basement. These are both manual. The setting disk I use on the meat grinder is one that is preferred for making baby food, so it gives me a fine grind. I’ve also found that as I grind the pulp, I periodically put pulp in a air tight container – this makes the kneading process much easier – not drying out and becoming hard.
Beforehand I get all ingredients ready, especially heating any honey so I can directly start mixing everything together.
I have been experimenting with the addition of other sprouted grains, beans and soaked nuts…in small quantities. I always add botanical water (usually from apple) but because it is very dense dough I have added yeast as well. I have a feeling I may be making a mistake in doing this. These two species may not play well together.
Of the the several loaves I’ve made with pulp some remain very memorable – every crumb consumed with relish. I feel like it is a very healthy loaf of bread.
With gratitude, Priscilla
They’re both probably s. cerviseae, so you should be okay. But as I mentioned before, the yeast density in botanicals will be lower as compared to instant yeast. It just takes longer for fermentation to start.
Pingback: Meine Oma wusste es am besten!