There’s this absolute fixation on creating big holes in the crumb that I often see in online home baking forums that I’ve always found a little annoying. Everyone seems to want to get this huge, open crumb structure, just like what they’ve seen in the book, “Tartine Bread.” Having an open crumb is good. But at least to me, it’s only good to a certain point. After that, it just becomes a work of art.
For my bread, I definitely want some holes in it, and I want to get what I think is a moderately-open crumb with a mixed set of holes because I know the bread will be nice and airy and that I’ve built a good gluten structure that will allow those holes to form. But I don’t want a predominance of large holes because I like my bread to be able to hold spreads like butter, honey, mayo, mustard, and jam. With a predominance of large holes, that shit just goes right through the bread! It’s impractical and frankly, the only thing you can really use it for is dipping it into olive oil and balsamic vinegar. Not a bad thing, but it’s definitely limiting.
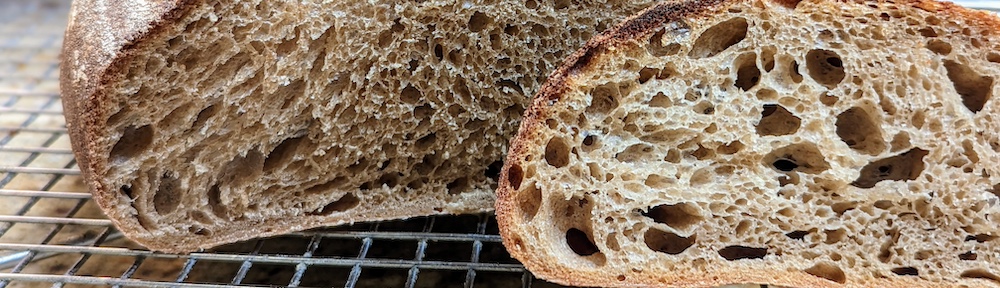
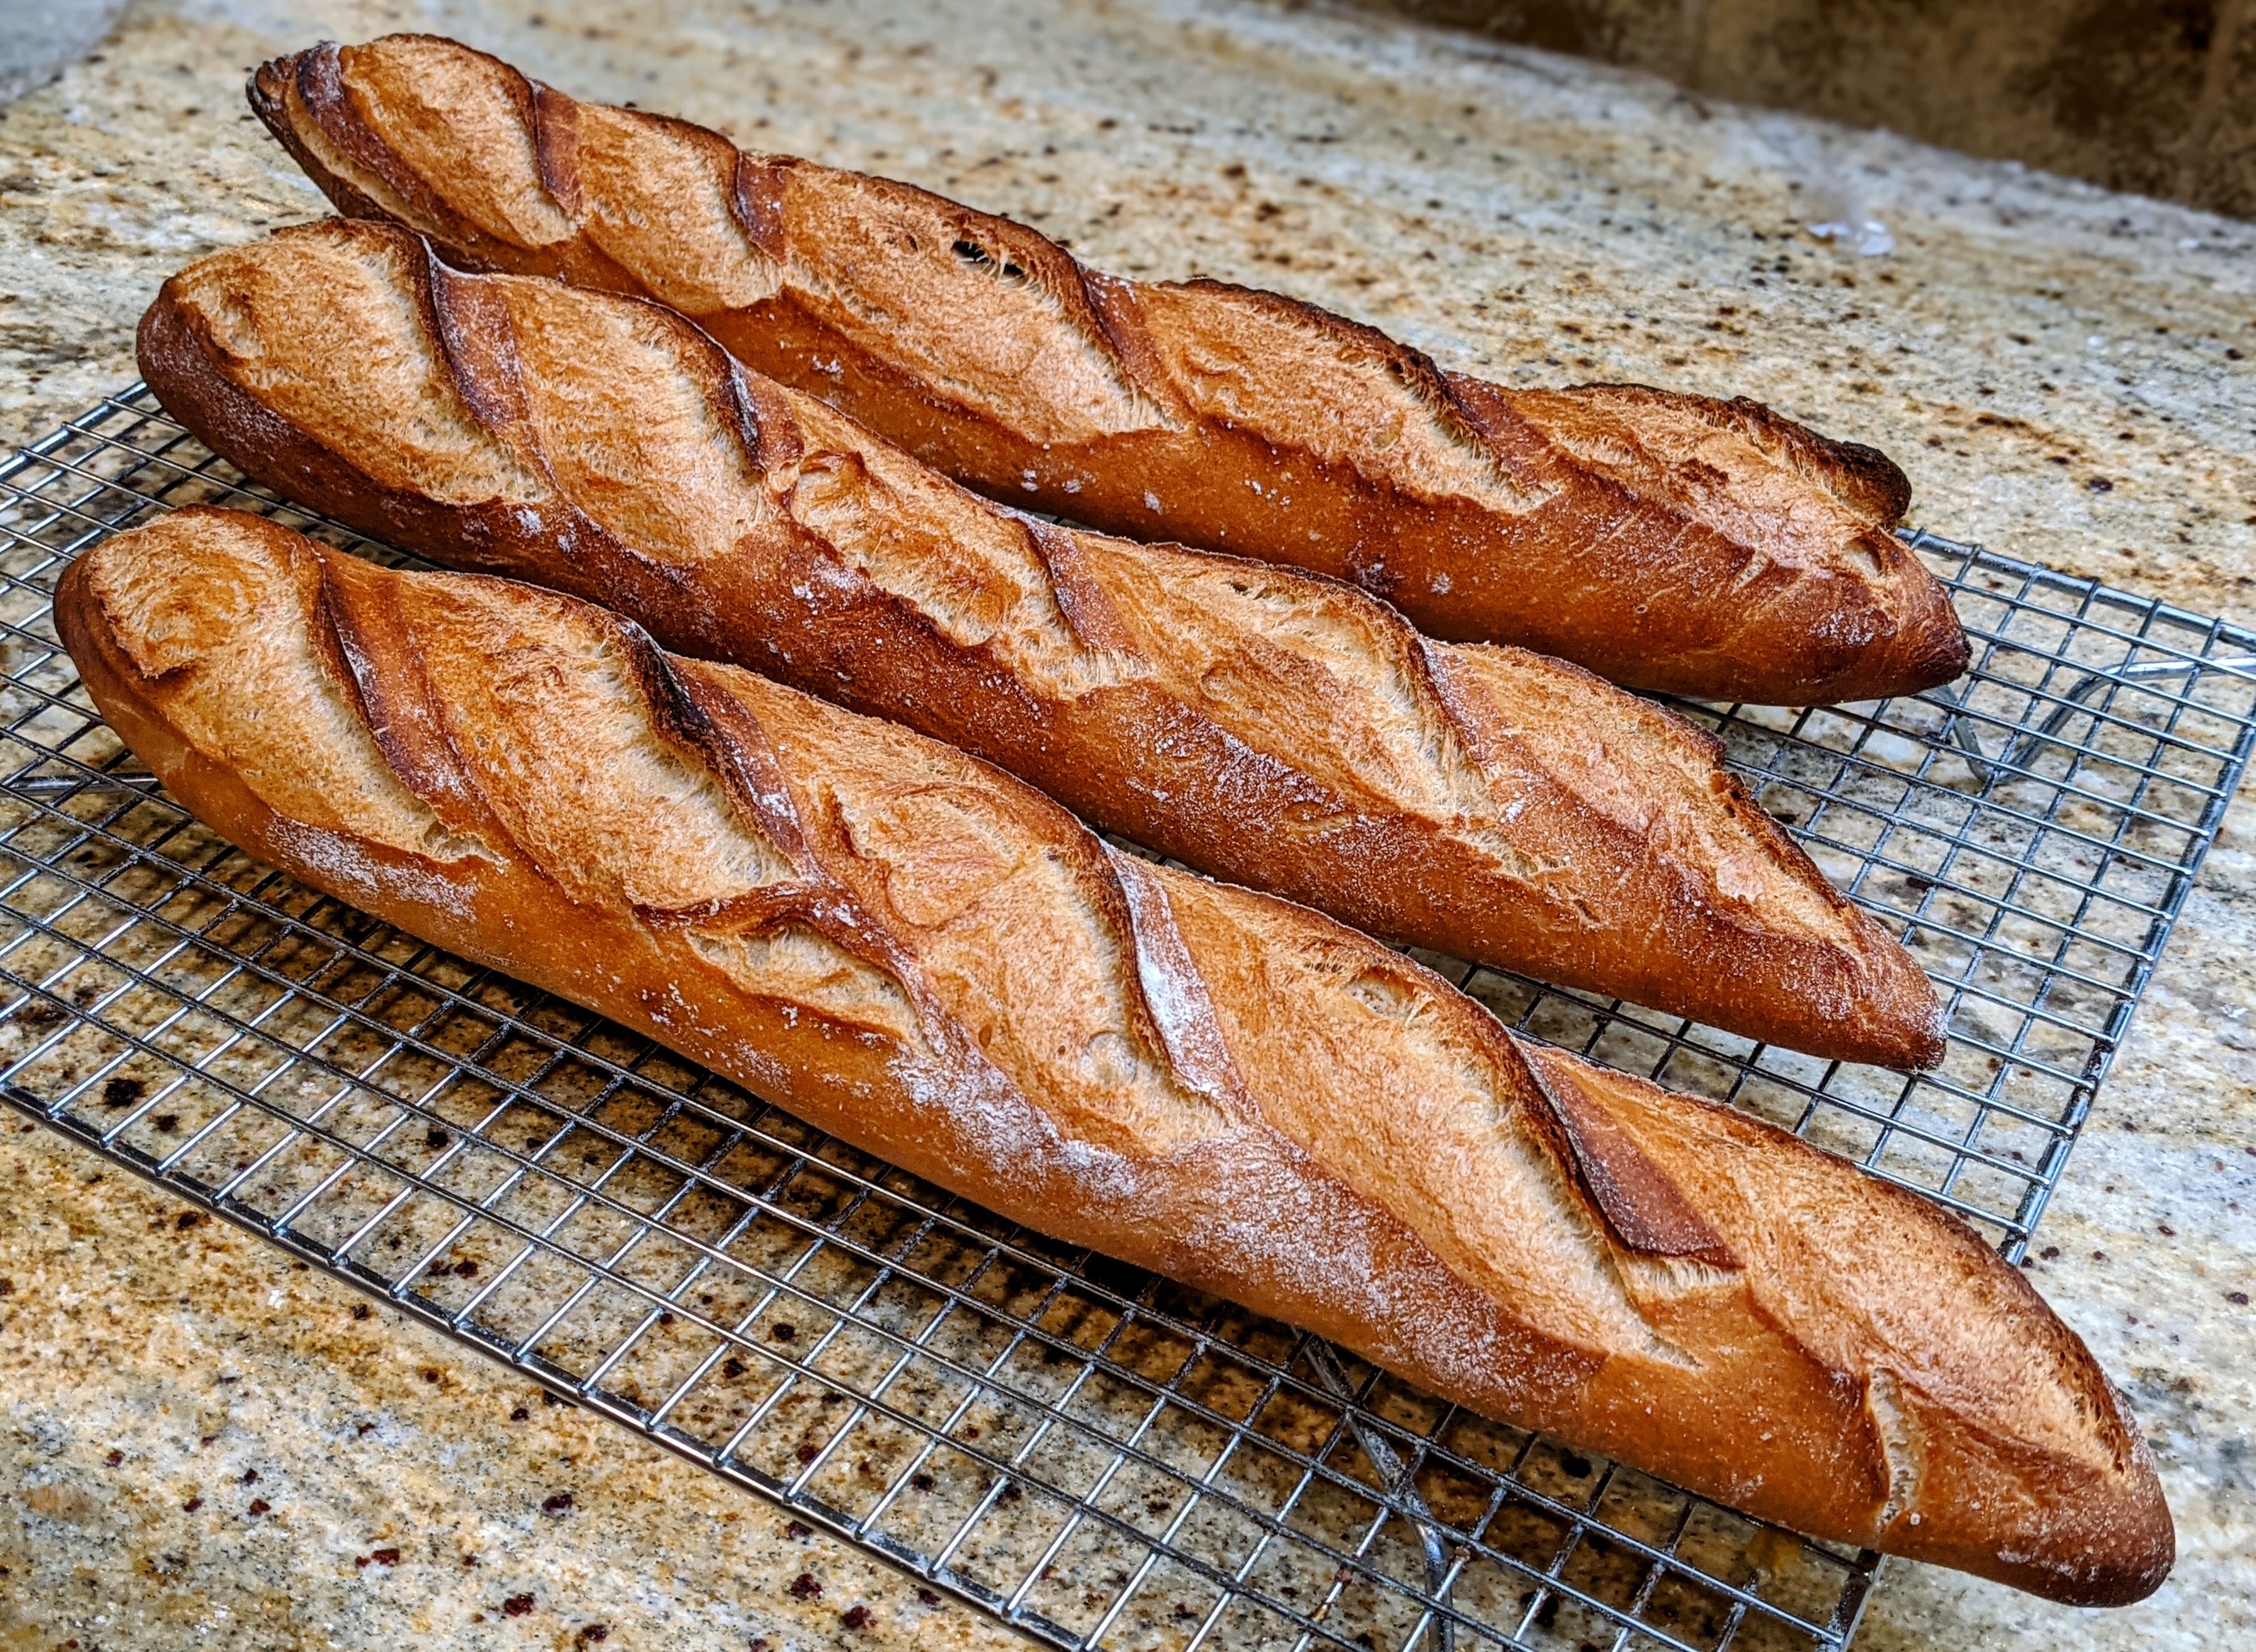
So what I prefer to achieve is a crumb similar to the picture below. It’s open and there are a few large holes but for the most part, the “openness” is driven by the plethora of smaller holes. This bread will hold spreads quite effectively!
30% Kamut, 40% high-extraction 30% bread flour I baked a few days ago
Luckily, I’m not alone in this thinking but the ideal crumb seems to be like the Tartine-like craters you see in the book. But here’s the thing: Even Tartine doesn’t achieve that 100%!
WHAT THE F$%K?
Even though I’m obsessed with dough, I love to cook in general. And I especially love to watch different chef shows. Yesterday, I happened to be watching John Favreau’s “Chef Show” and in particular, his episode where he and Roy Choi went to Tartine in Los Angeles. They visited all the different departments at the restaurant and the final segment had John help prepare flatbread and shape a batch of Tartine Country Bread dough.
At the beginning of the segment, John showed a photo of a nice loaf of sourdough he made then commented, “Then the crumb…” at which point, Chad Robertson said, “…People always ask me how we do that, but truth be told, we only put the photos out there of our aspirational loaves. We don’t put the other ones out there. <chuckle> Even we struggle with getting that. <more chuckles>.”
“WHAT THE F#$?!!!” I said out loud, and my wife asked me why I was having such a strong reaction. I replied, “Because SO many home bakers want a bunch of holes in their goddamn sourdough because THAT guy on the screen published a famous bread baking book and all the pictures of his bread were cratered with holes, and that has somehow become the ideal with home bakers. To hear him imply that even he can’t get it 100% is a total WTF moment for me!” We actually both laughed at that.
Hearing that was a real eye-opener and frankly, it was hilarious as I imagined all these home bakers who see this show having the same reaction. But it’s also a bit shocking to have heard Chad Robertson say that because at least from his books, he makes it seem as if every damn loaf Tartine produces comes out like the frickin’ pictures! Well now we know the TRUTH! Too funny!
I wrote a post saying that I had some issues with the Tartine Bread baguette recipe, especially with the yield, which was much more than the two or three baguettes that the recipe said it would produce. It was more like seven or eight baguettes. Not a bad thing, but the inconsistency kind of bugged me. I was also a little dubious about the hydration being only 64% and that the poolish used a seemingly large amount of yeast for such a small poolish amount.
But despite my issues, these baguettes totally intrigued me because Chad Robertson employed both a levain AND a poolish. And unlike most poolish baguette recipes that add a little yeast to the final dough, the rising potential with both types of preferments completely eliminates the need to use any extra commercial yeast other than what goes into the poolish!
Using two preferments was all I needed to know to want to make these baguettes. Chad’s reasoning was that they’d contribute tons of flavor to the bread – they do – but also give the dough lots of extensibility and a longer shelf-life (and I could attest to that because my pure sourdough baguettes will last a week).
But I didn’t want to make as much dough as the recipe in the book yields, so I had to scale it down. To scale it down I had to get the overall formula, then figure out my ingredient weights from that. I shared all this in my previous post, but I’ll put it down here now:
Overall Formula
Flour
100.00%
Water
64.00%
Salt
1.70%
Levain
In Tartine Bread, Chad Robertson says to use a tablespoon of mature starter – it’ll be somewhere around 30-40g of mature starter. The important thing is to make near a 300g levain.
Mature Starter
30-40g
AP Flour
150g ~14.25% of total flour
Water
150g
Optimal Fermentation Temp.
78°-82°F
Poolish
The book says to use 3 grams of yeast for 200 grams of flour and water each. Even if he meant fresh yeast, that’s an awful lot for such a small amount of flour (instant yeast weight would be 1.2g – that’s an insane amount). It’s not necessarily wrong, but the poolish will mature much faster than 3 hours with that amount of yeast and the aim is to get both preferments to peak near the same time.
AP Flour
150g ~14.25% of total flour
Water
150g
Instant Yeast
0.4g
Optimal Fermentation Temp.
78°-80°F
Poolish should develop in a warm environment to make the 3-hour schedule.
Final Dough
Bread Flour
170g
AP Flour
402g
Water
286g
Salt
14g
Poolish
229g
Levain
229g
Total yield
1330g 4 X 330g 60cm loaves 6 X 220g 40 cm loaves
Optimal dough temp
78°-82°F
Yield is just a little more than 1300g which is the target to account for loss due to evaporation or processing (dough sticking to stuff).
Note the relatively high dough temperature of 78°-82°F. This is consistent with Chad Robertson’s method of a warm bulk ferment. You can achieve this by placing your bulk fermentation container in a cold oven with the light on. The light bulb will provide enough heat to maintain that temperature range. But keep an eye on the temp. You don’t want it to get too warm. Propping the door open with a dish towel or oven mitt will help control the temperature.
This is a fairly straightforward formula. BTW, in case you’re interested, both the Poolish and Levain flour contribute 14.25% each to the total flour. So if you want to scale this up, you can use that percentage to determine how much flour you’ll need for both. Without further ado, let’s get into the dough development!
Make the Preferments
One thing to note is that both preferments should be made from predominantly AP flour. The reason for this is that whole grain flours will have much more fermentation activity.
Build the Levain
For the levain, take about 30-40 grams of mature starter and mix it with 150g each of flour and water. Your starter should have enough activity where the levain will be ready in three to four hours. Or if you have a regular schedule, try to coincide the peak of the levain with the peak of the poolish.
Poolish
With the poolish, thoroughly mix all ingredients together. Set aside in a warm place to promote yeast activity. Poolish will be ready when it is heavily bubbled on the top.
Both preferments should pass the float test to ensure optimum activity.
Initial Mix/Fermentolyse. Set aside 50 grams of water. Measure out what you need from both preferments and place in a mixing bowl. Liquify the preferments with the rest of the water, then sift all the flour and add to the liquid. Mix well until there are no dry ingredients and no large lumps in the mix. It’ll be shaggy. Cover and rest for 30-60 minutes.
If you’ve made baguettes previously, you will notice how stiff the dough is. Don’t be alarmed and add more water! The fermentation action of the starters will soften and aerate the dough. Also, note that this is not a true autolyse as the preferments are included. But it does help to hydrate the flour!
Final Mix/Bassinage. Sprinkle the salt all over the dough mass, then add the remaining 50 grams of water. Note that for this small amount of dough, I just mix it by hand, squeezing the salt and water into the dough. Mix until all the water has been incorporated and you don’t feel any salt crystals when you squeeze the dough.
You could use a stand mixer for all the mixing. But if you do, mix only on the lowest setting! I’ve found that with baguettes, you actually don’t want to develop the gluten too much in the mixing stage. You’ll do all that through the folds.
Bassinage Explained
Bassinage is a term you’ll occasionally hear from bakers from time to time. The literal translation of the word is “bathe.” From the perspective of dough development bassinage is the process of folding reserved water into an already mixed dough; basically bathing the mixed dough. You hold back some water (typically 5%-10%), then mix the dough with the remaining water to start the gluten formation. At a later time, you add in the reserved water.
The idea behind it is actually kind of ingenious. The thinking is that the initial mix will get gluten formation started. Then when the reserved water is added, though some water will obviously combine with the remaining flour, other water molecules will get trapped in the gluten matrix, thus forming little pockets of water, which in turn will help in the formation of a more open crumb.
Given that, especially with a moderately stiff dough like the Tartine baguettes, bassinage conceivably will help with creating an open crumb as the trapped water molecules will form steam bubbles during baking.
Bulk Fermentation. 3-4 hours. As with Chad’s basic country loaf, you’re looking for about 25-30% dough expansion. I let the bulk fermentation go for about 4 hours to get to that kind of expansion.
Folding. Fold every 30 minutes within the first three hours up to a total of six folds. Truth be told, I got to the fourth fold and the dough had plenty of strength, forming a nice windowpane. As with any kind of bread, you should never be too parochial about the folding suggested in a recipe. Once you’ve developed enough strength, stop folding. Continuing will just degas the dough.
To be honest, having made these a few times now, I’m not convinced the dough needs this many folds. The hydration is so low that the gluten bonds form quickly. I’ve never gone past four folds. The bulk fermentation does take four to five hours though. With that in mind, I’d suggest doing four folds every 45 minutes instead of six every 30 as is written in the book. But this also depends on your flour. When I use my Azure Standard Bread Flour, two folds is all I need.
Divide and Preshape. Gently turn the dough onto a lightly floured surface and tug it into a rough rectangle, then scale out four 330g pieces for 60cm baguettes, or six 220g pieces for 40cm baguettes. With each piece, letter-fold the dough in an east-west direction, then roll it up like a jelly roll and seal the seam and ends. Take care not to roll too tightly. Add just a little tension! Place seam-side-up on a well-floured couche. Rest for 30-45 minutes depending on how tightly you rolled the pieces. With this low-hydration dough, you need the dough to be well-relaxed.
Shape. I always use Master Chef Markus Farbinger’s baguette shaping technique. But if you have a shaping method already, feel free to use it. One thing that Chef Farbinger doesn’t mention in shaping is that while rolling, your fingertips and the heels of your hands should have contact with your board as you roll the dough out, forming a natural cup. To lengthen the log, you simply flatten your hands a bit – not completely – and the dough will push out to the sides.
Final Fermentation. Up to 3 hours. Yes, you read that correctly. Remember, this is a stiff dough, and after shaping, you want to give it plenty of time to relax. With my last batch, my dough was ready in about an hour and a half. It was a warm afternoon when I baked, and I didn’t want to run the risk of over-fermenting the loaves. In hindsight, I could’ve let it go out for about two hours. To tell if the loaves are ready to bake, if you do the poke test, the surface should give easily. And once you press a little deeper, the interior should have a little more tension, but it should give as well. Once you remove your finger, observe how the dough springs back. It should spring back slowly.
I can’t stress enough how important this last fermentation step is! This step will make or break the bake – even more so than the bulk fermentation because that rest period will allow the bubbles to re-form, which is crucial to achieving an open crumb. Remember, this is a stiff dough at 64% hydration compared to the standard hydration of 75%. And though the acid in the preferments will aid in the extensibility of the dough, it still needs time to develop the bubbles. So, once you’ve shaped, give this dough time to expand.
Bake. During the last hour of final fermentation, warm up your oven to 500°F. I use a stone to bake, but you can bake on a sheet or even a dedicated baguette pan. Use lots of steam! When I bake baguettes, I use both a broiler pan that I put hot water into, plus two loaf pans that have well-soaked terry-cloth towels in them to provide a steamy environment (NOTE: Your oven should be steamy when you place the baguettes in it). These are in the oven for about 10-15 minutes before I pop the loaves in (allowing my oven to come back to temperature). Quickly place your loaves in the oven, then immediately turn it down to 475°F. Bake for 12-15 minutes on steam or until the crust just starts getting color. Remove the steaming containers, turn down the oven to 425°F, then bake for another 12-15 minutes until the loaves turn a deep golden brown.
Cool on rack. You can eat these warm!
Notes
The trick to this recipe is getting the preferment timing close. You might expect the poolish to ferment more quickly than the levain, but having made these a lot, it’s hard to predict timing. But do not worry if one is ready before the other! It just means the yeast ran out of food. Once you mix everything together, the yeast will have a new food source.
The crumb, while open, is very much like a sourdough crumb. It’s tender, but a lot chewier than the baguettes I normally make. I realize that that could be a function of the flour I used. The next time I make these, I will use all AP flour – most probably Central Milling flour as it is only 10.7% protein. This should lend itself to a much lighter crumb texture.
While I appreciate the romanticism of baking on a stone, I always use parchment paper on my transfer board to get my loaves into the oven. Especially with baguettes, since I load them into the oven along their long sides, I’ve had too many mishaps where the loaves roll off my board! So, I use parchment paper. When I remove the steaming containers, I also remove the parchment paper from underneath the loaves.
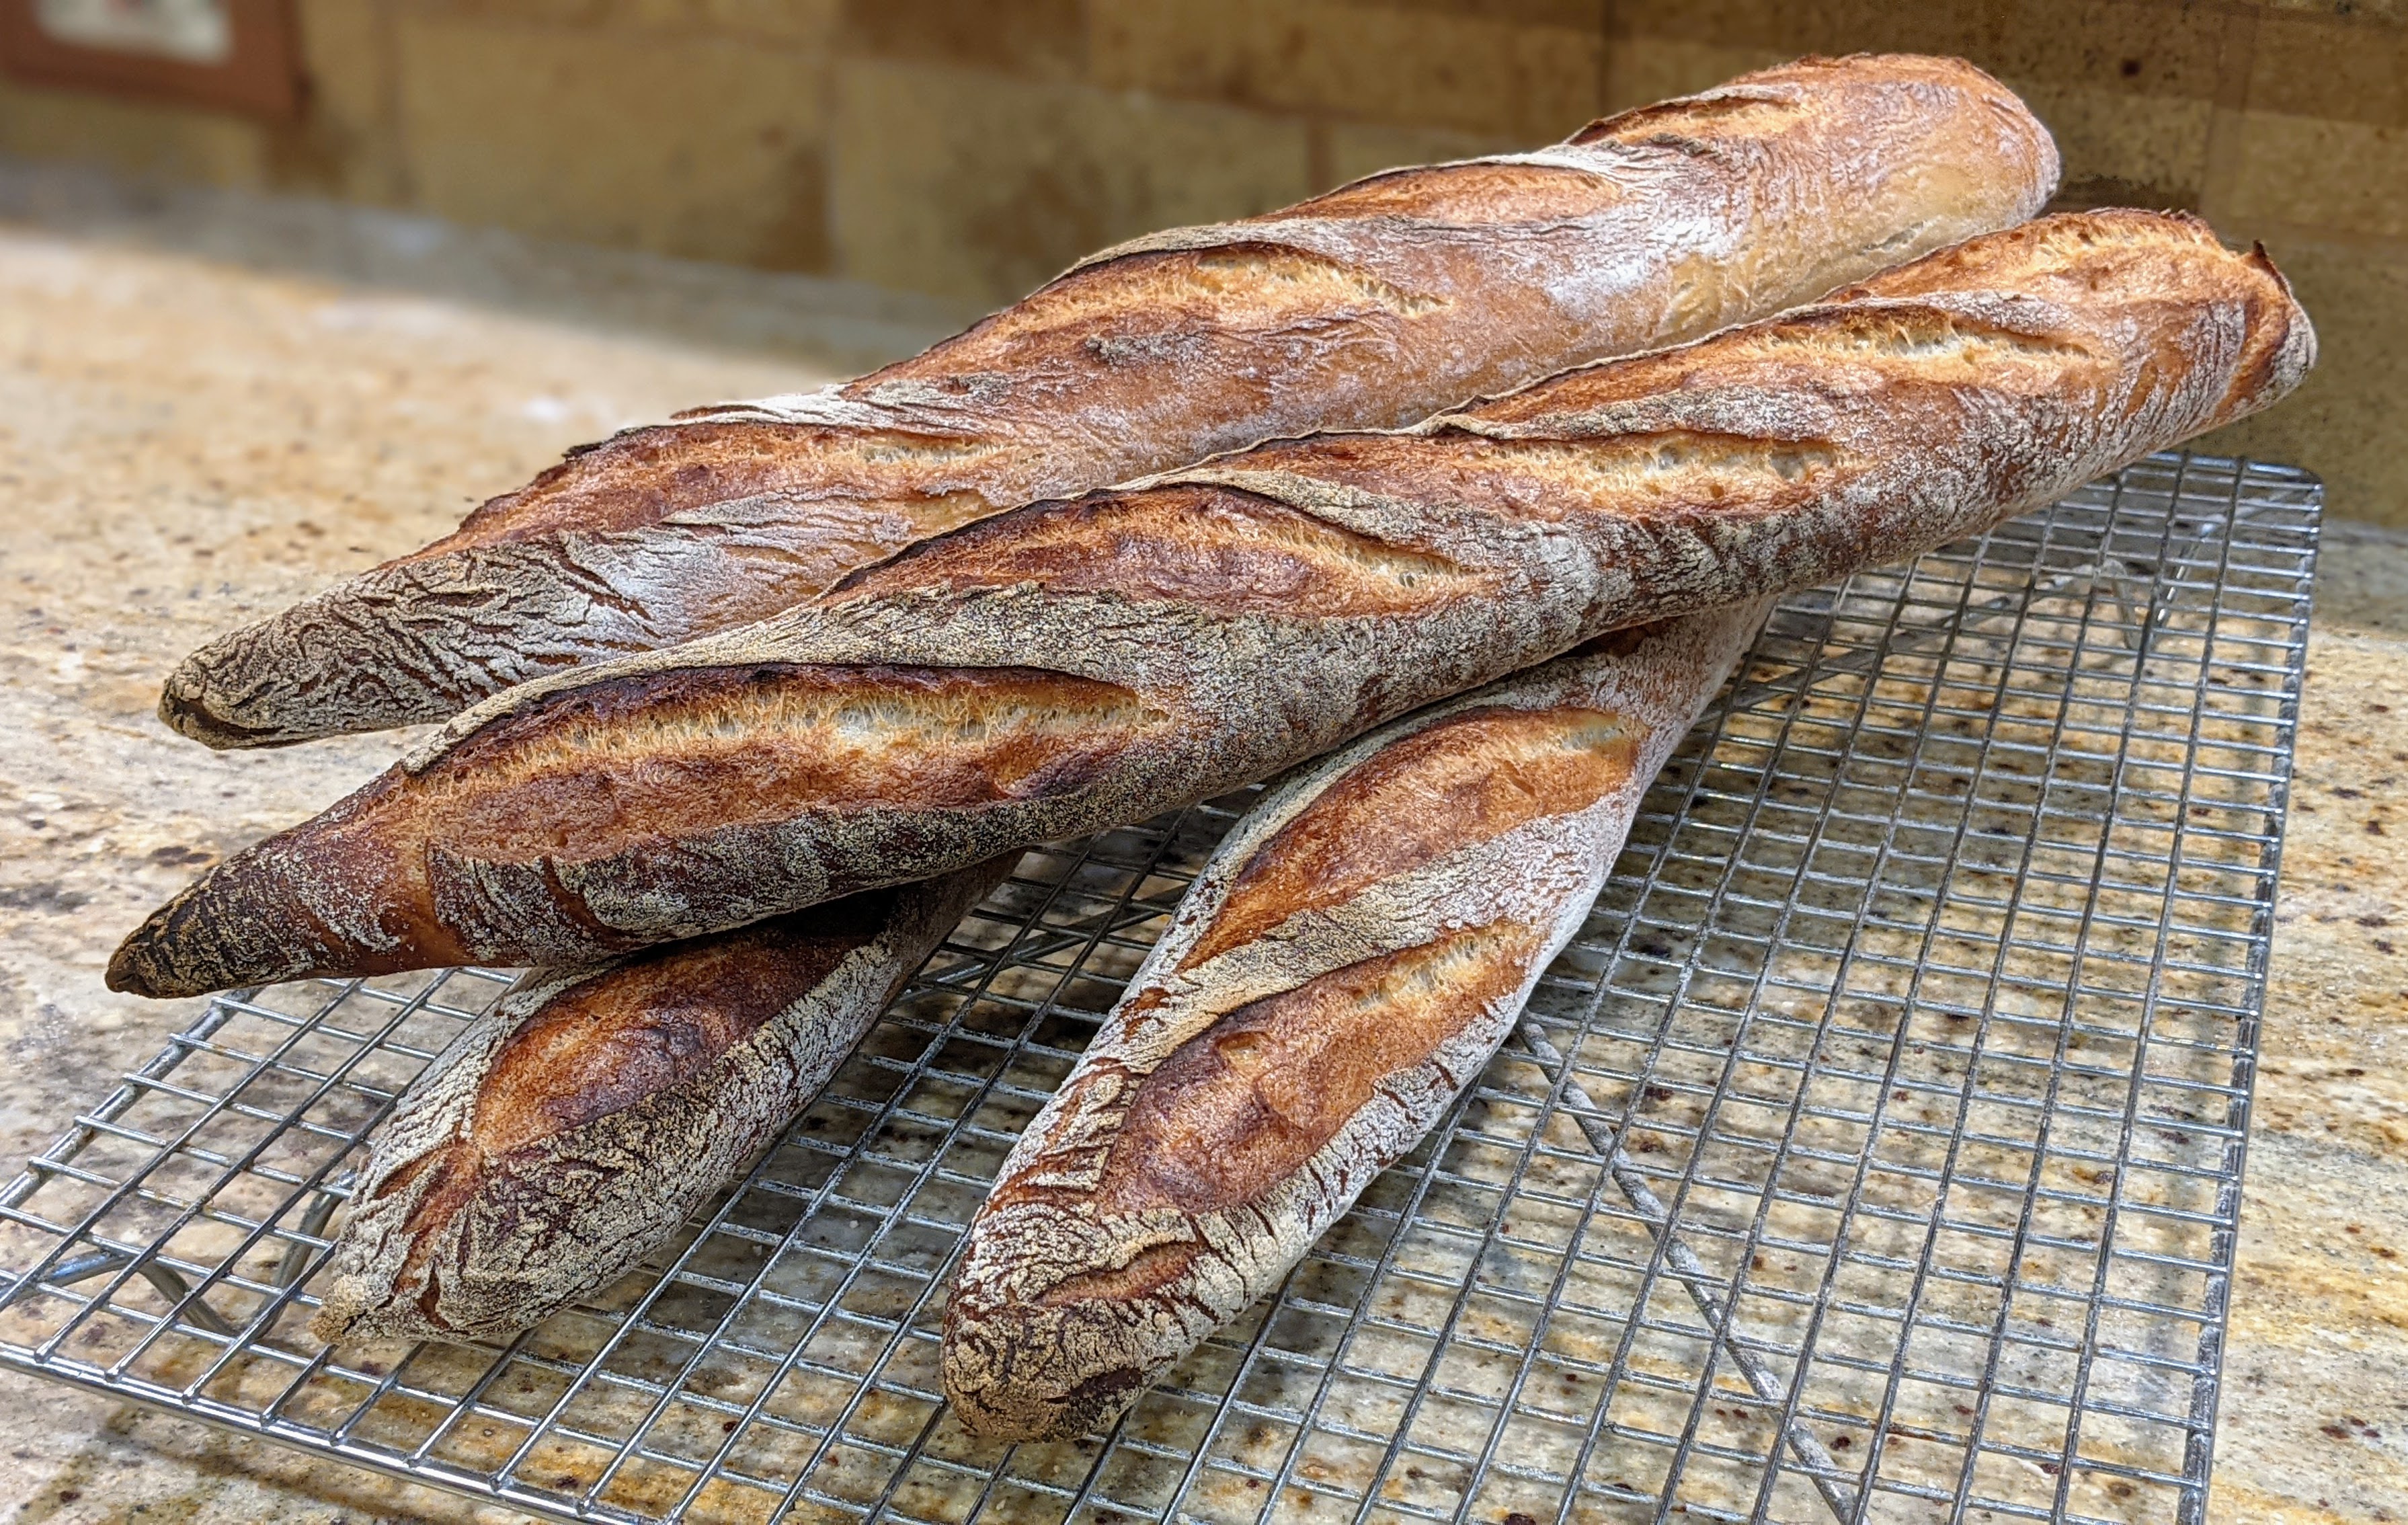
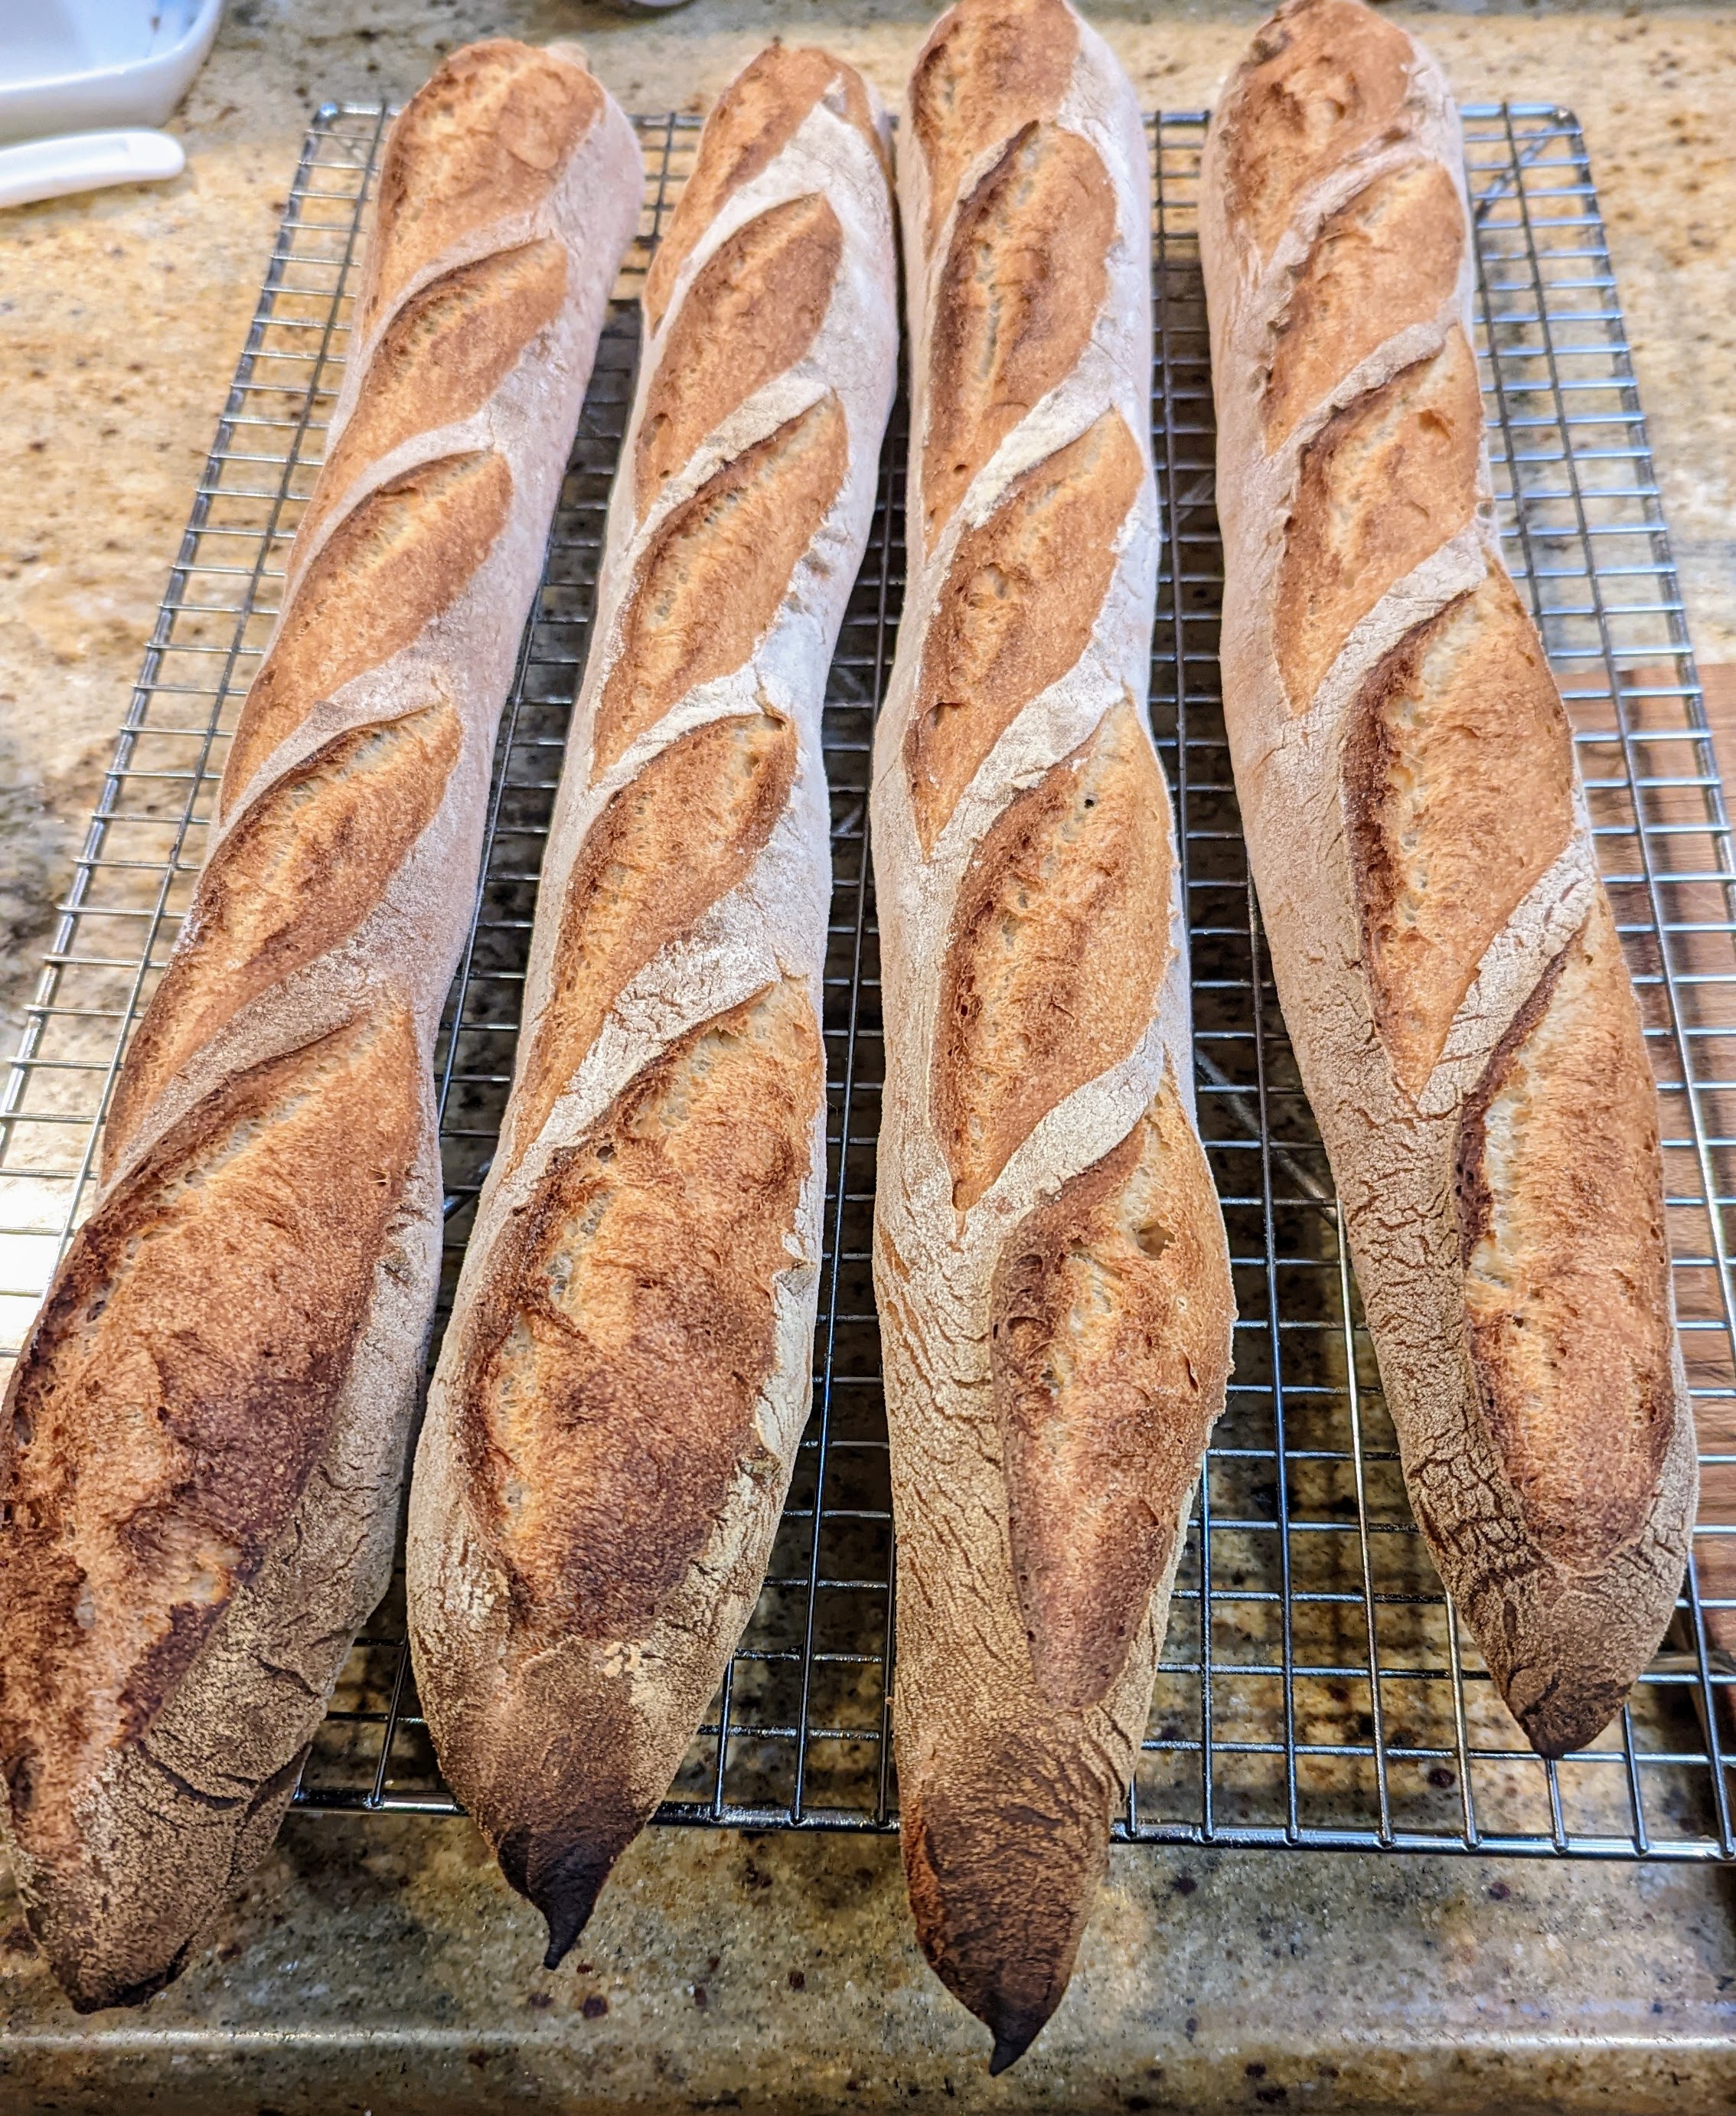
The loaves could’ve benefited from a longer final fermentation. As you can see in the pictures, they turned out fine, but I think I could’ve had them even puffier had I let the final fermentation go longer. That said, I will have to monitor their progress carefully if I use low-protein flour.
Once the final fermentation is complete, I cannot stress enough that you handle the shaped loaves as gently as possible.
I must admit that I’m still a little bugged by the yield in the original recipe and the recommendation to break up the dough into 2 or 3 pieces. But despite that, I will relegate that to copy-editing oversight.
Update 9/4/2025 – To be honest, I never liked the low hydration of the dough because the texture of the crumb was more like traditional sourdough in that it was chewy. Baguette crumb should be chewy to some extent, but not nearly as toothsome as sourdough. So, I used the same technique but changed the hydration to the standard 75%. They’re much lighter with a nice, open crumb. Plus, I add a bit of diastatic malt powder (0.5%) to help soften both the crumb and crust.
When you see the Real Bread loaf mark, it indicates that this recipe produces bread with no artificial additives and is leavened either by a natural starter or commercial yeast.
Okay… who am I that I should even have the audacity to correct Chad Robertson? But when I see a recipe in a book that’s obviously wrong – I don’t care if the author is a world-renown baker and I’m just a peon baker of a relatively unknown micro-bakery – I’m going to point it out.
So what got this bug up my ass about the baguette recipe in Tartine Bread? There are a few things I found in the recipe that seem off. The first issue is that the total yield of the recipe far exceeds what you actually need to make 2 to 3 baguettes as suggested in the book. Furthermore, the amount of yeast used in the poolish seems a little much for the amount of flour and water. And finally, the hydration seems awfully low based on my own research and experience.
By themselves, these issues aren’t really that bad. I have no doubt that the recipe will yield some very tasty baguettes. But all together, they make the recipe seem a little off to me. Again, these are minor things, though the dough yield is actually pretty major. Let’s dive in…
Here’s the recipe from the book:
Leaven
400g
Water
500g
Poolish
400g
All-Purpose Flour
650g
Bread Flour
350g
Salt
24g
Total Yield
2324g
Before the recipe, he writes:
Makes 2 or 3 baguettes
When I originally read that, I immediately thought that recipe amounts would be pretty small. But when I saw the amounts he was calling for, I immediately said out loud, “No friggin’ way!” Then that made me analyze the recipe even more.
Right-sizing the Recipe for Home Baking
I know, I know. Who am I to correct a master? But from everything I’ve learned about making baguettes, 40cm demi-baguette dough generally weighs about 220g. Standard 60cm baguettes are about 330-350g apiece depending on the oven. The amounts listed in the recipe would make 10 demi-baguettes or 7 full-size baguettes! Even if we scale out 400g pieces (as he mentions his are in Tartine Bread), that is enough dough to make more than 5 of those! So that must’ve been a typo. Furthermore, if you look at the pictures in the book, there’s no way that the dough pieces are 400g. But look, if you read the book and follow the recipe, just know that it’ll make more than 2 or 3 baguettes.
In light of that, here’s what I’ve been able to glean from the recipe in the book.
Overall Formula
Flour
100.00%
Water
64.00%
Salt
1.70%
Yeast
0.00%
Total Percentage
165.70%
Preferment (Both Levain and Poolish)
Note that the flour from both the levain and the poolish contributes ~14.25% of the total flour apiece. So for the final dough, you’ll need about 230g of each of the levain and poolish. I just combined the two for my calculations.
Preferment Flour %*
28.6%
Hydration %
100%
Preferment Flour Weight
229g
Preferment Water
229g
Preferment Required
459g
NOTE: Both starters use AP flour
Final Dough
Flour
575g
Water
286g
Salt
14g
Preferment
459g
Yield
1330g
4 X ~330g loaves 6 X ~220g loaves
This yield is much more sensible for a home baker. I realize that many folks don’t have a baking stone and can’t make full-size baguettes. Not a problem. The final dough weight of 1330 will make 6 X 220g 40cm baguettes, which is about 15″. If you have 15″ baguette trays, these will fit right on them!
As far as dough development is concerned, Chad Robertson uses the same process for his basic country loaf, which involves 6 folds over a 3-hour period after mixing.
An Issue with the Poolish
Another anomaly I saw in the recipe is that the poolish is made of 200g AP flour, 200g water. and 3 grams of active dry yeast, or 2.25 grams instant yeast. His instructions state to let that stand for 3 to 4 hours at room temp or overnight in the fridge. Based on my experience, that’s way too much yeast for that small amount of poolish. That poolish will be ready in less than two hours, even in cold weather. An overnight fridge rest will have exhausted all flour. I would say use 0.5g instant yeast, or 0.75g active dry. Ideally, you want the poolish and the levain to be peaked at roughly the same time. With that amount of yeast, the poolish will be ready long before the levain. But maybe that’s not necessarily a bad thing as once the poolish is incorporated into the dough, the yeast will have a new food source.
Hydration? Hmm…
You’ll notice that the overall hydration is 64%. That’s not a bad thing, but it does make a stiffer dough. I have to admit that I’m a little dubious of the openness of the crumb with hydration that low. However, Hamelman’s Poolish Baguettes in Bread are only 66%. I guess there are many ways to skin a cat. But that said, everything I’ve learned about baguettes is that in general, they’re at least 75% hydration – but that has just been my personal experience. And no, I’m not being a high-hydration snob.
Believe me, I don’t want to come off as being some know-it-all, and I’m not the kind to actively look for fault in someone’s approach just to make myself feel better. That’s absurd behavior. But being a home-based baker myself, I wanted to point out a few minor anomalies I found. Especially with the dough yield, I just couldn’t imagine making a baguette from almost 1200g of dough! 🙂
As for the dough itself, I see no problem with it. In fact, the high amount of preferment that’s used will make the dough much more extensible, despite it being such comparatively low hydration to what I’m used to – at least that’s what I’m thinking will happen. But there’s no better way to find out than to make these! I’ve never even considered using both a levain and a poolish together. I’m excited to see how it will turn out!
I made the loaf above a few days ago. It tastes great. It has a great texture. It is flat! Flat! FLAT!!! F$%k!!! The worst of it is that I knew it would turn out like this because it was WAY too hydrated for the protein content of the flour I used. Well… serves me right for following a recipe without compensating for the ingredients I had on hand.
That loaf is Chad Robertson’s 60% Kamut loaf from his Tartine No. 3 book, which focuses entirely on baking bread with whole grain flour. In his recipe he mentioned, “Due to the high protein in Kaumut flour, this dough can take a lot of water.” Stupid me, I took that at face value and made the bread straight from the recipe before checking on the actual protein content of the Kamut flour I have.
My Kamut flour is only 11.7% protein, the same protein content as AP flour. And I upped my hydration to 92% based on his notes in the book that say he usually takes the hydration up past 90%.
STUPID! STUPID! STUPID!
I’m actually laughing as I write this because it’s SUCH a rookie move. And I admit that I probably let my excitement over Chad Robertson doing a recipe with one of my favorite flours get the better of me. And in my zeal, I pushed through the process and didn’t spend enough time studying. Oh well, lesson learned.
This time around, there are a few things I’m going to do to make this a successful bake:
I will use vital wheat gluten to up the protein content of my flour to provide more mechanical strength. I did some research and I saw Kamut flour ranging in protein content from 15% to 17%.
One thing I missed in Chad Robertson’s instructions was that he does a fermented autolyse in that he performs his autolyse with the starter incorporated into the flour and water. I will do that this time around. That will really get the yeast in my starter going!
I will also stick with his basic 85% hydration to start out with. If the dough is still a little stiff at this level, I will do a bassinage in one of my folding sessions to give time for protein to build up first.
As much as it is frustrating, I love the learning process. I may swear a lot in the process, but damn! A good finished product trumps any failures!