I know, that’s a no-shit-Sherlock statement. Obviously, you can’t make bread without it. But there’s more to that statement than just the ingredient itself.
For dietary concerns, I’ve recently started incorporating more whole grain into my dough and I’m really looking to eventually move entirely to whole grain bread. I’ve made some loaves with nominal success with varying blends of bread and whole wheat flour. I’m blending mainly because of the crumb. 100% whole wheat dough, unless it’s worked for a long time or up above 90% hydration, just doesn’t rise that much – even with helpers like vital wheat gluten or psyllium fiber. Those provide a little help with oven spring and rising, but you just won’t get that wide crumb.
Enter white whole wheat flour.
From what I’ve been able to gather in my research, white whole wheat flour will get me that wide crumb. Granted, I still have to ferment it a long time and work it more than regular bread flour, but it apparently works great. Furthermore, by law, whole grain flour cannot have any GMOs in it and that’s a big concern for me and actually, a big reason why I’m moving to whole grain flour (or making sure I’m using flour produced by a company that ensures their flour is non-GMO certified, like King Arthur).
Given that, I’ve spent the last few days researching different brands.
And this is where I’ve gotten into a bit of a conundrum. Brands like King Arthur or Bob’s Mill tend to be a bit pricey – even with free shipping with Amazon Prime. Others, like Stafford County Flour Mills Hudson Cream Whole Wheat flour, are exceptionally reasonably priced, but shipping is expensive. For instance, a 50-pound bag of their Hudson Cream Whole Wheat is only $12.60 direct. But shipping is $48! See what I mean? Now that’s comparably priced to King Arthur with “free” shipping from Amazon, so I don’t feel too bad about the total price.
On the other hand, I found a great flour called Kansas Diamond White Whole Wheat flour. It has gotten great reviews. But it is produced by Archer Daniels Midland, which is a HUGE agriculture conglomerate on the scale of ConAgra – get the picture? No, I’m not looking at them as the evil empire, but for me at least, I think it’s important to support independent producers; especially independent farms and farmers of which there are fewer and fewer as time passes.
And speaking of Amazon… as of late, I’ve really been doing my best to NOT buy from Amazon. We’ve all heard the tales of their business practices and how they treat their employees, and let’s face it: Jeff Bezos is a wealth-hoarder. I have some serious issues giving my financial support to someone who has so much, but shares so little.
Circling back to the title of this post, I am of the conviction that it’s important to know where your ingredients come from – or at least as much can be known. And I think it’s essential to provide direct support for the small, independent businesses that are quickly being gobbled up by the big corporate machine. Small businesses and the people who work and run them are the salt of the earth. For this writer at least, I want to make sure my life is seasoned with them!
I’m not sure why this is, but it seems that people equate making artisan bread with sourdough. I’ve shown several people pictures of the some of the loaves I’ve made and to a person they ask if they were sourdough loaves. What? Is making sourdough some kind of rite of passage?
To tell you the truth, while I like sourdough bread, my personal preference in taste is for yeasty, non-sourdough bread. Both traditional French and Italian loaves are not sourdoughs. They’re yeasty with an expansive crumb and have crisp crusts. But still, many people who have been following my posts still ask if I’m going to make sourdough. I answer that eventually, I’ll get around to it, but I’m not in a big rush.
But to be completely honest, even though my tastes run to the non-sourdough variety of bread, I have been completely immersed in developing my technique. Like any good cook, I’ve totally focused on my mise-en-place and working out my moves.
I don’t want to just bake different types of loaves or work with different dough hydration rates. I want to make a consistent product. That takes doing things repeatedly and developing my sense of all the ingredients and implements I need to get me to a high level of consistency – mise-en-place.
I don’t have any aspirations of being a professional bread baker, but when it comes to cooking, what I do aspire to be is a great craftsman. This is why I’ve geeked out on bread making. For me, it’s not enough to be able to say I know how to bake bread. I have to KNOW how to bake bread; that is, I have to have developed the craft so that on any given day and in any given environment, I can produce loaves of the same quality. For me, when I learn to cook something, I need to get to the point where the process becomes intuitive.
Take grilling meat, for example. I’m known in my local community as the guy who cooks whole pigs over coals. I’ve been doing it for over 40 years, having learned how to do it from my father when I was teenager. I’ve done it so much that I instinctively know what to do given the size of the pig, the temperature of my pit, the ambient temperature of the day, etc.. In other words, I can roast a pig with my freakin’ eyes closed, and I’m not bragging when I say that. It’s just a matter of fact.
I’m not there yet with baking bread. I’m getting there, that’s for sure. But there are so many things that I still need to learn before I can confidently say that I’ve attained a level of expertise. And because of that, I’m in no rush to make sourdough bread.
Since I’ve started to finally get this whole artisan baking thing down, I thought I’d share some thoughts on what I feel are the essential tools you need to successfully bake quality bread at home. These aren’t in any particular order of importance; to me, they’re all equally important.
Digital Scale
My first month of baking, I used recipes based completely on volume (cups, tablespoons, and teaspoons). But real recipes always listed things by weight; specifically, in grams. The reason is because to a baker, everything is measured by percentages in weight, based on the flour. This makes it easy to scale a recipe up and down if you know the percentages. For instance, if a recipe calls for a 72% hydration, you know that the weight of the water divided by the amount of flour will be 0.72. So if the recipe calls for 1000 grams of flour and is 72% hydration, you know you’ll need 720 grams of water.
I normally take 1000 gram recipes down to 800 grams because that works better with my KitchenAid stand mixer. But I could easily go up from there as well. Get the picture?
You don’t have to spend a lot of money on a digital scale. My 22-lb. capacity scale costed me $15, and it works great. It’s not as precise as a professional kitchen scale, but for my purposes it works.
Plastic Scraper
I have a few of these, but I normally just use one scraper that I originally used for taping drywall. It has a flat edge on one side and a curved edge on the other. I love it because I can bend it to fit the curvature of any bowl that I use.
Even before I got a digital scale, this was a tool I knew that I could not be without. I can scrape dough off the sides of my bowls, I can scrape my bench, I can collect bench flour. I even use it for folding my high hydration dough so I don’t get too much dough on my working hand.
I actually got mine for free as a promo item from a sewer blockage company – go figure – but it works incredibly well!
Bakers Lame (pr. “lahm”)
To score loaves, a lame is indispensable. Basically, it’s a razor blade in a handle and can be curved or straight. Personally, I made my own curved lame from a wire hanger and a BiC pen. 🙂 And for my straight lame, I actually use a straight-razor because it works great for scoring.
You could use a super sharp knife, but it has to be razor sharp. You also could use a razor blade all by itself, but you risk cutting yourself.
Bakers Couche
This is not absolutely essential, but since I got mine, it has become something I can’t live without. I originally got it for proofing baguettes, but I use it for proofing all my long loaves, and I also use it to cover my bowl during bulk ferment. Very versatile.
It sounds obvious, right? You’d be surprised how many resumes I’ve seen that list experience that people just don’t have. For instance, awhile back you may have heard the news about former Yahoo CEO Scott Thompson lying on his resume about having a degree in Computer Science. This was back in 2012. At the time, there was a lot of outrage over this, and without a doubt, I shared the same views as many over this scandal. But after reading about it, and Yahoo’s initial “sheepish-grin-non-chalant-we’re-looking-into-it-wink-wink” response, I have to say that Thompson’s lying is indicative of a huge problem in our society, and that is the win-at-any-cost attitude that seems to pervade all levels of our society; even in education.
Following that news, there were major stories of cheating and lying in education. In addition to the Yahoo scandal, there was a student who got caught cheating in an honors class at Sierra High School recently. But the worst of it was his attorney father suing the school to get him admitted back into the program so it wouldn’t ruin his chances to get into an Ivy League school.
Are some people so morally corrupt and lacking in integrity that they’d even consider condoning this behavior? Apparently so. I listened to a panel discussion on NPR about this topic and a person called in and totally shocked me by admitting to cheating with other students in high school honors classes to get into the best colleges. They even maintained their lack of moral fiber and justified their cheating by saying that “it had to be done to get into quality universities.”
In my professional career as a software engineer and engineering manager, I’ve literally seen thousands of resumes. And I’ve gotten to the point where if I see that someone’s experience seems too good to be true it probably is too good to be true and I throw their resume in the waste bin.
But still, some slip through the cracks – and they even get hired. I once approved the hiring of an engineer who just happened to be the friend of a colleague. They vouched for him so naturally, I leaned heavily on their feedback. His resume looked great as well. He claimed that he was a manager at PayPal and when I asked him about this experience he looked me in the eye and talked about what he did (looking back, I realize that he cleverly answered my questions without really answering definitively – my bad for not catching it).
In any case, little did we know that once he was hired, he was in completely over his head. He knew very little about software engineering and had very little knowledge of UI languages (he was hired as a UI Engineer). And worse yet, he had an extremely toxic personality and loved to play politics. Needless to say, a few months into his employment, measures were taken to terminate him but he quit before he could get fired.
As a hiring manager, that experience sensitized me to what people put on their resumes and even more so, what I put on mine. And I’m not alone in this. Several other managers that I know have started putting extra scrutiny on resumes. So beware.
I’ve always been an innovator. Though I can create things independently, I’m much better at tweaking and improving an existing process. And I’m not boasting when I say that I’ve had a successful career in software development being an innovator. Call it a quirk of my personality; it’s just who I am.
When I picked up bread making a few months ago, within a week of playing around with recipes from Ken Forkish’s excellent book “Flour Water Salt Yeast,” (FWSY) I started experimenting with different variables in the bread making process. One of those things was what I kind of felt was breaking free of the Dutch oven.
While I loved all the content in FWSY, just a few times into making some of Ken’s bread recipes, I started feeling confined. I didn’t want to just make boules. I wanted to make buns and baguettes. I wanted to make pan bread and batards. But with a Dutch oven, I had one shape and one shape only: The shape of my Dutch oven. It felt incredibly limiting even though I was still learning.
So I started using a baking stone to bake all my bread; actually, two of them as I have a double-deck oven. That opened up a whole new world to me and literally forced me to learn about working dough and forming the gluten network structure. It forced me to learn how to properly shape all kinds of dough to create surface tension. It forced me to learn how to use steam to get a great oven spring.
Once I stopped using a Dutch oven, I had a few epic fails, mostly with collapsing loaves that would come out fairly dense. I’m smiling as I write this because they were ugly loaves! I’m a lot better with shaping now, though I realize I still have a ways to go. But in spite of that, I have a sense of freedom now that I’m not using a single baking medium.
Which leads me to the title of this post…
I was recently on an online forum where people share their bread making techniques and their finished products. Ninety percent of the folks shared their boules, which made me immediately think that they used a Dutch oven. I’ll be honest: When I read how they were making their bread, I immediately thought they kind of cheated.
I know. It makes no sense. These loaves were legit! Great crust, great crumb, and I imagine, great-tasting as well. But having graduated beyond the Dutch oven, I couldn’t help but feel that they were limiting themselves to just that style of bread. I immediately felt ashamed for thinking that, which is why I’m writing this post – kind of as an apology for being a bit condescending.
The plain fact of the matter is that I have completely geeked out on home-based bread making. I spend hours every day researching different techniques and adapting them to my home kitchen. I want to learn how to make all types of different bread. I want to experiment with different hydration rates and different flours. And the funny thing is that I can’t even eat 95% of the bread I make because I have high blood pressure! 🙂
So I realize that my journey is completely different from others. And to avoid ever descending into sanctimonious behavior, I’m going to share my journey in this blog.
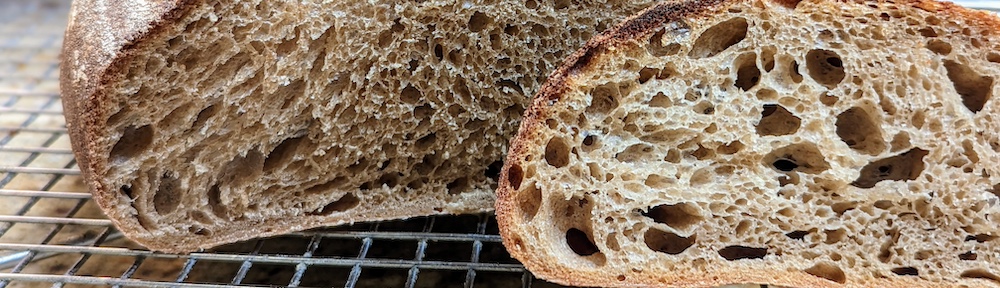
This bread is meant to be made in an afternoon (or less than half a day). And while using a pre-ferment like a poolish or a levain will certainly have more complexity in flavor, this is an absolutely delicious bread that stands on its own!
FYI, this loaf shaped by hand and proofed in a couche. I didn’t have any suitable batard baskets at the time! 🙂
Ingredients
The following will make two loaves about a pound and a half each. Note, I do all the mixing with a stand mixer. You can do all of this by hand if you want. I use a mixer up-front because I know I’ll get consistent results. This is a 70% hydration dough. It’ll be a little tacky but not floppy, and as you work it, it will become smooth and really strong.
BreadFlour
Water
Salt
Instant Yeast
800 grams
560 grams
15 grams (~1 tbls)
3 grams (scant 3/4 tspn)
100%
70%
2%
.4%
This is a 70% hydration ratio if you’re curious
A couple of important points:
Alternatively, you can replace 200 grams of the bread flour with fine or extra-fine grind whole wheat flour. But if you do that, up the water to 584 grams to make a 73% hydration dough – the wheat flour needs some extra water. Also, up the autolyse time from 20 to 45 minutes.
The amount of flour indicated is optimized for a 5-qt. stand mixer bowl. Other recipes call for 1000 grams, but I found that the standard KitchenAid dough hook will make the dough climb into the mechanism, and you’ll get machine oil in your dough – not good.
Note also that I use instant yeast. If you’re going to use active dry yeast, wake it up in a couple of tablespoons of 105-108 degree water. But bear in mind that you’ll need to remove that amount from the water measurement above. With instant yeast, you’ll just dump it into the dough.
You’ll notice that this recipe uses a significantly smaller amount of yeast than other recipes you might see. This is to ensure a nice, moderate yeast development. Don’t worry, you’ll distribute the yeast throughout the process by folding!
Dough Temperature Is Important!
Most online recipes will list water temps at 105-108 degrees to wake up the yeast, and that’s fine to wake up active dry yeast in a couple of tablespoons of water as mentioned above. But it’s too high if you use instant yeast, and at that temperature, your dough will go crazy and rise way too fast. This will affect the flavor and your finished product will be a little bland.
The prevailing wisdom is that your dough temperature should be only 75-80 degrees when working it. To figure that out, you need to measure the temperature of your flour (I use a digital thermometer), then you can use the table below to get near the proper temp (it doesn’t have to be exact):
Flour Temp
Water Temp
55
110
60
100
65
90
70
80
75
70
80
60
85
50
Hydrate the Dough
Mixing the flour and water first activates enzymes and releases sugars in the flour that help with fermentation and also start activating the gluten in the dough. Also, especially with high hydration doughs, it gives the flour a chance to absorb water up-front. This process is called autolyse (pr. ahto-lees).
Place the flour into your mixing bowl. Attach your dough hook to your mixer. Set the mixer to its slowest speed, then slowly add the water. Mix until the flour and water are incorporated (it’ll be lumpy). You can help the mix by occasionally stopping the mixer and scrape the sides down with a silicon spatula. Once fully incorporated, let the flour-water mix rest for at least 20 minutes.
You can also mix by hand, which some may prefer. I like to use a mixer for this first step because I get a more consistent and faster mix.
Start the Fermentation and Initial Folds ~ First Hour
Evenly sprinkle the salt and yeast over the top of the dough, then slowly incorporate them at the lowest speed setting on your mixer (you may have to do the occasional scrape down of the sides). Once the salt and yeast are incorporated, dump the dough onto your board or counter. Do not flour the surface as you will mess up the ratio!
Knead the dough for 6 minutes. You can refer to this video for proper kneading technique:
In the video above, Jack said to knead the dough for 10-12 minutes. But after initial kneading, we’re going to fold the dough a couple of times (or a few times) over the course of the first hour, so we don’t need to do the full 10 minutes. Just make sure you work out the lumps!
Let the dough rest for 10 minutes.
After 10 minutes, fold the dough. Here’s a great video on how to properly fold dough:
My preferred method of folding is in a bowl, but I use my hand instead of a scraper or spatula as in the video. It allows me to feel the dough better. No matter what method you use, be careful to not tear the dough.
Rest the dough for 50 minutes, then fold again. Once you’re done folding, invert the dough to rest on the folds.
TIP: At this point, the dough should feel smooth and luxurious in your hands. I love when it gets to this point!
Fermentation ~ Hour 2
After letting the dough rest and ferment for an hour, do one more fold and again invert the dough to rest on the folds and let it sit for another hour.
TIP: If you replaced a 1/4 of the bread flour with whole wheat flour, I’d recommend doing a fold after a half-hour after your first fold, then do the final fold a half-hour after that.
Final Fermentation?
Maybe… This final step can take an hour or it may require more time. What we’re looking for is that the dough ball has expanded in size (around 50%) with plenty of bubbles on the surface (not popped, mind you). But with dough fermentation, there are so many variables that affect how fast a dough rises from ambient room temperature and dough temperature or how much yeast you used that it’s difficult to pinpoint an exact time. But in general, the final fermentation should take 1 1/2 to 2 hours after the final fold if the ambient temperature of your room is around 70- to 75-degrees.
TIP: When I have the time, I use a scant 1/2 teaspoon of yeast to let the yeast develop slowly. I also do a couple of more folds than are called for in this recipe. I also use this small amount of yeast if my kitchen is really warm.
That said, check the dough after an hour. If it doesn’t show much activity, don’t panic. As long as you smell a sourness and perhaps a bit of alcohol, it’s all good. You can help the dough along at this point by doing one more fold. But this time, be extremely gentle with the dough and do not tear it! Once you do this last fold, your dough should really expand and become jiggly. Just be patient!
TIP: For goodness’ sake, don’t fret about the time! 🙂 Fermentation is not something that can be bound by time. I do a lot of vegetable fermentation (specifically hot peppers, and it sometimes takes several weeks to get the peppers where I like them – especially in cool weather). Take note that published recipes are written to address an average of conditions. Use your eyes and your hands. Don’t just blindly follow a recipe’s time table!
The reason we’re going 3-4 hours for fermentation is to allow the bacteria to do some work as well as the yeast. This is why I use a small amount of yeast. It gives airborne bacteria and naturally occurring yeast to play a role, however minor, in the fermentation process and flavor development.
Shape the Dough
I learned to shape a batard by watching the following YouTube video (actually I watched a bunch of them, but I prefer Jack’s method of pre-shaping and shaping). Check it out:
NOTE: You can certainly divide into fourths, as in the video, but this recipe is optimized for two medium-sized loaves.
Before you start shaping, turn your oven on to 475 degrees. If you have a pizza or baking stone, make sure it’s in the oven on the middle rack. And on the lowest rack, place a metal baking pan (you’ll be adding a cup of water later to create steam for the first 10-15 minutes of the bake – I’ll explain later).
Once shaped, sprinkle flour on the top of each loaf.
Place a piece of parchment paper on a peel or the bottom of an inverted cookie sheet if you don’t have a peel. Cover each loaf with a clean towel or paper towel.
TIP: You can also proof in a proofing basket, but it’s not mandatory. If you’ve created enough tension on the surface of your dough while shaping, it will stand on its own just fine and not collapse during the final proof.
In warm weather, your proof may not take long. At the height of summer as we are in right now in California, my loaves have been fully proofed in just 20 minutes, which is why I don’t provide a specific time. But, it’s easy to determine if your dough’s ready using the finger-dent test.
If you push your finger into the dough about a 1/2″, and it springs back immediately, leaving a very small indentation, it’s not ready. But if the dough springs back slowly and the indentation stays even after a few seconds, it’s ready. I realize that this isn’t very exact – it’s a real feel kind of thing. But to me, that’s one of the beauties of mastering bread making – and I’m not a master by any means, but I do love the uncertainty.
Scoring the Loaf
Scoring your loaf gives it that artisan look, but it also ensures that you’ll be letting out steam from the bread in a controlled fashion and prevent huge bubbles forming under your crust or eruptions in odd places on your loaf. Here’s a great video showing different scoring patterns and techniques:
In general, with long loaves like batards and baguettes, cuts should be made fairly parallel to the long axis of the loaf. With boules, you’re pretty free to do what you want. This article explains the hows and whys of scoring a little more in-depth than the video.
Time to Bake!
Before you place the loaf in the oven, heat up some water (it can be hot tap water). Fill a glass or container with about a cup and set it near the oven.
Now, get your loaf, and slide it onto the baking stone. Before you close the door, carefully pour the cup of hot water into the metal baking pan. This will create steam which will help the oven spring.
Set your timer for 20 minutes. Once it goes off, remove the parchment paper and rotate your loaf 180-degrees to ensure even baking. Also, remove the water pan if there’s still water in it. Bake for 10-15 minutes more: 10 minutes if you want a golden crust, 15 if you want a darker crust. Personally, I like the darker crust, and will sometimes even bake 17-20 minutes longer to get to a darker crust color.
A dark crust ensures that the Maillard reaction occurs, which happens at high heat, causing the amino acids and sugars to interact. It’s what gives carmelized foods their distinct taste. It’s not burned, it’s caramelized and to me at least, it’s the sign of well-baked bread. In my finished loaves, I want to see three colors on the crust: Brown, Yellow, and White.
Finally, remove your loaf and place it on a cooling rack and let it cool for at least 45 minutes before cutting.
That’s it! I know this was a rather lengthy article, but if you follow these steps, you’ll make a great straight dough bread time after time!
Want to Use Whole Wheat Flour?
If you want to use whole wheat flour, I recommend starting with half whole wheat and half bread flour with this recipe. You may not get all the benefits of a 100% whole wheat, but you’ll get more nutrition than a pure white bread. Given that, unfortunately, this turns the process into a bit of an all day affair – you just start in the morning instead of the afternoon and most of the time’s spent waiting anyway, so it shouldn’t be a big deal.
Given a 50-50 ratio white to whole wheat flour, keep these things in mind:
Increase the hydration up to 77-80% (640 grams of water) instead of 560 grams. Wheat flour absorbs more water than white.
Increase autolyse to at least an hour to allow the whole wheat flour to absorb the water. Some folks autolyse for hours anyway, but in keeping with doing this in a day, you don’t have to go so long.
Because this is higher hydration dough, I don’t recommend kneading after mixing. Instead, do at least 4 or more folds in the first two hours. You’ll know you’ve done enough folds when the dough has good tension and it doesn’t collapse much after folding. You can also do the windowpane test to check your dough’s doneness.
Alternatively, you can avoid doing all the folding and popping your dough into a container and let it ferment in the fridge for 24 hours or even up to 5 days. This slower fermentation really develops flavor!
Who doesn’t love coffee? Or should I say need coffee?
At least in America, coffee, especially that first cup in the morning, it’s practically a moral imperative. That first cup signals the start to our day; that first jolt that helps take the edge off our sleepiness. Ah! To me at least, it’s one of God’s greatest gifts to humankind.
For coffee-drinkers, I think we can all agree that there really is nothing better than that first sip. But taking a more amusing perspective on it, what that first sip represents to women versus men wildly differs between the two sexes. Mind you, this isn’t something you’d find in the famous relationship book “Men Are from Mars, Women Are from Venus” but it does speak to a similar theme: If we understand each other better, we can have better relationships. Granted, it’s a much more colloquial perspective, but it’s yet another way of understanding how men and women differ.
Women are multi-taskers. I’m constantly amazed at how they can do so many things at once. I’ve been married almost 30 years and I can’t keep up with everything my wife is doing. I look at our online family calendar and it’s all her stuff! And having a central calendar like that isn’t unique to us. She got the idea from a group of moms she hangs out with; it makes my head spin.
So given that, that first cup of coffee for a woman is that spark that ignites her multi-tasking engine. She feels that caffeine coursing through her veins and she transforms into Super Woman, flitting about the house, getting the kids ready for school while negotiating a better rate on her credit card, and in my wife’s case as a teacher, getting her stuff ready for class. This is all before 7 am. I have nothing but admiration and appreciation for a woman’s ability to think and act upon many things at once.
But for a man, that first cup represents something totally different. We’re focused creatures. We live our lives one thing at a time. We roll out of bed, relieve ourselves, perform our morning ablutions, then head to the kitchen to have that first cup. Nothing else is on our minds. We take that first sip and unlike a woman who probably visualizes the things she’ll be doing for the day we, on the other hand, close our eyes and are instantly filled with anticipation. The anticipation that after we finish that cup, we are going to retire to the bathroom and unload a massive dump.
And it ain’t that ooey-gooey, runny stuff either. It’s a log made from all the compressed waste that has accumulated in our colon overnight, pressing in on itself and building up into one long piece. And it comes out like that, piling on the bottom of the toilet bowl, curling around like soft-serve ice cream, replete with the curly point on top when our sphincter finally pinches together, finally having had enough of the onslaught.
And, of course, men take great amusement and perhaps a bit of guilty pleasure in dropping a smelly turd in the toilet. The more creative ones don’t let it pile. They’ll scoot their ass forward to lay cable, then stand up and admire their handiwork. But it doesn’t end there. Not only will they be proud of their accomplishment, they’ll tell their friends!
Crude and rude? Maybe. But like I said above, it’s a colloquial perspective on just how different men and women are. Sure, I could have taken a more scholarly approach and delved into studies and analyses. But I’ll leave that for the experts. I can only write about what I’ve observed over the years.
Okay, made it through Day 1 and just finished my breakfast, so I thought I’d write a diary of my process.
I actually tried to start doing the fast last Friday. Big mistake, since I knew I was going out that night. I was good and didn’t eat a thing after 4pm. But ended up having three beers and most of a basket of garlic fries at Dave Fabian’s gig. 🙂 I was a little better Saturday, but realized I blew it when I had a cocktail at bedtime. On Sunday I was generally pretty good all day but had dinner after Mass and a cocktail before bed.
So yesterday was the first real day of my 8/16 IF. It was not nearly as hard as I thought it would be. I was starving all night last night, but I think once my body adjusts, I should be fine. The best thing about fasting the night before is that I noticed my stomach had shrunken. I normally like a pretty big breakfast, but the little sandwich I had this morning was more than enough to tide me over. I’m going to get my root canal finished up this morning, so snacking will NOT be an issue. 🙂
The big challenge for me will be snacking after lunch. I had a bag of Chili Cheese Fritos after my lunch yesterday. I’m going to have to forego all snacks like this. If I do need a bit of a snack, I’ll have some nuts, but no sugar.
Having been a hiring manager on and off over the last 25 years, I’ve reviewed thousands of resumes. And I have to tell you that 95% of the resumes I see are – for lack of a better word – shit. This has never wavered whether I’ve looked to fill business positions or technical positions. Most resumes I get are crap.
I understand that I might be missing out on some potentially talented people, but the way I figure it, a resume gives me a first impression as to whether or not to talk to a candidate. And those whose resumes don’t possess a couple of critical traits will cause me to immediately pass on those candidates.
And when I say a “couple of traits,” I literally mean that I look at two traits, and no, unlike what seems to be popular these days with certain Mountain View, CA companies, one of those is NOT education.
Professional Summary
The first thing I look at is a professional summary or summary of qualifications. This is a simple paragraph that describes who you are and of what you’re capable. I really don’t care about an objective. After all, those are usually tailored to a specific position. Look, I know what you want to do. Your professional summary tells me why I should even take a closer look.
I’m not going to give examples here as there are plenty to be found online. So suffice it to say that your professional summary is your “elevator pitch.” In sales, this is your 10-15 seconds to catch the attention of your prospect, as if you were in an elevator and only had a little time to sell your product. In this case, the product is you, and the prospect is the hiring manager.
Employment
Here’s where I’m going to rant a bit because this is where so many resumes get thrown in the trash. I can’t tell you how many resumes I’ve seen where instead of describing what they did or accomplished in a company, they use that space to describe what the company does! When I see this, my immediate reaction is, So WHAT?!!! I don’t care what the company you worked for does, I care about what YOU did there! This is said while the crumpled resume sails through the air on its way to the trash.
For software engineers, you need to have the following:
Projects you worked on and your role in said projects
Any professional accomplishments/achievements while employed there
Technologies, frameworks, libraries, and methodologies you employed.
For more experienced engineers, the lists might take up some space. You can keep to your top three for items 1 and 2, but you should list as many as you can remember for item 3.
I realize that you might be worried that your resume will take more than three printed pages when you do this. But I really don’t know who prints out resumes any longer. Besides, at least for me, I don’t mind scrolling if someone takes the time to describe what they’ve done and what they’ve accomplished.
And since employment history is in chronological order, it gives me a great picture of how an engineer has progressed in their career; not just from a technology perspective, but how they’ve grown professionally over time.
The reason I wrote this rant is that I saw the resume of a former employee who is looking for employment. They actually had a great professional summary, but when it got to their work history, they only described the companies for whom they previously worked! I, of course, sent feedback to them and shared – albeit in a much more gentle way than this – how they could improve their resume. Hopefully, they’ll heed the advice.
In any case, especially for those of you entering the workforce, even though you may not have much experience, you’ll raise eyebrows if you tell the hiring manager:
Who you are
What you’ve done
What you’ve accomplished
Simple, right? And no, it’s not “easier said than done.” We sell ourselves every day. A resume is just another form of expression.
I’m sure you’ve heard of or read many inspirational sayings around being in the “NOW,” living in the present, etc. I myself as a former youth minister and career coach and mentor to many young people have given talks revolving around this subject.
One of my favorite sayings came from my own mentor who once told me, “Be clear about your goals, then give them up to the Universe, and the details will take care of themselves.” I know, it’s a real New Age-y thing to say, but it did strike home. What it told me was to stop focusing my attention on the little process details of achieving my goals. If I’m clear about what I wish to achieve and internalize what achievement of a goal means, I’ll naturally make the appropriate choices and changes in my life to achieve a goal.
That was advice I got literally thirty years ago. But let’s fast-forward to a conversation I recently had with my eldest son. He was lamenting the fact that he had studied a creative degree in college and couldn’t seem to find a job in his chosen field of study. He has been justifiably frustrated with this, and though he has gotten several side projects, he hasn’t been able to secure full-time employment in his field.
I empathized with him and told him I understood, but in addition, I happened to say this: “Son, you’re a dreamer like me. We look into the future and see all the possibilities the future has in store, and we want them now. But the reality is that we just can’t reach out to the future and grab our dreams and make them an instant reality. We have to deal with what we have – now – right in front of us. We have real issues that we need to face – now – right in front of us. This frustration you’re feeling is because you’ve got your eyes so fixed on the horizon that you’re stumbling on the obstacles that pop up right in front of you.’
‘Look, it’s not bad to have a dream, but there are more immediate things you need to take care of first to even start making your dreams a reality. For instance, you need to pay for your current life – food, rent, car, etc. So for now, instead of looking so far ahead that you miss what’s in front of you, put your focus five feet in front of you. You’ll still be able to see the future in the distance, but I guarantee you won’t trip on the obstacles that come your way.”
That was met with a little silence, and I realized that I had said something that hit home, something that he could conceptually work with. We’ve had these kinds of talks previously, but until that particular conversation, nothing really hit home.
After we hung up, I thought about what I had said and came up with a little mantra for myself that I’ll share here:
Focus five feet in front… (repeat)
As I said to my son if your focus is too far in the distance, you will stumble over the obstacles right in front of you. With a closer focus, you can avoid those obstacles.
The problem with focusing too far in the future is that just like looking out to the far horizon, you can’t make out any detail of objects, and by the time you reach that point in the distance, you oftentimes find that what you were looking at wasn’t at all what you thought.
For instance, one day recently, I was driving down the road and saw a shape in the distance. I immediately thought it was a dead animal, and it made me feel bad. But as I got closer, it turned out to be nothing but a brown piece of cloth that had bunched up. From a distance, it looked like a dead animal lying on its side. I laughed at my assumption. But that’s the point to this. Things far in the distance aren’t necessarily what they seem.
Another thing about our future is that it’s shaped like a funnel. We stand at the narrowest part of the funnel. As the funnel widens, so too do the number of different possibilities available to us. What causes so many of us so much anxiety is that when we place our focus into the wide-open spaces of the funnel, there are just too many possibilities to consider.
A common thing many of us do when faced with different possibilities is playing “what-if” games with ourselves. It’s fine to do with just a few possibilities, but imagine if there were lots of possibilities that we had to evaluate, which would be the case when we’re looking far into the future where there are several possibilities from which to choose. Add to that what I said about things in the distance not being what they seem from our current perspective – which means we’re also possibly playing what-if games with things that are not yet clear nor distinct. The net result is we become frozen because there are just too many factors we’re considering.
The way to overcome that is to bring our focus in where the number of possibilities is at an amount with which we can deal and the possibilities are things we can clearly identify. I use the “five feet in front” analogy to help drive that home. Now, some can handle more possibilities at once, but the point is to bring our focus back to where we can comfortably deal with the possibilities or issues within the limits of that focus.
Back in the early 90’s, I got into that “Personal Power” trend. I attended a different program, but it was similar to the Tony Robbins seminars. With those programs, one of the first things they’d drive home is that one of the ways to get yourself on a successful track was to start with achieving little goals first. Get the little wins to get you in the habit of achieving your goals.
The concept of focusing five feet in front plays nicely into that. When our focus is closer, it is easy to set easily achievable goals because the possibilities are right in front of us, and there are fewer possibilities to consider. As we learn to take care of those things and make them second-nature, we can start looking a bit further ahead at more distant goals. But our priority should be to take care of those things in front of us first.
Bear in mind, that this shouldn’t preclude us from looking to the future. But we should do it with the understanding that there are things that need our immediate attention first. So move your focus back, get the little wins first, and you’ll find that a whole new world may open up for you.