Batard Using Whole Wheat Poolish (Updated)

The loaf above just came out of the oven about 15 minutes ago as I write this recipe! This was a free-form batard where I didn’t use a banneton and proofed on a couche!

I love making bread from a poolish – or sponge – before I go to bed, then make a couple of loaves the next day. With this recipe, I’m using 25% fine-ground white whole wheat flour. You can use red whole wheat as well, but just make sure it’s fine-ground or extra-fine ground.

I will be upfront: It’s going to take a bit of patience, especially after mixing the final dough because there’s very little yeast used in total (I kind of wanted to simulate sourdough dough development). But your patience will be rewarded with a slightly sour bread with a wonderful, light, chewy texture. I did my folds in between meetings today! And the bulk ferment took about 5 hours. So yeah… it takes patience. Without further ado, let’s get to the recipe!

Overall Formula

Bread Flour75%
Whole Wheat Flour25%
Water75%
Salt1.5%
Yeast (Instant)0.075%

Poolish

Fine- / Extra-Fine-Ground Whole Wheat Flour250g
Water250g
Yeast (Instant)0.25g
Since the recipe calls for 500g of poolish, it’ll be a good idea to make more than what you need like 520g.

Final Dough

Bread Flour750g
Water500g
Salt15g
Yeast (instant)0.5g
Poolish500g

Make the Poolish

Just-mixed poolish, ready for a long nap.

The evening before you bake, in a large bowl, mix up the ingredients for the poolish until everything’s incorporated. Make sure to scrape down the sides of the bowl with a spatula. Cover the bowl with plastic wrap, making sure it vents to release the gases. Let it sit and do its magic for 12-16 hours. If your kitchen is really warm like mine, 12 hours is the max! But please do not rely on time! What you’re looking for is the poolish being bubbly and slightly domed on top. It should pass the float test (see picture below).

Tip: Alternatively, you can pop the poolish into your fridge and let it develop for 18 to 24 hours. I’ve found that this actually mellows the sourness a bit, but introduces some interesting nutty and earthy notes. NOTE that if you decide to do this, let your poolish “wake up” for an hour at room temp before doing the final mix.

Poolish is ready and passes the float test.

The Next Day ~ Mix and Bulk Ferment

Measure the temperature of your flour. We’re after around 75-80-degrees of final dough temperature. Use the following table to determine the temp of your water:

Flour TempWater Temp
55110
60100
6590
7080
7570
8060
8550

Add the rest of the water, salt, and yeast to the bowl with the poolish and mix thoroughly with a dough whisk or fork until the poolish is fully dissolved. Once combined, add the bread flour in batches.

Using a Danish dough whisk makes quick work of bringing ingredients together. That was probably one of the best investments I made for baking bread. By the way, that’s a 24″ wide mixing bowl. I prefer mixing in a huge bowl like that because it makes mixing by hand much easier as I don’t have to worry about ingredients popping out of the bowl!

Form the dough into a rough ball and let it rest in the bowl for 10 minutes. After 10 minutes, fold the dough, then turn it over to rest on the folds. From there, fold the dough every 30 minutes for the next 2 hours or until you feel the dough is strong and extensible (hint: do the windowpane test to see if it is developed enough). Other than the windowpane test, I know the dough has developed enough strength if I can take 1/4 of the dough ball and stretch it up about a foot without it tearing. But bear in mind that as you are using whole wheat flour, you need to be gentle when handling the dough!

I use a 6-liter Cambro container for bulk fermentation.

Finally, cover the bowl and let the dough rest for 2 hours or until it has expanded about 25% to 30% in volume with a nicely domed top. You may not see bubbles on top, but that’s okay. Give your container a gentle shake. The dough should be jiggly, which means there are air bubbles in the dough, which is what you want! If you don’t see much growth, and the dough’s not very billowy, just give it more time.*

Tip: Turn on your oven to 475 before dividing and shaping. If you’re cooking on a stone, make sure it’s placed on the middle rack and you also place a metal baking pan (I use a sheet pan) on the bottom rack. You’ll be pouring a cup of hot water into the pan to create steam.

If you’re using a Dutch oven, place it in the oven now so it’s hot when you’re ready to bake. A steam source isn’t necessary for the Dutch oven since the baking bread will provide enough steam in the enclosed chamber.

*Notice that I didn’t say wait until doubled. The whole doubling in size that you often see is a little misleading. Most recipes, even some of my early recipes, give that as a telltale. But to be honest, if you let your dough fully double or even triple in size, chances are that you’ll end up on, or close to the very end of the fermentation cycle where the yeast and microbes have no fuel left for the final fermentation. This is why I mentioned inspecting the dough to see if it’s jiggly (which means there are air bubbles in it). I’ve learned to rarely let the dough go over 50% expansion in volume unless I will be shortening the final proof.

Typically, you’ll see a double in size telltale with quick bread, or bread that is baked within a few hours. Those typically have a fairly short final fermentation. But with this particular bread, we’re only using a very small amount of yeast, so dough development is much more akin to sourdough as the rising process is much slower.

Divide and Shape

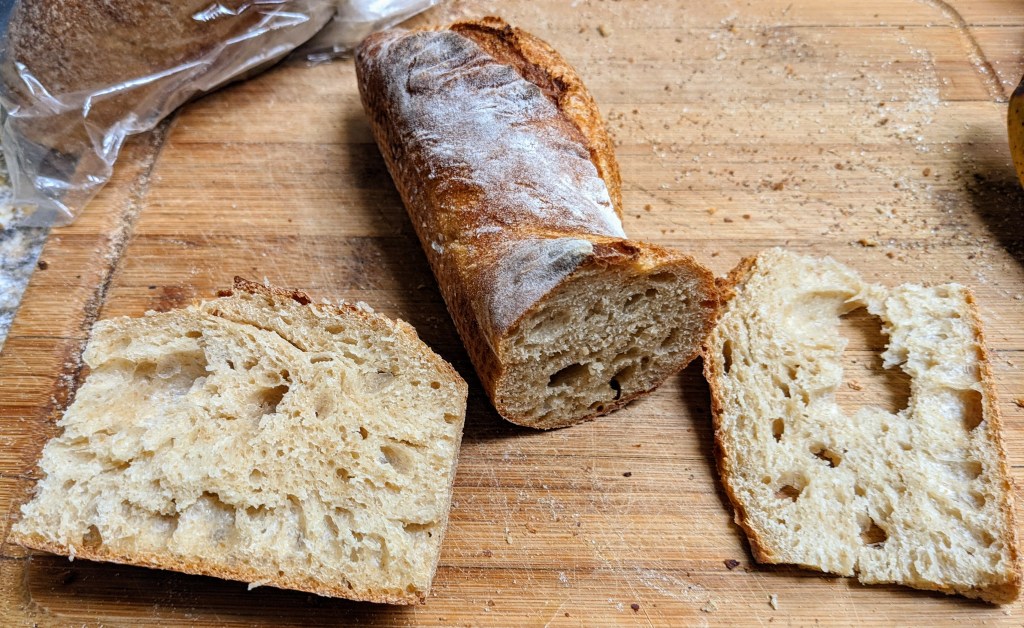
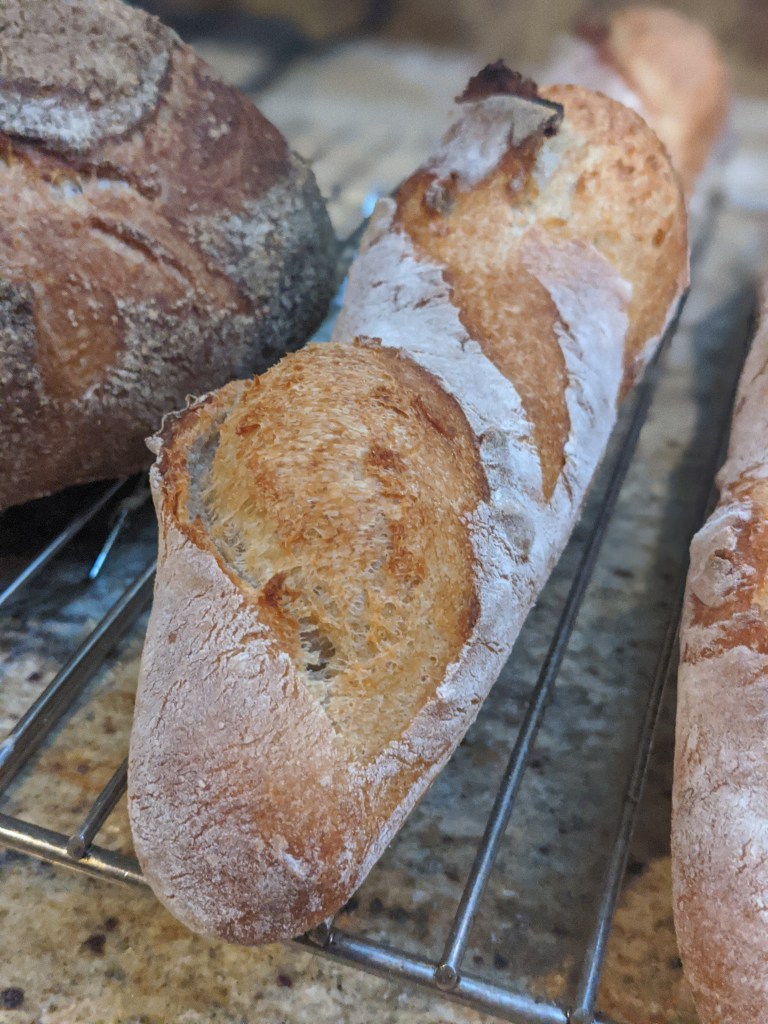
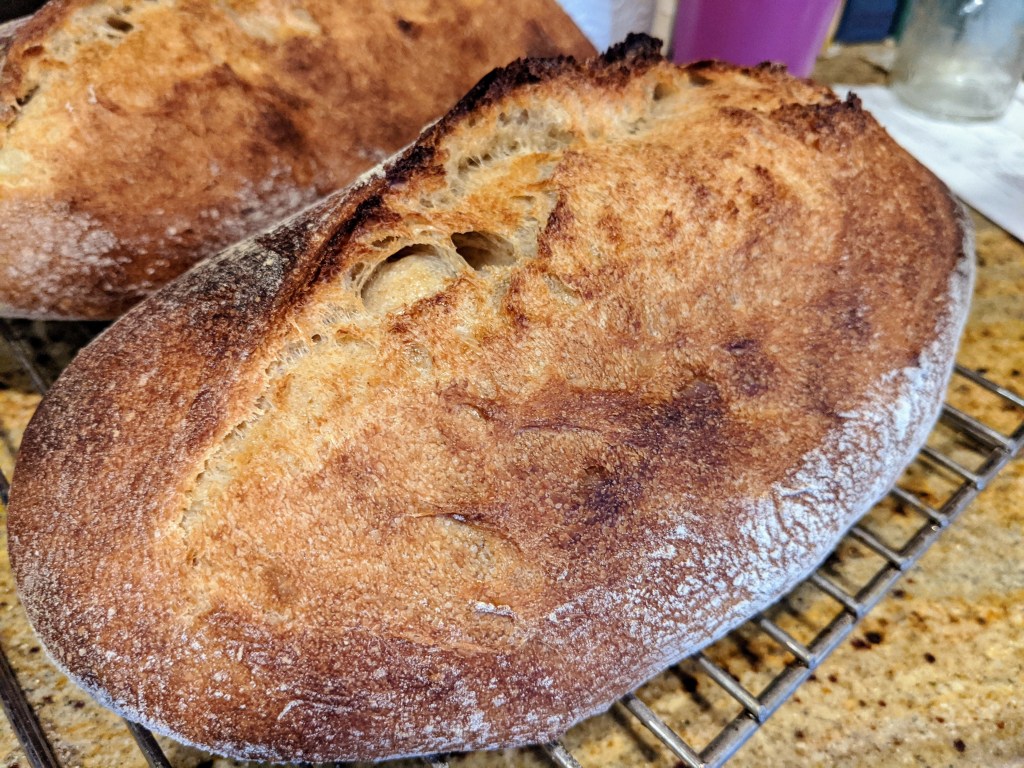
This is a fairly high-hydration dough at 75%. It’s not impossible to work, but it can be a bit challenging, especially if you haven’t worked with dough at this hydration rate. Anyway, pour your dough out from the bowl and divide it into two equal pieces. With this recipe, they should weigh ~880 grams each. Preshape into rounds.

I learned how to pre-shape and shape high-hydration dough with the following video:

I use a different batard shaping method that can be viewed here.

Final Proof

Once you’re done shaping, place the dough in an appropriate proofing container (banneton, wicker basket, etc.). Proof the dough for an hour or two. But check it after a half-hour with the finger dent test. On especially warm days, my dough proofs quickly.

Tip: For smaller batards, I got some french fry baskets to use as bannetons that work great. I also did an 18-hour proof in my mini-fridge, set to about 40-degrees to do a slow proof. Frankly, if you have room in your fridge (or a second fridge to use as a dough retarder like I do), I’d recommend doing a slow, chilled, final ferment. Cold dough is much easier to slash and also, even more importantly, cold dough releases steam into the bread for a longer time, promoting better oven spring.

Alternatively, you can shape these into logs, and instead of placing the dough into bannetons, place them into loaf pans. This recipe makes excellent sandwich bread!

Bake

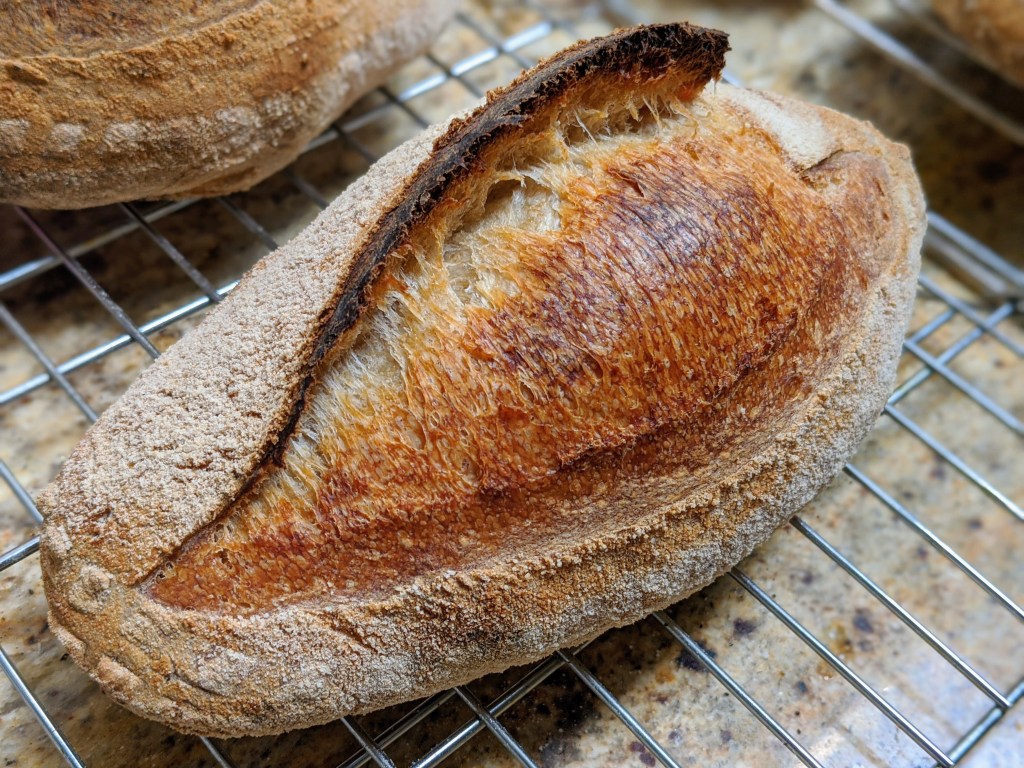
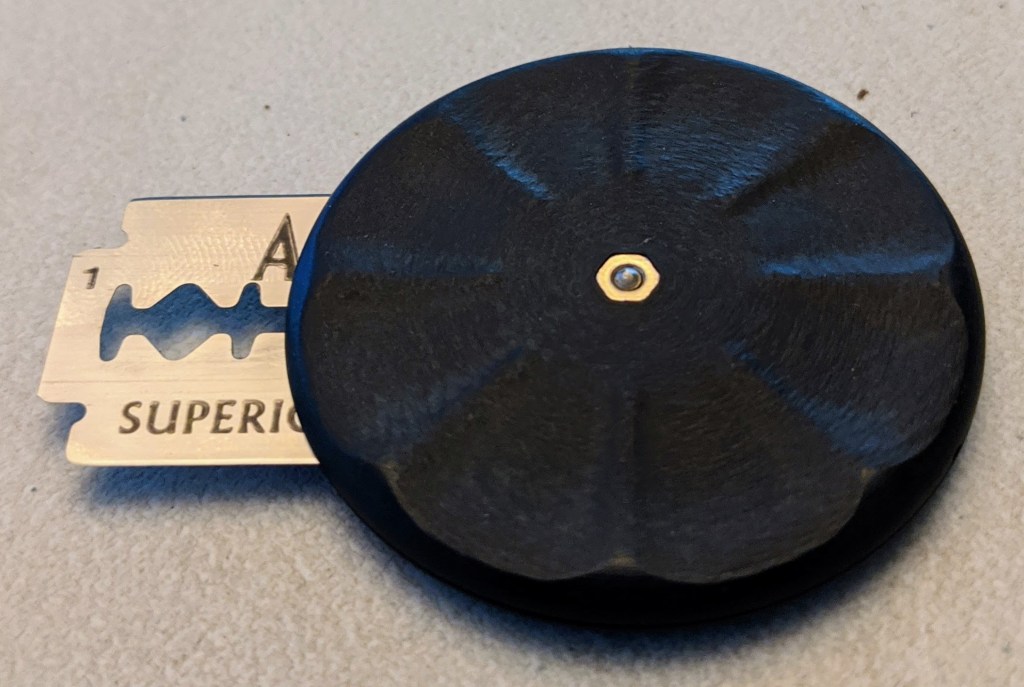
Once proofed, place the dough on a peel or appropriate device to slide onto your stone that has been liberally sprinkled with cornmeal or flour if you don’t have cornmeal. Don’t be shy about it! Your dough has got to slide off the peel easily. 🙂 But before you place the dough into the oven, score it with a super-sharp knife or a lame. Slide the dough onto your stone. Immediately pour the cup of hot water into the baking pan below. Careful of the steam that will rise!

If you’re using a Dutch oven, remove the Dutch oven from the oven and place it on a heat-safe surface. Remove the cover, then place your dough directly into the pot. Cover and place back into the oven.

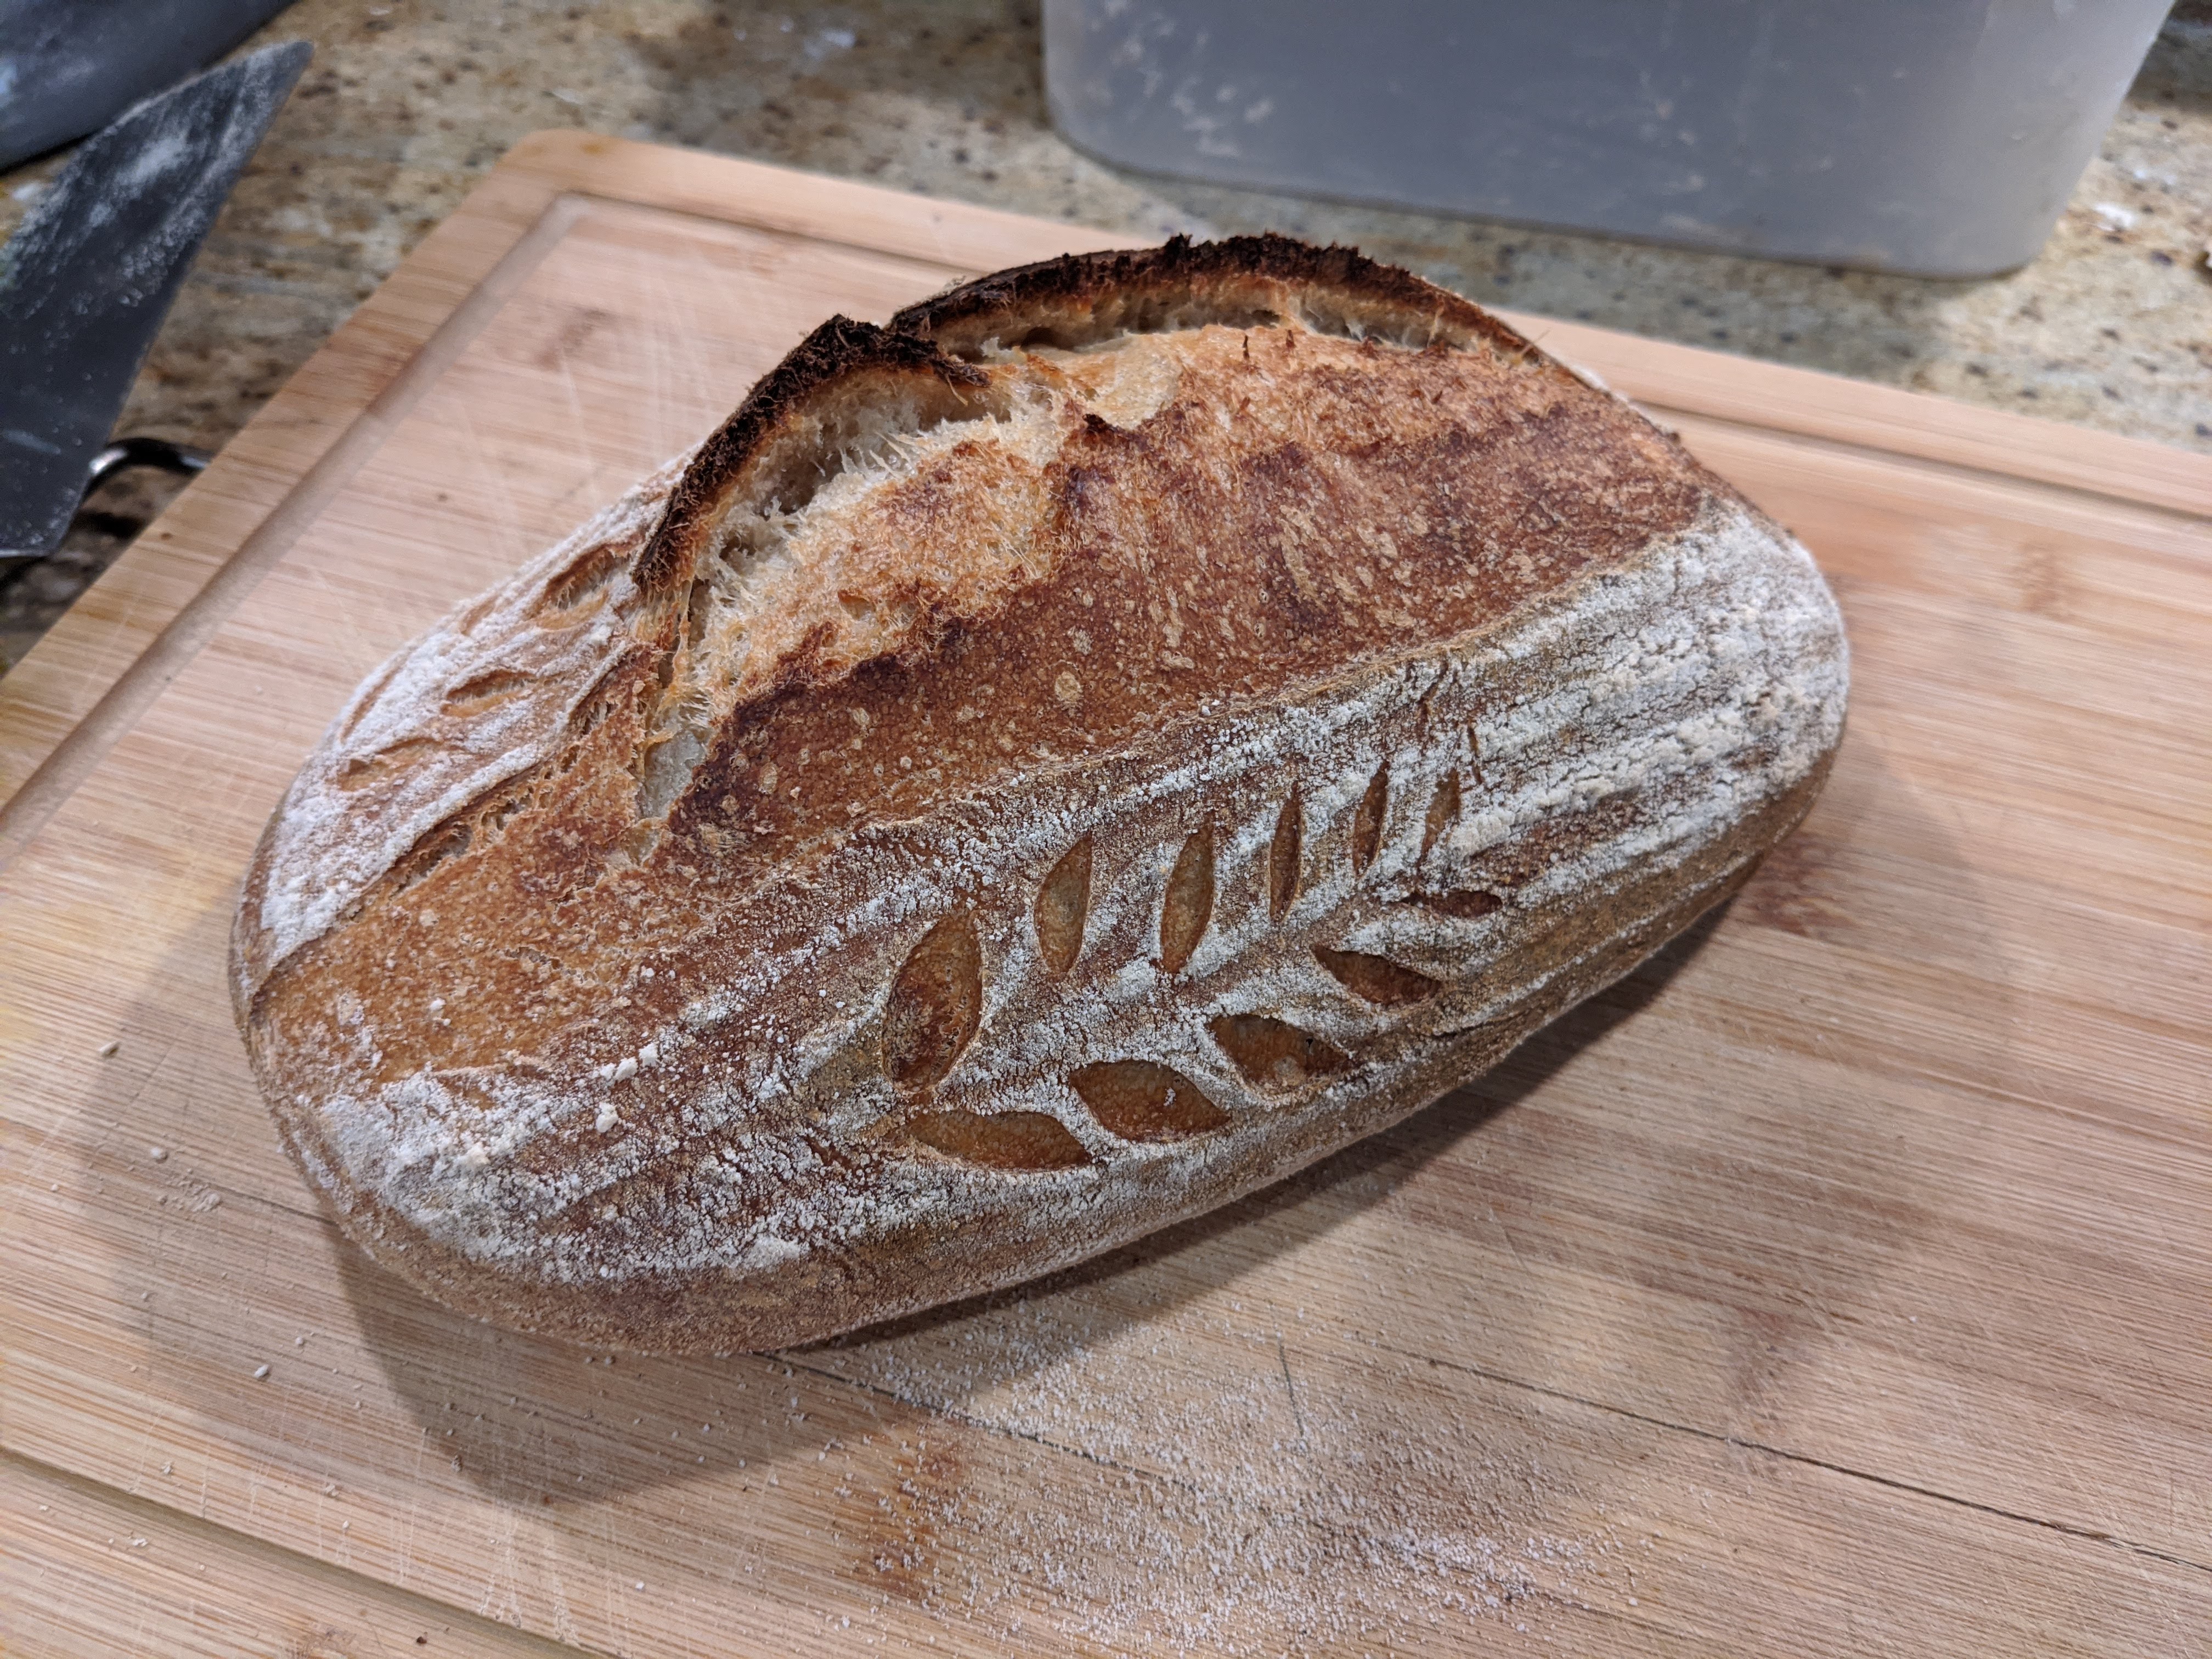
Bake at 460 for 40 minutes or until the crust achieves the classic tri-color of a deep burnished brown, golden in the cut groove, and blackened at the tips of the ear. Remove the baking pan from the oven after 20 minutes. If you’re using a Dutch oven, remove the lid after 20 minutes and bake open for the last 10 minutes.

That’s it! Enjoy!

Advertisement

Beouf Bourguin-off

There are two stews that I love to make. Beouf Bourguignon and Beef Stroganoff. One day, I thought to myself, what if I made a bastard stepchild from the two dishes. Would the ingredients clash, or would they come together and form a merry union? It turns out, that they can go together REALLY well. You just have to change a few things up, and it’ll work.

The first thing is that you don’t use cheap meat. Beouf Bourguignon is traditionally made of cheap cuts, and you braise the crap out of the meat till it’s tender. On the other hand, Beef Stroganoff uses better cuts like ribeye or top sirloin. Personally, I prefer top sirloin because I just can’t get myself to stew a nice ribeye steak. So I use top sirloin. Believe me, it’s worth it using a better cut of meat instead of stew meat.

With this recipe, you have your choice of starch to serve it over. But frankly, I just like sopping up the gravy with a hearty artisan bread. And since I make a lot of bread, it’s always on hand!

Without further ado, let’s get the recipe!

Ingredients

2 lbs. sirloin steak cut into 1″ cubes
4 whole garlic cloves, chopped
1 cup beef broth/stock (unsalted)
1 cup Burgundy or Pinot Noir (it doesn’t have to be expensive, but it should be drinkable)
4 medium carrots cut in 1″ pieces on the bias
1/2 pound of whole mushrooms, halved
1 small can of tomato paste
1 medium onion, sliced thin
1 pint sour cream
1 tbls herbs de province
2-3 tbls flour
Salt and fresh-ground pepper to taste

  1. Preheat oven to 450
  2. In a 5-qt Dutch oven or large oven-safe pot, add about 1 tbls olive oil and begin to heat on the stove over medium heat.
  3. When the olive oil starts reaching its smoking point, add the garlic and vigorously sautee, being careful not to brown it.
  4. Once the garlic starts becoming fragrant – about 45 seconds – add the meat.
  5. Add salt and fresh-ground pepper and brown the meat until all sides are grey
  6. Add about 1/2 of the beef broth and all of the tomato paste and stir to coat the meat completely and cook for a few minutes.
  7. Add all the wine and the rest of the broth.
  8. We want to get to the point where the liquid is barely covering the meat, so add the rest of the stock, then if the meat is still not covered, keep on adding wine in small amounts till you get there. 🙂
  9. Bring the mixture to a boil, then cover and let simmer until your oven comes to temp.
  10. Once your oven comes to temp, transfer the pot to the oven, then immediately turn the heat down to 350.
  11. Bake at 350 for an hour. After an hour, turn the oven down to 275.
  12. After the second hour, add the carrots and gently fold them into the mixture so you don’t break up the meat. Cook for half an hour.
  13. In a cast iron skillet, saute the sliced onions in olive oil.
  14. Once the onions begin to wilt, add the mushrooms and saute for about 4-5 minutes until the mushrooms start to soften.
  15. Add a bit of beef broth, then sprinkle the flour over the mixture to thicken it up. Make sure there are no lumps! If there are work them out and add a bit of beef broth, but you don’t want it too liquid.
  16. Finally, add a pint of sour cream, mix thoroughly, then set aside.
  17. When the beef and carrots are finished, remove the pot from the oven, then over low heat, add the onions and mushrooms and fold until everything’s incorporated.
  18. Let simmer for 10 minutes for all the flavors to marry.
  19. Serve over rice or noodles or sop up the gravy with bread!

It’s the Microbes, Baby!

Bread is the product of fermentation. Without it, all we’d have are bricks if we just combined flour and water and heated them. But luckily for us, we have yeasts and bacteria that gas up the flour-water mixture, interact with the enzymes in the flour and produce a plethora of pleasing flavors from nutty to sugary to sour and sometimes, even a bit of umami. And the little critters are responsible for giving us the gift of bread.

They’re everywhere and there’s no escaping them. This is why you can mix flour and water and leave it sitting and after a couple of days you’ll see it bubbling. There are natural yeasts and bacteria in the flour and in the air. And when you give them some food to eat by adding water flour, which in turn releases enzymes on which the yeasts and bacteria feed, they literally go on a feeding frenzy that we know as fermentation.

And it never ceases to amaze me that fermentation is a form of decay. Yes, decay. The yeasts and bacteria actually break down the starches and sugars in the flour. The things that they produce in the process that give us all that pleasing taste are actually- to put it plainly – the microbes’ shits and farts. Yeasts give off CO2 which creates pockets and bubbles in the dough. The lactic acid bacteria produces acids as well as other by-products. And we are rewarded with their excrement! I know… when you put that way, it’s a little gross. But given the product of that fermentation, personally, I can live with it…

Making Bread Like in the Old Days?

And I mean in the old days like a few thousands of years ago. Archaeological evidence has been found that people have been making some form of bread for almost 30,000 years! But I want to fast forward to Egyptian times (about 3000 years ago) as they seem to be credited with the first “mass” production of yeasted bread and generally establishing what we now know as Artisan Bread. If you look at the ancient pictograph above, what we do today to bake our bread really hasn’t changed much since those days… or has it?

The basic technique of mixing flour water and salt and adding a leavening agent really hasn’t changed much since those ancient times. But let’s make no bones about it: What we do today is MUCH easier than how they did it back then.

Think about it: The way we make Artisan Bread – whether at home or commercially – today is graced with a plethora of conveniences that our predecessors just didn’t have. Bread making has come a long way since then. Let’s look at a few things that we take for granted.

Our forefathers had to grind their flour. Though the Mesopotamians invented the grinding wheel and what we know today as milling, this was low production, highly manual intensive work to get flour. Even today, there are countries where community millers still exist. And if you think about it, the type of wheat or grain people baked with was highly regional. They basically baked with what grain crop was grown in the vicinity.

We, on the other hand, go online, and get our organic, hard red or white wheat, either stone ground or steel rolled or processed with a Unifine mill. We can get AP flour, bread flour, high-extraction flour, whole grain. We can get wheat, spelt, rye, millet, ancient grains like einkorn or durum. The variety that we have accesses to – literally at our fingertips – is mind-blowing!

Also, look at our baking apparati! At home we have our electric or gas ovens. For the more rustic-thinking, there’s the Ooni and other hearth-like ovens. Commercial bakers have deck ovens or huge stone or brick hearth ovens. For those using the traditional wood-burning ovens, sure, there’s a lot of labor that goes into maintaining a fire. But consider this: Our environments are controlled and somewhat predictable. Ancient bread makers didn’t have HVAC.

Furthermore, not everyone had a baking hearth. Most villages had a community oven. In his wonderful book, The Apprentice, chef Jacques Pepin described being a boy in a village in France where on a certain day, the whole village would bake at the community oven. Us? We preheat our oven at home and pop our bread in any damn time we choose!

Also, think about how information was passed on from baker to baker back then. It was all word of mouth. And it was truly a craft where master bakers took on apprentices, and the apprentices went on to being masters and pass that on. But today, we open up our browser and look at bread making blogs and join home baker forums. We learn in a matter weeks or months what would have taken years for an apprentice to learn.

For instance, I went from this:

To this:

…in just a matter of months. Sure, it was a lot of learn by doing, but I also had the luxury of the Internet to help diagnose issues. And mind you, that loaf above is one of my so-so loaves. I’ve been able to reach a level of consistent quality not just by doing it a lot (I do bake practically every day), but having information readily at my fingertips. And I’m not alone in this. What I’ve seen other home bakers create is absolutely amazing! And I’ll submit that it’s the quick, free-flow of information that has enabled people to get to relative mastery much sooner than in the old days.

And while there are people who have totally geeked out on creating and maintaining a sourdough culture, I’m not one of them. I generally use a poolish or a biga to get the slightly sour taste in my bread. But I can do this because of the easy availability of commercial yeast. That said, I actually do maintain three active cultures but I bake several different types of bread. My cultures are tools, not pets. 🙂

Back in the old days, people had to create and maintain their starters. But let’s take a deeper dive into that. They didn’t have refrigeration. They didn’t have convenient little tupperware or glass jars. They didn’t have high-precision gram scales to get the right proportions. They certainly didn’t have silicone spatulas to clean out their bowls! Get the picture? While there is still a definite amount of craft that goes into our baking today, our lives are SO much easier than the artisans of old!

But from the standpoint of tradition, very little has changed. If there was any good about this whole 2020 lockdown, the fact that so many turned to baking – myself included – has been a real bright spot. And based on my participation in bread making forums, there’s a widespread, renewed enthusiasm for making bread. It’s heart-warming to see so many keeping the tradition alive!

Oven Spring – There Is NOT Just One Secret to It!

I was watching a video the other day where this one dude was claiming that there was one secret to great oven spring. And while I won’t call the video out specifically just to play nice, I felt that his video was a bit misguided. In it, he claimed that the one secret thing that will give you great oven spring is proper fermentation; specifically, not fermenting too long. He then went on to say that once you mix, you don’t have to do anything like kneading and folding because the fermentation process will develop the gluten.

I will say this: He is not totally wrong. I’ve done 93% hydration whole wheat loaves that required zero folding because the dough was so wet, but did need a long, almost 2-day ferment in the fridge to properly develop the gluten. But the problem I had with what that dude was instructing was that he made it seem as if it was the ONLY thing that’s important in proper oven spring. It’s not. There are several factors that contribute to it in addition to proper fermentation.

To be fair, he did go on to say shaping and steam are also big factors in good oven spring, but the focus of his video was mainly on proper fermentation. Proper fermentation is absolutely critical to good oven spring. But any experienced baker will tell you that there are lots of different factors that contribute to great oven spring beyond proper fermentation such as dough structure development (folding and shaping) and baking environment (steam and a super-hot oven) to name a few. Sure, it starts at proper fermentation, but there’s so much more that will ensure you get good oven spring.

Happy Baking!

A New Approach to a Lame: The Wire Monkey Lame

Though I haven’t been doing artisan bread making for very long, I’ve come to understand that scoring is a really important step in the process to control the nature of the oven spring. And having a good tool for scoring is super-important. To that effect, I’ve made my own lame and even purchased a gorgeous stainless steel “professional” lame. I’ve been getting better at scoring, but in the back of my mind, I’ve felt the traditional lame is a bit unwieldy.

One of the main issues I’ve had with the traditional lame is that I have a natural tendency to lay the lame down, parallel to the surface of the bread. This causes the side of the blade to catch on the skin of the bread, sometimes tearing it – eek! And though I’m much better at it than I was in the beginning, there have been times where I’ve just ended up removing the razor blade and slashing with the blade. It’s not safe, but I have much more confidence slashing with the blade held closer.

Enter the Wire Monkey Lame.

I first found out about this lame from a couple of Proof Bread videos on YouTube. The owners, Jon and Amanda, made a point of calling out this particular lame, so I checked out the Wire Monkey web site and got the UFO Corbeau. One of the cool things about Wire Monkey lames is that they’re all made from sustainable materials. The Corbeau that I got is made from 100% recycled paper and food-safe resin. I think it’s what’s known as RichliteTM which is a fantastic material. One of my guitar’s fretboards is made of the material and it feels like ebony! So cool!

The shape of the lame is – in a word – perfect. Its diameter is the same as the length of a razor blade, so when you’re not using it the razor blade tucks right into the lame. It is SO easy to hold and I feel as if I have so much more control over slashing while holding it!

Update 8/1/2020: When I first received the lame the other day, I was right in the middle of a poolish ferment, and didn’t get to use it till this morning because I also did a 16-hour proof on the same dough.

So what’s the verdict? Okay… THIS LAME IS AN ABSOLUTE GAME-CHANGER! I love that I don’t have to worry about my attack angle as with a traditional lame, where I’d often catch the side of the razor blade because I laid the lame too parallel to the dough. With this lame, I feel incredibly confident in scoring my bread! Look at the results:

What an ear! That was scored just this morning with the Corbeau lame! It’s a thing of beauty!

They’re not cheap, starting at $27.95 (I paid $35.95 for mine). But they’re totally worth it! If you’ve struggled with scoring, I can guarantee that you won’t struggle with this lame!

For more information go to the Wire Monkey website. They’ve got some really cool designs!

Wire Monkey lames are the original, made in the USA lames. There are lots of cheaper alternatives that do the same thing. And though I’m not one of those “Buy Only American” types of folks, I do want to support artisans where I can and not the companies that rip off designs.

My Favorite Kitchen Tool

Years ago, I got some swag from our water company, among which was a flexible plastic scraper (shown above). I laugh every time I use it because of the “Prevent Sewage Backups” tagline. But irrespective of what’s written on the scraper, I use all the time, and not just for bread.

When I started making artisan bread, I was buying what I researched to be the essentials: A digitial scale, a baker’s lame, a few different kinds of loaf pans, etc., etc.. But when it came to a scraper, I put off getting a metal bench scraper because I could do practically everything with my handy-dandy, flexible plastic scraper! It’s SO useful that I’ve even used it to repair drywall!

The fact that it’s flexible is why I love it so. I can bend it to fit pretty much any bowl curvature; something rigid scrapers just can’t do. And though there’s a nifty, small scraper at Bed Bath and Beyond, I’ve seen it, and it just seems a bit too small for my tastes. But whatever, a great plastic scraper is an invaluable tool for working with dough.

As for metal bench scrapers, I have two of them: one 6″ scraper/chopper and a 12″ that I use for tensioning longer loaves (it works great).

Sourdough Is a Technique?

So I was watching this LONG video by Proof Bread on YouTube a few days ago. It’s over an hour long and when I saw the length of the video, I thought to myself, I’ll never last… But I’ll be damned if I didn’t watch it from start to finish and even skipped back to certain sections to help me understand his technique better.

In one segment, Jonathan Przybyl, the baker, said something to the effect of, “People seem to think that sourdough is a taste. It’s not. Sourdough is a technique.” I wish I could remember exactly in the video where he said it, but no matter. That phrase struck a real chord with me. It really helped me affirm my own approach to bread making, and helped resolve something with which I’ve struggled since I started making bread seriously: What really is sourdough?

To me, sourdough has been less about a particular taste and more about the craftsmanship in producing an artisan loaf from flour, water, salt, and a leavening agent. I had tasted lots of bread made from “sourdough” starter that, though it certainly had an earthy, fermented taste, it wasn’t all that sour. I struggled with this whole concept of sourdough because there just seemed to be a disconnect between the ingredients and the finished product. So when I heard Jonathan say that “Sourdough is a technique,” I felt I was on the right track with my thinking.

For those that know me, they also know that I haven’t made any sourdough yet; at least in the present. I actually used to make a whole wheat sourdough from an old starter that I got from the TA in my Microbiology class at UC Davis. I had it for years. But at the time, I was just a casual baker. But now that I’ve become serious about the craft, I’m taking my time getting to making bread from a sourdough starter.

It’s not that I don’t use a starter at all. In fact, I regularly make bread with a poolish or biga. In fact, I have a poolish that’s bubbling away right now, getting ready for baking tomorrow morning. For me, this whole artisan bread thing is all about mastering the manipulation of dough. I’m experimenting – a lot – finding the right combination of flours, learning how to properly shape. I’m trying to get a feel for the dough and also how it should look as I knead or fold it. To me, that’s the craft.

But also, there’s a lot of skill in maintaining a starter. I’m getting there. But I’m not there yet.

Redemption!

After my epic fail this past Saturday, I knew that I had to make up for it. But though those loaves definitely turned out wonky, they still tasted really good, and the family didn’t complain, though they did have a good laugh about my mutant bread (shown below).

But as I shared in my previous post, I did understand what I had done wrong. So given that, I had to put those lessons to the test.

First of all, I made absolutely sure my baking stone was set to go, and I pre-heated it for well over an hour before I baked. I also made sure that my loaves were completely proofed before I even considered baking them.

For my baguettes, I used a different shaping technique than what I have been using because I felt that the original technique I learned didn’t create enough tension on the surface. So I watched this video featuring master baker Scott Megee from The Artisan Crust channel:

I tell you what! That technique is the S%&T! I love the stitching technique that Scott uses. I did that and it I felt that it really gave me a more even distribution of the dough through the loaf.

Pre-shaping is so important! So is the bench rest immediately after the pre-shape. I also realized that I didn’t bench rest either loaf for very long on Saturday’s fail. But this time I took a good 20 minutes to let the dough settle down before I did the final shape. That combined with the new shaping technique made both loaves come out perfect!

As for the boule, I couldn’t be happier. I was a little concerned at the start of the bake because I kind of misjudged placing the dough on my stone and I had to pull it out, then reposition and all that movement kind of collapsed the loaf. But luckily it didn’t affect the oven spring.

I feel redeemed! Both the baguettes and the boule fit my archetype of artisan bread. The crust on both kinds are crackly with good ears; especially on the baguettes!

Bread making to me is very much like playing golf. I could be playing like crap and getting super-angry while I duff or skull or hook or slice. Then I hit a perfect shot. The club strikes the ball right in the middle of the sweet spot. I feel no resistance or impact and the ball shoots off like a rocket, landing smack dab in the middle of the fairway. And with that one shot, all my anxiety and frustration just goes away. It’s redeeming!

Fails Make Us Better

While I’ve had some wonderful successes in my journey of artisan bread making, I’ve also had some massive fails. I want to be transparent because especially when I first started baking bread, though they tasted great, I wouldn’t exactly call them ideal. Luckily for me though, I haven’t produced any bricks or inedible loaves. But I have a certain aesthetic of what my bread should look and taste like. And to be completely honest, I’ve only reached that ideal a few times.

Most have come pretty close to my ideal, and I’ve been relatively happy with the results. But some, like the loaves shown in the pictures above, have come out looking like mutant spores from another planet! I baked them just yesterday (at the time of this writing) to try out my new Fibrament-D baking stone. From what I can tell, a few things went wrong.

First, based on the cross-sectional cut, it appears that my baking stone wasn’t hot enough. I can tell that because the bottom half of the loaf has a much tighter crumb than the top. This means that the ambient temperature was much higher than the stone and it made the loaves spring much more on top. The dark almost burned top also indicates that there was a huge differential in heat between the ambient air and the stone. So next time, I will spend more time heating the stone.

Second, I used convection baking as opposed to heating from the bottom. This circulates the air evenly through the oven. But I think if I used just normal baking, the heat would’ve radiated from underneath the stone (there’s about 1″ of clearance on either side of the stone). That probably would have helped control the ambient temperature and relied more on the stone as the main heat conductor.

Finally, based on how both loaves exploded, I think my loaves were under-proofed. The fact that they exploded in such an uneven way is a sure sign that the loaves were under-proofed and the yeast had way too much energy left. So I need to let them proof for a bit longer. But I have to admit that it’s still tough for me to tell when the loaves are fully proofed because with the wildly varying temperature of my kitchen, I have to constantly monitor the loaves.

In light of that, I recently purchased a mini-fridge at an auction that I’m using as a dough retarder. I’ve baked a few loaves thus far using a long, overnight ferment, and the results have been promising. Chilled dough is also MUCH easier to score!

Just this one fail has taught me so many new things and it is really helping me appreciate everything that goes into the whole artisan bread-making process!