This bread is meant to be made in an afternoon (or less than half a day). And while using a pre-ferment like a poolish or a levain will certainly have more complexity in flavor, this is an absolutely delicious bread that stands on its own!

Ingredients
The following will make two loaves about a pound and a half each. Note, I do all the mixing with a stand mixer. You can do all of this by hand if you want. I use a mixer up-front because I know I’ll get consistent results. This is a 70% hydration dough. It’ll be a little tacky but not floppy, and as you work it, it will become smooth and really strong.
| Bread Flour | Water | Salt | Instant Yeast |
| 800 grams | 560 grams | 15 grams (~1 tbls) | 3 grams (scant 3/4 tspn) |
| 100% | 70% | 2% | .4% |
A couple of important points:
- Alternatively, you can replace 200 grams of the bread flour with fine or extra-fine grind whole wheat flour. But if you do that, up the water to 584 grams to make a 73% hydration dough – the wheat flour needs some extra water. Also, up the autolyse time from 20 to 45 minutes.
- The amount of flour indicated is optimized for a 5-qt. stand mixer bowl. Other recipes call for 1000 grams, but I found that the standard KitchenAid dough hook will make the dough climb into the mechanism, and you’ll get machine oil in your dough – not good.
- Note also that I use instant yeast. If you’re going to use active dry yeast, wake it up in a couple of tablespoons of 105-108 degree water. But bear in mind that you’ll need to remove that amount from the water measurement above. With instant yeast, you’ll just dump it into the dough.
- You’ll notice that this recipe uses a significantly smaller amount of yeast than other recipes you might see. This is to ensure a nice, moderate yeast development. Don’t worry, you’ll distribute the yeast throughout the process by folding!
Dough Temperature Is Important!
Most online recipes will list water temps at 105-108 degrees to wake up the yeast, and that’s fine to wake up active dry yeast in a couple of tablespoons of water as mentioned above. But it’s too high if you use instant yeast, and at that temperature, your dough will go crazy and rise way too fast. This will affect the flavor and your finished product will be a little bland.
The prevailing wisdom is that your dough temperature should be only 75-80 degrees when working it. To figure that out, you need to measure the temperature of your flour (I use a digital thermometer), then you can use the table below to get near the proper temp (it doesn’t have to be exact):
| Flour Temp | Water Temp |
| 55 | 110 |
| 60 | 100 |
| 65 | 90 |
| 70 | 80 |
| 75 | 70 |
| 80 | 60 |
| 85 | 50 |
Hydrate the Dough
Mixing the flour and water first activates enzymes and releases sugars in the flour that help with fermentation and also start activating the gluten in the dough. Also, especially with high hydration doughs, it gives the flour a chance to absorb water up-front. This process is called autolyse (pr. ahto-lees).
Place the flour into your mixing bowl. Attach your dough hook to your mixer. Set the mixer to its slowest speed, then slowly add the water. Mix until the flour and water are incorporated (it’ll be lumpy). You can help the mix by occasionally stopping the mixer and scrape the sides down with a silicon spatula. Once fully incorporated, let the flour-water mix rest for at least 20 minutes.
You can also mix by hand, which some may prefer. I like to use a mixer for this first step because I get a more consistent and faster mix.
Start the Fermentation and Initial Folds ~ First Hour
Evenly sprinkle the salt and yeast over the top of the dough, then slowly incorporate them at the lowest speed setting on your mixer (you may have to do the occasional scrape down of the sides). Once the salt and yeast are incorporated, dump the dough onto your board or counter. Do not flour the surface as you will mess up the ratio!
Knead the dough for 6 minutes. You can refer to this video for proper kneading technique:
In the video above, Jack said to knead the dough for 10-12 minutes. But after initial kneading, we’re going to fold the dough a couple of times (or a few times) over the course of the first hour, so we don’t need to do the full 10 minutes. Just make sure you work out the lumps!
Let the dough rest for 10 minutes.
After 10 minutes, fold the dough. Here’s a great video on how to properly fold dough:
My preferred method of folding is in a bowl, but I use my hand instead of a scraper or spatula as in the video. It allows me to feel the dough better. No matter what method you use, be careful to not tear the dough.
Rest the dough for 50 minutes, then fold again. Once you’re done folding, invert the dough to rest on the folds.
TIP: At this point, the dough should feel smooth and luxurious in your hands. I love when it gets to this point!
Fermentation ~ Hour 2
After letting the dough rest and ferment for an hour, do one more fold and again invert the dough to rest on the folds and let it sit for another hour.
TIP: If you replaced a 1/4 of the bread flour with whole wheat flour, I’d recommend doing a fold after a half-hour after your first fold, then do the final fold a half-hour after that.
Final Fermentation?
Maybe… This final step can take an hour or it may require more time. What we’re looking for is that the dough ball has expanded in size (around 50%) with plenty of bubbles on the surface (not popped, mind you). But with dough fermentation, there are so many variables that affect how fast a dough rises from ambient room temperature and dough temperature or how much yeast you used that it’s difficult to pinpoint an exact time. But in general, the final fermentation should take 1 1/2 to 2 hours after the final fold if the ambient temperature of your room is around 70- to 75-degrees.
TIP: When I have the time, I use a scant 1/2 teaspoon of yeast to let the yeast develop slowly. I also do a couple of more folds than are called for in this recipe. I also use this small amount of yeast if my kitchen is really warm.
That said, check the dough after an hour. If it doesn’t show much activity, don’t panic. As long as you smell a sourness and perhaps a bit of alcohol, it’s all good. You can help the dough along at this point by doing one more fold. But this time, be extremely gentle with the dough and do not tear it! Once you do this last fold, your dough should really expand and become jiggly. Just be patient!
TIP: For goodness’ sake, don’t fret about the time! 🙂 Fermentation is not something that can be bound by time. I do a lot of vegetable fermentation (specifically hot peppers, and it sometimes takes several weeks to get the peppers where I like them – especially in cool weather). Take note that published recipes are written to address an average of conditions. Use your eyes and your hands. Don’t just blindly follow a recipe’s time table!
The reason we’re going 3-4 hours for fermentation is to allow the bacteria to do some work as well as the yeast. This is why I use a small amount of yeast. It gives airborne bacteria and naturally occurring yeast to play a role, however minor, in the fermentation process and flavor development.
Shape the Dough
I learned to shape a batard by watching the following YouTube video (actually I watched a bunch of them, but I prefer Jack’s method of pre-shaping and shaping). Check it out:
NOTE: You can certainly divide into fourths, as in the video, but this recipe is optimized for two medium-sized loaves.
Before you start shaping, turn your oven on to 475 degrees. If you have a pizza or baking stone, make sure it’s in the oven on the middle rack. And on the lowest rack, place a metal baking pan (you’ll be adding a cup of water later to create steam for the first 10-15 minutes of the bake – I’ll explain later).
Once shaped, sprinkle flour on the top of each loaf.
Place a piece of parchment paper on a peel or the bottom of an inverted cookie sheet if you don’t have a peel. Cover each loaf with a clean towel or paper towel.
TIP: You can also proof in a proofing basket, but it’s not mandatory. If you’ve created enough tension on the surface of your dough while shaping, it will stand on its own just fine and not collapse during the final proof.
In warm weather, your proof may not take long. At the height of summer as we are in right now in California, my loaves have been fully proofed in just 20 minutes, which is why I don’t provide a specific time. But, it’s easy to determine if your dough’s ready using the finger-dent test.
If you push your finger into the dough about a 1/2″, and it springs back immediately, leaving a very small indentation, it’s not ready. But if the dough springs back slowly and the indentation stays even after a few seconds, it’s ready. I realize that this isn’t very exact – it’s a real feel kind of thing. But to me, that’s one of the beauties of mastering bread making – and I’m not a master by any means, but I do love the uncertainty.
Scoring the Loaf
Scoring your loaf gives it that artisan look, but it also ensures that you’ll be letting out steam from the bread in a controlled fashion and prevent huge bubbles forming under your crust or eruptions in odd places on your loaf. Here’s a great video showing different scoring patterns and techniques:
In general, with long loaves like batards and baguettes, cuts should be made fairly parallel to the long axis of the loaf. With boules, you’re pretty free to do what you want. This article explains the hows and whys of scoring a little more in-depth than the video.
Time to Bake!
Before you place the loaf in the oven, heat up some water (it can be hot tap water). Fill a glass or container with about a cup and set it near the oven.
Now, get your loaf, and slide it onto the baking stone. Before you close the door, carefully pour the cup of hot water into the metal baking pan. This will create steam which will help the oven spring.
Set your timer for 20 minutes. Once it goes off, remove the parchment paper and rotate your loaf 180-degrees to ensure even baking. Also, remove the water pan if there’s still water in it. Bake for 10-15 minutes more: 10 minutes if you want a golden crust, 15 if you want a darker crust. Personally, I like the darker crust, and will sometimes even bake 17-20 minutes longer to get to a darker crust color.
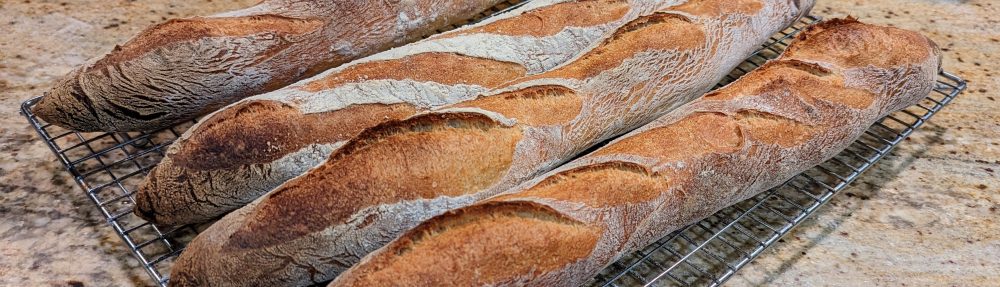
A dark crust ensures that the Maillard reaction occurs, which happens at high heat, causing the amino acids and sugars to interact. It’s what gives carmelized foods their distinct taste. It’s not burned, it’s caramelized and to me at least, it’s the sign of well-baked bread. In my finished loaves, I want to see three colors on the crust: Brown, Yellow, and White.
Finally, remove your loaf and place it on a cooling rack and let it cool for at least 45 minutes before cutting.
That’s it! I know this was a rather lengthy article, but if you follow these steps, you’ll make a great straight dough bread time after time!

Want to Use Whole Wheat Flour?
If you want to use whole wheat flour, I recommend starting with half whole wheat and half bread flour with this recipe. You may not get all the benefits of a 100% whole wheat, but you’ll get more nutrition than a pure white bread. Given that, unfortunately, this turns the process into a bit of an all day affair – you just start in the morning instead of the afternoon and most of the time’s spent waiting anyway, so it shouldn’t be a big deal.
Given a 50-50 ratio white to whole wheat flour, keep these things in mind:
- Increase the hydration up to 77-80% (640 grams of water) instead of 560 grams. Wheat flour absorbs more water than white.
- Increase autolyse to at least an hour to allow the whole wheat flour to absorb the water. Some folks autolyse for hours anyway, but in keeping with doing this in a day, you don’t have to go so long.
- Because this is higher hydration dough, I don’t recommend kneading after mixing. Instead, do at least 4 or more folds in the first two hours. You’ll know you’ve done enough folds when the dough has good tension and it doesn’t collapse much after folding. You can also do the windowpane test to check your dough’s doneness.
- Alternatively, you can avoid doing all the folding and popping your dough into a container and let it ferment in the fridge for 24 hours or even up to 5 days. This slower fermentation really develops flavor!

Pingback: Breaking With Convention | Welcome to my dawg house!
Pingback: Making the Transition to Whole Wheat Flour | Welcome to my dawg house!