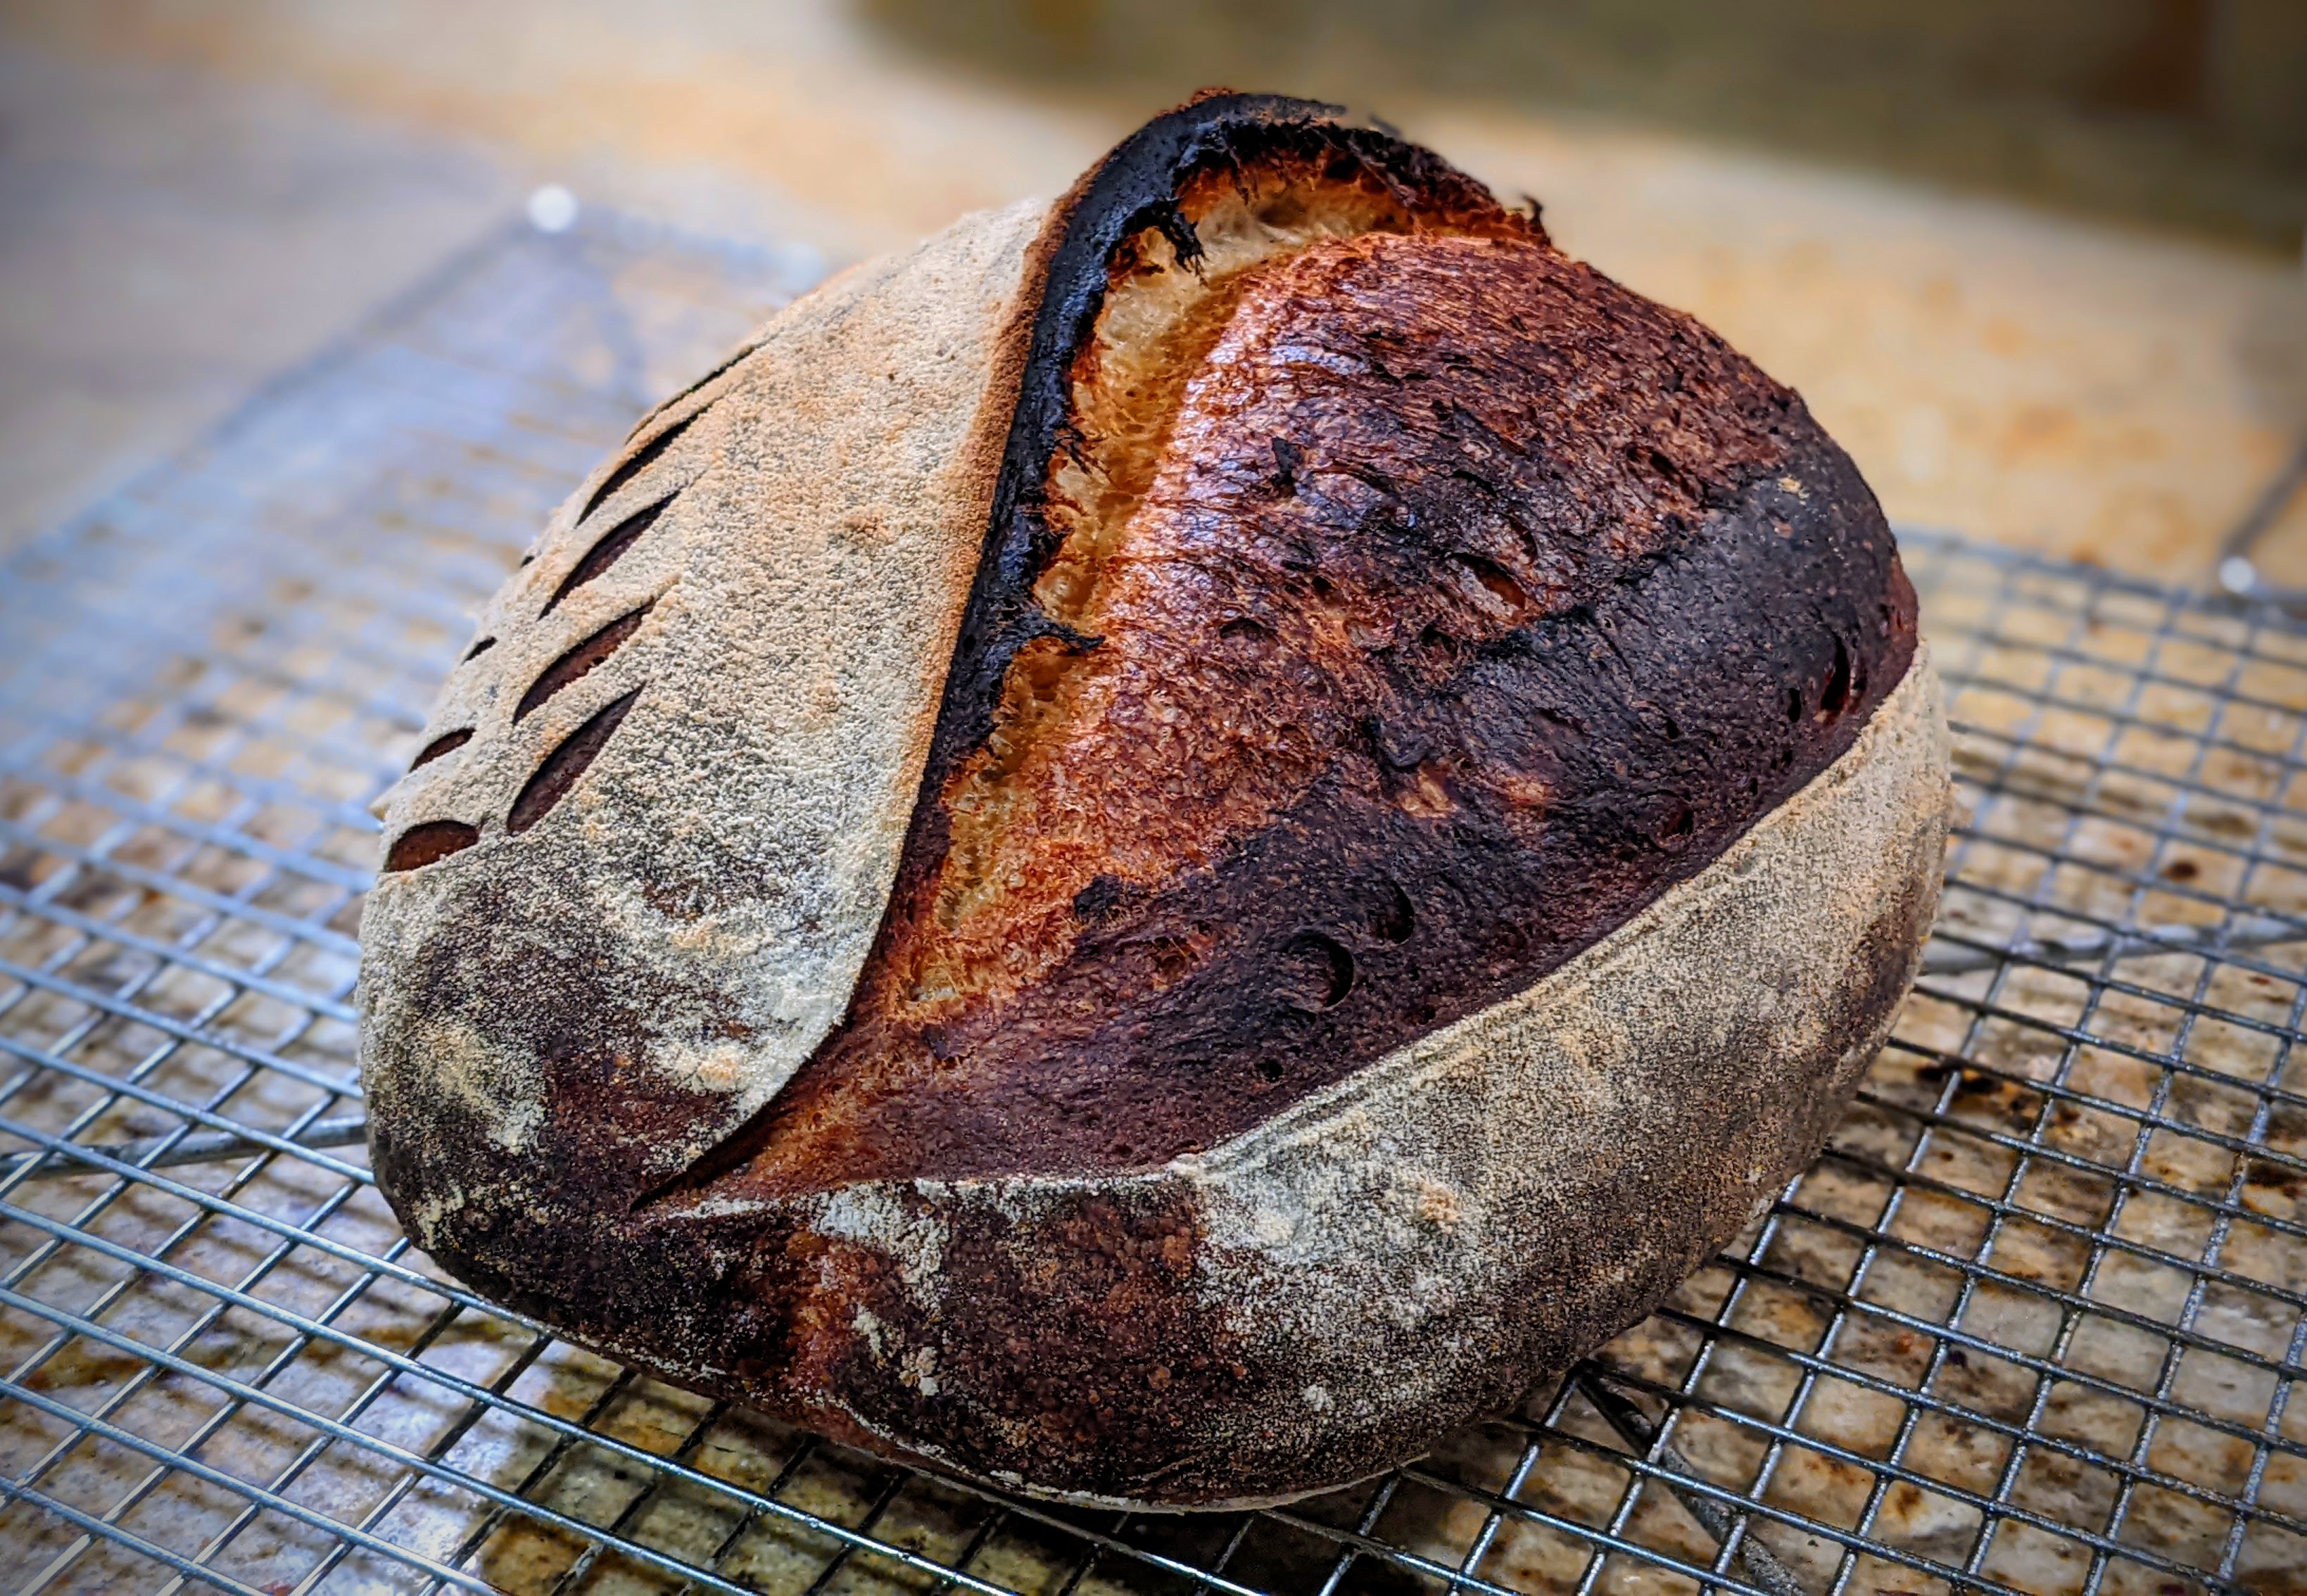
The other day, I watched a YouTube video by FoodGeek who did an experiment in which he turned his oven off during the first 20 minutes to see how it affected oven spring. He apparently learned it from a bakery that swore by this method. The results of the experiment were pretty amazing. In both cases (Dutch oven and baking stone) where he turned his oven off, the oven spring with both loaves was magnificent, especially with the Dutch oven loaf that had huge holes.
I was going to do that myself with my latest bake but instead decided to just lower the temp of my oven during the first 20 minutes. The reason for this was that my oven doesn’t retain heat very well, so turning off my oven entirely would cool it down way too much for my liking. And the results? well, they were pretty amazing as you can see in the pictures above.
The first thing I noticed when my loaf came out of the oven, was that it was nice and puffy all around. Compare that to this loaf that I baked earlier from the same batch of dough:
No doubt, that has a great oven spring as well, but you can tell that it’s not quite as much as the loaf up top as its ends slope down a little more severely though both have excellent crumb structures.
Here’s the technique I used:
Preheat oven to 485°F for an hour to ensure my stone has come fully to temp.
5 minutes before baking, add water to my steaming container to make sure the loaf enters a steamy environment.
Quickly transfer the loaf to my stone.
Immediately turn the oven down to 400°F and set the time to 20 minutes.
After 20 minutes, remove the steaming container, vent the steam, then bake at 425° for 40 minutes until the bottom third of the crust is a deep mahogany in color.
So why do I think this works so well? I think the main reason is that the lower temp means the loaf comes up to temp much more slowly, which allows the yeast to stay in their super-active zone (between 90°F and 140°F when they begin to die off). Combined with the steamy environment, that lets the loaf expand – a lot!
Admittedly, I’m going to have to do this a few more times. I’ll be making baguettes next, so I’ll attempt the technique with those. I’ll keep you posted!
As I’ve shared in the past, I’ve been baking bread for over 40 years, but it wasn’t until the pandemic lockdown that I had the time to devote to developing my artisan bread baking skills. And looking back over the last almost two years, it’s daunting to think that I’ve literally spent hundreds of hours mastering the craft; and I still consider myself a mere fledgling artisan bread baker.
Like many during the lockdown, my initial instruction came from Ken Forkish’ excellent book, Flour Water Salt Yeast. Though not very technical it helped me start getting a feel for the dough development process and for that, I’m ever grateful. I still refer to it for recipes.
On one such occasion recently, I revised the section where Ken wrote about making a dough you can call your own. I wrote about that a few months ago and while I still make lots of bread with my reference flour blend, soon after I wrote that article, I started making more and more use of Kamut flour.
Kamut is actually not a type of flour but a brand. The actual wheat type is known by its common name of Khorasan (Triticum polonicum) and is an ancient grain that can trace its roots to ancient Mesopotamia in an area known as the Golden Crescent. The kernel of this grain is roughly three times the size of most modern wheat varieties. And while it contains gluten, it’s of a type that is much more digestible than other wheat varieties and it is packed with B-vitamins.
Health benefits aside, Kamut has a wonderful flavor when incorporated in a flour blend. The bread that results has a slightly nutty flavor and when risen with a natural leaven presents a lovely fruity aroma. The crumb of bread made with Kamut is soft yet springy with a wonderful chewy texture. And as it is a rather thirsty flour even after a full bake (as shown above), the crumb retains a bit of moisture. Bread that I make using Kamut are among my most favorite.
But the main reason I love making bread with Kamut in the flour blend is that it is super-hard with which to work. The gluten that is formed with Kamut is incredibly delicate. And even though the Kamut flour I use has about 12% protein content, which you’d think could accommodate higher hydration, the delicate nature of Kamut’s gluten can a bit of an inhibitor to taking it above 75% hydration.
In light of that, Chad Robertson says in Tartine No. 3 that he takes his 60% Kamut dough past 90% hydration. But looking that the pictures, I believe he compensates by making smaller loaves though his recipe implies making 1-kilo loaves. Based on experience, medium-format loaves with that kind of hydration using that much Kamut will not have much vertical rise. You’ll get nice holes – which is what Tartine bread is known for – but not much vertical rise. For example, look at the pictures from Tartine No. 3 of the 60% Kamut bread below:
You’ll notice that there’s not much vertical rise in the cross-section. It’s a beautiful crumb that’s consistent with a highly hydrated dough. And though I don’t know how big those loaves are from the picture, I have made this recipe and experimented with 93% hydration for the 1-kilo loaves. Even though I built up lots of dough strength, they still spread out a lot. So I’m thinking that the loaves shown in the picture to the left above are significantly smaller than 1-kilo loaves so they retain some vertical rise.
As for me, I do a 40% Kamut, 30% Bread Flour, and 30% High-extraction Flour. The hydration is 75%. That blend and hydration offers the best balance of flavor and dough strength to give me great oven spring and a reasonably open crumb.
And given that Kamut’s gluten is so delicate, I’ve taken to final proofing at 39-40°F for up to 36 hours to allow plenty of time for the gases to expand in the dough. I’ve also learned to bake very gently during the first 20 minutes with steam at 400°F. Once I remove the steaming container, I up the temp to 425°F and bake for 35 minutes until I get a nice tri-color crust.
I mentioned above that I love working with Kamut because it’s a difficult flour with which to work, but I think another big reason is that it has taken me so long to master this blend and make consistently good loaves with it. And that in itself has been a revelation into the intricacies of bread baking. There are so many variables. And while it’s possible to establish methods that are common to many different kinds of bread, working with Kamut, I’ve had to make slight adjustments to my basic methodologies to accommodate the flour.
But I have to say that mastering this blend has given me an immense amount of satisfaction. And that satisfaction is what keeps me going and keeps me exploring!
As with many home bakers, I’ve studied several bread-making techniques from some very famous bakers. I’ve learned so much of the science behind bread from studying Jeffrey Hamelman; I’ve learned baguette technique from Markus Farbinger; I’ve learned sourdough bread technique from studying Chad Robertson.
Especially with respect to sourdough, Chad Robertson’s “bake-by-feel” technique has really helped me transform my own approach to making bread. After reading his first book, “Tartine Bread,” I came to believe that all the anecdotes he included in the book were included because he wanted to convey this sense of using a healthy dose of intuition when making bread. Furthermore, he puts an emphasis on engaging all the senses when baking, describing how the dough should feel or smell or look at different stages of development.
But the biggest takeaway I’ve gotten from his technique is temperature. Unlike other recipes and techniques I’ve learned in the past that emphasize fermenting around 75°F, Chad ferments his dough at 80°-82°F. That’s a significant temperature difference!
But it makes a lot of sense because his recipes only call for a small amount of levain. In fact, the flour content in his levain only accounts for 7.5% of the total flour. With the lower yeast density, you can up the dough temperature and not worry about the dough fermenting too quickly. Absolute genius!
And that’s the secret I discovered: A small amount of levain and fermenting at a higher temperature; specifically, at 80°F+. Especially with respect to dough temperature, that 80°F temp is pretty warm, but I can tell it makes my yeast very happy. Experienced bakers may balk at that temperature simply because it favors yeast activity over bacteria activity. BUT final fermentation for Tartine loaves is a cold ferment for 18 to 24 hours. At that very low temperature, the yeast activity is severely slowed down and will favor bacterial activity which will develop the flavor complexity.
Even Ken Forkish talks about his 75°F dough temp as offering the best balance of yeast and bacterial activity – baker’s preference. Chad takes the approach to his bread by emphasizing yeast activity first, then flavor development after.
As for myself, I prefer the Tartine method. As I mentioned, it requires a lot of intuition and engagement of all the senses and that resonates with me.
I’ve spent quite a bit of time on various online bread forums and have seen many pictures of bread people bake from around the world. There’s LOTS of talent out there! And today, as I was perusing a forum, I saw a picture that someone took of a half-dozen boules they made today. They were gorgeous!
And they were perfectly round and all the exact same diameter. When I zoomed in on the picture, I noticed that the bottom sides of the loaves were just a tad bit flat, which told me one thing: The loaves expanded outward to the sides of the Dutch oven.
Look, I don’t want to take away from how beautiful the loaves were. But it made me ask the question: What if they didn’t use a Dutch oven? Chances are, those loaves would be a LOT wider in diameter and not nearly as tall.
I don’t use a Dutch oven. I bake all my bread on a baking stone with a pan of water at the bottom of my oven for steam as shown below.
That doesn’t necessarily make my bread better or make me a better baker. But baking on a stone has forced me to constantly think about the strength of my dough and really hone my shaping skills. If I mess up, I get results like this:
That was not amusing. Those loaves were made with 40% Kamut, 30% Organic Whole Wheat, and 30% Bread Flour at 88% hydration. I knew I was in trouble after final proof. Though the loaves were perfectly fermented, there just wasn’t enough dough strength and they collapsed under their own weight. The lack of strength wasn’t due to kneading – or lack thereof – either. I used too much of a fairly acidic starter, and the hydration was simply too high for the flour I used. Both the Kamut and Whole Wheat flour from this supplier just don’t develop enough strength. Combine that with a low pH and well… you see the results.
As for the title of this post, here’s an acid test: For those of you who bake with a Dutch oven, try using a metal pan or a pizza stone to bake your next loaf. Instead of covering your loaf, put a cast-iron skillet on the bottom rack of your oven and put some hot water in it to generate steam. If you’re building up good strength in your dough, your loaf should rise up nicely. But if it spreads out, chances are you’ll need to work on building up your dough strength and shaping.
When I personally moved to a baking stone from a Dutch oven, I made several flat loaves until I learned how to get great gluten development, and learned how to create a taut skin during shaping; that, and studying my flour’s capabilities. In fact, with that brand of flour, I rarely take it above 80% and usually stay around the 78% hydration mark.
And when I saw the flatbread I had created, I have to admit that it was pretty humbling because I thought I was the bee’s knees with my perfectly shaped loaves! 🙂 Little did I know that my skills needed A LOT of development.
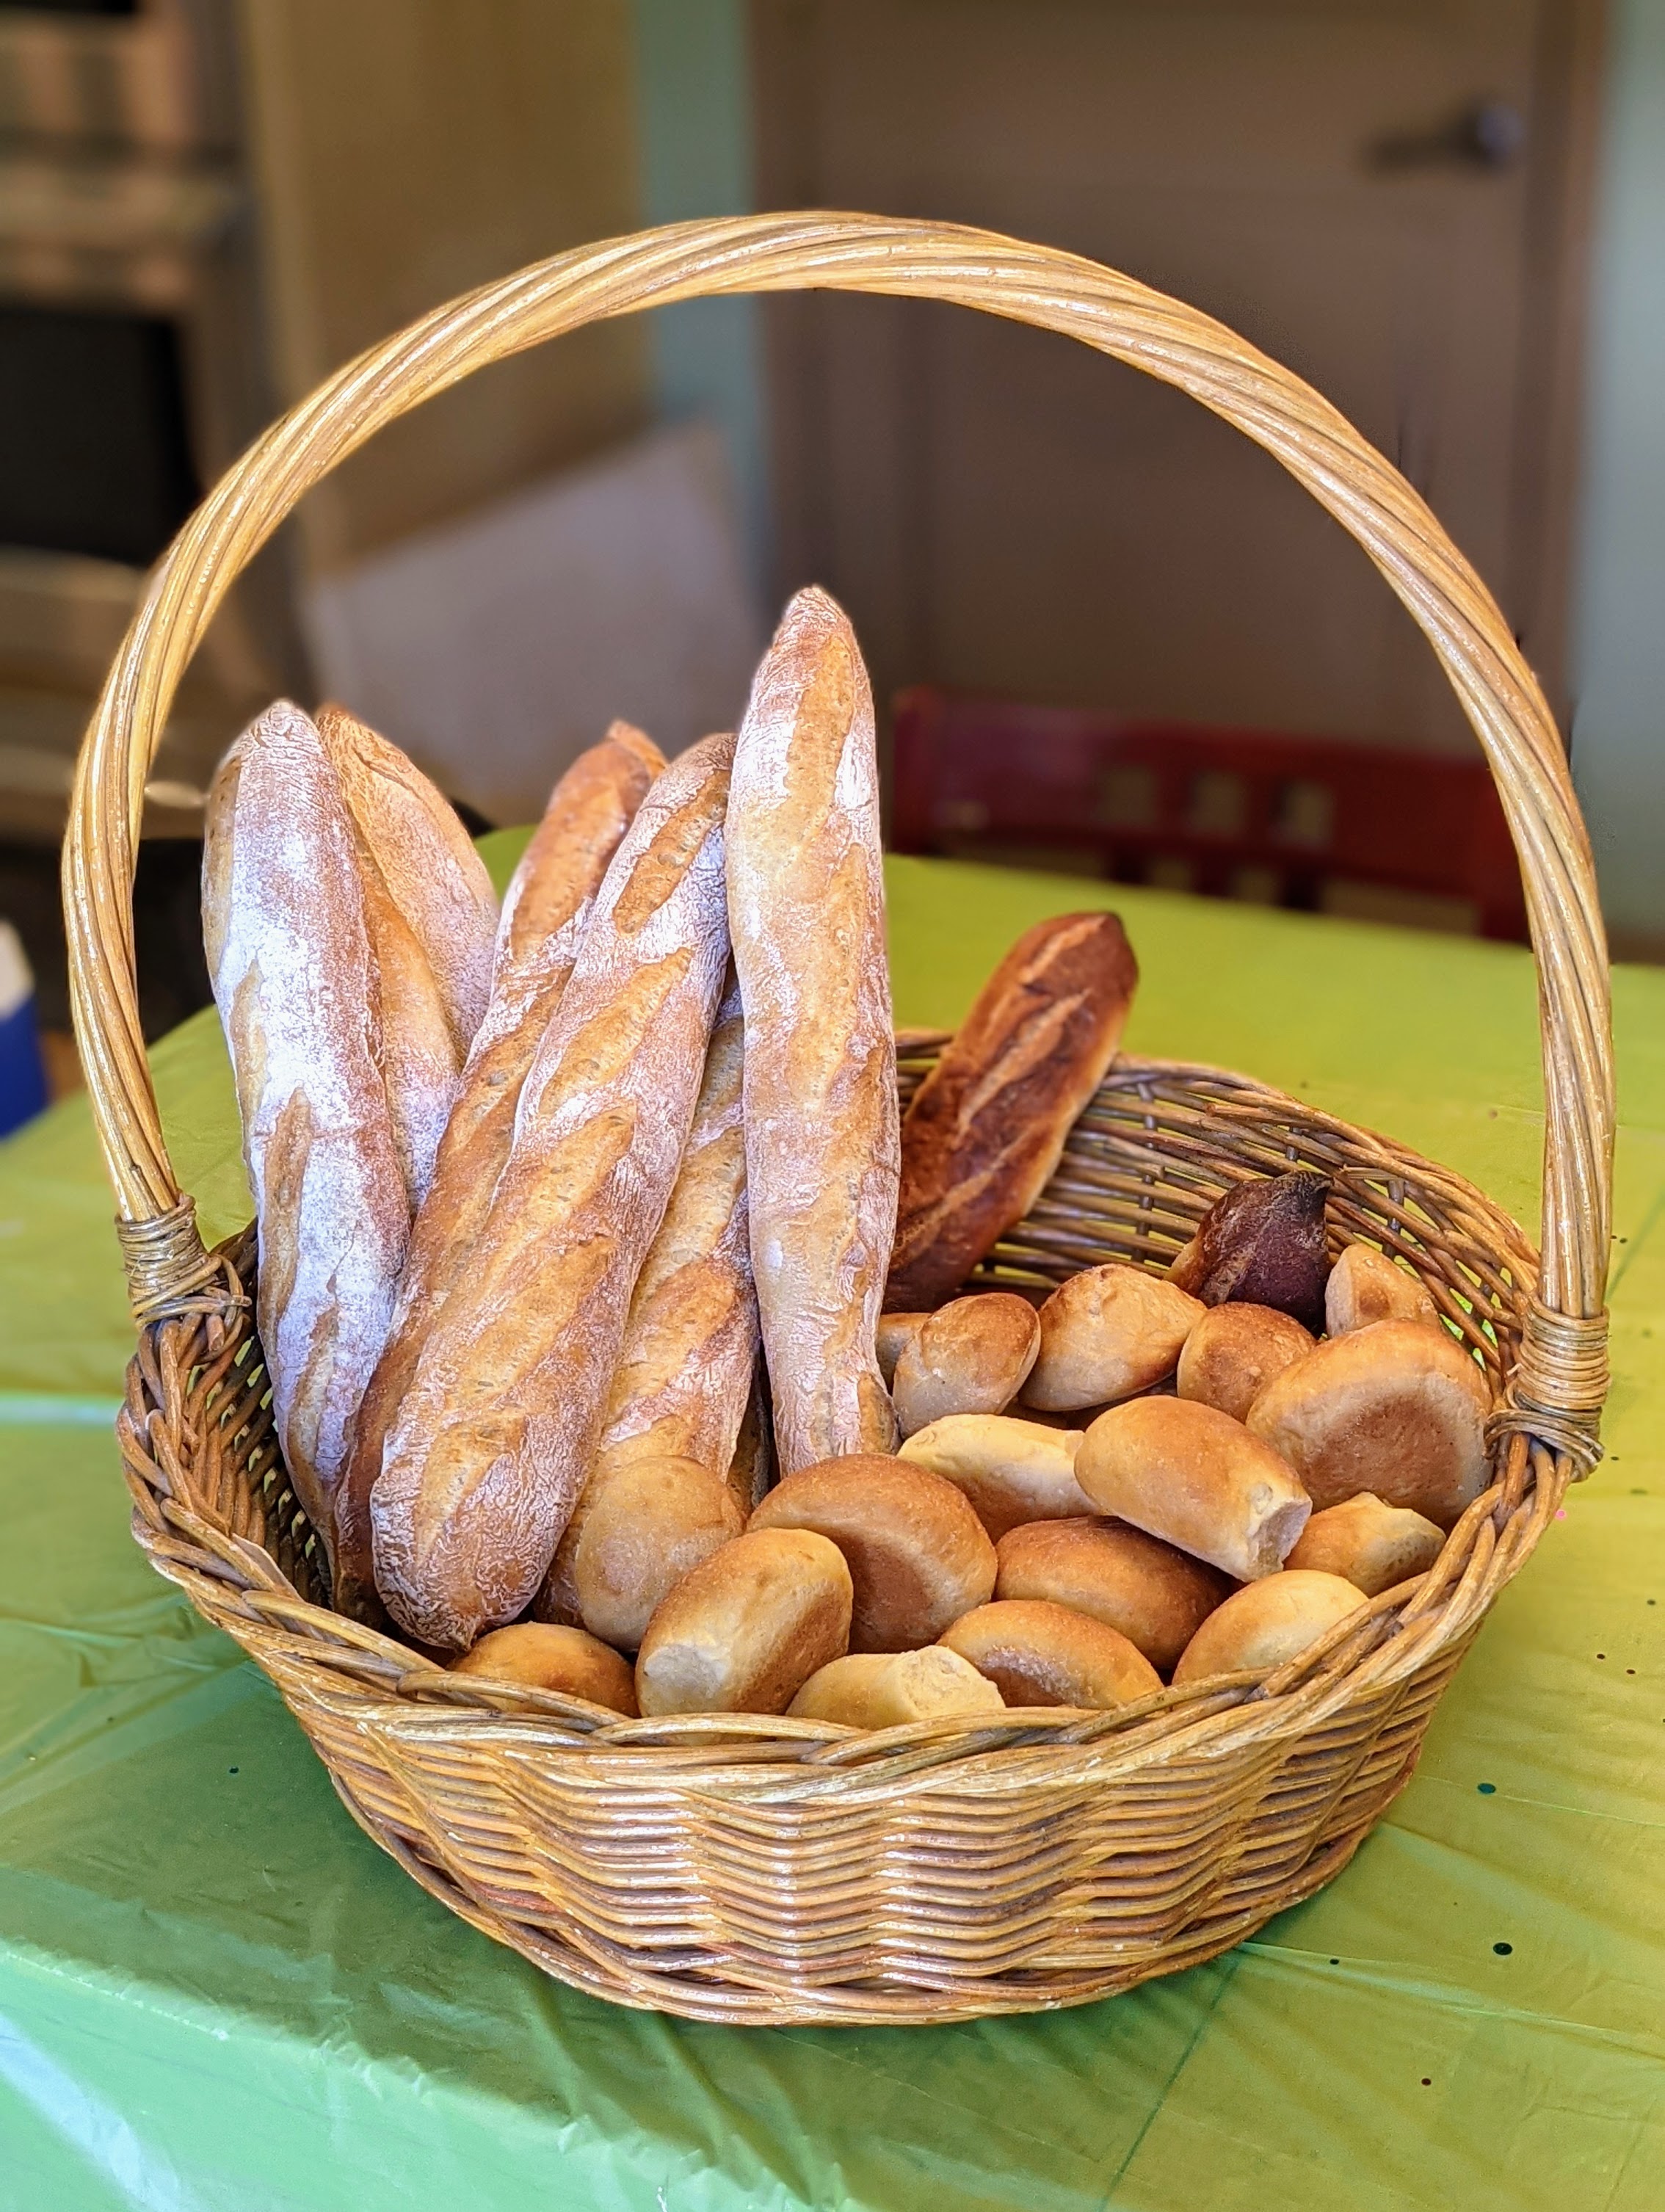
This past weekend, my family put on a small open house for my daughter’s graduation from high school. Though we invited around 50 people, we had no more than 25 at one time, spread through the house and the backyard, so social distancing wasn’t too much of a problem.
For the main dish, I BBQ’d and braised pork butts. And instead of our regular rice or noodle offering that we have at our parties, I figured with me being an avid baker, I’d make bread for the party!
I made four different kinds (as shown in the picture): Baguettes, Sourdough Demis, Sourdough Rolls, and what I call Hawaiian Butter Rolls. These were definitely the hit of the party, and they were gone long before the other bread. So given their popularity at the party, I thought I’d share the formula.
These aren’t exactly like King’s Hawaiian rolls – I didn’t develop the recipe to mimic them. They’re more like a cross between brioche and Hawaiian rolls. But no matter, they’re absolutely delicious! And though there’s both sugar and pineapple juice in the recipe, the rolls aren’t overly sweet, but the pineapple juice makes them incredibly fragrant. Here’s the formula:
Overall Formula
%
Flour
100.00%
Milk
30.00%
Pineapple Juice
35.00%
Eggs
10.00%
Butter
18.00%
Yeast
0.50%
Salt
1.00%
Sugar
2.00%
Total Percentage
196.50%
Don’t be fooled by what looks like a low-hydration dough (65% by adding the milk and pineapple juice together). If you count the eggs as water, they take hydration to 75%! But don’t worry the dough is actually pretty easy to work with.
Final Dough
AP Flour
733g
Milk
220g
Pineapple Juice
256g
Eggs
73g
Butter
132g
Yeast
4g
Salt
7g
Sugar
15g
Pineapple Juice
256g
Optimal Dough Temp
80ºF
Yield
24 X 60g dinner rolls 14 X 103g burger buns
Notes
Warm the milk – it should be around 80-90F
Warm Pineapple juice – should be a little above room temp.
73g for eggs? I will actually scramble a couple of eggs and pour in what I need. I will use the rest mixed with a little milk for an egg wash.
Instructions
Mix. Once you have everything prepared, add all the ingredients to the mixer and mix until the dough is smooth. At this hydration, you won’t have much gluten development but that’s okay.
Bulk Fermentation. 1 1/2 to 2 1/2 hours depending on ambient temp until just short of double.
Fold. Fold twice within the first hour. When folding make sure to stretch and fold until the dough no longer wants to be stretched.
Divide and Shape. Scale-out pieces as listed in the Final Dough table, roll into tight balls, then immediately transfer to a well-greased or parchment-covered baking sheet separated by about an inch or two depending on the size you’re making. Once all the balls have been shaped, gently press them out to 2 1/2- to 3 1/2-inch discs (smaller disc is for dinner rolls).
Final Fermentation. Allow discs to proof for 45 minutes to an hour. The discs should be a little puffy. Don’t worry if they touch and come together.
Bake. Just before baking, brush the dough with egg wash. Bake at 350ºF for 25-30 minutes until the rolls are deep, golden-brown.
Every time I make these, whether dinner rolls or burger buns, they’re a total hit! The whole house smells of butter and the sweetness of pineapples!
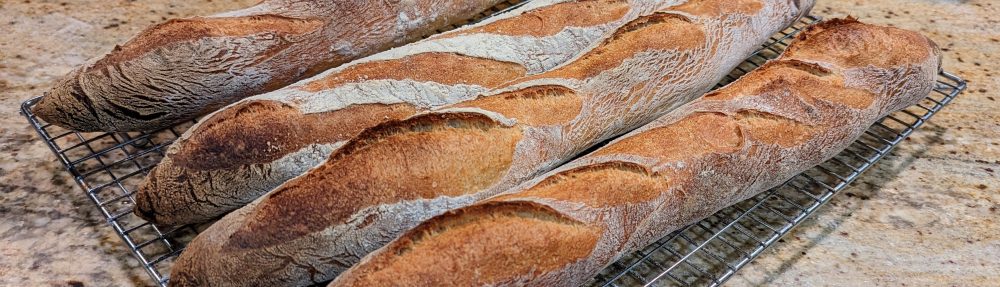
Last night, my wife told she was going to be attending a potluck dinner party this evening and asked me if I could bake something for her to bring. Of course, any excuse to bake bread is just fine by me so I told her I’d make baguettes. I was going to make my standard pointage en bac baguettes where I mix everything together then cold retard the bulk fermentation but decided instead to make poolish baguettes.
But I didn’t want to do my standard poolish baguettes where the poolish flour was only 25% of the total flour. I wanted to challenge myself a little. Then I remembered the white bread with poolish recipe from Ken Forkish’ Flour Water Salt Yeast book that uses 50% of the total flour for the poolish! That’s a challenging dough because it is SO easy to get the poolish wrong; that is, over-ferment it, as it calls for an overnight ferment at room temp. And as ambient temperatures vary wildly, I’ve had some real poolish fails in the past.
But luckily the weather is turning cooler and Ken’s requirement of a 65°-70°F temp is now possible. In fact, the temp in my house dropped even below 65°F overnight, so when I woke up this morning to check the poolish, it wasn’t yet ready. Whew! I could catch it at its peak!
To be honest, I hadn’t made baguettes with this dough yet. But at 75% hydration, I had a feeling this would be perfect dough for making baguettes! I wasn’t wrong. They turned out beautifully, with a crisp, golden crust, and a light, airy, and buttery crumb! Here’s the recipe!
Overall Formula
Flour
100.00%
Water
75.00%
Salt
2.00%
Yeast
0.43%
Poolish
Bread Flour 25% (96g) AP Flour 75% (286g)
382g
Preferment Water
382g
Yeast Weight
0.3g
As I always recommend, make a little more poolish than you need because you will lose some weight due to processing and evaporation. In this case, I’d do 400g flour water each.
Final Dough
Bread Flour 25% (96g) AP Flour 75% (286g)
382g
Water (~100°F)
191g
Salt
15g
Yeast
3g
Preferment
763g
Total Yield
1353g 4 X 335g, 60cm loaves 6 X 225g, 40cm loaves
Make the Poolish. The night before you bake, make the poolish and place it in a cool place where you can maintain about 65°-70°F. At that temp, it’ll take about 10-12 hours to be ready. Just like with a levain, the poolish will be ready when it passes the float test. Visually the poolish should be a bit more than doubled, its top mottled with bubbles, and the top surface slightly domed.
Mix. Thoroughly mix all the dry ingredients together in a large bowl. Pour the water around the edges of the poolish to help release it from its container. The poolish will then slip right out of its container. Add the poolish to the dry ingredients then mix thoroughly until you form a shaggy mass with no dry ingredients remaining.
Bulk Fermentation. 1 1/2 to 2 1/2 hours depending on ambient temp. My kitchen was pretty cool this morning, and even though I put the dough in my oven with the light on and door slightly cracked, it still took 2 1/2 hours. Bulk fermentation is done when the dough has expanded 50%-75% its original size.
Ken Forkish has his dough go out to 2 1/2 to three times volume. But he has a VERY short final fermentation at 30 minutes. I prefer to take the dough only as far as 50% and having a longer final fermentation to let the dough recover from shaping.
Folding. Fold three times in the first hour after mixing at 20-minute intervals.
Divide and Preshape. Pour the dough onto a lightly floured surface, then gently tug it into a nice, even rectangle. Divide the dough into four equal pieces. For this recipe, scale each piece to 335g for 60cm loaves. Alternatively, you can make six 40cm loaves. Scale those out to 225g. If you have any leftover dough, just cut it into pieces and distribute to the pieces. Preshape the loaves into small logs by letter folding them, then rolling them up like a jelly roll. Rest the logs seam-side-up on a well-floured couche for 20-30 minutes or until the dough has relaxed.
Shape. Shape each piece into a baguette, then place each shaped loaf onto a well-floured couche for final fermentation.
Final Fermenation. 45 minutes to 1 1/2 hour, depending on ambient temp. As I mentioned above, my kitchen temp this morning was pretty cool, and it took and hour and a half for the loaves to be ready to bake. The loaves will be ready when you do the finger dent test and the hole fills in very slowly.
Bake. Bake at 480°F with steam for 15 minutes. Remove steaming container, reduce oven temp to 425°F, then bake another 15-20 minutes or until the crust becomes a deep, golden-brown. These really benefit from a full bake!
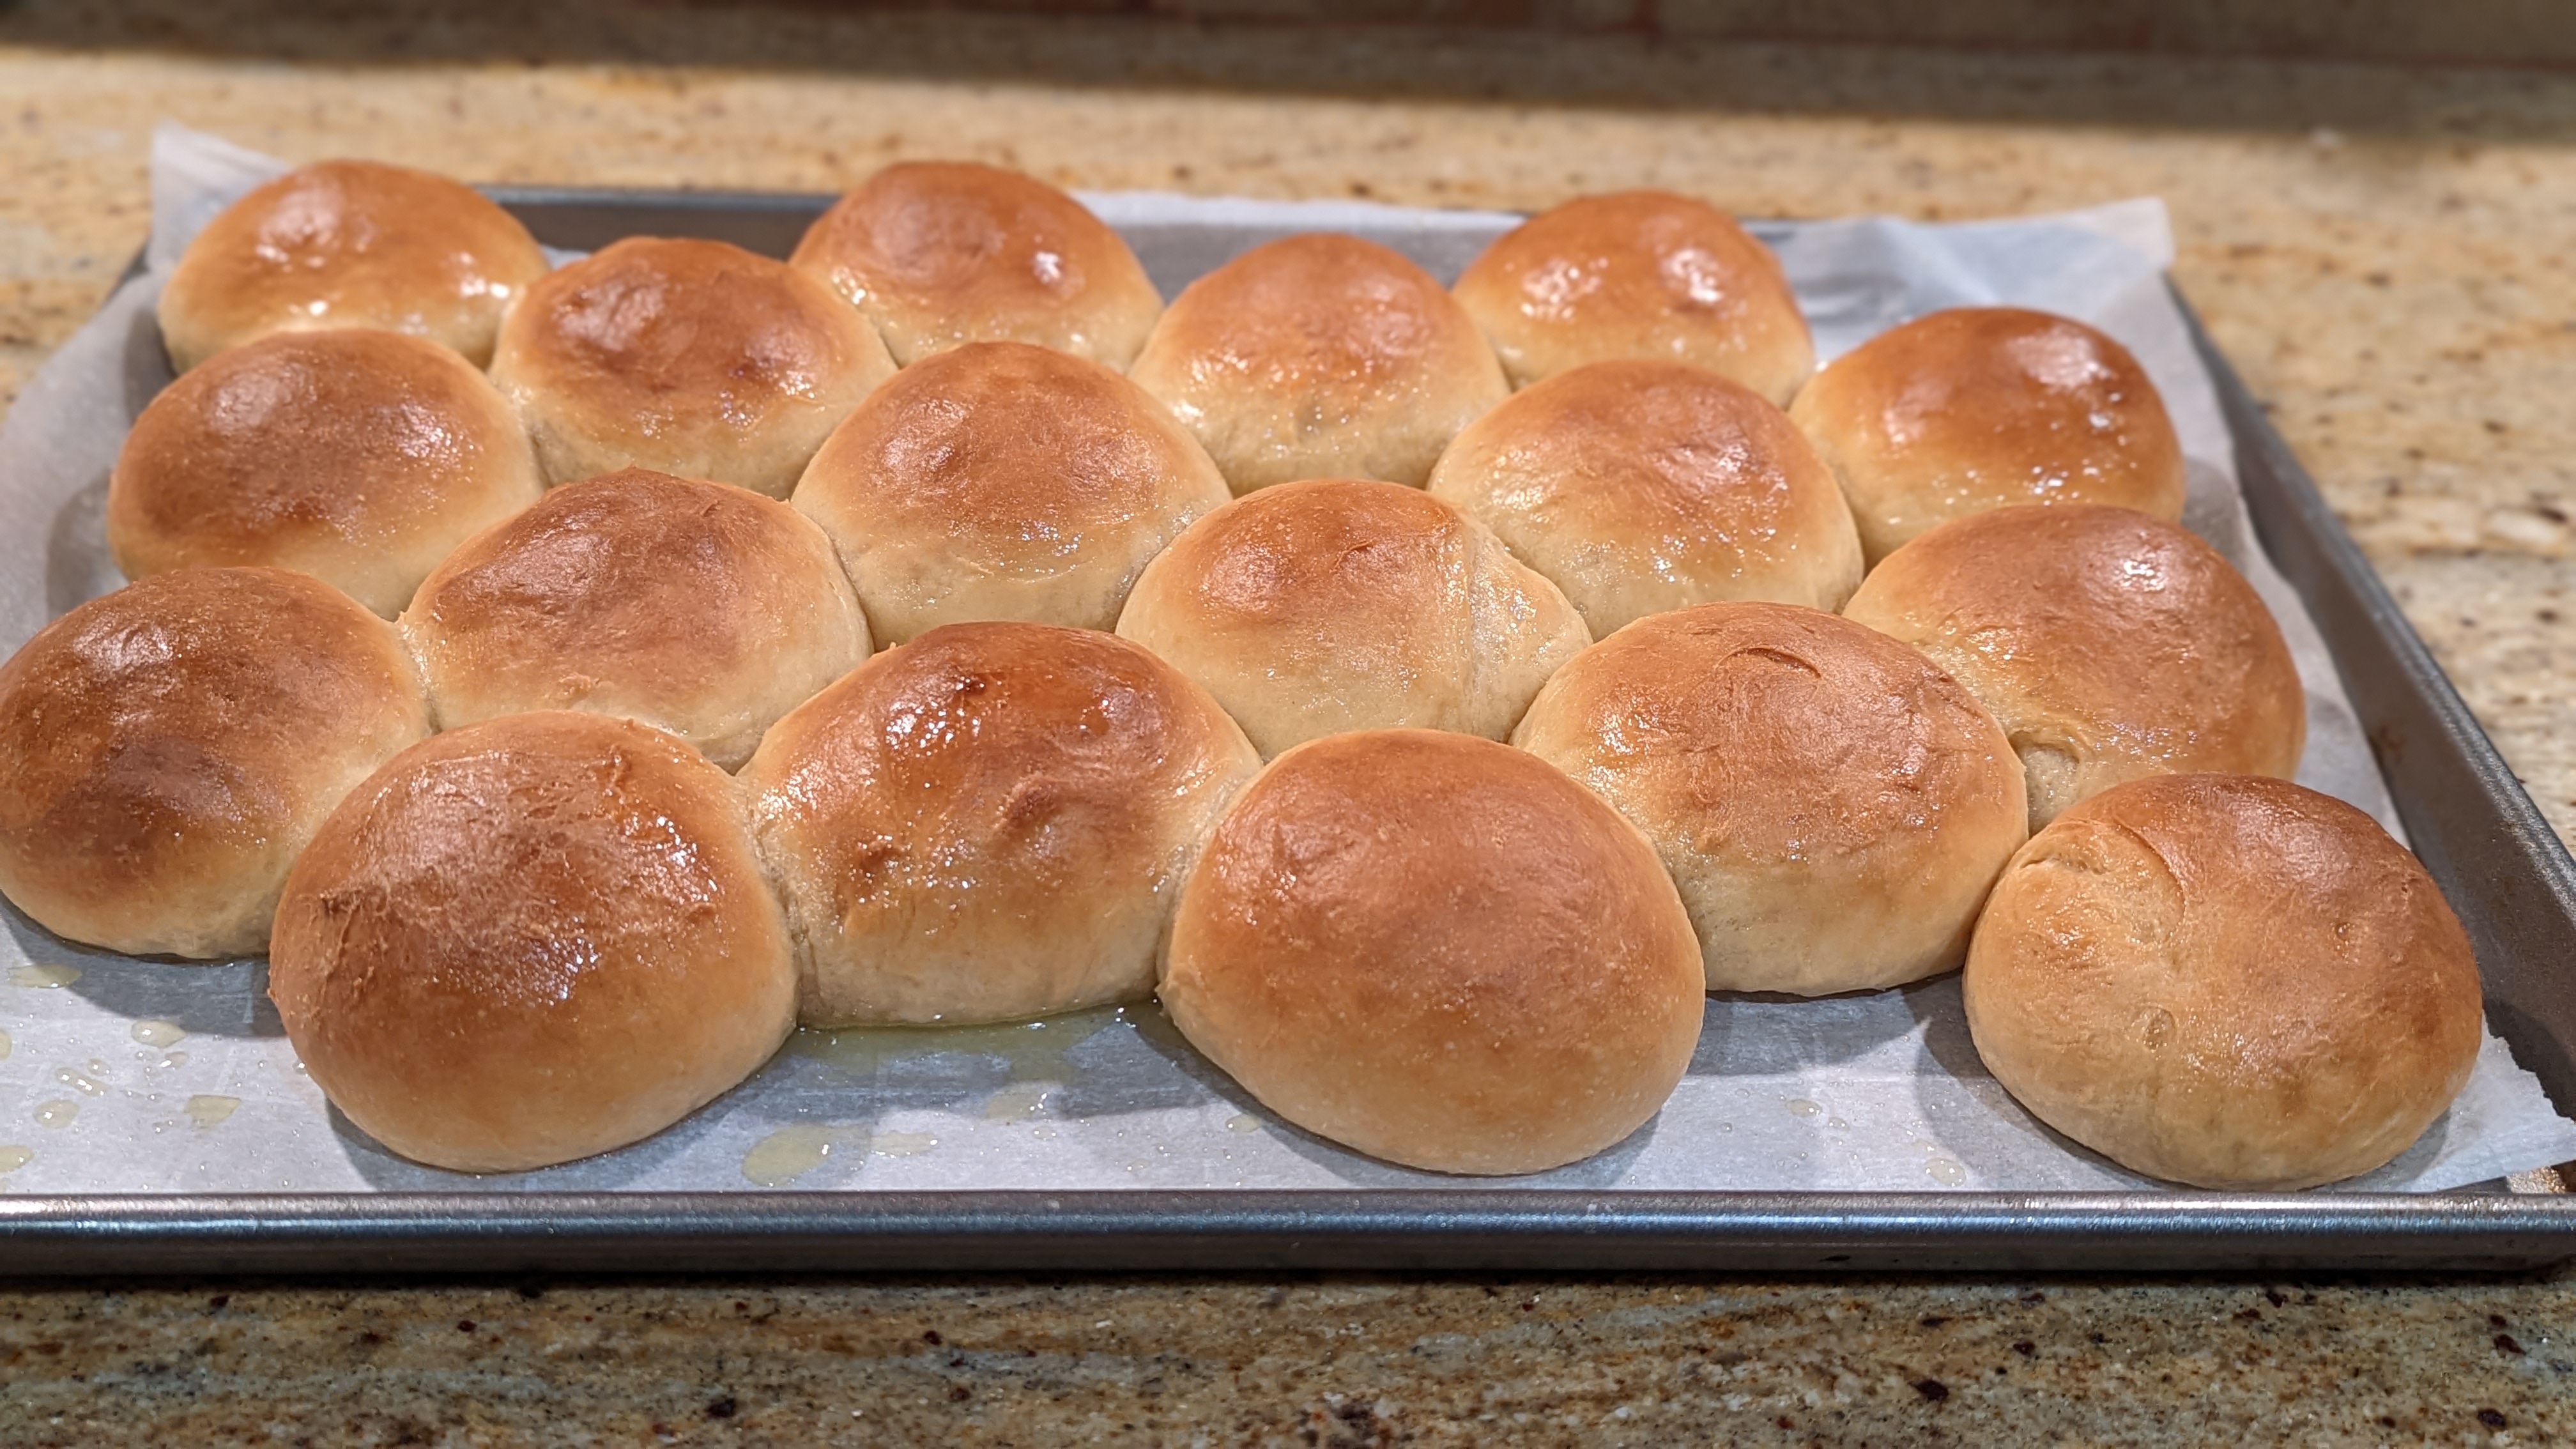
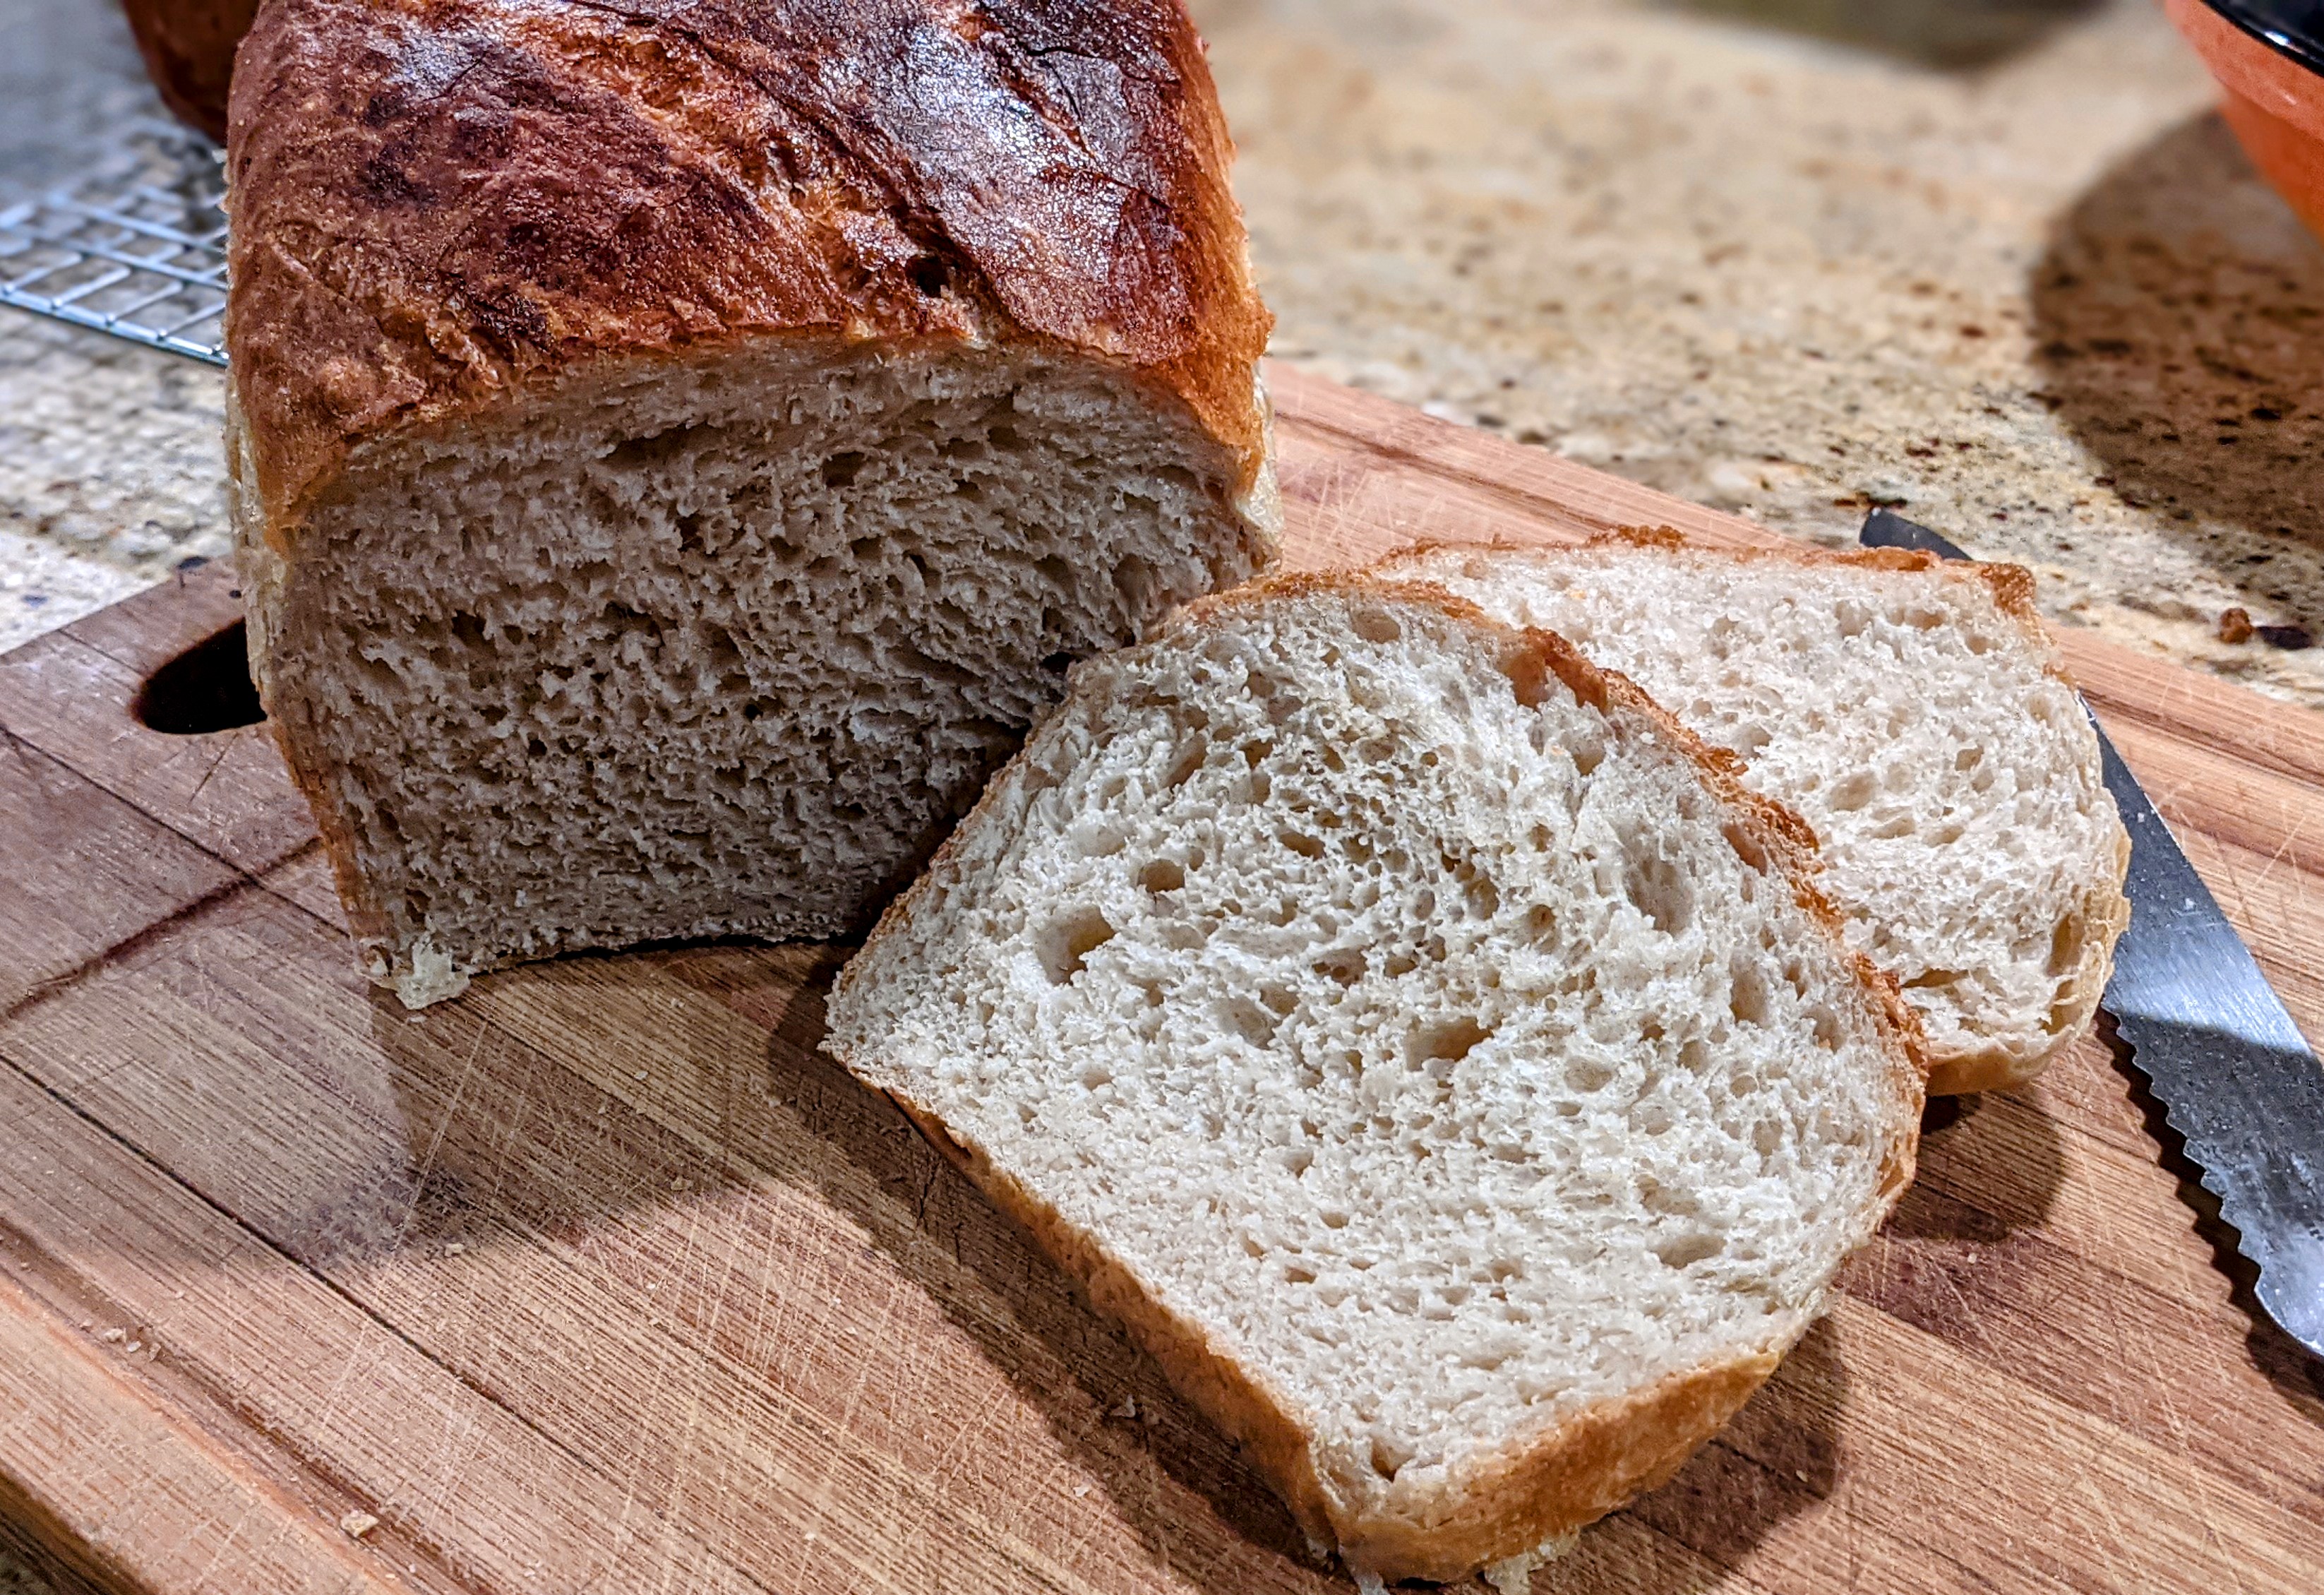
I know there’s this general obsession over sourdough this and sourdough that. And while making – and eating – fresh, sourdough bread is certainly satisfying, sometimes I get a real hankering for simple, yeasty bread. Plus, with my now very busy schedule that doesn’t permit me to bake nearly as much as I’d like, there are times when I just need the process to be absolutely straightforward. And I couldn’t think of an easier bread to make than simple, yeasty pan loaves!
I just pulled the loaves pictured above out of the oven about 20 minutes ago and the wonderful aroma of yeasty bread pervades my entire house! As with any bread, these take a few hours to prepare and bake, but the process is as straightforward as can be. These are perfect for those “work from home” days!
And the results! These have a light, thin, and crispy crust with a light, airy, and chewy crumb. Talk about a versatile bread! I just had some with butter and honey, but these make GREAT sandwiches!
Overall Formula
Bread Flour*
100.00%
Water
71.00%
Salt
2.00%
Yeast
1.25%
I used a 70%/30% blend of King Arthur Bread flour (12.7% protein) and Azure Standard Ultra-Unifine Bread Flour (14.7% protein but it’s also high-extraction)
Final Dough
Flour
933g
Water (~90ºF)
663g
Salt
19g
Yeast
12g
Total Yield
2 X 800g loaves
Optimal Dough Temp
~80ºF
Initial Mix/Autolyse. In a large bowl or container (I use an 8qt Cambro), mix all of the flour and all but 50g of the water until no dry flour remains. Once mixed, let it rest for 30 minutes to autolyse.
Final Mix. Sprinkle the salt and yeast evenly over the top of the dough mass, then pour the reserved water over the salt and yeast. Using a squeezing motion, work the water, salt, and yeast into the dough until fully incorporated. The dough will still be a little shaggy but that’s okay.
For both bulk and final fermentation steps, I place the dough and loaves into an oven with a slightly cracked door. The oven light will provide a little heat that will maintain the 80ºF dough temp I want.
Bulk Fermentation. About 1 1/2 to 2 hours or until the dough has expanded about 2 1/2 times in volume.
Normally, I recommend about 25% to 30% expansion. But we’re using a lot of yeast and it acts quickly and vigorously!Don’t worry, final fermentation is relatively short so we won’t be over-fermenting the dough.
Folding. Fold the dough 2 times in the first hour.
Divide and Preshape. Divide the dough into two 800g pieces. Shape into rounds, then let them rest for 15 minutes.
Shape. Shape tightly into logs that will fit into a 9″ X 5″ loaf pan. I use my batard shaping method that essentially creates an oval and I rely on the rising action to expand the dough in the pans. Once shaped, place each loaf into a 9″ X 5″ loaf pan.
Final Fermentation. 45 minutes.
Bake. Bake at 460ºF for 30 minutes. Use steam for the first 15 minutes. Brush with melted butter as soon as they’re out of the oven.
I told ya! This is as simple and straightforward as can be!
Ciabatt-ahhhhhhhh! Those pillows of airy goodness. I make basic ciabatta (just AP flour) almost as much as I make baguettes. They’re so light with a crispy crust. You can eat them plain, or with some butter, or dip them in good olive oil… Just puts a smile on my face. But despite loving to make them so much, I wanted to see what they’d be like with a flour blend.
Then it hit me that the other Italian bread I love to make is Pane di Altamura. That recipe uses an 80/20 Durum/AP Flour blend that’s absolutely delicious. So I decided to do a version of ciabatta that uses Durum wheat flour.
About Semolina…
Durum wheat ground up into flour is commonly called Semolina. But you can’t just use any semolina flour off the shelf as that is typically too coarse for making dough. You have to be sure that it’s ground fine to extra-fine. I get my Durum from Azure Standard. This is actually a high-extraction version of their Semolina that has a lot of the sharp bits of bran sifted out after milling. I use it for making bread and pasta!
Overall Formula
Flour Semolina AP Flour
100.00% 60% 40%
Water
90.00%
Salt
2.00%
Yeast
1.10%
193.10%
Final Dough
AP Flour
377g
Semolina
251g
Water
565g
Salt
13g
Yeast
7g
Total Yield
1212g 6 X ~200g loaves
Optimal Dough Temp
80ºF
Initial Mix/Autolyse. Mix all the flour and all but 50g of the water together in a large bowl. Autolyse for an hour. Semolina is a very hard wheat and benefits from an autolyse.
Final Mix. Sprinkle the yeast and salt over the dough, then add the reserved water. Work the water, salt, and yeast into the dough until fully incorporated.
Bulk Fermentation. 1 1/2 to 2 hours.
NOTE: You’ll do two folds in the first hour, separated by 30 minutes.
First Folding. After 30 minutes, stretch and fold the dough using a wet hand. With a dough this wet, you need to be very gentle with the folding to ensure you don’t tear it while stretching. Stretch and fold until the dough no longer wants to be stretched.
Second Fold. Generously flour your work surface to prevent any sticking, then pour the dough out of your bowl and use your scraper if any dough sticks – you want to minimize tearing. Using quick movements, tug the dough from underneath into a rough rectangle. Then working in an N-S-E-W pattern, letter fold the dough by stretching a side, then pulling it over the dough mass. Once the pattern is complete, gently pat the dough down to flatten it, then repeat the letter folding pattern. If any side sticks, use your scraper to push flour underneath the dough. Once the second letter fold is complete, roll the dough onto the seams, then work it into a nice taut round. Transfer the round to a well-oiled bowl, seam-side-down. Allow the dough to expand about 50% of its original size after folding.
From this point on, the keyword for handling the dough is: gentle. Semolina flour-based dough is extremely delicate and will easily degas.
Divide and Shape. Slide the dough out onto a well-floured surface and gently tug it into a rough rectangle. Divide the dough into 200g pieces. You can then just tug the individual pieces into sandwich roll rectangles. Myself, I like to letter fold the pieces then using my fingertips, dimple the pieces and work them into sandwich roll rectangles. Once done with shaping a piece, transfer it to a well-floured couche or appropriate cloth for final fermentation.
Final Fermentation. 30-45 minutes. Rolls will be ready when they’re puffy and slightly billowy.
Bake. Transfer rolls to a baking sheet or transfer board, then dust lightly with flour. Bake at 460ºF for 15 minutes with steam. After 15 minutes, remove the steaming container, then bake until deep golden brown (about 10-15 minutes).
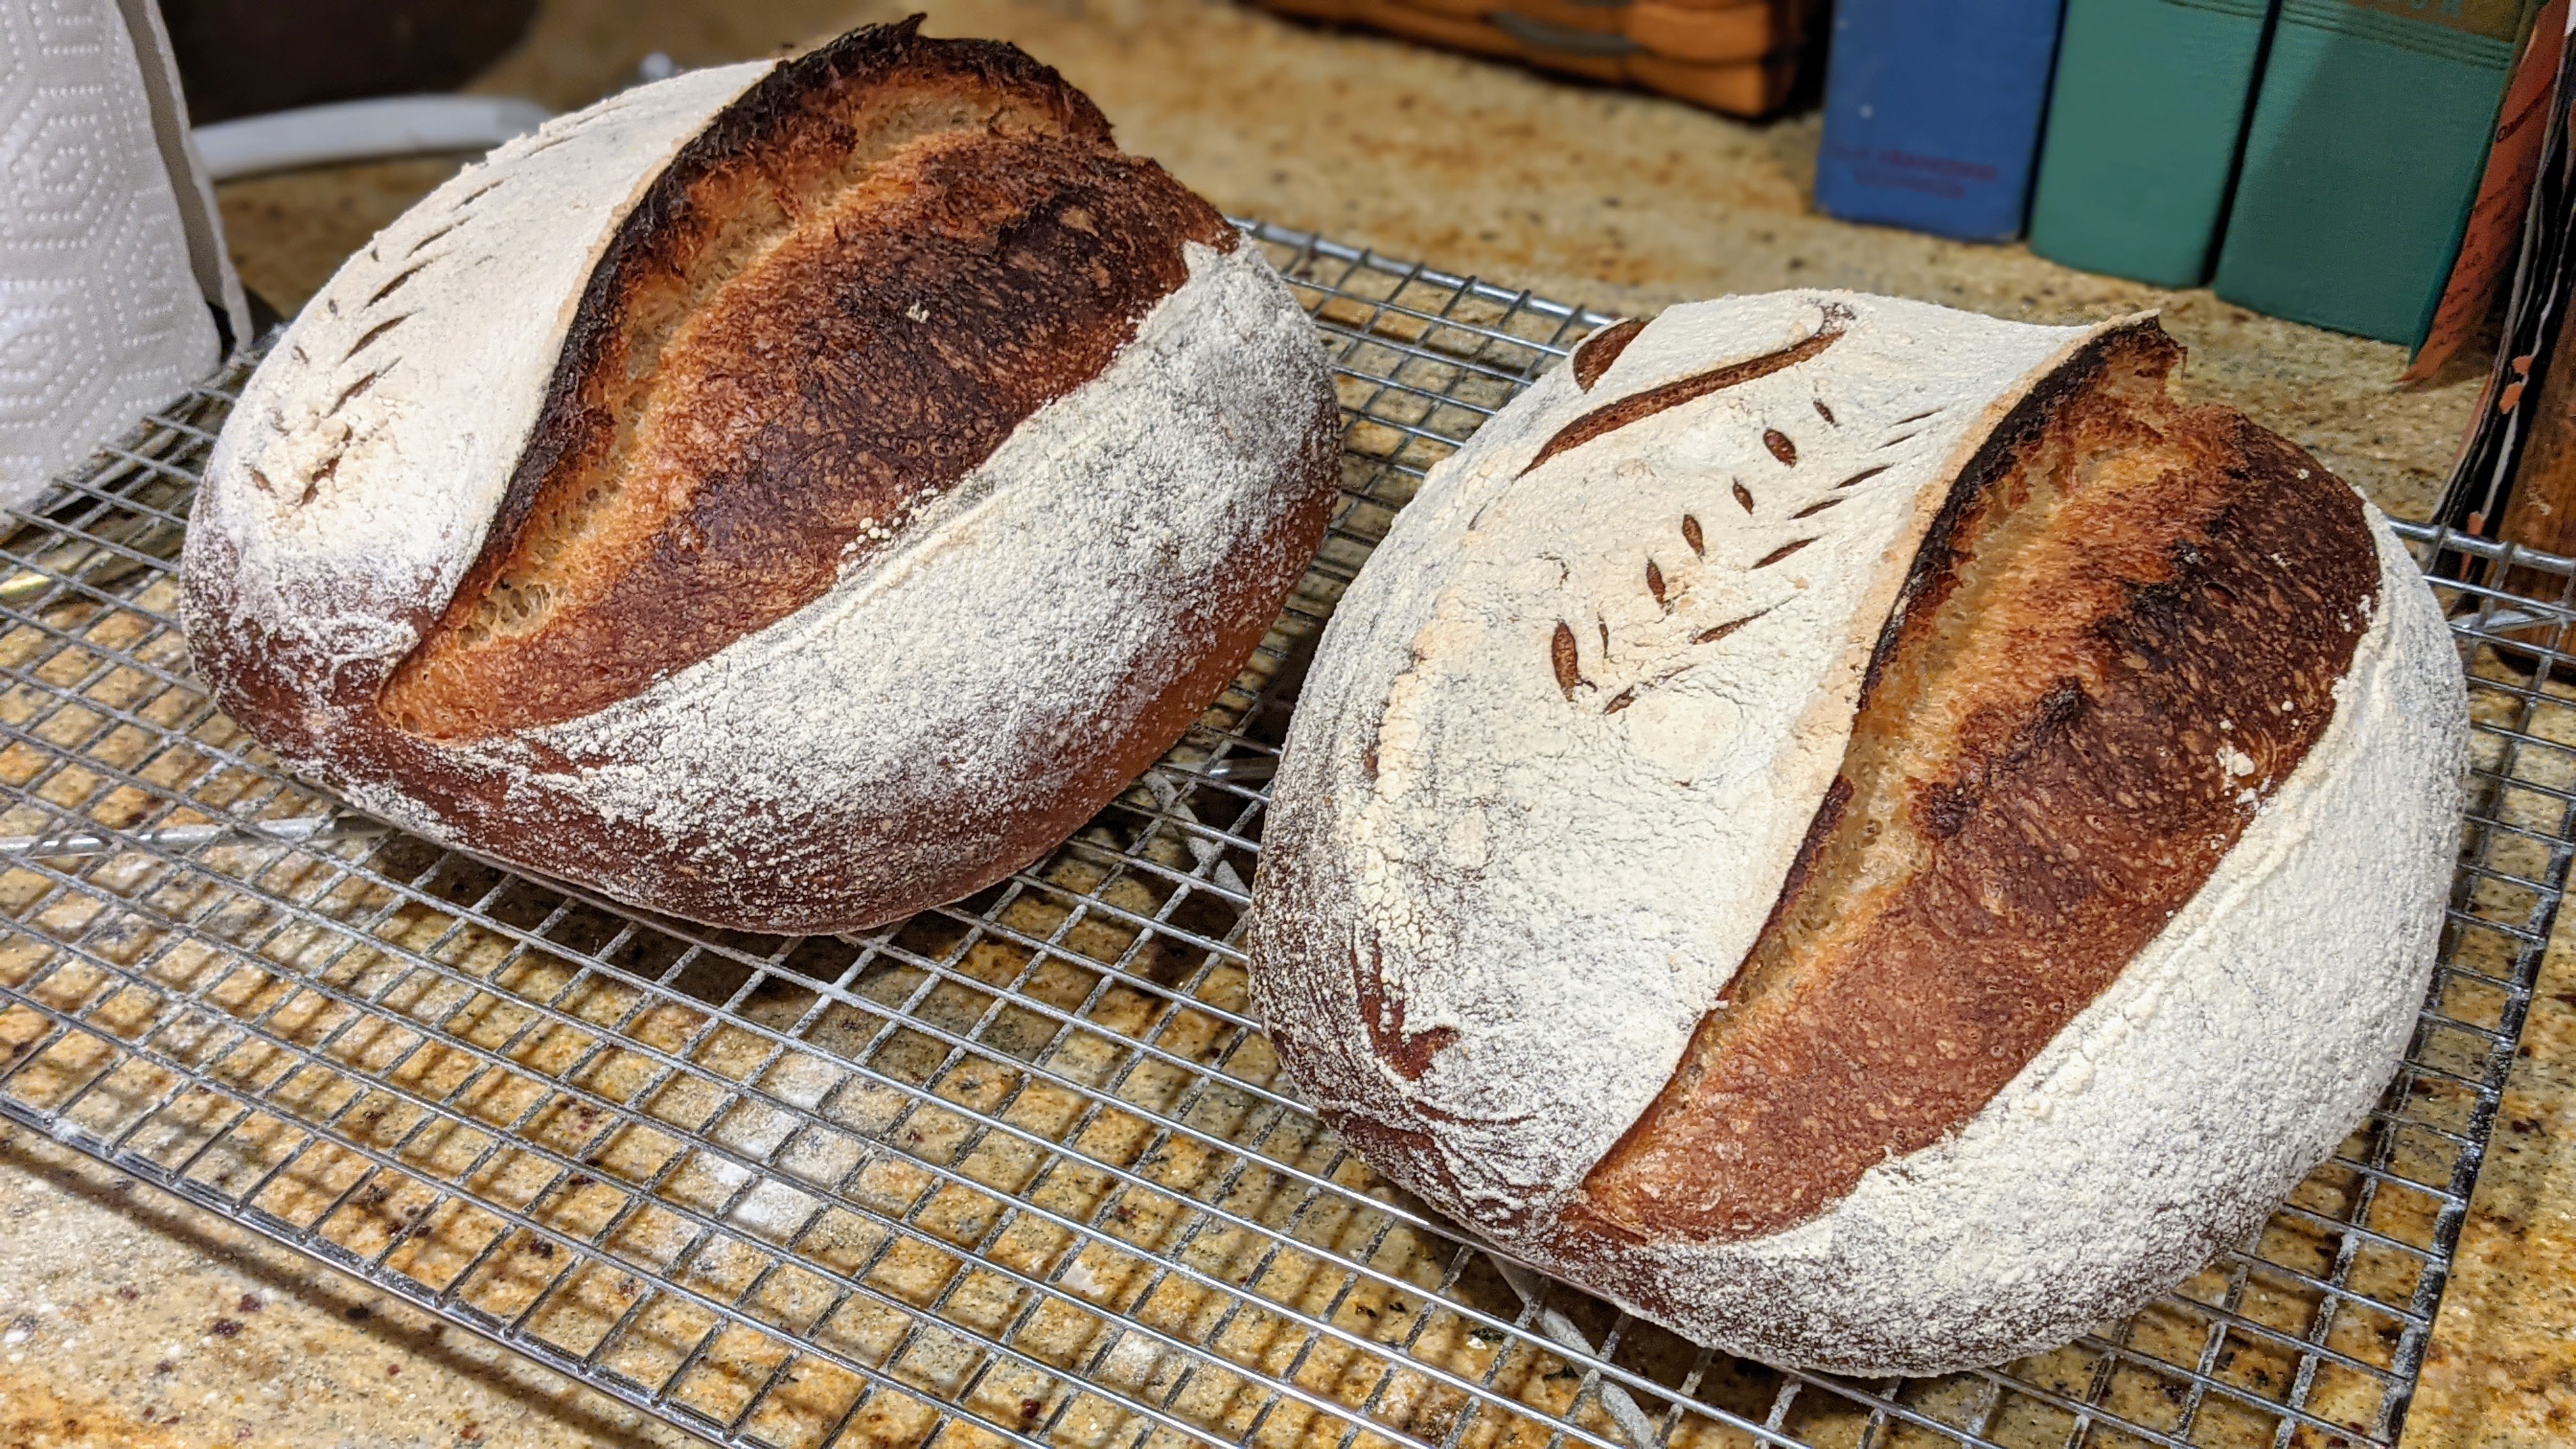
The title of this is a common Hawaiian pidgin phrase that basically means, if something’s possible, that’s great, if it’s not, then that’s okay too. In plainer terms, it means be flexible. It has been a useful thing to remember especially since I’ve gotten deep into bread-making. And admittedly, it was a hard lesson to learn. I used to totally obsess over the aesthetics of my bread. I wanted each and every loaf to fit an archetype – both inside and out – and I’d stress if it didn’t.
But bread dough is a living thing and it’s affected by all sorts of factors. And given that, working with forces you to be flexible. Look at ambient temperature for instance. When it’s warm – above 72°F – things happen fast. Dough action is significantly slower in cooler temps. But even if you adapt to different factors changing, there’s no guarantee that things will turn out as planned. You can certainly narrow the margin of error, but something will always be a little off.
Granted, as I’ve gained more and more experience, I make fewer mistakes, and quite frankly, the only person who notices an off outcome is usually me. But despite that, I’ve adjusted my thinking and usually just laugh at the little things that might happen.
For instance, with the loaves shown above, I actually tore the skin of the one on the left because I wasn’t paying attention when I preshaped the dough. And though I re-preshaped it after letting it rest a few minutes, I didn’t know how it would turn out in the end. And I was okay with that – If can can, no can no can… In the end it turned out fine. It spread out a little in the oven, but not severely to it was all good. But even if it did really collapse, it wasn’t going to end the world.
Not that I don’t fully let things go… I admit that I did have a concern because I inadvertently allowed bulk fermentation to go WAY longer than I normally do. Whereas I normally bulk ferment to about 25%-30% expansion, I let this dough go to over double because of a meeting. When I was done with the meeting, I saw how far it had gone and immediately went to preshape. I could tell that the dough was close to the edge of full-fermentation, so that tear got me a little worried that my dough wouldn’t have enough fuel for the long, cold final ferment.
When I pulled the loaves out of my fridge the next day, I took a whiff, and whew! They were sour-smelling; not in an off-putting way, but I knew that I had to bake them, lest they fall into a heap in my oven from over-fermenting. And alas, they turned out fine… If can can, if no can no can…
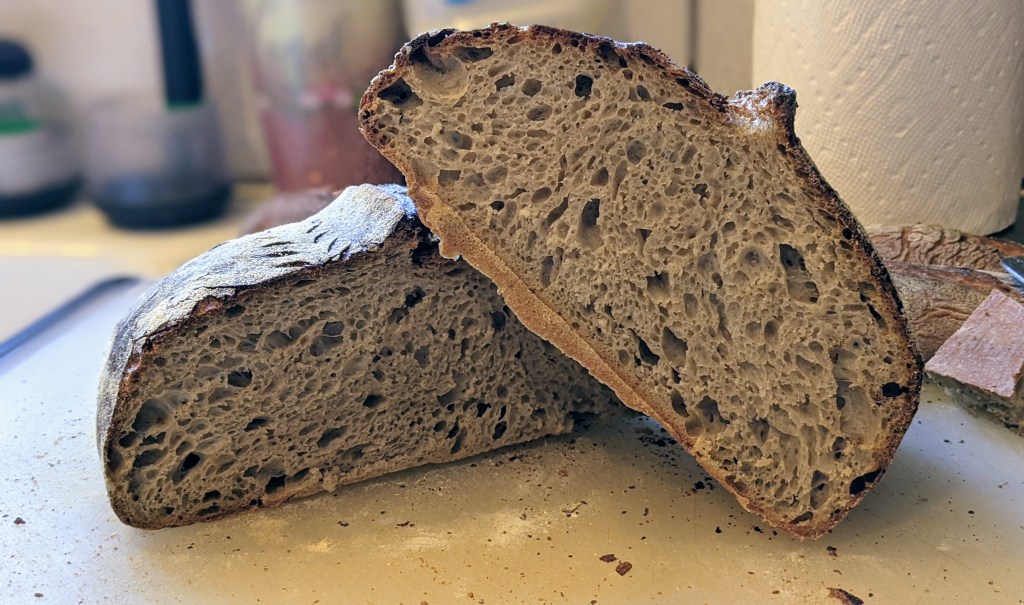
Spend any time on most home-bakers online forums and you’ll be convinced that your bread has to have an open crumb – the more open and lacy the better. When I was really getting into making artisan bread, I strived for that as well, upping my hydration percentages beyond 90% and using high-gluten flour, and learning the dough development techniques to achieve an open crumb.
It was a great experience, but in the end, that’s not what I wanted out of my bread. Aesthetically it looked great and it tasted great on its own. But especially with boules and batards where I’d be cutting slices, the bread was totally impractical! Any spread like mayonnaise and mustard would ooze right through. They were great for dipping in fine olive oil and balsamic, but that’s about it.
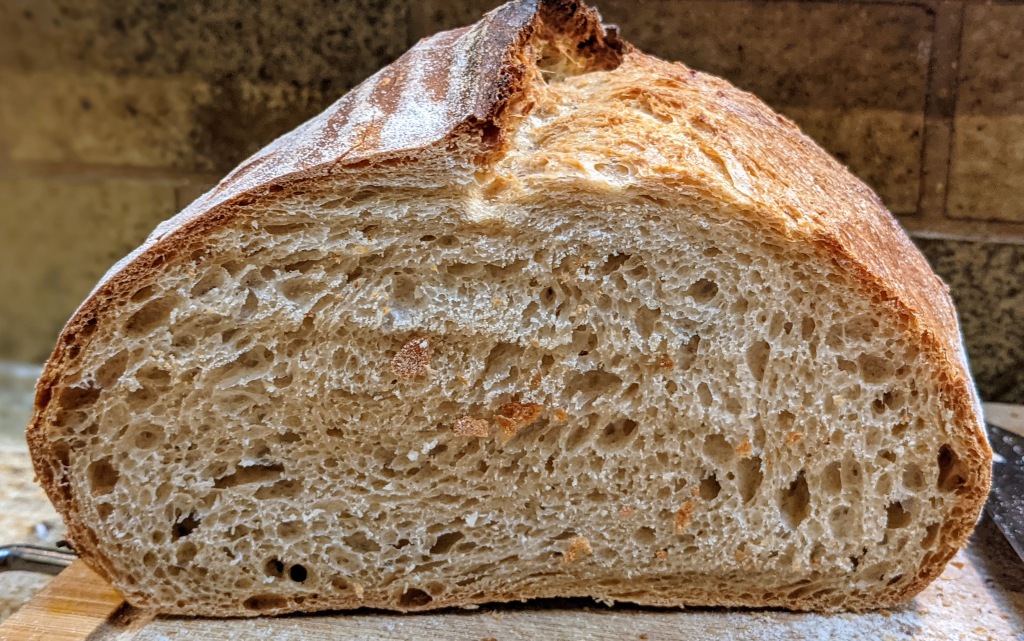
With the pictures above, I wanted to show the normal crumb of the boules and batards that I make. Though they employ different kinds of flour, I’ve figured out the hydration and processing that will get me that kind of crumb consistently. You’ll notice that while there are some larger holes, in general, the crumb of each loaf is only moderately open. What’s important to me is making sure the bread is fully fermented and that the yeast action is consistent and even during baking. Ultimately what I’m after is a soft, moist, yet airy crumb that has substance, but isn’t dense.
You’ll see on closer inspection that there are in fact numerous very small holes. I get lots of oven spring, but not due to large holes but by small holes acting together to raise the bread. If I’ve done the right job in making sure my dough is fully fermented, I’m good with that and it’s what I personally prefer. Given that, let me say this: A super-open crumb is not the be-all, end-all to baking bread! It really boils down to a baker’s preference. But this has somehow become a thing in home baking circles.
To be fair, I can understand why there’s so much enthusiasm surrounding an open crumb. It’s just not that easy to achieve when you don’t have the experience. And really, that’s what it takes: experience. In order to achieve that kind of open crumb, there are so many interdependent factors involved; and no, it’s not just upping the hydration as so many people are wont to recommend. And the only way one can fully understand the various interdependencies is through practice and repetition. So when someone finally achieves an open crumb with their bread, it’s understandable that they’d be excited.
And speaking of the recommendation to increase hydration, I have to admit that it’s irritating to me when I read this when someone asks how to get a more open crumb because most of the time that’s all the person answering says. So many people just blurt out, “Just increase your hydration,” as a catch-all, and don’t consider the flour the asker is using. First, your flour has to be able to absorb the extra water, and second, your flour has to have a high enough protein content to maintain the dough structure with higher hydration. Otherwise, you may very well get an open crumb, but your loaf will expand out and not up during baking.
And even with higher protein content, there’s the dough development and handling techniques to achieve that open crumb. Then you also have to consider the size of the loaf. A larger format loaf is going to have a lot of weight that could affect the openness of the crumb significantly. Like I said, there are lots of interdependencies…
Captured from Tartine Bread
Tongue-in-cheek, I kind of blame Chad Robertson for this craze because I’m fairly sure his book, Tartine Bread, had a lot to do with people’s notions of what constitutes an ideal crumb. Look at the picture to the right that I captured from Tartine Bread. That crumb is aesthetically amazing (unless, of course, you have trypophobia). And while it looks delicious – and I’ve had Tartine bread and it tastes amazing – spread some honey on a slice of that. Just make sure you don’t lay the slice directly on your hand without a napkin. And butter? Fuhgeddaboutit!
While that style of crumb isn’t what I’m personally after, it’s what Chad wanted to achieve as a baker and that’s entirely his prerogative. He spent years in search of that and developing the technique to achieve that crumb consistently in all his different kinds of bread – and at high-production levels, no less! So kudos to him!
And kudos to others who want to achieve this. It’s just not for me. Unfortunately, I’ve been on forums where people are downright snooty about other folks’ crumb shots that are like mine. And worse yet, they’ll say things like, “It looks like your dough is underfermented,” or “You need to up the hydration of your dough.” In my case, all my loaves contain a significant portion of whole-grain or high-extraction flour, at least 25% and usually more, and unless I add vital wheat gluten – which I try to avoid – I will not get big holes. The best I can hope for is a crumb similar to the leftmost loaf in the pictures above.
I know I kind of went off here… But don’t feel bad about not getting a super-open crumb. Even if that’s what you’re ultimately after. What you really should be concerned about is ensuring that your dough is fully fermented. Get that down first. Then study your flour to see if it can handle a higher hydration rate. You’ll also then have to ensure that you’re thoroughly developing your dough. Like I said above, there are lots of interdependent factors.