Make Your Baguettes LOOK Professional

Demi-baguettes

One of the greatest compliments I ever received was from a friend’s mom who excitedly remarked when I brought her a few baguettes, “Wow! What bakery did you get these from?!” I told her they were from Dawg House Bakery. She replied, “Hmm… I’ve never heard of it,” to which I replied, “You’re looking at it and I’m the head baker.” She giggled then said, “They look SO professional!” She couldn’t have said anything nicer! But I did tell her that as with anything you build, if you have the right tools combined with good technique, it’s not hard to achieve a professional look.

Just to set things straight from the get-go, I’m not going to cover a recipe here or any dough development or shaping techniques. I’ve written lots of articles on making baguettes already. But what I am going to cover is what you do and what you need to have after you’ve done all the dough development and shaping; things that I’ve found tend to be glossed over in most articles – or even many books that I’ve read!

Tools

There are three critical items you’ll need: 1) A decent lame; 2) A baker’s couche; 3) A transfter/flip board. While I’ll discuss the importance of these items individually, you can purchase all of them at the San Francisco Baking Institute. The prices are fantastic – I wish I had known about their shop a lot earlier. I would’ve saved quite a bit of money.

Lame

I use a UFO lame from Wire Monkey (www.wiremonkey.com). But there are others out there that are far less expensive. A lame is essentially a mounted razor blade used to score loaves. More than any other bread, I’ve found this to be a critical tool for scoring baguettes.

Couche

You’ll read some articles that say you can use a large tea towel or a couche. I myself prefer a linen couche because I’ve found that it holds flour much better than a tea towel. It has become an invaluable tool for proofing long and free-form loaves.

Transfer Board

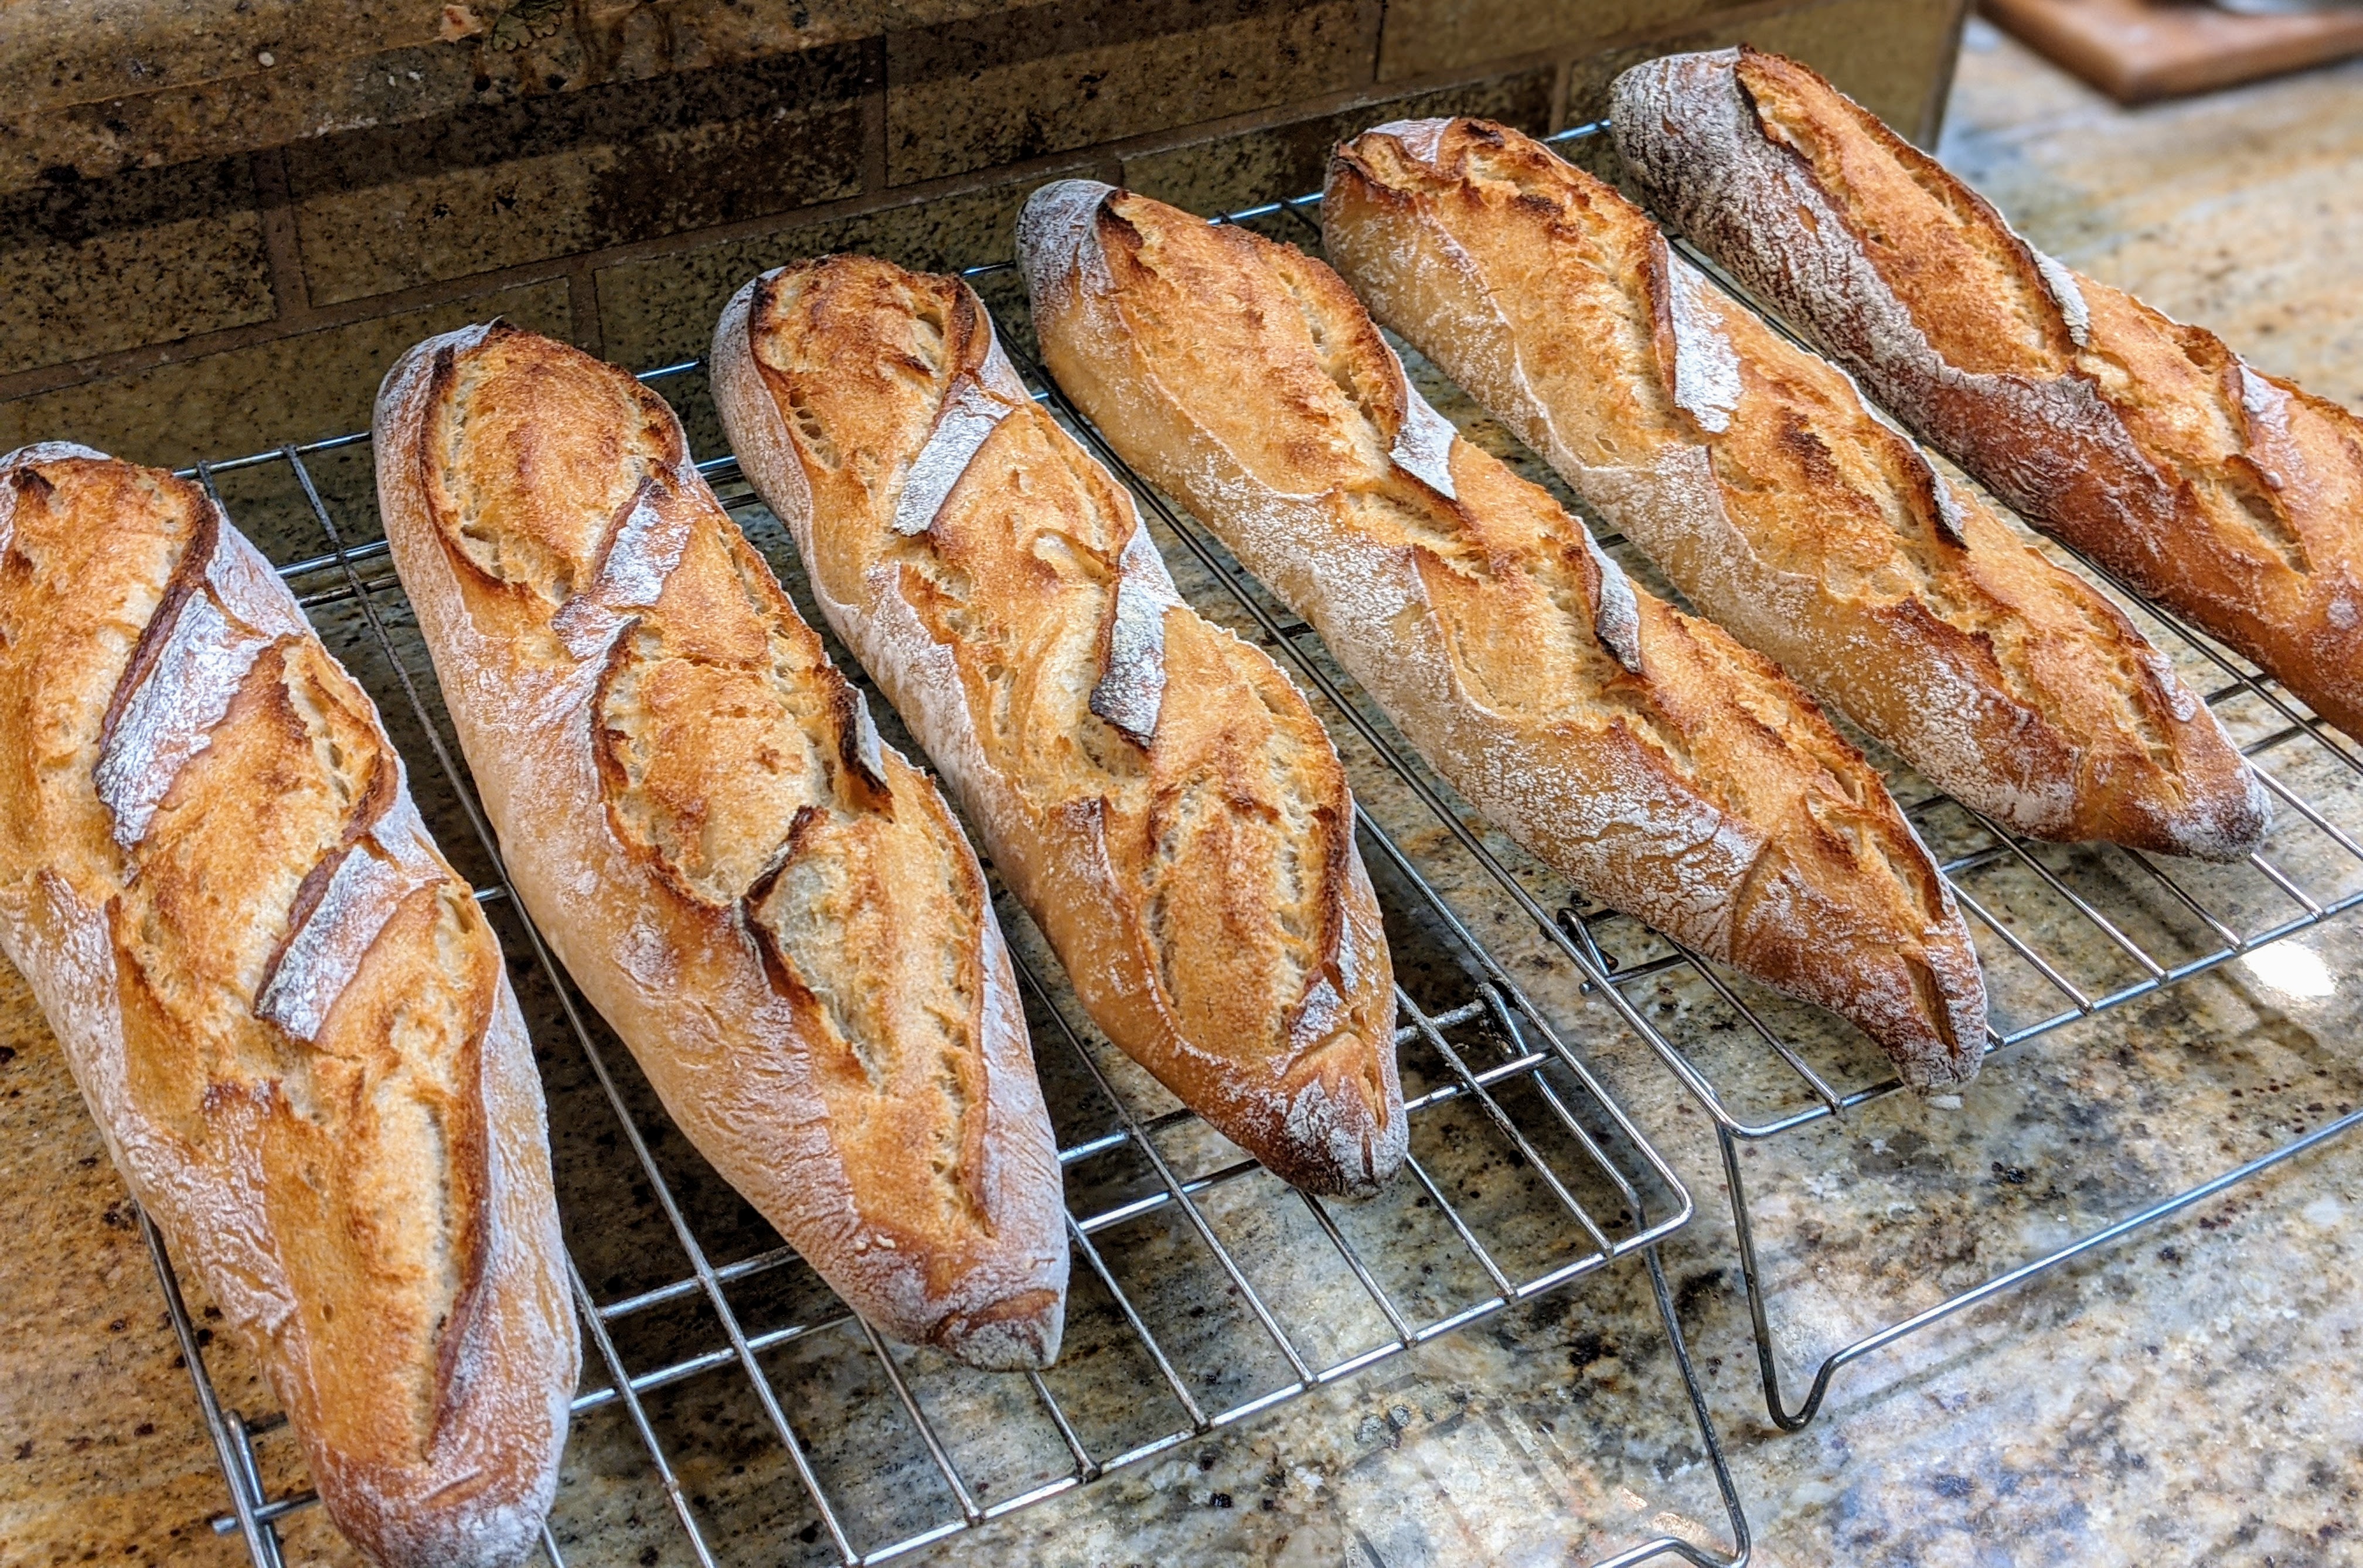
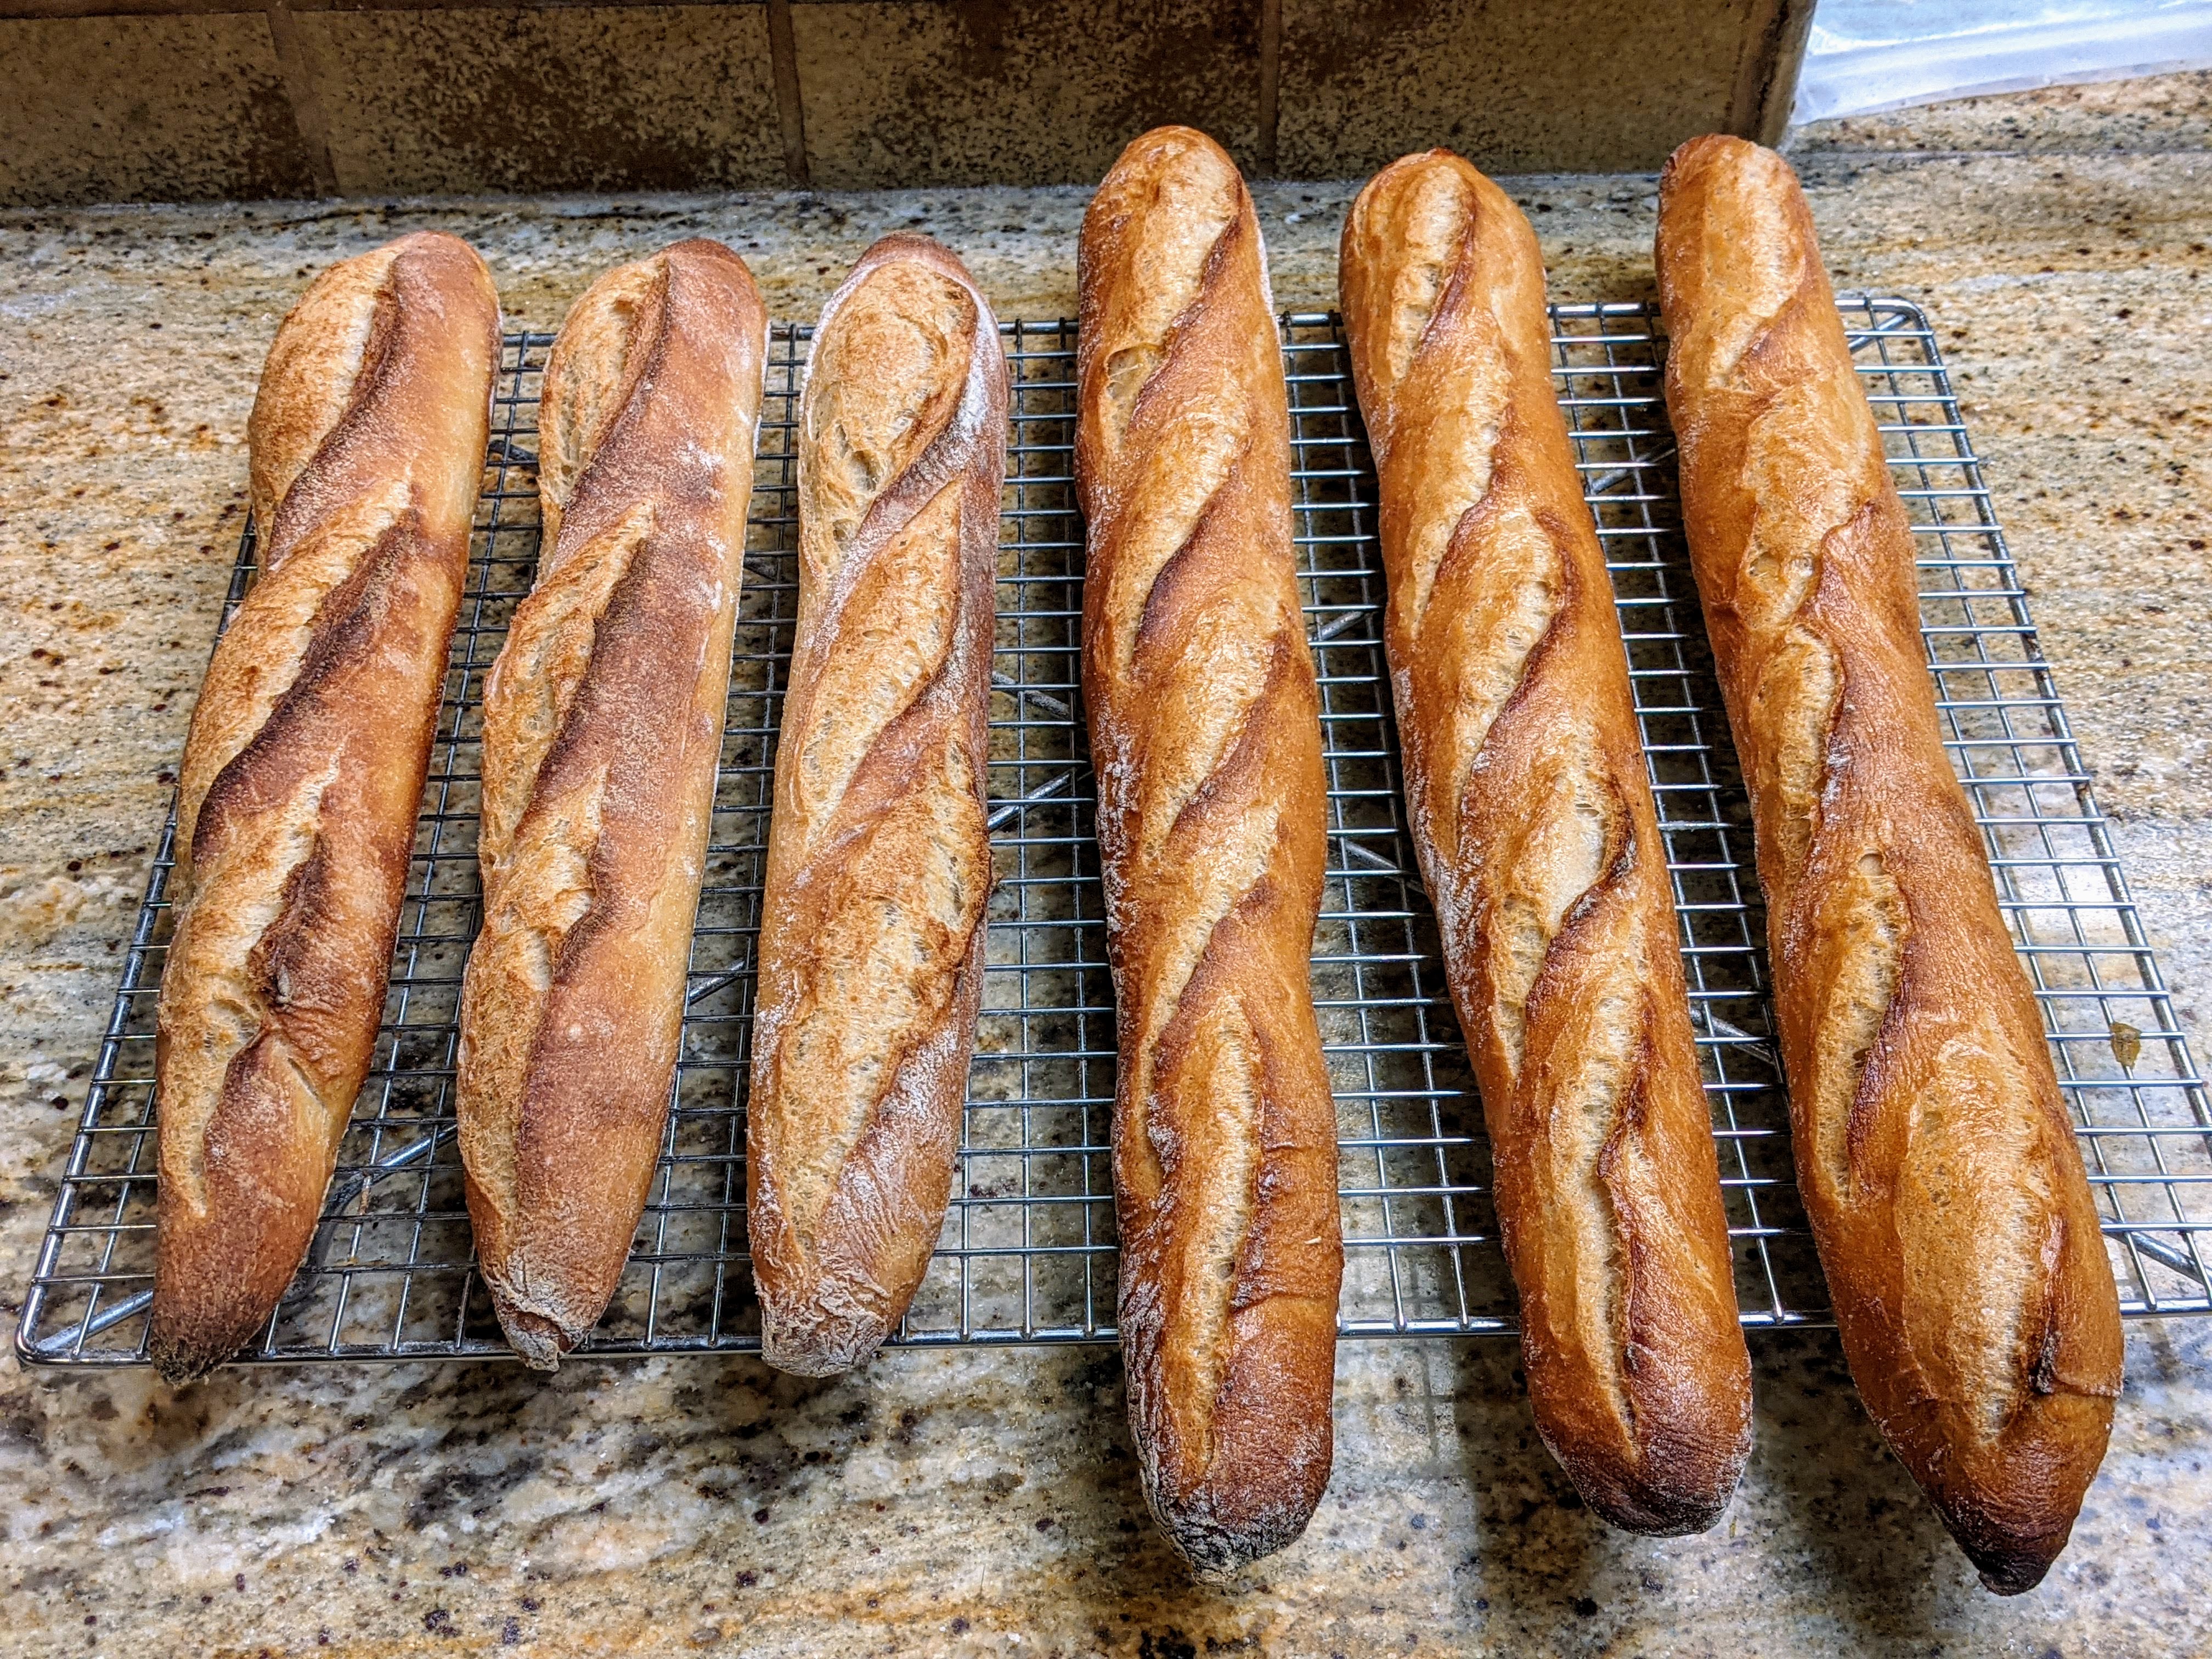
Out of all the three tools I’ve mentioned, a transfer board is the most important. With the lame and the couche, you can get away using alternatives, but having a tranfer board took my baguettes over the top. The reason is that I can flip the loaves onto the board at once, and not risk stretching or tearing my loaves.

Also, and perhaps even more importantly, I can use it to straighten my loaves once I’ve transferred them to my loading board. That’s a trick I learned from observing professional bakers. I was wondering how they straightened their loaves so nicely. I found that they do with a transfter board! For me, it was a total game-changer in the visual presentation quality of my baguettes.

If you don’t get the other two items, definitely get one of these. I made my own by cutting a sanded/finished quarter-inch birch plywood board to about 24″ X 5″. I used the remainder as my loading peel. With both, I regularly treat them with food-safe beeswax to keep them smooth and protected from moisture.

Properly Scoring Baguettes

I included this section in a previous article, but it deserved to be placed in this.

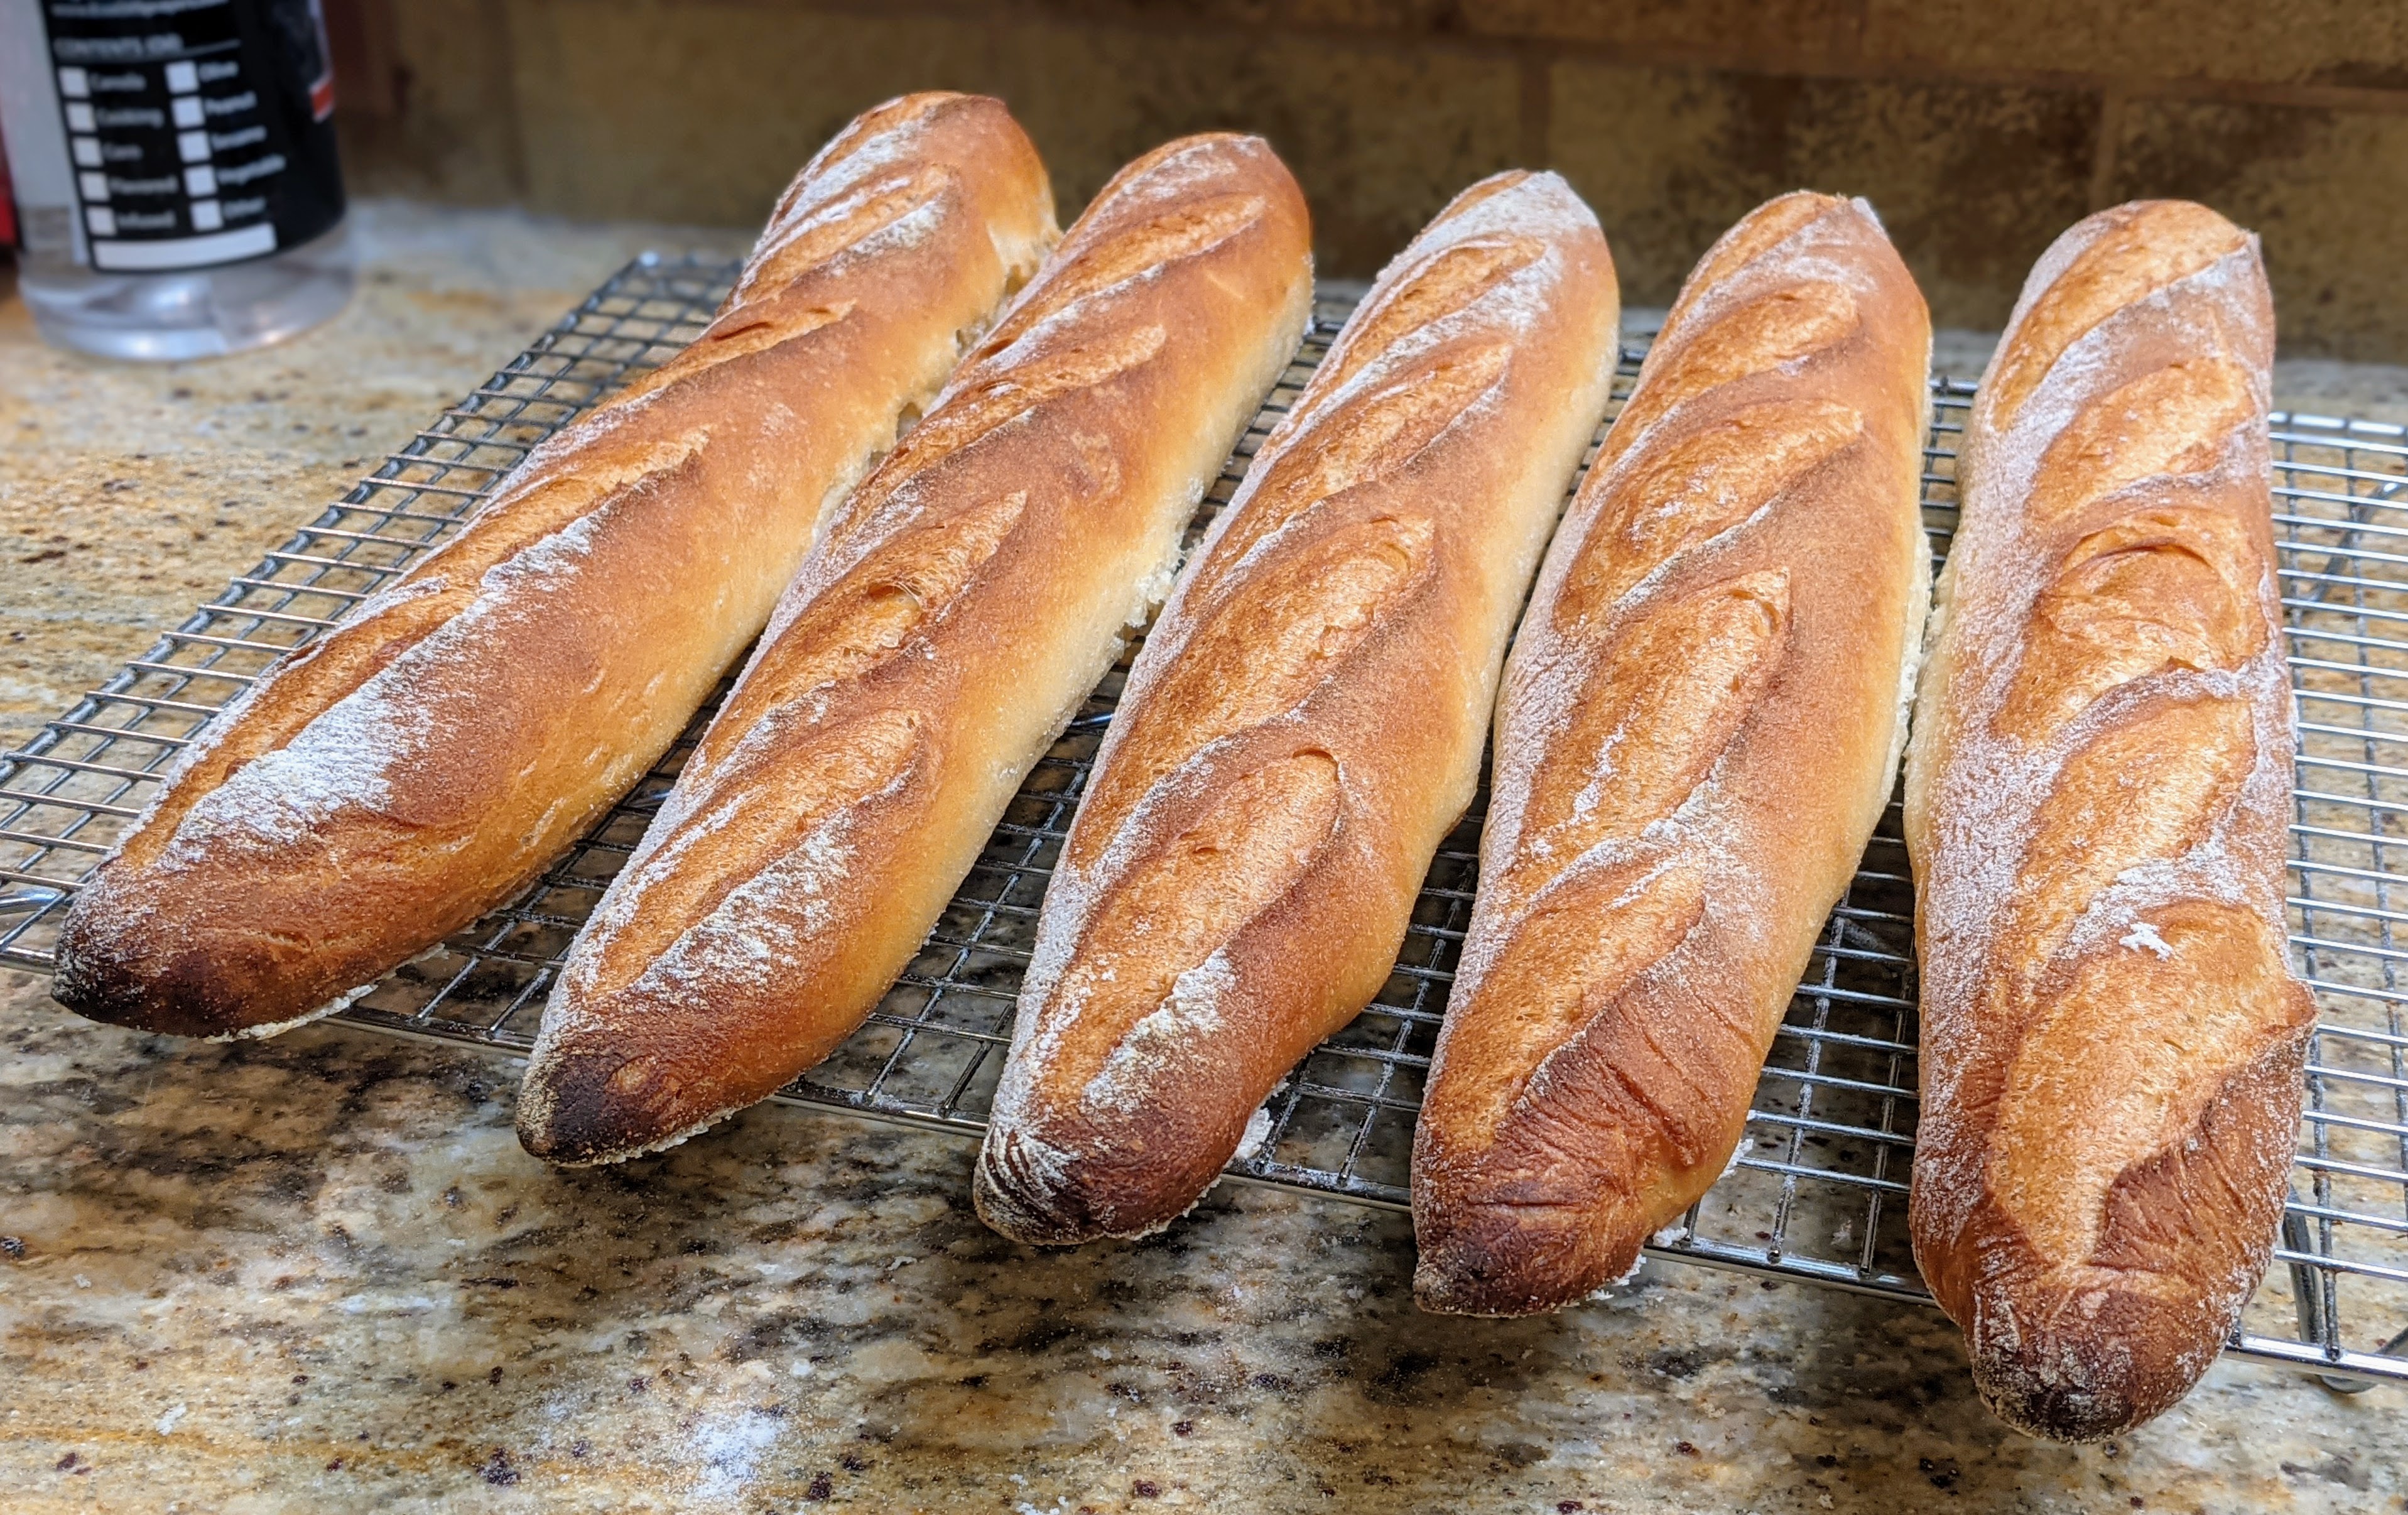
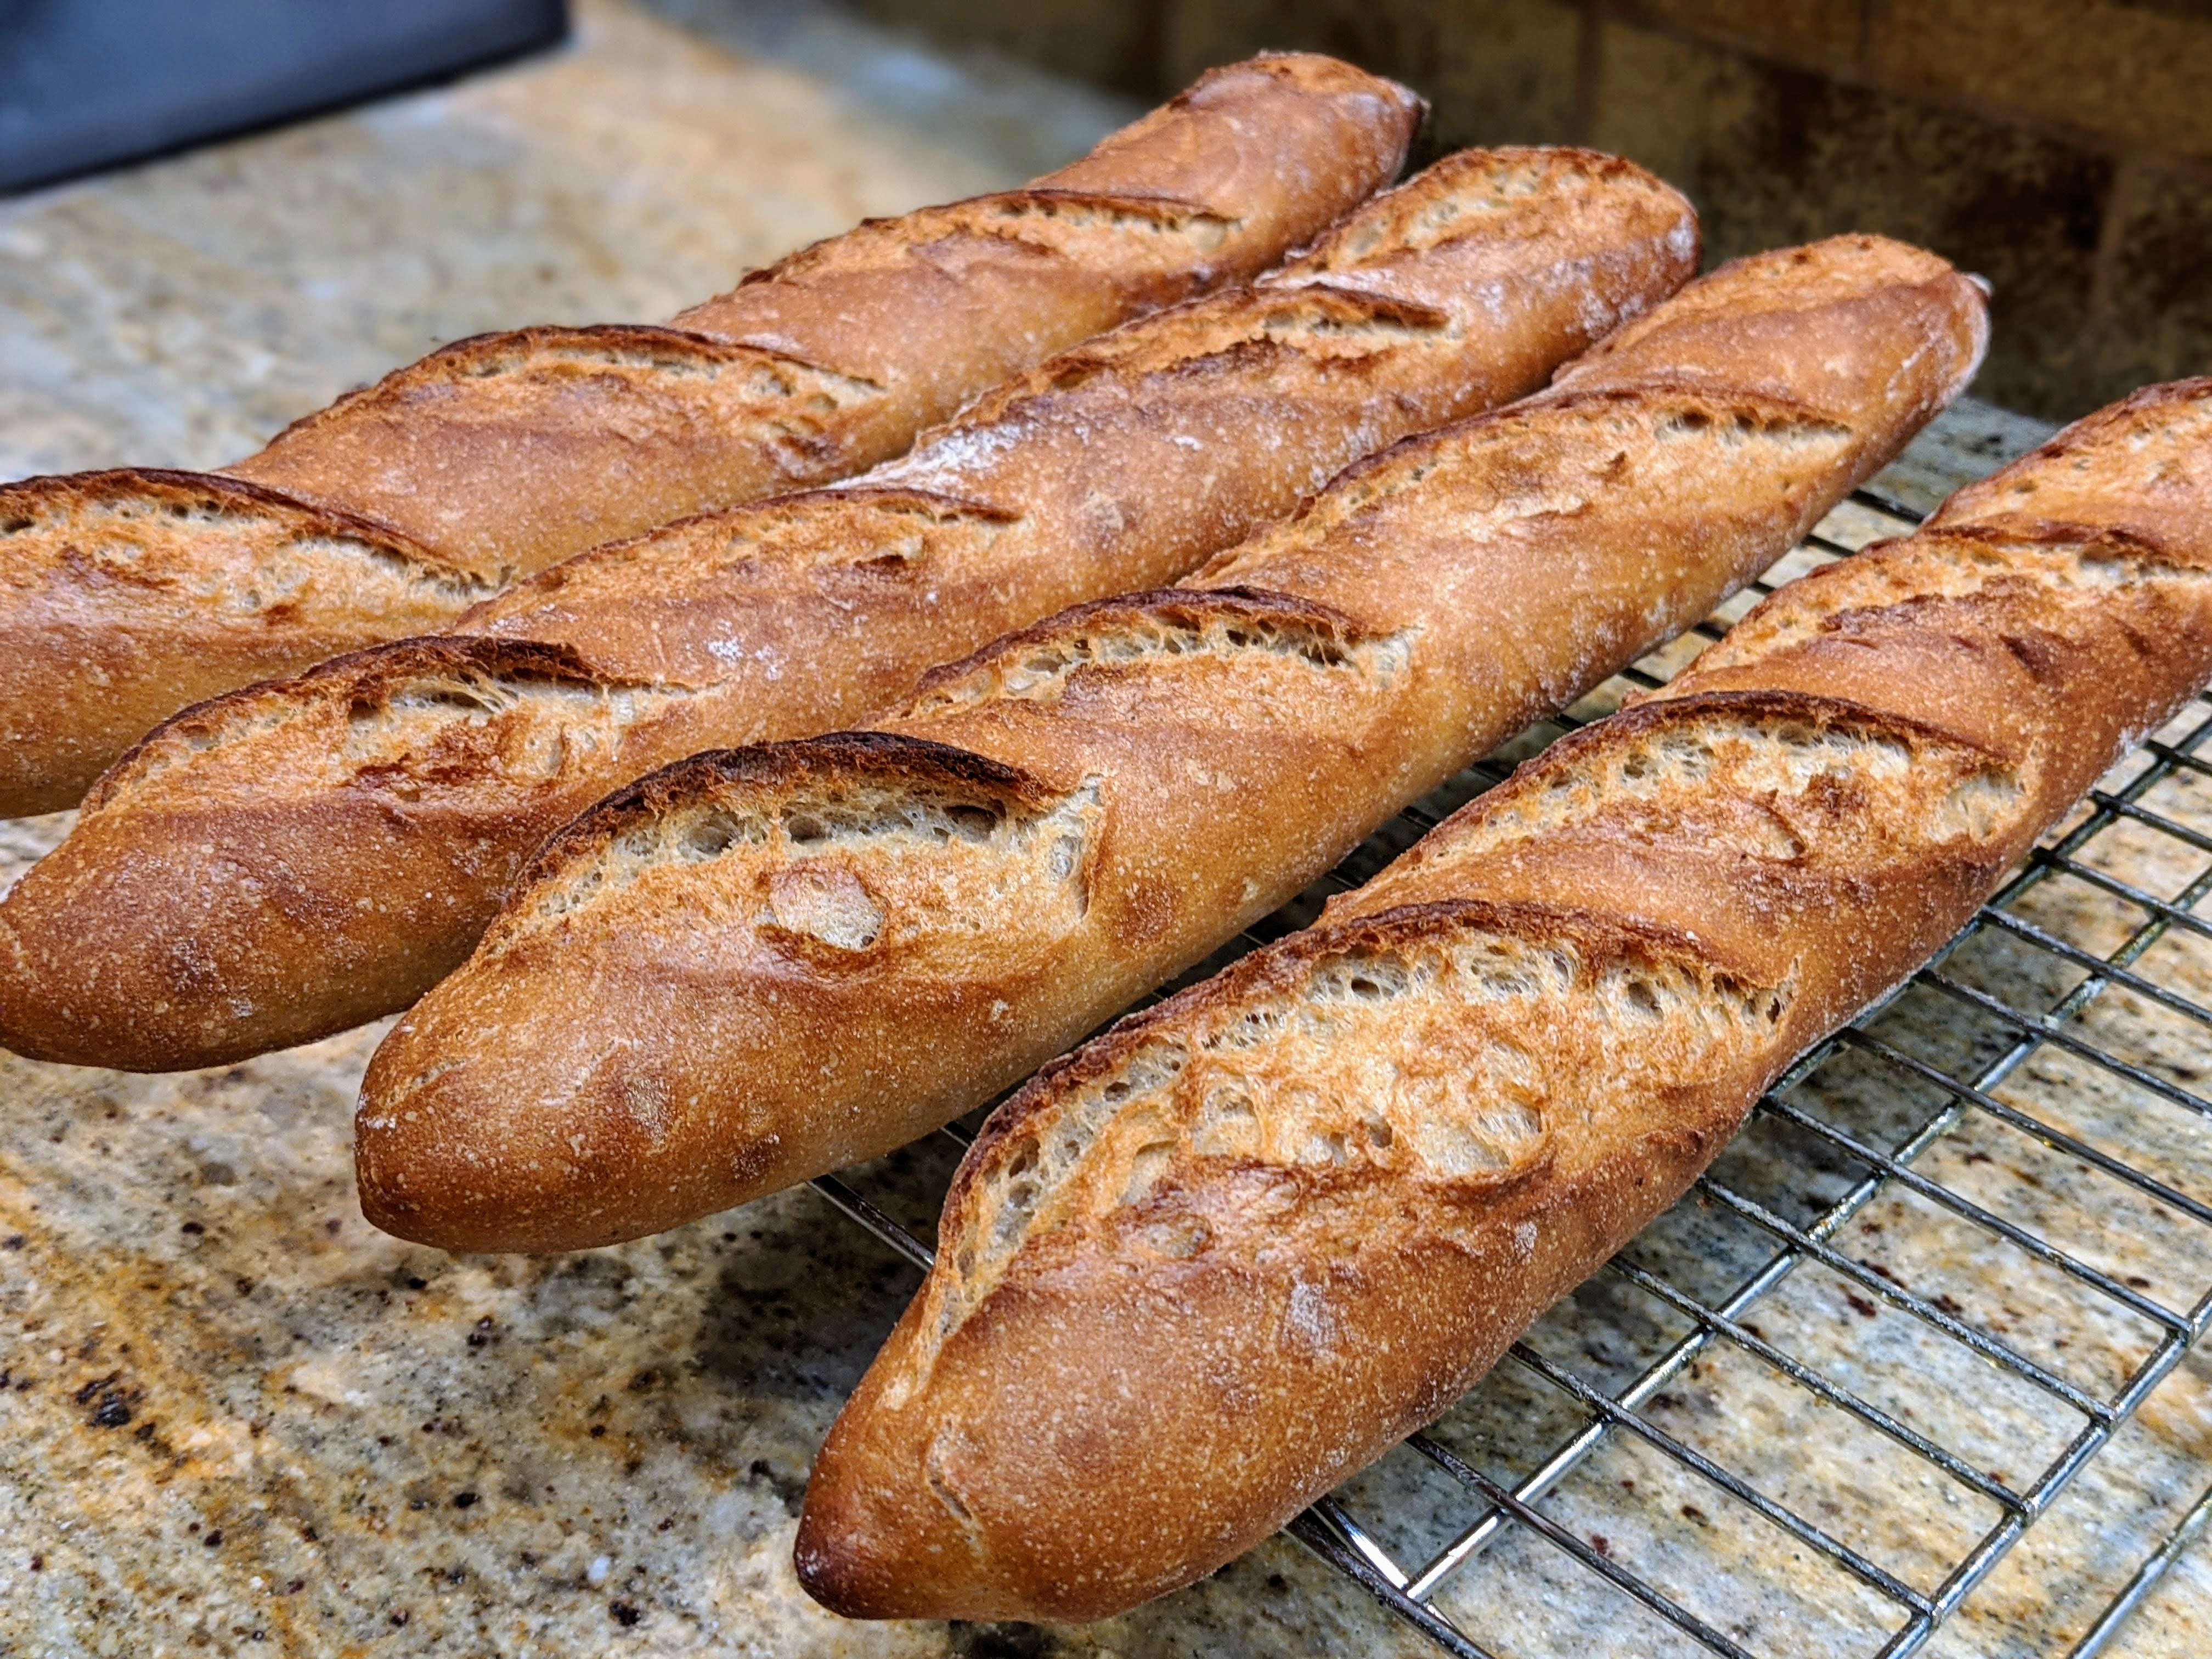
An earmark of a good-looking baguette is the scoring. It may or may not have ears, but it’s distinctive with what appear to be diagonal slashes across the top. When you’re new to making baguettes – this included me when I first started making them – there’s a mistaken belief with scoring that the loaves are scored in a diagonal fashion. Technically, they are, but not nearly at the extreme angles that many beginners score them. I’ve seen otherwise gorgeous, straight loaves online whose aesthetics were essentially ruined by improper scoring.

To be honest, there’s no big secret or special technique to score baguettes. Just remember this: Use shallow angles! The diagram below illustrates the angles you should be using:

In both the top and the cross-sectional views, the proper scoring and blade angles are much more shallow that what most might think. From the top, the lines are long, starting from the center of the loaf, and deflecting just a few degrees. The blade angle from the cross-section is absolutely critical as it creates a flap which will produce that distinctive ear that you see in the picture immediately above.

Especially with baguette scoring, you need to be assertive in your strokes. Avoid making choppy motions with your scoring and do your best to be as smooth as possible. Also, aesthetically – and according to Master Chef Jeffrey Hamelman – an odd number of scores is much more appealing to the eye than an even number.

As I mentioned above, with the right tools, getting that professional look is not at all that difficult to achieve!

A Bit More Sour Sourdough Baguette

I know, I know… I have several baguette recipes on here already. Despite that, I mostly use one dough development method no matter the type of baguette I happen to be making: pointage en bac, or the slow rise method, and I only vary it by the type of leavening agent I use. And whether I use yeast or starter, the process is exactly the same.

Of course, there is the exception (when isn’t there) of Baguettes de Tradition which is a straight-dough, same-day bake with no preferment. But I don’t make those too often and only when I’m pressed for time.

As for all the different recipes I have for baguettes, I’ve always been compelled to experiment. In Jeffrey Hamelman’s book, Bread, he has several recipes for baguettes and I’ve baked them all and shared those recipes here. But for my own baguettes, I riff on the original method I learned from Master Chef Markus Farbinger. It’s straight-forward and invariably yields me GREAT results.

Historically, baguettes were developed as a welcome change from sour breads. Leading up to the creation of the baguette – and other bread made with commercial yeast – all bread was sour because they were risen with natural starters. And we’re talking centuries here, folks! Baguettes offered up a different flavor profile; frankly, a neutral one, and based on the popularity of baguettes through the years, it was a welcome change.

Technically, there’s nothing wrong with making baguettes from sourdough starter as the French DecrΓ©t Pain states – however vaguely – that bread must be risen with a leavening agent suitable for bread. But, given how parochial the French are about food, using a natural starter isn’t quite de riguer.

Plus, the whole purpose behind the baguette was to create a neutral flavor platform, and sourdough is anything but neutral – and here I have to agree with the French: A baguette isn’t defined by its shape, but by its dough. But that doesn’t mean that you can’t do it, and dammit! These “baguettes” taste great!

Now the interesting thing about these baguettes is that the acid in the starter acts as both a dough conditioner and a preservative. Even after a couple days, the crumb is still supple and pliable – even if left in the open at room temp!

So here’s the basic formula for the baguettes:

Baker’s %Example
Flour*100%644
Water76%462
Salt1.8%14
Yeast0.07%.53
Preferment35%227
Optimal Dough Temp75Β°-78Β°FYield: 1346
*I use a blend of flour which is basically 40% unbleached high-extaction flour and 60% AP flour.

I deliberately used the word preferment instead of sourdough starter or levain because you can use a poolish for this formula as well, which I have done. But for this discussion, we’ll focus on a levain.

Using the example numbers above, this will yield 4 baguettes scaled at 335g apiece, leaving a few extra grams of dough for loss during processing, which almost always happens, so I always calculate a few grams more than I actually need so I can scale my loaves to the exact weight I want them.

Make the Levain

Though I listed the levain as being 35% of the flour, I need to clarify where I got this number. I didn’t just pull it out of thin air. Assuming I’m using a 100% hydration levain, it turns out that if the flour of the levain represents 15% of the total flour of the recipe, the levain’s total weight comes out to be just a smal fraction over 35% of the flour weight.

I factor in the flour of the levain as part of the overall flour because a levain is simply part of the overall dough development. I do this to calculate my yield as I now bake according to the amount of dough I need for a particular bake. This keeps my loaf weights absolutely consistent.

In any case, using a mature starter, make a liquid (100% hydration) levain (like a 1:3:3 or 1:5:5) and let it activate until it passes the float test. I’m not putting a time on this because it can vary wildly based on the microbe density in starters. For example, when I make a levain using botanical starter water and a mother I maintain based on the botanical starter, my levain will be ready in about 3 hours. And it’s super-active.

Make the Dough

  1. Dissolve the levain and yeast in the water. The water should be at the appropriate temp to get the dough to the optimal temp. At this time of the year, that’ll probably be around 90Β°-95Β°F.
    1. You can actually eliminate the yeast altogether. The resultant bread will be a bit more chewy. And depending on how long you let it ferment, the acid in the dough will keep the crust lighter in color.
  2. Add the salt to the flour and mix well, then gradually add the liquid to the flour and mix until you form a shaggy mass with no dry ingredients.
  3. Scrape down the sides of your mixing bowl and let the dough rest.
  4. Initial Fermentation: 1 1/2 hour. During this first hour, fold the dough every 30 minutes, making sure to pay attention to building up the gluten. After the second fold, rest the dough for another 30 minutes, cover and put in the fridge for 12-16 hours, or until the dough has at least doubled in size. For the sourdough baguettes, the dough may seem a bit slack. This is due to the acid in the starter which breaks down gluten.
  5. FROM THIS POINT ON, BE ABSOLUTELY GENTLE WITH THE DOUGH!
  6. Divide and scale the dough. For demi-baguettes, weight should be around 250g. I make 20″ baguettes scaled at 335g. Roll each piece up like a jelly roll and rest for 30 minutes seam-side-up on a well-floured couche or tea towel.
  7. Preheat your oven to 500Β°F.
  8. Once the dough has relaxed sufficiently (it’s normally 20-30 minutes for me, but sometimes it takes longer if I pre-shaped them tight, remove the pieces from the couche and place on a well-floured surface, then shape into baguettes, moving them back to the couche to do their final fermentation from 30-60 minutes. This step is important. You want to do a finger-dent test after 30 minutes. If it’s still really springy; that is, your dent essentially disappears right away, let it go another 20-30 minutes. But if your dent springs back quickly but some of it still remains, it’s ready to bake. Note that that partial spring is ultra-important. That means that there’s still life in yeast.
  9. Score the loaves (see below).
  10. Bake with steam at 500Β°F for 12 minutes, then 12-15 more minutes at 450Β°F dry.

These baguettes really benefit from a full bake to ensure a nice, crisp crust. I’m not a big believer in taking the crust out to chocolate as I do with my boules and batards. But a deep, golden-brown like the loaves above yields a delicious crust.

If you’ve baked traditional baguettes, you’ll immediately notice that once you bake these, the sourdough crust will not get as dark within the given times. You could bake them longer to get a darker crust, but you just might dry out the insides if you bake them for too long. I have a feeling that it has a lot to do with the amount acid in the starter which, at least for my very sour starter, is a clear indicator that there wasn’t much available sugar for browning.

But the other thing about these baguettes is that they stay fresh longer because of that acid. While they won’t remain as crisp as long as traditional baguettes, they will continue to be pliable for several days after the bake!

Scoring Baguettes

When you’re new to making baguettes – this included me when I first started making them – there’s a mistaken belief with scoring that the loaves are scored in a diagonal fashion. Technically, they are, but not nearly at the extreme angles that many beginners score them. I’ve seen otherwise gorgeous, straight loaves online whose aesthetics were essentially ruined by improper scoring.

To be honest, there’s no big secret or special technique to score baguettes. Just remember this: Use shallow angles! The diagram below illustrates the angles you should be using:

In both the top and the cross-sectional views, the proper scoring and blade angles are much more shallow that what most might think. From the top, the lines are long, starting from the center of the loaf, and deflecting just a few degrees. The blade angle from the cross-section is absolutely critical as it creates a flap which will produce that distinctive ear that you see in the picture immediately above.

Especially with baguette scoring, you need to be assertive in your strokes. Avoid making choppy motions with your scoring and do your best to be as smooth as possible. Also, aesthetically – and according to Master Chef Jeffrey Hamelman – an odd number of scores is much more appealing to the eye than an even number.

Recipe: Biga Baguettes

I needed to make lunch for the family tomorrow and I didn’t figure out what I was going to make until too late. I knew that I wanted to make sandwiches, but I wanted to make them on baguettes. But since it was late afternoon by the time I was going to start making them, my recipe options were a bit limited. I couldn’t make my normal Pointage en Bac baguettes which require an overnight cold fermentation (I had to have the sandwiches prepared early in the morning). That also left out making a poolish.

But what I did have on hand was some nice, ripe biga that was in my fridge. So I pulled it out of the fridge, let it warm up for an hour or so, and started preparing the dough. They turned out fantastic! They’re so good that I thought I’d share the recipe.

Biga

Make the biga the night before you bake. This will make a lot, so put the unused portion of the biga in the fridge in an airtight container. It’ll keep for over a week. It’s actually much more flavorful a few days old. The biga I used for my baguettes was five days old and had a rich and slightly sour flavor. Here’s the formula:

Flour500g100%
Water390g78%
Yeast0.25g0.05%
Biga will be ready to use when it has doubled in size and is slightly domed at the top.

Final Dough

AP Flour500g100%
Water* (warm)390g78%
Salt10g2%
Yeast4g0.8%
Biga200g40%
*Target dough temp is 78-80Β° F

The process we’re going to use here is loosely based on Hamelman’s Baguettes de Tradition which is a great recipe for making straight dough baguettes.

  1. Sift the dry ingredients together and set aside then mix the biga and water together until biga is broken up. Add the wet mixture to the dry ingredients and mix thoroughly, making sure there are no lumps (there’s shouldn’t be if you sifted the dry ingredients together). Mix until you form a shaggy mass. Don’t worry if it resembles more of a batter than a dough. It’ll all smooth out and come together nicely.
  2. Bulk ferment for 3 hours. During the first hour of bulk fermentation, fold the dough every 20 minutes. I recommend doing stretch and folds as opposed to coil folds as this is a fairly fast fermentation and the commercial yeast will expand the dough nicely. By the third fold, the dough will have built up plenty of strength with noticeable bubbles. Try not to degas the dough too much with the third fold. Let the dough rest for 2 hours or until it has nearly doubled.
  3. The yield will be about 1100g, which will give you 4 20″ baguettes at about 276g apiece. If you’re using a 15″ length, it will make 5 baguettes at 220g apiece. Divide and scale out the size that works for you. With each piece, lightly flatten, then letterfold it, then gently roll it into a compact log. Place each piece seam side up on a well-floured couche or tea towel. Bench rest for 20-30 minutes or until the dough has relaxed.
  4. Shape into baguettes and let rise for 1 hour or until loaves have reach about 75-80% fermentation.
  5. Bake at 485Β°F for 12 minutes with steam, then 425Β°F for 8-12 minutes. Note that the baguettes will not be very dark.

What amazed me about these baguettes is that despite the fact that I baked them for much longer than the final 12 minutes they didn’t get darker than when the time was up. But no matter, the crust on these baguettes is thin but very crisp and the crumb is super-soft. The crumb isn’t really open and pockmarked with holes, but it it’s super-light – almost like a banh mi crumb.

When I pick up a baguette and it feels as if it has very little weight, I know it’s going to be a great baguette, and these baguettes are great!

Happy Baking!

Dividing and Scaling Baguettes

One of the most important things I’ve learned about baking is striving to achieve consistency; that is, doing things the same way time after time to achieve consistent results. When bake a certain type of loaf, I expect it to fit a particular ideal I’ve established in appearance and taste. And as long as I haven’t strayed from the basic formula and process, it’s reasonable to assume that ideal will be met.

One way I achieve consistency is working with different ratios. After all, bread formulas are all about ratios. And working with ratios eliminates guesswork, and a lot of it you can do in your head. For instance, if I want to create a 75% hydration dough and I use a kilo of total flour, I automatically know that I’ll need 750g of water.

So given that, I worked out a ratio for scaling baguettes that ensures that I’ll get consistent results from bake to bake. Essentially it works like this:

Target Baguette Length (centimeters) X 5.5 = Portion Weight (grams)

Where did I get that “5.5?” I actually got it from Chef Markus Farbinger’s Baguette series on Vimeo. He scales out 220g portions for 40cm (~15 1/2 inches) baguettes. So given that, I took the weight of the portion and divided it by the length to give me grams per centimeter and that works out to 5.5g/cm. Because I have a nice baking stone, I bake 60cm baguettes (I used to do 40 cm), but I was able to easily scale up to 60cm and I know that each portion should be 330g. Easy, right?

I make four different types of baguettes: Baguette Traditional (straight dough), Pointage en Bac (straight dough with a slow bulk ferment – the one I bake the most), Levain, and of course, a Poolish baguette. No matter the type, I scale them the same. I may not bake them the same; for instance, the levain baguette gets a lot more oven time to get color into the crust. But they’re all scaled the same. For me, as I mentioned above, it takes the guesswork out of things.

The less you guess, the more consistent your results!

Happy Baking!

Jeffrey Hamelman’s Poolish Baguette (Adapted)

It’s no secret that I love making baguettes. In fact, I made a batch of sourdough baguettes based on Hamelman’s Baguettes de Tradition from his great book “Bread” this morning. Technically, Baguettes de Tradition is a straight dough. But I love the processing technique and it’s difficult to make because the hydration is 76%. And using a levain further exacerbates things because the acid in it makes the dough more extensible – and sticky.

But after I made them, I wondered what the chef’s poolish formula was like, so I looked it up and was a little shocked by his formula. A 66% hydration dough? That couldn’t be right. It’s commonly accepted that baguette dough is around 75% hydration, give or take a percentage point or two. It’s a fairly wet dough. But 66% is getting close to stiff!

But the kicker for this recipe is the long bulk fermentation at 2-2 1/2 hours and the long final fermentation at 1-1/2 hours. This gives the dough plenty of time to form lots of air bubbles, which is what you want with baguettes plus, the long periods of rest in the bulk fermentation give the dough plenty of time to relax. With a moderately stiff dough like this, you want to give it plenty of relaxation time if you can.

As my title indicates, this is an adapted recipe. The reason for this is that in the book, the quantities are all listed in kilos and pounds, which leads me to believe that this recipe really is geared towards a full-fledged bakery. But everything can be scaled if you work out the percentages properly. Also, the chef uses fresh yeast in his final dough, but I adapted the recipe to use regular, instant dry yeast for both the poolish and final dough. There’s no difference in what either does. You just use less granulated yeast. Here’s the formula:

PoolishFinalTotalBaker’s %
Bread Flour3306701000100.00%
Water330330*66066.00%
Salt0.0020202.00%
Yeast0.704**4.700.47%
*Target dough temp is 76-78Β°F so adjust water temp accordingly.
**If you have fresh yeast and want to use it in place of the granulated yeast, just divide by 0.4.

Poolish

  1. Mix all the ingredients together until smooth. I like mixing the yeast into the flour first to distribute it, then adding the water. Let ferment at room temperature for 12 to 16 hours or until the top is highly pockmarked and bubbling and ever so slightly domed.
  2. When the poolish is ready, dump everything thing into a mixing bowl and mix thoroughly. If using a mixer, incorporate ingredients at low speed for a couple of minutes, then increase speed to second speed and run for 1-2 minutes to break up any large lumps. Once the dough starts to pull cleanly off the sides, stop. If mixing by hand, thoroughly mix until moderately smooth being careful not to knead the dough too much.1
  3. Bulk ferment the dough for 2 hours, gently folding it after the first hour and being careful not to degas it too much.
  4. Divide2 the dough and lightly shape it into rounds, then bench rest (covered) on a lightly floured surface seam side up for 10 to 30 minutes depending on tightly you preshaped them. I recommend having a fairly light touch as you don’t want a skin to form.
  5. Once the dough has relaxed, shape them into long cylinders then set them on a well-floured couche or tea towel seam side up.
  6. Let the shaped loaves do a final fermentation for 1-1 1/2 hour. This is VERY important because shaping the loaves will have degassed them a bit and this long, final fermentation allows the gluten to relax and reform bubbles.
  7. Preheat oven to 460Β°F. When the loaves are ready, bake them for 24-26 minutes applying steam for the first 15 minutes.

Notes

  1. Whether using a machine or mixing by hand it’s important to NOT knead a baguette dough too much. You want the fermentation process to naturally form the gluten bonds and not force it by kneading. This will really tighten up the dough which you don’t want.
  2. Since I bake on a stone, I divide the dough into five pieces at about 336g apiece and 20″ long. You can do 8 pieces at about 14-15″ long as well to fit on a baking or baguette tray.

I’ve been writing this post while smack dab in the process of making these baguettes. I have to admit that I was really surprised at how supple the dough was when it ready to shape. It wasn’t nearly as pliable as my normal, high-hydration baguettes, but it was still pliant and luxurious.

And because it was rather cool in my kitchen, I let bulk fermentation go for almost three hours. And even at that point, it was easily less than 80% fully proofed. But that’s okay because it gave me plenty of runway for final fermentation, which I’ll probably take to a full 1 1/2 hour to ensure the loaves are close to fully proofed. This is definitely a recipe where I need to let everything that happens before baking get most of the work done on the dough!

Happy Baking!

Baguette Day Is My Favorite Day!

While I love baking all sorts of loaves, baguettes are definitely my favorite loaves to make. To me, there’s no more satisfying a feeling than seeing baguettes come out of the oven, all crunchy and steamy, and knowing the technique that goes into making them. Out of all the different loaves I make, baguettes require so much technique to get right.

When I made my first set of baguettes, they looked great, but they were extremely dense – and I was even using 100% white bread flour! I figured at the time that I could use my normal technique of several stretch and folds over a few hours – boy was I wrong!

Then thinking that the denseness was due to hydration, I upped my hydration to 80%. I got a marginally better result, but still, the baguettes were a little dense.

But then after watching several videos and reading a bunch of different recipes, I saw that most people just kneaded the dough once, then did maybe one extra stretch and fold within the first hour. Then they let it sit! I then got a much better crumb, with great oven spring, but the loaves were a bit lopsided.

Then it dawned on me that perhaps the last pieces of the puzzle were pre-shaping and final shaping. As I recently wrote in “Gimme Some Skin” the other day, it’s absolutely critical to form that outer skin of the dough. And especially with baguettes, because I don’t want to create a tight, internal gluten network which will affect the crumb, I have to rely on my shaping for structure. And once I figured that out, I started getting consistent results time after time.

Honestly though, I’m still honing my technique, but I’ve got the all-important fundamentals down to the point where I’m very confident of my ability to create great baguettes consistently. And like Chef Markus Farbinger says, “I still get excited when my baguettes come out of the oven!”

Best Videos Yet on Shaping and Baking Baguettes

I’m always trying to learn different techniques of shaping bread, and just when I thought I had baguette shaping down, I ran across the following videos with Chef Markus Farbinger. He has this quiet, soothing teaching style that I just love and great technique! But best of all, these videos are for making baguettes in a domestic oven! To me, this is the best of both worlds: A professional chef instructing for home baking. It doesn’t get better than this!

Shaping Baguettes

Scoring and Baking Baguettes

I love his passion and I really connect with his excitement. Even with all the loaves I’ve baked these past six months, I still get totally jazzed when my bread comes out of the oven! I addicted to the warm and fuzzy feel-good!

And following his techniques, here’s what I produced today!

Okay… I’m following his shaping technique from here on out. These came out perfect!

Baguettes Are Easy. NOT!

My favorite bread to make is baguettes. I love sandwiches and I especially love to make sandwiches with baguettes. And ever since I started making bread, my goal was to make my own baguettes so I could use them for sandwiches. And of all the different kinds of bread that I make, baguettes are the simplest with respect to the process. But they are also the easiest to completely screw up.

With my earliest attempts, the baguettes had a great shape. They appeared to get great oven spring and from appearance alone, they just looked right. But most of the time, they were pretty dense inside and super-chewy. I’d pick up a loaf and my heart would sink because I could feel the heft. They tasted okay, but damn if I couldn’t make a 6″ sub and not be completely weighed down by the dough.

But now my baguettes are light and airy. They have a great chew, but the dough gives very easily. And with the flour that I use, while the crust is crunchy and crispy, it’s not overly so. This bread is perfect for making sandwiches!

What changed to get me to making much better baguettes? In actuality, not much. I just did less; specifically, I worked the dough far less than I would with a larger loaf like a boule or batard. What I realized is that while forming a good, strong gluten network is important with any bread, with baguettes, there’s an inflection point that defines whether I get a light, airy crumb or I get a dense one. And that point comes a helluva lot sooner than when I’m making larger loaves.

With my larger-format loaves, I’m pretty aggressive with mixing the dough upfront until the dough is completely smooth. Then I do about six stretches and folds over the course of three hours from the initial mix. But with baguettes, I mix to a much courser consistency, rest the dough for a half-hour, then do at most two stretches and folds within the first hour then let it rest from 1 1/2 to 2 hours.

It reminds me of making biscuits. With biscuits you never want to overwork your dough. You mix only until all the ingredients are just incorporated and the butter or shortening is reasonably distributed throughout the dough. Then you roll it out and cut the biscuits. It’s a similar thing with making baguettes. Less is definitely more!

I wish I could explain where that inflection point is, but it’s something I feel. What I can share is that once I finish the second stretch and fold, if I can pull on the dough mass and the whole thing wants to come up, I know I’ve hit that point where the dough’s strong enough. And then I leave it alone!

Leaving the dough alone was a very difficult thing for me to learn. In fact, even with my larger-format loaves, I’ve learned that resting is just as important as manipulating the dough. And it’s been especially tough for a naturally impatient person as myself. As I used to say, “If patience was a virtue, then I’d be a slut.”

Surgery Recovery? Here’s My Remedy: I Baked Baguettes Dammit!

I’m actually pretty amazed at how mobile I am just three days after full hip replacement surgery. And I have to admit that my relative comfort level has quite a bit to do with the pain meds I’m on. But irrespective, since I’m capable of moving around and to avoid getting bored, I decided to bake baguettes!

I just pulled those baguettes out of the oven a few minutes ago! You’ll notice the ears on one loaf and just nice openings on the others. I was experimenting with my scoring and wanted to see what a shallow score would produce. I’ll stick with the deeper score. πŸ™‚

Now normally when I bake baguettes, I make a poolish the night before I bake. But I was pretty exhausted last night, so I decided to make a straight dough this morning. Here’s my recipe:

FlourWaterSaltYeast
500 grams365 grams (85ΒΊ-90ΒΊ F)12 grams7 grams
This will produce a 73% hydration dough
  1. Measure out your flour into a large mixing bowl.
  2. Add the water and mix until no dry ingredients are present and you form a shaggy dough.
  3. Let the dough rest for 30 minutes (autolyse)
  4. Sprinkle the salt and yeast evenly over the surface of the dough.
  5. Thoroughly mix the salt and yeast into the dough.
  6. Dump the dough onto an unfloured surface
  7. Knead the dough until it just starts getting smooth (about 5-8 minutes). Do NOT overwork it! The moment you start feeling tension in the dough (it feels like you’re fighting it), stop kneading.
  8. Transfer the dough back to your mixing bowl and let it rest for 30 minutes.
  9. Now do a stretch a fold and form the dough into a ball, then turn it over onto the folds.
  10. Allow the dough to rise from 1-2 hours. Check after an hour – you want the dough to have expanded at least 50%. You should see some bubbles formed on top and the surface should be nicely domed. At about 50% rise, you have room for proofing/final rise which I found is critical with baguettes.
  11. If you don’t see much activity, which typically happens on cooler days, do one more gentle stretch and fold and let the dough rise for an hour. But check it at a half hour because sometimes all the little beasties needed was a nudge. πŸ™‚ Again, you want to see some bubbles, but not a preponderance of them.
  12. Gently remove the risen dough from the bowl onto an unfloured surface.
  13. Portion out the dough into four equal pieces. By weight, the pieces should weigh about 213-215 grams apiece. Alternatively, you can portion out into three for a little beefier baguettes (I do this when I’m making baguettes for sandwiches).
  14. Lightly sprinkle the tops of the portioned dough with flour, then pre-shape each into a nice, tight ball.
  15. Flip the balls over on their folds, sprinkle a little more flour on top, then cover with a cloth and bench rest for 15 minutes.
  16. Shape the balls into baguettes. Here’s a simple, yet effective shaping technique from Markus Farbinger. But just take note: When you fold the dough, you want to make sure you’re creating good tension on the skin without tearing it! You don’t want to be lackadaisical with the folding because you won’t get any spring.
  17. If you have a couche, transfer the shaped loaves to the couch (or you can use a well-floured towel) and let them proof for an hour. This is why you don’t want to over-ferment in the bulk fermentation stage.
  18. Preheat your oven to 480 degrees.
  19. Once proofed, transfer the loaves to your peel, score with nice longitudinal cuts, then bake for 15 minutes. Provide steam for the first 15 minutes, then remove the steaming container. Then turn your oven down to 450 for 10 minutes.

You might be wondering why I’m using 7 grams of yeast. You can definitely use less, but it lengthens the timeline. I came up with this recipe specifically because I wanted to produce the bread relatively quickly with limited manipulation because I was literally three days out of total hip replacement surgery. But you know what? I like this process because it produces great results!

What About Using a Poolish?

You can absolutely use a poolish, and that’s my normal method of making baguettes. Typically I use 25% of my total flour for the flour I use for a poolish, and I make the poolish at 100% hydration. I do this the night before I bake and give it about 12-16 hours to ferment. At 12 hours, it will not be sour, but at 14-16 hours, it will get nicely sour, so if you vary the times of the poolish, you can make different flavored baguettes.

If you do use a poolish, you have the option of bumping up the fermentation activity with some yeast, or just let the poolish be the only leavening agent. If you do decide to use a bit of yeast, use no more than 2 grams of yeast because you have a lot of active microbes already in your dough, and you just want to give it a little kick.

Yet Another Word on Flour

If you read this blog with any regularity, I’m pretty obsessed with flour. Now even though I occasionally make my baguettes with white flour, you all know that my flour of choice is a 75-25 blend of high-extraction flour and white whole wheat flour (the second picture); and specifically, flours produced with the Unifine milling process. I prefer the darker crust it produces (the picture at the top) but more importantly, the nutrition those flours provide.

If you venture into high-extraction flour (Type 85 and above), do not expect to get the kind of open crumb you get with white flour. It just ain’t gonna happen. The particulates in high-extraction and whole wheat flour cut the gluten strands. And if you think working the dough to build more structure will help, it won’t. The strands you do create will be so tight, you won’t get any holes!

This is why I advocate for doing a shorter bulk and a bit longer final proof. This allows the dough to really relax so when you place the loaves in the oven, the final activity before the microbes die will allow for better gas pocket formation.