Brisket Burnt Ends

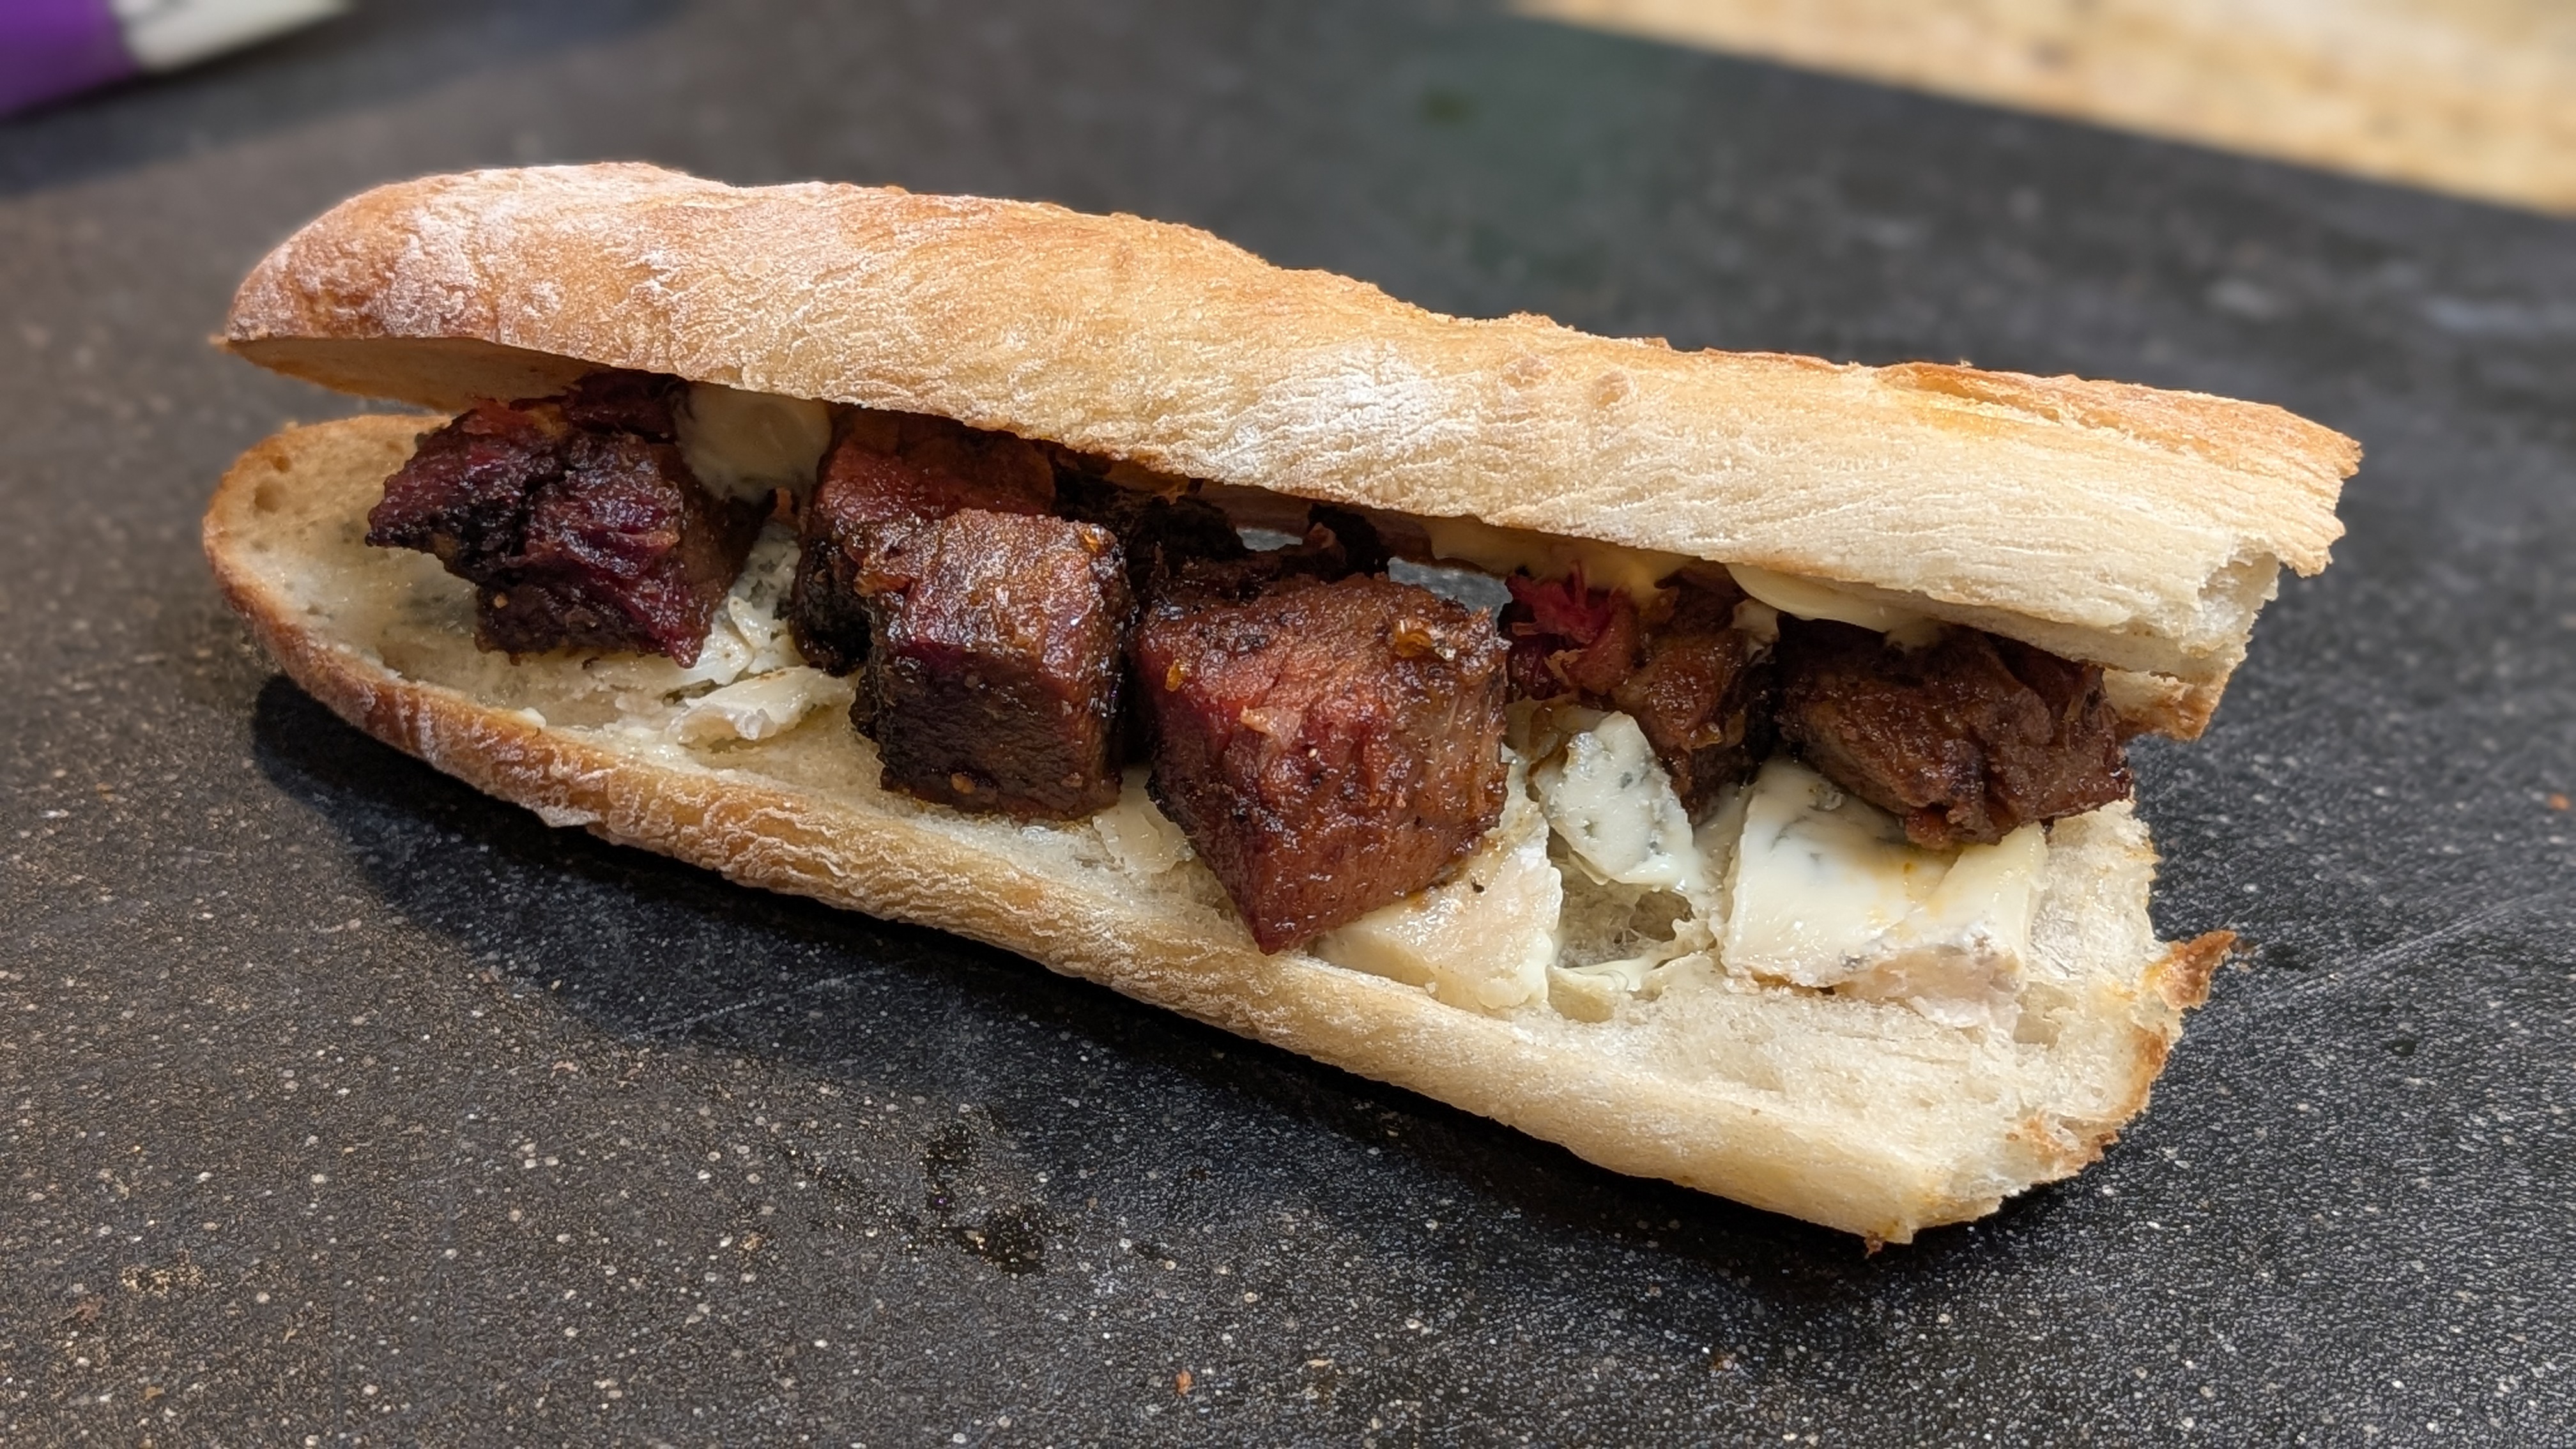
Yeah, I know… I’ve been writing a lot about barbecue lately but it’s another passion of mine besides baking bread. And yesterday, I made what is essentially meat candy!

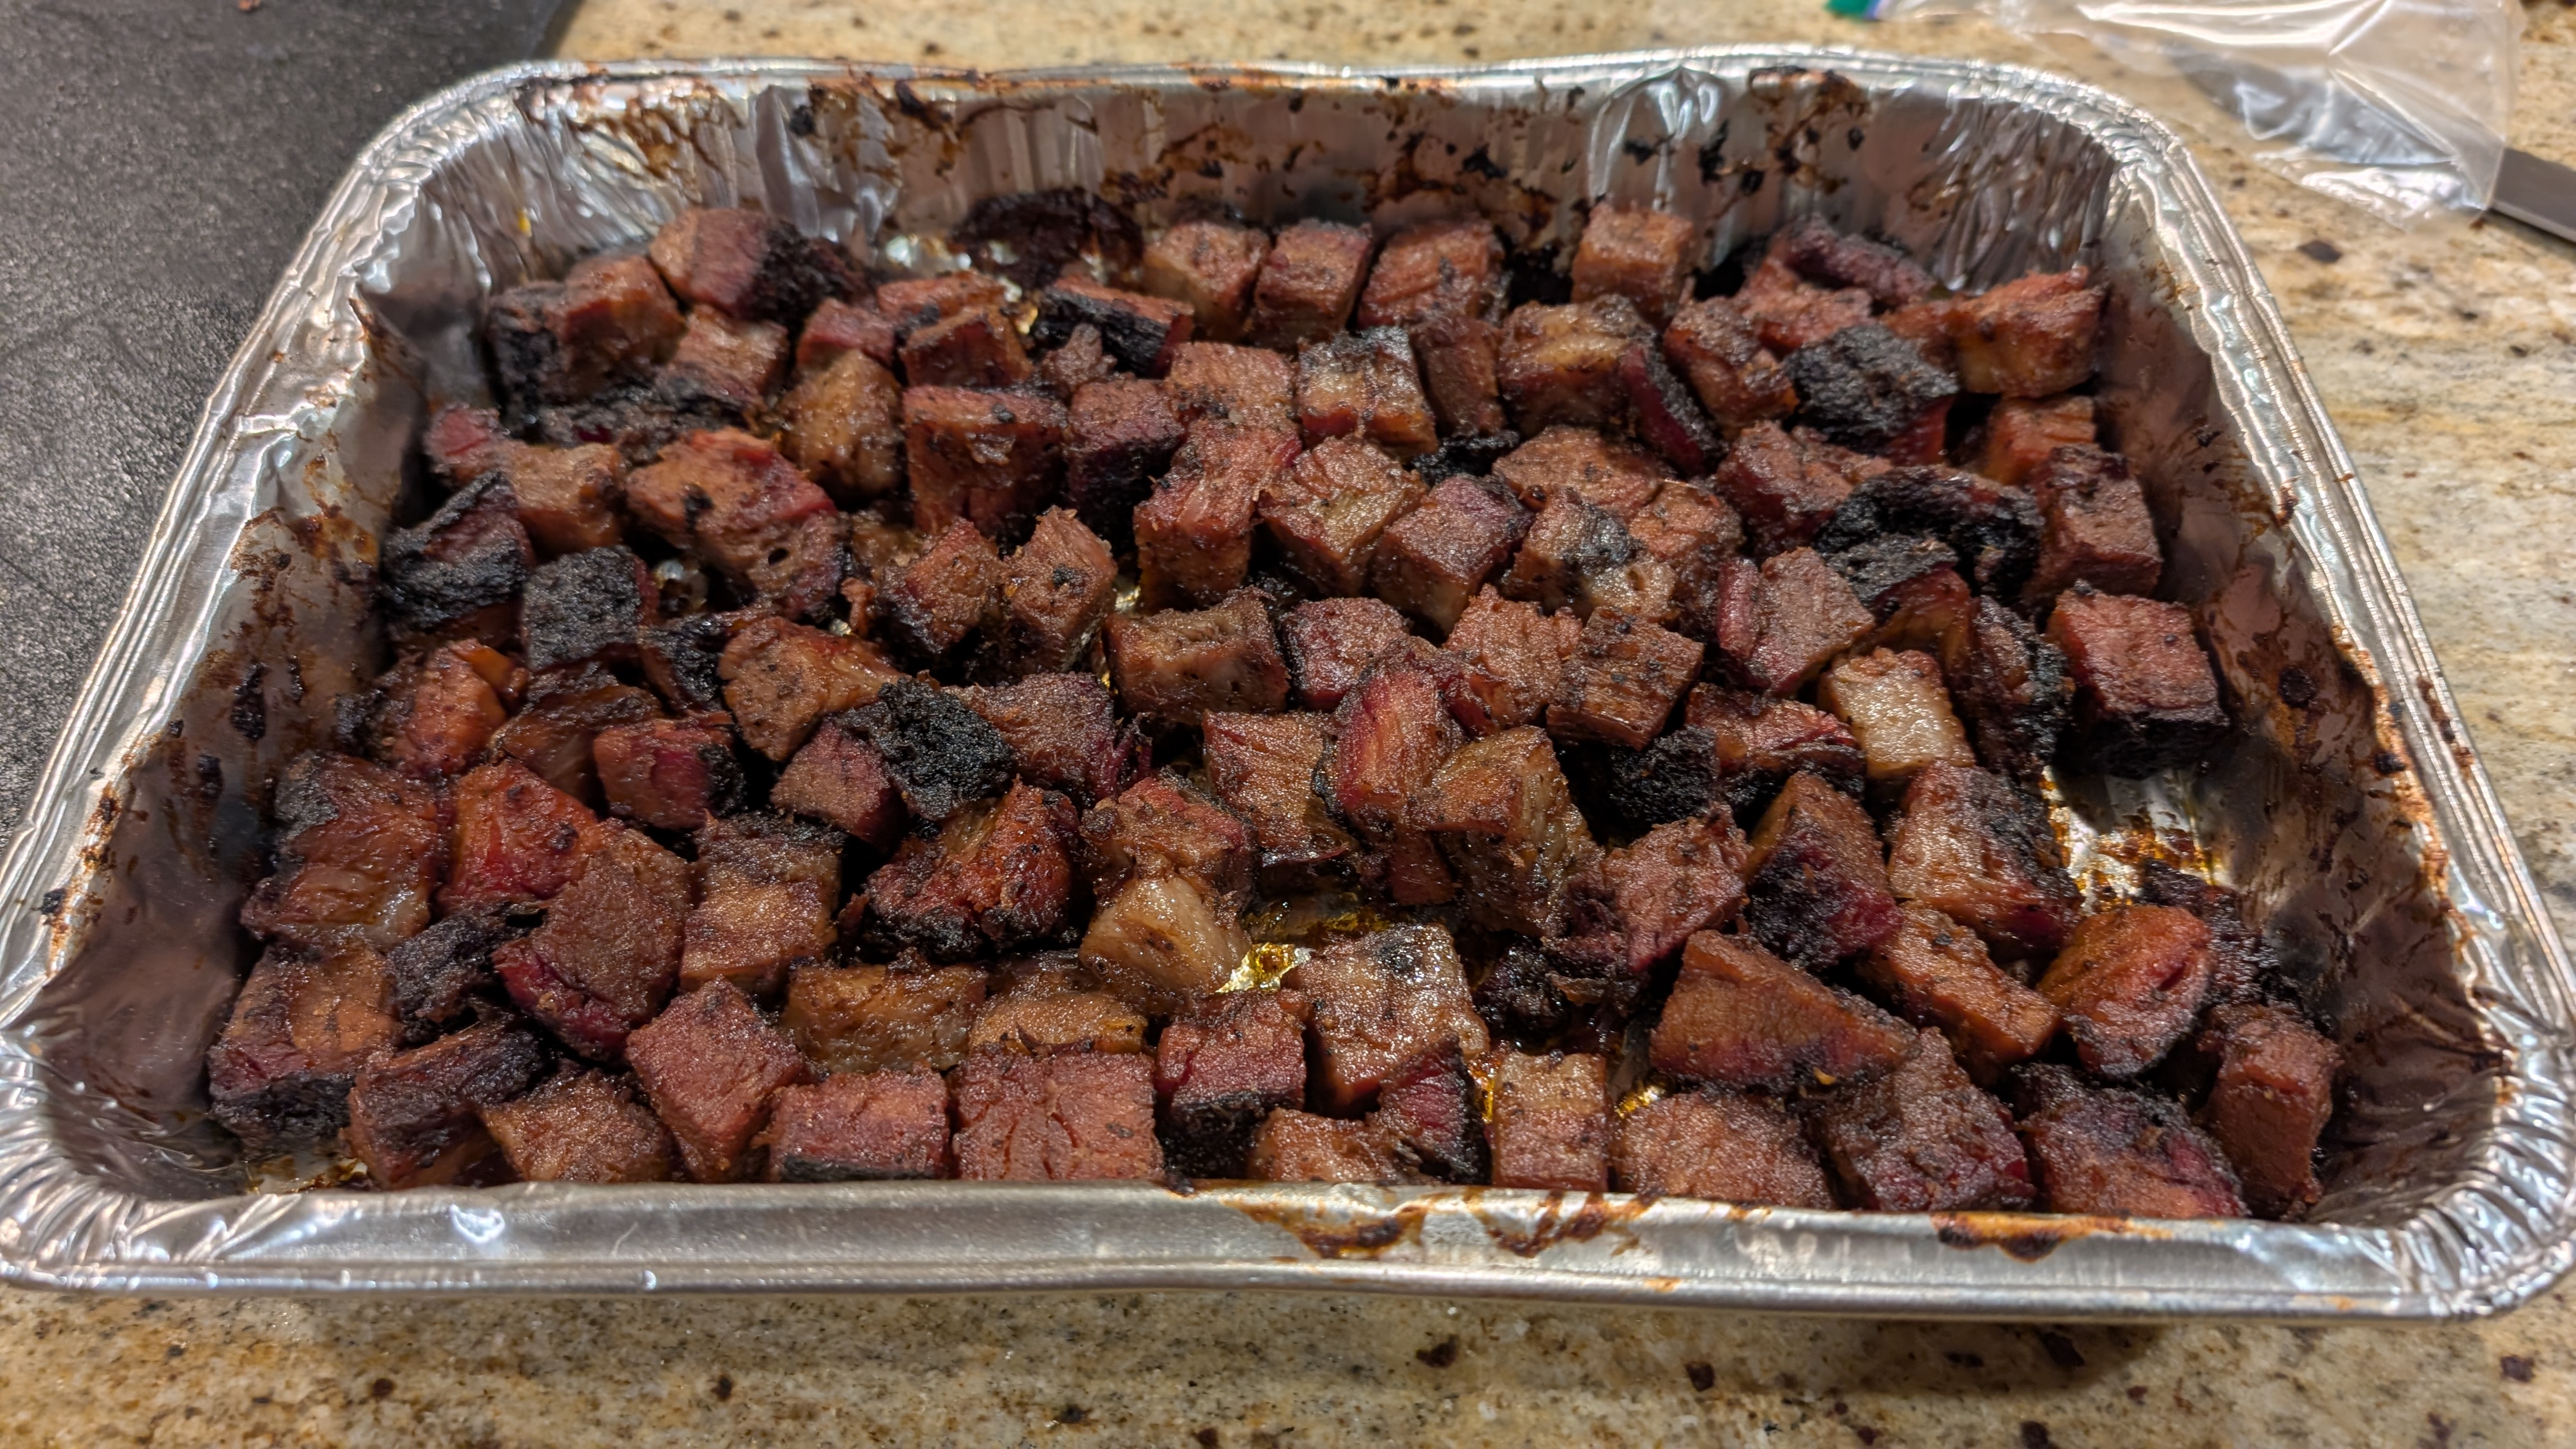
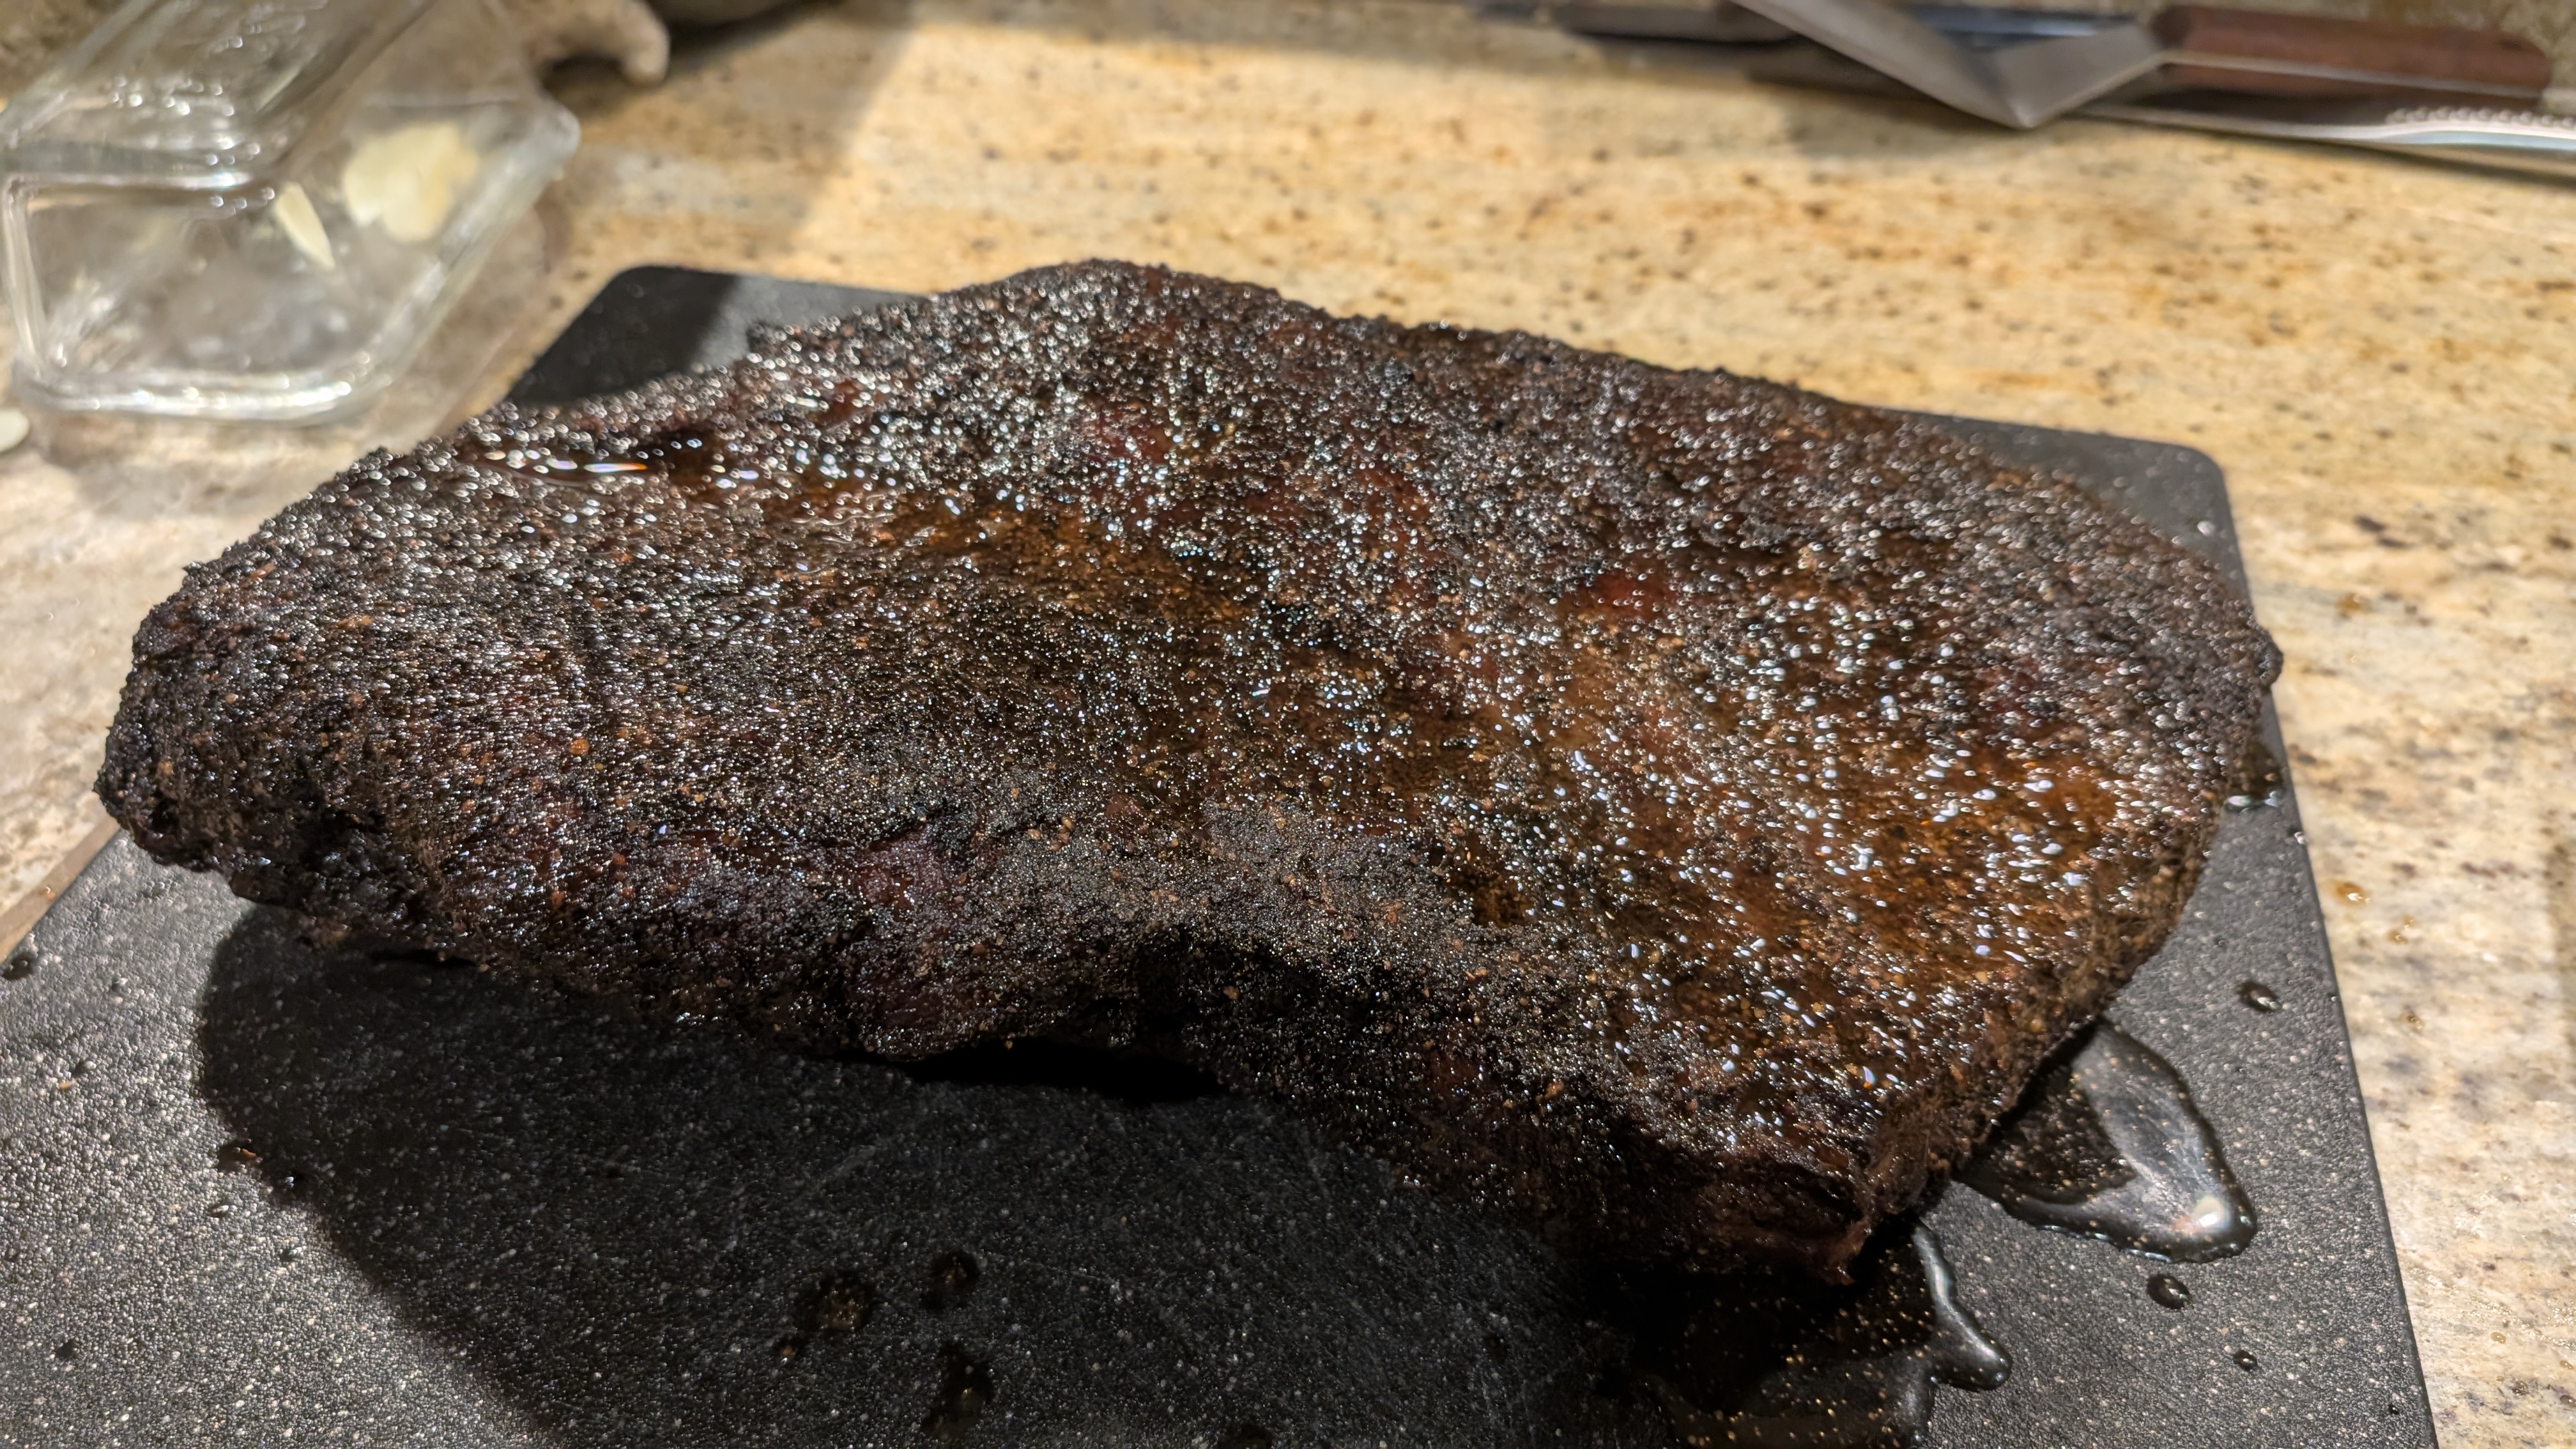
Last weekend, I made a gorgeous brisket. It was a huge cut of meat. I shared most of the flat (lean side) with a friend and kept the transition and point. Even after I split the transition from the point, I still had a bunch of point meat left. So, yesterday I cubed it up for burnt ends.

At least for me, burnt ends aren’t necessarily about the meat. They’re about the sauce. And because the meat was SO good, I didn’t want to use store-bought sauce, even though there are wonderful sauces out there. I wanted to make my own.

I must come clean about what inspired me to make the burnt ends and sauce. I happened to watch a video on bourbon burnt ends by Meat Church BBQ. And since I love bourbon, and have a few bottles, I thought that the sauce would be perfect for my burnt ends.

But when I looked at my shelf, I saw that I only had top-shelf bottles that are sippers. Bummer. I wasn’t going to use bourbon from $75+ bottles. But then I thought, what about using another spirit? I smiled because I had plenty of rum. So, I concocted a sauce recipe. I call it “Rum Fire.”

Jamaican Rum Fire BBQ Sauce

The idea behind this sauce was that I wanted to showcase the funkiness (aka “hogo”) of Jamaican Rum in a BBQ sauce and also give the sauce a more Caribbean feel as opposed to traditional southwest flavors. That covers the rum part. The “fire” comes from hot chili peppers like Habanero or Scotch Bonnet which also add to the Caribeean theme of this sauce.

Base

  • 1 cup ketchup
  • ½ cup tomato paste
  • ½ cup apple cider vinegar
  • 1 cup brown sugar

Rum and Aromatics

  • ¾ cup Jamaican Rum
  • 1 small onion, pureed
  • 4 cloves garlic, pureed
  • ¼ carrot, pureed
  • 1 tbsp Worcestershire (I prefer Bear & Burton’s W Sauce)
  • 1 tbsp Dijon mustard
  • 1 tbsp beef tallow or butter

Spice Layer (Jamaican‑leaning)

  • 1 tsp smoked paprika
  • ½ tsp ground ginger
  • ½ tsp cayenne
  • ½ tsp black pepper
  • ½ tsp allspice
  • Pinch of clove (tiny—Doctor Bird amplifies it fast)
  • 1 tbsp Meat Church Holy Cow
  • 1 tbsp Meat Church Holy Gospel (for dusting after the cook)
  • Optional: 1-2 Habanero or Scotch Bonnet chili peppers (seeds removed, finely chopped)

Process

  1. Puree the onion, garlic, and carrot in a blender to create a smooth paste.
  2. On medium-low heat, melt the tallow or butter, then pour the puree into a medium sauce pan. Sauté the puree until transluscent.
  3. Add the Worcestershire and Dijon and completely incorporate
  4. Add all the dry spices and incorporate them completely. Cook for 1-2 minutes or until the spices become fragrant.
  5. Add all the base ingredients and the chili peppers to the pot and mix well.
  6. Once everything’s together, add the rum. Mix until fully incorporated.
  7. Allow to come to a slow boil, then reduce heat to low to burn off the alcohol.
  8. Simmer uncovered for 30-45 minutes depending on how thick you want the sauce.
  9. Once you’ve got your desired thickness, let it cook for 30 minutes.

If you don’t want that Caribbean heat kick, use less chili peppers or devein them before chopping them up.

Making the Burnt Ends

When I’ve made burnt ends in the past, I don’t cook them right after I pull the brisket. The point meat is so soft and fatty that it’ll fall apart. So what I’ve learned to do is to refrigerate the meat. It makes cubing and saucing so much easier! Plus, it limits the amount – if any – the meat breaks up. If the meat was warm, it would tear apart and you’d have pulled brisket. That’s not a bad thing, but not what you’re after.

  1. Cube refrigerated brisket point meat into 3/4″ cubes.
  2. Sauce the meat just enough to coat. You don’t want the meat to be swimming in sauce, otherwise the sauce won’t caramelize, and that’s what makes a great burnt end.
  3. Sprinkle the Meat Church Holy Cow (or a salt, pepper, garlic, smoked paprika mix) over the meat, then gently fold the meat to evenly distribute the sauce and seasoning.
  4. Cook uncovered at 300°F for 30 minutes. That said, I like to cook them on my Traeger to give them a kiss of smoke.
  5. Fold the meat again, then cook for 30-45 minutes to fully caramelize the sauce.
  6. Remove from oven then immediately sprinkle Holy Gospel seasoning (or your favorite that has just a hint of sweetness to it).
  7. Gently fold the seasoning into the hot meat.
  8. Rest for 15 minutes, then serve, using the remaining BBQ sauce as a dip.
Brisket Burnt Ends Po’ Boy with Gorgonzola cheese!

Getting Used to My New Baking Steel

One thing about the baking process is that it is sensitive to changes in many different parameters. Change just one thing and you may get wildly different results than what you expected. For me, the latest change I made was getting a new baking steel after baking for years on a Fibrament D stone.

Take baguettes, for example. I was used to baking them on my stone, and my process revolved around it; mainly from a timing standpoint because my stone took so long to come to temp. But with my new steel, it comes to temp much quicker, and not only that, it retains heat much better than my old stone. Not only that, heat transfer to my dough is much more efficient than my stone.

What this means is that I’ve had to adjust my timings. For instance, I use to be able to bake my baguettes slightly underproofed with my stone because heat transfer wasn’t nearly as efficient and I could get a way with it. But with my steel, I have to take the final fermentation to fully fermented. Otherwise, my loaves would blow up and I’d get huge holes and the loaves would blow through my cuts and not form any ear. But this is a good thing.

With the loaves pictured above, I went a little too far with the final fermentation. They puffed up nicely and the tasted damn good. But I could tell just by looking at them, that I need to make an adjustment to my final fermentation timing.

But one thing I can tell you is this: I’m never going back to a stone for home baking. That super-efficient heat transfer has produced loaves with a glorious open crumb (what you want with baguettes), and more importantly with large format loaves, great oven spring that I couldn’t rely on with my stone unless I heated it up to a very high temperature because it didn’t retain heat as well.

ThermiChef XL Cooking Steel: It’s a Game-Changer!

For years I used a Fibrament-D baking stone for baking all my bread. But a few months ago, for reasons I still don’t understand, it started taking forever to come to temperature and then wouldn’t hold it. It was a pisser, to say the least. I was embarrassed to share pictures of my bread because it had that classic look of bread that had been baked in an environment where the ambient temperature was greater than the baking surface. Ugh!

Here’s a rough idea of that effect:

What happens when the ambient temperature is higher than the surface is that the sides and the top bake faster than the bottom. The crust also sets too fast and what you get is an elliptical loaf that is also quite dense.

After a few bakes trying to do different things, I finally trashed my stone and started baking my boules and batards in a Dutch oven. That wasn’t necessarily a bad thing, but it did limit the size of the loaves I could bake. I really prefer baking on an open surface.

So, since Christmas was coming up, I did some research and asked Santa for a baking steel; specifically, the ThermiChef XL. After using it for the first time last week, I exclaimed, “Damn! I probably should’ve just used a baking steel from the get-go!” But looking back on my original decision to use a stone, I admit that I got caught up in the romance of baking on a stone surface. I had wanted to model my baking on baking in a hearth oven. And it worked great for a while, but I’m really at a loss as to why my stone stopped performing.

But it doesn’t matter now. The baking steel is so much more efficient. It comes to temperature much quicker, and as I got the 1/4″ thick steel, it retains heat much more efficiently. But most importantly, based on what I’ve seen thus far, heat transfer seems to be much better than my old stone, which would cool down at the spots where the dough would make contact. What I’m finding with the steel is that the bottoms of my loaves are much more solid compared to baking on the stone.

Another advantage with the steel is that it heats up a lot quicker than the stone. Even though the manufacturer recommends heating it for an hour before baking, I found that it comes to a stable temperature in half that time. My stone usually took well over an hour to come to temperature. Also, the steel comes back to temperature after a bake much quicker – like 10-15 minutes after a batch, so if I am doing more than a batch, my baking cycles are now much faster.

Finally, at 16″ X 22″, the steel provides much more surface area than my old stone. Furthermore, it has straight sides, whereas my stone had sloping sides. With this new steel, I could easily bake 3-4 800g batards at once.

Yeah, baking with a steel is definitely a game-changer. I may just get another to go into my other oven so I can do two batches at once.

Traeger Smoked/Pulled Leg of Lamb

Ever since I was a little boy, I have loved lamb. When my mom made lamb chops or roasted a leg of lamb, those were some of my favorite meals growing up. Nowadays I don’t eat it much and normally it’s at a restaurant. My wife doesn’t like lamb and since there aren’t many people in the house, I don’t get to cook it. But I know I can make it at least once a year and that’s on my birthday.

For all the years I’ve made it, I’ve roasted it in the oven, then served it as slices. But this time, I wanted to do something different and barbecue it to make pulled lamb. I got some further inspiration from Matt Pittman of Meat Church who makes pulled lamb for gyros! So that’s what we’ll be having for dinner tonight. My daughter is making her awesome homemade tzatziki sauce and dicing up Persian cucumbers and tomatoes. We’ll be serving all that on fresh-made pita bread from our local falafel shop. But enough of that, let’s get to making the lamb.

Preparation

There’s really not much to do to prepare a leg of lamb. But a little effort will go a long way to creating a great product in the end. First off, I remove the hard fat from the leg. All hard fat does is block heat from penetrating the meat, so I remove it. But I keep the soft fat on because it’ll melt away and make the meat much more succulent. I also don’t remove the silver skin. You can, but it’s just a lot of work and it’s usually so thin that it just cooks away.

Some legs of lamb have a big flap of meat at the end of the bone. Whether I’m smoking or roasting the leg, I always fold it over the joint and truss it with some butcher twine. That’ll ensure a nice, even cook.

As far as seasoning is concerned, you can go from basic to sophisticated. Some folks like to make an oil and fresh herb and garlic rub with fresh dill, rosemary, garlic, and olive oil. I prefer using dry rubs. For this cook, I used my new favorite rub from Meat Church called the Hail Mary Rub. This is Matt Pittman’s tailgating rub that he uses for Dallas Cowboys tailgating before games (he’s the Cowboys’ official tailgate pitmaster, BTW). This is a great blend of several different spices and it goes great with lamb. I also use a light sprinkling of Meat Church Honey Hog Hot to give it just a tiny bit of a bite. Finally, I finely chop fresh rosemary from my garden and sprinkle that all over the leg.

What about garlic? That’ll come later.

When I do a leg of lamb, I always crosshatch the fat cap through the fat to expose some meat. I then season it liberally with whatever rub I’m using. I’ve gotten the best results prepping the lamb the day before and putting it into the fridge to dry brine. Once I’m ready to cook it, I apply a bit more seasoning to the top of the leg (fat side for me), then into the smoker or oven it goes.

Smoking the Lamb

For this cook, I cooked the lamb at 225°F. It was cold and windy to I set my Traeger to 250°F. It fluctuated between 220° and 230° the entire cook. When the lamb reached 160°F (about 6 hours), I placed it in a half sheet foil pan and dropped in about dozen cloves of whole garlic and a sprig of fresh rosemary. I covered the pan with a sheet of heavy duty foil, then finished the cook in a 250°F oven until the internal temp reached 201°F (about an hour and a half) and the meat was probe tender. If it took a little effort to probe the meat, I would’ve let it go to 203°F to 205°F.

Pulling the Lamb

Meats like pork and lamb don’t need a rest like beef, so I pulled it by hand using insulated gloves. That meat practically dropped off the bone in a few places! I also have large pulling forks that normally use for pulled pork, but for the lamb, I chose to do it by hand to get a chunkier end product.

As for the garlic, the beautiful thing about adding the whole garlic cloves to the pan was that they roasted in the au jus. The rosemary sprig added tons of aroma and flavor.

At that point, the lamb was ready to serve, but dinner was still a couple of hours away, so I re-covered the pan and put it back in the oven at the “keep warm” setting after I let most of the heat out. This’ll allow the au jus and juices really penetrate the pulled meat.