I’m surprised I haven’t posted a recipe for my poolish baguettes after all this time! I suppose I’ve been making pointage en bac baguettes for so long I completely forgot about these. But this evening after dinner I thought about what I’d like to bake and it occurred to me that I hadn’t made poolish baguettes in a long time. So I prepared a poolish for a nice 10-12 hour ferment. I can’t wait to bake them tomorrow morning!
What’s so special about using a poolish? The standard answer is that it adds flavor as the long fermentation time of 6-18 hours allows longer enzymatic activity adding to the complexity of the flavors of the dough. Plus, with the very small amount of yeast used, the bacteria have some time to do their thing and release organic acids into the dough. That adds flavor, but the acid also helps in making the dough more extensible. Cool stuff!
With these baguettes, the flour of the poolish represents 25% of the total flour of the recipe. Or put in simpler terms, the poolish weight is 50% of the total flour.
Overall Formula
| Flour | 100.00% |
| Water | 75.00% |
| Salt | 2.00% |
| Yeast | 0.43% |
Poolish
| AP Flour | 200g |
| Water | 200g |
| Yeast | 0.2g |
Final Dough
| Flour – You can use different flour blends. It doesn’t have to be only bread and AP flour. | 571g |
| Water | 381g |
| Salt | 15g |
| Yeast | 1g (cold ferment) 3g (room temp) |
| Preferment | 381g |
| Total Yield | 1353g 4 X 335g 55-60cm loaves 6 X 225g 40cm loaves |
| Optimal Dough Temp | 78°-80°F |
Make the Poolish. Though the recipe only calls for 381g of poolish, I recommend making 400g, as there will always be some loss in the process. Combine all ingredients in a bowl, cover with plastic and let sit overnight at least 6-8 hours. The poolish will be ready when it’s nicely bubbled on top and passes the float test (it could be doubled, but don’t necessarily rely on that). Note that in cooler weather, the poolish will take longer to mature, sometimes up to 18 hours.
Please see my Baguette Dough Development Process for a more in-depth discussion on developing baguette dough.
Mix. Mix all the ingredients together to form a shaggy mass.
Bulk Fermentation. 1 1/2 to 2 hours or 6-18 hours in the fridge. Bulk fermentation is finished when the dough has expanded about 50%.
***If you want to do a long, cold bulk fermentation, I recommend using no more than 1 gram of yeast. Technically, you could forego the yeast altogether as the poolish will be full of yeast.***
Folding. Whether doing a cold bulk fermentation or not, stretch and fold the dough every 20 minutes in the first hour. By the third fold, the dough should be smooth and luxurious and will be highly extensible.
Divide and Pre-Shape. Divide the dough into 4 pieces at 335g or 6 pieces at 225g. Once divided, letter fold each piece by stretching one side, then folding it to the center, then stretching the other side and folding it over the body of the piece. Then roll the piece up like a jelly roll perpendicular to the folds, seal the seam, then place the piece seam-side-up on a well-floured couche.
Shape. I use Master Chef Markus Farbinger’s shaping technique. There are others out there, but this is the one I know. Feel free to use one with which you’re familiar.
At this point, it’s probably a good idea to preheat your oven to 475°F.
Final Fermentation: Depending on the ambient temp of your kitchen, final fermentation can take anywhere from 30 minutes to 2 hours. To determine when the loaves are ready for the oven, poke a floured or wet finger about a half to three-quarters of an inch into a loaf, then pull your finger back quickly. Observe the rate at which the indentation comes back. If it doesn’t come back at all, pop the loaves into the oven immediately – you’re extremely close to over-fermenting the dough. If it comes back quickly, and almost fills the indentation back up, give it a bit more time. If it comes back quickly, but immediately slows down, then you’re ready to bake!
Score. See below…
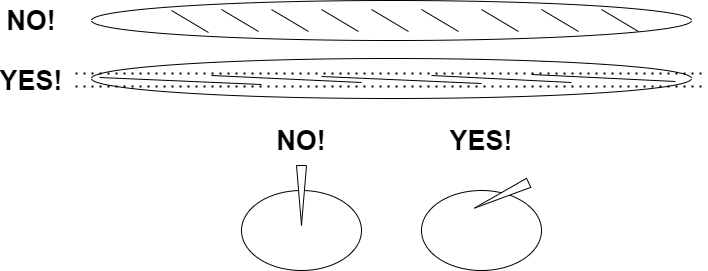
The important thing to note with scoring (and unfortunately Chef Markus doesn’t mention this) is that you have to make sure that the angle of your blade is extremely shallow (almost flat) because you want to create a flap. Also, your cut doesn’t have to be deep – no more than 1/2 inch. So, as the chef says, your cuts need to be as parallel as possible down the loaf, and your blade angle needs to be as shallow as possible to create a flap.
Bake. Transfer the loaves to a transfer board and score (see below). Bake at 475ºF with steam for 12-15 minutes or until the loaves start taking on color. Vent the steam and remove your steaming container, then bake for 12-15 minutes at 425ºF or until the loaves turn a nice, deep, golden brown.
NOTE: The bake times are approximate! The temperatures I listed work for my home oven. They may not work for yours. The important thing to note is that within the first 10-15 minutes while the loaves are on steam, the baguettes take on just a little bit of color. If they’re golden-brown to dark in that short period of time, your oven is too hot, or you need to lower your rack a little the next bake. It takes a few times to get the sweet spot.
Alternate Baking Technique. I just started experimenting with a gentler baking temp: 400ºF. 15 minutes with steam, 20 minutes dry. This will produce a slightly thick, crunchy crust and a light, airy and creamy crumb. It’s pretty awesome! And the oven spring is pretty amazing!

Pingback: Using Salt-Stressed Yeast | The Dawg House!
Pingback: Welcome! | The Dawg House!
Just want to let you know I’m excited to come across a blog that’s dedicated to a wonderful resource on baguette baking for home baker! I’ve been trying to learn, and perfecting baguettes for such a long time, off and on, in my small home kitchen. The journey hasn’t been easy and many times so frustrated that I gave up many times over. Yet, keep seeing beautiful baguette pictures and posts like yours is one thing that keeps me coming back to try again, and again, and again. Another thing is where I live, sadly there aren’t many bakeries that can bake a decent baguette. It seems almost impossible to find one without wishing that I can get on a plane to g straight to Paris! Baguette is also my absolute favorite bread to bake, and I love baking breads. It’s easily my top choice if given the chance of what would I like to bake if I have all the time in the world!
I just baked a batch yesterday using your poolish formula and they came out really nice! I was worried about the hydration level because I used Janie’s Mill flour and unlike King Arthur flour, it behaves very differently. I had to add some malt powder as well because the flour doesn’t have any and I know KA added that into its flour. I read that you mostly used KA flour so I took that as a hint that I need to tweak my flour a bit trying to mimic your beautiful results.
I’m still learning how to handle the dough; maybe my poolish was slightly over fermented, or JM flour overall just a bit more tricky to handle. I’m not sure, but the final shaping to get those sharp end tails weren’t all that sharp and easy.
Am I going to give it another try, or two? You bet I will! I’ll continue the tweak a bit here and there as I’ve always been doing with baguette!
Have you baked yours with any combination of commercial yeast and natural yeast ? Have you incorporated autolyse into your method? I’m curious to know given you have been baking baguette a lot more!
Your formula helps giving me the right direction to go! I hope you can still find time to keep up with this blog and post more of your baguette expertises because they are absolutely amazing and inspiring!
It’s so pleasing to hear that you’re having such great success with the formulas! As far handling dough is concerned. Just keep at it. It takes practice to develop “bakers hands.”
| Have you baked yours with any combination of commercial yeast and natural yeast ?
Yes! I have recipe for Tartine Bread Baguettes which was a study of the recipe in the book “Tartine Bread.” The formula in that book was wonky, so I had to tweak it to reasonable proportions. But that uses both a poolish AND a levain!
| Have you incorporated autolyse into your method?
It depends on the flour. But understand that autolyse was introduced for commercial bakeries. It doesn’t have the same impact at home. That said, I do like to hydrate my dough depending on the flour. If I’m using whole-grain flour, I do a half-hour to hour autolyse to make sure the water’s well-absorb. Another thing I often do is bassinage, where I reserve about 1% of the water, then add it in with my 2nd fold.
Thank you for taking the time to respond!
I asked about autolyse because I read it has some benefits for easier shaping later on, but I don’t know enough to notice… I used to keep a jar of starter but that was a very long time ago and I just couldn’t keep up with feeding it so I haven’t done that for a long time. I’m just trying to at least learn the principles of baking baguettes first then once I’m comfortable and understand those principles better, I’ll probably try to do the starter again…
I’ll be honest, I’m one of the few, if there are others out there, found Tartine Bread book a bit confusing. I think it’s mostly because of its writing format where the explanation is too much for a novice to go through all in the recipe vs having a separate chapters to explain each components in details. But, that’s just me. I have that book and I rarely relies on it to get the answers to most of my bread baking. I’m not one to judge the author because yes, his breads are absolutely wonderful to behold and to eat, but I can’t seem to benefit from the book much, besides the pictures of baguette shaping.
Anyway, I’m rambling but thank you for keeping this blog up because your formula and instructions are spot on!