

I’m going to just be up front: The one thing you have to expect when you introduce 100% whole wheat flour into your dough, or like me, where you use a combination of high-extraction flour and whole wheat is that you will not get a big vertical oven spring; at least compared to a pure white flour loaf. The more bran and germ there are in the flour, the less vertical rise you’ll get and that’s a fact of life and there’s nothing you can do about it.
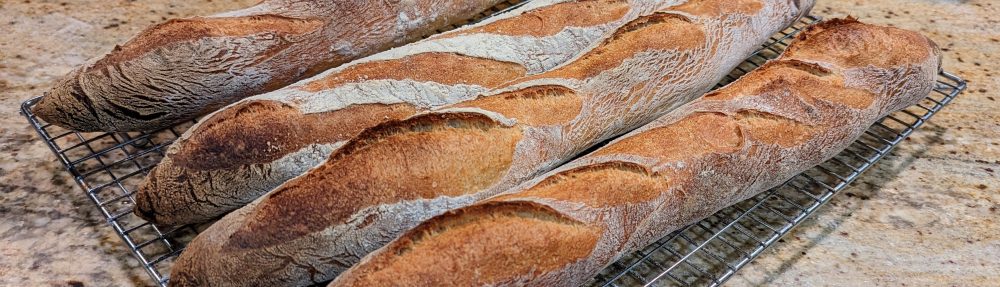
This is something I’ve had to expect once I made the move to more nutritious flour. Especially when I moved to high-extraction flour in lieu of white bread flour, I noticed a distinct lessening of the vertical rise. The fact that my bread was making nice ears meant that I was getting great oven spring (as evidenced above) and open crumb. It just hasn’t been as vertical and you know what? I’m now okay with that! But admittedly, it has taken several adjustments to achieve the crumb that I achieved with those loaves above.
Before I go on to explain what I did, I just can’t believe the flavor and texture of the final bread that this combination of flours produces. It’s chewy but with a velvety-smooth texture. I just can’t say enough about how great these Azure Standard Unifine flours are!
Adjustment Time
Lots of changes to my process… I used to pride myself on being able to make bread in a day, but with the switch to these flours, that’s no longer possible if I want to get results like I got above.
- The first thing I had to do was up my hydration to 82%. I started out with 75%, 78% and 80% hydration, and while the loaves turned out pretty good, they were still a little dense. Just that extra 2% between 80 and 82 made a HUGE difference. Now you might think that at 82% the dough would be difficult to work with. I won’t lie. It’s a challenge, but it’s not nearly as bad as one might think. You just have to get used to working with a wet dough.
- The next adjustment that I made was using a poolish. But instead of doing an overnight poolish, I started it at 7 AM in the morning, let it bubble up for 12 hours. then made my final dough at 7pm.
- After mixing the final dough, I kneaded it until smooth, let it rest for 10 minutes, then did a stretch and fold. I then did five more stretch and folds every 10 minutes over the next hour or so.
- After I did the last stretch and fold, I moved my container to the fridge where I let it bulk ferment for 14 hours. After the bulk ferment, I divided and shaped the loaves, then proofed them for 45 minutes at room temperature, then popped my bannetons in the fridge for an hour.
- I then baked the loaves at 500 degrees for 30 minutes on my baking stone.
Here’s the recipe:
| Flour | Water | Salt | Yeast | |
| Poolish | 250 | 250 | 0.40 | |
| Final Dough | 750 | 570 | 19 | 3.00 |
| Totals | 1000 | 820 | 19 | 3.40 |
| Bakers % | 100.00% | 82.00% | 1.90% | 0.34% |
- In a separate container, make the poolish and mix everything together until smooth. This wet, you don’t want any lumps. You can make this in the early morning then let it sit out all day (at least 12 hours) at room temperature, then make the final dough in the early evening – you’re going to refrigerate it for awhile. At the end of the 12 hours, it should be pretty bubbly.
- Just before the poolish is finished fermenting, in large bowl, add the remaining flour.
- Add the water to the remaining flour, but reserve a little bit (like 50-100 grams) to rinse out the poolish container after you’ve added the poolish.
- Mix the flour and water until you get a shaggy dough, then let it rest and autolyse for 30 minutes. We just want to get it started because bulk fermentation will take place in the fridge.
- After the final dough has rested, evenly sprinkle the salt and yeast over the dough, then add the poolish to it.
- Rinse out the poolish container with the water you reserved and make sure you get everything in the poolish container. Add that to the final dough.
- Mix well until all the ingredients are fully incorporated.
- At this point, you either dump it out on your board and knead it until it’s smooth, or if you’re using a stand mixer, mix at Speed 2 until the dough is smooth.
- Let the dough rest for 10 minutes, then do a stretch and fold.
- Over the next hour or so, do a stretch and fold every ten minutes until you’ve done 5 or 6 folds. You’ll know you’ve done enough when you pick up a corner of the dough and the whole ball comes will try to come with it without tearing.
- Cover the container with a lid or plastic wrap and let it ferment in your fridge for at least 14 hours or until the dough about doubles in size. It really depends on the temperature of your fridge. I have my mini fridge set to 49-degrees and 14 hours is the sweet spot. You should see some nice bubbles in the dough. If not, let it ferment some more. It could take up to 30 hours.
- Once the dough has doubled, remove it from the fridge and divide and shape it as you normally would, but be EXTREMELY gentle with the dough. You do not want to degas it!
- Once shaped, proof for 45-minutes to an hour at room temperature, then move the loaves into your fridge once again to chill for an hour.
- Once chilled, remove the loaves from their proofing containers, score the loaves, then bake for 30 minutes at 500 degrees.
Yes, this is at least a 2-day process. But believe me, the results are totally worth it!
